- Jest - Getting Started
- Jest - Core Concepts
- Jest - Mocking
- Jest - Advanced Testing
- Jest - React Testing
- Jest - Configuration
- Jest - Special Testing Scenarios
- Jest - Performance & Advanced Topics
- Jest - Integrations
- Jest - Best Practices
- Jest - Deployment and CI/CD
- Jest Resources
- Jest - Useful Resources
- Jest - Discussion
Jest - Installation
In this chapter, we'll guide you through installing Jest in your project. Jest helps you run tests on your JavaScript code, catch bugs early, and ensure your functions, modules, or components work properly. By the end, you'll have Jest set up and ready to go.
Prerequisites Before Installing Jest
Before you start installing Jest, make sure you have the following:
- Node.js(v14 or higher): Jest runs on Node.js, so you need to have it installed. It's recommended to use version 14 or above. If you don't have them, download and install from the Node.js website.
- npm (Node Package Manager): npm is required to install Jest and manage dependencies.
- Code Editor (VS Code Recommended): A code editor is important for writing and editing code. Visual Studio Code (VS Code) is a popular choice that works well with Node.js and Jest.
- JavaScript Project: If you don't have a project yet, follow these steps:
- Crete a new directory and navigate into it:
mkdir your-project-name
cd your-project-name
- Initialize a new npm project:
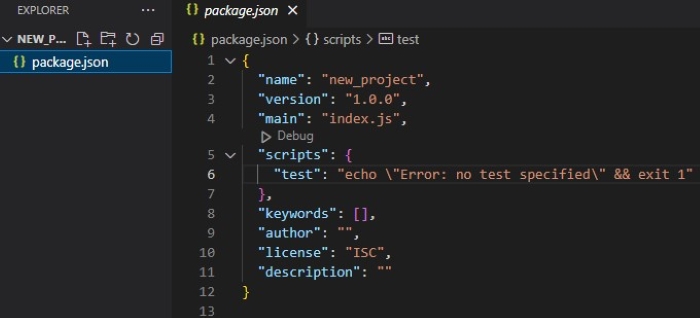
npm init -yThis will create a package.json file for your project. Here's an example of what it might look like.
System Verification
Once the necessary software is installed, verify the versions of Node.js and npm with the following commands:
- Check Node.js Version:
node --version
npm --version
If both commands return the correct version numbers, you're ready to proceed with the Jest installation.
Step-by-Step Installation Instructions
Now that you've verified that you have Node.js and npm installed, let's go through the steps for installing Jest in your project.
Navigate to Your Project Directory
Before proceeding, make sure you're in your project directory. If you're not there yet, run:
cd path/to/your/project
Install Jest Using npm
# Global installation
npm install -g jest

# Project-specific installation
npm install --save-dev jest
This installs Jest as a development dependency, meaning it's only needed during development and testing, not in production.
Installs Jest Using Yarn
# Global installation
yarn global add jest

# Project-specific installation
yarn add --dev jest
Yarn installs Jest the same way as npm, so choose whichever package manager you're using.
Install Jest Using pnpm (Optional)
# Global installation:
pnpm add -g jest

# Project-specific installation
pnpm add --dev jest
pnpm is an alternative package manager that works similarly to npm and yarn.
How to Check if Jest is Installed Correctly?
Once Jest is installed, it's important to verify that everything is working as expected.
Check Jest Installation
You can check if Jest is correctly installed by running the following command:
npx jest --version
This command will print the installed version of Jest. If you see a version number, Jest is installed correctly.
Basic Verification: Run a Simple Test
To further verify that Jest is working as expected, you can run a simple test. Follow the steps below:
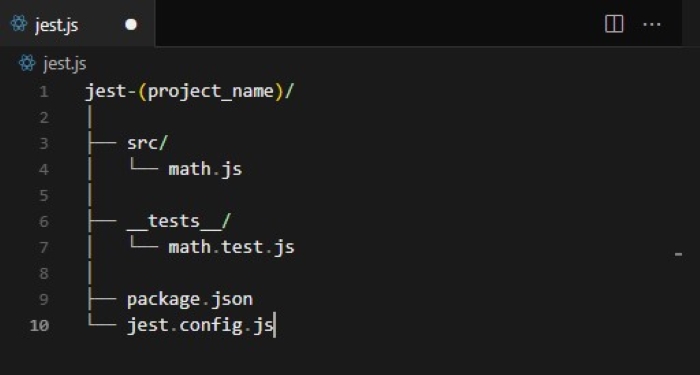
Your project directory should look something like this:
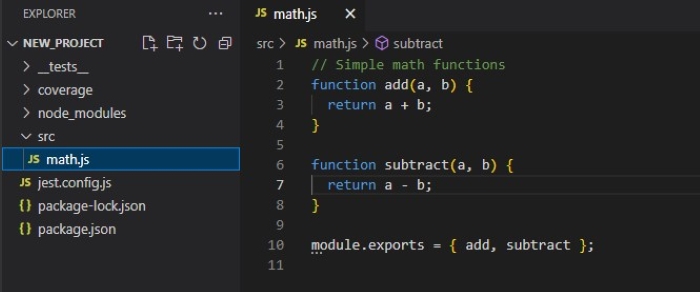
Create Source File (src/math.js)
In the src folder, create a math.js file with the following content:
function add(a, b) {
  return a + b;
}

function subtract(a, b) {
  return a - b;
}

module.exports = { add, subtract };
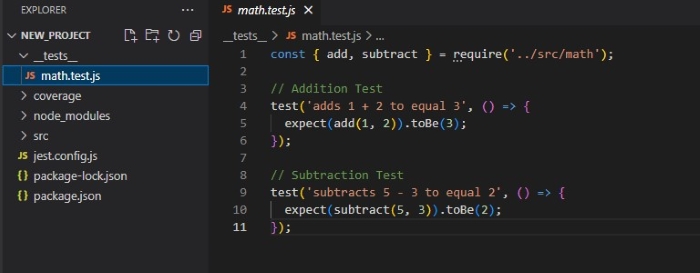
Your math.test.js file should look like this:
Create Test File (tests/math.test.js)
In the __tests__ folder, create a math.test.js file to write tests for the add and subtract functions:
const { add, subtract } = require('../src/math');

test('adds 1 + 2 to equal 3', () => {
  expect(add(1, 2)).toBe(3);
});

test('subtracts 5 - 3 to equal 2', () => {
  expect(subtract(5, 3)).toBe(2);
});
Your test file should look something like this:
Configuration
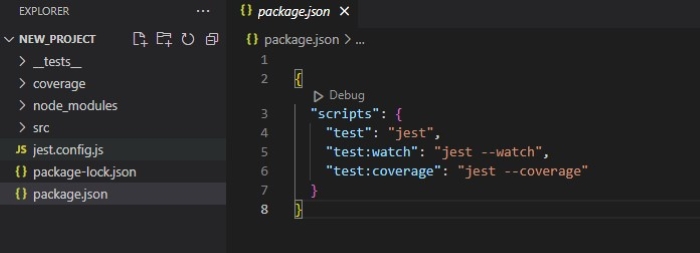
Next, make sure your project is ready to run Jest by updating the package.json file. You can also add a jest.config.js file for advanced settings if needed.
Update package.json: Make sure your package.json contains the following scripts for running tests with Jest:
{
  "scripts": {
    "test": "jest",
    "test:watch": "jest --watch",
    "test:coverage": "jest --coverage"
  }
}
Your package.json should look something like this:
Optional: jest.config.js: You can create a jest.config.js file in your project root for additional settings, like enabling coverage reporting.
module.exports = {
  verbose: true,
  collectCoverage: true,
  coverageReporters: ['text', 'lcov'],
  testEnvironment: 'node'
};
It should look like this:

Running tests
Once your files are in place, you can run your tests using the following commands.
# Run All Tests
npm test

# Watch Mode (Auto-rerun on changes)
npm run test:watch

# Generate Coverage Report
npm run test:coverage
Sample Test Output
When you run the tests, you should see output like this:
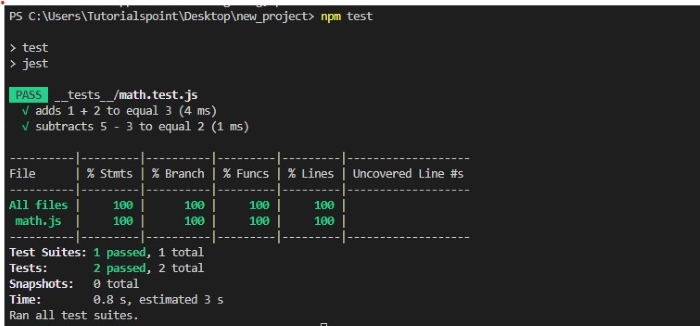
Jest will automatically find and run your test files (e.g., __tests__ or .test.js), confirming Jest is working correctly.
Examples of Test Commands
Once your files are set up, you can run your jest tests using a variety of commands, each serving different purposes. Here are the most common ones:
- Run All Tests (default): To run all tests, execute:
jest
jest my-test        # or
jest path/to/my-test.js
jest -o
jest --findRelatedTests path/to/fileA.js path/to/fileB.js
jest -t "name-of-spec"
jest --watch        # Runs jest -o by default
jest --watchAll     # Runs all tests
In watch mode, you can also specify the name or path to a file to focus on a specific set of tests.
