- iText - Overview
- iText - Creating a PDF Document
- iText - Adding an AreaBreak
- iText - Adding a Paragraph
- iText - Adding a List
- iText Tables
- iText - Adding a Table
- iText - Formatting Cell Contents
- Formatting the Borders of a Cell
- iText - Adding Image to a Table
- iText - Nested Table
- iText - Adding Lists to a Table
- iText Images
- iText - Adding Image to a PDF
- iText - Setting Position of the Image
- iText - Scaling an Image
- iText - Rotating an Image
- iText Annotations
- iText - Text Annotation
- iText - Link Annotation
- iText - Line Annotation
- iText - Markup Annotation
- iText - Circle Annotation
- iText Miscellaneous
- iText - Setting Font
- iText - Shrinking the Content
- iText - Tiling PDF Pages
- iText - N-up
- iText Useful Resources
- iText - Quick Guide
- iText - Useful Resources
- iText - Discussion
iText - Adding Image to a Table
In this chapter, we will see how to add an image to a table in a PDF document using the iText library.
Adding an Image to a Table
You can create an empty PDF document by instantiating the Document class. While instantiating this class, you need to pass a PdfDocument object as a parameter, to its constructor. Then, to add a table to the document, you need to instantiate the Table class and add this object to the document using the add() method.
To add an image to this table, you need to instantiate the Cell class, create and an object of the image that is required to be added, add the image to the cell object using the add() method of the Cell class.
Following are the steps to insert an image into the cell of a table.
Step 1: Creating a PdfWriter object
The PdfWriter class represents the Doc Writer for a PDF, this class belongs to the package com.itextpdf.kernel.pdf. The constructor of this class accepts a string, representing the path of the file where the PDF is to be created.
Instantiate PdfWriter class by passing a string value representing the path where you need to create a PDF, to its constructor, as shown below.
// Creating a PdfWriter
String dest = "C:/itextExamples/addingImage.pdf";
PdfWriter writer = new PdfWriter(dest);
When an object of this type is passed to a PdfDocument (class), every element added to this document will be written to the file specified.
Step 2: Creating a PdfDocument object
The PdfDocument class is the class that represents the PDF Document in iText. This class belongs to the package com.itextpdf.kernel.pdf. To instantiate this class (in writing mode), you need to pass an object of the class PdfWriter to its constructor.
Instantiate the PdfDocument class by passing the above created PdfWriter object to its constructor, as shown below.
// Creating a PdfDocument
PdfDocument pdfDoc = new PdfDocument(writer);
Once a PdfDocument object is created, you can add various elements like page, font, file attachment, and event handler using the respective methods provided by its class.
Step 3: Creating the Document object
The Document class of the package com.itextpdf.layout is the root element while creating a self-sufficient PDF. One of the constructors of this class accepts an object of the class PdfDocument.
Instantiate the Document class by passing the object of the class PdfDocument created in the previous steps, as shown below.
// Creating a Document
Document document = new Document(pdfDoc);
Step 4: Creating a Table object
The Table class represents a two-dimensional grid filled with cells, ordered in rows and columns. It belongs to the package com.itextpdf.layout.element.
Instantiate the Table class as shown below.
// Creating a table
float [] pointColumnWidths = {200F, 200F};
Table table = new Table(pointColumnWidths);
Step 5: Creating the cell
Create a cell object by instantiating the Cell class of the package com.itextpdf.layout, as shown below.
// Adding cell to the table
Cell cell = new Cell();  // Creating a cell
Step 6: Creating an Image
To create the image object, first of all, create an ImageData object using the create() method of the ImageDataFactory class. As a parameter of this method, pass a string parameter representing the path of the image, as shown below.
// Creating an ImageData object
String imageFile = "C:/itextExamples/javafxLogo.jpg";
ImageData data = ImageDataFactory.create(imageFile);
Now, instantiate the Image class of the com.itextpdf.layout.element package. While instantiating, pass the ImageData object created above, as a parameter to its constructor, as shown below.
// Creating an Image object
Image img = new Image(data);
Add the image object to the cell using the add() method of the cell class, as shown below.
// Adding image to the cell
cell.add(img.setAutoScale(true));
Step 7: Adding cell to the table
Finally, to add this cell to the table, call the addCell() method of the Table class and pass the cell object as a parameter to this method, as shown below.
table.addCell(cell);
Step 8: Adding table to the document
Add the table object created in the previous step using the add() method of the Document class, as shown below.
// Adding list to the document
document.add(table);
Step 9: Closing the Document
Close the document using the close() method of the Document class, as shown below.
// Closing the document
document.close();
Example
The following Java program demonstrates how to add an image to a cell of a table in a PDF document using the iText library. It creates a PDF document with the name addingImage.pdf, adds a table to it, inserts an image (javafxLogo.jpg) to one of its cells, and saves it in the path C:/itextExamples/.
Save this code in a file with the name AddingImageToTable.java.
import com.itextpdf.io.image.ImageData;
import com.itextpdf.io.image.ImageDataFactory;

import com.itextpdf.kernel.pdf.PdfDocument;
import com.itextpdf.kernel.pdf.PdfWriter;

import com.itextpdf.layout.Document;
import com.itextpdf.layout.element.Cell;
import com.itextpdf.layout.element.Image;
import com.itextpdf.layout.element.Table;

public class a3AddingImageToTable {
   public static void main(String args[]) throws Exception {
      // Creating a PdfWriter object
      String dest = "C:/itextExamples/addingImage.pdf";
      PdfWriter writer = new PdfWriter(dest);

      // Creating a PdfDocument object
      PdfDocument pdfDoc = new PdfDocument(writer);

      // Creating a Document object
      Document doc = new Document(pdfDoc);

      // Creating a table
      float [] pointColumnWidths = {150f, 150f};
      Table table = new Table(pointColumnWidths);

      // Populating row 1 and adding it to the table
      Cell cell1 = new Cell();
      cell1.add("Tutorial ID");
      table.addCell(cell1);

      Cell cell2 = new Cell();
      cell2.add("1");
      table.addCell(cell2);

      // Populating row 2 and adding it to the table
      Cell cell3 = new Cell();
      cell3.add("Tutorial Title");
      table.addCell(cell3);

      Cell cell4 = new Cell();
      cell4.add("JavaFX");
      table.addCell(cell4);

      // Populating row 3 and adding it to the table
      Cell cell5 = new Cell();
      cell5.add("Tutorial Author");
      table.addCell(cell5);

      Cell cell6 = new Cell();
      cell6.add("Krishna Kasyap");
      table.addCell(cell6);

      // Populating row 4 and adding it to the table
      Cell cell7 = new Cell();
      cell7.add("Submission date");
      table.addCell(cell7);

      Cell cell8 = new Cell();
      cell8.add("2016-07-06");
      table.addCell(cell8);

      // Populating row 5 and adding it to the table
      Cell cell9 = new Cell();
      cell9.add("Tutorial Icon");
      table.addCell(cell9);

      // Creating the cell10
      Cell cell10 = new Cell();

      // Creating an ImageData object
      String imageFile = "C:/itextExamples/javafxLogo.jpg";
      ImageData data = ImageDataFactory.create(imageFile);

      // Creating the image
      Image img = new Image(data);

      // Adding image to the cell10
      cell10.add(img.setAutoScale(true));

      // Adding cell110 to the table
      table.addCell(cell10);

      // Adding Table to document
      doc.add(table);

      // Closing the document
      doc.close();

      System.out.println("Image added to table successfully..");
   }
}
Compile and execute the saved Java file from the Command prompt using the following commands −
javac AddingImageToTable.java
java AddingImageToTable
Upon execution, the above program creates a PDF document, displaying the following message.
Image added to table successfully..
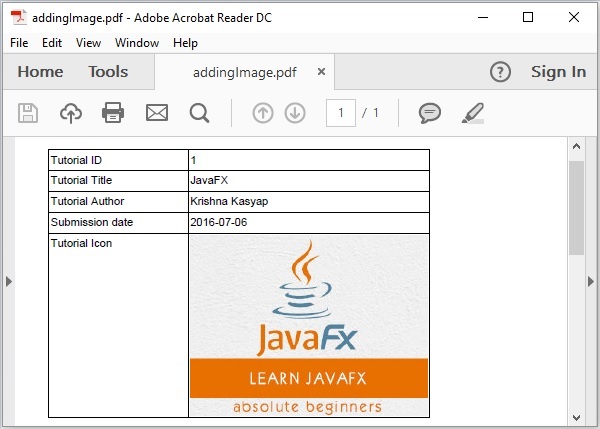
If you verify the specified path, you can find the created PDF document, as shown below.