- HSQLDB - Home
- HSQLDB - Introduction
- HSQLDB - Installation
- HSQLDB - Connect
- HSQLDB - Data Types
- HSQLDB - Create Table
- HSQLDB - Drop Table
- HSQLDB - Insert Query
- HSQLDB - Select Query
- HSQLDB - Where Clause
- HSQLDB - Update Query
- HSQLDB - Delete Clause
- HSQLDB - Like Clause
- HSQLDB - Sorting Results
- HSQLDB - Joins
- HSQLDB - Null Values
- HSQLDB - Regular Expressions
- HSQLDB - Transactions
- HSQLDB - Alter Command
- HSQLDB - Indexes
HSQLDB - Quick Guide
HSQLDB - Introduction
HyperSQL Database (HSQLDB) is a modern relational database manager that conforms closely to the SQL:2011 standard and JDBC 4 specifications. It supports all core features and RDBMS. HSQLDB is used for development, testing, and deployment of database applications.
The main and unique feature of HSQLDB is Standard Compliance. It can provide database access within the user's application process, within an application server, or as a separate server process.
Features of HSQLDB
HSQLDB uses in-memory structure for fast operations against DB server. It uses disk persistence as per user flexibility, with a reliable crash recovery.
HSQLDB is also suitable for business intelligence, ETL, and other applications that process large data sets.
HSQLDB has a wide range of enterprise deployment options, such as XA transactions, connection pooling data sources, and remote authentication.
HSQLDB is written in the Java programming language and runs in a Java Virtual Machine (JVM). It supports the JDBC interface for database access.
Components of HSQLDB
There are three different components in HSQLDB jar package.
HyperSQL RDBMS Engine (HSQLDB)
HyperSQL JDBC Driver
Database Manager (GUI database access tool, with Swing and AWT versions)
HyperSQL RDBMS and JDBC Driver provide the core functionality. Database Managers are general-purpose database access tools that can be used with any database engine having a JDBC driver.
An additional jar called sqltool.jar, contains Sql Tool, which is a command line database access tool. This is a general purpose command. Line database access tool that can be used with other database engines as well.
HSQlDB - Installation
HSQLDB is a relational database management system implemented in pure Java. You can easily embed this database to your application using JDBC. Or you can use the operations separately.
Prerequisites
Follow the prerequisite software installations for HSQLDB.
Verify Java Installation
Since HSQLDB is a relational database management system implemented in pure Java, you must install JDK (Java Development Kit) software before installing HSQLDB. If you already have JDK installation in your system, then try the following command to verify the Java version.
java version
If JDK is successfully installed in your system, you will get the following output.
java version "1.8.0_91"
Java(TM) SE Runtime Environment (build 1.8.0_91-b14)
Java HotSpot(TM) 64-Bit Server VM (build 25.91-b14, mixed mode)
If you dont have JDK installed in your system, then visit the following link to Install JDK.
HSQLDB Installation
Following are the steps to install HSQLDB.
Step 1 − Download HSQLDB bundle
Download the latest version of HSQLDB database from the following link https://sourceforge.net/projects/hsqldb/files/. Once you click the link, you will get the following screenshot.
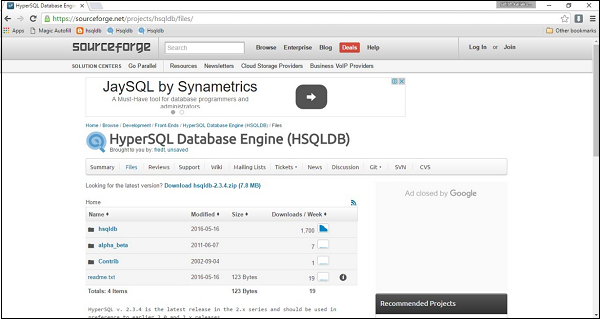
Click HSQLDB and the download will start immediately. Finally, you will get the zip file named hsqldb-2.3.4.zip.
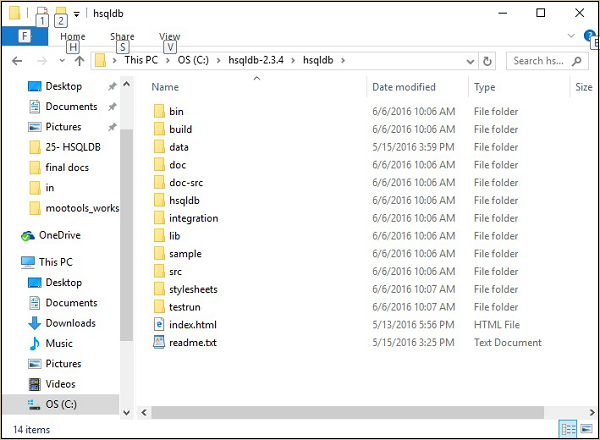
Step 2 − Extract the HSQLDB zip file
Extract the zip file and place it into the C:\ directory. After extraction, you will get a file structure as shown in the following screenshot.
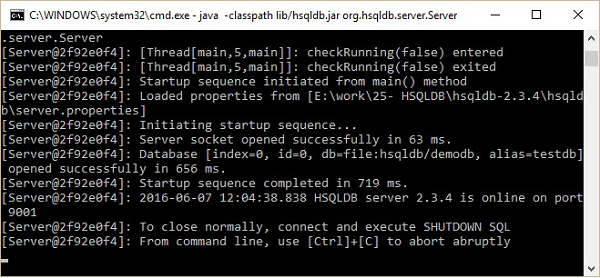
Step 3 − Create a default database
There is no default database for HSQLDB, therefore, you need to create a database for HSQLDB. Let us create a properties file named server.properties which defines a new database named demodb. Take a look at the following database server properties.
server.database.0 = file:hsqldb/demodb
server.dbname.0 = testdb
Place this server.properties file into HSQLDB home directory that is C:\hsqldb- 2.3.4\hsqldb\.
Now execute the following command on command prompt.
\>cd C:\hsqldb-2.3.4\hsqldb
hsqldb>java -classpath lib/hsqldb.jar org.hsqldb.server.Server
After execution of the above command, you will receive the server status as shown in the following screenshot.
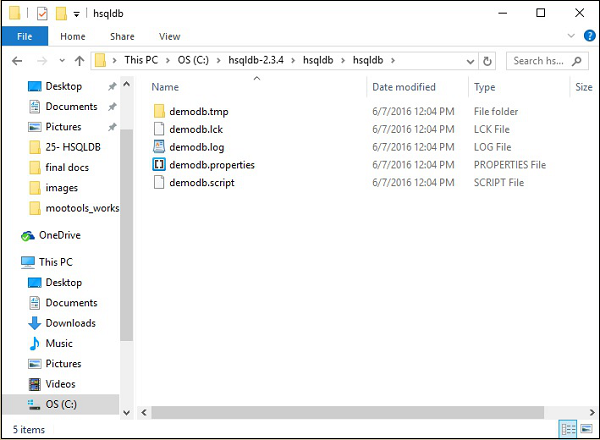
Later, you will get to find the following folder structure of the hsqldb directory in the HSQLDB home directory that is C:\hsqldb-2.3.4\hsqldb. Those files are temp file, lck file, log file, properties file, and script file of demodb database created by HSQLDB database server.
Step 4 − Start the database server
Once you are done creating a database, you have to start the database by using the following command.
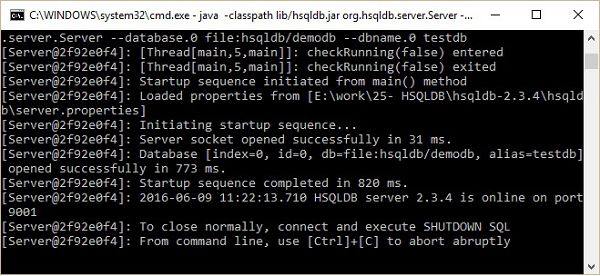
\>cd C:\hsqldb-2.3.4\hsqldb
hsqldb>java -classpath lib/hsqldb.jar org.hsqldb.server.Server --database.0
file:hsqldb/demodb --dbname.0 testdb
After execution of the above command, you get the following status.
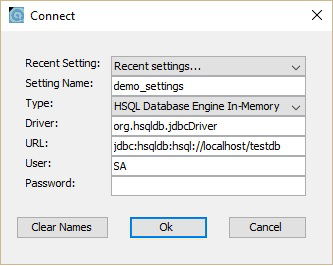
Now, you can open the database home screen that is runManagerSwing.bat from C:\hsqldb-2.3.4\hsqldb\bin location. This bat file will open the GUI file for HSQLDB database. Before that it will ask you for database settings through a dialog box. Take a look at the following screenshot. In this dialog box, enter the Setting Name, URL as shown above and click Ok.
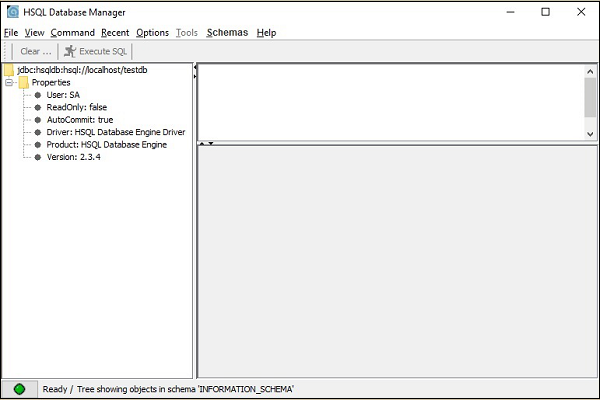
You will get the GUI screen of HSQLDB database as shown in the following screenshot.
HSQlDB - Connect
In the installation chapter, we discussed how to connect the database manually. In this chapter, we will discuss how to connect the database programmatically (using Java programming).
Take a look at the following program, which will start the server and create a connection between the Java application and the database.
Example
import java.sql.Connection;
import java.sql.DriverManager;

public class ConnectDatabase {
   public static void main(String[] args) {
      Connection con = null;

      try {
         //Registering the HSQLDB JDBC driver
         Class.forName("org.hsqldb.jdbc.JDBCDriver");
         //Creating the connection with HSQLDB
         con = DriverManager.getConnection("jdbc:hsqldb:hsql://localhost/testdb", "SA", "");
         if (con!= null){
            System.out.println("Connection created successfully");

         }else{
            System.out.println("Problem with creating connection");
         }

      }  catch (Exception e) {
         e.printStackTrace(System.out);
      }
   }
}
Save this code into ConnectDatabase.java file. You will have to start the database using the following command.
\>cd C:\hsqldb-2.3.4\hsqldb
hsqldb>java -classpath lib/hsqldb.jar org.hsqldb.server.Server --database.0
file:hsqldb/demodb --dbname.0 testdb
You can use the following command to compile and execute the code.
\>javac ConnectDatabase.java
\>java ConnectDatabase
After execution of the above command, you will receive the following output −
Connection created successfully
HSQLDB - Data Types
This chapter explains the different datatypes of HSQLDB. HSQLDB server offers six categories of data types.
Exact Numeric Data Types
| Data Type | From | To |
|---|---|---|
| bigint | -9,223,372,036,854,775,808 | 9,223,372,036,854,775,807 |
| int | -2,147,483,648 | 2,147,483,647 |
| smallint | -32,768 | 32,767 |
| tinyint | 0 | 255 |
| bit | 0 | 1 |
| decimal | -10^38 +1 | 10^38 -1 |
| numeric | -10^38 +1 | 10^38 -1 |
| money | -922,337,203,685,477.5808 | +922,337,203,685,477.5807 |
| smallmoney | -214,748.3648 | +214,748.3647 |
Approximate Numeric Data Types
| Data Type | From | To |
|---|---|---|
| float | -1.79E + 308 | 1.79E + 308 |
| real | -3.40E + 38 | 3.40E + 38 |
Date and Time Data Types
| Data Type | From | To |
|---|---|---|
| datetime | Jan 1, 1753 | Dec 31, 9999 |
| smalldatetime | Jan 1, 1900 | Jun 6, 2079 |
| date | Stores a date like June 30, 1991 | |
| time | Stores a time of day like 12:30 P.M. | |
Note − Here, datetime has 3.33 milliseconds accuracy whereas small datetime has 1- minute accuracy.
Character Strings Data Types
| Data Type | Description |
|---|---|
| char | Maximum length of 8,000 characters (Fixed length non-Unicode characters) |
| varchar | Maximum of 8,000 characters (Variable-length non-Unicode data) |
| varchar(max) | Maximum length of 231 characters, variable-length non-Unicode data (SQL Server 2005 only) |
| text | Variable-length non-Unicode data with a maximum length of 2,147,483,647 characters |
Unicode Character Strings Data Types
| Data Type | Description |
|---|---|
| nchar | Maximum length of 4,000 characters (Fixed length Unicode) |
| nvarchar | Maximum length of 4,000 characters (Variable length Unicode) |
| nvarchar(max) | Maximum length of 231 characters (SQL Server 2005 only),(Variable length Unicode) |
| ntext | Maximum length of 1,073,741,823 characters (Variable length Unicode) |
Binary Data Types
| Data Type | Description |
|---|---|
| binary | Maximum length of 8,000 bytes (Fixed length binary data) |
| varbinary | Maximum length of 8,000 bytes (Variable length binary data) |
| varbinary(max) | Maximum length of 231 bytes (SQL Server 2005 only), (Variable length Binary data) |
| image | Maximum length of 2,147,483,647 bytes (Variable length Binary Data) |
Misc Data Types
| Data Type | Description |
|---|---|
| sql_variant | Stores values of various SQL Server-supported data types, except text, ntext, and timestamp |
| timestamp | Stores a database-wide unique number that gets updated every time a row gets updated |
| uniqueidentifier | Stores a globally unique identifier (GUID) |
| xml | Stores XML data. You can store xml instances in a column or a variable (SQL Server 2005 only) |
| cursor | Reference to a cursor object |
| table | Stores a result set for later processing |
HSQLDB - Create Table
The basic mandatory requirements to create a table are table name, field names, and the data types to those fields. Optionally, you can also provide the key constraints to the table.
Syntax
Take a look at the following syntax.
CREATE TABLE table_name (column_name column_type);
Example
Let us create a table named tutorials_tbl with the field-names such as id, title, author, and submission_date. Take a look at the following query.
CREATE TABLE tutorials_tbl (
   id INT NOT NULL,
   title VARCHAR(50) NOT NULL,
   author VARCHAR(20) NOT NULL,
   submission_date DATE,
   PRIMARY KEY (id)
);
After execution of the above query, you will receive the following output −
(0) rows effected
HSQLDB JDBC Program
Following is the JDBC program used to create a table named tutorials_tbl into the HSQLDB database. Save the program into CreateTable.java file.
import java.sql.Connection;
import java.sql.DriverManager;
import java.sql.Statement;

public class CreateTable {

   public static void main(String[] args) {

      Connection con = null;
      Statement stmt = null;
      int result = 0;

      try {
         Class.forName("org.hsqldb.jdbc.JDBCDriver");
         con = DriverManager.getConnection("jdbc:hsqldb:hsql://localhost/testdb", "SA", "");
         stmt = con.createStatement();

         result = stmt.executeUpdate("CREATE TABLE tutorials_tbl (
            id INT NOT NULL, title VARCHAR(50) NOT NULL,
            author VARCHAR(20) NOT NULL, submission_date DATE,
            PRIMARY KEY (id));
         ");

      }  catch (Exception e) {
         e.printStackTrace(System.out);
      }
      System.out.println("Table created successfully");
   }
}
You can start the database using the following command.
\>cd C:\hsqldb-2.3.4\hsqldb
hsqldb>java -classpath lib/hsqldb.jar org.hsqldb.server.Server --database.0
file:hsqldb/demodb --dbname.0 testdb
Compile and execute the above program using the following command.
\>javac CreateTable.java
\>java CreateTable
After execution of the above command, you will receive the following output −
Table created successfully
HSQLDB - Drop Table
It is very easy to drop an existing HSQLDB table. However, you need to be very careful while deleting any existing table as any data lost will not be recovered after deleting a table.
Syntax
Following is a generic SQL syntax to drop a HSQLDB table.
DROP TABLE table_name;
Example
Let us consider an example to drop a table named employee from the HSQLDB server. Following is the query to drop a table named employee.
DROP TABLE employee;
After execution of the above query, you will receive the following output −
(0) rows effected
HSQLDB JDBC Program
Following is the JDBC program used to drop the table employee from the HSQLDB server.
Save the following code into DropTable.java file.
import java.sql.Connection;
import java.sql.DriverManager;
import java.sql.Statement;

public class DropTable {
   public static void main(String[] args) {
      Connection con = null;
      Statement stmt = null;
      int result = 0;

      try {
         Class.forName("org.hsqldb.jdbc.JDBCDriver");
         con = DriverManager.getConnection("jdbc:hsqldb:hsql://localhost/testdb", "SA", "");
         stmt = con.createStatement();
         result = stmt.executeUpdate("DROP TABLE employee");
      }catch (Exception e) {
         e.printStackTrace(System.out);
      }

      System.out.println("Table dropped successfully");
   }
}
You can start the database using the following command.
\>cd C:\hsqldb-2.3.4\hsqldb
hsqldb>java -classpath lib/hsqldb.jar org.hsqldb.server.Server --database.0
file:hsqldb/demodb --dbname.0 testdb
Compile and execute the above program using the following command.
\>javac DropTable.java
\>java DropTable
After execution of the above command, you will receive the following output −
Table dropped successfully
HSQLDB - Insert Query
You can achieve Insert query statement in HSQLDB by using the INSERT INTO command. You have to provide the user-defined data following the column field order from the table.
Syntax
Following is the generic syntax to INSERT a query.
INSERT INTO table_name (field1, field2,...fieldN)
VALUES (value1, value2,...valueN );
To insert a string type data into a table, you will have to use double or single quotes to provide string value into the insert query statement.
Example
Let us consider an example that inserts a record into a table named tutorials_tbl with the values id = 100, title = Learn PHP, Author = John Poul, and the submission date is current date.
Following is the query for the given example.
INSERT INTO tutorials_tbl VALUES (100,'Learn PHP', 'John Poul', NOW());
After execution of the above query, you will receive the following output −
1 row effected
HSQLDB JDBC Program
Here is the JDBC program to insert the record into the table with the given values, id =100, title = Learn PHP, Author = John Poul, and the submission date is current date. Take a look at the given program. Save the code into the InserQuery.java file.
import java.sql.Connection;
import java.sql.DriverManager;
import java.sql.Statement;

public class InsertQuery {
   public static void main(String[] args) {
      Connection con = null;
      Statement stmt = null;
      int result = 0;
      try {
         Class.forName("org.hsqldb.jdbc.JDBCDriver");
         con = DriverManager.getConnection(
            "jdbc:hsqldb:hsql://localhost/testdb", "SA", "");
         stmt = con.createStatement();
         result = stmt.executeUpdate("INSERT INTO tutorials_tbl
            VALUES (100,'Learn PHP', 'John Poul', NOW())");
         con.commit();
      }catch (Exception e) {
         e.printStackTrace(System.out);
      }
      System.out.println(result+" rows effected");
      System.out.println("Rows inserted successfully");
   }
}
You can start the database using the following command.
\>cd C:\hsqldb-2.3.4\hsqldb
hsqldb>java -classpath lib/hsqldb.jar org.hsqldb.server.Server --database.0
file:hsqldb/demodb --dbname.0 testdb
Compile and execute the above program using the following command.
\>javac InsertQuery.java
\>java InsertQuery
After execution of the above command, you will receive the following output −
1 rows effected
Rows inserted successfully
Try to insert the following records into the tutorials_tbl table by using the INSERT INTO command.
| Id | Title | Author | Submission Date |
|---|---|---|---|
| 101 | Learn C | Yaswanth | Now() |
| 102 | Learn MySQL | Abdul S | Now() |
| 103 | Learn Excell | Bavya kanna | Now() |
| 104 | Learn JDB | Ajith kumar | Now() |
| 105 | Learn Junit | Sathya Murthi | Now() |
HSQLDB - Select Query
The SELECT command is used to fetch the record data from HSQLDB database. Here, you need to mention the required fields list in the Select statement.
Syntax
Here is the generic syntax for Select query.
SELECT field1, field2,...fieldN table_name1, table_name2...
[WHERE Clause]
[OFFSET M ][LIMIT N]
You can fetch one or more fields in a single SELECT command.
You can specify star (*) in place of fields. In this case, SELECT will return all the fields.
You can specify any condition using WHERE clause.
You can specify an offset using OFFSET from where SELECT will start returning records. By default, offset is zero.
You can limit the number of returns using LIMIT attribute.
Example
Here is an example that fetches id, title, and author fields of all records from tutorials_tbl table. We can achieve this by using the SELECT statement. Following is the query for the example.
SELECT id, title, author FROM tutorials_tbl
After execution of the above query, you will receive the following output.
+------+----------------+-----------------+
|  id  |      title     |    author       |
+------+----------------+-----------------+
| 100  |     Learn PHP  |    John Poul    |
| 101  |     Learn C    |    Yaswanth     |
| 102  |   Learn MySQL  |     Abdul S     |
| 103  |   Learn Excell |   Bavya kanna   |
| 104  |   Learn JDB    |    Ajith kumar  |
| 105  |   Learn Junit  |   Sathya Murthi |
+------+----------------+-----------------+
HSQLDB JDBC Program
Here is the JDBC program that will fetch id, title, and author fields of all records from tutorials_tbl table. Save the following code into the SelectQuery.java file.
import java.sql.Connection;
import java.sql.DriverManager;
import java.sql.ResultSet;
import java.sql.Statement;

public class SelectQuery {

   public static void main(String[] args) {
      Connection con = null;
      Statement stmt = null;
      ResultSet result = null;

      try {
         Class.forName("org.hsqldb.jdbc.JDBCDriver");
         con = DriverManager.getConnection(
            "jdbc:hsqldb:hsql://localhost/testdb", "SA", "");
         stmt = con.createStatement();
         result = stmt.executeQuery(
            "SELECT id, title, author FROM tutorials_tbl");

         while(result.next()){
            System.out.println(result.getInt("id")+" | "+
               result.getString("title")+" | "+
               result.getString("author"));
         }
      } catch (Exception e) {
         e.printStackTrace(System.out);
      }
   }
}
You can start the database using the following command.
\>cd C:\hsqldb-2.3.4\hsqldb
hsqldb>java -classpath lib/hsqldb.jar org.hsqldb.server.Server --database.0
file:hsqldb/demodb --dbname.0 testdb
Compile and execute the above code using the following command.
\>javac SelectQuery.java
\>java SelectQuery
After execution of the above command, you will receive the following output −
100 | Learn PHP | John Poul
101 | Learn C | Yaswanth
102 | Learn MySQL | Abdul S
103 | Learn Excell | Bavya Kanna
104 | Learn JDB | Ajith kumar
105 | Learn Junit | Sathya Murthi
HSQLDB - Where Clause
Generally, we use SELECT command to fetch data from HSQLDB table. We can use WHERE conditional clause to filter the resultant data. Using WHERE we can specify the selection criteria to select the required records from a table.
Syntax
Following is the syntax of SELECT command WHERE clause to fetch data from HSQLDB table.
SELECT field1, field2,...fieldN table_name1, table_name2...
[WHERE condition1 [AND [OR]] condition2.....
You can use one or more tables separated by comma to include various conditions using a WHERE clause, but WHERE clause is an optional part of SELECT command.
You can specify any condition using WHERE clause.
You can specify more than one conditions using AND or OR operators.
A WHERE clause can also be used along with DELETE or UPDATE SQL command to specify a condition.
We can filter the record data by using conditions. We are using different operators in conditional WHERE clause. Here is the list of operators, which can be used with WHERE clause.
| Operator | Description | Example |
|---|---|---|
| = | Checks if the values of two operands are equal or not, if yes then the condition becomes true. | (A = B) is not true |
| != | Checks if the values of two operands are equal or not, if values are not equal then the condition becomes true. | (A != B) is true |
| > | Checks if the value of the left operand is greater than the value of the right operand, if yes then the condition becomes true. | (A > B) is not true |
| < | Checks if the value of the left operand is less than the value of the right operand, if yes then the condition becomes true. | (A < B) is true |
| >= | Checks if the value of the left operand is greater than or equal to the value of the right operand, if yes then the condition becomes true. | (A >= B) is not true |
| <= | Checks if the value of the left operand is less than or equal to the value of the right operand, if yes then the condition becomes true. | (A <= B) is true |
Example
Here is an example that retrieves the details such as id, title, and the author of the book titled "Learn C". It is possible by using WHERE clause in the SELECT command. Following is the query for the same.
SELECT id, title, author FROM tutorials_tbl WHERE title = 'Learn C';
After execution of the above query, you will receive the following output.
+------+----------------+-----------------+
| id   |      title     |    author       |
+------+----------------+-----------------+
| 101  |      Learn C   |   Yaswanth      |
+------+----------------+-----------------+
HSQLDB JDBC Program
Here is the JDBC program that retrieves the record data from the table tutorials_tblhaving the title Learn C. Save the following code into WhereClause.java.
import java.sql.Connection;
import java.sql.DriverManager;
import java.sql.ResultSet;
import java.sql.Statement;

public class WhereClause {

   public static void main(String[] args) {
      Connection con = null;
      Statement stmt = null;
      ResultSet result = null;
      try {
         Class.forName("org.hsqldb.jdbc.JDBCDriver");
         con = DriverManager.getConnection(
            "jdbc:hsqldb:hsql://localhost/testdb", "SA", "");
         stmt = con.createStatement();
         result = stmt.executeQuery(
            "SELECT id, title, author FROM tutorials_tbl
            WHERE title = 'Learn C'");

         while(result.next()){
            System.out.println(result.getInt("id")+" |
               "+result.getString("title")+" |
               "+result.getString("author"));
         }
      } catch (Exception e) {
         e.printStackTrace(System.out);
      }
   }

}
You can start the database using the following command.
\>cd C:\hsqldb-2.3.4\hsqldb
hsqldb>java -classpath lib/hsqldb.jar org.hsqldb.server.Server --database.0
file:hsqldb/demodb --dbname.0 testdb
Compile and execute the above code using the following command.
\>javac WhereClause.java
\>java WhereClause
After execution of the above command, you will receive the following output.
101 | Learn C | Yaswanth
HSQLDB - Update Query
Whenever you want to modify the values of a table, you can use the UPDATE command. This will modify any field value from any HSQLDB table.
Syntax
Here is the generic syntax for UPDATE command.
UPDATE table_name SET field1 = new-value1, field2 = new-value2 [WHERE Clause]
- You can update one or more field altogether.
- You can specify any condition using WHERE clause.
- You can update values in a single table at a time.
Example
Let us consider an example that updates the title of the tutorial from "Learn C" to "C and Data Structures" having an id "101". Following is the query for the update.
UPDATE tutorials_tbl SET title = 'C and Data Structures' WHERE id = 101;
After execution of the above query, you will receive the following output.
(1) Rows effected
HSQLDB JDBC Program
Here is the JDBC program that will update a tutorial title from Learn C to C and Data Structures having an id 101. Save the following program into the UpdateQuery.java file.
import java.sql.Connection;
import java.sql.DriverManager;
import java.sql.Statement;

public class UpdateQuery {

   public static void main(String[] args) {
      Connection con = null;
      Statement stmt = null;
      int result = 0;

      try {
         Class.forName("org.hsqldb.jdbc.JDBCDriver");
         con = DriverManager.getConnection(
            "jdbc:hsqldb:hsql://localhost/testdb", "SA", "");
         stmt = con.createStatement();
         result = stmt.executeUpdate(
            "UPDATE tutorials_tbl SET title = 'C and Data Structures' WHERE id = 101");
      } catch (Exception e) {
         e.printStackTrace(System.out);
      }
      System.out.println(result+" Rows effected");
   }
}
You can start the database using the following command.
\>cd C:\hsqldb-2.3.4\hsqldb
hsqldb>java -classpath lib/hsqldb.jar org.hsqldb.server.Server --database.0
file:hsqldb/demodb --dbname.0 testdb
Compile and execute the above program using the following command.
\>javac UpdateQuery.java
\>java UpdateQuery
After execution of the above command, you will receive the following output −
1 Rows effected
HSQLDB - Delete Clause
Whenever you want to delete a record from any HSQLDB table, you can use the DELETE FROM command.
Syntax
Here is the generic syntax for DELETE command to delete data from a HSQLDB table.
DELETE FROM table_name [WHERE Clause]
If WHERE clause is not specified, then all the records will be deleted from the given MySQL table.
You can specify any condition using WHERE clause.
You can delete records in a single table at a time.
Example
Let us consider an example that deletes the record data from the table named tutorials_tbl having id 105. Following is the query that implements the given example.
DELETE FROM tutorials_tbl WHERE id = 105;
After execution of the above query, you will receive the following output −
(1) rows effected
HSQLDB JDBC Program
Here is the JDBC program that implements the given example. Save the following program into DeleteQuery.java.
import java.sql.Connection;
import java.sql.DriverManager;
import java.sql.Statement;

public class DeleteQuery {

   public static void main(String[] args) {
      Connection con = null;
      Statement stmt = null;
      int result = 0;

      try {
         Class.forName("org.hsqldb.jdbc.JDBCDriver");
         con = DriverManager.getConnection(
            "jdbc:hsqldb:hsql://localhost/testdb", "SA", "");
         stmt = con.createStatement();
         result = stmt.executeUpdate(
            "DELETE FROM tutorials_tbl   WHERE id=105");
      } catch (Exception e) {

         e.printStackTrace(System.out);
      }
      System.out.println(result+" Rows effected");
   }
}
You can start the database using the following command.
\>cd C:\hsqldb-2.3.4\hsqldb
hsqldb>java -classpath lib/hsqldb.jar org.hsqldb.server.Server --database.0
file:hsqldb/demodb --dbname.0 testdb
Compile and execute the above program using the following command.
\>javac DeleteQuery.java
\>java DeleteQuery
After execution of the above command, you will receive the following output −
1 Rows effected
HSQLDB - LIKE Clause
There is a WHERE clause in the RDBMS structure. You can use the WHERE clause with an equal to sign (=) where we want to do an exact match. But there may be a requirement where we want to filter out all the results where the author name should contain "john". This can be handled using the SQL LIKE clause along with the WHERE clause.
If the SQL LIKE clause is used along with % characters, then it will work like a metacharacter (*) in UNIX while listing out all the files or directories at command prompt.
Syntax
Following is the generic SQL syntax of the LIKE clause.
SELECT field1, field2,...fieldN table_name1, table_name2...
WHERE field1 LIKE condition1 [AND [OR]] filed2 = 'somevalue'
You can specify any condition using the WHERE clause.
You can use the LIKE clause along with the WHERE clause.
You can use the LIKE clause in place of the equal to sign.
When the LIKE clause is used along with the % sign, then it will work like a metacharacter search.
You can specify more than one conditions using AND or OR operators.
A WHERE...LIKE clause can be used along with the DELETE or the UPDATE SQL command to specify a condition.
Example
Let us consider an example that retrieves the list of tutorials data where the author name starts with John. Following is the HSQLDB query for the given example.
SELECT * from tutorials_tbl WHERE author LIKE 'John%';
After execution of the above query, you will receive the following output.
+-----+----------------+-----------+-----------------+
|  id |      title     |   author  | submission_date |
+-----+----------------+-----------+-----------------+
| 100 |    Learn PHP   | John Poul | 2016-06-20      |
+-----+----------------+-----------+-----------------+
HSQLDB JDBC Program
Following is the JDBC program that retrieves the list of tutorials data where the author name starts with John. Save the code into LikeClause.java.
import java.sql.Connection;
import java.sql.DriverManager;
import java.sql.ResultSet;
import java.sql.Statement;

public class LikeClause {

   public static void main(String[] args) {
      Connection con = null;
      Statement stmt = null;
      ResultSet result = null;

      try {
         Class.forName("org.hsqldb.jdbc.JDBCDriver");
         con = DriverManager.getConnection(
            "jdbc:hsqldb:hsql://localhost/testdb", "SA", "");
         stmt = con.createStatement();
         result = stmt.executeQuery(
            "SELECT * from tutorials_tbl WHERE author LIKE 'John%';");

         while(result.next()){
            System.out.println(result.getInt("id")+" |
               "+result.getString("title")+" |
               "+result.getString("author")+" |
               "+result.getDate("submission_date"));
         }
      } catch (Exception e) {
         e.printStackTrace(System.out);
      }
   }
}
You can start the database using the following command.
\>cd C:\hsqldb-2.3.4\hsqldb
hsqldb>java -classpath lib/hsqldb.jar org.hsqldb.server.Server --database.0
file:hsqldb/demodb --dbname.0 testdb
Compile and execute the above code using the following command.
\>javac LikeClause.java
\>java LikeClause
After execution of the following command, you will receive the following output.
100 | Learn PHP | John Poul | 2016-06-20
HSQLDB - Sorting Results
The SQL SELECT command fetches data from the HSQLDB table whenever there is a requirement that follows a particular order while retrieving and displaying records. In that case, we can use the ORDER BY clause.
Syntax
Here is the syntax of the SELECT command along with ORDER BY clause to sort data from HSQLDB.
SELECT field1, field2,...fieldN table_name1, table_name2...
ORDER BY field1, [field2...] [ASC [DESC]]
You can sort the returned result on any field provided that field is being listed out.
You can sort the result on more than one field.
You can use the keyword ASC or DESC to get the result in an ascending or descending order. By default, it's in an ascending order.
You can use the WHERE...LIKE clause in a usual way to put a condition.
Example
Let us consider an example that fetches and sorts the records of tutorials_tbl table by ordering the author name in an ascending order. Following is the query for the same.
SELECT id, title, author from tutorials_tbl ORDER BY author ASC;
After execution of the above query, you will receive the following output.
+------+----------------+-----------------+
| id   |     title      |     author      |
+------+----------------+-----------------+
| 102  |  Learn MySQL   |     Abdul S     |
| 104  |  Learn JDB     |    Ajith kumar  |
| 103  |  Learn Excell  |    Bavya kanna  |
| 100  |  Learn PHP     |    John Poul    |
| 105  |  Learn Junit   |   Sathya Murthi |
| 101  |  Learn C       |    Yaswanth     |
+------+----------------+-----------------+
HSQLDB JDBC Program
Here is the JDBC program that fetches and sorts the records of tutorials_tbl table by ordering the author name in an ascending order. Save the following program into OrderBy.java.
import java.sql.Connection;
import java.sql.DriverManager;
import java.sql.ResultSet;
import java.sql.Statement;

public class OrderBy {

   public static void main(String[] args) {
      Connection con = null;
      Statement stmt = null;
      ResultSet result = null;

      try {
         Class.forName("org.hsqldb.jdbc.JDBCDriver");
         con = DriverManager.getConnection(
            "jdbc:hsqldb:hsql://localhost/testdb", "SA", "");
         stmt = con.createStatement();
         result = stmt.executeQuery(
            "SELECT id, title, author from tutorials_tbl
            ORDER BY author ASC");

         while(result.next()){
            System.out.println(result.getInt("id")+" |
            "+result.getString("title")+" |
            "+result.getString("author"));
         }
      } catch (Exception e) {
         e.printStackTrace(System.out);
      }
   }
}
You can start the database using the following command.
\>cd C:\hsqldb-2.3.4\hsqldb
hsqldb>java -classpath lib/hsqldb.jar org.hsqldb.server.Server --database.0
file:hsqldb/demodb --dbname.0 testdb
Compile and execute the above program using the following command.
\>javac OrderBy.java
\>java OrderBy
After execution of the above command, you will receive the following output.
102 | Learn MySQL           | Abdul S
104 | Learn JDB             | Ajith kumar
103 | Learn Excell          | Bavya Kanna
100 | Learn PHP             | John Poul
105 | Learn Junit           | Sathya Murthi
101 | C and Data Structures | Yaswanth
HSQLDB - Joins
Whenever there is a requirement to retrieve data from multiple tables using a single query, you can use JOINS from RDBMS. You can use multiple tables in your single SQL query. The act of joining in HSQLDB refers to smashing two or more tables into a single table.
Consider the following Customers and Orders tables.
Customer:
+----+----------+-----+-----------+----------+
| ID |   NAME   | AGE |  ADDRESS  |  SALARY  |
+----+----------+-----+-----------+----------+
| 1  |  Ramesh  | 32  | Ahmedabad |  2000.00 |
| 2  |  Khilan  | 25  |   Delhi   |  1500.00 |
| 3  |  kaushik | 23  |   Kota    |  2000.00 |
| 4  | Chaitali | 25  |   Mumbai  |  6500.00 |
| 5  |  Hardik  | 27  |   Bhopal  |  8500.00 |
| 6  |  Komal   | 22  |    MP     |  4500.00 |
| 7  |  Muffy   | 24  |   Indore  | 10000.00 |
+----+----------+-----+-----------+----------+
Orders:
+-----+---------------------+-------------+--------+
|OID  |         DATE        | CUSTOMER_ID | AMOUNT |
+-----+---------------------+-------------+--------+
| 102 | 2009-10-08 00:00:00 |      3      |  3000  |
| 100 | 2009-10-08 00:00:00 |      3      |  1500  |
| 101 | 2009-11-20 00:00:00 |      2      |  1560  |
| 103 | 2008-05-20 00:00:00 |      4      |  2060  |
+-----+---------------------+-------------+--------+
Now, let us try to retrieve the data of the customers and the order amount that the respective customer placed. This means we are retrieving the record data from both customers and orders table. We can achieve this by using the JOINS concept in HSQLDB. Following is the JOIN query for the same.
SELECT ID, NAME, AGE, AMOUNT FROM CUSTOMERS, ORDERS WHERE CUSTOMERS.ID =
ORDERS.CUSTOMER_ID;
After execution of the above query, you will receive the following output.
+----+----------+-----+--------+
| ID |   NAME   | AGE | AMOUNT |
+----+----------+-----+--------+
|  3 | kaushik  |  23 |  3000  |
|  3 | kaushik  |  23 |  1500  |
|  2 | Khilan   |  25 |  1560  |
|  4 | Chaitali |  25 |  2060  |
+----+----------+-----+--------+
JOIN Types
There are different types of joins available in HSQLDB.
INNER JOIN − Returns the rows when there is a match in both tables.
LEFT JOIN − Returns all rows from the left table, even if there are no matches in the right table.
RIGHT JOIN − Returns all rows from the right table, even if there are no matches in the left table.
FULL JOIN − Returns the rows when there is a match in one of the tables.
SELF JOIN − Used to join a table to itself as if the table were two tables, temporarily renaming at least one table in the SQL statement.
Inner Join
The most frequently used and important of the joins is the INNER JOIN. It is also referred to as an EQUIJOIN.
The INNER JOIN creates a new result table by combining the column values of two tables (table1 and table2) based upon the join-predicate. The query compares each row of table1 with each row of table2 to find all pairs of rows, which satisfy the join-predicate. When the join-predicate is satisfied, the column values for each matched pair of rows A and B are combined into a result row.
Syntax
The basic syntax of INNER JOIN is as follows.
SELECT table1.column1, table2.column2...
FROM table1
INNER JOIN table2
ON table1.common_field = table2.common_field;
Example
Consider the following two tables, one titled as CUSTOMERS table and another titled as ORDERS table as follows −
+----+----------+-----+-----------+----------+
| ID |   NAME   | AGE |  ADDRESS  | SALARY   |
+----+----------+-----+-----------+----------+
| 1  |  Ramesh  | 32  | Ahmedabad | 2000.00  |
| 2  |  Khilan  | 25  |   Delhi   | 1500.00  |
| 3  |  kaushik | 23  |   Kota    | 2000.00  |
| 4  | Chaitali | 25  |   Mumbai  | 6500.00  |
| 5  |  Hardik  | 27  |   Bhopal  | 8500.00  |
| 6  |  Komal   | 22  |     MP    | 4500.00  |
| 7  |  Muffy   | 24  |   Indore  | 10000.00 |
+----+----------+-----+-----------+----------+
+-----+---------------------+-------------+--------+
| OID |         DATE        | CUSTOMER_ID | AMOUNT |
+-----+---------------------+-------------+--------+
| 102 | 2009-10-08 00:00:00 |      3      | 3000   |
| 100 | 2009-10-08 00:00:00 |      3      | 1500   |
| 101 | 2009-11-20 00:00:00 |      2      | 1560   |
| 103 | 2008-05-20 00:00:00 |      4      | 2060   |
+-----+---------------------+-------------+--------+
Now, let us join these two tables using INNER JOIN query as follows −
SELECT ID, NAME, AMOUNT, DATE FROM CUSTOMERS
INNER JOIN ORDERS
ON CUSTOMERS.ID = ORDERS.CUSTOMER_ID;
After execution of the above query, you will receive the following output.
+----+----------+--------+---------------------+
| ID |   NAME   | AMOUNT |         DATE        |
+----+----------+--------+---------------------+
| 3  |  kaushik |  3000  | 2009-10-08 00:00:00 |
| 3  |  kaushik |  1500  | 2009-10-08 00:00:00 |
| 2  |  Khilan  |  1560  | 2009-11-20 00:00:00 |
| 4  | Chaitali |  2060  | 2008-05-20 00:00:00 |
+----+----------+--------+---------------------+
Left Join
The HSQLDB LEFT JOIN returns all rows from the left table, even if there are no matches in the right table. This means that if the ON clause matches 0 (zero) records in the right table, the join will still return a row in the result, but with NULL in each column from the right table.
This means that a left join returns all the values from the left table, plus matched values from the right table or NULL in case of no matching join predicate.
Syntax
The basic syntax of LEFT JOIN is as follows −
SELECT table1.column1, table2.column2...
FROM table1
LEFT JOIN table2
ON table1.common_field = table2.common_field;
Here the given condition could be any given expression based on your requirement.
Example
Consider the following two tables, one titled as CUSTOMERS table and another titled as ORDERS table as follows −
+----+----------+-----+-----------+----------+
| ID |   NAME   | AGE |  ADDRESS  | SALARY   |
+----+----------+-----+-----------+----------+
| 1  |  Ramesh  | 32  | Ahmedabad | 2000.00  |
| 2  |  Khilan  | 25  |   Delhi   | 1500.00  |
| 3  |  kaushik | 23  |   Kota    | 2000.00  |
| 4  | Chaitali | 25  |   Mumbai  | 6500.00  |
| 5  |  Hardik  | 27  |   Bhopal  | 8500.00  |
| 6  |  Komal   | 22  |    MP     | 4500.00  |
| 7  |  Muffy   | 24  |  Indore   | 10000.00 |
+----+----------+-----+-----------+----------+
+-----+---------------------+-------------+--------+
| OID |        DATE         | CUSTOMER_ID | AMOUNT |
+-----+---------------------+-------------+--------+
| 102 | 2009-10-08 00:00:00 |     3       | 3000   |
| 100 | 2009-10-08 00:00:00 |     3       | 1500   |
| 101 | 2009-11-20 00:00:00 |     2       | 1560   |
| 103 | 2008-05-20 00:00:00 |     4       | 2060   |
+-----+---------------------+-------------+--------+
Now, let us join these two tables using the LEFT JOIN query as follows −
SELECT ID, NAME, AMOUNT, DATE FROM CUSTOMERS
LEFT JOIN ORDERS
ON CUSTOMERS.ID = ORDERS.CUSTOMER_ID;
After execution of the above query, you will receive the following output −
+----+----------+--------+---------------------+
| ID |   NAME   | AMOUNT |         DATE        |
+----+----------+--------+---------------------+
|  1 |  Ramesh  |  NULL  |        NULL         |
|  2 |  Khilan  |  1560  | 2009-11-20 00:00:00 |
|  3 |  kaushik |  3000  | 2009-10-08 00:00:00 |
|  3 |  kaushik |  1500  | 2009-10-08 00:00:00 |
|  4 | Chaitali |  2060  | 2008-05-20 00:00:00 |
|  5 |  Hardik  |  NULL  |        NULL         |
|  6 |  Komal   |  NULL  |        NULL         |
|  7 |  Muffy   |  NULL  |        NULL         |
+----+----------+--------+---------------------+
Right Join
The HSQLDB RIGHT JOIN returns all rows from the right table, even if there are no matches in the left table. This means that if the ON clause matches 0 (zero) records in the left table, the join will still return a row in the result, but with NULL in each column from the left table.
This means that a right join returns all the values from the right table, plus matched values from the left table or NULL in case of no matching join predicate.
Syntax
The basic syntax of RIGHT JOIN is as follows −
SELECT table1.column1, table2.column2...
FROM table1
RIGHT JOIN table2
ON table1.common_field = table2.common_field;
Example
Consider the following two tables, one titled as CUSTOMERS table and another titled as ORDERS table as follows −
+----+----------+-----+-----------+----------+
| ID |   NAME   | AGE |  ADDRESS  |  SALARY  |
+----+----------+-----+-----------+----------+
| 1  |  Ramesh  | 32  | Ahmedabad |  2000.00 |
| 2  |  Khilan  | 25  |   Delhi   |  1500.00 |
| 3  |  kaushik | 23  |   Kota    |  2000.00 |
| 4  | Chaitali | 25  |   Mumbai  |  6500.00 |
| 5  |  Hardik  | 27  |   Bhopal  |  8500.00 |
| 6  |  Komal   | 22  |     MP    |  4500.00 |
| 7  |  Muffy   | 24  |   Indore  | 10000.00 |
+----+----------+-----+-----------+----------+
+-----+---------------------+-------------+--------+
| OID |       DATE          | CUSTOMER_ID | AMOUNT |
+-----+---------------------+-------------+--------+
| 102 | 2009-10-08 00:00:00 |      3      |  3000  |
| 100 | 2009-10-08 00:00:00 |      3      |  1500  |
| 101 | 2009-11-20 00:00:00 |      2      |  1560  |
| 103 | 2008-05-20 00:00:00 |      4      |  2060  |
+-----+---------------------+-------------+--------+
Now, let us join these two tables using the RIGHT JOIN query as follows −
SELECT ID, NAME, AMOUNT, DATE FROM CUSTOMERS
RIGHT JOIN ORDERS
ON CUSTOMERS.ID = ORDERS.CUSTOMER_ID;
After execution of the above query, you will receive the following result.
+------+----------+--------+---------------------+
|  ID  |   NAME   | AMOUNT |        DATE         |
+------+----------+--------+---------------------+
|  3   |  kaushik |  3000  | 2009-10-08 00:00:00 |
|  3   |  kaushik |  1500  | 2009-10-08 00:00:00 |
|  2   |  Khilan  |  1560  | 2009-11-20 00:00:00 |
|  4   | Chaitali |  2060  | 2008-05-20 00:00:00 |
+------+----------+--------+---------------------+
Full Join
The HSQLDB FULL JOIN combines the results of both left and right outer joins.
The joined table will contain all records from both tables, and fill in NULLs for the missing matches on either side.
Syntax
The basic syntax of FULL JOIN is as follows −
SELECT table1.column1, table2.column2...
FROM table1
FULL JOIN table2
ON table1.common_field = table2.common_field;
Here the given condition could be any given expression based on your requirement.
Example
Consider the following two tables, one titled as CUSTOMERS table and another titled as ORDERS table as follows −
+----+----------+-----+-----------+----------+
| ID |   NAME   | AGE |  ADDRESS  |  SALARY  |
+----+----------+-----+-----------+----------+
|  1 |  Ramesh  | 32  | Ahmedabad | 2000.00  |
|  2 |  Khilan  | 25  |   Delhi   | 1500.00  |
|  3 |  kaushik | 23  |   Kota    | 2000.00  |
|  4 | Chaitali | 25  |   Mumbai  | 6500.00  |
|  5 |  Hardik  | 27  |   Bhopal  | 8500.00  |
|  6 |  Komal   | 22  |   MP      | 4500.00  |
|  7 |  Muffy   | 24  |   Indore  | 10000.00 |
+----+----------+-----+-----------+----------+
+-----+---------------------+-------------+--------+
| OID |         DATE        | CUSTOMER_ID | AMOUNT |
+-----+---------------------+-------------+--------+
| 102 | 2009-10-08 00:00:00 |    3        | 3000   |
| 100 | 2009-10-08 00:00:00 |    3        | 1500   |
| 101 | 2009-11-20 00:00:00 |    2        | 1560   |
| 103 | 2008-05-20 00:00:00 |    4        | 2060   |
+-----+---------------------+-------------+--------+
Now, let us join these two tables using the FULL JOIN query as follows −
SELECT ID, NAME, AMOUNT, DATE FROM CUSTOMERS
FULL JOIN ORDERS
ON CUSTOMERS.ID = ORDERS.CUSTOMER_ID;
After execution of the above query, you will receive the following result.
+------+----------+--------+---------------------+
|  ID  |    NAME  | AMOUNT |        DATE         |
+------+----------+--------+---------------------+
|   1  |  Ramesh  |  NULL  |        NULL         |
|   2  |  Khilan  |  1560  | 2009-11-20 00:00:00 |
|   3  |  kaushik |  3000  | 2009-10-08 00:00:00 |
|   3  |  kaushik |  1500  | 2009-10-08 00:00:00 |
|   4  | Chaitali |  2060  | 2008-05-20 00:00:00 |
|   5  |  Hardik  |  NULL  |        NULL         |
|   6  |   Komal  |  NULL  |        NULL         |
|   7  |   Muffy  |  NULL  |        NULL         |
|   3  |  kaushik |  3000  | 2009-10-08 00:00:00 |
|   3  |  kaushik |  1500  | 2009-10-08 00:00:00 |
|   2  |  Khilan  |  1560  | 2009-11-20 00:00:00 |
|   4  | Chaitali |  2060  | 2008-05-20 00:00:00 |
+------+----------+--------+---------------------+
Self Join
The SQL SELF JOIN is used to join a table to itself as if the table were two tables, temporarily renaming at least one table in the SQL statement.
Syntax
The basic syntax of SELF JOIN is as follows −
SELECT a.column_name, b.column_name...
FROM table1 a, table1 b
WHERE a.common_field = b.common_field;
Here, the WHERE clause could be any given expression based on your requirement.
Example
Consider the following two tables, one titled as CUSTOMERS table and another titled as ORDERS table as follows −
+----+----------+-----+-----------+----------+
| ID |    NAME  | AGE |   ADDRESS |   SALARY |
+----+----------+-----+-----------+----------+
|  1 |  Ramesh  |  32 | Ahmedabad | 2000.00  |
|  2 |  Khilan  |  25 |   Delhi   | 1500.00  |
|  3 |  kaushik |  23 |   Kota    | 2000.00  |
|  4 | Chaitali |  25 |   Mumbai  | 6500.00  |
|  5 |  Hardik  |  27 |   Bhopal  | 8500.00  |
|  6 |  Komal   |  22 |   MP      | 4500.00  |
|  7 |  Muffy   |  24 |   Indore  | 10000.00 |
+----+----------+-----+-----------+----------+
Now, let us join this table using the SELF JOIN query as follows −
SELECT a.ID, b.NAME, a.SALARY FROM CUSTOMERS a, CUSTOMERS b
WHERE a.SALARY > b.SALARY;
After execution of the above query, you will receive the following output −
+----+----------+---------+
| ID |   NAME   | SALARY  |
+----+----------+---------+
| 2  |  Ramesh  | 1500.00 |
| 2  |  kaushik | 1500.00 |
| 1  | Chaitali | 2000.00 |
| 2  | Chaitali | 1500.00 |
| 3  | Chaitali | 2000.00 |
| 6  | Chaitali | 4500.00 |
| 1  |  Hardik  | 2000.00 |
| 2  |  Hardik  | 1500.00 |
| 3  |  Hardik  | 2000.00 |
| 4  |  Hardik  | 6500.00 |
| 6  |  Hardik  | 4500.00 |
| 1  |  Komal   | 2000.00 |
| 2  |  Komal   | 1500.00 |
| 3  |  Komal   | 2000.00 |
| 1  |  Muffy   | 2000.00 |
| 2  |  Muffy   | 1500.00 |
| 3  |  Muffy   | 2000.00 |
| 4  |  Muffy   | 6500.00 |
| 5  |  Muffy   | 8500.00 |
| 6  |  Muffy   | 4500.00 |
+----+----------+---------+
HsqlDB - Null Values
SQL NULL is a term used to represent a missing value. A NULL value in a table is a value in a field that appears to be blank. Whenever we try to give a condition, which compare the field or column value to NULL, it does not work properly.
We can handle the NULL values by using the three things.
IS NULL − The operator returns true if the column value is NULL.
IS NOT NULL − The operator returns true if the column value is NOT NULL.
<=> − The operator compares values, which (unlike the = operator) is true even for two NULL values.
To look for columns that are NULL or NOT NULL, use IS NULL or IS NOT NULL respectively.
Example
Let us consider an example where there is a table tcount_tbl that contains two columns, author and tutorial_count. We can provide NULL values to the tutorial_count indicates that the author did not publish even one tutorial. Therefore, the tutorial_count value for that respective author is NULL.
Execute the following queries.
create table tcount_tbl(author varchar(40) NOT NULL, tutorial_count INT);
INSERT INTO tcount_tbl values ('Abdul S', 20);
INSERT INTO tcount_tbl values ('Ajith kumar', 5);
INSERT INTO tcount_tbl values ('Jen', NULL);
INSERT INTO tcount_tbl values ('Bavya kanna', 8);
INSERT INTO tcount_tbl values ('mahran', NULL);
INSERT INTO tcount_tbl values ('John Poul', 10);
INSERT INTO tcount_tbl values ('Sathya Murthi', 6);
Use the following command to display all the records from the tcount_tbl table.
select * from tcount_tbl;
After execution of the above command, you will receive the following output.
+-----------------+----------------+
|     author      | tutorial_count |
+-----------------+----------------+
|      Abdul S    |      20        |
|    Ajith kumar  |      5         |
|        Jen      |     NULL       |
|    Bavya kanna  |      8         |
|       mahran    |     NULL       |
|     John Poul   |      10        |
|   Sathya Murthi |      6         |
+-----------------+----------------+
To find the records where the tutorial_count column IS NULL, following is the query.
SELECT * FROM tcount_tbl WHERE tutorial_count IS NULL;
After execution of the query, you will receive the following output.
+-----------------+----------------+
|     author      | tutorial_count |
+-----------------+----------------+
|       Jen       |     NULL       |
|      mahran     |     NULL       |
+-----------------+----------------+
To find the records where the tutorial_count column IS NOT NULL, following is the query.
SELECT * FROM tcount_tbl WHERE tutorial_count IS NOT NULL;
After execution of the query, you will receive the following output.
+-----------------+----------------+
|      author     | tutorial_count |
+-----------------+----------------+
|      Abdul S    |      20        |
|     Ajith kumar |       5        |
|     Bavya kanna |       8        |
|     John Poul   |      10        |
|   Sathya Murthi |       6        |
+-----------------+----------------+
HSQLDB JDBC Program
Here is the JDBC program that retrieves the records separately from the table tcount_tbl where the tutorial_ count is NULL and the tutorial_count is NOT NULL. Save the following program into NullValues.java.
import java.sql.Connection;
import java.sql.DriverManager;
import java.sql.ResultSet;
import java.sql.Statement;

public class NullValues {
   public static void main(String[] args) {
      Connection con = null;
      Statement stmt_is_null = null;
      Statement stmt_is_not_null = null;
      ResultSet result = null;
      try {
         Class.forName("org.hsqldb.jdbc.JDBCDriver");
         con = DriverManager.getConnection(
            "jdbc:hsqldb:hsql://localhost/testdb", "SA", "");
         stmt_is_null = con.createStatement();
         stmt_is_not_null = con.createStatement();
         result = stmt_is_null.executeQuery(
            "SELECT * FROM tcount_tbl WHERE tutorial_count IS NULL;");
         System.out.println("Records where the tutorial_count is NULL");

         while(result.next()){
            System.out.println(result.getString("author")+" |
            "+result.getInt("tutorial_count"));
         }
         result = stmt_is_not_null.executeQuery(
            "SELECT * FROM tcount_tbl WHERE tutorial_count IS NOT NULL;");
         System.out.println("Records where the tutorial_count is NOT NULL");

         while(result.next()){
            System.out.println(result.getString("author")+" |
            "+result.getInt("tutorial_count"));
         }
      } catch (Exception e) {
         e.printStackTrace(System.out);
      }
   }
}
Compile and execute the above program using the following command.
\>javac NullValues.java
\>Java NullValues
After execution of the above command, you will receive the following output.
Records where the tutorial_count is NULL
Jen         | 0
mahran      | 0

Records where the tutorial_count is NOT NULL
Abdul S        | 20
Ajith kumar    | 5
Bavya kanna    | 8
John Poul      | 10
Sathya Murthi  | 6
HSQLDB - Regular Expressions
HSQLDB supports some special symbols for pattern matching operation based on regular expressions and the REGEXP operator.
Following is the table of pattern, which can be used along with REGEXP operator.
| Pattern | What the Pattern Matches |
|---|---|
| ^ | Beginning of the string |
| $ | End of the string |
| . | Any single character |
| [...] | Any character listed between the square brackets |
| [^...] | Any character not listed between the square brackets |
| p1|p2|p3 | Alternation; matches any of the patterns p1, p2, or p3 |
| * | Zero or more instances of the preceding element |
| + | One or more instances of the preceding element |
| {n} | n instances of the preceding element |
| {m,n} | m through n instances of the preceding element |
Example
Let us try different example queries to meet our requirements. Take a look at the following given queries.
Try this Query to find all the authors whose name starts with '^A'.
SELECT author FROM tcount_tbl WHERE REGEXP_MATCHES(author,'^A.*');
After execution of the above query, you will receive the following output.
+-----------------+
|     author      |
+-----------------+
|     Abdul S     |
|    Ajith kumar  |
+-----------------+
Try this Query to find all the authors whose name ends with 'ul$'.
SELECT author FROM tcount_tbl WHERE REGEXP_MATCHES(author,'.*ul$');
After execution of the above query, you will receive the following output.
+-----------------+
|     author      |
+-----------------+
|    John Poul    |
+-----------------+
Try this Query to find all the authors whose name contains 'th'.
SELECT author FROM tcount_tbl WHERE REGEXP_MATCHES(author,'.*th.*');
After execution of the above query, you will receive the following output.
+-----------------+
|     author      |
+-----------------+
|    Ajith kumar  |
|     Abdul S     |
+-----------------+
Try this query to find all the authors whose name starts with vowel (a, e, i, o, u).
SELECT author FROM tcount_tbl WHERE REGEXP_MATCHES(author,'^[AEIOU].*');
After execution of the above query, you will receive the following output.
+-----------------+
|     author      |
+-----------------+
|     Abdul S     |
|    Ajith kumar  |
+-----------------+
HSQLDB - Transactions
A Transaction is a sequential group of database manipulation operations, which is performed and considered as one single work unit. In other words, when all the operations are successfully executed, only then the entire transaction will be complete. If any operation within the transaction fails, then the entire transaction will fail.
Properties of Transactions
Basically, transaction supports 4 standard properties. They can be referred to as ACID properties.
Atomicity − All the operations in the transactions are executed successfully, otherwise the transaction gets aborted at the point of failure and the previous operations are rolled back to their previous position.
Consistency − The database properly changes states upon a successfully committed transaction.
Isolation − It enables the transaction to operate independently on and transparent to each other.
Durability − The result or effect of a committed transaction persists in case of a system failure.
Commit, Rollback, and Savepoint
These keywords are mainly used for HSQLDB transactions.
Commit− Always the successful transaction should be completed by executing the COMMIT command.
Rollback − If a failure occurs in the transaction, then the ROLLBACK command should be executed to return every table referenced in the transaction to its previous state.
Savepoint − Creates a point within the group of transactions in which to rollback.
Example
The following example explains the transactions concept along with commit, rollback, and Savepoint. Let us consider the table Customers with the columns id, name, age, address, and salary.
| Id | Name | Age | Address | Salary |
|---|---|---|---|---|
| 1 | Ramesh | 32 | Ahmedabad | 2000.00 |
| 2 | Karun | 25 | Delhi | 1500.00 |
| 3 | Kaushik | 23 | Kota | 2000.00 |
| 4 | Chaitanya | 25 | Mumbai | 6500.00 |
| 5 | Harish | 27 | Bhopal | 8500.00 |
| 6 | Kamesh | 22 | MP | 1500.00 |
| 7 | Murali | 24 | Indore | 10000.00 |
Use the following commands to create the customer table along the lines of the above data.
CREATE TABLE Customer (id INT NOT NULL, name VARCHAR(100) NOT NULL, age INT NOT
NULL, address VARCHAR(20), Salary INT, PRIMARY KEY (id));
Insert into Customer values (1, "Ramesh", 32, "Ahmedabad", 2000);
Insert into Customer values (2, "Karun", 25, "Delhi", 1500);
Insert into Customer values (3, "Kaushik", 23, "Kota", 2000);
Insert into Customer values (4, "Chaitanya", 25, "Mumbai", 6500);
Insert into Customer values (5, "Harish", 27, "Bhopal", 8500);
Insert into Customer values (6, "Kamesh", 22, "MP", 1500);
Insert into Customer values (7, "Murali", 24, "Indore", 10000);
Example for COMMIT
The following query deletes rows from the table having age = 25 and uses the COMMIT command to apply those changes in the database.
DELETE FROM CUSTOMERS WHERE AGE = 25;
COMMIT;
After execution of the above query, you will receive the following output.
2 rows effected
After successful execution of the above command, check the records of the customer table by executing the below given command.
Select * from Customer;
After execution of the above query, you will receive the following output.
+----+----------+-----+-----------+----------+
| ID |   NAME   | AGE |   ADDRESS |  SALARY  |
+----+----------+-----+-----------+----------+
| 1  |  Ramesh  |  32 | Ahmedabad |   2000   |
| 3  |  kaushik |  23 |   Kota    |   2000   |
| 5  |  Harish  |  27 |   Bhopal  |   8500   |
| 6  |  Kamesh  |  22 |    MP     |   4500   |
| 7  |  Murali  |  24 |   Indore  |   10000  |
+----+----------+-----+-----------+----------+
Example for Rollback
Let us consider the same Customer table as input.
| Id | Name | Age | Address | Salary |
|---|---|---|---|---|
| 1 | Ramesh | 32 | Ahmedabad | 2000.00 |
| 2 | Karun | 25 | Delhi | 1500.00 |
| 3 | Kaushik | 23 | Kota | 2000.00 |
| 4 | Chaitanya | 25 | Mumbai | 6500.00 |
| 5 | Harish | 27 | Bhopal | 8500.00 |
| 6 | Kamesh | 22 | MP | 1500.00 |
| 7 | Murali | 24 | Indore | 10000.00 |
Here is the example query that explains about Rollback functionality by deleting records from the table having age = 25 and then ROLLBACK the changes in the database.
DELETE FROM CUSTOMERS WHERE AGE = 25;
ROLLBACK;
After successful execution of the above two queries, you can view the record data in the Customer table using the following command.
Select * from Customer;
After execution of the above command, you will receive the following output.
+----+----------+-----+-----------+----------+
| ID |   NAME   | AGE |   ADDRESS |  SALARY  |
+----+----------+-----+-----------+----------+
|  1 |  Ramesh  |  32 | Ahmedabad |   2000   |
|  2 |  Karun   |  25 |   Delhi   |   1500   |
|  3 |  Kaushik |  23 |   Kota    |   2000   |
|  4 | Chaitanya|  25 |   Mumbai  |   6500   |
|  5 |  Harish  |  27 |   Bhopal  |   8500   |
|  6 |  Kamesh  |  22 |     MP    |   4500   |
|  7 |  Murali  |  24 |    Indore |   10000  |
+----+----------+-----+-----------+----------+
The delete query deletes the record data of customers whose age = 25. The Rollback command, rolls back those changes on the Customer table.
Example for Savepoint
Savepoint is a point in a transaction when you can roll the transaction back to a certain point without rolling back the entire transaction.
Let us consider the same Customer table as input.
| Id | Name | Age | Address | Salary |
|---|---|---|---|---|
| 1 | Ramesh | 32 | Ahmedabad | 2000.00 |
| 2 | Karun | 25 | Delhi | 1500.00 |
| 3 | Kaushik | 23 | Kota | 2000.00 |
| 4 | Chaitanya | 25 | Mumbai | 6500.00 |
| 5 | Harish | 27 | Bhopal | 8500.00 |
| 6 | Kamesh | 22 | MP | 1500.00 |
| 7 | Murali | 24 | Indore | 10000.00 |
Let us consider in this example, you plan to delete the three different records from the Customers table. You want to create a Savepoint before each delete, so that you can roll back to any Savepoint at any time to return the appropriate data to its original state.
Here is the series of operations.
SAVEPOINT SP1;
DELETE FROM CUSTOMERS WHERE ID = 1;
SAVEPOINT SP2;
DELETE FROM CUSTOMERS WHERE ID = 2;
SAVEPOINT SP3;
DELETE FROM CUSTOMERS WHERE ID = 3;
Now, you have created three Savepoint and deleted three records. In this situation, if you want to roll back the records having Id 2 and 3 then use the following Rollback command.
ROLLBACK TO SP2;
Notice that only the first deletion took place since you rolled back to SP2. Use the following query to display all the records of the customers.
Select * from Customer;
After execution of the above query, you will receive the following output.
+----+----------+-----+-----------+----------+
| ID |   NAME   | AGE |   ADDRESS |  SALARY  |
+----+----------+-----+-----------+----------+
|  2 |   Karun  |  25 |  Delhi    |   1500   |
|  3 |  Kaushik |  23 |  Kota     |   2000   |
|  4 | Chaitanya|  25 |  Mumbai   |   6500   |
|  5 |  Harish  |  27 |  Bhopal   |   8500   |
|  6 |  Kamesh  |  22 |  MP       |   4500   |
|  7 |  Murali  |  24 |  Indore   |  10000   |
+----+----------+-----+-----------+----------+
Release Savepoint
We can release the Savepoint using the RELEASE command. Following is the generic syntax.
RELEASE SAVEPOINT SAVEPOINT_NAME;
HsqlDB - Alter Command
Whenever there is a need to change the name of a table or a field, change the order of fields, change the datatype of fields, or any table structure, you can achieve the same using the ALTER command.
Example
Let us consider an example that explains the ALTER command using different scenarios.
Use the following query to create a table named testalter_tbl with the fields id and name.
//below given query is to create a table testalter_tbl table.
create table testalter_tbl(id INT, name VARCHAR(10));

//below given query is to verify the table structure testalter_tbl.
Select * From INFORMATION_SCHEMA.SYSTEM_COLUMNS as C Where C.TABLE_SCHEM =
   'PUBLIC' AND C.TABLE_NAME = 'TESTALTER_TBL';
After execution of the above query, you will receive the following output.
+------------+-------------+------------+-----------+-----------+------------+
|TABLE_SCHEM |  TABLE_NAME | COLUMN_NAME| DATA_TYPE | TYPE_NAME | COLUMN_SIZE|
+------------+-------------+------------+-----------+-----------+------------+
|   PUBLIC   |TESTALTER_TBL|     ID     |     4     |   INTEGER |     4      |
|   PUBLIC   |TESTALTER_TBL|    NAME    |     12    |   VARCHAR |     10     |
+------------+-------------+------------+-----------+-----------+------------+
Dropping or Adding a Column
Whenever you want to DROP an existing column from the HSQLDB table, then you can use the DROP clause along with the ALTER command.
Use the following query to drop a column (name) from the table testalter_tbl.
ALTER TABLE testalter_tbl DROP name;
After successful execution of the above query, you can get to know if the name field is dropped from the table testalter_tbl using the following command.
Select * From INFORMATION_SCHEMA.SYSTEM_COLUMNS as C Where C.TABLE_SCHEM =
   'PUBLIC' AND C.TABLE_NAME = 'TESTALTER_TBL';
After execution of the above command, you will receive the following output.
+------------+-------------+------------+-----------+-----------+------------+
|TABLE_SCHEM |  TABLE_NAME | COLUMN_NAME| DATA_TYPE | TYPE_NAME | COLUMN_SIZE|
+------------+-------------+------------+-----------+-----------+------------+
|  PUBLIC    |TESTALTER_TBL|      ID    |      4    |   INTEGER |     4      |
+------------+-------------+------------+-----------+-----------+------------+
Whenever you want to add any column into the HSQLDB table, you can use the ADD clause along with the ALTER command.
Use the following query to add a column named NAME to the table testalter_tbl.
ALTER TABLE testalter_tbl ADD name VARCHAR(10);
After successful execution of the above query, you can get to know if the name field is added to the table testalter_tbl using the following command.
Select * From INFORMATION_SCHEMA.SYSTEM_COLUMNS as C Where C.TABLE_SCHEM =
   'PUBLIC' AND C.TABLE_NAME = 'TESTALTER_TBL';
After execution of the above query, you will receive the following output.
+------------+-------------+------------+-----------+-----------+------------+
|TABLE_SCHEM |  TABLE_NAME | COLUMN_NAME| DATA_TYPE | TYPE_NAME | COLUMN_SIZE|
+------------+-------------+------------+-----------+-----------+------------+
|  PUBLIC    |TESTALTER_TBL|      ID    |     4     |   INTEGER |     4      |
|  PUBLIC    |TESTALTER_TBL|     NAME   |     12    |   VARCHAR |     10     |
+------------+-------------+------------+-----------+-----------+------------+
Changing a Column Definition or Name
Whenever there is a requirement of changing the column definition, use the MODIFY or CHANGE clause along with the ALTER command.
Let us consider an example that will explain how to use the CHANGE clause. The table testalter_tbl contains two fields - id and name - having datatypes int and varchar respectively. Now let us try to change the datatype of id from INT to BIGINT. Following is the query to make the change.
ALTER TABLE testalter_tbl CHANGE id id BIGINT;
After successful execution of the above query, the table structure can be verified using the following command.
Select * From INFORMATION_SCHEMA.SYSTEM_COLUMNS as C Where C.TABLE_SCHEM =
   'PUBLIC' AND C.TABLE_NAME = 'TESTALTER_TBL';
After execution of the above command, you will receive the following output.
+------------+-------------+------------+-----------+-----------+------------+
|TABLE_SCHEM |  TABLE_NAME | COLUMN_NAME| DATA_TYPE | TYPE_NAME | COLUMN_SIZE|
+------------+-------------+------------+-----------+-----------+------------+
|  PUBLIC    |TESTALTER_TBL|      ID    |     4     |   BIGINT  |     4      |
|  PUBLIC    |TESTALTER_TBL|     NAME   |     12    |   VARCHAR |     10     |
+------------+-------------+------------+-----------+-----------+------------+
Now let us try to increase the size of a column NAME from 10 to 20 in the testalter_tbl table. Following is the query to achieve this using the MODIFY clause along with the ALTER command.
ALTER TABLE testalter_tbl MODIFY name VARCHAR(20);
After successful execution of the above query, the table structure can be verified using the following command.
Select * From INFORMATION_SCHEMA.SYSTEM_COLUMNS as C Where C.TABLE_SCHEM =
   'PUBLIC' AND C.TABLE_NAME = 'TESTALTER_TBL';
After execution of the above command, you will receive the following output.
+------------+-------------+------------+-----------+-----------+------------+
|TABLE_SCHEM |  TABLE_NAME | COLUMN_NAME| DATA_TYPE | TYPE_NAME | COLUMN_SIZE|
+------------+-------------+------------+-----------+-----------+------------+
|  PUBLIC    |TESTALTER_TBL|    ID      |      4    |    BIGINT |     4      |
|  PUBLIC    |TESTALTER_TBL|    NAME    |     12    |   VARCHAR |    20      |
+------------+-------------+------------+-----------+-----------+------------+
HSQLDB - Indexes
A database index is a data structure that improves the speed of operations in a table. Indexes can be created using one or more columns, providing the basis for both rapid random lookups and efficient ordering of access to the records.
While creating an index, it should be considered what are the columns which will be used to make SQL queries, and create one or more indexes on those columns.
Practically, indexes are also type of tables, which keep the primary key or the index field and a pointer to each record into the actual table.
The users cannot see the indexes. They are just used to speed up queries and will be used by the Database Search Engine to quickly locate records.
The INSERT and UPDATE statements take more time on tables having indexes, whereas SELECT statements run faster on those tables. The reason being while inserting or updating, the database needs to insert or update the index values as well.
Simple & Unique Index
You can create a unique index on a table. A unique index means that two rows cannot have the same index value. Following is the syntax to create an Index on a table.
CREATE UNIQUE INDEX index_name
ON table_name (column1, column2,...);
You can use one or more columns to create an index. For example, create an index on tutorials_tbl using tutorial_author.
CREATE UNIQUE INDEX AUTHOR_INDEX
ON tutorials_tbl (tutorial_author)
You can create a simple index on a table. Just omit the UNIQUE keyword from the query to create a simple index. A simple index allows duplicate values in a table.
If you want to index the values in a column in a descending order, you can add the reserved word DESC after the column name.
CREATE UNIQUE INDEX AUTHOR_INDEX
ON tutorials_tbl (tutorial_author DESC)
ALTER Command to Add & Drop INDEX
There are four types of statements for adding indexes to a table −
ALTER TABLE tbl_name ADD PRIMARY KEY (column_list) − This statement adds a PRIMARY KEY, which means that indexed values must be unique and cannot be NULL.
ALTER TABLE tbl_name ADD UNIQUE index_name (column_list) − This statement creates an index for which the values must be unique (with the exception of NULL values, which may appear multiple times).
ALTER TABLE tbl_name ADD INDEX index_name (column_list) − This adds an ordinary index in which any value may appear more than once.
ALTER TABLE tbl_name ADD FULLTEXT index_name (column_list) − This creates a special FULLTEXT index that is used for text-searching purposes.
Following is the query to add index in an existing table.
ALTER TABLE testalter_tbl ADD INDEX (c);
You can drop any INDEX by using the DROP clause along with the ALTER command. Following is the query to drop the above-created index.
ALTER TABLE testalter_tbl DROP INDEX (c);
Displaying INDEX Information
You can use the SHOW INDEX command to list out all the indexes associated with a table. Vertical-format output (specified by \G) often is useful with this statement, to avoid long line wraparound.
Following is the generic syntax to display the index information about a table.
SHOW INDEX FROM table_name\G
