- Hibernate - Home
- ORM - Overview
- Hibernate - Overview
- Hibernate - Architecture
- Hibernate - Environment
- Hibernate - Configuration
- Hibernate - Sessions
- Hibernate - Persistent Class
- Hibernate - Mapping Files
- Hibernate - Mapping Types
- Hibernate - Examples
- Hibernate - O/R Mappings
- Hibernate - Cascade Types
- Hibernate - Annotations
- Hibernate - Query Language
- Hibernate - Criteria Queries
- Hibernate - Native SQL
- Hibernate - Caching
- Hibernate - Entity Lifecycle
- Hibernate - Batch Processing
- Hibernate - Interceptors
- Hibernate - ID Generator
- Hibernate - Saving Image
- Hibernate - log4j Integration
- Hibernate - Spring Integration
- Hibernate - Struts 2 Integration
- Hibernate - Web Application
- Mapping Table Examples
- Hibernate - Table Per Hiearchy
- Hibernate - Table Per Concrete Class
- Hibernate - Table Per Subclass
- Hibernate - Questions and Answers
- Hibernate - Quick Guide
- Hibernate - Useful Resources
- Hibernate - Discussion
Hibernate - Quick Guide
Hibernate - ORM Overview
What is JDBC?
JDBC stands for Java Database Connectivity. It provides a set of Java API for accessing the relational databases from Java program. These Java APIs enables Java programs to execute SQL statements and interact with any SQL compliant database.
JDBC provides a flexible architecture to write a database independent application that can run on different platforms and interact with different DBMS without any modification.
Pros and Cons of JDBC
| Pros of JDBC | Cons of JDBC |
|---|---|
|
Clean and simple SQL processing Good performance with large data Very good for small applications Simple syntax so easy to learn |
Complex if it is used in large projects Large programming overhead No encapsulation Hard to implement MVC concept Query is DBMS specific |
Why Object Relational Mapping (ORM)?
When we work with an object-oriented system, there is a mismatch between the object model and the relational database. RDBMSs represent data in a tabular format whereas object-oriented languages, such as Java or C# represent it as an interconnected graph of objects.
Consider the following Java Class with proper constructors and associated public function −
public class Employee {
   private int id;
   private String first_name;
   private String last_name;
   private int salary;

   public Employee() {}
   public Employee(String fname, String lname, int salary) {
      this.first_name = fname;
      this.last_name = lname;
      this.salary = salary;
   }

   public int getId() {
      return id;
   }

   public String getFirstName() {
      return first_name;
   }

   public String getLastName() {
      return last_name;
   }

   public int getSalary() {
      return salary;
   }
}
Consider the above objects are to be stored and retrieved into the following RDBMS table −
create table EMPLOYEE (
   id INT NOT NULL auto_increment,
   first_name VARCHAR(20) default NULL,
   last_name  VARCHAR(20) default NULL,
   salary     INT  default NULL,
   PRIMARY KEY (id)
);
First problem, what if we need to modify the design of our database after having developed a few pages or our application? Second, loading and storing objects in a relational database exposes us to the following five mismatch problems −
| Sr.No. | Mismatch & Description |
|---|---|
| 1 |
Granularity Sometimes you will have an object model, which has more classes than the number of corresponding tables in the database. |
| 2 |
Inheritance RDBMSs do not define anything similar to Inheritance, which is a natural paradigm in object-oriented programming languages. |
| 3 |
Identity An RDBMS defines exactly one notion of 'sameness': the primary key. Java, however, defines both object identity (a==b) and object equality (a.equals(b)). |
| 4 |
Associations Object-oriented languages represent associations using object references whereas an RDBMS represents an association as a foreign key column. |
| 5 |
Navigation The ways you access objects in Java and in RDBMS are fundamentally different. |
The Object-Relational Mapping (ORM) is the solution to handle all the above impedance mismatches.
What is ORM?
ORM stands for Object-Relational Mapping (ORM) is a programming technique for converting data between relational databases and object oriented programming languages such as Java, C#, etc.
An ORM system has the following advantages over plain JDBC −
| Sr.No. | Advantages |
|---|---|
| 1 | Lets business code access objects rather than DB tables. |
| 2 | Hides details of SQL queries from OO logic. |
| 3 | Based on JDBC 'under the hood.' |
| 4 | No need to deal with the database implementation. |
| 5 | Entities based on business concepts rather than database structure. |
| 6 | Transaction management and automatic key generation. |
| 7 | Fast development of application. |
An ORM solution consists of the following four entities −
| Sr.No. | Solutions |
|---|---|
| 1 | An API to perform basic CRUD operations on objects of persistent classes. |
| 2 | A language or API to specify queries that refer to classes and properties of classes. |
| 3 | A configurable facility for specifying mapping metadata. |
| 4 | A technique to interact with transactional objects to perform dirty checking, lazy association fetching, and other optimization functions. |
Java ORM Frameworks
There are several persistent frameworks and ORM options in Java. A persistent framework is an ORM service that stores and retrieves objects into a relational database.
- Enterprise JavaBeans Entity Beans
- Java Data Objects
- Castor
- TopLink
- Spring DAO
- Hibernate
- And many more
Hibernate - Overview
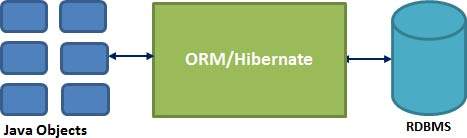
Hibernate is an Object-Relational Mapping (ORM) solution for JAVA. It is an open source persistent framework created by Gavin King in 2001. It is a powerful, high performance Object-Relational Persistence and Query service for any Java Application.
Hibernate maps Java classes to database tables and from Java data types to SQL data types and relieves the developer from 95% of common data persistence related programming tasks.
Hibernate sits between traditional Java objects and database server to handle all the works in persisting those objects based on the appropriate O/R mechanisms and patterns.
Hibernate Advantages
Hibernate takes care of mapping Java classes to database tables using XML files and without writing any line of code.
Provides simple APIs for storing and retrieving Java objects directly to and from the database.
If there is change in the database or in any table, then you need to change the XML file properties only.
Abstracts away the unfamiliar SQL types and provides a way to work around familiar Java Objects.
Hibernate does not require an application server to operate.
Manipulates Complex associations of objects of your database.
Minimizes database access with smart fetching strategies.
Provides simple querying of data.
Supported Databases
Hibernate supports almost all the major RDBMS. Following is a list of few of the database engines supported by Hibernate −
- HSQL Database Engine
- DB2/NT
- MySQL
- PostgreSQL
- FrontBase
- Oracle
- Microsoft SQL Server Database
- Sybase SQL Server
- Informix Dynamic Server
Supported Technologies
Hibernate supports a variety of other technologies, including −
- XDoclet Spring
- J2EE
- Eclipse plug-ins
- Maven
Hibernate - Architecture
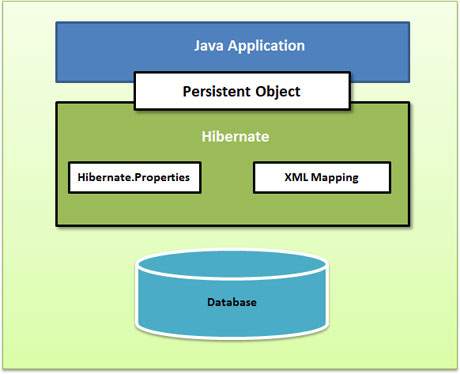
Hibernate has a layered architecture which helps the user to operate without having to know the underlying APIs. Hibernate makes use of the database and configuration data to provide persistence services (and persistent objects) to the application.
Following is a very high level view of the Hibernate Application Architecture.
Following is a detailed view of the Hibernate Application Architecture with its important core classes.
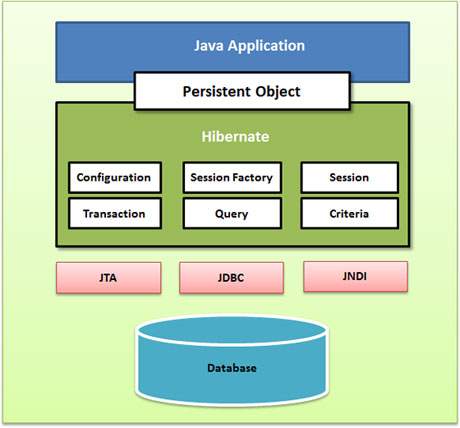
Hibernate uses various existing Java APIs, like JDBC, Java Transaction API(JTA), and Java Naming and Directory Interface (JNDI). JDBC provides a rudimentary level of abstraction of functionality common to relational databases, allowing almost any database with a JDBC driver to be supported by Hibernate. JNDI and JTA allow Hibernate to be integrated with J2EE application servers.
Following section gives brief description of each of the class objects involved in Hibernate Application Architecture.
Configuration Object
The Configuration object is the first Hibernate object you create in any Hibernate application. It is usually created only once during application initialization. It represents a configuration or properties file required by the Hibernate.
The Configuration object provides two keys components −
Database Connection − This is handled through one or more configuration files supported by Hibernate. These files are hibernate.properties and hibernate.cfg.xml.
Class Mapping Setup − This component creates the connection between the Java classes and database tables.
SessionFactory Object
SessionFactory object configures Hibernate for the application using the supplied configuration file and allows for a Session object to be instantiated. The SessionFactory is a thread safe object and used by all the threads of an application.
The SessionFactory is a heavyweight object; it is usually created during application start up and kept for later use. You would need one SessionFactory object per database using a separate configuration file. So, if you are using multiple databases, then you would have to create multiple SessionFactory objects.
Session Object
A Session is used to get a physical connection with a database. The Session object is lightweight and designed to be instantiated each time an interaction is needed with the database. Persistent objects are saved and retrieved through a Session object.
The session objects should not be kept open for a long time because they are not usually thread safe and they should be created and destroyed them as needed.
Transaction Object
A Transaction represents a unit of work with the database and most of the RDBMS supports transaction functionality. Transactions in Hibernate are handled by an underlying transaction manager and transaction (from JDBC or JTA).
This is an optional object and Hibernate applications may choose not to use this interface, instead managing transactions in their own application code.
StandardServiceRegistry ssr = new StandardServiceRegistryBuilder().configure("hibernate.cfg.xml").build();
Metadata meta = new MetadataSources(ssr).getMetadataBuilder().build();

// Create the SessionFactory Instance
SessionFactory factory = meta.getSessionFactoryBuilder().build();

// Create the session
Session session = factory.openSession();

// Create the transaction
Transaction t = session.beginTransaction();
Query Object
Query objects use SQL or Hibernate Query Language (HQL) string to retrieve data from the database and create objects. A Query instance is used to bind query parameters, limit the number of results returned by the query, and finally to execute the query.
Criteria Object
Criteria objects are used to create and execute object oriented criteria queries to retrieve objects.
Hibernate - Environment Setup
This chapter explains how to install Hibernate and other associated packages to prepare an environment for the Hibernate applications. We will work with MySQL database to experiment with Hibernate examples, so make sure you already have a setup for MySQL database. For more detail on MySQL, you can check our MySQL Tutorial.
Downloading Hibernate
It is assumed that you already have the latest version of Java installed on your system. Following are the simple steps to download and install Hibernate on your system −
Make a choice whether you want to install Hibernate on Windows, or Unix and then proceed to the next step to download .zip file for windows and .tz file for Unix.
Download the latest version of Hibernate from http://www.hibernate.org/downloads.
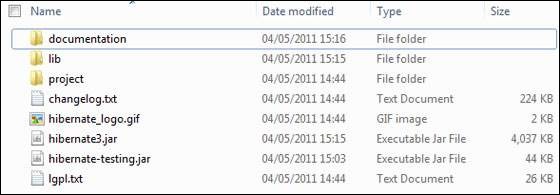
At the time of writing this tutorial, I downloaded hibernate-distribution 5.3.1.Final from mvnrepository and when you unzip the downloaded file, it will give you directory structure as shown in the following image
Installing Hibernate
Once you downloaded and unzipped the latest version of the Hibernate Installation file, you need to perform following two simple steps. Make sure you are setting your CLASSPATH variable properly otherwise you will face problem while compiling your application.
Now, copy all the library files from /lib into your CLASSPATH, and change your classpath variable to include all the JARs −
Finally, copy hibernate3.jar file into your CLASSPATH. This file lies in the root directory of the installation and is the primary JAR that Hibernate needs to do its work.
Hibernate Prerequisites
Following is the list of packages/libraries required by Hibernate and you should install them before starting with Hibernate. To install these packages, you will have to copy library files from /lib into your CLASSPATH, and change your CLASSPATH variable accordingly.
| Sr.No. | Packages/Libraries |
|---|---|
| 1 | MySQL Connector/J MySQL Driver https://dev.mysql.com/downloads/connector/j/ |
| 2 | Java EE Java EE API J2EE API |
Hibernate Nice to have Prerequisites
Following is the list of optional packages/libraries required by Hibernate and you can install them to starting with Hibernate. To install these packages, you will have to copy library files from /lib into your CLASSPATH, and change your CLASSPATH variable accordingly.
| Sr.No. | Packages/Libraries |
|---|---|
| 1 | dom4j XML parsing www.dom4j.org/ |
| 2 | Xalan XSLT Processor https://xml.apache.org/xalan-j/ |
| 3 | Xerces The Xerces Java Parser https://xml.apache.org/xerces-j/ |
| 4 | cglib Appropriate changes to Java classes at runtime http://cglib.sourceforge.net/ |
| 5 | log4j Logging Faremwork https://logging.apache.org/log4j |
| 6 | Commons Logging, Email etc. https://jakarta.apache.org/commons |
| 7 | SLF4J Logging Facade for Java https://www.slf4j.org |
Hibernate - Configuration
Hibernate requires to know in advance where to find the mapping information that defines how your Java classes relate to the database tables. Hibernate also requires a set of configuration settings related to database and other related parameters. All such information is usually supplied as a standard Java properties file called hibernate.properties, or as an XML file named hibernate.cfg.xml.
I will consider XML formatted file hibernate.cfg.xml to specify required Hibernate properties in my examples. Most of the properties take their default values and it is not required to specify them in the property file unless it is really required. This file is kept in the root directory of your application's classpath.
Hibernate Properties
Following is the list of important properties, you will be required to configure for a databases in a standalone situation −
| Sr.No. | Properties & Description |
|---|---|
| 1 |
hibernate.dialect This property makes Hibernate generate the appropriate SQL for the chosen database. |
| 2 | hibernate.connection.driver_class The JDBC driver class. |
| 3 | hibernate.connection.url The JDBC URL to the database instance. |
| 4 | hibernate.connection.username The database username. |
| 5 | hibernate.connection.password The database password. |
| 6 | hibernate.connection.pool_size Limits the number of connections waiting in the Hibernate database connection pool. |
| 7 | hibernate.connection.autocommit Allows autocommit mode to be used for the JDBC connection. |
If you are using a database along with an application server and JNDI, then you would have to configure the following properties −
| Sr.No. | Properties & Description |
|---|---|
| 1 | hibernate.connection.datasource The JNDI name defined in the application server context, which you are using for the application. |
| 2 | hibernate.jndi.class The InitialContext class for JNDI. |
| 3 | hibernate.jndi.<JNDIpropertyname> Passes any JNDI property you like to the JNDI InitialContext. |
| 4 | hibernate.jndi.url Provides the URL for JNDI. |
| 5 | hibernate.connection.username The database username. |
| 6 | hibernate.connection.password The database password. |
Hibernate with MySQL Database
MySQL is one of the most popular open-source database systems available today. Let us create hibernate.cfg.xml configuration file and place it in the root of your application's classpath. You will have to make sure that you have testdb database available in your MySQL database and you have a user test available to access the database.
The XML configuration file must conform to the Hibernate 3 Configuration DTD, which is available at http://www.hibernate.org/dtd/hibernate-configuration-3.0.dtd.
<?xml version='1.0' encoding='UTF-8'?>
<!DOCTYPE hibernate-configuration PUBLIC
   "-//Hibernate/Hibernate Configuration DTD 5.3//EN"
   "http://hibernate.org/dtd/hibernate-configuration-3.0.dtd">

<hibernate-configuration>
   <session-factory>
      <property name="hbm2ddl.auto">update</property>
      <property name="dialect">org.hibernate.dialect.MySQL8Dialect</property>
      <property name="connection.url">jdbc:mysql://localhost/TUTORIALSPOINT</property>
      <property name="connection.username">root</property>
      <property name="connection.password">guest123</property>
      <property name="connection.driver_class">com.mysql.cj.jdbc.Driver</property>
      <mapping resource="employee.hbm.xml"/>
   </session-factory>
</hibernate-configuration>
The above configuration file includes <mapping> tags, which are related to hibernatemapping file and we will see in next chapter what exactly a hibernate mapping file is and how and why do we use it?
hbm2ddl.auto Property
The hbm2ddl.auto property in Hibernate defines how your database schema is handled. Possible values are:
create − If the value is 'create', Hibernate creates a new table in the database when the SessionFactory object is created. In case a table exists in the database with the same name, it deletes the table along with data and creates a new table.
update − If the value is 'update', then Hibernate first validates whether the table is present in the database. If present, it alters that table as per the changes. If not, it creates a new one.
validate − If the value is 'validate', then Hibernate only verifies whether the table is present. If the table does not exist then it throws an exception.
create-drop − If the value is 'create-drop', then Hibernate creates a new table when SessionFactory is created, performs required operations, and deletes the table when SessionFactory is destroyed. This value is used for testing hibernate code.
none − It does not make any changes to the schema.
Hibernate Dialect
A database dialect is a configuration option that allows software to translate general SQL statements into vendor-specific DDL and DML. Different database products, such as PostgreSQL, MySQL, Oracle, and SQL Server, have their own variant of SQL, which are called SQL dialects.
Following is the list of various important databases dialect property type −
| Sr.No. | Database & Dialect Property |
|---|---|
| 1 | Cach 2007.1 org.hibernate.dialect.Cache71Dialect |
| 2 | DB2 org.hibernate.dialect.DB2Dialect |
| 3 | DB2/390 org.hibernate.dialect.DB2390Dialect |
| 4 | DB2/400 org.hibernate.dialect.DB2400Dialect |
| 5 | Cloudscape 10 - aka Derby. org.hibernate.dialect.DerbyDialect |
| 6 | Firebird org.hibernate.dialect.FirebirdDialect |
| 7 | FrontBase org.hibernate.dialect.FrontBaseDialect |
| 8 | H2 org.hibernate.dialect.H2Dialect |
| 9 | HSQLDB(HyperSQL) org.hibernate.dialect.HSQLDialect |
| 10 | Informix org.hibernate.dialect.InformixDialect |
| 11 | Ingres 9.2 org.hibernate.dialect.IngresDialect |
| 12 | Ingres 9.3 and later org.hibernate.dialect.Ingres9Dialect |
| 13 | Ingres 10 and later org.hibernate.dialect.Ingres10Dialect |
| 14 | Interbase org.hibernate.dialect.InterbaseDialect |
| 15 | Microsoft SQL Server 2000 org.hibernate.dialect.SQLServerDialect |
| 16 | Microsoft SQL Server 2005 org.hibernate.dialect.SQLServerDialect |
| 17 | Microsoft SQL Server 2008 org.hibernate.dialect.SQLServer2008Dialect |
| 18 | MySQL (prior to 5.x) org.hibernate.dialect.MySQLDialect |
| 19 | MySQL 5.x org.hibernate.dialect.MySQL5Dialect |
| 20 | Oracle 8i org.hibernate.dialect.Oracle8iDialect |
| 21 | Oracle 9i org.hibernate.dialect.Oracle9iDialect |
| 22 | Oracle 10g org.hibernate.dialect.Oracle10gDialect |
| 23 | Oracle 11g org.hibernate.dialect.Oracle10gDialect |
| 24 | Pointbase org.hibernate.dialect.PointbaseDialect |
| 25 | PostgreSQL org.hibernate.dialect.PostgreSQLDialect |
| 26 | PostgreSQL Plus org.hibernate.dialect.PostgrePlusDialect |
| 27 | Progress org.hibernate.dialect.ProgressDialect |
| 28 | Unisys 2200 Relational Database (RDMS) org.hibernate.dialect.RDMSOS2200Dialect |
| 29 | SAP DB org.hibernate.dialect.SAPDBDialect |
| 30 | Sybase 11.9.2 org.hibernate.dialect.Sybase11Dialect |
| 31 | Sybase Anywhere org.hibernate.dialect.SybaseAnywhereDialect |
| 32 | Sybase Adaptive Server Enterprise (ASE) 15 org.hibernate.dialect.SybaseASE15Dialect |
| 33 | Teradata org.hibernate.dialect.TeradataDialect |
| 34 | TimesTen 5.1 org.hibernate.dialect.TimesTenDialect |
Hibernate - Sessions
A Session is used to get a physical connection with a database. The Session object is lightweight and designed to be instantiated each time an interaction is needed with the database. Persistent objects are saved and retrieved through a Session object.
The session objects should not be kept open for a long time because they are not usually thread safe and they should be created and destroyed them as needed. The main function of the Session is to offer, create, read, and delete operations for instances of mapped entity classes.
Instances may exist in one of the following three states at a given point in time −
transient − A new instance of a persistent class, which is not associated with a Session and has no representation in the database and no identifier value is considered transient by Hibernate.
persistent − You can make a transient instance persistent by associating it with a Session. A persistent instance has a representation in the database, an identifier value and is associated with a Session.
detached − Once we close the Hibernate Session, the persistent instance will become a detached instance.
A Session instance is serializable if its persistent classes are serializable. A typical transaction should use the following idiom −
Session session = factory.openSession();
Transaction tx = null;

try {
   tx = session.beginTransaction();
   // do some work
   ...
   tx.commit();
}

catch (Exception e) {
   if (tx!=null) tx.rollback();
   e.printStackTrace();
} finally {
   session.close();
}
If the Session throws an exception, the transaction must be rolled back and the session must be discarded.
Session Interface Methods
There are number of methods provided by the Session interface, but I'm going to list down a few important methods only, which we will use in this tutorial. You can check Hibernate documentation for a complete list of methods associated with Session and SessionFactory.
| Sr.No. | Session Methods & Description |
|---|---|
| 1 |
Transaction beginTransaction() Begin a unit of work and return the associated Transaction object. |
| 2 |
void cancelQuery() Cancel the execution of the current query. |
| 3 |
void clear() Completely clear the session. |
| 4 |
Connection close() End the session by releasing the JDBC connection and cleaning up. |
| 5 |
Criteria createCriteria(Class persistentClass) Create a new Criteria instance, for the given entity class, or a superclass of an entity class. |
| 6 |
Criteria createCriteria(String entityName) Create a new Criteria instance, for the given entity name. |
| 7 |
Serializable getIdentifier(Object object) Return the identifier value of the given entity as associated with this session. |
| 8 |
Query createFilter(Object collection, String queryString) Create a new instance of Query for the given collection and filter string. |
| 9 |
Query createQuery(String queryString) Create a new instance of Query for the given HQL query string. |
| 10 |
SQLQuery createSQLQuery(String queryString) Create a new instance of SQLQuery for the given SQL query string. |
| 11 |
void delete(Object object) Remove a persistent instance from the datastore. |
| 12 |
void delete(String entityName, Object object) Remove a persistent instance from the datastore. |
| 13 |
Session get(String entityName, Serializable id) Return the persistent instance of the given named entity with the given identifier, or null if there is no such persistent instance. |
| 14 |
SessionFactory getSessionFactory() Get the session factory which created this session. |
| 15 |
void refresh(Object object) Re-read the state of the given instance from the underlying database. |
| 16 |
Transaction getTransaction() Get the Transaction instance associated with this session. |
| 17 |
boolean isConnected() Check if the session is currently connected. |
| 18 |
boolean isDirty() Does this session contain any changes which must be synchronized with the database? |
| 19 |
boolean isOpen() Check if the session is still open. |
| 20 |
Serializable save(Object object) Persist the given transient instance, first assigning a generated identifier. |
| 21 |
void saveOrUpdate(Object object) Either save(Object) or update(Object) the given instance. |
| 22 |
void update(Object object) Update the persistent instance with the identifier of the given detached instance. |
| 23 |
void update(String entityName, Object object) Update the persistent instance with the identifier of the given detached instance. |
Hibernate - Persistent Class
The entire concept of Hibernate is to take the values from Java class attributes and persist them to a database table. A mapping document helps Hibernate in determining how to pull the values from the classes and map them with table and associated fields.
Java classes whose objects or instances will be stored in database tables are called persistent classes in Hibernate. Hibernate works best if these classes follow some simple rules, also known as the Plain Old Java Object (POJO) programming model.
There are following main rules of persistent classes, however, none of these rules are hard requirements −
All Java classes that will be persisted need a default constructor.
All classes should contain an ID in order to allow easy identification of your objects within Hibernate and the database. This property maps to the primary key column of a database table.
All attributes that will be persisted should be declared private and have getXXX and setXXX methods defined in the JavaBean style.
A central feature of Hibernate, proxies, depends upon the persistent class being either non-final, or the implementation of an interface that declares all public methods.
All classes that do not extend or implement some specialized classes and interfaces required by the EJB framework.
The POJO name is used to emphasize that a given object is an ordinary Java Object, not a special object, and in particular not an Enterprise JavaBean.
Simple POJO Example
Based on the few rules mentioned above, we can define a POJO class as follows −
public class Employee {
   private int id;
   private String firstName;
   private String lastName;
   private int salary;

   public Employee() {}
   public Employee(String fname, String lname, int salary) {
      this.firstName = fname;
      this.lastName = lname;
      this.salary = salary;
   }

   public int getId() {
      return id;
   }

   public void setId( int id ) {
      this.id = id;
   }

   public String getFirstName() {
      return firstName;
   }

   public void setFirstName( String first_name ) {
      this.firstName = first_name;
   }

   public String getLastName() {
      return lastName;
   }

   public void setLastName( String last_name ) {
      this.lastName = last_name;
   }

   public int getSalary() {
      return salary;
   }

   public void setSalary( int salary ) {
      this.salary = salary;
   }
}
Hibernate - Mapping Files
An Object/relational mappings are usually defined in an XML document. This mapping file instructs Hibernate how to map the defined class or classes to the database tables?
Though many Hibernate users choose to write the XML by hand, but a number of tools exist to generate the mapping document. These include XDoclet, Middlegen and AndroMDA for the advanced Hibernate users.
Let us consider our previously defined POJO class whose objects will persist in the table defined in next section.
public class Employee {
   private int id;
   private String firstName;
   private String lastName;
   private int salary;

   public Employee() {}

   public Employee(String fname, String lname, int salary) {
      this.firstName = fname;
      this.lastName = lname;
      this.salary = salary;
   }

   public int getId() {
      return id;
   }

   public void setId( int id ) {
      this.id = id;
   }

   public String getFirstName() {
      return firstName;
   }

   public void setFirstName( String first_name ) {
      this.firstName = first_name;
   }

   public String getLastName() {
      return lastName;
   }

   public void setLastName( String last_name ) {
      this.lastName = last_name;
   }

   public int getSalary() {
      return salary;
   }

   public void setSalary( int salary ) {
      this.salary = salary;
   }
}
There would be one table corresponding to each object you are willing to provide persistence. Consider above objects need to be stored and retrieved into the following RDBMS table −
create table EMPLOYEE (
   id INT NOT NULL auto_increment,
   first_name VARCHAR(20) default NULL,
   last_name  VARCHAR(20) default NULL,
   salary     INT  default NULL,
   PRIMARY KEY (id)
);
Based on the two above entities, we can define following mapping file, which instructs Hibernate how to map the defined class or classes to the database tables.
<?xml version = "1.0" encoding = "utf-8"?>
<!DOCTYPE hibernate-mapping PUBLIC
"-//Hibernate/Hibernate Mapping DTD//EN"
"http://www.hibernate.org/dtd/hibernate-mapping-3.0.dtd">

<hibernate-mapping>
   <class name = "Employee" table = "EMPLOYEE">

      <meta attribute = "class-description">
         This class contains the employee detail.
      </meta>

      <id name = "id" type = "int" column = "id">
         <generator class="native"/>
      </id>

      <property name = "firstName" column = "first_name" type = "string"/>
      <property name = "lastName" column = "last_name" type = "string"/>
      <property name = "salary" column = "salary" type = "int"/>

   </class>
</hibernate-mapping>
You should save the mapping document in a file with the format <classname>.hbm.xml. We saved our mapping document in the file Employee.hbm.xml.
Let us see understand a little detail about the mapping elements used in the mapping file −
The mapping document is an XML document having <hibernate-mapping> as the root element, which contains all the <class> elements.
The <class> elements are used to define specific mappings from a Java classes to the database tables. The Java class name is specified using the name attribute of the class element and the database table name is specified using the table attribute.
The <meta> element is optional element and can be used to create the class description.
The <id> element maps the unique ID attribute in class to the primary key of the database table. The name attribute of the id element refers to the property in the class and the column attribute refers to the column in the database table. The type attribute holds the hibernate mapping type, this mapping types will convert from Java to SQL data type.
The <generator> element within the id element is used to generate the primary key values automatically. The class attribute of the generator element is set to native to let hibernate pick up either identity, sequence, or hilo algorithm to create primary key depending upon the capabilities of the underlying database.
The <property> element is used to map a Java class property to a column in the database table. The name attribute of the element refers to the property in the class and the column attribute refers to the column in the database table. The type attribute holds the hibernate mapping type, this mapping types will convert from Java to SQL data type.
There are other attributes and elements available, which will be used in a mapping document and I would try to cover as many as possible while discussing other Hibernate related topics.
Hibernate- Mapping Types
When you prepare a Hibernate mapping document, you find that you map the Java data types into RDBMS data types. The types declared and used in the mapping files are not Java data types; they are not SQL database types either. These types are called Hibernate mapping types, which can translate from Java to SQL data types and vice versa.
This chapter lists down all the basic, date and time, large object, and various other builtin mapping types.
Primitive Types
| Mapping type | Java type | ANSI SQL Type |
|---|---|---|
| integer | int or java.lang.Integer | INTEGER |
| long | long or java.lang.Long | BIGINT |
| short | short or java.lang.Short | SMALLINT |
| float | float or java.lang.Float | FLOAT |
| double | double or java.lang.Double | DOUBLE |
| big_decimal | java.math.BigDecimal | NUMERIC |
| character | java.lang.String | CHAR(1) |
| string | java.lang.String | VARCHAR |
| byte | byte or java.lang.Byte | TINYINT |
| boolean | boolean or java.lang.Boolean | BIT |
| yes/no | boolean or java.lang.Boolean | CHAR(1) ('Y' or 'N') |
| true/false | boolean or java.lang.Boolean | CHAR(1) ('T' or 'F') |
Date and Time Types
| Mapping type | Java type | ANSI SQL Type |
|---|---|---|
| date | java.util.Date or java.sql.Date | DATE |
| time | java.util.Date or java.sql.Time | TIME |
| timestamp | java.util.Date or java.sql.Timestamp | TIMESTAMP |
| calendar | java.util.Calendar | TIMESTAMP |
| calendar_date | java.util.Calendar | DATE |
Binary and Large Object Types
| Mapping type | Java type | ANSI SQL Type |
|---|---|---|
| binary | byte[] | VARBINARY (or BLOB) |
| text | java.lang.String | CLOB |
| serializable | any Java class that implements java.io.Serializable | VARBINARY (or BLOB) |
| clob | java.sql.Clob | CLOB |
| blob | java.sql.Blob | BLOB |
JDK-related Types
| Mapping type | Java type | ANSI SQL Type |
|---|---|---|
| class | java.lang.Class | VARCHAR |
| locale | java.util.Locale | VARCHAR |
| timezone | java.util.TimeZone | VARCHAR |
| currency | java.util.Currency | VARCHAR |
Hibernate - Examples
Let us now take an example to understand how we can use Hibernate to provide Java persistence in a standalone application. We will go through the different steps involved in creating a Java Application using Hibernate technology.
Create POJO Classes
The first step in creating an application is to build the Java POJO class or classes, depending on the application that will be persisted to the database. Let us consider our Employee class with getXXX and setXXX methods to make it JavaBeans compliant class.
A POJO (Plain Old Java Object) is a Java object that doesn't extend or implement some specialized classes and interfaces respectively required by the EJB framework. All normal Java objects are POJO.
When you design a class to be persisted by Hibernate, it is important to provide JavaBeans compliant code as well as one attribute, which would work as index like id attribute in the Employee class.
public class Employee {
   private int id;
   private String firstName;
   private String lastName;
   private int salary;

   public Employee() {}
   public Employee(String fname, String lname, int salary) {
      this.firstName = fname;
      this.lastName = lname;
      this.salary = salary;
   }

   public int getId() {
      return id;
   }

   public void setId( int id ) {
      this.id = id;
   }

   public String getFirstName() {
      return firstName;
   }

   public void setFirstName( String first_name ) {
      this.firstName = first_name;
   }

   public String getLastName() {
      return lastName;
   }

   public void setLastName( String last_name ) {
      this.lastName = last_name;
   }

   public int getSalary() {
      return salary;
   }

   public void setSalary( int salary ) {
      this.salary = salary;
   }
}
Create Database Tables
Second step would be creating tables in your database. There would be one table corresponding to each object, you are willing to provide persistence. Consider above objects need to be stored and retrieved into the following RDBMS table −
create table EMPLOYEE (
   id INT NOT NULL auto_increment,
   first_name VARCHAR(20) default NULL,
   last_name  VARCHAR(20) default NULL,
   salary     INT  default NULL,
   PRIMARY KEY (id)
);
Create Mapping Configuration File
This step is to create a mapping file that instructs Hibernate how to map the defined class or classes to the database tables.
<?xml version = "1.0" encoding = "utf-8"?>
<!DOCTYPE hibernate-mapping PUBLIC
"-//Hibernate/Hibernate Mapping DTD//EN"
"http://www.hibernate.org/dtd/hibernate-mapping-3.0.dtd">

<hibernate-mapping>
   <class name = "Employee" table = "EMPLOYEE">

      <meta attribute = "class-description">
         This class contains the employee detail.
      </meta>

      <id name = "id" type = "int" column = "id">
         <generator class="native"/>
      </id>

      <property name = "firstName" column = "first_name" type = "string"/>
      <property name = "lastName" column = "last_name" type = "string"/>
      <property name = "salary" column = "salary" type = "int"/>

   </class>
</hibernate-mapping>
You should save the mapping document in a file with the format <classname>.hbm.xml. We saved our mapping document in the file Employee.hbm.xml. Let us see little detail about the mapping document −
The mapping document is an XML document having <hibernate-mapping> as the root element which contains all the <class> elements.
The <class> elements are used to define specific mappings from a Java classes to the database tables. The Java class name is specified using the name attribute of the class element and the database table name is specified using the table attribute.
The <meta> element is optional element and can be used to create the class description.
The <id> element maps the unique ID attribute in class to the primary key of the database table. The name attribute of the id element refers to the property in the class and the column attribute refers to the column in the database table. The type attribute holds the hibernate mapping type, this mapping types will convert from Java to SQL data type.
The <generator> element within the id element is used to generate the primary key values automatically. The class attribute of the generator element is set to native to let hibernate pick up either identity, sequence or hilo algorithm to create primary key depending upon the capabilities of the underlying database.
The <property> element is used to map a Java class property to a column in the database table. The name attribute of the element refers to the property in the class and the column attribute refers to the column in the database table. The type attribute holds the hibernate mapping type, this mapping types will convert from Java to SQL data type.
There are other attributes and elements available, which will be used in a mapping document and I would try to cover as many as possible while discussing other Hibernate related topics.
Create Application Class
Finally, we will create our application class with the main() method to run the application. We will use this application to save few Employee's records and then we will apply CRUD operations on those records.
import java.util.List;
import java.util.Date;
import java.util.Iterator;

import org.hibernate.HibernateException;
import org.hibernate.Session;
import org.hibernate.Transaction;
import org.hibernate.SessionFactory;
import org.hibernate.cfg.Configuration;

public class ManageEmployee {
   private static SessionFactory factory;
   public static void main(String[] args) {

      try {
         factory = new Configuration().configure().buildSessionFactory();
      } catch (Throwable ex) {
         System.err.println("Failed to create sessionFactory object." + ex);
         throw new ExceptionInInitializerError(ex);
      }

      ManageEmployee ME = new ManageEmployee();

      /* Add few employee records in database */
      Integer empID1 = ME.addEmployee("Zara", "Ali", 1000);
      Integer empID2 = ME.addEmployee("Daisy", "Das", 5000);
      Integer empID3 = ME.addEmployee("John", "Paul", 10000);

      /* List down all the employees */
      ME.listEmployees();

      /* Update employee's records */
      ME.updateEmployee(empID1, 5000);

      /* Delete an employee from the database */
      ME.deleteEmployee(empID2);

      /* List down new list of the employees */
      ME.listEmployees();
   }

   /* Method to CREATE an employee in the database */
   public Integer addEmployee(String fname, String lname, int salary){
      Session session = factory.openSession();
      Transaction tx = null;
      Integer employeeID = null;

      try {
         tx = session.beginTransaction();
         Employee employee = new Employee(fname, lname, salary);
         employeeID = (Integer) session.save(employee);
         tx.commit();
      } catch (HibernateException e) {
         if (tx!=null) tx.rollback();
         e.printStackTrace();
      } finally {
         session.close();
      }
      return employeeID;
   }

   /* Method to  READ all the employees */
   public void listEmployees( ){
      Session session = factory.openSession();
      Transaction tx = null;

      try {
         tx = session.beginTransaction();
         List employees = session.createQuery("FROM Employee").list();
         for (Iterator iterator = employees.iterator(); iterator.hasNext();){
            Employee employee = (Employee) iterator.next();
            System.out.print("First Name: " + employee.getFirstName());
            System.out.print("  Last Name: " + employee.getLastName());
            System.out.println("  Salary: " + employee.getSalary());
         }
         tx.commit();
      } catch (HibernateException e) {
         if (tx!=null) tx.rollback();
         e.printStackTrace();
      } finally {
         session.close();
      }
   }

   /* Method to UPDATE salary for an employee */
   public void updateEmployee(Integer EmployeeID, int salary ){
      Session session = factory.openSession();
      Transaction tx = null;

      try {
         tx = session.beginTransaction();
         Employee employee = (Employee)session.get(Employee.class, EmployeeID);
         employee.setSalary( salary );
		 session.update(employee);
         tx.commit();
      } catch (HibernateException e) {
         if (tx!=null) tx.rollback();
         e.printStackTrace();
      } finally {
         session.close();
      }
   }

   /* Method to DELETE an employee from the records */
   public void deleteEmployee(Integer EmployeeID){
      Session session = factory.openSession();
      Transaction tx = null;

      try {
         tx = session.beginTransaction();
         Employee employee = (Employee)session.get(Employee.class, EmployeeID);
         session.delete(employee);
         tx.commit();
      } catch (HibernateException e) {
         if (tx!=null) tx.rollback();
         e.printStackTrace();
      } finally {
         session.close();
      }
   }
}
Compilation and Execution
Here are the steps to compile and run the above mentioned application. Make sure, you have set PATH and CLASSPATH appropriately before proceeding for the compilation and execution.
Create hibernate.cfg.xml configuration file as explained in configuration chapter.
Create Employee.hbm.xml mapping file as shown above.
Create Employee.java source file as shown above and compile it.
Create ManageEmployee.java source file as shown above and compile it.
Execute ManageEmployee binary to run the program.
Output
You would get the following result, and records would be created in the EMPLOYEE table.
$java ManageEmployee
.......VARIOUS LOG MESSAGES WILL DISPLAY HERE........

First Name: Zara  Last Name: Ali  Salary: 1000
First Name: Daisy  Last Name: Das  Salary: 5000
First Name: John  Last Name: Paul  Salary: 10000
First Name: Zara  Last Name: Ali  Salary: 5000
First Name: John  Last Name: Paul  Salary: 10000
If you check your EMPLOYEE table, it should have the following records −
mysql> select * from EMPLOYEE;
+----+------------+-----------+--------+
| id | first_name | last_name | salary |
+----+------------+-----------+--------+
| 29 | Zara       | Ali       |   5000 |
| 31 | John       | Paul      |  10000 |
+----+------------+-----------+--------+
2 rows in set (0.00 sec

mysql>
Hibernate - O/R Mappings
So far, we have seen very basic O/R mapping using hibernate, but there are three most important mapping topics, which we have to learn in detail.
These are −
- Mapping of collections,
- Mapping of associations between entity classes, and
- Component Mappings.
Collections Mappings
If an entity or class has collection of values for a particular variable, then we can map those values using any one of the collection interfaces available in java. Hibernate can persist instances of java.util.Map, java.util.Set, java.util.SortedMap, java.util.SortedSet, java.util.List, and any array of persistent entities or values.
| Sr.No. | Collection type & Mapping Description |
|---|---|
| 1 | java.util.Set
This is mapped with a <set> element and initialized with java.util.HashSet |
| 2 | java.util.SortedSet
This is mapped with a <set> element and initialized with java.util.TreeSet. The sort attribute can be set to either a comparator or natural ordering. |
| 3 | java.util.List
This is mapped with a <list> element and initialized with java.util.ArrayList |
| 4 | java.util.Collection
This is mapped with a <bag> or <ibag> element and initialized with java.util.ArrayList |
| 5 | java.util.Map
This is mapped with a <map> element and initialized with java.util.HashMap |
| 6 | java.util.SortedMap
This is mapped with a <map> element and initialized with java.util.TreeMap. The sort attribute can be set to either a comparator or natural ordering. |
Arrays are supported by Hibernate with <primitive-array> for Java primitive value types and <array> for everything else. However, they are rarely used, so I am not going to discuss them in this tutorial.
If you want to map a user defined collection interfaces, which is not directly supported by Hibernate, you need to tell Hibernate about the semantics of your custom collections, which is not very easy and not recommend to be used.
Association Mappings
The mapping of associations between entity classes and the relationships between tables is the soul of ORM. Following are the four ways in which the cardinality of the relationship between the objects can be expressed. An association mapping can be unidirectional as well as bidirectional.
| Sr.No. | Mapping type & Description |
|---|---|
| 1 | Many-to-One
Mapping many-to-one relationship using Hibernate |
| 2 | One-to-One
Mapping one-to-one relationship using Hibernate |
| 3 | One-to-Many
Mapping one-to-many relationship using Hibernate |
| 4 | Many-to-Many
Mapping many-to-many relationship using Hibernate |
Component Mappings
It is very much possible that an Entity class can have a reference to another class as a member variable. If the referred class does not have its own life cycle and completely depends on the life cycle of the owning entity class, then the referred class hence therefore is called as the Component class.
The mapping of Collection of Components is also possible in a similar way just as the mapping of regular Collections with minor configuration differences. We will see these two mappings in detail with examples.
| Sr.No. | Mapping type & Description |
|---|---|
| 1 | Component Mappings
Mapping for a class having a reference to another class as a member variable. |
Hibernate - Cascade Types
While configuring collections in hbm file, also in mapping one-to-many, many-to-many mappings, the collection element (say, list) in the hbm file contains an attribute cascade.
Example
...
<class name="Student" table="student_tbl_100">
   <id name="studentid">
      <generator class="native"></generator>
   </id>
   <property name="name"></property>

   <map name="courses" table="course_tbl_100" cascade="all">
      <key column="id"></key>
      <index column="course_id" type="string"></index>
      <element column="course_name" type="string"></element>
   </map>
</class>
...
The cascade type can also be mentioned in an annotation as shown below:
@Entity
public class Customer {
   @Id
   @GeneratedValue(strategy = GenerationType.IDENTITY)
   private Long id;

   @OneToMany(mappedBy = "customer", cascade = CascadeType.ALL)
   private Set<Order> orders = new HashSet();

   // getters and setters
}
@Entity
public class Order {
   @Id
   @GeneratedValue(strategy = GenerationType.IDENTITY)
   private Long id;

   @ManyToOne
   @JoinColumn(name = "customer_id")
   private Customer customer;

   // getters and setters
}
When a Customer entity is persisted, updated, or deleted, all associated Order entities will also be persisted, updated, or deleted.
Different Cascade Types in Hibernate
Hibernate provides several types of cascade options that can be used to manage the relationships between entities. Here are the different cascade types in Hibernate:
CascadeType.ALL − A cascading type in Hibernate that specifies that all state transitions (create, update, delete, and refresh) should be cascaded from the parent entity to the child entities.
CascadeType.PERSIST − A cascading type in Hibernate that specifies that the create (or persist) operation should be cascaded from the parent entity to the child entities.
CascadeType.MERGE − A cascading type in Hibernate that specifies that the update (or merge) operation should be cascaded from the parent entity to the child entities.
CascadeType.REMOVE − A cascading type in Hibernate that specifies that the delete operation should be cascaded from the parent entity to the child entities.
CascadeType.REFRESH − A cascading type in Hibernate that specifies that the refresh operation should be cascaded from the parent entity to the child entities.
CascadeType.DETACH − A cascading type in Hibernate that specifies that the detach operation should be cascaded from the parent entity to the child entities.
CascadeType.REPLICATE − A cascading type in Hibernate that specifies that the replicate operation should be cascaded from the parent entity to the child entities.
CascadeType.SAVE_UPDATE − A cascading type in Hibernate that specifies that the save or update operation should be cascaded from the parent entity to the child entities.
These cascade types can be used individually or in combination to manage the relationships between entities based on the requirements of the application. It is important to use cascade types carefully, as they can lead to unintended consequences if not used properly.
Hibernate - Annotations
So far you have seen how Hibernate uses XML mapping file for the transformation of data from POJO to database tables and vice versa. Hibernate annotations are the newest way to define mappings without the use of XML file. You can use annotations in addition to or as a replacement of XML mapping metadata.
Hibernate Annotations is the powerful way to provide the metadata for the Object and Relational Table mapping. All the metadata is clubbed into the POJO java file along with the code, this helps the user to understand the table structure and POJO simultaneously during the development.
If you going to make your application portable to other EJB 3 compliant ORM applications, you must use annotations to represent the mapping information, but still if you want greater flexibility, then you should go with XML-based mappings.
Environment Setup for Hibernate Annotation
First of all you would have to make sure that you are using JDK 5.0 otherwise you need to upgrade your JDK to JDK 5.0 to take advantage of the native support for annotations.
Second, you will need to install the Hibernate 3.x annotations distribution package, available from the sourceforge: (Download Hibernate Annotation) and copy hibernate-annotations.jar, lib/hibernate-comons-annotations.jar and lib/ejb3-persistence.jar from the Hibernate Annotations distribution to your CLASSPATH.
Annotated Class Example
As I mentioned above while working with Hibernate Annotation, all the metadata is clubbed into the POJO java file along with the code, this helps the user to understand the table structure and POJO simultaneously during the development.
Consider we are going to use the following EMPLOYEE table to store our objects −
create table EMPLOYEE (
   id INT NOT NULL auto_increment,
   first_name VARCHAR(20) default NULL,
   last_name  VARCHAR(20) default NULL,
   salary     INT  default NULL,
   PRIMARY KEY (id)
);
Following is the mapping of Employee class with annotations to map objects with the defined EMPLOYEE table −
import javax.persistence.*;

@Entity
@Table(name = "EMPLOYEE")
public class Employee {
   @Id @GeneratedValue
   @Column(name = "id")
   private int id;

   @Column(name = "first_name")
   private String firstName;

   @Column(name = "last_name")
   private String lastName;

   @Column(name = "salary")
   private int salary;

   public Employee() {}

   public int getId() {
      return id;
   }

   public void setId( int id ) {
      this.id = id;
   }

   public String getFirstName() {
      return firstName;
   }

   public void setFirstName( String first_name ) {
      this.firstName = first_name;
   }

   public String getLastName() {
      return lastName;
   }

   public void setLastName( String last_name ) {
      this.lastName = last_name;
   }

   public int getSalary() {
      return salary;
   }

   public void setSalary( int salary ) {
      this.salary = salary;
   }
}
Hibernate detects that the @Id annotation is on a field and assumes that it should access properties of an object directly through fields at runtime. If you placed the @Id annotation on the getId() method, you would enable access to properties through getter and setter methods by default. Hence, all other annotations are also placed on either fields or getter methods, following the selected strategy.
Following section will explain the annotations used in the above class.
@Entity Annotation
The EJB 3 standard annotations are contained in the javax.persistence package, so we import this package as the first step. Second, we used the @Entity annotation to the Employee class, which marks this class as an entity bean, so it must have a no-argument constructor that is visible with at least protected scope.
@Table Annotation
The @Table annotation allows you to specify the details of the table that will be used to persist the entity in the database.
The @Table annotation provides four attributes, allowing you to override the name of the table, its catalogue, and its schema, and enforce unique constraints on columns in the table. For now, we are using just table name, which is EMPLOYEE.
@Id and @GeneratedValue Annotations
Each entity bean will have a primary key, which you annotate on the class with the @Id annotation. The primary key can be a single field or a combination of multiple fields depending on your table structure.
By default, the @Id annotation will automatically determine the most appropriate primary key generation strategy to be used but you can override this by applying the @GeneratedValue annotation, which takes two parameters strategy and generator that I'm not going to discuss here, so let us use only the default key generation strategy. Letting Hibernate determine which generator type to use makes your code portable between different databases.
@Column Annotation
The @Column annotation is used to specify the details of the column to which a field or property will be mapped. You can use column annotation with the following most commonly used attributes −
name attribute permits the name of the column to be explicitly specified.
length attribute permits the size of the column used to map a value particularly for a String value.
nullable attribute permits the column to be marked NOT NULL when the schema is generated.
unique attribute permits the column to be marked as containing only unique values.
Create Application Class
Finally, we will create our application class with the main() method to run the application. We will use this application to save few Employee's records and then we will apply CRUD operations on those records.
import java.util.List;
import java.util.Date;
import java.util.Iterator;

import org.hibernate.HibernateException;
import org.hibernate.Session;
import org.hibernate.Transaction;
import org.hibernate.cfg.AnnotationConfiguration;
import org.hibernate.SessionFactory;
import org.hibernate.cfg.Configuration;

public class ManageEmployee {
   private static SessionFactory factory;
   public static void main(String[] args) {

      try {
         factory = new AnnotationConfiguration().
                   configure().
                   //addPackage("com.xyz") //add package if used.
                   addAnnotatedClass(Employee.class).
                   buildSessionFactory();
      } catch (Throwable ex) {
         System.err.println("Failed to create sessionFactory object." + ex);
         throw new ExceptionInInitializerError(ex);
      }

      ManageEmployee ME = new ManageEmployee();

      /* Add few employee records in database */
      Integer empID1 = ME.addEmployee("Zara", "Ali", 1000);
      Integer empID2 = ME.addEmployee("Daisy", "Das", 5000);
      Integer empID3 = ME.addEmployee("John", "Paul", 10000);

      /* List down all the employees */
      ME.listEmployees();

      /* Update employee's records */
      ME.updateEmployee(empID1, 5000);

      /* Delete an employee from the database */
      ME.deleteEmployee(empID2);

      /* List down new list of the employees */
      ME.listEmployees();
   }

   /* Method to CREATE an employee in the database */
   public Integer addEmployee(String fname, String lname, int salary){
      Session session = factory.openSession();
      Transaction tx = null;
      Integer employeeID = null;

      try {
         tx = session.beginTransaction();
         Employee employee = new Employee();
         employee.setFirstName(fname);
         employee.setLastName(lname);
         employee.setSalary(salary);
         employeeID = (Integer) session.save(employee);
         tx.commit();
      } catch (HibernateException e) {
         if (tx!=null) tx.rollback();
         e.printStackTrace();
      } finally {
         session.close();
      }
      return employeeID;
   }

   /* Method to  READ all the employees */
   public void listEmployees( ){
      Session session = factory.openSession();
      Transaction tx = null;

      try {
         tx = session.beginTransaction();
         List employees = session.createQuery("FROM Employee").list();
         for (Iterator iterator = employees.iterator(); iterator.hasNext();){
            Employee employee = (Employee) iterator.next();
            System.out.print("First Name: " + employee.getFirstName());
            System.out.print("  Last Name: " + employee.getLastName());
            System.out.println("  Salary: " + employee.getSalary());
         }
         tx.commit();
      } catch (HibernateException e) {
         if (tx!=null) tx.rollback();
         e.printStackTrace();
      } finally {
         session.close();
      }
   }

   /* Method to UPDATE salary for an employee */
   public void updateEmployee(Integer EmployeeID, int salary ){
      Session session = factory.openSession();
      Transaction tx = null;

      try {
         tx = session.beginTransaction();
         Employee employee = (Employee)session.get(Employee.class, EmployeeID);
         employee.setSalary( salary );
		 session.update(employee);
         tx.commit();
      } catch (HibernateException e) {
         if (tx!=null) tx.rollback();
         e.printStackTrace();
      } finally {
         session.close();
      }
   }

   /* Method to DELETE an employee from the records */
   public void deleteEmployee(Integer EmployeeID){
      Session session = factory.openSession();
      Transaction tx = null;

      try {
         tx = session.beginTransaction();
         Employee employee = (Employee)session.get(Employee.class, EmployeeID);
         session.delete(employee);
         tx.commit();
      } catch (HibernateException e) {
         if (tx!=null) tx.rollback();
         e.printStackTrace();
      } finally {
         session.close();
      }
   }
}
Database Configuration
Now let us create hibernate.cfg.xml configuration file to define database related parameters.
<?xml version = "1.0" encoding = "utf-8"?>
<!DOCTYPE hibernate-configuration SYSTEM
"http://www.hibernate.org/dtd/hibernate-configuration-3.0.dtd">

<hibernate-configuration>
   <session-factory>

      <property name = "hibernate.dialect">
         org.hibernate.dialect.MySQLDialect
      </property>

      <property name = "hibernate.connection.driver_class">
         com.mysql.jdbc.Driver
      </property>

      <!-- Assume students is the database name -->

      <property name = "hibernate.connection.url">
         jdbc:mysql://localhost/test
      </property>

      <property name = "hibernate.connection.username">
         root
      </property>

      <property name = "hibernate.connection.password">
         cohondob
      </property>

   </session-factory>
</hibernate-configuration>
Compilation and Execution
Here are the steps to compile and run the above mentioned application. Make sure, you have set PATH and CLASSPATH appropriately before proceeding for the compilation and execution.
Delete Employee.hbm.xml mapping file from the path.
Create Employee.java source file as shown above and compile it.
Create ManageEmployee.java source file as shown above and compile it.
Execute ManageEmployee binary to run the program.
You would get the following result, and records would be created in EMPLOYEE table.
$java ManageEmployee
.......VARIOUS LOG MESSAGES WILL DISPLAY HERE........

First Name: Zara  Last Name: Ali  Salary: 1000
First Name: Daisy  Last Name: Das  Salary: 5000
First Name: John  Last Name: Paul  Salary: 10000
First Name: Zara  Last Name: Ali  Salary: 5000
First Name: John  Last Name: Paul  Salary: 10000
If you check your EMPLOYEE table, it should have the following records −
mysql> select * from EMPLOYEE;
+----+------------+-----------+--------+
| id | first_name | last_name | salary |
+----+------------+-----------+--------+
| 29 | Zara       | Ali       |   5000 |
| 31 | John       | Paul      |  10000 |
+----+------------+-----------+--------+
2 rows in set (0.00 sec

mysql>
Hibernate - Query Language
Hibernate Query Language (HQL) is an object-oriented query language, similar to SQL, but instead of operating on tables and columns, HQL works with persistent objects and their properties. HQL queries are translated by Hibernate into conventional SQL queries, which in turns perform action on database.
Although you can use SQL statements directly with Hibernate using Native SQL, but I would recommend to use HQL whenever possible to avoid database portability hassles, and to take advantage of Hibernate's SQL generation and caching strategies.
Keywords like SELECT, FROM, and WHERE, etc., are not case sensitive, but properties like table and column names are case sensitive in HQL.
FROM Clause
You will use FROM clause if you want to load a complete persistent objects into memory. Following is the simple syntax of using FROM clause −
String hql = "FROM Employee";
Query query = session.createQuery(hql);
List results = query.list();
If you need to fully qualify a class name in HQL, just specify the package and class name as follows −
String hql = "FROM com.hibernatebook.criteria.Employee";
Query query = session.createQuery(hql);
List results = query.list();
AS Clause
The AS clause can be used to assign aliases to the classes in your HQL queries, especially when you have the long queries. For instance, our previous simple example would be the following −
String hql = "FROM Employee AS E";
Query query = session.createQuery(hql);
List results = query.list();
The AS keyword is optional and you can also specify the alias directly after the class name, as follows −
String hql = "FROM Employee E";
Query query = session.createQuery(hql);
List results = query.list();
SELECT Clause
The SELECT clause provides more control over the result set then the from clause. If you want to obtain few properties of objects instead of the complete object, use the SELECT clause. Following is the simple syntax of using SELECT clause to get just first_name field of the Employee object −
String hql = "SELECT E.firstName FROM Employee E";
Query query = session.createQuery(hql);
List results = query.list();
It is notable here that Employee.firstName is a property of Employee object rather than a field of the EMPLOYEE table.
WHERE Clause
If you want to narrow the specific objects that are returned from storage, you use the WHERE clause. Following is the simple syntax of using WHERE clause −
String hql = "FROM Employee E WHERE E.id = 10";
Query query = session.createQuery(hql);
List results = query.list();
ORDER BY Clause
To sort your HQL query's results, you will need to use the ORDER BY clause. You can order the results by any property on the objects in the result set either ascending (ASC) or descending (DESC). Following is the simple syntax of using ORDER BY clause −
String hql = "FROM Employee E WHERE E.id > 10 ORDER BY E.salary DESC";
Query query = session.createQuery(hql);
List results = query.list();
If you wanted to sort by more than one property, you would just add the additional properties to the end of the order by clause, separated by commas as follows −
String hql = "FROM Employee E WHERE E.id > 10 " +
             "ORDER BY E.firstName DESC, E.salary DESC ";
Query query = session.createQuery(hql);
List results = query.list();
GROUP BY Clause
This clause lets Hibernate pull information from the database and group it based on a value of an attribute and, typically, use the result to include an aggregate value. Following is the simple syntax of using GROUP BY clause −
String hql = "SELECT SUM(E.salary), E.firtName FROM Employee E " +
             "GROUP BY E.firstName";
Query query = session.createQuery(hql);
List results = query.list();
Using Named Parameters
Hibernate supports named parameters in its HQL queries. This makes writing HQL queries that accept input from the user easy and you do not have to defend against SQL injection attacks. Following is the simple syntax of using named parameters −
String hql = "FROM Employee E WHERE E.id = :employee_id";
Query query = session.createQuery(hql);
query.setParameter("employee_id",10);
List results = query.list();
UPDATE Clause
Bulk updates are new to HQL with Hibernate 3, and delete work differently in Hibernate 3 than they did in Hibernate 2. The Query interface now contains a method called executeUpdate() for executing HQL UPDATE or DELETE statements.
The UPDATE clause can be used to update one or more properties of an one or more objects. Following is the simple syntax of using UPDATE clause −
String hql = "UPDATE Employee set salary = :salary "  +
             "WHERE id = :employee_id";
Query query = session.createQuery(hql);
query.setParameter("salary", 1000);
query.setParameter("employee_id", 10);
int result = query.executeUpdate();
System.out.println("Rows affected: " + result);
DELETE Clause
The DELETE clause can be used to delete one or more objects. Following is the simple syntax of using DELETE clause −
String hql = "DELETE FROM Employee "  +
             "WHERE id = :employee_id";
Query query = session.createQuery(hql);
query.setParameter("employee_id", 10);
int result = query.executeUpdate();
System.out.println("Rows affected: " + result);
INSERT Clause
HQL supports INSERT INTO clause only where records can be inserted from one object to another object. Following is the simple syntax of using INSERT INTO clause −
String hql = "INSERT INTO Employee(firstName, lastName, salary)"  +
             "SELECT firstName, lastName, salary FROM old_employee";
Query query = session.createQuery(hql);
int result = query.executeUpdate();
System.out.println("Rows affected: " + result);
Aggregate Methods
HQL supports a range of aggregate methods, similar to SQL. They work the same way in HQL as in SQL and following is the list of the available functions −
| Sr.No. | Functions & Description |
|---|---|
| 1 |
avg(property name) The average of a property's value |
| 2 |
count(property name or *) The number of times a property occurs in the results |
| 3 |
max(property name) The maximum value of the property values |
| 4 |
min(property name) The minimum value of the property values |
| 5 |
sum(property name) The sum total of the property values |
The distinct keyword only counts the unique values in the row set. The following query will return only unique count −
String hql = "SELECT count(distinct E.firstName) FROM Employee E";
Query query = session.createQuery(hql);
List results = query.list();
Pagination using Query
There are two methods of the Query interface for pagination.
| Sr.No. | Method & Description |
|---|---|
| 1 |
Query setFirstResult(int startPosition) This method takes an integer that represents the first row in your result set, starting with row 0. |
| 2 |
Query setMaxResults(int maxResult) This method tells Hibernate to retrieve a fixed number maxResults of objects. |
Using above two methods together, we can construct a paging component in our web or Swing application. Following is the example, which you can extend to fetch 10 rows at a time −
String hql = "FROM Employee";
Query query = session.createQuery(hql);
query.setFirstResult(1);
query.setMaxResults(10);
List results = query.list();
Hibernate - Criteria Queries
Hibernate provides alternate ways of manipulating objects and in turn data available in RDBMS tables. One of the methods is Criteria API, which allows you to build up a criteria query object programmatically where you can apply filtration rules and logical conditions.
The Hibernate Session interface provides createCriteria() method, which can be used to create a Criteria object that returns instances of the persistence object's class when your application executes a criteria query.
Following is the simplest example of a criteria query is one, which will simply return every object that corresponds to the Employee class.
Criteria cr = session.createCriteria(Employee.class);
List results = cr.list();
Restrictions with Criteria
You can use add() method available for Criteria object to add restriction for a criteria query. Following is the example to add a restriction to return the records with salary is equal to 2000 −
Criteria cr = session.createCriteria(Employee.class);
cr.add(Restrictions.eq("salary", 2000));
List results = cr.list();
Following are the few more examples covering different scenarios and can be used as per the requirement −
Criteria cr = session.createCriteria(Employee.class);

// To get records having salary more than 2000
cr.add(Restrictions.gt("salary", 2000));

// To get records having salary less than 2000
cr.add(Restrictions.lt("salary", 2000));

// To get records having fistName starting with zara
cr.add(Restrictions.like("firstName", "zara%"));

// Case sensitive form of the above restriction.
cr.add(Restrictions.ilike("firstName", "zara%"));

// To get records having salary in between 1000 and 2000
cr.add(Restrictions.between("salary", 1000, 2000));

// To check if the given property is null
cr.add(Restrictions.isNull("salary"));

// To check if the given property is not null
cr.add(Restrictions.isNotNull("salary"));

// To check if the given property is empty
cr.add(Restrictions.isEmpty("salary"));

// To check if the given property is not empty
cr.add(Restrictions.isNotEmpty("salary"));
You can create AND or OR conditions using LogicalExpression restrictions as follows −
Criteria cr = session.createCriteria(Employee.class);

Criterion salary = Restrictions.gt("salary", 2000);
Criterion name = Restrictions.ilike("firstNname","zara%");

// To get records matching with OR conditions
LogicalExpression orExp = Restrictions.or(salary, name);
cr.add( orExp );

// To get records matching with AND conditions
LogicalExpression andExp = Restrictions.and(salary, name);
cr.add( andExp );

List results = cr.list();
Though all the above conditions can be used directly with HQL as explained in previous tutorial.
Pagination Using Criteria
There are two methods of the Criteria interface for pagination.
| Sr.No. | Method & Description |
|---|---|
| 1 |
public Criteria setFirstResult(int firstResult) This method takes an integer that represents the first row in your result set, starting with row 0. |
| 2 |
public Criteria setMaxResults(int maxResults) This method tells Hibernate to retrieve a fixed number maxResults of objects. |
Using above two methods together, we can construct a paging component in our web or Swing application. Following is the example, which you can extend to fetch 10 rows at a time −
Criteria cr = session.createCriteria(Employee.class);
cr.setFirstResult(1);
cr.setMaxResults(10);
List results = cr.list();
Sorting the Results
The Criteria API provides the org.hibernate.criterion.Order class to sort your result set in either ascending or descending order, according to one of your object's properties. This example demonstrates how you would use the Order class to sort the result set −
Criteria cr = session.createCriteria(Employee.class);

// To get records having salary more than 2000
cr.add(Restrictions.gt("salary", 2000));

// To sort records in descening order
cr.addOrder(Order.desc("salary"));

// To sort records in ascending order
cr.addOrder(Order.asc("salary"));

List results = cr.list();
Projections & Aggregations
The Criteria API provides the org.hibernate.criterion.Projections class, which can be used to get average, maximum, or minimum of the property values. The Projections class is similar to the Restrictions class, in that it provides several static factory methods for obtaining Projection instances.
Following are the few examples covering different scenarios and can be used as per requirement −
Criteria cr = session.createCriteria(Employee.class);

// To get total row count.
cr.setProjection(Projections.rowCount());

// To get average of a property.
cr.setProjection(Projections.avg("salary"));

// To get distinct count of a property.
cr.setProjection(Projections.countDistinct("firstName"));

// To get maximum of a property.
cr.setProjection(Projections.max("salary"));

// To get minimum of a property.
cr.setProjection(Projections.min("salary"));

// To get sum of a property.
cr.setProjection(Projections.sum("salary"));
Criteria Queries Example
Consider the following POJO class −
public class Employee {
   private int id;
   private String firstName;
   private String lastName;
   private int salary;

   public Employee() {}

   public Employee(String fname, String lname, int salary) {
      this.firstName = fname;
      this.lastName = lname;
      this.salary = salary;
   }

   public int getId() {
      return id;
   }

   public void setId( int id ) {
      this.id = id;
   }

   public String getFirstName() {
      return firstName;
   }

   public void setFirstName( String first_name ) {
      this.firstName = first_name;
   }

   public String getLastName() {
      return lastName;
   }

   public void setLastName( String last_name ) {
      this.lastName = last_name;
   }

   public int getSalary() {
      return salary;
   }

   public void setSalary( int salary ) {
      this.salary = salary;
   }
}
Let us create the following EMPLOYEE table to store Employee objects −
create table EMPLOYEE (
   id INT NOT NULL auto_increment,
   first_name VARCHAR(20) default NULL,
   last_name  VARCHAR(20) default NULL,
   salary     INT  default NULL,
   PRIMARY KEY (id)
);
Following will be the mapping file.
<?xml version = "1.0" encoding = "utf-8"?>
<!DOCTYPE hibernate-mapping PUBLIC
"-//Hibernate/Hibernate Mapping DTD//EN"
"http://www.hibernate.org/dtd/hibernate-mapping-3.0.dtd">

<hibernate-mapping>
   <class name = "Employee" table = "EMPLOYEE">

      <meta attribute = "class-description">
         This class contains the employee detail.
      </meta>

      <id name = "id" type = "int" column = "id">
         <generator class="native"/>
      </id>

      <property name = "firstName" column = "first_name" type = "string"/>
      <property name = "lastName" column = "last_name" type = "string"/>
      <property name = "salary" column = "salary" type = "int"/>

   </class>
</hibernate-mapping>
Finally, we will create our application class with the main() method to run the application where we will use Criteria queries −
import java.util.List;
import java.util.Date;
import java.util.Iterator;

import org.hibernate.HibernateException;
import org.hibernate.Session;
import org.hibernate.Transaction;
import org.hibernate.SessionFactory;
import org.hibernate.Criteria;
import org.hibernate.criterion.Restrictions;
import org.hibernate.criterion.Projections;
import org.hibernate.cfg.Configuration;

public class ManageEmployee {
   private static SessionFactory factory;
   public static void main(String[] args) {

      try {
         factory = new Configuration().configure().buildSessionFactory();
      } catch (Throwable ex) {
         System.err.println("Failed to create sessionFactory object." + ex);
         throw new ExceptionInInitializerError(ex);
      }

      ManageEmployee ME = new ManageEmployee();

      /* Add few employee records in database */
      Integer empID1 = ME.addEmployee("Zara", "Ali", 2000);
      Integer empID2 = ME.addEmployee("Daisy", "Das", 5000);
      Integer empID3 = ME.addEmployee("John", "Paul", 5000);
      Integer empID4 = ME.addEmployee("Mohd", "Yasee", 3000);

      /* List down all the employees */
      ME.listEmployees();

      /* Print Total employee's count */
      ME.countEmployee();

      /* Print Total salary */
      ME.totalSalary();
   }

   /* Method to CREATE an employee in the database */
   public Integer addEmployee(String fname, String lname, int salary){
      Session session = factory.openSession();
      Transaction tx = null;
      Integer employeeID = null;

      try {
         tx = session.beginTransaction();
         Employee employee = new Employee(fname, lname, salary);
         employeeID = (Integer) session.save(employee);
         tx.commit();
      } catch (HibernateException e) {
         if (tx!=null) tx.rollback();
         e.printStackTrace();
      } finally {
         session.close();
      }
      return employeeID;
   }

   /* Method to  READ all the employees having salary more than 2000 */
   public void listEmployees( ) {
      Session session = factory.openSession();
      Transaction tx = null;

      try {
         tx = session.beginTransaction();
         Criteria cr = session.createCriteria(Employee.class);
         // Add restriction.
         cr.add(Restrictions.gt("salary", 2000));
         List employees = cr.list();

         for (Iterator iterator = employees.iterator(); iterator.hasNext();){
            Employee employee = (Employee) iterator.next();
            System.out.print("First Name: " + employee.getFirstName());
            System.out.print("  Last Name: " + employee.getLastName());
            System.out.println("  Salary: " + employee.getSalary());
         }
         tx.commit();
      } catch (HibernateException e) {
         if (tx!=null) tx.rollback();
         e.printStackTrace();
      } finally {
         session.close();
      }
   }

   /* Method to print total number of records */
   public void countEmployee(){
      Session session = factory.openSession();
      Transaction tx = null;

      try {
         tx = session.beginTransaction();
         Criteria cr = session.createCriteria(Employee.class);

         // To get total row count.
         cr.setProjection(Projections.rowCount());
         List rowCount = cr.list();

         System.out.println("Total Coint: " + rowCount.get(0) );
         tx.commit();
      } catch (HibernateException e) {
         if (tx!=null) tx.rollback();
         e.printStackTrace();
      } finally {
         session.close();
      }
   }

   /* Method to print sum of salaries */
   public void totalSalary(){
      Session session = factory.openSession();
      Transaction tx = null;

      try {
         tx = session.beginTransaction();
         Criteria cr = session.createCriteria(Employee.class);

         // To get total salary.
         cr.setProjection(Projections.sum("salary"));
         List totalSalary = cr.list();

         System.out.println("Total Salary: " + totalSalary.get(0) );
         tx.commit();
      } catch (HibernateException e) {
         if (tx!=null) tx.rollback();
         e.printStackTrace();
      } finally {
         session.close();
      }
   }
}
Compilation and Execution
Here are the steps to compile and run the above mentioned application. Make sure, you have set PATH and CLASSPATH appropriately before proceeding for the compilation and execution.
Create hibernate.cfg.xml configuration file as explained in configuration chapter.
Create Employee.hbm.xml mapping file as shown above.
Create Employee.java source file as shown above and compile it.
Create ManageEmployee.java source file as shown above and compile it.
Execute ManageEmployee binary to run the program.
You would get the following result, and records would be created in the EMPLOYEE table.
$java ManageEmployee
.......VARIOUS LOG MESSAGES WILL DISPLAY HERE........

First Name: Daisy  Last Name: Das  Salary: 5000
First Name: John  Last Name: Paul  Salary: 5000
First Name: Mohd  Last Name: Yasee  Salary: 3000
Total Coint: 4
Total Salary: 15000
If you check your EMPLOYEE table, it should have the following records−
mysql> select * from EMPLOYEE;
+----+------------+-----------+--------+
| id | first_name | last_name | salary |
+----+------------+-----------+--------+
| 14 | Zara       | Ali       |   2000 |
| 15 | Daisy      | Das       |   5000 |
| 16 | John       | Paul      |   5000 |
| 17 | Mohd       | Yasee     |   3000 |
+----+------------+-----------+--------+
4 rows in set (0.00 sec)
mysql>
Hibernate - Native SQL
You can use native SQL to express database queries if you want to utilize database-specific features such as query hints or the CONNECT keyword in Oracle. Hibernate 3.x allows you to specify handwritten SQL, including stored procedures, for all create, update, delete, and load operations.
Your application will create a native SQL query from the session with the createSQLQuery() method on the Session interface −
public SQLQuery createSQLQuery(String sqlString) throws HibernateException
After you pass a string containing the SQL query to the createSQLQuery() method, you can associate the SQL result with either an existing Hibernate entity, a join, or a scalar result using addEntity(), addJoin(), and addScalar() methods respectively.
Scalar Queries
The most basic SQL query is to get a list of scalars (values) from one or more tables. Following is the syntax for using native SQL for scalar values −
String sql = "SELECT first_name, salary FROM EMPLOYEE";
SQLQuery query = session.createSQLQuery(sql);
query.setResultTransformer(Criteria.ALIAS_TO_ENTITY_MAP);
List results = query.list();
Entity Queries
The above queries were all about returning scalar values, basically returning the "raw" values from the result set. Following is the syntax to get entity objects as a whole from a native sql query via addEntity().
String sql = "SELECT * FROM EMPLOYEE";
SQLQuery query = session.createSQLQuery(sql);
query.addEntity(Employee.class);
List results = query.list();
Named SQL Queries
Following is the syntax to get entity objects from a native sql query via addEntity() and using named SQL query.
String sql = "SELECT * FROM EMPLOYEE WHERE id = :employee_id";
SQLQuery query = session.createSQLQuery(sql);
query.addEntity(Employee.class);
query.setParameter("employee_id", 10);
List results = query.list();
Native SQL Example
Consider the following POJO class −
public class Employee {
   private int id;
   private String firstName;
   private String lastName;
   private int salary;

   public Employee() {}

   public Employee(String fname, String lname, int salary) {
      this.firstName = fname;
      this.lastName = lname;
      this.salary = salary;
   }

   public int getId() {
      return id;
   }

   public void setId( int id ) {
      this.id = id;
   }

   public String getFirstName() {
      return firstName;
   }

   public void setFirstName( String first_name ) {
      this.firstName = first_name;
   }

   public String getLastName() {
      return lastName;
   }

   public void setLastName( String last_name ) {
      this.lastName = last_name;
   }

   public int getSalary() {
      return salary;
   }

   public void setSalary( int salary ) {
      this.salary = salary;
   }
}
Let us create the following EMPLOYEE table to store Employee objects −
create table EMPLOYEE (
   id INT NOT NULL auto_increment,
   first_name VARCHAR(20) default NULL,
   last_name  VARCHAR(20) default NULL,
   salary     INT  default NULL,
   PRIMARY KEY (id)
);
Following will be mapping file −
<?xml version = "1.0" encoding = "utf-8"?>
<!DOCTYPE hibernate-mapping PUBLIC
"-//Hibernate/Hibernate Mapping DTD//EN"
"http://www.hibernate.org/dtd/hibernate-mapping-3.0.dtd">

<hibernate-mapping>
   <class name = "Employee" table = "EMPLOYEE">

      <meta attribute = "class-description">
         This class contains the employee detail.
      </meta>

      <id name = "id" type = "int" column = "id">
         <generator class="native"/>
      </id>

      <property name = "firstName" column = "first_name" type = "string"/>
      <property name = "lastName" column = "last_name" type = "string"/>
      <property name = "salary" column = "salary" type = "int"/>

   </class>
</hibernate-mapping>
Finally, we will create our application class with the main() method to run the application where we will use Native SQL queries −
import java.util.*;

import org.hibernate.HibernateException;
import org.hibernate.Session;
import org.hibernate.Transaction;
import org.hibernate.SessionFactory;
import org.hibernate.SQLQuery;
import org.hibernate.Criteria;
import org.hibernate.Hibernate;
import org.hibernate.cfg.Configuration;

public class ManageEmployee {
   private static SessionFactory factory;
   public static void main(String[] args) {

      try {
         factory = new Configuration().configure().buildSessionFactory();
      } catch (Throwable ex) {
         System.err.println("Failed to create sessionFactory object." + ex);
         throw new ExceptionInInitializerError(ex);
      }

      ManageEmployee ME = new ManageEmployee();

      /* Add few employee records in database */
      Integer empID1 = ME.addEmployee("Zara", "Ali", 2000);
      Integer empID2 = ME.addEmployee("Daisy", "Das", 5000);
      Integer empID3 = ME.addEmployee("John", "Paul", 5000);
      Integer empID4 = ME.addEmployee("Mohd", "Yasee", 3000);

      /* List down employees and their salary using Scalar Query */
      ME.listEmployeesScalar();

      /* List down complete employees information using Entity Query */
      ME.listEmployeesEntity();
   }

   /* Method to CREATE an employee in the database */
   public Integer addEmployee(String fname, String lname, int salary){
      Session session = factory.openSession();
      Transaction tx = null;
      Integer employeeID = null;

      try {
         tx = session.beginTransaction();
         Employee employee = new Employee(fname, lname, salary);
         employeeID = (Integer) session.save(employee);
         tx.commit();
      } catch (HibernateException e) {
         if (tx!=null) tx.rollback();
         e.printStackTrace();
      } finally {
         session.close();
      }
      return employeeID;
   }

   /* Method to  READ all the employees using Scalar Query */
   public void listEmployeesScalar( ){
      Session session = factory.openSession();
      Transaction tx = null;

      try {
         tx = session.beginTransaction();
         String sql = "SELECT first_name, salary FROM EMPLOYEE";
         SQLQuery query = session.createSQLQuery(sql);
         query.setResultTransformer(Criteria.ALIAS_TO_ENTITY_MAP);
         List data = query.list();

         for(Object object : data) {
            Map row = (Map)object;
            System.out.print("First Name: " + row.get("first_name"));
            System.out.println(", Salary: " + row.get("salary"));
         }
         tx.commit();
      } catch (HibernateException e) {
         if (tx!=null) tx.rollback();
         e.printStackTrace();
      } finally {
         session.close();
      }
   }

   /* Method to READ all the employees using Entity Query */
   public void listEmployeesEntity( ){
      Session session = factory.openSession();
      Transaction tx = null;

      try {
         tx = session.beginTransaction();
         String sql = "SELECT * FROM EMPLOYEE";
         SQLQuery query = session.createSQLQuery(sql);
         query.addEntity(Employee.class);
         List employees = query.list();

         for (Iterator iterator = employees.iterator(); iterator.hasNext();){
            Employee employee = (Employee) iterator.next();
            System.out.print("First Name: " + employee.getFirstName());
            System.out.print("  Last Name: " + employee.getLastName());
            System.out.println("  Salary: " + employee.getSalary());
         }
         tx.commit();
      } catch (HibernateException e) {
         if (tx!=null) tx.rollback();
         e.printStackTrace();
      } finally {
         session.close();
      }
   }
}
Compilation and Execution
Here are the steps to compile and run the above mentioned application. Make sure, you have set PATH and CLASSPATH appropriately before proceeding for the compilation and execution.
Create hibernate.cfg.xml configuration file as explained in configuration chapter.
Create Employee.hbm.xml mapping file as shown above.
Create Employee.java source file as shown above and compile it.
Create ManageEmployee.java source file as shown above and compile it.
Execute ManageEmployee binary to run the program.
You would get the following result, and records would be created in the EMPLOYEE table.
$java ManageEmployee
.......VARIOUS LOG MESSAGES WILL DISPLAY HERE........

First Name: Zara, Salary: 2000
First Name: Daisy, Salary: 5000
First Name: John, Salary: 5000
First Name: Mohd, Salary: 3000
First Name: Zara  Last Name: Ali  Salary: 2000
First Name: Daisy  Last Name: Das  Salary: 5000
First Name: John  Last Name: Paul  Salary: 5000
First Name: Mohd  Last Name: Yasee  Salary: 3000
If you check your EMPLOYEE table, it should have the following records −
mysql> select * from EMPLOYEE;
+----+------------+-----------+--------+
| id | first_name | last_name | salary |
+----+------------+-----------+--------+
| 26 | Zara       | Ali       |   2000 |
| 27 | Daisy      | Das       |   5000 |
| 28 | John       | Paul      |   5000 |
| 29 | Mohd       | Yasee     |   3000 |
+----+------------+-----------+--------+
4 rows in set (0.00 sec)
mysql>
Hibernate - Caching
Caching is a mechanism to enhance the performance of a system. It is a buffer memorythat lies between the application and the database. Cache memory stores recently used data items in order to reduce the number of database hits as much as possible.
Caching is important to Hibernate as well. It utilizes a multilevel caching scheme as explained below −
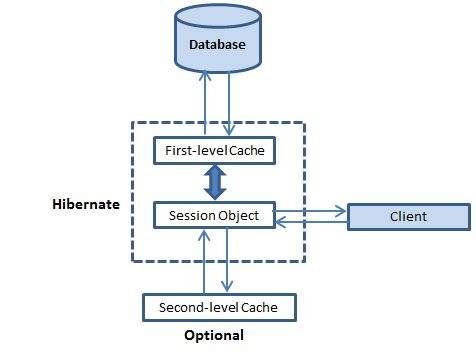
First-level Cache
The first-level cache is the Session cache and is a mandatory cache through which all requests must pass. The Session object keeps an object under its own power before committing it to the database.
If you issue multiple updates to an object, Hibernate tries to delay doing the update as long as possible to reduce the number of update SQL statements issued. If you close the session, all the objects being cached are lost and either persisted or updated in the database.
Second-level Cache
Second level cache is an optional cache and first-level cache will always be consulted before any attempt is made to locate an object in the second-level cache. The second level cache can be configured on a per-class and per-collection basis and mainly responsible for caching objects across sessions.
Any third-party cache can be used with Hibernate. An org.hibernate.cache.CacheProvider interface is provided, which must be implemented to provide Hibernate with a handle to the cache implementation.
Query-level Cache
Hibernate also implements a cache for query resultsets that integrates closely with the second-level cache.
This is an optional feature and requires two additional physical cache regions that hold the cached query results and the timestamps when a table was last updated. This is only useful for queries that are run frequently with the same parameters.
The Second Level Cache
Hibernate uses first-level cache by default and you have nothing to do to use first-level cache. Let's go straight to the optional second-level cache. Not all classes benefit from caching, so it's important to be able to disable the second-level cache.
The Hibernate second-level cache is set up in two steps. First, you have to decide which concurrency strategy to use. After that, you configure cache expiration and physical cache attributes using the cache provider.
Concurrency Strategies
A concurrency strategy is a mediator, which is responsible for storing items of data in the cache and retrieving them from the cache. If you are going to enable a second-level cache, you will have to decide, for each persistent class and collection, which cache concurrency strategy to use.
Transactional − Use this strategy for read-mostly data where it is critical to prevent stale data in concurrent transactions, in the rare case of an update.
Read-write − Again use this strategy for read-mostly data where it is critical to prevent stale data in concurrent transactions, in the rare case of an update.
Nonstrict-read-write − This strategy makes no guarantee of consistency between the cache and the database. Use this strategy if data hardly ever changes and a small likelihood of stale data is not of critical concern.
Read-only − A concurrency strategy suitable for data, which never changes. Use it for reference data only.
If we are going to use second-level caching for our Employee class, let us add the mapping element required to tell Hibernate to cache Employee instances using read-write strategy.
<?xml version = "1.0" encoding = "utf-8"?>
<!DOCTYPE hibernate-mapping PUBLIC
"-//Hibernate/Hibernate Mapping DTD//EN"
"http://www.hibernate.org/dtd/hibernate-mapping-3.0.dtd">
<hibernate-mapping>
   <class name = "Employee" table = "EMPLOYEE">

      <meta attribute = "class-description">
         This class contains the employee detail.
      </meta>

      <cache usage = "read-write"/>

      <id name = "id" type = "int" column = "id">
         <generator class="native"/>
      </id>

      <property name = "firstName" column = "first_name" type = "string"/>
      <property name = "lastName" column = "last_name" type = "string"/>
      <property name = "salary" column = "salary" type = "int"/>

   </class>
</hibernate-mapping>
The usage="read-write" attribute tells Hibernate to use a read-write concurrency strategy for the defined cache.
Cache Provider
Your next step after considering the concurrency strategies, you will use your cache candidate classes to pick a cache provider. Hibernate forces you to choose a single cache provider for the whole application.
| Sr.No. | Cache Name & Description |
|---|---|
| 1 |
EHCache It can cache in memory or on disk and clustered caching and it supports the optional Hibernate query result cache. |
| 2 |
OSCache Supports caching to memory and disk in a single JVM with a rich set of expiration policies and query cache support. |
| 3 |
warmCache A cluster cache based on JGroups. It uses clustered invalidation, but doesn't support the Hibernate query cache. |
| 4 |
JBoss Cache A fully transactional replicated clustered cache also based on the JGroups multicast library. It supports replication or invalidation, synchronous or asynchronous communication, and optimistic and pessimistic locking. The Hibernate query cache is supported. |
Every cache provider is not compatible with every concurrency strategy. The following compatibility matrix will help you choose an appropriate combination.
| Strategy/Provider | Read-only | Nonstrictread-write | Read-write | Transactional |
|---|---|---|---|---|
| EHCache | X | X | X | |
| OSCache | X | X | X | |
| SwarmCache | X | X | ||
| JBoss Cache | X | X |
You will specify a cache provider in hibernate.cfg.xml configuration file. We choose EHCache as our second-level cache provider −
<?xml version = "1.0" encoding = "utf-8"?>
<!DOCTYPE hibernate-configuration SYSTEM
"http://www.hibernate.org/dtd/hibernate-configuration-3.0.dtd">
<hibernate-configuration>
   <session-factory>

      <property name = "hibernate.dialect">
         org.hibernate.dialect.MySQLDialect
      </property>

      <property name = "hibernate.connection.driver_class">
         com.mysql.jdbc.Driver
      </property>

      <!-- Assume students is the database name -->

      <property name = "hibernate.connection.url">
         jdbc:mysql://localhost/test
      </property>

      <property name = "hibernate.connection.username">
         root
      </property>

      <property name = "hibernate.connection.password">
         root123
      </property>

      <property name = "hibernate.cache.provider_class">
         org.hibernate.cache.EhCacheProvider
      </property>

      <!-- List of XML mapping files -->
      <mapping resource = "Employee.hbm.xml"/>

   </session-factory>
</hibernate-configuration>
Now, you need to specify the properties of the cache regions. EHCache has its own configuration file, ehcache.xml, which should be in the CLASSPATH of the application. A cache configuration in ehcache.xml for the Employee class may look like this −
<diskStore path="java.io.tmpdir"/>

<defaultCache
maxElementsInMemory = "1000"
eternal = "false"
timeToIdleSeconds = "120"
timeToLiveSeconds = "120"
overflowToDisk = "true"
/>

<cache name = "Employee"
maxElementsInMemory = "500"
eternal = "true"
timeToIdleSeconds = "0"
timeToLiveSeconds = "0"
overflowToDisk = "false"
/>
That's it, now we have second-level caching enabled for the Employee class and Hibernate, now hits the second-level cache whenever you navigate to an Employee or when you load an Employee by identifier.
You should analyze your all the classes and choose appropriate caching strategy for each of the classes. Sometime, second-level caching may downgrade the performance of the application. So, it is recommended to benchmark your application first, without enabling caching and later on enable your well suited caching and check the performance. If caching is not improving system performance, then there is no point in enabling any type of caching.
The Query-level Cache
To use the query cache, you must first activate it using the hibernate.cache.use_query_cache="true" property in the configuration file. By setting this property to true, you make Hibernate create the necessary caches in memory to hold the query and identifier sets.
Next, to use the query cache, you use the setCacheable(Boolean) method of the Query class. For example −
Session session = SessionFactory.openSession();
Query query = session.createQuery("FROM EMPLOYEE");
query.setCacheable(true);
List users = query.list();
SessionFactory.closeSession();
Hibernate also supports very fine-grained cache support through the concept of a cache region. A cache region is part of the cache that's given a name.
Session session = SessionFactory.openSession();
Query query = session.createQuery("FROM EMPLOYEE");
query.setCacheable(true);
query.setCacheRegion("employee");
List users = query.list();
SessionFactory.closeSession();
This code uses the method to tell Hibernate to store and look for the query in the employee area of the cache.
Hibernate - Entity Lifecyle
An entity in Hibernate is an object that is mapped to a database table. An entity can be in one of the four states −
Transient − Not persistent. Just instantiated, or maybe some methods have been called, but not associated with a Session.
Persistent − Associated with a Session. As soon as we call save or persist, the object is in persistent state.
Detached − Previously attached to a Session, but not anymore.
Removed − An entity enters the removed state when it is marked for deletion from the database.
Let's discuss each state in details.
Transient state
Transient state means an entity is not persistent. It is just instantiated, or maybe some methods have been called, but not associated with a Session. Objects can enter persistent state by calling save, persist or saveOrUpdate() methods.
Example
Employee employee = new Employee();
employee.setName("John Doe");
employee.setSalary(50000.0);
In the above example, the Employee object is in the transient state because it is not yet associated with a Hibernate session.
Persistent state
Persistent state refers to an association with a session. As soon as we call save or persist, the object is in persistent state. Persistent objects can become transient when the delete() method is called. Calling get() and load() on Session, returns a persistent entity.
Example
Session session = sessionFactory.openSession();
session.beginTransaction();

Employee employee = new Employee();
employee.setName("John Doe");
employee.setSalary(50000.0);

session.save(employee); // The entity is now in the persistent //state

session.getTransaction().commit();
session.close();
Here, the Employee object becomes persistent when it is saved using the session.save() method. Any changes made to the employee object will be reflected in the database.
Detached state
Detached state refers to state where an entity was previously attached with a session, but not anymore. An entity enters the detached state when the Hibernate session that was managing it is closed. In this state, the entity is no longer associated with any session, and changes made to it are not automatically synchronized with the database.
Example
Session session = sessionFactory.openSession();
session.beginTransaction();

Employee employee = session.get(Employee.class, 1L);
session.getTransaction().commit();
session.close(); // The entity is now in the detached state

employee.setSalary(60000.0); // Changes are not synchronized with the database
Removed state
An entity enters the removed state when it is marked for deletion from the database. In this state, the entity is still associated with a session, but it will be deleted from the database when the transaction is committed.
Example
Session session = sessionFactory.openSession();
session.beginTransaction();

Employee employee = session.get(Employee.class, 1L);
session.delete(employee); // The entity is now in the removed state

session.getTransaction().commit();
session.close();
Transitioning Between States
Entities can transition between these states through various Hibernate methods −
Transient to Persistent − Calling session.save() or session.persist() method, moves the entity from transient to persistent state.
Persistent to Detached − Calling session.evit() or session.clear() or session.close() method, cause the entity to be in detached state.
Detached to Persistent − Call session.update() or session.merge() method to persist an detached entity.
Persistent to Removed − Remove an entity by calling session.delete() method.
Hibernate - Batch Processing
Consider a situation when you need to upload a large number of records into your database using Hibernate. Following is the code snippet to achieve this using Hibernate −
Session session = SessionFactory.openSession();
Transaction tx = session.beginTransaction();
for ( int i=0; i<100000; i++ ) {
   Employee employee = new Employee(.....);
   session.save(employee);
}
tx.commit();
session.close();
By default, Hibernate will cache all the persisted objects in the session-level cache and ultimately your application would fall over with an OutOfMemoryException somewhere around the 50,000th row. You can resolve this problem, if you are using batch processing with Hibernate.
To use the batch processing feature, first set hibernate.jdbc.batch_size as batch size to a number either at 20 or 50 depending on object size. This will tell the hibernate container that every X rows to be inserted as batch. To implement this in your code, we would need to do little modification as follows −
Session session = SessionFactory.openSession();
Transaction tx = session.beginTransaction();
for ( int i=0; i<100000; i++ ) {
   Employee employee = new Employee(.....);
   session.save(employee);
   if( i % 50 == 0 ) { // Same as the JDBC batch size
      //flush a batch of inserts and release memory:
      session.flush();
      session.clear();
   }
}
tx.commit();
session.close();
Above code will work fine for the INSERT operation, but if you are willing to make UPDATE operation, then you can achieve using the following code −
Session session = sessionFactory.openSession();
Transaction tx = session.beginTransaction();

ScrollableResults employeeCursor = session.createQuery("FROM EMPLOYEE").scroll();
int count = 0;

while ( employeeCursor.next() ) {
   Employee employee = (Employee) employeeCursor.get(0);
   employee.updateEmployee();
   seession.update(employee);
   if ( ++count % 50 == 0 ) {
      session.flush();
      session.clear();
   }
}
tx.commit();
session.close();
Batch Processing Example
Let us modify the configuration file to add hibernate.jdbc.batch_size property −
<?xml version = "1.0" encoding = "utf-8"?>
<!DOCTYPE hibernate-configuration SYSTEM
"http://www.hibernate.org/dtd/hibernate-configuration-3.0.dtd">

<hibernate-configuration>
   <session-factory>

      <property name = "hibernate.dialect">
         org.hibernate.dialect.MySQLDialect
      </property>

      <property name = "hibernate.connection.driver_class">
         com.mysql.jdbc.Driver
      </property>

      <!-- Assume students is the database name -->

      <property name = "hibernate.connection.url">
         jdbc:mysql://localhost/test
      </property>

      <property name = "hibernate.connection.username">
         root
      </property>

      <property name = "hibernate.connection.password">
         root123
      </property>

      <property name = "hibernate.jdbc.batch_size">
         50
      </property>

      <!-- List of XML mapping files -->
      <mapping resource = "Employee.hbm.xml"/>

   </session-factory>
</hibernate-configuration>
Consider the following POJO Employee class −
public class Employee {
   private int id;
   private String firstName;
   private String lastName;
   private int salary;

   public Employee() {}

   public Employee(String fname, String lname, int salary) {
      this.firstName = fname;
      this.lastName = lname;
      this.salary = salary;
   }

   public int getId() {
      return id;
   }

   public void setId( int id ) {
      this.id = id;
   }

   public String getFirstName() {
      return firstName;
   }

   public void setFirstName( String first_name ) {
      this.firstName = first_name;
   }

   public String getLastName() {
      return lastName;
   }

   public void setLastName( String last_name ) {
      this.lastName = last_name;
   }

   public int getSalary() {
      return salary;
   }

   public void setSalary( int salary ) {
      this.salary = salary;
   }
}
Let us create the following EMPLOYEE table to store the Employee objects −
create table EMPLOYEE (
   id INT NOT NULL auto_increment,
   first_name VARCHAR(20) default NULL,
   last_name  VARCHAR(20) default NULL,
   salary     INT  default NULL,
   PRIMARY KEY (id)
);
Following will be the mapping file to map the Employee objects with EMPLOYEE table −
<?xml version = "1.0" encoding = "utf-8"?>
<!DOCTYPE hibernate-mapping PUBLIC
"-//Hibernate/Hibernate Mapping DTD//EN"
"http://www.hibernate.org/dtd/hibernate-mapping-3.0.dtd">

<hibernate-mapping>
   <class name = "Employee" table = "EMPLOYEE">

      <meta attribute = "class-description">
         This class contains the employee detail.
      </meta>

      <id name = "id" type = "int" column = "id">
         <generator class="native"/>
      </id>

      <property name = "firstName" column = "first_name" type = "string"/>
      <property name = "lastName" column = "last_name" type = "string"/>
      <property name = "salary" column = "salary" type = "int"/>

   </class>
</hibernate-mapping>
Finally, we will create our application class with the main() method to run the application where we will use flush() and clear() methods available with Session object so that Hibernate keeps writing these records into the database instead of caching them in the memory.
import java.util.*;

import org.hibernate.HibernateException;
import org.hibernate.Session;
import org.hibernate.Transaction;
import org.hibernate.SessionFactory;
import org.hibernate.cfg.Configuration;

public class ManageEmployee {
   private static SessionFactory factory;
   public static void main(String[] args) {

      try {
         factory = new Configuration().configure().buildSessionFactory();
      } catch (Throwable ex) {
         System.err.println("Failed to create sessionFactory object." + ex);
         throw new ExceptionInInitializerError(ex);
      }
      ManageEmployee ME = new ManageEmployee();

      /* Add employee records in batches */
      ME.addEmployees( );
   }

   /* Method to create employee records in batches */
   public void addEmployees( ){
      Session session = factory.openSession();
      Transaction tx = null;
      Integer employeeID = null;

      try {
         tx = session.beginTransaction();
         for ( int i=0; i<100000; i++ ) {
            String fname = "First Name " + i;
            String lname = "Last Name " + i;
            Integer salary = i;
            Employee employee = new Employee(fname, lname, salary);
            session.save(employee);
         	if( i % 50 == 0 ) {
               session.flush();
               session.clear();
            }
         }
         tx.commit();
      } catch (HibernateException e) {
         if (tx!=null) tx.rollback();
         e.printStackTrace();
      } finally {
         session.close();
      }
      return ;
   }
}
Compilation and Execution
Here are the steps to compile and run the above mentioned application. Make sure, you have set PATH and CLASSPATH appropriately before proceeding for the compilation and execution.
Create hibernate.cfg.xml configuration file as explained above.
Create Employee.hbm.xml mapping file as shown above.
Create Employee.java source file as shown above and compile it.
Create ManageEmployee.java source file as shown above and compile it.
Execute ManageEmployee binary to run the program, which will create 100000 records in EMPLOYEE table.
Hibernate - Interceptors
As you have learnt that in Hibernate, an object will be created and persisted. Once the object has been changed, it must be saved back to the database. This process continues until the next time the object is needed, and it will be loaded from the persistent store.
Thus an object passes through different stages in its life cycle and Interceptor Interface provides methods, which can be called at different stages to perform some required tasks. These methods are callbacks from the session to the application, allowing the application to inspect and/or manipulate properties of a persistent object before it is saved, updated, deleted or loaded. Following is the list of all the methods available within the Interceptor interface −
| Sr.No. | Method & Description |
|---|---|
| 1 |
findDirty() This method is be called when the flush() method is called on a Session object. |
| 2 |
instantiate() This method is called when a persisted class is instantiated. |
| 3 |
isUnsaved() This method is called when an object is passed to the saveOrUpdate() method/ |
| 4 |
onDelete() This method is called before an object is deleted. |
| 5 |
onFlushDirty() This method is called when Hibernate detects that an object is dirty (i.e. have been changed) during a flush i.e. update operation. |
| 6 |
onLoad() This method is called before an object is initialized. |
| 7 |
onSave() This method is called before an object is saved. |
| 8 |
postFlush() This method is called after a flush has occurred and an object has been updated in memory. |
| 9 |
preFlush() This method is called before a flush. |
Hibernate Interceptor gives us total control over how an object will look to both the application and the database.
How to Use Interceptors?
To build an interceptor, you can either implement Interceptor class directly or extend EmptyInterceptor class. Following will be the simple steps to use Hibernate Interceptor functionality.
Create Interceptors
We will extend EmptyInterceptor in our example where Interceptor's method will be called automatically when Employee object is created and updated. You can implement more methods as per your requirements.
import java.io.Serializable;
import java.util.Date;
import java.util.Iterator;

import org.hibernate.EmptyInterceptor;
import org.hibernate.Transaction;
import org.hibernate.type.Type;

public class MyInterceptor extends EmptyInterceptor {
   private int updates;
   private int creates;
   private int loads;

   public void onDelete(Object entity, Serializable id,
      Object[] state, String[] propertyNames, Type[] types) {
       // do nothing
   }

   // This method is called when Employee object gets updated.
   public boolean onFlushDirty(Object entity, Serializable id,
      Object[] currentState, Object[] previousState, String[] propertyNames,
      Type[] types) {
         if ( entity instanceof Employee ) {
            System.out.println("Update Operation");
            return true;
         }
         return false;
   }

   public boolean onLoad(Object entity, Serializable id,
      Object[] state, String[] propertyNames, Type[] types) {
         // do nothing
         return true;
   }

   // This method is called when Employee object gets created.
   public boolean onSave(Object entity, Serializable id,
      Object[] state, String[] propertyNames, Type[] types) {
         if ( entity instanceof Employee ) {
            System.out.println("Create Operation");
            return true;
         }
         return false;
   }

   //called before commit into database
   public void preFlush(Iterator iterator) {
      System.out.println("preFlush");
   }

   //called after committed into database
   public void postFlush(Iterator iterator) {
      System.out.println("postFlush");
   }
}
Create POJO Classes
Now, let us modify a little bit our first example where we used EMPLOYEE table and Employee class to play with −
public class Employee {
   private int id;
   private String firstName;
   private String lastName;
   private int salary;

   public Employee() {}

   public Employee(String fname, String lname, int salary) {
      this.firstName = fname;
      this.lastName = lname;
      this.salary = salary;
   }

   public int getId() {
      return id;
   }

   public void setId( int id ) {
      this.id = id;
   }

   public String getFirstName() {
      return firstName;
   }

   public void setFirstName( String first_name ) {
      this.firstName = first_name;
   }

   public String getLastName() {
      return lastName;
   }

   public void setLastName( String last_name ) {
      this.lastName = last_name;
   }

   public int getSalary() {
      return salary;
   }

   public void setSalary( int salary ) {
      this.salary = salary;
   }
}
Create Database Tables
Second step would be creating tables in your database. There would be one table corresponding to each object, you are willing to provide persistence. Consider the objects explained above, need to be stored and retrieved into the following RDBMS table −
create table EMPLOYEE (
   id INT NOT NULL auto_increment,
   first_name VARCHAR(20) default NULL,
   last_name  VARCHAR(20) default NULL,
   salary     INT  default NULL,
   PRIMARY KEY (id)
);
Create Mapping Configuration File
This step is to create a mapping file that instructs Hibernate how to map the defined class or classes to the database tables.
<?xml version = "1.0" encoding = "utf-8"?>
<!DOCTYPE hibernate-mapping PUBLIC
"-//Hibernate/Hibernate Mapping DTD//EN"
"http://www.hibernate.org/dtd/hibernate-mapping-3.0.dtd">

<hibernate-mapping>
   <class name = "Employee" table = "EMPLOYEE">

      <meta attribute = "class-description">
         This class contains the employee detail.
      </meta>

      <id name = "id" type = "int" column = "id">
         <generator class="native"/>
      </id>

      <property name = "firstName" column = "first_name" type = "string"/>
      <property name = "lastName" column = "last_name" type = "string"/>
      <property name = "salary" column = "salary" type = "int"/>

   </class>
</hibernate-mapping>
Create Application Class
Finally, we will create our application class with the main() method to run the application. Here, it should be noted that while creating session object, we used our Interceptor class as an argument.
import java.util.List;
import java.util.Date;
import java.util.Iterator;

import org.hibernate.HibernateException;
import org.hibernate.Session;
import org.hibernate.Transaction;
import org.hibernate.SessionFactory;
import org.hibernate.cfg.Configuration;

public class ManageEmployee {
   private static SessionFactory factory;
   public static void main(String[] args) {

      try {
         factory = new Configuration().configure().buildSessionFactory();
      } catch (Throwable ex) {
         System.err.println("Failed to create sessionFactory object." + ex);
         throw new ExceptionInInitializerError(ex);
      }

      ManageEmployee ME = new ManageEmployee();

      /* Add few employee records in database */
      Integer empID1 = ME.addEmployee("Zara", "Ali", 1000);
      Integer empID2 = ME.addEmployee("Daisy", "Das", 5000);
      Integer empID3 = ME.addEmployee("John", "Paul", 10000);

      /* List down all the employees */
      ME.listEmployees();

      /* Update employee's records */
      ME.updateEmployee(empID1, 5000);

      /* Delete an employee from the database */
      ME.deleteEmployee(empID2);

      /* List down new list of the employees */
      ME.listEmployees();
   }

   /* Method to CREATE an employee in the database */
   public Integer addEmployee(String fname, String lname, int salary){
      Session session = factory.openSession( new MyInterceptor() );
      Transaction tx = null;
      Integer employeeID = null;

      try {
         tx = session.beginTransaction();
         Employee employee = new Employee(fname, lname, salary);
         employeeID = (Integer) session.save(employee);
         tx.commit();
      } catch (HibernateException e) {
         if (tx!=null) tx.rollback();
         e.printStackTrace();
      } finally {
         session.close();
      }
      return employeeID;
   }

   /* Method to  READ all the employees */
   public void listEmployees( ){
      Session session = factory.openSession( new MyInterceptor() );
      Transaction tx = null;

      try {
         tx = session.beginTransaction();
         List employees = session.createQuery("FROM Employee").list();
         for (Iterator iterator = employees.iterator(); iterator.hasNext();){
            Employee employee = (Employee) iterator.next();
            System.out.print("First Name: " + employee.getFirstName());
            System.out.print("  Last Name: " + employee.getLastName());
            System.out.println("  Salary: " + employee.getSalary());
         }
         tx.commit();
      } catch (HibernateException e) {
         if (tx!=null) tx.rollback();
         e.printStackTrace();
      } finally {
         session.close();
      }
   }

   /* Method to UPDATE salary for an employee */
   public void updateEmployee(Integer EmployeeID, int salary ){
      Session session = factory.openSession( new MyInterceptor() );
      Transaction tx = null;

      try {
         tx = session.beginTransaction();
         Employee employee = (Employee)session.get(Employee.class, EmployeeID);
         employee.setSalary( salary );
		 session.update(employee);
         tx.commit();
      } catch (HibernateException e) {
         if (tx!=null) tx.rollback();
         e.printStackTrace();
      } finally {
         session.close();
      }
   }

   /* Method to DELETE an employee from the records */
   public void deleteEmployee(Integer EmployeeID){
      Session session = factory.openSession( new MyInterceptor() );
      Transaction tx = null;

      try {
         tx = session.beginTransaction();
         Employee employee = (Employee)session.get(Employee.class, EmployeeID);
         session.delete(employee);
         tx.commit();
      } catch (HibernateException e) {
         if (tx!=null) tx.rollback();
         e.printStackTrace();
      } finally {
         session.close();
      }
   }
}
Compilation and Execution
Here are the steps to compile and run the above mentioned application. Make sure, you have set PATH and CLASSPATH appropriately before proceeding for the compilation and execution.
Create hibernate.cfg.xml configuration file as explained in configuration chapter.
Create Employee.hbm.xml mapping file as shown above.
Create Employee.java source file as shown above and compile it.
Create MyInterceptor.java source file as shown above and compile it.
Create ManageEmployee.java source file as shown above and compile it.
Execute ManageEmployee binary to run the program.
You would get the following result, and records would be created in the EMPLOYEE table.
$java ManageEmployee
.......VARIOUS LOG MESSAGES WILL DISPLAY HERE........

Create Operation
preFlush
postFlush
Create Operation
preFlush
postFlush
Create Operation
preFlush
postFlush
First Name: Zara  Last Name: Ali  Salary: 1000
First Name: Daisy  Last Name: Das  Salary: 5000
First Name: John  Last Name: Paul  Salary: 10000
preFlush
postFlush
preFlush
Update Operation
postFlush
preFlush
postFlush
First Name: Zara  Last Name: Ali  Salary: 5000
First Name: John  Last Name: Paul  Salary: 10000
preFlush
postFlush
If you check your EMPLOYEE table, it should have the following records −
mysql> select * from EMPLOYEE;
+----+------------+-----------+--------+
| id | first_name | last_name | salary |
+----+------------+-----------+--------+
| 29 | Zara       | Ali       |   5000 |
| 31 | John       | Paul      |  10000 |
+----+------------+-----------+--------+
2 rows in set (0.00 sec
mysql>
Hibernate - ID Generator
A generator class is used to generate an ID for the for an object, which is going to be the primary key of the database table. All generator classes implement org.hibernate.id.IdentifierGenerator interface. One can create their own generator class by implementing the above-mentioned interface and overriding the generator(SharedSessionContractImplementor sess, Object obj) method.
Check the employee.hbm.xml file snippet below:
<hibernate-mapping>
   <class name="com.mypackage.Employee" table="emp">
      <id name="id">
         <generator class="assigned"></generator>
      </id>
...
</hibernate-mapping>
Types of Generator Classes
Hibernate provides many predefined generator classes. Some of the important predefined generator classes in hibernate are:
assigned − This generator indicates that the application will assign the primary key value. Hibernate doesn't generate any value in this case.
identity − This generator uses the database's auto-increment feature to generate primary key values. It works with most databases and is suitable for simple use cases. Oracle does not support identity generator. MySQL, MS SQL Server, DB2, etc. supports this.
sequence − This generator uses a database sequence to generate primary key values. It provides better performance and control compared to identity in some cases.
Command to create a sequence
create sequence <sequence_name> start with <number> increment by <number>
Note − MySQL does not support sequences. Oracle does support sequences.
Entry in employee.hbm.xml
<hibernate-mapping>
   <class name="com.mypackage.Employee" table="emp">
      <id name="id">
         <generator class=sequence>
            <param name=sequence>datasource_name</param>
         </generator>
      </id>
...
</hibernate-mapping>
increment − This generator generates primary key values by incrementing a value stored in memory.
hilo − This generator uses a high-low algorithm to generate primary key values. It combines the advantages of sequence and increment.
uuid − This generator generates universally unique identifiers (UUIDs) as primary key values. It is useful for distributed systems where unique IDs are required.
native − This generator delegates the primary key generation strategy to the underlying database. If identity is supported by the underlying database, it chooses identity. Otherwise, it chooses sequence or hilo. It chooses the best strategy based on the database dialect.
foreign − This generator uses the primary key value from another associated entity as the primary key value for the current entity.
Generating ID using Annotations
We can use IDENTITY generator annotation to generate the ID field. See the example below:
@Entity
public class Employee {
   @Id
   @GeneratedValue(strategy = GenerationType.IDENTITY)
   private Long id;

   // ... other fields
}
Hibernate - Saving Image
Often we need to save images or large documents in database. Databases provide saving characters or image files as BLOB (Binary Large Object) or CLOB (Character Large Object). In database, the type is BLOB/LONGBLOB, LONGTEXT etc.
To indicate that an entity has a field that has to be stored as a BLOB,CLOB the @Lob annotation is used. For example, consider the following code snippet −
@Entity
@Table(name = "save_image")
public class LobEntity {

...
   @Lob
   @Column(name = "image")
   private byte[] image;
...
}
Let's discuss Saving Image in Hibernate in details with an example.
Create Mapping Class
Let's create the POJO class whose data is to be persisted in the database.
LobEntity.java
package com.tutorialspoint;

import javax.persistence.*;

@Entity
@Table(name = "save_image")
public class LobEntity {

   @Id
   @GeneratedValue(strategy = GenerationType.IDENTITY)
   private Long id;

   public Long getId() {
      return id;
   }

   public void setId(Long id) {
      this.id = id;
   }

   @Lob
   @Column(name = "image")
   private byte[] image;

   public byte [] getImage() {
      return image;
   }
   public void setImage(byte[] imageData) {
      this.image = imageData;
   }
}
Create Hibernate Configuration File
Now create a hibernate configuration file for database and other details.
hibernate.cfg.xml
<?xml version="1.0" encoding="UTF-8"?>
<!DOCTYPE hibernate-configuration PUBLIC
   "-//Hibernate/Hibernate Configuration DTD 5.3//EN"
   "http://www.hibernate.org/dtd/hibernate-configuration-3.0.dtd">
<hibernate-configuration>
   <session-factory>
      <property name="hbm2ddl.auto">update</property>
      <property name="dialect">org.hibernate.dialect.MySQL8Dialect</property>
      <property name="connection.url">jdbc:mysql://localhost/TUTORIALSPOINT</property>
      <property name="connection.username">root</property>
      <property name="connection.password">guest123</property>
      <property name="connection.driver_class">com.mysql.cj.jdbc.Driver</property>
      <mapping class="com.tutorialspoint.LobEntity"/>
   </session-factory>
</hibernate-configuration>
Notice how in the file mapping element has a class instead of resource. And having hbm2ddl.auto property as update creates the table automatically if table is not present.
Create Application Class
Finally, we will create our application class with the main() method to run the application. We will use this application to test Table per Hiearchy mapping.
SaveBlob.java
package com.tutorialspoint;

import org.hibernate.Session;
import org.hibernate.SessionFactory;
import org.hibernate.Transaction;
import org.hibernate.boot.Metadata;
import org.hibernate.boot.MetadataSources;
import org.hibernate.boot.registry.StandardServiceRegistry;
import org.hibernate.boot.registry.StandardServiceRegistryBuilder;

import java.io.*;

public class SaveBlob {
   public static void main(String[] args) throws FileNotFoundException, IOException {

      FileInputStream fis = new FileInputStream("C:\\Users\\Saikat\\OneDrive\\Pictures\\almoural_castle.jpg");
      byte[] bytes = new byte[fis.available()];
      StandardServiceRegistry ssr = new StandardServiceRegistryBuilder().configure("hibernate.cfg.xml").build();
      Metadata meta = new MetadataSources(ssr).getMetadataBuilder().build();
      SessionFactory factory = meta.getSessionFactoryBuilder().build();
      Session session = factory.openSession();
      Transaction t = session.beginTransaction();
      LobEntity lob = new LobEntity();
      lob.setImage(bytes);
      session.save(lob);
      session.getTransaction().commit();
      fis.close();
      System.out.println("Successfully inserted image in table.");
   }
}
Compilation and Execution
Execute SaveBlob binary to run the program.
Output
You would get the following result, and record would be created in the save_image table.
$java SaveBlob
Successfully inserted image in table.
If you check your save_image table, it should have the following records −
mysql> select id from save_image;
+----+
| id |
+----+
|  1 |
+----+
1 row in set (0.00 sec)


mysql> desc save_image;
+-------+----------+------+-----+---------+----------------+
| Field | Type     | Null | Key | Default | Extra          |
+-------+----------+------+-----+---------+----------------+
| id    | bigint   | NO   | PRI | NULL    | auto_increment |
| image | longblob | YES  |     | NULL    |                |
+-------+----------+------+-----+---------+----------------+
2 rows in set (0.00 sec)
Hibernate - log4j Integration
Log4j is a logging framework, written entirely in Java. It is an open-source project from Apache Software Foundation.
In order to use Log4j, you need to put log4j library to your project's CLASSPATH. Then you need to set up a configuration file, which can be one of the following −
An XML file called log4j.xml
A properties file called log4j.properties
Different log levels of log4j
Following is the list of log levels supported by log4j framework.
| Sr.No. | Level & Description |
|---|---|
| 1 | ALL Highest Debug level. Outputs everything that is possible. |
| 2 | DEBUG Logs detailed information that is useful for debugging. |
| 3 | INFO Logs informational messages that highlight the progress of the application at a high level. |
| 4 | WARN Logs potentially harmful situations that are not necessarily errors. |
| 5 | ERROR Designates error events that might still allow the application to continue running. |
| 6 | FATAL Designates very severe error events that will presumably lead the application to abort. |
| 7 | OFF Disables logging. Used to turn off logging completely. |
| 8 | TRACE Designates finer-grained informational events than the DEBUG. |
Configuration using log4j.xml
For xml file configuration, you need log4j.jar in your CLASSPATH. Remember to save log4j.xml in the same directory (src/) as hibernate.cfg.xml.
log4j.xml
<?xml version="1.0" encoding="UTF-8" ?>
<!DOCTYPE log4j:configuration SYSTEM "log4j.dtd">
<log4j:configuration>
   <appender name="ConsoleAppender" class="org.apache.log4j.ConsoleAppender">
      <layout class="org.apache.log4j.PatternLayout">
         <param name="ConversionPattern" value="%d{MM/dd HH:mm:ss} %-5p
            %30.30c %x - %m\n"/>
      </layout>
   </appender>
   <appender name="FileAppender" class="org.apache.log4j.RollingFileAppender">
      <param name="File" value="C:/hibernate-log4j.log"/>
      <param name="MaxFileSize" value="10MB"/>
      <layout class="org.apache.log4j.PatternLayout">
         <param name="ConversionPattern" value="%d{MM/dd HH:mm:ss} %-5p
            %30.30c %x - %m\n"/>
      </layout>
   </appender>
   <root>
      <level value="info"/>
      <appender-ref ref="ConsoleAppender"/>
      <appender-ref ref="FileAppender"/>
   </root>
</log4j:configuration>
In, this configuration debug messages will be output to console (because of ConsoleAppender) and also to file (because of FileAppender) in C:/ > hibernate-log4j.log. You can change the file name as per your wish, but the extension needs to be log.
Configuration using log4j.properties
Similar to the XML file, the log4j.properties file must be put in under src/ folder (same as hibernate.cfg.xml).
log4j.properties
#Definetherootloggerwithappenderfile
log4j.rootLogger=DEBUG,FILE, stdout

#Output logmessagesto file
log4j.appender.file=org.apache.log4j.RollingFileAppender
log4j.appender.file.File=C:\\hibernate.log
log4j.appender.file.MaxFileSize=10MB
log4j.appender.file.layout=org.apache.log4j.PatternLayout
log4j.appender.file.layout.ConversionPattern=%d{ABSOLUTE}%5p%c{1}:%L-
%m%n

#Outputlogmessagestostdout
log4j.appender.stdout=org.apache.log4j.ConsoleAppender
log4j.appender.stdout.Target=System.out
log4j.appender.stdout.layout=org.apache.log4j.PatternLayout
log4j.appender.stdout.layout.ConversionPattern=%d{yyyy-MM-ddHH:mm:ss}%-
5p%c{1}:%L-%m%n

# Hibernate logging
-------------------------------------------------
# General Hibernate logging
log4j.logger.org.hibernate=INFO
# Logs all SQL statements generated by Hibernate
log4j.logger.org.hibernate.SQL=DEBUG
Hibernate - Spring Integration
Spring is an open-source framework for building enterprise-level Java applications. Spring has an applicationContext.xml file. We will use this file to provide all information including database configuration. Since database configuration is included in hibernate.cfg.xml in Hibernate, we will not need it anymore.
In Hibernate, we use StandardServiceRegistry, MetadataSources, SessionFactory to get Session, Transaction. Spring framework provides a HibernateTemplate class, where you just have to call save method to persist in database. HibernateTemplate class resides in org.springframework.orm.hibernate3 package.
Syntax
// create a new student object
Student s1 = new Student( 111, "Karan", "Physics");

// save the student object in database using HibernateTemplate instance
hibernateTemplate.persist(s1);
Required Libraries
For using HibernateTemplate, you will need the jar file from https://mvnrepository.com/artifact/org.springframework/spring-hibernate3/2.0.8
You will need spring-dao jar from https://mvnrepository.com/artifact/org.springframework/spring-dao/2.0.3
You will also need to put Hibernate-core jar in your CLASSPATH.
Useful Methods of HibernateTemplate Class
Following is the list of important methods of HibernateTemplate Class:
| Sr.No. | Method & Description |
|---|---|
| 1 | void persist(Object entity) Saves the object to the mapped table in database. |
| 2 | Serializable save(Object entity) Saves the object to the mapped table record in database and returns id. |
| 3 | void saveOrUpdate(Object entity) Saves or Updates the table mapped to the object. If id is entered, it updates the record otherwise saves. |
| 4 | void update(Object entity) Updates the table mapped to the object. |
| 5 | void delete(Object entity) Deletes the given object mapped to the table in database on the basis of id. |
Example
Let's discuss Spring Hibernate Integration in details with an example.
Create Mapping Class
Let's create the POJO class whose data is to be persisted in the database.
Student.java
package com.tutorialspoint;

public class Student {

   private long id;
   private String name;
   private String dept;
   public long getId() {
      return id;
   }
   public void setId(long id) {
      this.id = id;
   }
   public String getName() {
      return name;
   }
   public void setName(String name) {
      this.name = name;
   }
   public String getDept() {
      return dept;
   }
   public void setDept(String dept) {
      this.dept = dept;
   }
}
Create DAO Class
Create the DAO class which will be using HibernateTemplate class to create, update and delete student object.
StudentDAO.java
package com.tutorialspoint;

import org.springframework.orm.hibernate3.HibernateTemplate;

public class StudentDAO{

   HibernateTemplate template;

   public void setTemplate(HibernateTemplate template) {
      this.template = template;
   }

   public void saveStudent(Student s){
      template.save(s);
   }

   public void updateStudent(Student s){
      template.update(s);
   }

   public void deleteStudent(Student s){
      template.delete(s);
   }
}
Create Mapping XML
Create hibernate mapping for the student object to persist in database.
student.hbm.xml
<?xml version='1.0' encoding='UTF-8'?>
   <!DOCTYPE hibernate-mapping PUBLIC
   "-//Hibernate/Hibernate Mapping DTD 3.0//EN"
   "http://hibernate.org/dtd/hibernate-mapping-3.0.dtd">
<hibernate-mapping>
   <class name="Student" table="student_hib">
      <id name="id">
         <generator class="assigned"></generator>
      </id>
      <property name="name"></property>
      <property name="dept"></property>
   </class>
</hibernate-mapping>
Create Application Context XML
Create Spring Application Context
applicationContext.xml
<?xml version="1.0" encoding="UTF-8"?>
<beans xmlns="http://www.springframework.org/schema/beans"
   xmlns:xsi="http://www.w3.org/2001/XMLSchema-instance"
   xmlns:p="http://www.springframework.org/schema/p"
   xsi:schemaLocation="http://www.springframework.org/schema/beans
   http://www.springframework.org/schema/beans/spring-beans-3.0.xsd">
   <bean id="dataSource" class=" com.mysql.cj.jdbc.MysqlDataSource">
      <property name="driverClassName"  value=" com.mysql.cj.jdbc.Driver"></property>
      <property name="url" value=" jdbc:mysql://localhost/TUTORIALSPOINT"></property>
      <property name="username" value="root"></property>
      <property name="password" value="guest123"></property>
   </bean>
   <bean id="localSessionFactory"  class="org.springframework.orm.hibernate3.LocalSessionFactoryBean">
      <property name="dataSource" ref="dataSource"></property>
      <property name="mappingResources">
         <list>
            <value>student.hbm.xml</value>
         </list>
      </property>
      <props>
         <prop key="hibernate.dialect"> org.hibernate.dialect.MySQL8Dialect</prop>
         <prop key="hibernate.hbm2ddl.auto">update</prop>
      </props>
   </bean>
   <bean id="hibernateTemplate" class="org.springframework.orm.hibernate3.HibernateTemplate">
      <property name="sessionFactory" ref="localSessionFactory"></property>
   </bean>
   <bean id="st" class="StudentDAO">
      <property name="template" ref="hibernateTemplate"></property>
   </bean>
</beans>
Create Application Class
Finally, we will create our application class with the main() method to run the application. We will use this application to test Spring Hibernate Integration.
PersistStudent.java
package com.tutorialspoint;

import org.springframework.beans.factory.BeanFactory;
import org.springframework.beans.factory.xml.XmlBeanFactory;
import org.springframework.core.io.ClassPathResource;
import org.springframework.core.io.Resource;

public class PersistStudent {
   public static void main(String[] args) {

      Resource r=new ClassPathResource("applicationContext.xml");
      BeanFactory factory=new XmlBeanFactory(r);

      StudentDAO dao=(StudentDAO)factory.getBean("st");

      Student s=new Student();
      s.setId(190);
      s.setName("Danny Jing");
      s.setDept("Physics");
      dao.persistStudent(s);
      System.out.println(" Successfully persisted the student. Please check your database for results.");

   }
}
Compilation and Execution
Execute PersistStudent binary to run the program.
Output
You would get the following result, and records would be created in the Shape table.
$java PersistStudent
 Successfully persisted the student. Please check your database for results.
If you check your table, those should have the following records −
mysql> select * from student;
mysql> select * from student;
+------+------------+---------+
| id   | name       | dept    |
+------+------------+---------+
|  190 | Danny Jing | Physics |
+------+------------+---------+
1 row in set (0.00 sec)
Hibernate - Struts 2 Integration
Struts 2 is a web framework which is free and opensource available from Apache, and can be downloaded from https://struts.apache.org/releases.html
In this tutorial, we will build a web application using Struts and Hibernate. You need to have jars for Struts 2 and Hibernate. Place the jar files in your CLASSPATH.
It is a simple application with 2 jsp's, index.jsp and showResults.jsp. User will enter a Student ID and hit the button 'Search'. The showResults.jsp will display Student information based on the Student ID.
Create UI Pages
Let's create following jsp pages to be used in this web application.
index.jsp
<form action="DisplayResults" method="post">
   <center>Student id:<input type="text" name="StudentId"/><br><br/>
   <input type="submit" value="Search"/></center>
</form>
showResults.jsp
<%
String as = request.getParameter("StudentId");
System.out.println("StudentId: " + as);

if(as.equals("")){
   out.print("Sorry, you have not entered Student Id");
}
int idr = Integer.parseInt(as);
Student st1 = StudentDAO.getStudent(idr);
%>
<body>
   <table border="1" align="center">
      <thead><tr><td>StudentID</td><td>First Name</td><td>Last Name</td><td>Dept<td></tr></thead>
      <tr><td><%= st1.getStudentid() %></td><td><%= st1.getfName()%></td><td><%= st1.getlName() %></td><td><%= st1.getDept() %></td></tr>
   </table>
</body>
Create Database Table
Let's create a Students table and insert data using following sql queries −
create table students(
   StudentID int,
   LastName varchar(255),
   FirstName varchar(255),
   Address varchar(255),
   Dept varchar(255),
   primary key(StudentID)
);

insert into students values
(1000, 'Agarwal', 'Bonny', '12 Southern Ave', 'Mathematics')
(1001, 'Pandey', 'Amit', ' 8 Ganesh Chandra Rd. ', 'Physics')
(1002, 'Kumar', 'Kalyan', '42 Brick Rd., Alipur', 'English');
Create Hibernate Configuration File
Now create a hibernate configuration file for database and other details.
hibernate.cfg.xml
<?xml version='1.0' encoding='UTF-8'?>
<!DOCTYPE hibernate-configuration PUBLIC
   "-//Hibernate/Hibernate Configuration DTD 3.0//EN"
   "http://hibernate.org/dtd/hibernate-configuration-3.0.dtd">
<hibernate-configuration>
   <session-factory>
      <property name="hbm2ddl.auto">update</property>
      <property name="dialect">org.hibernate.dialect.MySQL8Dialect</property>
      <property name="connection.url">jdbc:mysql://localhost/TUTORIALSPOINT</property>
      <property name="connection.username">root</property>
      <property name="connection.password">guest123</property>
      <property name="connection.driver_class">com.mysql.cj.jdbc.Driver</property>
      <mapping resource="student.hbm.xml"/>
   </session-factory>
</hibernate-configuration>
Create Mapping Configuration File
Now create a mapping file that instructs Hibernate how to map the Student object to the database table.
student.hbm.xml
<?xml version='1.0' encoding='UTF-8'?>
<!DOCTYPE hibernate-mapping PUBLIC
   "-//Hibernate/Hibernate Mapping DTD 3.0//EN"
   "http://hibernate.org/dtd/hibernate-mapping-3.0.dtd">
<hibernate-mapping>
   <class name="com.tutorialspoint.webhibernate.Student" table="students">
      <id name="studentid">
         <generator class="increment"></generator>
      </id>
      <property name="firstName" column="firstname"></property>
      <property name="lastName" column="lastname"></property>
      <property name="dept" column="dept"></property>
   </class>
</hibernate-mapping>
Create Struts 2 Configuration File
Now create a configuration file for struts which instructs structs to map structs action.
struts.xml
<?xml version="1.0" encoding="UTF-8" ?>
<!DOCTYPE struts PUBLIC "-//Apache Software Foundation
//DTD Struts Configuration 2.1//EN"
"http://struts.apache.org/dtds/struts-2.1.dtd">
<struts>
   <action name="DisplayResults" class="Student" >
      <result name="success">showResults.jsp</result>
   </action>
</struts>
Create WEB.XML File
Now create a web.xml, deployment descriptor under WEB-INF folder.
web.xml
<?xml version="1.0" encoding="UTF-8"?>
<web-app version="2.5"   SYSTEM web-app_2_5.dtd >
   <welcome-file-list>
      <welcome-file>index.jsp</welcome-file>
   </welcome-file-list>
   <filter>
      <filter-name>studentFilter</filter-name>
      <filter-class>
         org.apache.struts2.dispatcher.ng.filter.StrutsPrepareAndExecuteFilter
      </filter-class>
   </filter>
   <filter-mapping>
      <filter-name>studentFilter</filter-name>
      <url-pattern>/*</url-pattern>
   </filter-mapping>
</web-app>
Create Java Classes
Now let's create the Student class and a DAO class to persist the Student object. Student class serves as the Action class class for Struts and persistent class for Hibernate.
Student.java
package com.tutorialspoint.webhibernate;

public class Student {

   private int studentid;
   private String firstName;
   private String lastName;
   private String dept;

   public Student() {}

   public Student(int i) {
      this.studentid = i;
   }

   public String execute() {
      return "success";
   }

   public Student getStudentForId(int j) {
      Student s1 = StudentDAO.getStudent(studentid);
      return s1;
   }

   public int getStudentid() {
      return studentid;
   }
   public void setStudentid(int studID) {
      studentid = studID;
   }
   public String getFirstName() {
      return firstName;
   }
   public void setFirstName(String fName) {
      this.firstName = fName;
   }
   public String getLastName() {
      return lastName;
   }
   public void setLastName(String lName) {
      this.lastName = lName;
   }
   public String getDept() {
      return dept;
   }
   public void setDept(String dept) {
      this.dept = dept;
   }
}
StudentDAO.java
package com.tutorialspoint.webhibernate;

import org.hibernate.Session;
import org.hibernate.SessionFactory;
import org.hibernate.Transaction;
import org.hibernate.query.Query;
import org.hibernate.boot.Metadata;
import org.hibernate.boot.MetadataSources;
import org.hibernate.boot.registry.StandardServiceRegistry;
import org.hibernate.boot.registry.StandardServiceRegistryBuilder;
import java.util.List;
import java.util.Iterator;

public class StudentDAO {

   public static Student getStudent(int i) {
      StandardServiceRegistry ssr=new StandardServiceRegistryBuilder().configure("hibernate.cfg.xml").build();
      Metadata meta=new MetadataSources(ssr).getMetadataBuilder().build();

      SessionFactory factory=meta.getSessionFactoryBuilder().build();
      Session session=factory.openSession();
      Transaction tx = session.beginTransaction();

      String hql = " from Student where studentid = :student_id ";
      Query<?> query = session.createQuery(hql, Student.class);
      query.setParameter("student_id", i);

      System.out.println("student_id: " + i);
      List<Student> k = (List<Student>) query.getResultList();
      System.out.println("List size: " + k.size());
      tx.commit();
      session.close();
      Student st = new Student(1);
      for (Iterator<?> iterator = k.iterator(); iterator.hasNext();){
         st = (Student) iterator.next();
      }
      return st;
   }
}
Flow of the application
User types Student ID in index.jsp
In index.jsp, the form is said to process 'DisplayResults' action. 'DisplayResults' is mapped to Student.java in struts.xml which is the Action class. The execute() method of Student.java is called, which returns "success".
Upon returning "success", as declared in struts.xml, the control passes to "showResults.jsp".
Steps to deploy Web Application
We're using Tomcat to deploy this web application. Once Tomcat is installed, we're assuming TOMCAT_HOME environment variable represents the tomcat installation directory.
Create a directory called WebHibernate under TOMCAT_HOME/webapps directory.
Under this directory(TOMCAT_HOME/webapps), place index.jsp, showResults.jsp
Create a directory, WEB-INF in the same directory (TOMCAT_HOME/webapps).
Under WEB-INF, copy web.xml.
Create a directory lib under WEB-INF and place all the dependencies.
Create directory structure under WEB-INF/classes/com/tutorialspoint/webhibernate/ and place Student.class, StudentDAO.class
Start Tomcat
Output
Open browser, type URL: http://localhost:8080/WebHibernate .Your index page is going to look like this:
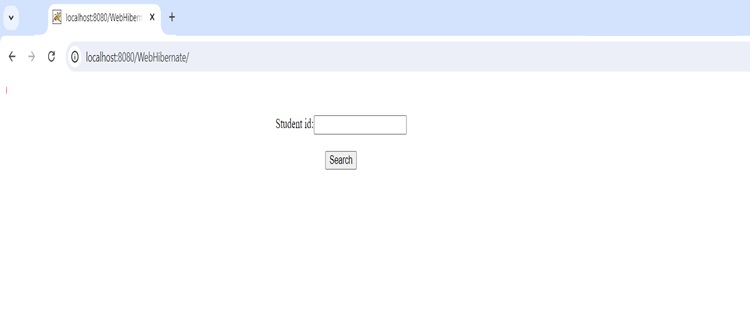
Enter 1000 for Student Id. The results page looks like this:
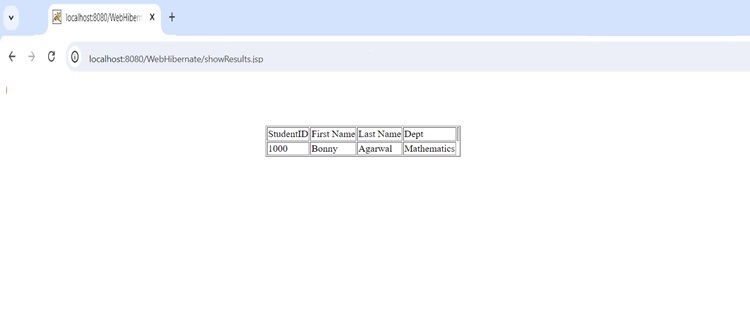
Hibernate - Example Web Application
In this tutorial, we will build a sample web application. It is a simple application with 2 jsp's, index.jsp and showResults.jsp. User will enter a Student ID and hit the button 'Search'. The showResults.jsp will display Student information based on the Student ID.
Create UI Pages
Let's create following jsp pages to be used in this web application.
index.jsp
<form action="showResults.jsp" method="post">
   <center>Student id:<input type="text" name="StudentId"/><br><br/>
   <input type="submit" value="Search"/></center>
</form>
showResults.jsp
<%@ page import="com.tutorialspoint.webhibernate.*" %>
<%
String as = request.getParameter("StudentId");
System.out.println("StudentId: " + as);
if(as.equals("")){
   out.print("Sorry, you have not entered Student Id");
}
int idr = Integer.parseInt(as);
Student st1 = StudentDAO.getStudent(idr);
%>
<body>
   <table border="1" align="center">
      <thead><tr><td>StudentID</td><td>First Name</td><td>Last Name</td><td>Dept<td></tr></thead>
      <tr><td><%= st1.getStudentid() %></td><td><%= st1.getfName()%></td><td><%= st1.getlName() %></td><td><%= st1.getDept() %></td></tr>
   </table>
</body>
Create Database Table
Let's create a Students table and insert data using following sql queries −
create table students(
   StudentID int,
   LastName varchar(255),
   FirstName varchar(255),
   Address varchar(255),
   Dept varchar(255),
   primary key(StudentID)
);

insert into students values
(1000, 'Agarwal', 'Bonny', '12 Southern Ave', 'Mathematics')
(1001, 'Pandey', 'Amit', ' 8 Ganesh Chandra Rd. ', 'Physics')
(1002, 'Kumar', 'Kalyan', '42 Brick Rd., Alipur', 'English');
Create Hibernate Configuration File
Now create a hibernate configuration file for database and other details.
hibernate.cfg.xml
<?xml version='1.0' encoding='UTF-8'?>
<!DOCTYPE hibernate-configuration PUBLIC
   "-//Hibernate/Hibernate Configuration DTD 3.0//EN"
   "http://hibernate.org/dtd/hibernate-configuration-3.0.dtd">
<hibernate-configuration>
   <session-factory>
      <property name="hbm2ddl.auto">update</property>
      <property name="dialect">org.hibernate.dialect.MySQL8Dialect</property>
      <property name="connection.url">jdbc:mysql://localhost/TUTORIALSPOINT</property>
      <property name="connection.username">root</property>
      <property name="connection.password">guest123</property>
      <property name="connection.driver_class">com.mysql.cj.jdbc.Driver</property>
      <mapping resource="student.hbm.xml"/>
   </session-factory>
</hibernate-configuration>
Create Mapping Configuration File
Now create a mapping file that instructs Hibernate how to map the Student object to the database table.
student.hbm.xml
<?xml version='1.0' encoding='UTF-8'?>
<!DOCTYPE hibernate-mapping PUBLIC
   "-//Hibernate/Hibernate Mapping DTD 3.0//EN"
   "http://hibernate.org/dtd/hibernate-mapping-3.0.dtd">
<hibernate-mapping>
   <class name="com.tutorialspoint.webhibernate.Student" table="students">
      <id name="studentid">
         <generator class="increment"></generator>
      </id>
      <property name="fName" column="firstname"></property>
      <property name="lName" column="lastname"></property>
      <property name="dept" column="dept"></property>
   </class>
</hibernate-mapping>
Create Java Classes
Now let's create the Student POJO class and a DAO class to persist the Student object:
Student.java
package com.tutorialspoint.webhibernate;

public class Student {
   private int studentid;
   private String fName;
   private String lName;
   private String dept;

   public Student() {}

   public Student(int i) {
      this.studentid = i;
   }

   public Student getStudentForId(int j) {
      Student s1 = StudentDAO.getStudent(studentid);
      return s1;
   }

   public int getStudentid() {
      return studentid;
   }
   public void setStudentid(int studID) {
      studentid = studID;
   }
   public String getfName() {
      return fName;
   }
   public void setfName(String fName) {
      this.fName = fName;
   }
   public String getlName() {
      return lName;
   }
   public void setlName(String lName) {
      this.lName = lName;
   }
   public String getDept() {
      return dept;
   }
   public void setDept(String dept) {
      this.dept = dept;
   }
}
StudentDAO.java
package com.tutorialspoint.webhibernate;

import org.hibernate.Session;
import org.hibernate.SessionFactory;
import org.hibernate.Transaction;
import org.hibernate.query.Query;
import org.hibernate.boot.Metadata;
import org.hibernate.boot.MetadataSources;
import org.hibernate.boot.registry.StandardServiceRegistry;
import org.hibernate.boot.registry.StandardServiceRegistryBuilder;
import java.util.List;
import java.util.Iterator;

public class StudentDAO {

   public static Student getStudent(int i) {
      StandardServiceRegistry ssr=new StandardServiceRegistryBuilder().configure("hibernate.cfg.xml").build();
      Metadata meta=new MetadataSources(ssr).getMetadataBuilder().build();

      SessionFactory factory=meta.getSessionFactoryBuilder().build();
      Session session=factory.openSession();
      Transaction tx = session.beginTransaction();

      String hql = " from Student where studentid = :student_id ";
      Query<?> query = session.createQuery(hql, Student.class);
      query.setParameter("student_id", i);

      System.out.println("student_id: " + i);
      List<Student> k = (List<Student>) query.getResultList();
      System.out.println("List size: " + k.size());
      tx.commit();
      session.close();
      Student st = new Student(1);
      for (Iterator<?> iterator = k.iterator(); iterator.hasNext();){
         st = (Student) iterator.next();
      }
      return st;
   }
}
Steps to deploy Web Application
We're using Tomcat to deploy this web application. Once Tomcat is installed, we're assuming TOMCAT_HOME environment variable represents the tomcat installation directory.
Create a directory called WebHibernate under TOMCAT_HOME/webapps directory.
Under this directory(TOMCAT_HOME/webapps), place index.jsp, showResults.jsp
Create a directory, WEB-INF in the same directory (TOMCAT_HOME/webapps).
Under WEB-INF, create a new file web.xml and add the following:
<?xml version="1.0" encoding="UTF-8"?>
<web-app version="2.5"
   xmlns="http://java.sun.com/xml/ns/javaee"
   xmlns:xsi="http://www.w3.org/2001/XMLSchema-instance"
   xsi:schemaLocation="http://java.sun.com/xml/ns/javaee
   http://java.sun.com/xml/ns/javaee/web-app_2_5.xsd">
   <welcome-file-list>
      <welcome-file>index.jsp</welcome-file>
   </welcome-file-list>
</web-app>
Create a directory lib under WEB-INF and place all the dependencies.
Create directory structure under WEB-INF/classes/com/tutorialspoint/webhibernate/ and place Student.class, StudentDAO.class
Start Tomcat
Output
Open browser, type URL: http://localhost:8080/WebHibernate .Your index page is going to look like this:
Enter 1000 for Student Id. The results page looks like this:
Hibernate - Table per Hiearchy
Introduction
In Hibernate, Java classes are mapped to DB tables. Suppose we have a class and it has several sub-classes, there are three ways Hibernate provides to map the classes to tables −
Table per Hierarchy
Table per Concrete Class
Table per Subclass
Let's discuss Table per hierarchy in details with an example.
Table per Hierarchy
Let's say we have a class 'Shape', and it has two subclasses, 'Circle' and 'Rectangle'. In this type of mapping, we will have only one table in the database.

There are three classes in the hierarchy. Shape is the superclass and Circle and Rectangle are the child classes. Consider the type variable. Its value is shape for Shape class, circle for Circle class and rectangle for Rectangle class. This is for us to know from database what type of Object is stored. Thus, it is the discriminator.
Create Mapping Classes
Let's create the POJO classes whose data is to be persisted in the database.
Shape.java
package com.tutorialspoint;

public class Shape {
   public int Id;
   public String type;
   public double area;

   public Shape() {
      this.type = "Shape";
   }

   public double calculateArea() {
      return 0; // default implementation.
   }

   public int getId() {
      return Id;
   }

   public void setId(int i) {
      this.Id = i;
   }

   public String getType() {
      return this.type;
   }

   public void setArea(double a) {
      this.area = a;
   }

   public double getArea() {
      return this.area;
   }
}
Circle.java
package com.tutorialspoint;

import java.math.*;

public class Circle extends Shape {

   private double radius;

   public Circle(double rad ) {
      this.radius = rad;
      this.type = "Circle";
   }

   @Override
   public double calculateArea() {
      area =  Math.PI * radius * radius;
      return area;
   }
}
Rectangle.java
package com.tutorialspoint;

public class Rectangle extends Shape {

   private double length, width;

   public Rectangle(double length, double width) {
      this.length = length;
      this.width = width;
      this.type = "Rectangle";
   }

   @Override
   public double calculateArea() {
      return length * width;
   }
}
Create Database Table
Let us create a table in the database. There would be one table corresponding to above objects, you are willing to provide persistence. Consider above objects need to be stored and retrieved into the following RDBMS table −
CREATE TABLE students.shape(
   id int NOT NULL,
   type VARCHAR(20),
   radius int,
   length int,
   width int,
   area float
);
Create Mapping Configuration File
Now create a mapping file that instructs Hibernate how to map the defined classes to the database table.
shape.hbm.xml
<?xml version='1.0' encoding='UTF-8'?>
<!DOCTYPE hibernate-mapping PUBLIC
   "-//Hibernate/Hibernate Mapping DTD 5.3//EN"
   "http://hibernate.org/dtd/hibernate-mapping-3.0.dtd">
<hibernate-mapping>
   <class name="com.tutorialspoint.Shape" table="shape" discriminator-value="Shape">
      <id name="id">
         <generator class="increment"></generator>
      </id>
      <discriminator column="type" type="string"></discriminator>
      <property name="area"></property>
      <subclass name="com.tutorialspoint.Circle" discriminator-value="Circle">
         <property name="radius"></property>
      </subclass>
      <subclass name="com.tutorialspoint.Rectangle" discriminator-value="Rectangle">
         <property name="width"></property>
         <property name="length"></property>
      </subclass>
   </class>
</hibernate-mapping>
Create Hibernate Configuration File
Now create a hibernate configuration file for database and other details.
hibernate.cfg.xml
<?xml version = "1.0" encoding = "utf-8"?>
<!DOCTYPE hibernate-configuration SYSTEM
   "http://www.hibernate.org/dtd/hibernate-configuration-3.0.dtd">
<hibernate-configuration>
   <session-factory>
      <property name="hbm2ddl.auto">update</property>
      <property name = "hibernate.dialect">
         org.hibernate.dialect.MySQL8Dialect
      </property>
      <property name = "hibernate.connection.driver_class">
         com.mysql.cj.jdbc.Driver
      </property>
      <!'students' is the database name -->
      <property name = "hibernate.connection.url">
         jdbc:mysql://localhost/students
      </property>
      <property name = "hibernate.connection.username">
         root
      </property>
      <property name = "hibernate.connection.password">
         guest123
      </property>
      <!-- List of XML mapping files -->
      <mapping resource = "shape.hbm.xml"/>
   </session-factory>
</hibernate-configuration>
Create Application Class
Finally, we will create our application class with the main() method to run the application. We will use this application to test Table per Hiearchy mapping.
TestTablePerhierarchy.java
package com.tutorialspoint;

import org.hibernate.Session;
import org.hibernate.SessionFactory;
import org.hibernate.Transaction;
import org.hibernate.boot.Metadata;
import org.hibernate.boot.MetadataSources;
import org.hibernate.boot.registry.StandardServiceRegistry;
import org.hibernate.boot.registry.StandardServiceRegistryBuilder;

public class TestTablePerHierarchy {
   public static void main(String[] args) {
      // create a hibernate configuration
      StandardServiceRegistry ssr=new StandardServiceRegistryBuilder().configure("hibernate.cfg.xml").build();
      Metadata meta=new MetadataSources(ssr).getMetadataBuilder().build();
      // get the sessionfactory and open the session
      SessionFactory factory=meta.getSessionFactoryBuilder().build();
      Session session=factory.openSession();

      // begin the transaction
      Transaction t=session.beginTransaction();

      // create Shape instance and set details to persist
      Shape s1=new Shape();
      s1.setType(s1.getType());
      s1.setArea(s1.calculateArea());

      // create Circle instance and set details to persist
      Circle c1=new Circle(2);
      c1.setType(c1.getType());
      c1.setArea(c1.calculateArea());

      // create Rectangle instance and set details to persist
      Rectangle r1 = new Rectangle(3,4);
      r1.setType(r1.getType());
      r1.setArea(r1.calculateArea());

      // persist all instances
      session.persist(s1);
      session.persist(c1);
      session.persist(r1);

      // commit the transaction and close the session
      t.commit();
      session.close();
      System.out.println(" Successfully persisted 3 classes. Please check your database for results.");
   }
}
Compilation and Execution
Execute TestTablePerHierarchy binary to run the program.
Output
You would get the following result, and records would be created in the Shape table.
$java TestTablePerHierarchy
 Successfully persisted 3 classes. Please check your database for results.
If you check your Shape table, it should have the following records −
mysql> select * from shape;
+----+-----------+--------+--------+-------+-------+
| id | type      | radius | length | width | area  |
+----+-----------+--------+--------+-------+-------+
|  1 | Shape     |   NULL |   NULL |  NULL |     0 |
|  2 | Circle    |      2 |   NULL |  NULL | 12.56 |
|  3 | Rectangle |   NULL |      3 |     4 |    12 |
+----+-----------+--------+--------+-------+-------+
3 rows in set (0.00 sec)
Hibernate - Table per Concrete Class
Introduction
In Hibernate, Java classes are mapped to DB tables. Suppose we have a class and it has several sub-classes, there are three ways Hibernate provides to map the classes to tables −
Table per Hierarchy
Table per Concrete Class
Table per Subclass
Let's discuss Table per Concrete Class in details with an example.
Table per Concrete Class
Let's say we have a class 'Shape', and it has two subclasses, 'Circle' and 'Rectangle'. In this type of mapping, we will have three tables in the database.
There are three classes in the hierarchy. Shape is the superclass and Circle and Rectangle are the child classes. Tables of subclasses will have only the fields of the subclass. In order to view all fields of sub-class, a JOIN of the superclass and subclass needs to be done.
SELECT col1, col2coln FROM superclass_table
UNION
SELECT col_a, col_b,..col_n FROM subclass_table;
This will select all the attributes of child class (including those that in parent class). TheUNIONoperator selects only distinct values by default. To allow duplicate values, useUNION ALL. This is why Table per Concrete is also known as Joined Subclass. To map the classes, we'll using union-subclass element in *.hbm.xml as shown below:
<class name="com.tutorialspoint.Shape" table="shape">
...
      <union-subclass name="com.tutorialspoint.Circle"
         table="circle">
         <property name="radius"></property>
      </union-subclass>
	  <union-subclass name="com.tutorialspoint.Rectangle"
         table="rectangle">
         <property name="length"></property>
         <property name="width"></property>
      </union-subclass>
...
Create Mapping Classes
Let's create the POJO classes whose data is to be persisted in the database.
Shape.java
package com.tutorialspoint;

public class Shape {
   public int Id;
   public String type;
   public double area;

   public Shape() {
      this.type = "Shape";
   }

   public double calculateArea() {
      this.area= 0;
      setArea(area);
      return area;
   }

   public int getId() {
      return Id;
   }

   public void setId(int i) {
      this.Id = i;
   }

   public String getType() {
      return this.type;
   }
   public double getArea() {
      return area;
   }
   public void setArea(double i) {
      area = i;
   }
}
Circle.java
package com.tutorialspoint;

import java.math.*;

public class Circle extends Shape {

   private double radius;

   public Circle(double rad ) {
      this.radius = rad;
      this.type = "Circle";
   }

   @Override
   public double calculateArea() {
      area =  Math.PI * radius * radius;
      return area;
   }
   public void setArea() {
      this.area = calculateArea();
   }
   public double getArea() {
      return area;
   }
}
Rectangle.java
package com.tutorialspoint;

public class Rectangle extends Shape {

   private double length, width;

   public Rectangle(double length, double width) {
      this.length = length;
      this.width = width;
      this.type = "Rectangle";
   }

   @Override
   public double calculateArea() {
      return length * width;
   }
   public void setArea() {
      this.area = calculateArea();
   }
   public double getArea() {
      return area;
   }
}
Create Database Tables
Let us create the tables in the database. There would be three tables corresponding to above objects, you are willing to provide persistence. Consider above objects need to be stored and retrieved into the following RDBMS tables −
CREATE TABLE students.shape(
   id int NOT NULL,
   type VARCHAR(20),
   area float
);

CREATE TABLE students.circle(
   id int NOT NULL,
   type VARCHAR(20),
   area float,
   radius float
);

CREATE TABLE students.rectangle(
   id int NOT NULL,
   type VARCHAR(20),
   area float,
   length float,
   width float
);
Create Mapping Configuration File
Now create a mapping file that instructs Hibernate how to map the defined classes to the database table.
shape.hbm.xml
<?xml version='1.0' encoding='UTF-8'?>
<!DOCTYPE hibernate-mapping PUBLIC
   "-//Hibernate/Hibernate Mapping DTD 5.3//EN"
   "http://www.hibernate.org/dtd/hibernate-mapping-3.0.dtd">
<hibernate-mapping>
   <class name="com.tutorialspoint.Shape" table="shape">
      <id name="id">
         <generator class="increment"></generator>
      </id>
      <property name="type"></property>
      <property name="area"></property>
      <union-subclass name="com.tutorialspoint.Circle"
         table="circle">
         <property name="radius"></property>
      </union-subclass>
      <union-subclass name="com.tutorialspoint.Rectangle"
         table="rectangle">
         <property name="length"></property>
         <property name="width"></property>
      </union-subclass>
   </class>
</hibernate-mapping>
Create Hibernate Configuration File
Now create a hibernate configuration file for database and other details.
hibernate.cfg.xml
<?xml version = "1.0" encoding = "utf-8"?>
<!DOCTYPE hibernate-configuration SYSTEM
   "http://www.hibernate.org/dtd/hibernate-configuration-3.0.dtd">
<hibernate-configuration>
   <session-factory>
      <property name="hbm2ddl.auto">update</property>
      <property name = "hibernate.dialect">
         org.hibernate.dialect.MySQL8Dialect
      </property>
      <property name = "hibernate.connection.driver_class">
         com.mysql.cj.jdbc.Driver
      </property>
      <!'students' is the database name -->
      <property name = "hibernate.connection.url">
         jdbc:mysql://localhost/students
      </property>
      <property name = "hibernate.connection.username">
         root
      </property>
      <property name = "hibernate.connection.password">
         guest123
      </property>
      <!-- List of XML mapping files -->
      <mapping resource = "shape.hbm.xml"/>
   </session-factory>
</hibernate-configuration>
Having property hbm2ddlauto to update will create the table if not already created during program execution.
Create Application Class
Finally, we will create our application class with the main() method to run the application. We will use this application to test Table per Concrete mapping.
TestTablePerConcrete.java
package com.tutorialspoint;

import org.hibernate.Session;
import org.hibernate.SessionFactory;
import org.hibernate.Transaction;
import org.hibernate.boot.Metadata;
import org.hibernate.boot.MetadataSources;
import org.hibernate.boot.registry.StandardServiceRegistry;
import org.hibernate.boot.registry.StandardServiceRegistryBuilder;

public class TestTablePerConcrete{ {
   public static void main(String[] args) {
      // create a hibernate configuration
      StandardServiceRegistry ssr=new StandardServiceRegistryBuilder().configure("hibernate.cfg.xml").build();
      Metadata meta=new MetadataSources(ssr).getMetadataBuilder().build();
      // get the sessionfactory and open the session
      SessionFactory factory=meta.getSessionFactoryBuilder().build();
      Session session=factory.openSession();

      // begin the transaction
      Transaction t=session.beginTransaction();

      // create Shape instance and set details to persist
      Shape s1=new Shape();
      s1.setType(s1.getType());
      s1.setArea(s1.calculateArea());

      // create Circle instance and set details to persist
      Circle c1=new Circle(2);
      c1.setType(c1.getType());
      c1.setArea();

      // create Rectangle instance and set details to persist
      Rectangle r1 = new Rectangle(3,4);
      r1.setType(r1.getType());
      r1.setArea();

      // persist all instances
      session.persist(s1);
      session.persist(c1);
      session.persist(r1);

      // commit the transaction and close the session
      t.commit();
      session.close();
      System.out.println(" Successfully persisted 3 classes. Please check your database for results.");
   }
}
Compilation and Execution
Execute TestTablePerHierarchy binary to run the program.
Output
You would get the following result, and records would be created in the Shape table.
$java TestTablePerHierarchy
 Successfully persisted 3 classes. Please check your database for results.
If you check your tables, those should have the following records −
mysql> select * from shape;
+----+-------+------+
| id | type  | area |
+----+-------+------+
|  1 | Shape |    0 |
+----+-------+------+
1 row in set (0.00 sec)

mysql> select * from circle;
+----+--------+-------+--------+
| id | type   | area  | radius |
+----+--------+-------+--------+
|  1 | Circle | 12.56 |      2 |
+----+--------+-------+--------+
1 row in set (0.00 sec)

mysql> select * from rectangle;
+----+-----------+------+--------+-------+
| id | type      | area | length | width |
+----+-----------+------+--------+-------+
|  1 | Rectangle |   12 |      3 |     4 |
+----+-----------+------+--------+-------+
1 row in set (0.00 sec)
Hibernate - Table per SubClass
Introduction
In Hibernate, Java classes are mapped to DB tables. Suppose we have a class and it has several sub-classes, there are three ways Hibernate provides to map the classes to tables −
Table per Hierarchy
Table per Concrete Class
Table per Subclass
Let's discuss Table per SubClass in details with an example.
Table per SubClass
Let's say we have a class 'Shape', and it has two subclasses, 'Circle' and 'Rectangle'. In this strategy, we create a new table for each class. Also, in the subclass table, all fields of parent class are added. So, we don't need to join with superclass table, as the subclass table has all the fields of the superclass.
There are three classes in the hierarchy. Shape is the superclass and Circle and Rectangle are the child classes. To map the classes, we'll using joined-subclass element in *.hbm.xml as shown below:
<class name="com.tutorialspoint.Shape" table="shape">
...
      <joined-subclass name="com.tutorialspoint.Circle"
         table="circle">
		 <key column="sid"></key>
         <property name="radius"></property>
      </joined-subclass>
	  <joined-subclass name="com.tutorialspoint.Rectangle"
         table="rectangle">
		 <key column="rid"></key>
         <property name="length"></property>
         <property name="width"></property>
      </joined-subclass>
...
Create Mapping Classes
Let's create the POJO classes whose data is to be persisted in the database.
Shape.java
package com.tutorialspoint;

public class Shape {
   public int Id;
   public String type;
   public double area;

   public Shape() {
      this.type = "Shape";
   }

   public double calculateArea() {
      this.area= 0;
      setArea(area);
      return area;
   }

   public int getId() {
      return Id;
   }

   public void setId(int i) {
      this.Id = i;
   }

   public String getType() {
      return this.type;
   }
   public double getArea() {
      return area;
   }
   public void setArea(double i) {
      area = i;
   }
}
Circle.java
package com.tutorialspoint;

import java.math.*;

public class Circle extends Shape {

   private double radius;

   public Circle(double rad ) {
      this.radius = rad;
      this.type = "Circle";
   }

   @Override
   public double calculateArea() {
      area =  Math.PI * radius * radius;
      return area;
   }
   public void setArea() {
      this.area = calculateArea();
   }
   public double getArea() {
      return area;
   }
}
Rectangle.java
package com.tutorialspoint;

public class Rectangle extends Shape {

   private double length, width;

   public Rectangle(double length, double width) {
      this.length = length;
      this.width = width;
      this.type = "Rectangle";
   }

   @Override
   public double calculateArea() {
      return length * width;
   }
   public void setArea() {
      this.area = calculateArea();
   }
   public double getArea() {
      return area;
   }
}
Create Database Tables
Let us create the tables in the database. There would be three tables corresponding to above objects, you are willing to provide persistence. Consider above objects need to be stored and retrieved into the following RDBMS tables −
CREATE TABLE students.shape(
   id int NOT NULL,
   type VARCHAR(20),
   area float
);

CREATE TABLE students.circle(
   sid int NOT NULL,
   radius float
);

CREATE TABLE students.rectangle(
   rid int NOT NULL,
   length float,
   width float
);
Create Mapping Configuration File
Now create a mapping file that instructs Hibernate how to map the defined classes to the database table.
shape.hbm.xml
<?xml version='1.0' encoding='UTF-8'?>
<!DOCTYPE hibernate-mapping PUBLIC
   "-//Hibernate/Hibernate Mapping DTD 5.3//EN"
   "http://www.hibernate.org/dtd/hibernate-mapping-3.0.dtd">
<hibernate-mapping>
   <class name="com.tutorialspoint.Shape" table="shape">
      <id name="id">
         <generator class="increment"></generator>
      </id>
      <property name="type"></property>
      <property name="area"></property>
      <joined-subclass name="com.tutorialspoint.Circle"
         table="circle">
		 <key column="sid"></key>
         <property name="radius"></property>
      </joined-subclass>
	  <joined-subclass name="com.tutorialspoint.Rectangle"
         table="rectangle">
		 <key column="rid"></key>
         <property name="length"></property>
         <property name="width"></property>
      </joined-subclass>
   </class>
</hibernate-mapping>
Create Hibernate Configuration File
Now create a hibernate configuration file for database and other details.
hibernate.cfg.xml
<?xml version = "1.0" encoding = "utf-8"?>
<!DOCTYPE hibernate-configuration SYSTEM
   "http://www.hibernate.org/dtd/hibernate-configuration-3.0.dtd">
<hibernate-configuration>
   <session-factory>
      <property name="hbm2ddl.auto">update</property>
      <property name = "hibernate.dialect">
         org.hibernate.dialect.MySQL8Dialect
      </property>
      <property name = "hibernate.connection.driver_class">
         com.mysql.cj.jdbc.Driver
      </property>
      <!'students' is the database name -->
      <property name = "hibernate.connection.url">
         jdbc:mysql://localhost/students
      </property>
      <property name = "hibernate.connection.username">
         root
      </property>
      <property name = "hibernate.connection.password">
         guest123
      </property>
      <!-- List of XML mapping files -->
      <mapping resource = "shape.hbm.xml"/>
   </session-factory>
</hibernate-configuration>
Having property hbm2ddlauto to update will create the table if not already created during program execution.
Create Application Class
Finally, we will create our application class with the main() method to run the application. We will use this application to test Table per Concrete mapping.
TestTablePerSubclass.java
package com.tutorialspoint;

import org.hibernate.Session;
import org.hibernate.SessionFactory;
import org.hibernate.Transaction;
import org.hibernate.boot.Metadata;
import org.hibernate.boot.MetadataSources;
import org.hibernate.boot.registry.StandardServiceRegistry;
import org.hibernate.boot.registry.StandardServiceRegistryBuilder;

public class TestTablePerSubclass{ {
   public static void main(String[] args) {
      // create a hibernate configuration
      StandardServiceRegistry ssr=new StandardServiceRegistryBuilder().configure("hibernate.cfg.xml").build();
      Metadata meta=new MetadataSources(ssr).getMetadataBuilder().build();
      // get the sessionfactory and open the session
      SessionFactory factory=meta.getSessionFactoryBuilder().build();
      Session session=factory.openSession();

      // begin the transaction
      Transaction t=session.beginTransaction();

      // create Shape instance and set details to persist
      Shape s1=new Shape();
      s1.setType(s1.getType());
      s1.setArea(0);

      // create Circle instance and set details to persist
      Circle c1=new Circle(2);
      c1.setArea();

      // create Rectangle instance and set details to persist
      Rectangle r1 = new Rectangle(3,4);
      r1.setArea();

      // persist all instances
      session.persist(s1);
      session.persist(c1);
      session.persist(r1);

      // commit the transaction and close the session
      t.commit();
      session.close();
      System.out.println(" Successfully persisted 3 classes. Please check your database for results.");
   }
}
Compilation and Execution
Execute TestTablePerHierarchy binary to run the program.
Output
You would get the following result, and records would be created in the Shape table.
$java TestTablePerHierarchy
 Successfully persisted 3 classes. Please check your database for results.
If you check your tables, those should have the following records −
mysql> select * from shape;
+----+-----------+-------+
| id | type      | area  |
+----+-----------+-------+
|  1 | Shape     |     0 |
|  2 | Circle    | 12.56 |
|  3 | Rectangle |    12 |
+----+-----------+-------+
3 rows in set (0.00 sec)

mysql> select * from circle;
+-----+--------+
| sid | radius |
+-----+--------+
|   2 |      2 |
+-----+--------+
1 row in set (0.00 sec)

mysql> select * from rectangle;
+-----+--------+--------+
| rid | length | height |
+-----+--------+--------+
|   3 |      3 |      4 |
+-----+--------+--------+
1 row in set (0.00 sec)
