- Google Tag Manager - Home
- Overview
- Set Up
- Getting Started
- Track Tags
- Organize the Interface
- Publish a Tag
- The Data Layer
- Advanced Tracking
Google Tag Manager - Getting Started
This chapter provides an overview of how to get started with Google Tag Manager, add a tag and analyze it for completeness.
While going through the process, we will use the blog (created in the previous chapter) for demonstration of different steps.
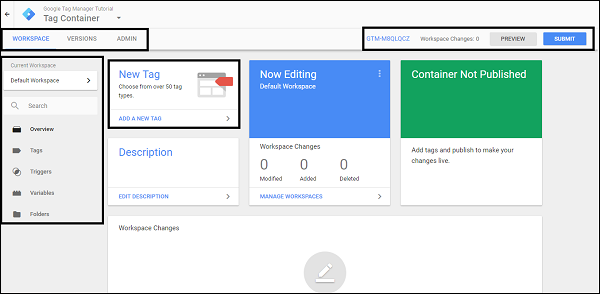
Step 1 − As shown in the above screenshot, click the container code (GTM-XXXXXXX) at the top right corner besides the label Workspace Changes: 0.
You will get to see the Install Google Tag Manager dialog box.
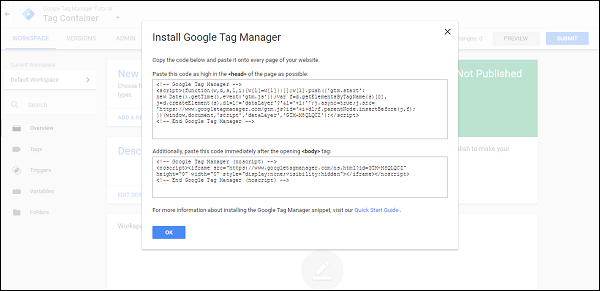
Now, here we want to install the Google Tag Manager code on our blog.
Step 2 − To get the GTM code in the above figure added on the blog, go to https://Blogger.com and log in with your credentials.
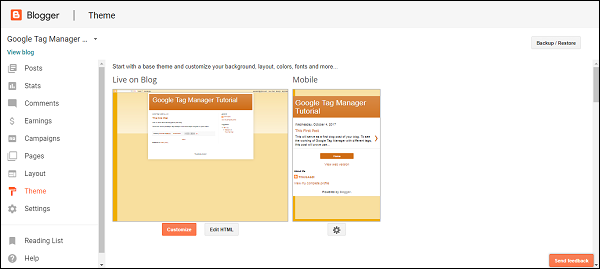
You will be presented with a screen as shown below with your blog post name in the list.

Step 3 − From the panel on the left, locate the option: Theme.
You will see the following screen.
Step 4 − Click Edit HTML to edit the HTML code for the blog. An HTML source code for your blog will be visible, as shown in the following figure.
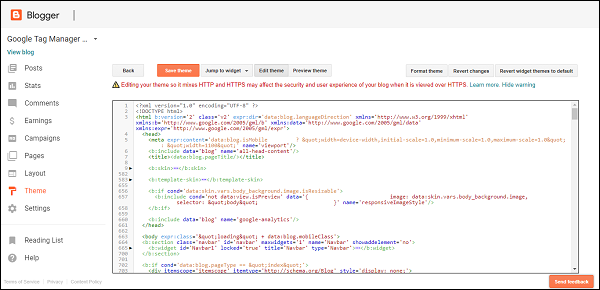
Here, we want to install the code Google Tag Manager. As instructed by GTM, we are required to insert the code at the following locations −
- As high as possible in the <head> tag
- In the <body> tag
Step 5 − Locate the <head> tag in the HTML code above. Go back to https://tagmanager.google.com and copy the code in the Install Google Tag Manager dialog box under step 1 above. Paste the copied code exactly under the <head> tag opening.
Step 6 − Similarly, locate the <body> tag in the HTML code.
Note − You can use shortcut key Ctrl + F to find the <head> and <body> tag. The browser search functionality will come in handy to find the tags.
Once you have located the <body> tag, repeat the procedure to copy the code associated with <body> tag from Google Tag Manager.
For ease of locating the tag, typically, <body> tag will begin with <body expr:class = '"loading" + data:blog.mobileClass'>.
Paste the required code under the <body> tag and then click Save theme.
It will show the following error, and it is normal to see that error.

Step 7 − To address this issue, in the Google Tag Manager code under the <head> tag, locate the line with −
j = d.createElement(s),dl = l != 'dataLayer'?' &l = '+l:'';j.async = true;j.src =
Replace the & as underlined in the line above with & and click Save theme. The error will be resolved.
This concludes the process of adding Google Tag Manager Code to your blog.
Introduction to Tag
As put simply on Google Tag Manager Support website, a tag is a piece of code that sends information to a third party, such as Google Analytics.
Taking a cue from there, with respect to a particular analytical tool, there can be multiple tags associated. Having them all in one page is indeed a plus, as the product marketer will get to see multiple metrics associated with the page.
However, there is an equally important point to note here, one should not overdo the tags on a website. This not only increases the confusion while managing the tag but also makes it cumbersome to differentiate the data coming from various tags.
The following code, as we have seen on the Install Google Tag Manager dialog, is actually a Tag.
<!-- Google Tag Manager -->
<script>
   (function(w,d,s,l,i){
      w[l] = w[l]||[];w[l].push({'gtm.start':
      new Date().getTime(),event:'gtm.js'});
      var f = d.getElementsByTagName(s)[0], j = d.createElement(s),
      dl = l != 'dataLayer'?' &l = '+l:'';
      j.async = true;
      j.src = 'https://www.googletagmanager.com/gtm.js?id='+i+dl;
      f.parentNode.insertBefore(j,f);
   })
   (window,document,'script','dataLayer','GTM-M8QLQCZ');
</script>
<!-- End Google Tag Manager -->
Location of a Tag
The location of a tag can be anywhere in the page source code. It can very much be at the top as the one above or it can sit in the footer transmitting the information that is required.
This concludes a quick introduction to a Tag and how it can be created.
Triggers
Triggers actually detect when a tag will be fired. These are a set of rules to configure a tag to be fired. For instance, the triggers may decide that a particular tag X will be fired when a user performs Y action. More specifically, a trigger can direct a tag to fire when a particular button in a particular form is clicked.
Triggers are conditions which can be attached to a tag to function the desired way. A real world example will be, consider that a tag is being configured for a successful transaction on an ecommerce page.
The tag will indicate whether the transaction was carried out successfully. To do so, a trigger will be created, which will say, fire the tag only when the transaction confirmation page is displayed to the user.
More prominently, consider you want to track all the page views of a blog/website. So, specifically, you can create a tag with Google Analytics, which will get fired when the user accesses any page on your blog/website. A trigger in this case, will be generic, saying fire this tag on all pages. The trigger will be set accordingly.
The trigger sometimes can get complicated. For example, if someone clicks a button on a specific page, then fire a tag.
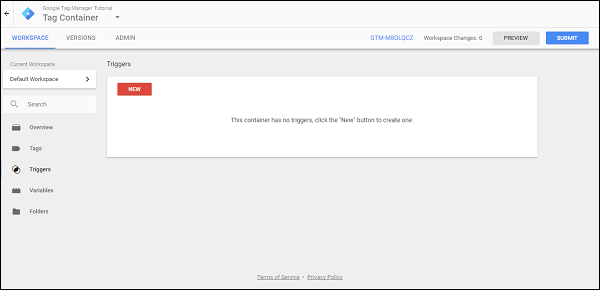
As shown in the following figure, you can access triggers by clicking Triggers on the left side panel of the screen.

As there are no any triggers configured as yet, you will see no results on the triggers.
Variables
Essentially, variables are values that can be changed.
For instance, let us consider a simple link click. When a link is clicked, there are several built-in variables that are collected with this click event. These variables can eventually be used to record the link, which is redirected when a user clicks on the particular link button.
Going in a bit detail, you can also record the particular div class of the element that was clicked, using variables. They are called variables, because if there are 10 different link buttons on the page, the redirection from these link buttons is going to change, depending on which of the elements are clicked on.
You can access variables by using the left panel and clicking Variables.

Google Tag Manager offers two types of variables −
- Built-in variables
- User-defined variables
As the names indicates, you have a scope of using the existing variables as offered by Google Tag Manager or you can create your own variables.
Let us consider an example and see how a tag functions. We will be debugging the tag now with Google Tag Manager.
Debugging a Tag
In the initial section of this chapter, we took time to add Google Tag Manager Tracking Code to our blog on Blogger.com.
This was the first step to have Google Tag Manager identify our tracking code. If you observe closely, in the script that has got included in the <head> tag, there exists a Google Tag Manager Tracking Code in the format GTM-XXXXXXX.
Now, when it comes to debugging a tag, it is fairly simple with the Google Tag Manager Interface. We will use the Basic Google Analytics tag for the demonstration. We are assuming that a Google Analytics Account already exists.
Creating a Basic Google Analytics Tag
In Google Tag Manager, to create a tag, there are various steps involved. To get into the details of each one of them, let us consider the following screen.

Step 1 − Click the button ADD A NEW TAG.
A panel from the right will slide to start the process of creating a new tag. This will show an untitled, blank tag for you to configure.
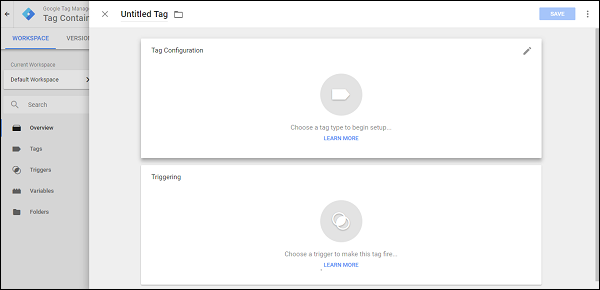
Step 2 − Provide a name to your tag. Let us give it the name First Tag.
Step 3 − Once done, click the text/icon Choose a tag type to begin setup.
Another panel will slide from the right, which will have the following tag types displayed.
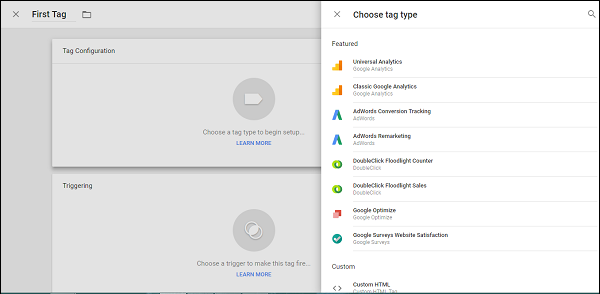
As we have seen in the definition, there are different tags associated with different analytical tool. In this particular step, Google Tag Manager requires you to specify the exact type of tag you wish to create.
You will notice some tag types as follows −
- Universal Analytics
- Classic Google Analytics
- AdWords Remarketing
- Google Optimize
Note − Universal analytics is the enhanced and most popular version of Google Analytics. However, there are many sites, which employ Classic Google Analytics.
For this example, let us proceed specify Universal Analytics.
Step 4 − Click Universal Analytics to continue. The control will switch back to the previous screen and you will be required to select what do you want to track. See the following screenshot for reference.
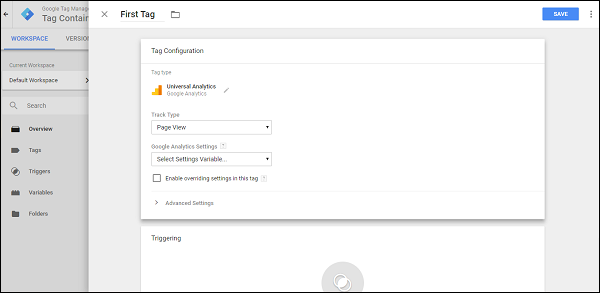
Step 5 − Check Enable overriding settings in this tag.
Note − We are using this step so as to get acquainted with Tag Creation at a faster pace. You may go ahead and create a Google Analytics settings variable without checking the above checkbox as well.
Step 6 − Open the Google Analytics interface. In Google Analytics, locate the button ADMIN on the front page. Under Property section, click Property Settings. You will be able to see the screen similar to the following.
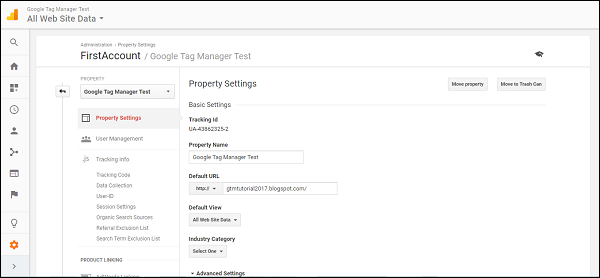
Step 7 − Copy the Tracking Id. The tracking Id will have the format UA-XXXXX-X.
Step 8 − Once you have copied the tracking ID, return to the Google Tag Manager interface. As already shown earlier, paste the Tracking Id in the associated text box.
Now, we are about to configure the important element of tag a trigger.
We are going to direct Google Tag Manager that the tag should get fired if the page is viewed by the user. In order to do that, we should have the trigger configured using the next section on the screen.
Step 9 − Click Choose a trigger to make this tag fire
A dialog box will slide from the left, requiring you to select a trigger. It will show the trigger as shown in the following screenshot.
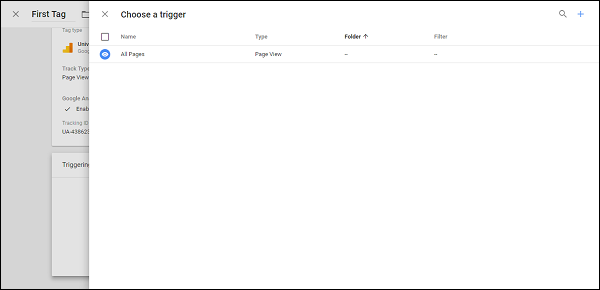
Step 10 − Click All Pages.
The control will return back to the tag configuration screen. Click the blue SAVE button at the top right corner. You have successfully configured your first tag!
Step 11 − Now for the debugging mode, click the PREVIEW button in grey.
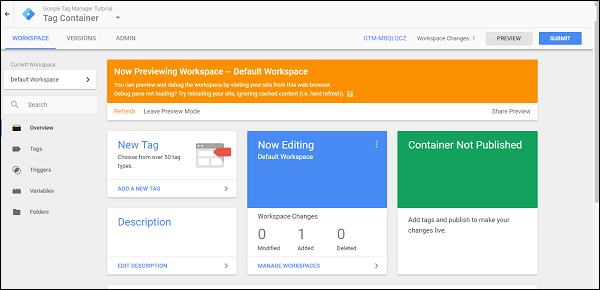
As shown in the above screenshot, an orange box will show up. This indicates that the debugging mode is on. Access your blog using the link available.
Step 12 − Now, when you access the blog, you should be able to see a section on your blog showing the Google Tag Manager Debug section.
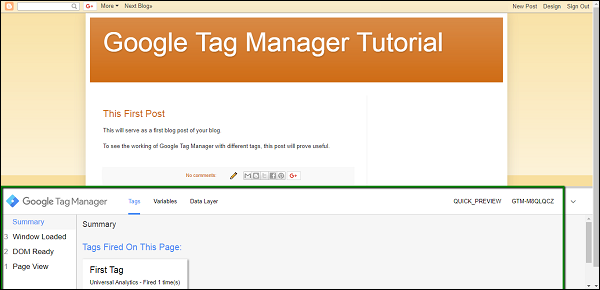
Also, if you observe closely, there is First Tag being displayed under Tags Fired On This Page. This indicates that our tag got fired on successful page view.
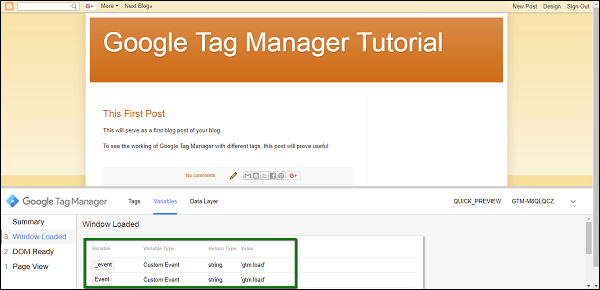
Step 13 − From the debug section, click Variables. Then, click Window Loaded on the left panel. This action means that we are selecting an action for analyzing the variables loaded as a result of that action.
It will show the Variables section as seen marked in a green box in the following screenshot.
You can analyze the variables more clearly as we move on to the next chapter.
