- BackboneJS - Home
- BackboneJS - Overview
- BackboneJS - Environment Setup
- BackboneJS - Applications
- BackboneJS - Events
- BackboneJS - Model
- BackboneJS - Collection
- BackboneJS - Router
- BackboneJS - History
- BackboneJS - Sync
- BackboneJS - View
- BackboneJS - Utility
Selected Reading
BackboneJS - Router Navigate
Description
To save the application as a URL, you need to use the navigate method to update the URL.
Syntax
router.navigate(fragment, options)
Parameters
fragment − It is the name of the parameter in which the url will be displayed after this parameter.
options − The options such as trigger and replace to call the route function and to update the URL.
Example
<!DOCTYPE html>
<html>
   <head>
      <title>Router Example</title>
      <script src = "https://code.jquery.com/jquery-2.1.3.min.js"
         type = "text/javascript"></script>

      <script src = "https://cdnjs.cloudflare.com/ajax/libs/underscore.js/1.8.2/underscore-min.js"
         type = "text/javascript"></script>

      <script src = "https://cdnjs.cloudflare.com/ajax/libs/backbone.js/1.1.2/backbone-min.js"
         type = "text/javascript"></script>
   </head>

   <script type = "text/javascript">

      //'RouteMenu' is a name of the view class
      var RouteMenu = Backbone.View.extend ({
         el: '#routemenu',   //'el' defines which element to be used as the view reference

         //defines a click event to be occur on link
         events: {
            'click a' : 'onClick'
         },

         //After clicking on a link, router calls 'navigate' to update URL
         onClick: function( e ) {

            //Uses the navigate() method save the application as URL
            router.navigate('/');
         }
      });
      var Router = Backbone.Router.extend ({

         //The 'routes' maps URLs with parameters to functions on your router
         routes: {
            'route/:id' : 'defaultRoute'
         },
      });

      //'routemenu' is an instance of the view class
      var routemenu = new RouteMenu();

      //It start listening to the routes and manages the history for bookmarkable URL's
      Backbone.
      history.start();
   </script>

   <body>
      <p>It refers to the view class 'RouteMenu' and creates the 3 links
      which changes the url when you click on the links</p>

      <section id = "routemenu">
         <ul>
            <li> <a href = "#/route/1">route 1 </a> </li>
            <li> <a href = "#/route/2">route 2 </a> </li>
            <li> <a href = "#/route/3">route 3 </a> </li>
         </ul>
      </section>
   </body>
</html>
Output
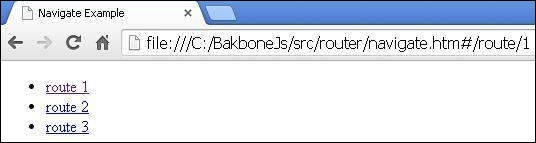
Let us carry out the following steps to see how the above code works −
Save the above code in the navigate.htm file.
Open this HTML file in a browser.
NOTE − The above functionality is related to the address bar. So, when you will open the above code in the browser, it will show the result as follows.
backbonejs_router.htm

Advertisements