
Article Categories
- All Categories
-
 Data Structure
-
 Networking
-
 RDBMS
RDBMS
-
 Operating System
-
 Java
Java
-
 MS Excel
-
 iOS
iOS
-
 HTML
HTML
-
 CSS
CSS
-
 Android
-
 Python
-
 C Programming
-
 C++
C++
-
 C#
C#
-
 MongoDB
-
 MySQL
MySQL
-
 Javascript
-
 PHP
PHP
-
 Economics & Finance
How to install Python in Windows?
Python is a widely used high-level programming language. To write and execute code in Python, we first need to install Python on our system.
Installing Python on Windows takes a series of few easy steps. This guide will walk you through the complete process.
Step 1 ? Select Version of Python to Install
Python has various versions available with differences between the syntax and working of different versions of the language. We need to choose the version which we want to use or need.
Python 3.x is the current version and recommended for new projects. Python 2.x is deprecated and no longer supported since January 2020. Always choose the latest stable Python 3.x version unless you have specific compatibility requirements.
Step 2 ? Download Python Executable Installer
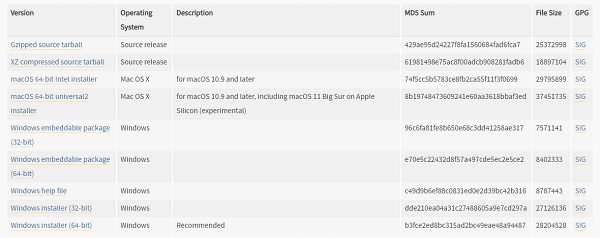
On the web browser, visit the official Python website (www.python.org), and navigate to the Download for Windows section.
All the available versions of Python will be listed. Select the version required by you and click on Download. For example, we chose the Python 3.9.1 version.

On clicking download, various available executable installers shall be visible with different operating system specifications. Choose the installer which suits your system operating system and download the installer. For example, we select the Windows installer (64-bit).
The download size is typically less than 30MB for the standard installer.
Step 3 ? Run Executable Installer
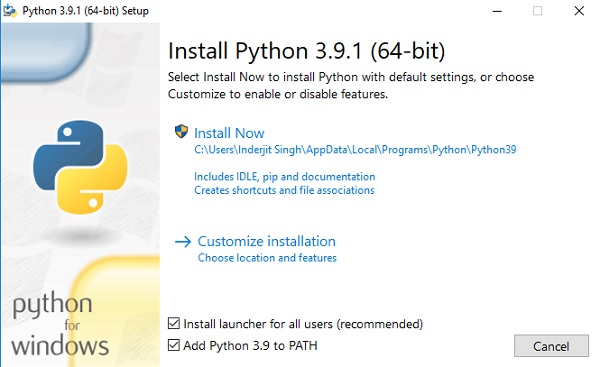
After downloading the Python installer (e.g., Python 3.9.1 Windows 64-bit installer), run the installer.
Important: Make sure to select both checkboxes at the bottom:
Add Python to PATH ? This allows you to run Python from any directory in Command Prompt
Install launcher for all users ? This makes Python available to all users on the system
Then click Install Now.
On clicking Install Now, the installation process starts.
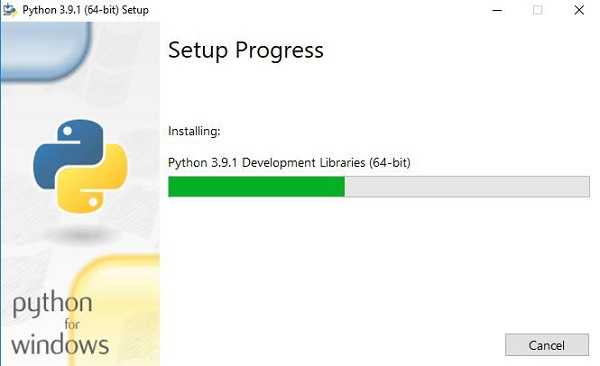
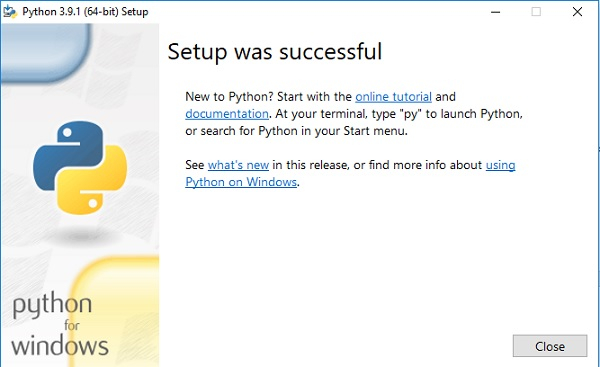
The installation process will take a few minutes to complete. Once the installation is successful, the following screen is displayed.
Step 4 ? Verify Python Installation
To ensure Python is successfully installed on your system, follow these steps ?
Open the Command Prompt (Press Win + R, type
cmd, and press Enter)Type
python --versionorpython -Vand press EnterThe version of Python you installed will be displayed if Python is successfully installed
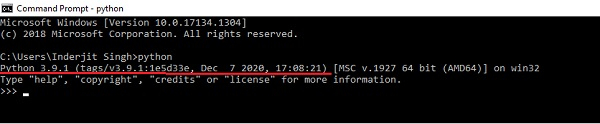
Alternatively, you can simply type python and press Enter to launch the Python interactive shell.
Step 5 ? Verify Pip Installation
Pip is a powerful package management system for Python software packages. It comes pre-installed with Python 3.4+ and Python 2.7.9+.
To verify if pip was installed, follow these steps ?
Open the Command Prompt
Enter
pip --versionorpip -Vto check if pip was installedThe following output appears if pip is installed successfully

Common Installation Issues
If you encounter issues during installation:
PATH not set: If Python commands don't work, ensure "Add Python to PATH" was checked during installation
Permission errors: Run the installer as Administrator if you get permission-related errors
Multiple versions: Use
py -3command to specifically run Python 3 if you have multiple versions
Conclusion
You have successfully installed Python and pip on your Windows system. Remember to check "Add Python to PATH" during installation for easy access. You can now start writing and executing Python programs on your Windows machine.

208K+ Views
