Apache CXF With POJO
Apache CXF with JAX-WS
Apache CXF with WSDL First
Apache CXF With JAX-RS
Apache CXF With JMS
Apache CXF Conclusion
Apache CXF Useful Resources
Apache CXF with JAX-WS
In this JAX-WS application, we will use Apache CXF-first approach like the earlier POJO application. So first we will create an interface for our web service.
Declaring Service Interface
As in the earlier case, we will create a trivial service that has only one interface method called greetings. The code for the service interface is shown below −
package com.tutorialspoint.cxf.jaxws.helloworld;

import jakarta.jws.WebService;

@WebService
public interface HelloWorld {
   String greetings(String text);
}
We annotate the interface with a @WebService tag. Next, we will implement this interface.
Implementing Web Interface
The implementation of the web interface is shown here −
package com.tutorialspoint.cxf.jaxws.helloworld;

public class HelloWorldImpl implements HelloWorld {
   @Override
   public String greetings(String name) {
      return ("hi " + name);
   }
}
The greetings method is annotated with @Override tag. The method returns a "hi" message to the caller.
Next, we will write the code for developing the server.
Developing Server
Unlike the POJO application, we will now decouple the interface by using the CXF supplied Endpoint class to publish our service. This is done in the following two lines of code −
HelloWorld implementor = new HelloWorldImpl();

Endpoint.publish(
   "http://localhost:9090/HelloServerPort",
   implementor,
   new LoggingFeature()
);
The first parameter of the publish method specifies the URL at which our service will be made available to the clients. The second parameter specifies the implementation class for our service. The entire code for the server is shown below −
package com.tutorialspoint.cxf.jaxws.helloworld;

import org.apache.cxf.feature.LoggingFeature;

import jakarta.xml.ws.Endpoint;

public class Server {
   public static void main(String[] args) throws Exception {
      HelloWorld implementor = new HelloWorldImpl();
      Endpoint.publish("http://localhost:9090/HelloServerPort",
      implementor,
      new LoggingFeature());
      System.out.println("Server ready...");
      Thread.sleep(5 * 60 * 1000);
      System.out.println("Server exiting ...");
      System.exit(0);
   }
}
To deploy our server, you will need to make few more modifications to your project as listed below.
Deploying Server
Finally, to deploy the server application, you will need to make one more modification in pom.xml to setup your application as a web application. The code that you need to add into your pom.xml is given below −
<profiles>
   <profile>
      <id>server</id>
      <build>
         <defaultGoal>test</defaultGoal>
         <plugins>
            <plugin>
               <groupId>org.codehaus.mojo</groupId>
               <artifactId>exec-maven-plugin</artifactId>
               <version>1.6.0</version>
               <executions>
                  <execution>
                     <phase>test</phase>
                     <goals>
                        <goal>java</goal>
                     </goals>
                     <configuration>
                        <mainClass>
                           com.tutorialspoint.cxf.jaxws.helloworld.Server
                        </mainClass>
                     </configuration>
                  </execution>
               </executions>
            </plugin>
         </plugins>
      </build>
   </profile>
</profiles>
Before you deploy the application, you need to add two more files to your project. These are shown in the screenshot below −
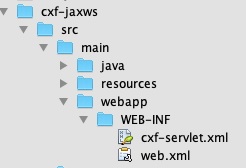
These files are CXF standard files which define the mapping for CXFServlet. The code within the web.xml file is shown here for your quick reference −
<?xml version = "1.0" encoding = "UTF-8"??>
<web-app xmlns = "http://java.sun.com/xml/ns/javaee"
xmlns:xsi="http://www.w3.org/2001/XMLSchema-instance" version="2.5"
xsi:schemaLocation = "http://java.sun.com/xml/ns/javaee
http://java.sun.com/xml/ns/javaee/web-app_2_5.xsd">
   <display-name>cxf</display-name>
   <servlet>
      <description>Apache CXF Endpoint</description>
      <display-name>cxf</display-name>
      <servlet-name>cxf</servlet-name>
      <servlet-class>
         org.apache.cxf.transport.servlet.CXFServlet
      </servlet-class>
      <load-on-startup>
         1
      </load-on-startup>
   </servlet>
   <servlet-mapping>
      <servlet-name>
         cxf
      </servlet-name>
      <url-pattern>
         /services/*
      </url-pattern>
   </servlet-mapping>
   <session-config>
      <session-timeout>60</session-timeout>
   </session-config>
</web-app>
In the cxf-servlet.xml, you declare the properties for your service's endpoint. This is shown in the code snippet below −
<beans xmlns="http://www.springframework.org/schema/beans"
    xmlns:xsi="http://www.w3.org/2001/XMLSchema-instance"
    xmlns:jaxws="http://cxf.apache.org/jaxws"
    xsi:schemaLocation="http://www.springframework.org/schema/beans
    http://www.springframework.org/schema/beans/spring-beans-2.0.xsd
	http://cxf.apache.org/jaxws
	http://cxf.apache.org/schemas/jaxws.xsd">

   <jaxws:endpoint xmlns:helloworld = "https://www.tutorialspoint.com/"
      id = "helloHTTP"
      address = "http://localhost:9090/HelloServerPort"
      serviceName = "helloworld:HelloServiceService"
      endpointName = "helloworld:HelloServicePort">
   </jaxws:endpoint>

</beans>
Here we define the id for our service endpoint, the address on which the service will be available, the service name and the endpoint name. Now, you learnt how your service gets routed and processed by a CXF servlet.
