- AngularJS - Home
- AngularJS - Overview
- AngularJS - Environment Setup
- AngularJS - MVC Architecture
- AngularJS - First Application
- AngularJS - Directives
- AngularJS - Expressions
- AngularJS - Controllers
- AngularJS - Filters
- AngularJS - Tables
- AngularJS - HTML DOM
- AngularJS - Modules
- AngularJS - Forms
- AngularJS - Includes
- AngularJS - AJAX
- AngularJS - Views
- AngularJS - Scopes
- AngularJS - Services
- AngularJS - Dependency Injection
- AngularJS - Custom Directives
- AngularJS - Internationalization
- AngularJS - ToDo Application
- AngularJS - Notepad Application
- AngularJS - Bootstrap Application
- AngularJS - Login Application
- AngularJS - Upload File
- AngularJS - In-line Application
- AngularJS - Nav Menu
- AngularJS - Switch Menu
- AngularJS - Order Form
- AngularJS - Search Tab
- AngularJS - Drag Application
- AngularJS - Cart Application
- AngularJS - Translate Application
- AngularJS - Chart Application
- AngularJS - Maps Application
- AngularJS - Share Application
- AngularJS - Weather Application
- AngularJS - Timer Application
- AngularJS - Leaflet Application
- AngularJS - Lastfm Application
- AngularJS Useful Resources
- AngularJS - Questions and Answers
- AngularJS - Quick Guide
- AngularJS - Useful Resources
- AngularJS - Discussion
AngularJS - Environment Setup
This chapter describes how to set up AngularJS library to be used in web application development. It also briefly describes the directory structure and its contents.
When you open the link https://angularjs.org/, you will see there are two options to download AngularJS library −
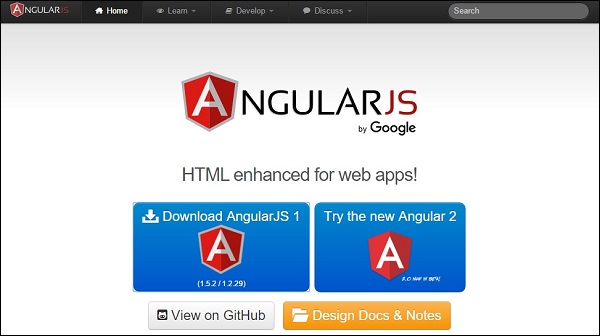
View on GitHub − By clicking on this button, you are diverted to GitHub and get all the latest scripts.
Download AngularJS 1 − By clicking on this button, a screen you get to see a dialog box shown as −
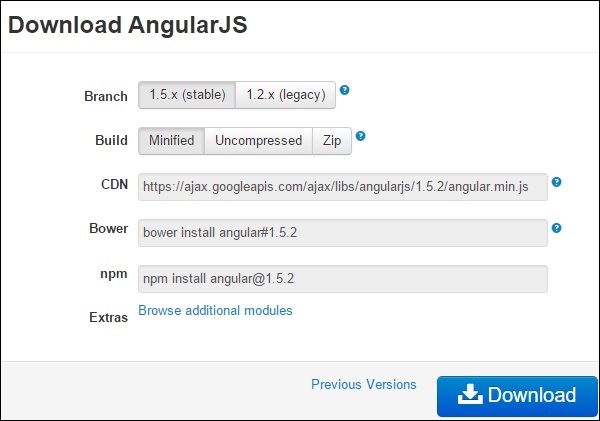
This screen gives various options of using Angular JS as follows −
Downloading and hosting files locally
There are two different options : Legacy and Latest. The names themselves are self-descriptive. The Legacy has version less than 1.2.x and the Latest come with version 1.3.x.
We can also go with the minimized, uncompressed, or zipped version.
CDN access − You also have access to a CDN. The CDN gives you access to regional data centers. In this case, the Google host. The CDN transfers the responsibility of hosting files from your own servers to a series of external ones. It also offers an advantage that if the visitor of your web page has already downloaded a copy of AngularJS from the same CDN, there is no need to re-download it.
We are using the CDN versions of the library throughout this tutorial.
Example
Now let us write a simple example using AngularJS library. Let us create an HTML file myfirstexample.html shown as below −
<!doctype html>
<html>
   <head>
      <script src = "https://ajax.googleapis.com/ajax/libs/angularjs/1.5.2/angular.min.js"></script>
   </head>

   <body ng-app = "myapp">
      <div ng-controller = "HelloController" >
         <h2>Welcome {{helloTo.title}} to the world of Tutorialspoint!</h2>
      </div>

      <script>
         angular.module("myapp", [])

         .controller("HelloController", function($scope) {
            $scope.helloTo = {};
            $scope.helloTo.title = "AngularJS";
         });
      </script>

   </body>
</html>
Let us go through the above code in detail −
Include AngularJS
We include the AngularJS JavaScript file in the HTML page so that we can use it −
<head>
   <script src = "https://ajax.googleapis.com/ajax/libs/angularjs/1.4.8/angular.min.js">
   </script>
</head>
You can check the latest version of AngularJS on its official website.
Point to AngularJS app
Next, it is required to tell which part of HTML contains the AngularJS app. You can do this by adding the ng-app attribute to the root HTML element of the AngularJS app. You can either add it to the html element or the body element as shown below −
<body ng-app = "myapp">
</body>
View
The view is this part −
<div ng-controller = "HelloController" >
   <h2>Welcome {{helloTo.title}} to the world of Tutorialspoint!</h2>
</div>
ng-controller tells AngularJS which controller to use with this view. helloTo.title tells AngularJS to write the model value named helloTo.title in HTML at this location.
Controller
The controller part is −
<script>
   angular.module("myapp", [])

   .controller("HelloController", function($scope) {
      $scope.helloTo = {};
      $scope.helloTo.title = "AngularJS";
   });
</script>
This code registers a controller function named HelloController in the angular module named myapp. We will study more about modules and controllers in their respective chapters. The controller function is registered in angular via the angular.module(...).controller(...) function call.
The $scope parameter model is passed to the controller function. The controller function adds a helloTo JavaScript object, and in that object it adds a title field.
Execution
Save the above code as myfirstexample.html and open it in any browser. You get to see the following output −
Welcome AngularJS to the world of Tutorialspoint!
What happens when the page is loaded in the browser ? Let us see −
HTML document is loaded into the browser, and evaluated by the browser.
AngularJS JavaScript file is loaded, the angular global object is created.
The JavaScript which registers controller functions is executed.
Next, AngularJS scans through the HTML to search for AngularJS apps as well as views.
Once the view is located, it connects that view to the corresponding controller function.
Next, AngularJS executes the controller functions.
It then renders the views with data from the model populated by the controller. The page is now ready.
