- AJAX Tutorial
- AJAX - Home
- AJAX - What is AJAX?
- AJAX - History
- AJAX - Dynamic Versus Static Sites
- AJAX - Technologies
- AJAX - Action
- AJAX - XMLHttpRequest
- AJAX - Sending Request
- AJAX - Types of requests
- AJAX - Handling Responses
- AJAX - Handling Binary Data
- AJAX - Submitting Forms
- AJAX - File Uploading
- AJAX - FormData Object
- AJAX - Send POST Requests
- AJAX - Send PUT Requests
- AJAX - Send JSON Data
- AJAX - Send Data Objects
- AJAX - Monitoring Progress
- AJAX - Status Codes
- AJAX - Applications
- AJAX - Browser Compatibility
- AJAX - Examples
- AJAX - Browser Support
- AJAX - XMLHttpRequest
- AJAX - Database Operations
- AJAX - Security
- AJAX - Issues
- Fetch API Basics
- Fetch API - Basics
- Fetch API Vs XMLHttpRequest
- Fetch API - Browser Compatibility
- Fetch API - Headers
- Fetch API - Request
- Fetch API - Response
- Fetch API - Body Data
- Fetch API - Credentials
- Fetch API - Send GET Requests
- Fetch API - Send POST Requests
- Fetch API - Send PUT Requests
- Fetch API - Send JSON Data
- Fetch API - Send Data Objects
- Fetch API - Custom Request Object
- Fetch API - Uploading Files
- Fetch API - Handling Binary Data
- Fetch API - Status Codes
- Stream API Basics
- Stream API - Basics
- Stream API - Readable Streams
- Stream API - Writeable Streams
- Stream API - Transform Streams
- Stream API - Request Object
- Stream API - Response Body
- Stream API - Error Handling
- AJAX Useful Resources
- AJAX - Quick Guide
- AJAX - Useful Resources
- AJAX - Discussion
AJAX - Send POST Requests
The POST request sends data from a web page to a web server. In this request, the data is sent in the request body that is separated from the URL. You cannot cache and bookmark Post requests. Also using POST request you can data of any length.
Syntax
open('POST', url, true)
Where this method takes three parameters and they are −
POST − It is used to send data to the web server.
url − It represents the file url which will be opened on the web server.
true − For asynchronous connection set this parameter's value to true. Or for synchronous connection set the value to false. The default value of this parameter is true.
How to use POST Request
To use the POST request we need to follow the following steps −
Step 1 − Create an object of XMLHttpRequest.
var variableName = new XMLHttpRequest()
Step 2 − After creating XMLHttpRequest an object, now we have to define a callback function which will trigger after getting a response from the web server.
XMLHttpRequestObjectName.onreadystatechange = function(){
   // Callback function body
}
Step 3 − Now we use open() functions. Inside the open() function we pass a POST request along with the URL to which we have to send data.
XMLHttpRequestObjectName.open("POST", url, async)
XMLHttpRequestObjectName.setRequestHeader('Content-type', 'application/json')
Step 4 − Set the HTTP header request using setRequestHeader(). It always calls after the open() method but before send() method. Here the content-type header is set to "application/json" which indicates that the data is going to send in JSON format.
Step 5 − At last, we convert the JSON data into the string using stringify() method and then send it to the web server using send() method.
XMLHttpRequestObjectName.send(JSON.stringify(JSONdata))
The following flow chart will show the working of the below code −
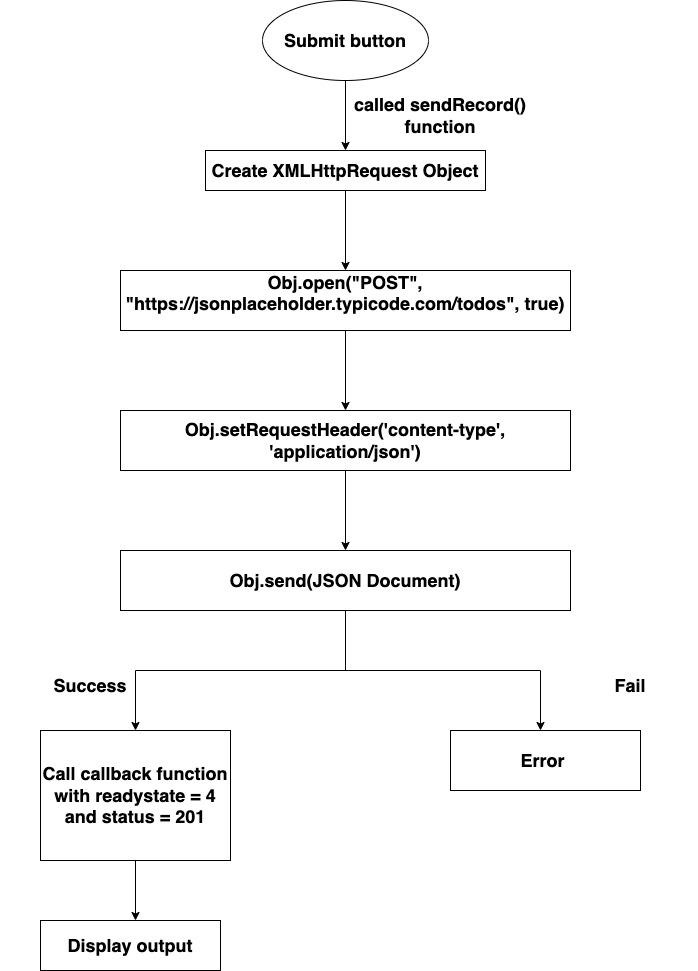
Example
<!DOCTYPE html>
<html>
<body>
<script>
   function sendRecords() {
      // Creating XMLHttpRequest object
      var zhttp = new XMLHttpRequest();

      // JSON document
      const mParameters = {
         title: document.querySelector('#Utitle').value,
         userid: document.querySelector('#UId').value,
         body: document.querySelector('#Ubody').value
      }
      // Creating call back function
      zhttp.onreadystatechange = function() {
         if (this.readyState == 4 && this.status == 201) {
            document.getElementById("example").innerHTML = this.responseText;
            console.log("Data Posted Successfully")
         }
         console.log("Error found")
      };
      // Post/Add JSON document on the given API
      zhttp.open("POST", "https://jsonplaceholder.typicode.com/todos", true);

      // Setting HTTP request header
      zhttp.setRequestHeader('Content-type', 'application/json')

      // Sending the request to the server
      zhttp.send(JSON.stringify(mParameters));
   }
</script>

   <!--Creating simple form-->
   <h2>Enter data</h2>
   <label for="Utitle">Title</label>
   <input id="Utitle" type="text" name="title"><br>

   <label for="UId">UserId</label>
   <input id="UId" type="number" name="UserID"><br>

   <label for="Ubody">Body</label>
   <input id="Ubody" type="text" name="body"><br>

   <button type="button" onclick="sendRecords()">Submit</button>
   <div id="example"></div>
</body>
</html>

initialise the request with the HTTP POST method and the URL of the server which is "https://jsonplaceholder.typicode.com/todos". Then we call the setRequestHeader() method to set the content type of the request as JSON. After that, we call send() function to send the request along with a JSON document in the form of a string to the server.
So when the server responds to the request, the "onreadystatechange" property calls the callback function with the current state of the XMLHttpRequest object. If the "ready state" property is set to 4(that means the request is completed) and the "status" property is set to 201(that means the server is successfully created a new resource), then the response data is extracted from the "responseText" property and display the HTML document with the help of "innerHTML" property of the example element.
Here is the JSON.stringify() method is used to convert JSON documents into a string. It is necessary because XHR requests can only send text data.
Difference between PUT and POST request
Following is the difference between the PUT and the POST request −
| PUT Request | POST Request |
|---|---|
| It is used to update the existing record. | It is used to create a new record. |
| It sends the entire resource as a payload. | It only sends the part to be updated. |
| It can be cached | It cannot be cached |
| It is idempotent | It is non-idempotent |
| If we send this request multiple times then multiple URLs will be created on the specified server. | If we send this request multiple times then multiple URLs will be created on the specified server If we send this request multiple times, still it counted as a single modification request by the server. |
Conclusion
So this is how a POST request is sent by the XMLHttpRequest. It is the most commonly used method to send or post data to the server. Now in the next article, we will learn how to send a PUT request.
To Continue Learning Please Login