- Microsoft Azure Tutorial
- Microsoft Azure - Home
- Cloud Computing - Overview
- Microsoft Azure - Windows
- Microsoft Azure - Components
- Microsoft Azure - Compute Module
- Microsoft Azure - Fabric Controller
- Microsoft Azure - Storage
- Microsoft Azure - Blobs
- Microsoft Azure - Queues
- Microsoft Azure - Tables
- Microsoft Azure - CDN
- Microsoft Azure - Applications
- Microsoft Azure - Security
- Microsoft Azure - Datacenters
- Microsoft Azure - Scenarios
- Microsoft Azure Advanced
- Microsoft Azure - Management Portal
- Azure - Create Virtual Network
- Azure - Deploying Virtual Machines
- Azure - Endpoint Configuration
- Azure - Point-to-Site Connectivity
- Azure - Site-to-Site Connectivity
- Microsoft Azure - Traffic Manager
- Microsoft Azure - PowerShell
- Azure - Monitoring Virtual Machines
- Azure - Setting Up Alert Rules
- Azure - Application Deployment
- Microsoft Azure - Backup & Recovery
- Azure - Self-Service Capabilities
- Azure - Multi-Factor Authentication
- Azure - Forefront Identity Manager
- Azure - Data Import & Export Job
- Microsoft Azure - Websites
- Microsoft Azure - Scalability
- Microsoft Azure - Disk Configuration
- Microsoft Azure - Disk Caching
- Microsoft Azure - Personalize Access
- Azure - Personalize Company Brand
- Azure - Self-Service Password Reset
- Microsoft Azure - Self-Service Group
- Microsoft Azure - Create a Group
- Azure - Security Reports & Alerts
- Azure - Orchestrated Recovery
- Microsoft Azure - Health Monitoring
- Microsoft Azure - Upgrades
- Microsoft Azure Useful Resources
- Microsoft Azure - Quick Guide
- Microsoft Azure - Useful Resources
- Microsoft Azure - Discussion
Azure - Self-Service Group Management
Users can themselves create groups in the access panel. Let us see how to enable users to create and join groups.
Policy Setup for Self-service Group Management
Step 1 − Login into the management portal.
Step 2 − Go to the Active Directory.
Step 3 − Click ‘Configure’ tab from the top menu.
Step 4 − Scroll down and locate ‘group management’ heading. Here you can choose to let users create and manage their own group. There are 6 things that you need to set under this heading. Azure team keeps adding the features.
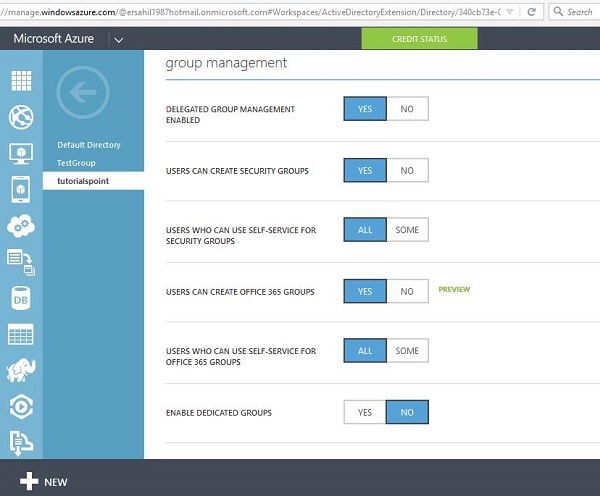
Step 5 − First option is ‘Delegated Group Management enabled'. If you choose yes, it will allow you to handover authority to manage the groups to users through the access panel which is the main purpose.
Step 6 − Second option is whether users can create security groups.
Step 7 − Third option is you can choose either to allow all users to manage groups or some of them. If you choose ‘Some’ you will have to specify the group.
Step 8 − Fourth option is, it lets you enable/disable the users to create groups in Office 365.
Step 9 − Fifth option is, if you want to allow some of the users to create and manage groups for Office 365, you will have to specify them.
Step 10 − Last option, is to enable dedicated group. If you choose to enable them you will be asked to add the group members.
After you have made changes, a ‘Save’ button will appear at the bottom of the screen to save changes.
To Continue Learning Please Login