
Article Categories
- All Categories
-
 Data Structure
-
 Networking
-
 RDBMS
RDBMS
-
 Operating System
-
 Java
Java
-
 MS Excel
-
 iOS
iOS
-
 HTML
HTML
-
 CSS
CSS
-
 Android
-
 Python
-
 C Programming
-
 C++
C++
-
 C#
C#
-
 MongoDB
-
 MySQL
MySQL
-
 Javascript
-
 PHP
PHP
-
 Economics & Finance
How to use a simple SQLite database in Kotlin android?
This example demonstrates how to use a simple SQLite database in Kotlin android.
Step 1 − Create a new project in Android Studio, go to File ? New Project and fill all required details to create a new project.
Step 2 − Add the following code to res/layout/activity_main.xml.
Step 3 − Add the following code to src/MainActivity.kt
package app.com.q10
import androidx.appcompat.app.AppCompatActivity
import android.os.Bundle
import android.widget.Toast
import kotlinx.android.synthetic.main.activity_main.*
class MainActivity : AppCompatActivity() {
override fun onCreate(savedInstanceState: Bundle?) {
super.onCreate(savedInstanceState)
setContentView(R.layout.activity_main)
title = "KotlinApp"
val context = this
val db = DataBaseHandler(context)
btnInsert.setOnClickListener {
if (editTextName.text.toString().isNotEmpty() &&
editTextAge.text.toString().isNotEmpty()
) {
val user = User(editTextName.text.toString(), editTextAge.text.toString().toInt())
db.insertData(user)
clearField()
}
else {
Toast.makeText(context, "Please Fill All Data's", Toast.LENGTH_SHORT).show()
}
}
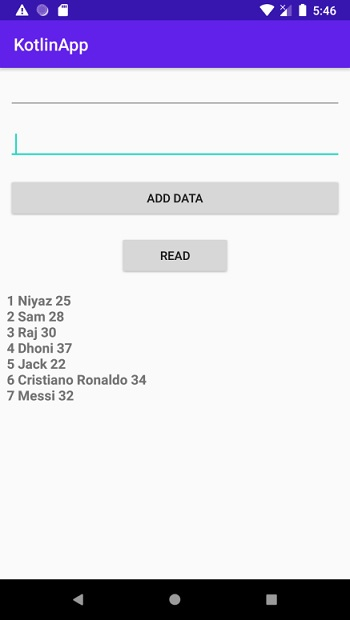
btnRead.setOnClickListener {
val data = db.readData()
tvResult.text = ""
for (i in 0 until data.size) {
tvResult.append(
data[i].id.toString() + " " + data[i].name + " " + data[i].age + "
"
)
}
}
}
private fun clearField() {
editTextName.text.clear()
editTextAge.text.clear()
}
}
Step 4 − Add the following code to src/DataBaseHelper.kt
import android.content.ContentValues
import android.content.Context
import android.database.sqlite.SQLiteDatabase
import android.database.sqlite.SQLiteOpenHelper
import android.widget.Toast
val DATABASENAME = "MY DATABASE"
val TABLENAME = "Users"
val COL_NAME = "name"
val COL_AGE = "age"
val COL_ID = "id"
class DataBaseHandler(var context: Context) : SQLiteOpenHelper(context, DATABASENAME, null,
1) {
   override fun onCreate(db: SQLiteDatabase?) {
      val createTable = "CREATE TABLE " + TABLENAME + " (" + COL_ID + " INTEGER PRIMARY KEY AUTOINCREMENT," + COL_NAME + " VARCHAR(256)," + COL_AGE + " INTEGER)"
      db?.execSQL(createTable)
   }
   override fun onUpgrade(db: SQLiteDatabase?, oldVersion: Int, newVersion: Int) {
      //onCreate(db);
   }
   fun insertData(user: User) {
      val database = this.writableDatabase
      val contentValues = ContentValues()
      contentValues.put(COL_NAME, user.name)
      contentValues.put(COL_AGE, user.age)
      val result = database.insert(TABLENAME, null, contentValues)
      if (result == (0).toLong()) {
         Toast.makeText(context, "Failed", Toast.LENGTH_SHORT).show()
      }
      else {
         Toast.makeText(context, "Success", Toast.LENGTH_SHORT).show()
      }
   }
   fun readData(): MutableList {
      val list: MutableList = ArrayList()
      val db = this.readableDatabase
      val query = "Select * from $TABLENAME"
      val result = db.rawQuery(query, null)
      if (result.moveToFirst()) {
         do {
            val user = User()
            user.id = result.getString(result.getColumnIndex(COL_ID)).toInt()
            user.name = result.getString(result.getColumnIndex(COL_NAME))
            user.age = result.getString(result.getColumnIndex(COL_AGE)).toInt()
            list.add(user)
         }
         while (result.moveToNext())
      }
      return list
   }
}
Step 5 − Add the following code to androidManifest.xml
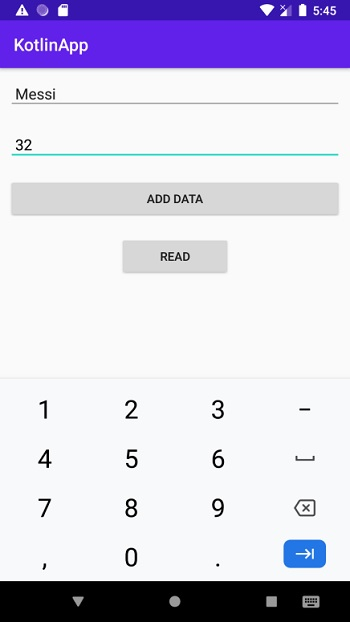
Let's try to run your application. I assume you have connected your actual Android Mobile device with your computer. To run the app from android studio, open one of your project's activity files and click the Run ![]() icon from the toolbar. Select your mobile device as an option and then check your mobile device which will display your default screen –
icon from the toolbar. Select your mobile device as an option and then check your mobile device which will display your default screen –
Click here to download the project code.

5K+ Views
