
Article Categories
- All Categories
-
 Data Structure
-
 Networking
-
 RDBMS
RDBMS
-
 Operating System
-
 Java
Java
-
 MS Excel
-
 iOS
iOS
-
 HTML
HTML
-
 CSS
CSS
-
 Android
-
 Python
-
 C Programming
-
 C++
C++
-
 C#
C#
-
 MongoDB
-
 MySQL
MySQL
-
 Javascript
-
 PHP
PHP
-
 Economics & Finance
How to remove data from hashmap to arraylist for listview in Android?
This example demonstrate about How to remove data from hashmap to arraylist for listview in Android
Step 1 − Create a new project in Android Studio, go to File ⇒ New Project and fill all required details to create a new project.
Step 2 − Add the following code to res/layout/activity_main.xml.
In the above code, we have taken the name and record number as Edit text, when user click on save button it will store the data into arraylist. Click on delete button with record id to remove an element from the listview.
Step 3 − Add the following code to src/MainActivity.java
package com.example.andy.myapplication;

import android.os.Bundle;
import android.support.v7.app.AppCompatActivity;
import android.view.View;
import android.widget.ArrayAdapter;
import android.widget.Button;
import android.widget.EditText;
import android.widget.ListView;
import android.widget.Toast;

import java.util.ArrayDeque;
import java.util.ArrayList;
import java.util.Collection;
import java.util.Deque;
import java.util.HashMap;
import java.util.Map;
import java.util.PriorityQueue;

public class MainActivity extends AppCompatActivity {
   Button save, refresh;
   EditText name,record;
   ArrayAdapter arrayAdapter;
   PriorityQueue hs;
   ArrayList array_list;
   private ListView listView;
   Map map = new HashMap();

   @Override
   protected void onCreate(Bundle readdInstanceState) {
      super.onCreate(readdInstanceState);
      setContentView(R.layout.activity_main);
      array_list = new ArrayList();
      name = findViewById(R.id.name);
      record = findViewById(R.id.record);
      listView = findViewById(R.id.listView);
      findViewById(R.id.refresh).setOnClickListener(new View.OnClickListener() {
         @Override
         public void onClick(View v) {
            arrayAdapter.notifyDataSetChanged();
            listView.invalidateViews();
            listView.refreshDrawableState();
         }
      });

      findViewById(R.id.delete).setOnClickListener(new View.OnClickListener() {
         @Override
         public void onClick(View v) {
            if(!record.getText().toString().isEmpty()){
               map.remove(record.getText().toString());
               array_list.clear();
               array_list.addAll(map.values());
               arrayAdapter = new ArrayAdapter(MainActivity.this, android.R.layout.simple_list_item_1, array_list);
               listView.setAdapter(arrayAdapter);
               Toast.makeText(MainActivity.this, "Deleted", Toast.LENGTH_LONG).show();
            }
         }
      });

      findViewById(R.id.save).setOnClickListener(new View.OnClickListener() {
         @Override
         public void onClick(View v) {
            if (!name.getText().toString().isEmpty() && !record.getText().toString().isEmpty()) {
               map.put(record.getText().toString(),name.getText().toString());
               array_list.clear();
               array_list.addAll(map.values());
               arrayAdapter = new ArrayAdapter(MainActivity.this, android.R.layout.simple_list_item_1, array_list);
               listView.setAdapter(arrayAdapter);
               Toast.makeText(MainActivity.this, "Inserted", Toast.LENGTH_LONG).show();
            } else {
               name.setError("Enter NAME");
               record.setError("Enter Record");
            }
         }
      });
   }
}
Let's try to run your application. I assume you have connected your actual Android Mobile device with your computer. To run the app from android studio, open one of your project's activity files and click Run ![]() icon from the toolbar. Select your mobile device as an option and then check your mobile device which will display your default screen −
icon from the toolbar. Select your mobile device as an option and then check your mobile device which will display your default screen −
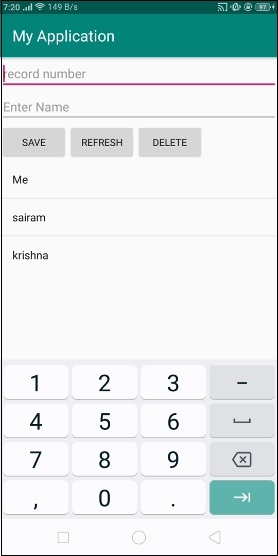
In the above result, we have inserted 3 records as shown above.

Now we have entered record number as 3 and clicked on the delete button. It will delete a record from listview as shown above.
Click here to download the project code

260 Views
