- WordPress Basics
- WordPress - Home
- WordPress - Overview
- WordPress - Installation
- WordPress - Dashboard
- WordPress Settings
- WordPress - General Setting
- WordPress - Writing Setting
- WordPress - Reading Setting
- WordPress - Discussion Setting
- WordPress - Media Setting
- WordPress - Permalink Setting
- WordPress - Plugin Setting
- WordPress Categories
- WordPress - Add Category
- WordPress - Edit Category
- WordPress - Delete Category
- WordPress - Arrange Categories
- WordPress Posts
- WordPress - Add Posts
- WordPress - Edit Posts
- WordPress - Delete Posts
- WordPress - Preview Posts
- WordPress - Publish Posts
- WordPress Media
- WordPress - Media Library
- WordPress - Add Media
- WordPress - Insert Media
- WordPress - Edit Media
- WordPress Pages
- WordPress - Add Pages
- WordPress - Publish Pages
- WordPress - Edit Pages
- WordPress - Delete Pages
- WordPress Tags
- WordPress - Add Tags
- WordPress - Edit Tags
- WordPress - Delete Tags
- WordPress Links
- WordPress - Add Links
- WordPress - Edit Links
- WordPress - Delete Links
- WordPress Comments
- WordPress - Add Comments
- WordPress - Edit Comments
- WordPress - Moderate Comments
- WordPress Plugins
- WordPress - View Plugins
- WordPress - Install Plugins
- WordPress - Customize Plugins
- WordPress Users
- WordPress - User Roles
- WordPress - Add Users
- WordPress - User Photo
- WordPress - Edit Users
- WordPress - Delete Users
- WordPress - Personal Profile
- WordPress Appearance
- WordPress - Theme Management
- WordPress - Customize Theme
- WordPress - Widget Management
- WordPress - Background
- WordPress Advanced
- WordPress - Host Transfer
- WordPress - Version Update
- WordPress - Spam Protection
- WordPress - Backup & Restore
- WordPress - Optimization
- WordPress - Reset Password
- WordPress Useful Resources
- WordPress - Questions and Answers
- WordPress - Quick Guide
- WordPress - Useful Resources
- WordPress - Discussion
WordPress - Personal Profile
In this chapter, we will learn how to create a Personal profile in WordPress.
Following are the steps to Personal Profile.
Step(1) − Click on Users → Your Profile from the left navigation bar.
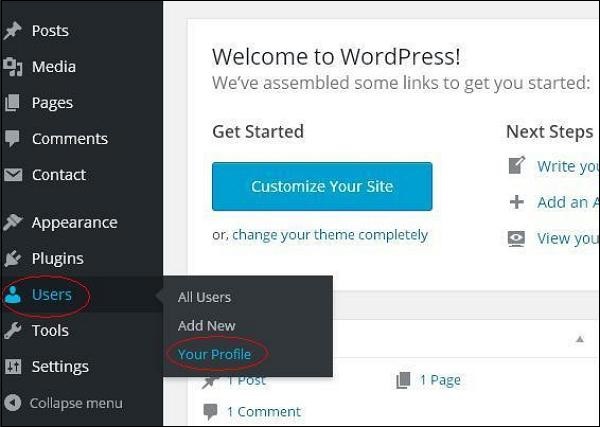
Step (2) − When you click on ‘Your profile’ the following screen will be displayed.
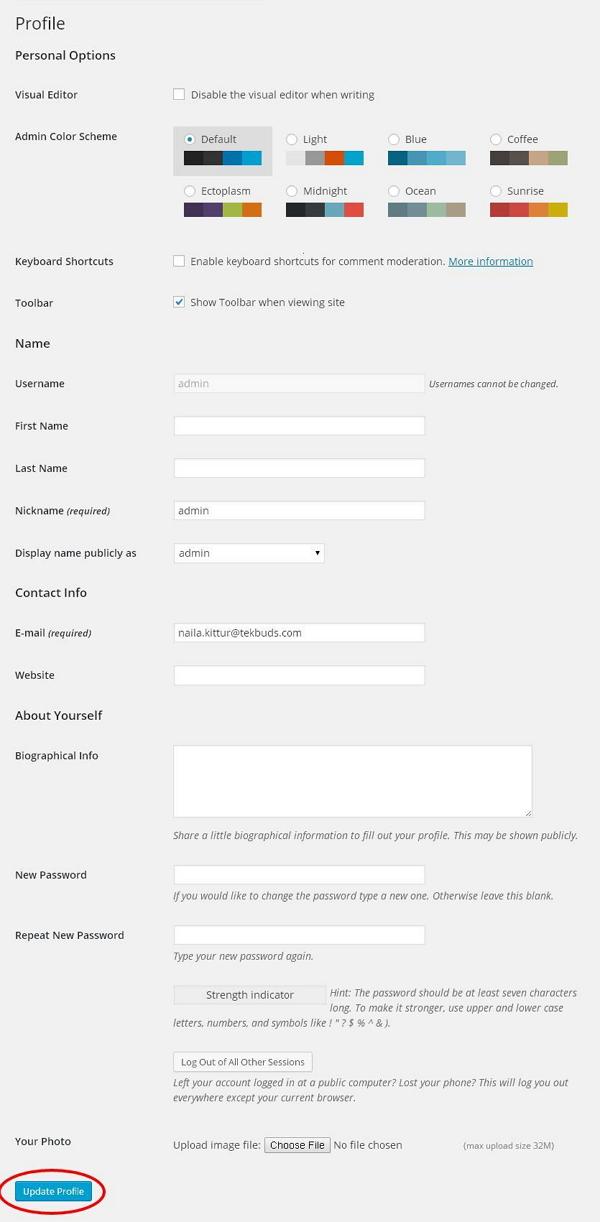
The following Personal options appear on the screen −
Visual editor − While you are adding posts/pages to your site you can enable this setting if you wish to create, format, or edit your post. If you disable this setting, you won’t be able to use this option.
Admin color scheme − You can change the color of your WordPress site by selecting any of the following.
Keyboard Shortcuts − If you are too fast at getting your work done and need keyboard shortcuts then you can check this box.
Toolbar − If you check this box, you can view the toolbar while using WordPress.
Name
Username − Enter your user name.
First Name/ Last Name − Enter your first name and last name.
Nick name − Enter nick names if any.
Display name publicly as − Check the box if you want your name to be displayed publicly.
Contact Info
E-mail − Enter a valid e-mail address.
Website − Type in your web address.
About yourself
Biographical Info − Some details about you.
New password − Enter a password of your choice.
Repeat password − Re-enter the password for authentication. Password must contain 7 characters.
Your photo − You can upload an image of your own from your computer. This will be your profile picture.
Step (3) − After you have updated all the changes, click on Update Profile.