- WML Tutorial
- WML - Home
- WML - Overview
- WML - Environment
- WML - Syntax
- WML - Elements
- WML - Comments
- WML - Variables
- WML - Formatting
- WML - Fonts
- WML - Images
- WML - Tables
- WML - Links
- WML - Tasks
- WML - Inputs
- WML - Submit Data
- WML - Server Scripts
- WML - Events
- WML - Timer
- WML - Template
- WML - DTD
- WML2 - Tutorial
- WML References
- WML - Entities
- WML - Tags Reference
- WML Tools
- WAP - Emulators
- WML - Validator
- WML Useful Resources
- WML - Quick Guide
- WML - Useful Resources
- WML - Discussion
- accept
- prev
- help
- reset
- options
- delete
- unknown
- x-*
- vnd.*
WML <do> Tag
The <do> tag can be used to activate a task when the user clicks on a word/phrase on the screen.
Attributes:
This element supports the following attributes:
| Attribute | Value | Description |
|---|---|---|
| name | text | Sets a name for the <do> element. |
| label | string | Sets a label for the <do> element. |
| type |
| Defines the type of the <do> element |
| value | number | Specifies the timer after which timer will be expired. Timeouts are specified in units of a tenth of a second. |
| class | class_data | Sets a class name for the element. |
| id | element ID | A unique ID for the element. |
Example:
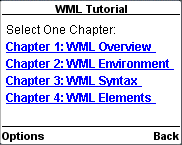
Following is the example showing usage of <do> element along with <go> element.
<?xml version="1.0"?>
<!DOCTYPE wml PUBLIC "-//WAPFORUM//DTD WML 1.3//EN"
"http://www.wapforum.org/DTD/wml13.dtd">

<wml>
  <template>
    <do name="main_menu" type="accept" label="Chapters">
      <go href="chapters"/>
    </do>
    <do name="menu_1" type="accept" label="Chapter 1">

      <go href="#chapter1"/>
    </do>
    <do name="menu_2" type="accept" label="Chapter 2">
      <go href="#chapter2"/>
    </do>
    <do name="menu_3" type="accept" label="Chapter 3">

      <go href="#chapter3"/>
    </do>
    <do name="menu_4" type="accept" label="Chapter 4">
      <go href="#chapter4"/>
    </do>
  </template>

  <card id="chapters" title="WML Tutorial">
    <p>
      Select One Chapter:<br/>
      <anchor>
        <go href="#chapter1"/>

        Chapter 1: WML Overview
      </anchor><br />

      <anchor>
        <go href="#chapter2"/>
        Chapter 2: WML Environment
      </anchor><br />

      <anchor>
        <go href="#chapter3"/>
        Chapter 3: WML Syntax
      </anchor><br />

      <anchor>
        <go href="#chapter4"/>

        Chapter 4: WML Elements
      </anchor><br />
    </p>
  </card>

  <card id="chapter1" title="WML Tutorial Ch1">
    <p>

      <em>Chapter 1: WML Introduction</em><br/>
      ...
    </p>
  </card>

  <card id="chapter2" title="WML Tutorial Ch2">

    <p>
      <em>Chapter 2: WML Environment</em><br/>
      ...
    </p>
  </card>

  <card id="chapter3" title="WML Tutorial Ch3">
    <p>
      <em>Chapter 3: WML Syntax</em><br/>
      ...
    </p>
  </card>

  <card id="chapter4" title="WML Tutorial Ch4">
    <p>
      <em>Chapter 4: WML Elements</em><br/>
      ...
    </p>

  </card>
</wml>
This will produce the following menu and now you can navigate through all the chapters:
Advertisements