- Windows 10 Development Tutorial
- Windows 10 - Home
- Windows 10 - Introduction
- Windows 10 – UWP
- Windows 10 – First App
- Windows 10 - Store
- Windows 10 - XAML Controls
- Windows 10 - Data Binding
- Windows 10 - XAML Performance
- Windows 10 - Adaptive Design
- Windows 10 - Adaptive UI
- Windows 10 - Adaptive Code
- Windows 10 - File Management
- Windows 10 - SQLite Database
- Windows 10 – Communication
- Windows 10 - App Localization
- Windows 10 - App Lifecycle
- Windows 10 - Background Execution
- Windows 10 - APP Services
- Windows 10 - Web Platform
- Windows 10 - Connected Experience
- Windows 10 - Navigation
- Windows 10 - Networking
- Windows 10 - Cloud Services
- Windows 10 - Live Tiles
- Windows 10 - Sharing Contract
- Windows 10 - Porting to Windows
- Windows 10 Useful Resources
- Windows 10 - Quick Guide
- Windows 10 - Useful Resources
- Windows 10 - Discussion
Windows 10 Development - Adaptive Code
In this chapter, we will be demonstrating the adoption of your application to different devices supported by Windows 10. We have already learnt about adopting your UI and all the tricks, techniques and controls used in UWP applications.
Now, we will learn about adopting your code, because
Application codes are not the same across all the devices.
APIs used, particularly for Xbox, will not be available for mobile devices. The same thing is true for HoloLens etc.

Adaptive code can light up your application conditionally and execute code only when running on a specific device family and/or on a particular version of the platform/extension APIs.
Writing Code
In Windows 10, you can implement the UWP applications in Visual Studio by using either C++, C#, Visual Basic or JavaScript.
With C# and Visual Basic you can use XAML for UI designing.
With C++ you can either use DirectX instead of using XAML.
For JavaScript, you can use HTML for your presentation layer, which is a cross platform Web standards.
The Windows Core APIs run in the same way for all the devices, which contain most of the functionality you need for your code and UI. However, for the code and the UI tailored for particular device families, you need to use the adaptive code and adaptive UI.
Calling an API that is NOT implemented by the target device family −
The UI adapts to different screens easily, but different device families not only have different screen sizes, it has a lot more than that.
For example, the mobile phones have some hardware buttons such as Back and Camera, which might not be available on other devices such as PC.
By default, the core APIs contain most of the functionality, which works for all the devices, but the device specific functionality can be used by referencing the Extension SDKs in your UWP applications just like external assemblies.
To add any particular extension SDK, needed in your application, follow the below given steps −
Right click on the References.
Select “Add References..”. The following dialog will open.
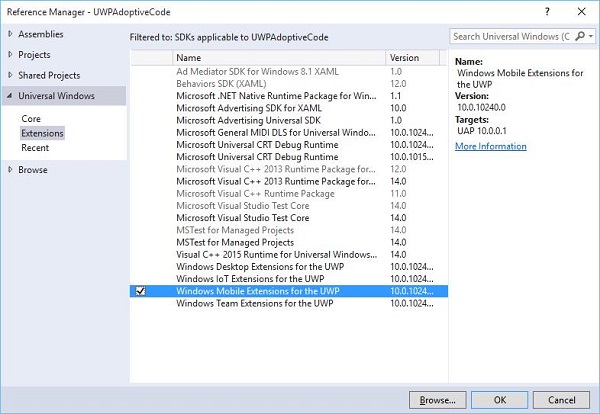
Adding an extension is as simple as adding a project reference.
Now you can add any extension SDK from the list, which contains Desktop Extension, IoT Extension, and Mobile Extension etc.
Desktop and Mobile extensions are the two most common platform Extension SDKs. The Mobile extension, for example, enables the APIs necessary to use the hardware camera button.
You can check the device capabilities by using the Windows.Foundation.Metadata.ApiInformation class method, which returns a Boolean output if the type is supported on the current device. For example, you can enable your Windows app to use the Camera button with code like this −
bool isHardwareButtonsAPIPresent =
   Windows.Foundation.Metadata.ApiInformation.
   IsTypePresent("Windows.Phone.UI.Inpu t.HardwareButtons");

if (isHardwareButtonsAPIPresent) {
   Windows.Phone.UI.Input.HardwareButtons.CameraPressed += HardwareButtons_CameraPressed;
}
The phone-camera button code will execute only if the Mobile Extension SDK is enabled on the device. Similarly, you can also check for any particular event, method or property in the current API version by using IsEventPresent, IsMethodPresent, IsPropertyPresent, instead of IsTypePresent as shown below.
bool isHardwareButtons_CameraPressedAPIPresent =
   Windows.Foundation.Metadata.ApiInformation.IsEventPresent
   ("Windows.Phone.UI.Input.HardwareButtons", "CameraPressed");
Win32 APIs in the UWP
A Universal Widows Platform (UWP) application or Windows Runtime Component, which are written in C++/CX, can access Win32 APIs, which are also a part of UWP now. All of the Windows 10 device families can implement Win32 APIs by linking your application with Windowsapp.lib.
Windowsapp.lib is an "umbrella" lib that provides the exports for the UWP APIs. Linking to Windowsapp.lib will add to your app dependencies on dlls that are present on all Windows 10 device families.
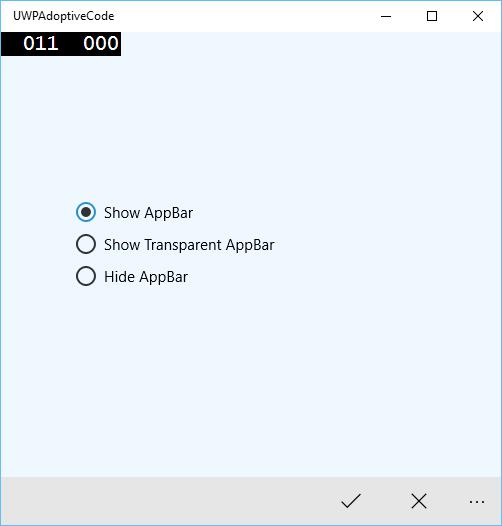
Let us have a look into a simple example in which the application targets both the desktop and the phone. Therefore, when the application runs on the desktop, it will not show the status bar, but when the same application runs on the phone, it will display the status bar.
Given below is the XAML code in which different controls are added.
<Page
   x:Class = "UWPAdoptiveCode.MainPage"
   xmlns = "http://schemas.microsoft.com/winfx/2006/xaml/presentation"
   xmlns:x = "http://schemas.microsoft.com/winfx/2006/xaml"
   xmlns:local = "using:UWPAdoptiveCode"
   xmlns:d = "http://schemas.microsoft.com/expression/blend/2008"
   xmlns:mc = "http://schemas.openxmlformats.org/markup-compatibility/2006"
   mc:Ignorable = "d">

   <Page.Background>
      <SolidColorBrush Color = "Green"/>
   </Page.Background>

   <Page.BottomAppBar>
      <CommandBar x:Name = "commandBar" >
         <AppBarButton Icon = "Accept" Label = "appbarbutton"/>
         <AppBarButton Icon = "Cancel" Label = "appbarbutton"/>
      </CommandBar>
   </Page.BottomAppBar>

   <Grid Background = "AliceBlue">

      <VisualStateManager.VisualStateGroups>

         <VisualStateGroup>

            <VisualState>
               <VisualState.StateTriggers>
                  <local:DeviceFamilyTrigger DeviceFamily = "Desktop" />
               </VisualState.StateTriggers>

               <VisualState.Setters>
                  <Setter Target = "StatusBarControls.Visibility"
                     Value = "Collapsed"/>
               </VisualState.Setters>

            </VisualState>

         </VisualStateGroup>

      </VisualStateManager.VisualStateGroups>

      <StackPanel HorizontalAlignment = "Left" Margin = "75,164,0,0"
         VerticalAlignment = "Top" >

         <RadioButton x:Name = "ShowAppBarRadioButton" Content = "Show AppBar"
            HorizontalAlignment = "Stretch" VerticalAlignment = "Stretch"
            IsChecked = "True" Checked = "RadioButton_Checked"/>

         <RadioButton x:Name = "ShowOpaqueAppBarRadioButton"
            Content = "Show Transparent AppBar" HorizontalAlignment = "Stretch"
            VerticalAlignment = "Stretch" Checked = "RadioButton_Checked"/>

         <RadioButton x:Name = "HideAppBarRadioButton" Content = "Hide AppBar"
            HorizontalAlignment = "Stretch" VerticalAlignment = "Stretch"
            Checked = "RadioButton_Checked"/>

      </StackPanel>

      <StackPanel x:Name = "StatusBarControls" Orientation = "Vertical"
         Margin = "75,350,0,0" Visibility = "Visible">

         <CheckBox x:Name = "StatusBarBackgroundCheckBox"
            Content = "Set StatusBar Background"
            Checked = "StatusBarBackgroundCheckBox_Checked"
            Unchecked = "StatusBarBackgroundCheckBox_Unchecked"/>

         <CheckBox x:Name = "StatusBarHiddenCheckBox"
            Content = "Set StatusBar Hidden" Checked = "StatusBarHiddenCheckBox_Checked"
            Unchecked = "StatusBarHiddenCheckBox_Unchecked"/>

      </StackPanel>

   </Grid>

</Page>
Given below is the C# implementation for different events.
using Windows.UI;
using Windows.UI.Xaml;
using Windows.UI.Xaml.Controls;

// The Blank Page item template is documented at
   http://go.microsoft.com/fwlink/?LinkId=402352&clcid=0x409

namespace UWPAdoptiveCode {
   /// <summary>
      /// An empty page that can be used on its own or navigated to within a Frame.
   /// </summary>

   public sealed partial class MainPage : Page {

      private Color? DefaultTitleBarButtonsBGColor;
      private Color? DefaultTitleBarBGColor;

      public MainPage() {
         this.InitializeComponent();

         //Windows.UI.ViewManagement.ApplicationView.GetForCurrentView().
            VisibleBoundsCh anged += MainPage_VisibleBoundsChanged;

         var viewTitleBar = Windows.UI.ViewManagement.ApplicationView.
            GetForCurrentView().TitleBar;

         DefaultTitleBarBGColor = viewTitleBar.BackgroundColor;
         DefaultTitleBarButtonsBGColor = viewTitleBar.ButtonBackgroundColor;
      }

      private void RadioButton_Checked(object sender, RoutedEventArgs e) {

         // Bottom AppBar shows on Desktop and Mobile
         if (ShowAppBarRadioButton != null) {

            if (ShowAppBarRadioButton.IsChecked.HasValue &&
               (ShowAppBarRadioButton.IsChecked.Value == true)) {
                 commandBar.Visibility = Windows.UI.Xaml.Visibility.Visible;
                 commandBar.Opacity = 1;
            } else {
               commandBar.Visibility = Windows.UI.Xaml.Visibility.Collapsed;
            }
         }

         if (ShowOpaqueAppBarRadioButton != null) {

            if (ShowOpaqueAppBarRadioButton.IsChecked.HasValue &&
               (ShowOpaqueAppBarRadioButton.IsChecked.Value == true)){
                  commandBar.Visibility = Windows.UI.Xaml.Visibility.Visible;
                  commandBar.Background.Opacity = 0;
            } else{
               commandBar.Background.Opacity = 1;
            }
         }

      }

      private void StatusBarHiddenCheckBox_Checked(object sender, RoutedEventArgs e){

         // StatusBar is Mobile only
         if (Windows.Foundation.Metadata.ApiInformation.
            IsTypePresent("Windows.UI.ViewManag ement.StatusBar")){
               var ignore = Windows.UI.ViewManagement.StatusBar.GetForCurrentView().HideAsync();
         }
      }

      private void StatusBarHiddenCheckBox_Unchecked(object sender, RoutedEventArgs e){

         // StatusBar is Mobile only
         if (Windows.Foundation.Metadata.ApiInformation.
            IsTypePresent("Windows.UI.ViewManag ement.StatusBar")){
               var ignore = Windows.UI.ViewManagement.StatusBar.GetForCurrentView().ShowAsync();
         }
      }

      private void StatusBarBackgroundCheckBox_Checked(object sender, RoutedEventArgs e){

         // StatusBar is Mobile only
         if (Windows.Foundation.Metadata.ApiInformation.
            IsTypePresent("Windows.UI.ViewManag ement.StatusBar")){

               Windows.UI.ViewManagement.StatusBar.GetForCurrentView().
                  BackgroundColor = Windows.UI.Colors.Blue;

               Windows.UI.ViewManagement.StatusBar.GetForCurrentView().
                   BackgroundOpacity = 1;
         }
      }

      private void StatusBarBackgroundCheckBox_Unchecked(object sender, RoutedEventArgs e){

         // StatusBar is Mobile only
         if (Windows.Foundation.Metadata.ApiInformation.
            IsTypePresent("Windows.UI.ViewManag ement.StatusBar")){
               Windows.UI.ViewManagement.StatusBar.GetForCurrentView().
                  BackgroundOpacity = 0;
         }
      }

   }

   public class DeviceFamilyTrigger : StateTriggerBase{

      //private variables
      private string _deviceFamily;

      //Public property
      public string DeviceFamily {

         get {
            return _deviceFamily;
         }
         set{
            _deviceFamily = value;
            var qualifiers = Windows.ApplicationModel.Resources.Core.ResourceContext.
               GetForCurrentView().Qua lifierValues;

            if (qualifiers.ContainsKey("DeviceFamily"))
               SetActive(qualifiers["DeviceFamily"] == _deviceFamily);
            else
               SetActive(false);
         }
      }
   }
}
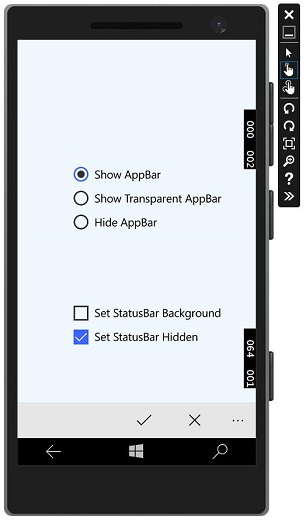
When the above given code is compiled and executed on a Mobile, you will see the following window.
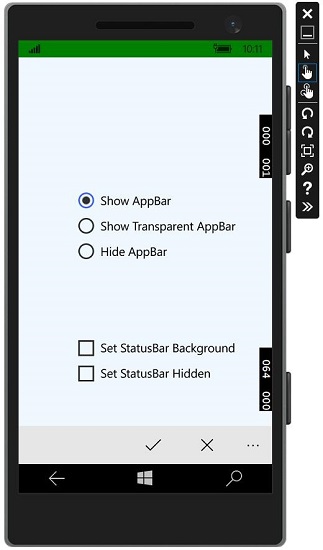
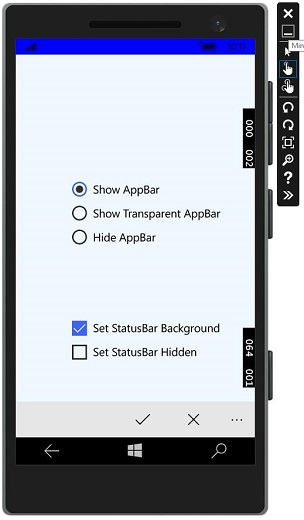
You can change the background color of the status bar with the checkbox as shown in the image.
You can also hide the status bar.
Now, when you run the same application on a desktop device, you will see the following window in which the status bar and the checkboxes specific to the status bar are not visible.