- Web2py Tutorial
- Web2py - Home
- Web2py - Introduction
- Web2py - Python Language
- Web2py - Framework Overview
- Web2py - Core
- Web2py - Views
- Web2py - Database Abstraction Layer
- Web2py - Forms & Validators
- Web2py - Email & SMS
- Web2py - Access Control
- Web2py - Services
- Web2py - Adding Ajax Effects
- Web2py - Components
- Web2py - Deployment
- Web2py - Security
- Web2py Useful Resources
- Web2py - Quick Guide
- Web2py - Useful Resources
- Web2py - Discussion
Web2py - Forms & Validators
web2py comes with powerful functions for form generation. Four distinct ways to build forms in web2py are as follows −
FORM − In terms of HTML helpers, it is considered as a low-level implementation. A FORM object is aware of its field contents.
SQLFORM − It provides the functionalities of Create, Update and Delete to the existing database.
SQLFORM.factory − It is considered as abstraction layer on the top of SQLFORM, which generates a form similar to SQLFORM. Here, there is no need to create a new database.
CRUD Methods − As the name suggests, it provides Create, Retrieve, Update and Delete features with the similar functionalities based on SQLFORM.
FORM
Consider an application, which accepts an input from the user and has a “submit” button to submit the response.
Controller
“default.py” controller will include the following associated function
def display_form():
   return dict()
View
The associated view "default/display_form.html" will render the display of form in HTML as −
{{extend 'layout.html'}}
<h2>Basic Form</h2>

<form enctype = "multipart/form-data" action = "{{= URL()}}" method = "post">
   Your name:
   <input name = "name" />
   <input type = "submit" />
</form>

<h2>Submitted variables</h2>
{{= BEAUTIFY(request.vars)}}
The above example is the normal HTML form, which asks for the user input. The same form can be generated with the helpers like FORM object.
Controller
def display_form():
   form = FORM('Value:', INPUT(_value = 'name'), INPUT(_type = 'submit'))
   return dict(form = form)
The above function in “default.py” controller includes FORM object (HTML helper) which helps in creation of form.
View
{{extend 'layout.html'}}
<h2>Basic form</h2>

{{= form}}
<h2>Submitted variables</h2>

{{= BEAUTIFY(request.vars)}}
He form which is generated by the statement {{= form}} serializes the FORM object. When a user fills the form and clicks on the submit button, the form self-submits, and the variable request.vars.value along with its input value is displayed at the bottom.
SQLFORM
It helps in creation of a form to the existing database. The steps for its implementation are discussed below.
Establishing connection with database using DAL, this is created using DAL object which is also called DAL constructor. After establishing the connection, user can create the respective table.
db = DAL('sqlite://storage.sqlite')
db.define_table('employee', Field('name', requires = IS_NOT_EMPTY()))
Thus, we have created a table named “employee”. The controller builds the form and button with the following statements −
form = SQLFORM(
   db.mytable,
   record = mytable_index,
   deletable = True,
   submit_button = T('Update')
)
Therefore, for the employee table created, the modification in the controller would be −
def display_form():
   form = SQLFORM(db.person)
There is no modification in View. In the new controller, it is necessary build a FORM, since the SQLFORM constructor built one from the table db.employee is defined in the model. The new form, when serialized, appears as follows −
<form enctype = "multipart/form-data" action = "" method = "post">

   <table>
      <tr id = "employee_name__row">
         <td>
            <label id = "person_name__label" for = "person_name">Your name: </label>
         </td>

         <td>
            <input type = "text" class = "string" name = "name" value = "" id = "employee_name" />
         </td>

         <td></td>
      </tr>

      <tr id = "submit_record__row">
         <td></td>
         <td><input value = "Submit" type = "submit" /></td>
         <td></td>
      </tr>

   </table>

   <input value = "9038845529" type = "hidden" name = "_formkey" />
   <input value = "employee" type = "hidden" name = "_formname" />

</form>
All tags in the form have names derived from the table and field name.
An SQLFORM object also deals with "upload" fields by saving uploaded files in the "uploads" folder. This is done automatically. SQLFORM displays “Boolean” values in the form of checkboxes and text values with the help of “textareas”.
SQLFORM also uses the process method.This is necessary if the user wants to keep values with an associated SQLFORM.
If form.process(keepvalues = True) then it is accepted.
Example
def display_form():
   form = SQLFORM(db.employee)
if form.process().accepted:
   response.flash = 'form accepted'

elif form.errors:
   response.flash = 'form has errors'
else:
   response.flash = 'please fill out the form'

return dict(form = form)
SQLFORM.factory
Sometimes, the user needs to generate a form in a way that there is an existing database table without the implementation of the database. The user simply wants to take an advantage of the SQLFORM capability.
This is done via form.factory and it is maintained in a session.
def form_from_factory():
   form = SQLFORM.factory(
      Field('your_name', requires = IS_NOT_EMPTY()),
      Field('your_image', 'upload'))

   if form.process().accepted:
      response.flash = 'form accepted'
      session.your_name = form.vars.your_name
      session.your_image = form.vars.your_image
   elif form.errors:
      response.flash = 'form has errors'

   return dict(form = form)
The form will appear like SQLFORM with name and image as its fields, but there is no such existing table in database.
The "default/form_from_factory.html" view will represent as −
{{extend 'layout.html'}}
{{= form}}
CRUD Methods
CRUD is an API used on top of SQLFORM. As the name suggests, it is used for creation, retrieval, updating and deletion of appropriate form.
CRUD, in comparison to other APIs in web2py, is not exposed; therefore, it is necessary that it should be imported.
from gluon.tools import Crud
crud = Crud(db)
The CRUD object defined above provides the following API −
| Sr.No | API & Functionality |
|---|---|
| 1 |
crud.tables() Returns a list of tables defined in the database. |
| 2 |
crud.create(db.tablename) Returns a create form for the table tablename. |
| 3 |
crud.read(db.tablename, id) Returns a read-only form for tablename and record id. |
| 4 |
crud.delete(db.tablename, id) deletes the record |
| 5 |
crud.select(db.tablename, query) Returns a list of records selected from the table. |
| 6 |
crud.search(db.tablename) Returns a tuple (form, records) where form is a search form. |
| 7 |
crud() Returns one of the above based on the request.args(). |
Creation of Form
Let us create a form. Follow the codes given below.
Model
A new model is created under the models folder of the application. The name of the file would be “dynamic_search.py”.
def build_query(field, op, value):
   if op == 'equals':
      return field == value

   elif op == 'not equal':
      return field != value

   elif op == 'greater than':
      return field > value

   elif op == 'less than':
      return field < value

   elif op == 'starts with':
      return field.startswith(value)

   elif op == 'ends with':
      return field.endswith(value)

   elif op == 'contains':
      return field.contains(value)

def dynamic_search(table):
   tbl = TABLE()
   selected = []
   ops = ['equals',
      'not equal',
      'greater than',
      'less than',
      'starts with',
      'ends with',
      'contains']

query = table.id > 0

for field in table.fields:
   chkval = request.vars.get('chk'+field,None)
   txtval = request.vars.get('txt'+field,None)
   opval = request.vars.get('op'+field,None)

row = TR(TD(INPUT(_type = "checkbox",_name = "chk"+field,value = chkval == 'on')),
   TD(field),TD(SELECT(ops,_name = "op"+field,value = opval)),
   TD(INPUT(_type = "text",_name = "txt"+field,_value = txtval)))

tbl.append(row)

if chkval:
   if txtval:
      query &= build_query(table[field], opval,txtval)
      selected.append(table[field])
      form = FORM(tbl,INPUT(_type="submit"))
      results = db(query).select(*selected)
   return form, results
Controller
The associated file namely “dynamic_search.py” under controllers section will include the following code −
def index():
   form,results = dynamic_search(db.things)
   return dict(form = form,results = results)
View
We can render this with the following view.
{{extend 'layout.html'}}
{{= form}}
{{= results}}
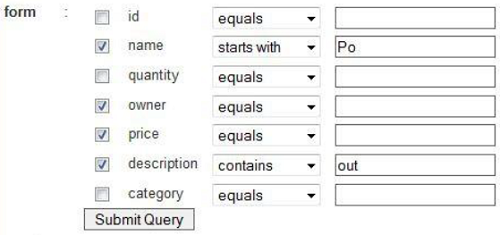
Here is what it looks like −