- WCF Tutorial
- WCF - Home
- WCF - Overview
- WCF - Versus Web Service
- WCF - Developers Tools
- WCF - Architecture
- WCF - Creating WCF Service
- WCF - Hosting WCF Service
- WCS - IIS Hosting
- WCF - Self-Hosting
- WCF - WAS Hosting
- WCF - Windows Service Hosting
- WCF - Consuming WCF Service
- WCF - Service Binding
- WCF - Instance Management
- WCF - Transactions
- WCF - RIA Services
- WCF - Security
- WCF - Exception Handling
- WCF Resources
- WCF - Quick Guide
- WCF - Useful Resources
- WCF - Discussion
WCF - Quick Guide
WCF - Overview
WCF stands for Windows Communication Foundation. The elementary feature of WCF is interoperability. It is one of the latest technologies of Microsoft that is used to build service-oriented applications. Based on the concept of message-based communication, in which an HTTP request is represented uniformly, WCF makes it possible to have a unified API irrespective of diverse transport mechanisms.
WCF was released for the first time in 2006 as a part of the .NET framework with Windows Vista, and then got updated several times. WCF 4.5 is the most recent version that is now widely used.
A WCF application consists of three components −
- WCF service,
- WCF service host, and
- WCF service client.
WCF platform is also known as the Service Model.
Fundamental Concepts of WCF
Message
This is a communication unit that comprises of several parts apart from the body. Message instances are sent as well as received for all types of communication between the client and the service.
Endpoint
It defines the address where a message is to be sent or received. It also specifies the communication mechanism to describe how the messages will be sent along with defining the set of messages. A structure of an endpoint comprises of the following parts −
Address
Address specifies the exact location to receive the messages and is specified as a Uniform Resource Identifier (URI). It is expressed as scheme://domain[:port]/[path]. Take a look at the address mentioned below −
net.tcp://localhost:9000/ServiceA
Here, 'net.tcp' is the scheme for the TCP protocol. The domain is 'localhost' which can be the name of a machine or a web domain, and the path is 'ServiceA'.
Binding
It defines the way an endpoint communicates. It comprises of some binding elements that make the infrastructure for communication. For example, a binding states the protocols used for transport like TCP, HTTP, etc., the format of message encoding, and the protocols related to security as well as reliability.
Contracts
It is a collection of operations that specifies what functionality the endpoint exposes to the client. It generally consists of an interface name.
Hosting
Hosting from the viewpoint of WCF refers to the WCF service hosting which can be done through many available options like self-hosting, IIS hosting, and WAS hosting.
Metadata
This is a significant concept of WCF, as it facilitates easy interaction between a client application and a WCF service. Normally, metadata for a WCF service is generated automatically when enabled, and this is done by inspection of service and its endpoints.
WCF Client
A client application that gets created for exposing the service operations in the form of methods is known as a WCF client. This can be hosted by any application, even the one that does service hosting.
Channel
Channel is a medium through which a client communicates with a service. Different types of channels get stacked and are known as Channel Stacks.
SOAP
Although termed as ‘Simple Object Access Protocol’, SOAP is not a transport protocol; instead it is an XML document comprising of a header and body section.
Advantages of WCF
It is interoperable with respect to other services. This is in sharp contrast to .NET Remoting in which both the client and the service must have .Net.
WCF services offer enhanced reliability as well as security in comparison to ASMX (Active Server Methods) web services.
Implementing the security model and binding change in WCF do not require a major change in coding. Just a few configuration changes is required to meet the constraints.
WCF has built-in logging mechanism whereas in other technologies, it is essential to do the requisite coding.
WCF has integrated AJAX and support for JSON (JavaScript object notation).
It offers scalability and support for up-coming web service standards.
It has a default security mechanism which is extremely robust.
WCF - Versus Web Service
There are some major differences that exist between WCF and a Web service which are listed below.
Attributes − WCF service is defined by ServiceContract and OperationContract attributes, whereas a web service is defined by WebService and WebMethod attributes.
Protocols − WCF supports a range of protocols, i.e., HTTP, Named Pipes, TCP, and MSMQ, whereas a web service only supports HTTP protocol.
Hosting Mechanisms − Various activation mechanisms are there for WCF hosting, i.e., IIS (Internet Information Service), WAS (Windows Activation Service), Self-hosting and Windows Service, but a web service is hosted only by IIS.
Services − WCF supports a robust security, trustworthy messaging, transaction and interoperability, while a web service only supports security services.
Serializer − WCF Supports DataContract serializer by employing System.Runtime.Serialization, whereas a web service supports XML serializer by making use of System.Xml.Serialization.
Tools − ServiceMetadata tool (svcutil.exe) is used for client generation for a WCF service, while WSDL.EXE tool is used for generating the same for a web service.
Exception Handling − In WCF, unhandled exceptions are handled in a better way by making use of FaultContract. They do not return to the client like in a web service as SOAP faults.
Hash Table − It is possible to serialize a Hash Table in WCF, but this is not the case in a web service.
Bindings − WCF supports several types of bindings like BasicHttpBinding, WSDualHttpBinding, WSHttpBinding, etc., while a web service supports only SOAP or XML.
Multithreading − WCF supports multithreading by using the ServiceBehavior Class, whereas this is not supported in a web service.
Duplex Service Operations − WCF supports duplex service operations apart from supporting one-way and request-response service operations, whereas a web service does not support duplex service operations.
WCF - Developers Tools
For developing a WCF service application, there are mainly two tools – Microsoft Visual Studio and CodePlex. Microsoft Visual Studio is a complete package of development tools, necessary for developing a large number of diverse applications like ASP.NET web applications, desktop applications, mobile applications, and many more.
Microsoft Visual Studio uses the .NET framework functionality. CodePlex on the other hand is an open-source project hosting site of Microsoft that offers several free tools for WCF service application development.
Microsoft Visual Studio
There are many editions of Microsoft Visual Studio and initially it (Visual Studio 2005) was not an ardent supporter of WCF development. At present, Visual Studio 2008 is the only Microsoft IDE available for the development of WCF service applications.
Nowadays, the latest version of Microsoft Visual Studio 2010 is also a preferred tool for developing WCF service application. There is also a readymade template in Visual Studio for developing WCF service application.
Selection of such a template leads to addition of files for the following purposes −
- Service contract
- Service implementation
- Service configuration
Requisite attributes get added automatically and a simple "Hello World" service gets created by Microsoft Visual Studio without even writing any code.
CodePlex
CodePlex was launched by Microsoft in June 2006 and since then, it has been used by a large number of developers across the world to create .NET projects successfully. Some of the tools offered by CodePlex for developing WCF service applications are as follows −
wscf.blue − This is a Microsoft Visual Studio add-in, and also "contract-first" development toolset that facilitates the defining of the WCF service operations, and generating a code skeleton accordingly. An important link for the same is − https://wscfblue.codeplex.com
WCFProxyGenerator − This is also a Microsoft Visual Studio add-in. The tool is used to extend the client-side generation and offer additional error handling. For having more information regarding this particular development tool, visit https://wcfproxygenerator.codeplex.com
WCFMock − Testing of WCF service can be a complicating task and this development tool offers a convenient solution for the unit testing of WCF services by its useful classes. For more information regarding this tool, visit https://wcfmock.codeplex.com
Another free tool for the development of WCF service applications in an easy manner is WCFStorm. Its LITE version offers many striking features for dynamically invoking and testing WCF services, editing the service binding, modifying WCF URL endpoint, etc.
WCF - Architecture
WCF has a layered architecture that offers ample support for developing various distributed applications. The architecture is explained below in detail.

Contracts
The contracts layer is just next to the application layer and contains information similar to that of a real-world contract that specifies the operation of a service and the kind of accessible information it will make. Contracts are basically of four types discussed below in brief −
Service contract − This contract provides information to the client as well as to the outer world about the offerings of the endpoint, and the protocols to be used in the communication process.
Data contract − The data exchanged by a service is defined by a data contract. Both the client and the service has to be in agreement with the data contract.
Message contract − A data contract is controlled by a message contract. It primarily does the customization of the type formatting of the SOAP message parameters. Here, it should be mentioned that WCF employs SOAP format for the purpose of communication. SOAP stands for Simple Object Access Protocol.
Policy and Binding − There are certain pre-conditions for communication with a service, and such conditions are defined by policy and binding contract. A client needs to follow this contract.
Service Runtime
The service runtime layer is just below the contracts layer. It specifies the various service behaviors that occur during runtime. There are many types of behaviors that can undergo configuration and come under the service runtime.
Throttling Behavior − Manages the number of messages processed.
Error Behavior − Defines the result of any internal service error occurrence.
Metadata Behavior − Specifies the availability of metadata to the outside world.
Instance Behavior − Defines the number of instances that needs to be created to make them available for the client.
Transaction Behavior − Enables a change in transaction state in case of any failure.
Dispatch Behavior − Controls the way by which a message gets processed by the infrastructure of WCF.
Concurrency Behavior − Controls the functions that run parallel during a client-server communication.
Parameter Filtering − Features the process of validation of parameters to a method before it gets invoked.
Messaging
This layer, composed of several channels, mainly deals with the message content to be communicated between two endpoints. A set of channels form a channel stack and the two major types of channels that comprise the channel stack are the following ones −
Transport Channels − These channels are present at the bottom of a stack and are accountable for sending and receiving messages using transport protocols like HTTP, TCP, Peer-to-Peer, Named Pipes, and MSMQ.
Protocol Channels − Present at the top of a stack, these channels also known as layered channels, implement wire-level protocols by modifying messages.
Activation and Hosting
The last layer of WCF architecture is the place where services are actually hosted or can be executed for easy access by the client. This is done by various mechanisms discussed below in brief.
IIS − IIS stands for Internet Information Service. It offers a myriad of advantages using the HTTP protocol by a service. Here, it is not required to have the host code for activating the service code; instead, the service code gets activated automatically.
Windows Activation Service − This is popularly known as WAS and comes with IIS 7.0. Both HTTP and non-HTTP based communication is possible here by using TCP or Namedpipe protocols.
Self-hosting − This is a mechanism by which a WCF service gets self-hosted as a console application. This mechanism offers amazing flexibility in terms of choosing the desired protocols and setting own addressing scheme.
Windows Service − Hosting a WCF service with this mechanism is advantageous, as the services then remain activated and accessible to the client due to no runtime activation.
WCF - Creating WCF Service
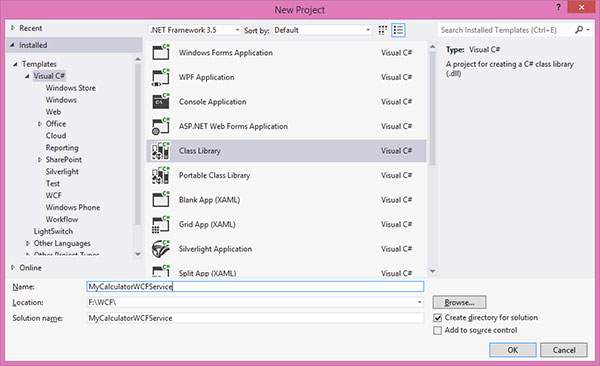
Creating a WCF service is a simple task using Microsoft Visual Studio 2012. Given below is the step-by-step method for creating a WCF service along with all the requisite coding, to understand the concept in a better way.
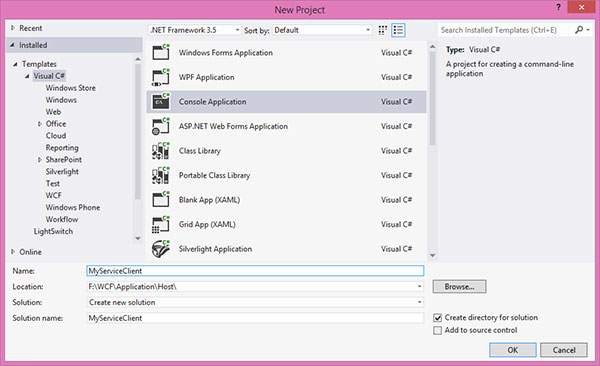
- Launch Visual Studio 2012.
- Click on new project, then in Visual C# tab, select WCF option.
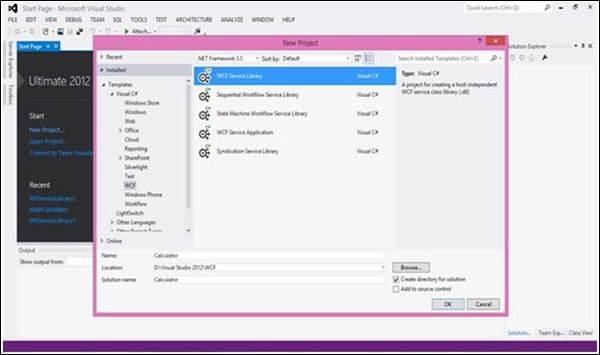
A WCF service is created that performs basic arithmetic operations like addition, subtraction, multiplication, and division. The main code is in two different files – one interface and one class.
A WCF contains one or more interfaces and its implemented classes.
using System;
using System.Collections.Generic;
using System.Linq;
using System.Runtime.Serialization;
using System.ServiceModel;
using System.Text;

namespace WcfServiceLibrary1 {
   // NOTE: You can use the "Rename" command on the "Refactor" menu to
   // change the interface name "IService1" in both code and config file
   // together.

   [ServiceContract]
   Public interface IService1 {
      [OperationContract]
      int sum(int num1, int num2);

      [OperationContract]
      int Subtract(int num1, int num2);

      [OperationContract]
      int Multiply(int num1, int num2);

      [OperationContract]
      int Divide(int num1, int num2);
   }

   // Use a data contract as illustrated in the sample below to add
   // composite types to service operations.

   [DataContract]
   Public class CompositeType {
      Bool boolValue = true;
      String stringValue = "Hello ";

      [DataMember]
      Public bool BoolValue {
         get { return boolValue; }
         set { boolValue = value; }
      }

      [DataMember]
      Public string StringValue {
         get { return stringValue; }
         set { stringValue = value; }
      }
   }
}
The code behind its class is given below.
using System;
usingSystem.Collections.Generic;
usingSystem.Linq;
usingSystem.Runtime.Serialization;
usingSystem.ServiceModel;
usingSystem.Text;

namespace WcfServiceLibrary1 {
   // NOTE: You can use the "Rename" command on the "Refactor" menu to
   // change the class name "Service1" in both code and config file
   // together.

   publicclassService1 :IService1 {
      // This Function Returns summation of two integer numbers

      publicint sum(int num1, int num2) {
         return num1 + num2;
      }

      // This function returns subtraction of two numbers.
      // If num1 is smaller than number two then this function returns 0

      publicint Subtract(int num1, int num2) {
         if (num1 > num2) {
            return num1 - num2;
         }
         else {
            return 0;
         }
      }

      // This function returns multiplication of two integer numbers.
      publicint Multiply(int num1, int num2) {
         return num1 * num2;
      }

      // This function returns integer value of two integer number.
      // If num2 is 0 then this function returns 1.
      publicint Divide(int num1, int num2) {
         if (num2 != 0) {
            return (num1 / num2);
         } else {
            return 1;
         }
      }
   }
}
To run this service, click the Start button in Visual Studio.
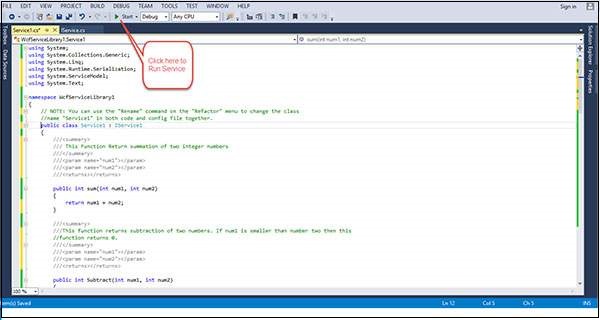
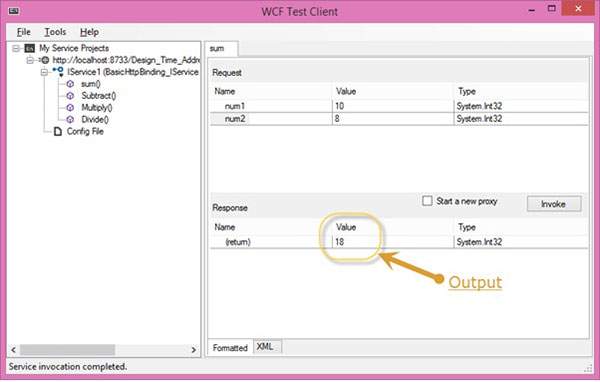
While we run this service, the following screen appears.
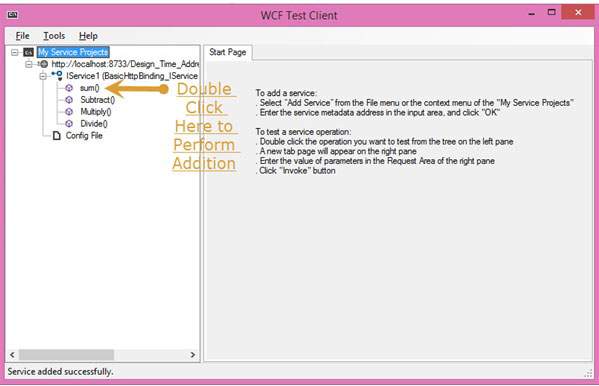
On clicking the sum method, the following page opens. Here, you can enter any two integer numbers and click on the Invoke button. The service will return the summation of those two numbers.
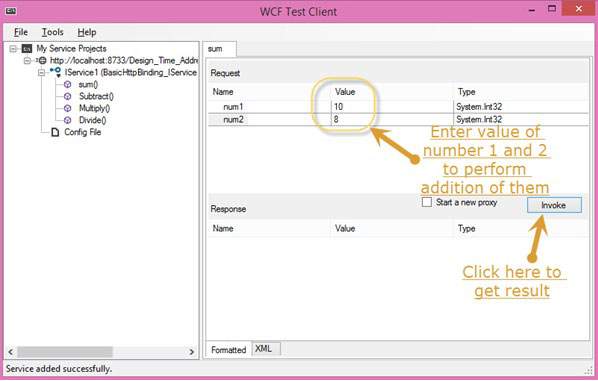
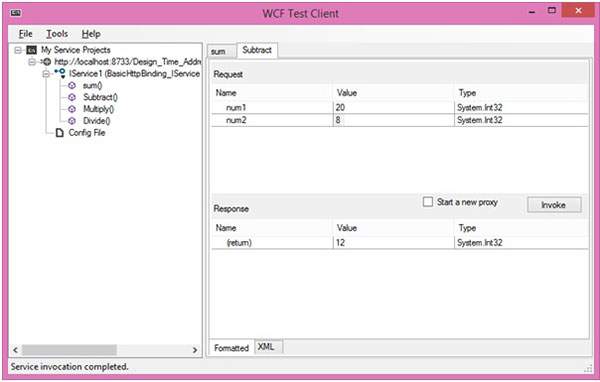
Like summation, we can perform all other arithmetic operations which are listed in the menu. And here are the snaps for them.
The following page appears on clicking the Subtract method. Enter the integer numbers, click the Invoke button, and get the output as shown here −
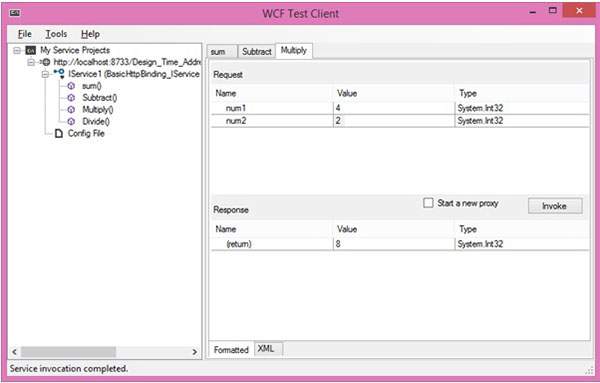
The following page appears on clicking the Multiply method. Enter the integer numbers, click the Invoke button, and get the output as shown here −
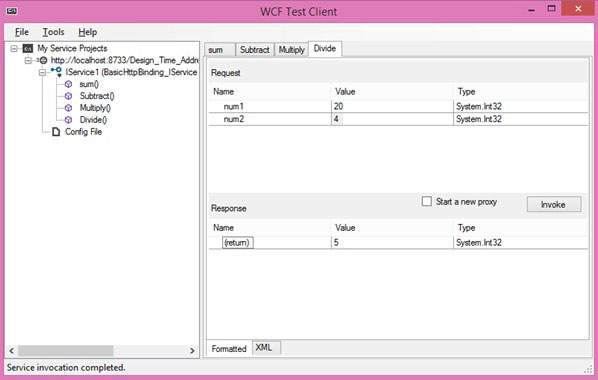
The following page appears on clicking the Divide method. Enter the integer numbers, click the Invoke button, and get the output as shown here −
Once the service is called, you can switch between them directly from here.

WCF - Hosting WCF Service
After creating a WCF service, the next step is to host it so that the client applications can consume it. This is known as WCF service hosting. A WCF service can be hosted by using any of the four ways given below −
IIS Hosting − IIS stands for Internet Information Services. Its working model is similar to that of ASP.NET while hosting a WCF service. The best feature of IIS hosting is that the service activation is processed automatically. IIS hosting also offers process health monitoring, idle shutdown, process recycling, and many more features to facilitate a WCF service hosting.
Self-Hosting − When a WCF service is hosted in a managed application, it is known as self-hosting. It requires a developer to write the requisite coding for ServiceHost initialization. In self-hosting, a WCF service can be hosted in a variety of applications like Console application, Windows form, etc.
WAS Hosting − Hosting a WCF service in Windows Activation Service (WAS) is most advantageous because of its features such as process recycling, idle time management, common configuration system, and support for HTTP, TCP, etc.
Windows Service Hosting − For local system clients, it is best to host WCF service as a window service and this is known as Window Service Hosting. All the versions of Windows support this type of hosting and here, the Service Control Manager can control the process lifecycle of the WCF service.
WCF - IIS Hosting
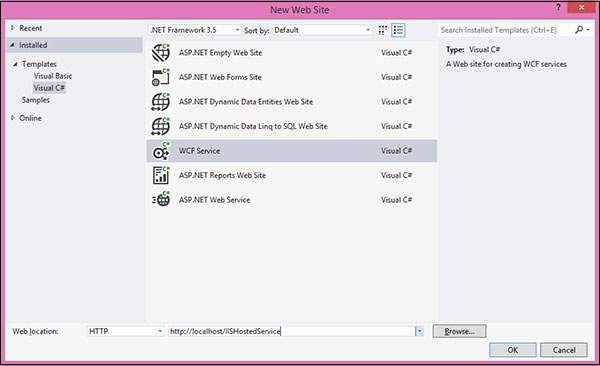
Hosting a WCF service in IIS (Internet Information Services) is a step-by-step process. IIS Hosting is illustrated below in detail with the desired coding as well as screenshots to understand the process.
Step 1 − Start Visual Studio 2012 and click File → New → Web site. Select “WCF Service” and Location as http. This will host the service in IIS. Click OK.
Step 2 − The code behind the interface is given below.
using System;
using System.Collections.Generic;
using System.Linq;
using System.Runtime.Serialization;
using System.ServiceModel;
using System.ServiceModel.Web;
using System.Text;

// NOTE: You can use the "Rename" command on the "Refactor" menu to
// change the interface name "IService" in both code and config file
// together.

[ServiceContract]
Public interface IService {
   [OperationContract]
   String GetData(int value);

   [OperationContract]
   CompositeType GetDataUsingDataContract(CompositeType composite);

   // TODO: Add your service operations here
}

// Use a data contract as illustrated in the sample below to add
// composite types to service operations.

[DataContract]
Public class CompositeType {
   Bool boolValue = true;
   String stringValue = "Hello ";

   [DataMember]
   Public bool BoolValue {
      get { return boolValue; }
      set { boolValue = value; }
   }

   [DataMember]
   Public string StringValue {
      get { return stringValue; }
      set { stringValue = value; }
   }
}
Step 3 − The code behind the class file is given below.
using System;
using System.Collections.Generic;
using System.Linq;
using System.Runtime.Serialization;
using System.ServiceModel;
using System.ServiceModel.Web;
using System.Text;

// NOTE: You can use the "Rename" command on the "Refactor" menu to
// change the class name "Service" in code, svc and config file
// together.

Public class Service : IService {
   Public string GetData(int value) {
      Return string.Format("You entered: {0}", value);
   }

   Public CompositeType GetDataUsingDataContract(CompositeType composite) {
      if(composite == null) {
         thrownewArgumentNullException("composite");
      }

      if(composite.BoolValue) {
         composite.StringValue += "Suffix";
      }
      return composite;
   }
}
Step 4 − Service file (.svc) contains the name of the service and the code behind the file name. This file is used to know about the service.
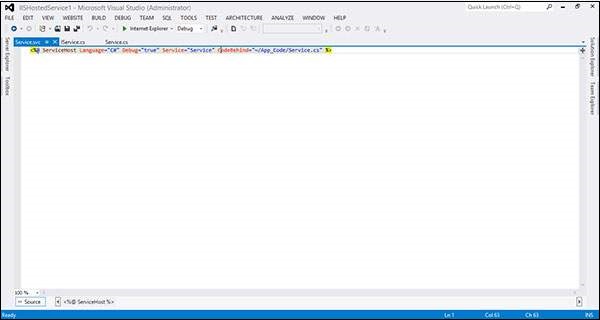
<%@ ServiceHost Language = "C#" Debug = "true" Service = "Service"
   CodeBehind = "~/App_Code/Service.cs" %>
Step 5 − Server-side configurations are mentioned in the config file. Here, there is a mention of only one end-point which is configured to 'wsHttpBinding'; we can also have multiple endpoints with different bindings. Since we are going to host in IIS, we have to use only http binding.
<?xml version = "1.0"?>
<configuration>
   <!--
      Note: As an alternative to hand editing this file you can use the
         web admin tool to configure settings for your application. Use
         the Website->Asp.Net Configuration option in Visual Studio.
         A full list of settings and comments can be found in
         machine.config.comments usually located in
         \Windows\Microsoft.Net\Framework\vx.x\Config
   -->
   <configSections>
      <sectionGroup name = "system.web.extensions"
         ype = "System.Web.Configuration.SystemWebExtensionsSectionGroup,
         System.Web.Extensions, Version = 3.5.0.0, Culture = neutral,
         PublicKeyToken = 31BF3856AD364E35">

         <sectionGroup name = "scripting"
            type = "System.Web.Configuration.ScriptingSectionGroup,
            System.Web.Extensions, Version = 3.5.0.0, Culture = neutral,
            PublicKeyToken = 31BF3856AD364E35">

            <section name = "scriptResourceHandler"
               type = "System.Web.Configuration.ScriptingScriptResourceHandlerSection,
               System.Web.Extensions, Version = 3.5.0.0,
               Culture = neutral, PublicKeyToken = 31BF3856AD364E35"
               requirePermission = "false"
               allowDefinition = "MachineToApplication"/>

            <sectionGroup name = "webServices"
               type = "System.Web.Configuration.ScriptingWebServicesSectionGroup,
               System.Web.Extensions, Version = 3.5.0.0,
               Culture = neutral, PublicKeyToken = 31BF3856AD364E35">

               <section name = "jsonSerialization"
                  type = "System.Web.Configuration.ScriptingJsonSerializationSection,
                  System.Web.Extensions, Version = 3.5.0.0,
                  Culture = neutral, PublicKeyToken = 31BF3856AD364E35"
                  requirePermission = "false" allowDefinition = "Everywhere"/>

               <section name = "profileService"
                  type = "System.Web.Configuration.ScriptingProfileServiceSection,
                  System.Web.Extensions, Version = 3.5.0.0,
                  Culture = neutral, PublicKeyToken = 31BF3856AD364E35"
                  requirePermission = "false"
                  allowDefinition = "MachineToApplication"/>

               <section name = "authenticationService"
                  type = "System.Web.Configuration.ScriptingAuthenticationServiceSection,
                  System.Web.Extensions, Version = 3.5.0.0,
                  Culture = neutral, PublicKeyToken = 31BF3856AD364E35"
                  requirePermission = "false"
                  allowDefinition = "MachineToApplication"/>

               <section name = "roleService"
                  type = "System.Web.Configuration.ScriptingRoleServiceSection,
                  System.Web.Extensions, Version = 3.5.0.0,
                  Culture = neutral, PublicKeyToken = 31BF3856AD364E35"
                  requirePermission = "false"
                  allowDefinition = "MachineToApplication"/>

            </sectionGroup>
         </sectionGroup>
      </sectionGroup>
   </configSections>

<appSettings/>
   <connectionStrings/>
   <system.web>
      <!--
         Set compilation debug="true" to insert debugging
         symbols into the compiled page. Because this
         affects performance, set this value to true only
         during development.
      -->

      <compilation debug = "true">
         <assemblies>

            <add assembly = "System.Core, Version = 3.5.0.0, Culture = neutral,
               PublicKeyToken = B77A5C561934E089"/>

            <add assembly = "System.Web.Extensions, Version = 3.5.0.0,
               Culture = neutral, PublicKeyToken = 31BF3856AD364E35"/>

            <add assembly = "System.Data.DataSetExtensions, Version = 3.5.0.0,
               Culture = neutral, PublicKeyToken = B77A5C561934E089"/>

            <add assembly = "System.Web.Extensions, Version = 3.5.0.0,
               Culture = neutral, PublicKeyToken = 31BF3856AD364E35"/>

            <add assembly = "System.Xml.Linq, Version = 3.5.0.0, Culture = neutral,
               PublicKeyToken = B77A5C561934E089"/>

         </assemblies>
      </compilation>

         <!--
            The <authentication> section enables configuration
            of the security authentication mode used by
            ASP.NET to identify an incoming user.
         -->

      <authentication mode="Windows"/>
         <!--
            The <customErrors> section enables configuration
            of what to do if/when an unhandled error occurs
            during the execution of a request. Specifically,
            it enables developers to configure html error pages
            to be displayed in place of a error stack trace.

            <customErrors mode = "RemoteOnly" defaultRedirect = "GenericErrorPage.htm">
               <error statusCode = "403" redirect = "NoAccess.htm" />
               <error statusCode = "404" redirect = "FileNotFound.htm" />
            </customErrors>
         -->

         <pages>
            <controls>
               <add tagPrefix = "asp" namespace = "System.Web.UI"
                  assembly = "System.Web.Extensions, Version = 3.5.0.0,
                  Culture = neutral, PublicKeyToken = 31BF3856AD364E35"/>

               <add tagPrefix = "asp" namespace = "System.Web.UI.WebControls"
                  assembly = "System.Web.Extensions, Version = 3.5.0.0,
                  Culture = neutral, PublicKeyToken = 31BF3856AD364E35"/>

            </controls>
         </pages>

         <httpHandlers>
            <remove verb = "*" path = "*.asmx"/>

            <add verb = "*" path = "*.asmx" validate = "false"
               type = "System.Web.Script.Services.ScriptHandlerFactory,
               System.Web.Extensions, Version = 3.5.0.0, Culture = neutral,
               PublicKeyToken = 31BF3856AD364E35"/>

            <add verb = "*" path = "*_AppService.axd" validate = "false"
               type = "System.Web.Script.Services.ScriptHandlerFactory,
               System.Web.Extensions, Version = 3.5.0.0, Culture = neutral,
               PublicKeyToken = 31BF3856AD364E35"/>

            <add verb = "GET,HEAD" path = "ScriptResource.axd"
               type = "System.Web.Handlers.ScriptResourceHandler,
               System.Web.Extensions, Version = 3.5.0.0, Culture = neutral,
               PublicKeyToken = 31BF3856AD364E35" validate = "false"/>
         </httpHandlers>

         <httpModules>
            <add name = "ScriptModule"
               type = "System.Web.Handlers.ScriptModule,
               System.Web.Extensions, Version = 3.5.0.0, Culture = neutral,
               PublicKeyToken = 31BF3856AD364E35"/>
         </httpModules>
   </system.web>

   <system.codedom>
      <compilers>

         <compiler language = "c#;cs;csharp" extension = ".cs"
            warningLevel = "4" type = "Microsoft.CSharp.CSharpCodeProvider,
            System, Version = 2.0.0.0, Culture = neutral,
            PublicKeyToken = b77a5c561934e089">

            <providerOption name = "CompilerVersion" value = "v3.5"/>
            <providerOption name = "WarnAsError" value = "false"/>

         </compiler>

         <compiler language = "vb;vbs;visualbasic;vbscript" extension = ".vb"
            warningLevel = "4" type = "Microsoft.VisualBasic.VBCodeProvider,
            System, Version = 2.0.0.0, Culture = neutral,
            PublicKeyToken = b77a5c561934e089">

            <providerOption name = "CompilerVersion" value = "v3.5"/>
            <providerOption name = "OptionInfer" value = "true"/>
            <providerOption name = "WarnAsError" value = "false"/>

         </compiler>
      </compilers>

   </system.codedom>
   <!--
      The system.webServer section is required for running ASP.NET AJAX
      under Internet Information Services 7.0.
      It is not necessary for previous version of IIS.
   -->
   <system.webServer>
      <validation validateIntegratedModeConfiguration="false"/>

      <modules>
         <remove name = "ScriptModule"/>
         <add name = "ScriptModule" preCondition = "managedHandler"
            type = "System.Web.Handlers.ScriptModule,
            System.Web.Extensions, Version = 3.5.0.0, Culture = neutral,
            PublicKeyToken = 31BF3856AD364E35"/>
      </modules>

      <handlers>
         <remove name = "WebServiceHandlerFactory-Integrated"/>
         <remove name = "ScriptHandlerFactory"/>
         <remove name = "ScriptHandlerFactoryAppServices"/>
         <remove name = "ScriptResource"/>

         <add name = "ScriptHandlerFactory" verb = "*" path = "*.asmx"
            preCondition = "integratedMode"
            type = "System.Web.Script.Services.ScriptHandlerFactory,
            System.Web.Extensions, Version = 3.5.0.0, Culture = neutral,
            PublicKeyToken = 31BF3856AD364E35"/>

         <add name = "ScriptHandlerFactoryAppServices"
            verb = "*" path = "*_AppService.axd" preCondition = "integratedMode"
            type = "System.Web.Script.Services.ScriptHandlerFactory,
            System.Web.Extensions, Version = 3.5.0.0, Culture = neutral,
            PublicKeyToken = 31BF3856AD364E35"/>

         <add name = "ScriptResource" preCondition = "integratedMode"
            verb = "GET,HEAD" path = "ScriptResource.axd"
            type = "System.Web.Handlers.ScriptResourceHandler,
            System.Web.Extensions, Version = 3.5.0.0, Culture = neutral,
            PublicKeyToken = 31BF3856AD364E35"/>
      </handlers>

      <!--To browse web app root directory during debugging,
         set the value below to true. Set to false before deployment to
         avoid disclosing web app folder information.-->

      <directoryBrowse enabled = "true"/>
   </system.webServer>

   <runtime>
      <assemblyBinding appliesTo = "v2.0.05727" xmlns =" urn:schemas-microsoft-com:asm.v1">

         <dependentAssembly>
            <assemblyIdentity name = "System.Web.Extensions" publicKeyToken = "31bf3856ad364e35"/>
            <bindingRedirect oldVersion = "1.0.0.0-1.1.0.0" newVersion = "3.5.0.0"/>
         </dependentAssembly>

         <dependentAssembly>
            <assemblyIdentity name = "System.Web.Extensions.Design" publicKeyToken =" 31bf3856ad364e35"/>
            <bindingRedirect oldVersion = "1.0.0.0-1.1.0.0" newVersion = "3.5.0.0"/>
         </dependentAssembly>

      </assemblyBinding>
   </runtime>

   <system.serviceModel>
      <services>
         <service name = "Service" behaviorConfiguration = "ServiceBehavior">
         <!-- Service Endpoints -->
            <endpoint address = "" binding = "basicHttpBinding" contract = "IService">
               <!--
                  Upon deployment, the following identity element should be removed or replaced
                  to reflect the identity under which the deployed service runs. If removed,
                  WCF will infer an appropriate identity automatically.
               -->

               <identity>
                  <dns value="localhost"/>
               </identity>

            </endpoint>
            <endpoint address = "mex" binding = "mexHttpBinding" contract = "IMetadataExchange"/>

         </service>
      </services>

      <behaviors>
         <serviceBehaviors>
            <behavior name = "ServiceBehavior">
               <!-- To avoid disclosing metadata information, set the value below
                  to false before deployment -->

               <serviceMetadata httpGetEnabled = "true"/>

               <!-- To receive exception details in faults for debugging purposes,
                  set the value below to true.
                  Set to false before deployment to false avoid
                  disclosing exception information -->

               <serviceDebug includeExceptionDetailInFaults = "false"/>
            </behavior>
         </serviceBehaviors>
      </behaviors>

   </system.serviceModel>
</configuration>
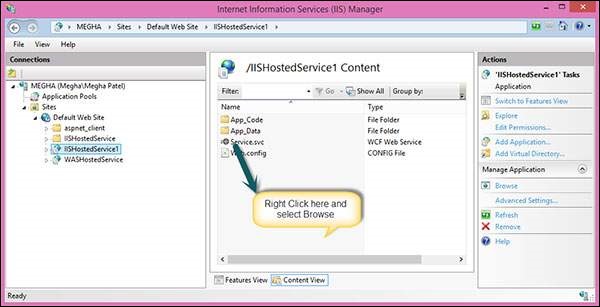
Step 6 − You need to mention the service file name, along with the Address mentioned in the config file. The screenshot of IIS is given here.
Click Start → run → inetmgr which will open the following window.
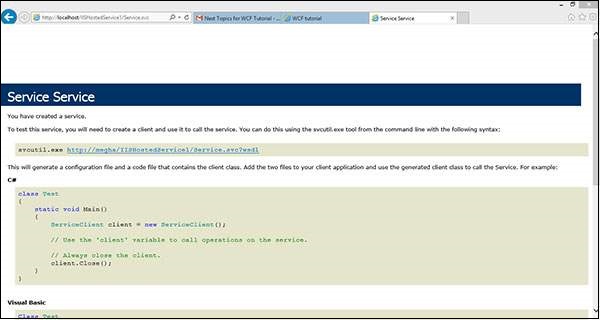
Step 7 − Run the application which will produce the following screen.
WCF - Self Hosting
Here, the WCF service is hosted in a console application. Given below is the process with suitable steps in a sequential manner that explains the entire process.
Step 1 − First, let's create the Service contract and its implementation. Create a console application and name it as MyCalculatorService. This is a simple service to return the addition of two numbers.
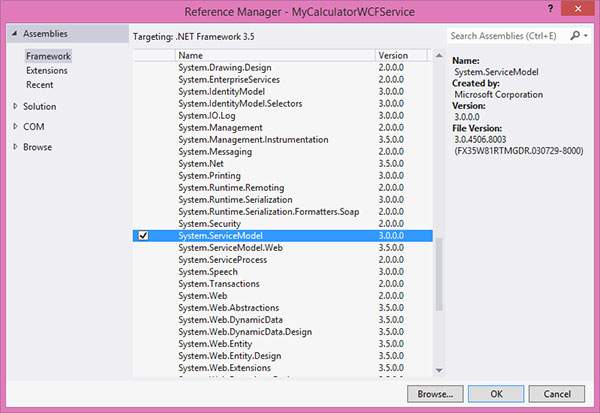
Step 2 − Now, right click on the References in the Solution Explorer and click Add References. The following window opens; add System.ServiceModel reference to the project.
Step 3 − Create an ISimpleCalculator interface, Add ServiceContract and OperationContract attribute to the class and function as shown below. You will know more about these contracts in the later session. These contracts will expose the method to the outside world for using this service.
Step 4 − The code behind this file is as follows −
using System;
using System.Collections.Generic;
using System.Linq;
using System.Text;
using System.ServiceModel;

namespace MyCalculatorWCFService {
   [ServiceContract()]
   Public interface ISimpleCalculator {
      [OperationContract()]
      int Add(int num1, int num2);
   }
}
Step 5 − MyCalculatorService is the implementation class for IMyCalculatorService interface as shown below.
using System;
using System.Collections.Generic;
using System.Linq;
using System.Text;

namespace MyCalculatorWCFService {
   Class SimpleCalculator : ISimpleCalculator {
      Public int Add(int num1, int num2) {
         return num1 + num2;
      }
   }
}
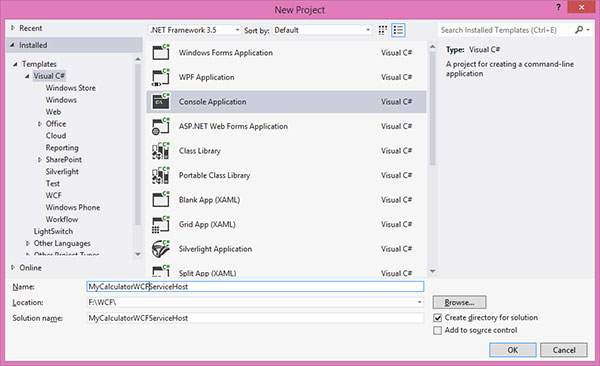
Step 6 − Now, we are ready with the service. Let's go for implementing the hosting process. Create a new console application and name it as 'MyCalculatorWCFServiceHost'.
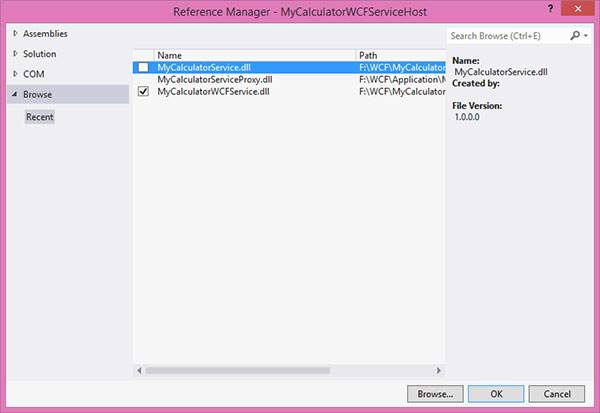
Step 7 − Add the reference of system.servicemodel and the project MyCalculatorWCFService.
The code behind this is as follows −
using System;
using System.Collections.Generic;
using System.Linq;
using System.Text;
using MyCalculatorWCFService;
using System.ServiceModel;
using System.ServiceModel.Description;
namespace MyCalculatorWCFServiceHost {
class Program {
static void Main(string[] args) {
//Create a URI to serve as the base address
UrihttpUrl = newUri("http://localhost:8090/MyCalculatorWCFService/SimpleCalculator");
//Create ServiceHost
ServiceHost host = newServiceHost(typeof(MyCalculatorWCFService.ISimpleCalculator), httpUrl);
//Add a service endpoint
host.AddServiceEndpoint(typeof(MyCalculatorWCFService.ISimpleCal culator), newWSHttpBinding(), "");
//Enable metadata exchange
ServiceMetadataBehaviorsmb = newServiceMetadataBehavior();
smb.HttpGetEnabled = true;
host.Description.Behaviors.Add(smb);
//Start the Service
host.Open();
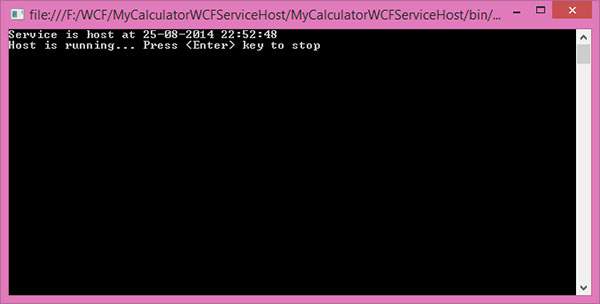
Console.WriteLine("Service is host at " + DateTime.Now.ToString());
Console.WriteLine("Host is running... Press key to stop");
Console.ReadLine();
}
}
}
WCF - WAS Hosting
To understand the concept of WAS hosting, we need to comprehend how a system is configured and how a service contract is created, enabling different binding to the hosted service.
First of all, enable WCF for non-protocols. Before we start creating the service, we need to configure the system to support WAS. Following are the steps to configure WAS −
Click Start Menu → Control Panel → Programs and Features, and click "Turn Windows Components On or Off" in the left pane.
Expand "Microsoft .Net Framework 3.0" and enable "Windows Communication Foundation HTTP Activation" and "Windows Communication Foundation Non- HTTP Activation".
Next, we need to add Binding to the default website. As an example, we will bind the default website to the TCP protocol. Go to Start Menu → Programs → Accessories. Right click on the "Command Prompt", and select "Run as administrator" from the context menu.
Execute the following command −
C:\Windows\system32\inetsrv> appcmd.exe set site "Default Web Site" -+bindings.[protocol='net.tcp',bindingInformation='808:*']
This command adds the net.tcp site binding to the default website by modifying the applicationHost.config file located in the "C:\Windows\system32\inetsrv\config" directory. Similarly, we can add different protocols to the default website.
Create WAS Hosted Service
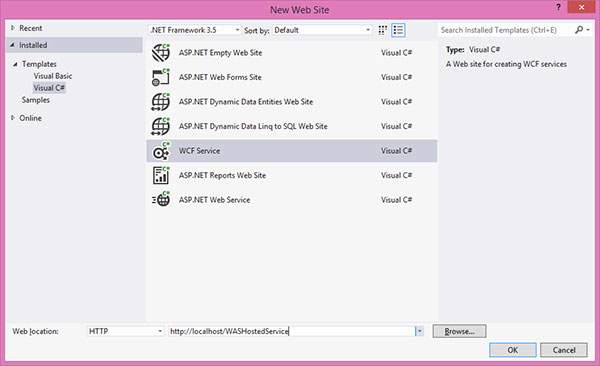
Step-1 − Open Visual Studio 2008 and click New → WebSite and select WCF Service from the template and Location as HTTP, as shown below −
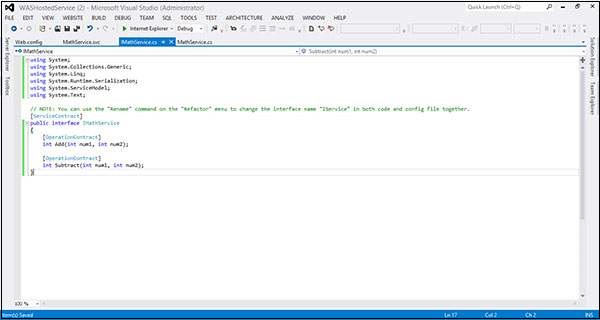
Step-2 − Create the Contract by creating an interface IMathService. Add the ServiceContract attribute to the interface and the OperationContract attribute to the method declaration.
using System;
using System.Collections.Generic;
using System.Linq;
using System.Runtime.Serialization;
using System.ServiceModel;
using System.Text;

// NOTE: You can use the "Rename" command on the "Refactor" menu to
// change the interface name "IService" in both code and config file
// together.

[ServiceContract]

Public interface IMathService {
   [OperationContract]
   int Add(int num1, int num2);

   [OperationContract]
   int Subtract(int num1, int num2);
}
Step-3 − The implementation of the IMathService interface is shown below −
using System;
using System.Collections.Generic;
using System.Linq;
using System.Runtime.Serialization;
using System.ServiceModel;
using System.ServiceModel.Web;
using System.Text;

// NOTE: You can use the "Rename" command on the "Refactor" menu to
// change the class name "Service" in code, svc and config file
// together.

Public class MathService : IMathService {
   Public int Add(int num1, int num2) {
      return num1 + num2;
   }
   Public int Subtract(int num1, int num2) {
      return num1 - num2;
   }
}
Step-4 − The Service file is shown below.
<%@ServiceHostLanguage="C#"Debug="true"Service="MathService"CodeBehind="~/App_Code/MathService.cs"%>
Step-5 − In the web.Config file, create endpoint with 'netTcpBinding' binding and the service metadata will be published using the Metadata Exchange point. So create the Metadata Exchange end-point with the address as 'mex' and the binding as 'mexTcpBinding'. Without publishing the service metadata, we cannot create the proxy using the net.tcp address, for example −
svcutil.exe net.tcp://localhost/WASHostedService/MathService.svc).
<?xml version = "1.0" ?>
<configuration>
   <!--
      Note: As an alternative to hand editing this file you can use the
         web admin tool to configure settings for your application. Use
         the Website->Asp.Net Configuration option in Visual Studio.
         A full list of settings and comments can be found in
         machine.config.comments usually located in
         \Windows\Microsoft.Net\Framework\vx.x\Config
   -->
   <configSections>
      <sectionGroup name = "system.web.extensions"
         type = "System.Web.Configuration.SystemWebExtensionsSectionGroup,
         System.Web.Extensions, Version = 3.5.0.0, Culture = neutral,
         PublicKeyToken = 31BF3856AD364E35">

         <sectionGroup name = "scripting"
            type = "System.Web.Configuration.ScriptingSectionGroup,
            System.Web.Extensions, Version = 3.5.0.0, Culture = neutral,
            PublicKeyToken =3 1BF3856AD364E35">

            <section name = "scriptResourceHandler"
               type = "System.Web.Configuration.ScriptingScriptResourceHandlerSection,
               System.Web.Extensions, Version = 3.5.0.0, Culture = neutral,
               PublicKeyToken = 31BF3856AD364E35"
               requirePermission = "false"
               allowDefinition = "MachineToApplication"/>

            <sectionGroup name = "webServices"
               type = "System.Web.Configuration.ScriptingWebServicesSectionGroup,
               System.Web.Extensions, Version = 3.5.0.0, Culture = neutral,
               PublicKeyToken = 31BF3856AD364E35">

               <section name = "jsonSerialization"
                  type = "System.Web.Configuration.ScriptingJsonSerializationSection,
                  System.Web.Extensions, Version = 3.5.0.0, Culture = neutral,
                  PublicKeyToken = 31BF3856AD364E35" requirePermission = "false"
                  allowDefinition = "Everywhere"/>

               <section name = "profileService"
                  type = "System.Web.Configuration.ScriptingProfileServiceSection,
                  System.Web.Extensions, Version = 3.5.0.0, Culture = neutral,
                  PublicKeyToken = 31BF3856AD364E35" requirePermission = "false"
                  allowDefinition = "MachineToApplication"/>

               <section name = "authenticationService"
                  type = "System.Web.Configuration.ScriptingAuthenticationServiceSection,
                  System.Web.Extensions, Version = 3.5.0.0, Culture = neutral,
                  PublicKeyToken = 31BF3856AD364E35" requirePermission = "false"
                  allowDefinition = "MachineToApplication"/>

               <section name = "roleService"
                  type = "System.Web.Configuration.ScriptingRoleServiceSection,
                  System.Web.Extensions, Version = 3.5.0.0, Culture = neutral,
                  PublicKeyToken = 31BF3856AD364E35" requirePermission = "false"
                  allowDefinition = "MachineToApplication"/>

            </sectionGroup>
         </sectionGroup>
      </sectionGroup>
   </configSections>

   <appSettings/>
   <connectionStrings/>

   <system.web>
      <!--
         Set compilation debug="true" to insert debugging
         symbols into the compiled page. Because this
         affects performance, set this value to true only
         during development.
      -->
      <compilation debug = "true">
         <assemblies>
            <add assembly = "System.Core, Version = 3.5.0.0,
               Culture = neutral, PublicKeyToken = B77A5C561934E089"/>

            <add assembly = "System.Web.Extensions, Version = 3.5.0.0,
               Culture = neutral, PublicKeyToken = 31BF3856AD364E35"/>

            <add assembly = "System.Data.DataSetExtensions,
               Version = 3.5.0.0, Culture = neutral,
               PublicKeyToken = B77A5C561934E089"/>

            <add assembly = "System.Web.Extensions, Version = 3.5.0.0,
               Culture = neutral, PublicKeyToken = 31BF3856AD364E35"/>

            <add assembly = "System.Xml.Linq,
               Version = 3.5.0.0, Culture = neutral,
               PublicKeyToken = B77A5C561934E089"/>
         </assemblies>
      </compilation>

      <!--
         The <authentication> section enables configuration
         of the security authentication mode used by
         ASP.NET to identify an incoming user.
      -->

      <authentication mode="Windows"/>

      <!--
         The <customErrors> section enables configuration
         of what to do if/when an unhandled error occurs
         during the execution of a request. Specifically,
         it enables developers to configure html error pages
         to be displayed in place of a error stack trace.
         <customErrors mode = "RemoteOnly" defaultRedirect = "GenericErrorPage.htm">
         <error statusCode = "403" redirect = "NoAccess.htm" />
         <error statusCode = "404" redirect = "FileNotFound.htm" />
         </customErrors>
      -->

      <pages>
         <controls>
            <add tagPrefix = "asp" namespace = "System.Web.UI"
               assembly = "System.Web.Extensions, Version = 3.5.0.0, Culture = neutral,
               PublicKeyToken = 31BF3856AD364E35"/>

            <add tagPrefix = "asp" namespace = "System.Web.UI.WebControls"
               assembly = "System.Web.Extensions, Version = 3.5.0.0, Culture = neutral,
               PublicKeyToken = 31BF3856AD364E35"/>
         </controls>
      </pages>

      <httpHandlers>
         <remove verb = "*" path = "*.asmx"/>

         <add verb =" *" path =" *.asmx" validate="false"
            type = "System.Web.Script.Services.ScriptHandlerFactory,
            System.Web.Extensions, Version = 3.5.0.0, Culture = neutral,
            PublicKeyToken = 31BF3856AD364E35"/>

         <add verb = "*" path = "*_AppService.axd" validate = "false"
            type = "System.Web.Script.Services.ScriptHandlerFactory,System.Web.Extensions,
            Version = 3.5.0.0, Culture = neutral,
            PublicKeyToken = 31BF3856AD364E35"/>

         <add verb = "GET,HEAD" path = "ScriptResource.axd"
            type = "System.Web.Handlers.ScriptResourceHandler, System.Web.Extensions,
            Version = 3.5.0.0, Culture = neutral,
            PublicKeyToken = 31BF3856AD364E35" validate = "false"/>
      </httpHandlers>

      <httpModules>
         <add name = "ScriptModule"
            type = "System.Web.Handlers.ScriptModule,
            System.Web.Extensions, Version = 3.5.0.0, Culture = neutral,
            PublicKeyToken = 31BF3856AD364E35"/>
      </httpModules>

   </system.web>

   <system.codedom>
      <compilers>

         <compiler language = "c#;cs;csharp" extension = ".cs" warningLevel = "4"
            type = "Microsoft.CSharp.CSharpCodeProvider, System,
            Version = 2.0.0.0, Culture = neutral,
            PublicKeyToken = b77a5c561934e089">

            <providerOption name = "CompilerVersion" value = "v3.5"/>
            <providerOption name = "WarnAsError" value = "false"/>
         </compiler>

         <compiler language = "vb;vbs;visualbasic;vbscript"
            extension = ".vb" warningLevel = "4"
            type = "Microsoft.VisualBasic.VBCodeProvider, System,
            Version = 2.0.0.0, Culture = neutral,
            PublicKeyToken = b77a5c561934e089">

            <providerOption name = "CompilerVersion" value = "v3.5"/>
            <providerOption name = "OptionInfer" value = "true"/>
            <providerOption name = "WarnAsError" value = "false"/>
         </compiler>

      </compilers>
   </system.codedom>

   <!--
      The system.webServer section is required for running ASP.NET AJAX under
      Internet Information Services 7.0. It is not necessary for previous version of IIS.
   -->

   <system.webServer>
      <validation validateIntegratedModeConfiguration = "false"/>

      <modules>
         <remove name = "ScriptModule"/>
         <add name = "ScriptModule" preCondition = "managedHandler"
            type = "System.Web.Handlers.ScriptModule, System.Web.Extensions,
            Version = 3.5.0.0, Culture = neutral,
            PublicKeyToken = 31BF3856AD364E35"/>
      </modules>

      <handlers>
         <remove name = "WebServiceHandlerFactory-Integrated"/>
         <remove name = "ScriptHandlerFactory"/>
         <remove name = "ScriptHandlerFactoryAppServices"/>
         <remove name = "ScriptResource"/>

         <add name = "ScriptHandlerFactory"
            verb = "*" path = "*.asmx" preCondition = "integratedMode"
            type = "System.Web.Script.Services.ScriptHandlerFactory,
            System.Web.Extensions, Version = 3.5.0.0, Culture = neutral,
            PublicKeyToken = 31BF3856AD364E35"/>

         <add name = "ScriptHandlerFactoryAppServices"
            verb = "*" path = "*_AppService.axd" preCondition = "integratedMode"
            type = "System.Web.Script.Services.ScriptHandlerFactory,
            System.Web.Extensions, Version = 3.5.0.0, Culture = neutral,
            PublicKeyToken = 31BF3856AD364E35"/>

         <add name = "ScriptResource" preCondition = "integratedMode"
            verb = "GET,HEAD" path = "ScriptResource.axd"
            type = "System.Web.Handlers.ScriptResourceHandler,
            System.Web.Extensions, Version = 3.5.0.0, Culture = neutral,
            PublicKeyToken = 31BF3856AD364E35"/>

      </handlers>
      <!--
         To browse web app root directory during debugging, set the value below to true.
         Set to false before deployment to avoid disclosing web app folder information.
      -->
      <directoryBrowse enabled="true"/>
   </system.webServer>

   <runtime>
      <assemblyBinding appliesTo = "v2.0.05727" xmlns = "urn:schemas-microsoft-com:asm.v1">

         <dependentAssembly>
            <assemblyIdentity name = "System.Web.Extensions" publicKeyToken = "31bf3856ad364e35"/>
            <bindingRedirect oldVersion = "1.0.0.0-1.1.0.0" newVersion = "3.5.0.0"/>
         </dependentAssembly>

         <dependentAssembly>
            <assemblyIdentity name = "System.Web.Extensions.Design" publicKeyToken = "31bf3856ad364e35"/>
            <bindingRedirect oldVersion = "1.0.0.0-1.1.0.0" newVersion = "3.5.0.0"/>
         </dependentAssembly>

      </assemblyBinding>
   </runtime>

   <system.serviceModel>
      <services>
         <service behaviorConfiguration = "ServiceBehavior" name = "Service">
            <endpoint address = "" binding = "basicHttpBinding" contract = "IMathService">

            <identity>
               <dns value = "localhost" />
            </identity>

            </endpoint>
            <endpoint address = "mex" binding = "mexHttpBinding" contract = "IMetadataExchange"/>
         </service>
      </services>

      <behaviors>
         <serviceBehaviors>
            <behavior name = "ServiceBehavior">
               <!--
                  To avoid disclosing metadata information, set the value below
                  to false before deployment.
               -->
               <serviceMetadata httpGetEnabled="true"/>

               <!--
                  To receive exception details in faults for debugging purposes,
                  set the value below to true. Set to false before deployment to avoid
                  disclosing exception information
               -->
               <serviceDebug includeExceptionDetailInFaults="false"/>
            </behavior>
         </serviceBehaviors>
      </behaviors>

   </system.serviceModel>
</configuration>
Enable Different Bindings to the Hosted Service
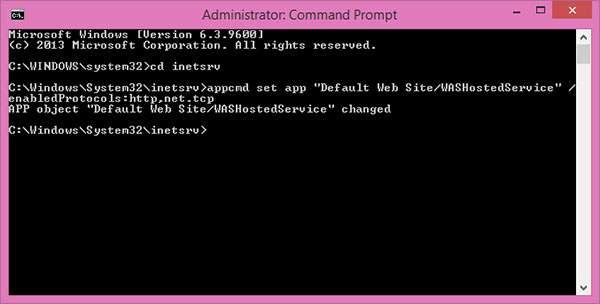
Go to Start menu → Programs → Accessories. Right click on the "Command Prompt", and select "Run as administrator" from the context menu.
Execute the following command -
C:\Windows\system32\inetsrv>appcmd set app "Default Web Site/WASHostedService" /enabledProtocols:http,net.tcp
It will produce the following output −
WCF - Windows Service Hosting
The operation of Windows service hosting is a simple one. Given below are the steps with requisite coding and screenshots that explain the process in an easy way.
Step 1 − Now let’s create a WCF service. Open Visual Studio 2008 and click New → Project and select Class Library from the template.
Step 2 − Add reference System.ServiceModel to the project. This is the core assembly used for creating the WCF service.
Step 3 − Next, we can create the ISimpleCalulator interface. Add the Service and Operation Contract attribute as shown below −
using System;
using System.Collections.Generic;
using System.Linq;
using System.Text;
using System.ServiceModel;

namespace WindowsServiceHostedService{
   [ServiceContract]
   public interfaceISimpleCalculator {
      [OperationContract]
      int Add(int num1, int num2);

      [OperationContract]
      int Subtract(int num1, int num2);

      [OperationContract]
      int Multiply(int num1, int num2);

      [OperationContract]
      double Divide(int num1, int num2);
   }
}
Step 4 − Implement the ISimpleCalculator interface as shown below −
using System;
using System.Collections.Generic;
using System.Linq;
using System.Text;

namespace WindowsServiceHostedService {
   Class SimpleCalulator : ISimpleCalculator {
      Public int Add(int num1, int num2) {
         return num1 + num2;
      }
      Public int Subtract(int num1, int num2) {
         return num1 - num2;
      }
      Public int Multiply(int num1, int num2) {
         return num1 * num2;
      }
      Public double Divide(int num1, int num2) {
         if (num2 != 0)
            return num1 / num2;
         else
            return 0;
      }
   }
}
Step 5 − Build the Project and get the dll. Now, we are ready with the WCF service. We are going to see how to host the WCF service in Windows service.
Note − In this project, it is mentioned that we are creating both Contract and Service (implementation) in the same project. However it is always a good practice if you have both in different projects.
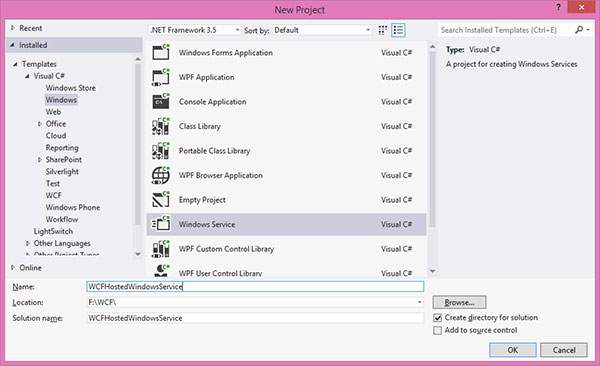
Step 6 − Open Visual Studio 2008 and Click New → Project and select Windows Service.
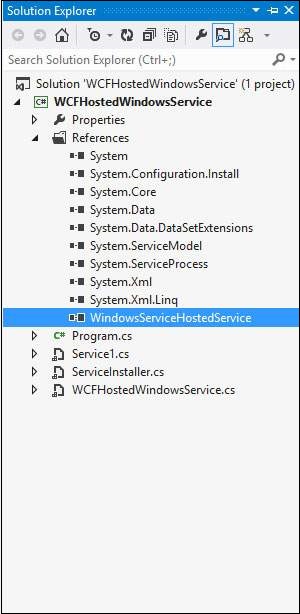
Step 7 − Add 'WindowsServiceHostedService.dll' as reference to the project. This assembly is going to act as service.
Step 8 − The OnStart method of the service can be used to write the hosting code for WCF. We have to make sure that we are using only one service host object. OnStop method is used to close the Service Host. The following code shows how to host the WCF service in Windows service.
using System;
using System.Collections.Generic;
using System.ComponentModel;
using System.Data;
using System.Diagnostics;
using System.Linq;
using System.ServiceProcess;
using System.Text;
using System.ServiceModel;
using System.ServiceModel.Description;

namespace WCFHostedWindowsService {
   Partial class WCFHostedWindowsService : ServiceBase {
      ServiceHostm_Host;

      Public WCFHostedWindowsService() {
         InitializeComponent();
      }
      Private void InitializeComponent() {
         thrownewNotImplementedException();
      }
      protectedoverridevoidOnStart(string[] args) {
         if (m_Host != null) {
            m_Host.Close();
         }

         //Create a URI to serve as the base address
         UrihttpUrl = newUri("http://localhost:8090/WindowsServiceHostedService/SimpleCalculator");

         //Create ServiceHost
         m_Host = newServiceHost typeof(WindowsServiceHostedService.SimpleCalulator), httpUrl);

         //Add a service endpoint
         m_Host.AddServiceEndpoint (typeof(WindowsServiceHostedService.ISimpleCalculator), newWSHttpBinding(), "");

         //Enable metadata exchange
         ServiceMetadataBehaviorsmb = newServiceMetadataBehavior();
         smb.HttpGetEnabled = true;
         m_Host.Description.Behaviors.Add(smb);

         //Start the Service
         m_Host.Open();
      }
      protectedoverridevoidOnStop() {
         if (m_Host != null) {
            m_Host.Close();
            m_Host = null;
         }
      }
      staticvoid Main() {
         ServiceBase[] ServicesToRun;
         ServicesToRun = newServiceBase[] {
            newWCFHostedWindowsService();
         }
         ServiceBase.Run(ServicesToRun);
      }
   }
}
Step 9 − In order to install the service, we need to have the Installer class for the Windows service. So add a new Installer class to the project, which is inherited from the Installer class. Given below is the code that shows the Service name, StartUp type, etc. of the service.
using System;
using System.Collections.Generic;
using System.Text;
using System.ServiceProcess;
using System.Configuration.Install;
using System.ComponentModel;
using System.Configuration;

namespace WCFHostedWindowsService {
   [RunInstaller(true)]
   Public class WinServiceInstaller : Installer {
      Private ServiceProcessInstaller process;
      Private ServiceInstaller service;

      Public WinServiceInstaller() {
         process = newServiceProcessInstaller();
         process.Account = ServiceAccount.NetworkService;
         service = newServiceInstaller();

         service.ServiceName = "WCFHostedWindowsService";
         service.DisplayName = "WCFHostedWindowsService";
         service.Description = "WCF Service Hosted";
         service.StartType = ServiceStartMode.Automatic;

         Installers.Add(process);
         Installers.Add(service);
      }
   }
}
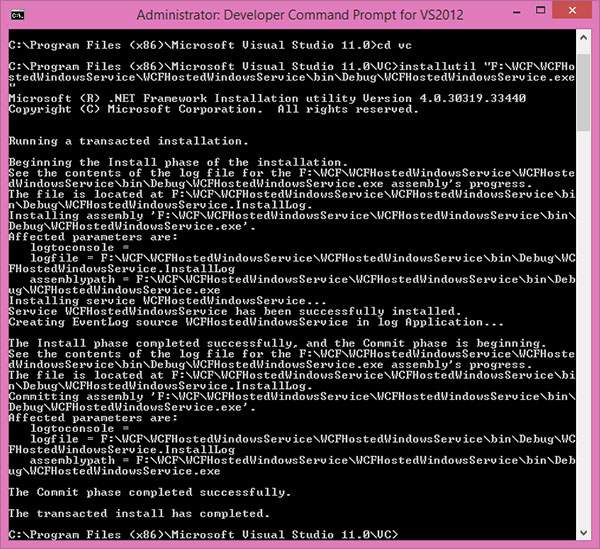
Step 10 − Build the project to get the executable file WCFHostedWindowsService.exe. Next, we need to install the service using the Visual Studio Command Prompt. So open the command prompt by clicking Start→All Programs→Microsoft Visual Studio 2008→Visual Studio Tools→ Visual Studio Command Prompt. Using the install util utility application, you can install the service as shown below.
WCF - Consuming WCF Service
WCF services allow other applications to access or consume them. A WCF service can be consumed by many ways depending on the hosting type. Here, we are explaining the step-by-step method to consume a WCF service for each of the following popular hosting options −
- Consuming WCF Service hosted in IIS 5/6
- Consuming WCF Service that is self-hosted
- Consuming WCF Service hosted in Windows Activation Service
- Consuming WCF Service hosted in Windows Service
Consuming WCF Service Hosted in IIS 5/6
The process of consumption of a WCF service hosted in IIS 5/6 is discussed below in detail. In addition, the discussion includes how to create proxy and console applications.
Step 1 − Once a service is hosted in IIS, we have to consume it in client applications. Before creating the client application, we need to create a proxy for the service. This proxy is used by the client application to interact with the service. To create a proxy, run Visual Studio 2008 command prompt. Using service utility, we can create the proxy class and its configuration information.
svcutilhttp://localhost/IISHostedService/Service.svc
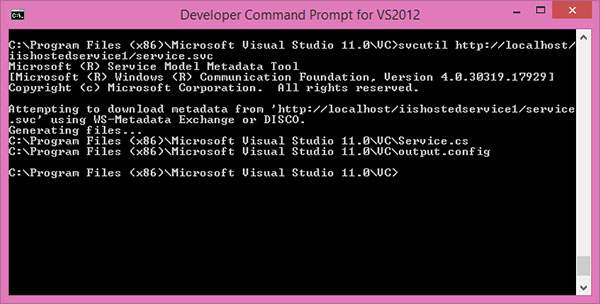
After executing this command, we will get two files generated in the default location.
MyService.cs − Proxy class for the WCF service
output.config − Configuration information about the service
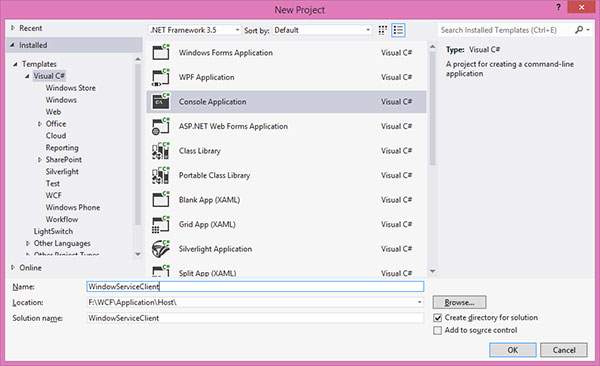
Step 2 − Now, we will start creating the Console application using Visual Studio 2008 (Client application).
Step 3 − Add the reference 'System.ServiceModel'; this is the core dll for WCF.
Step 4 − Create a Proxy class.
using System;
using System.Collections.Generic;
using System.Linq;
using System.Text;

namespace MyServiceClient {
   Class Program {
      Static void Main(string[] args) {
         // Creating Proxy for the MyService
         ServiceClient Client = newServiceClient();
         Console.WriteLine("Client calling the service...");
         Console.WriteLine("Hello Ram");
         Console.Read();
      }
   }
}
The output appears as follows −

Consuming Self-hosted WCF Service
Here, the entire process of consuming a self-hosted WCF Service is explained step-by-step along with ample coding and screenshots wherever necessary.
Step 1 − Service is hosted, now we need to implement the proxy class for the client. There are different ways of creating the proxy.
Using SvcUtil.exe, we can create the proxy class and its configuration file with end-points.
Adding Service reference to the client application.
Implementing ClientBase<T> class
Of these three methods, Implementing ClientBase<T> is the best practice. If you are using the other two methods, we need to create a proxy class every time we make any changes in the Service implementation. But this is not the case for ClientBase<T>. It will create the proxy only at runtime and so it will take care of everything.
For this purpose, create one proxy class, which includes the references of System.ServiceModel and MyCalculatorService.
using System;
using System.Collections.Generic;
using System.Linq;
using System.Text;
using System.ServiceModel;
using MyCalculatorService;

namespace MyCalculatorServiceProxy {
   // WCF create proxy for ISimpleCalculator using ClientBase
   Public class MyCalculatorServiceProxy :
   ClientBase<ISimpleCalculator>,

   ISimpleCalculator {
      Public int Add(int num1, int num2) {
         //Call base to do funtion
         returnbase.Channel.Add(num1, num2);
      }
   }
}
Now, create one console application, which includes the references of System.ServiceModel and MyCalculatorServiceProxy.
using System;
using System.Collections.Generic;
using System.Linq;
using System.Text;
using System.ServiceModel;
using MyCalculatorServiceProxy;
namespace MyCalculatorServiceClient {
classProgram {
Static void Main(string[] args) {
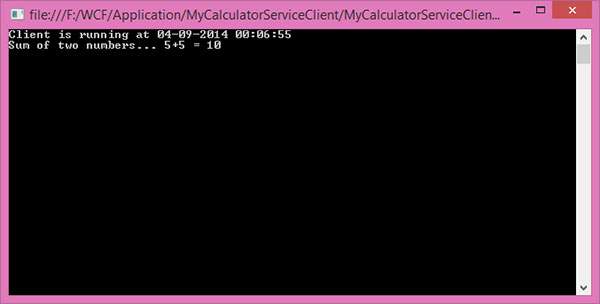
MyCalculatorServiceProxy.MyCalculatorServiceProxy proxy = newMyCalculatorServiceProxy.MyCalculatorServiceProxy();
Console.WriteLine("Client is running at " + DateTime.Now.ToString());
Console.WriteLine("Sum of two numbers. 5 + 5 =" + proxy.Add(5,5));
Console.ReadLine();
}
}
}
Step 2 − End-point (same as service) information should be added to the configuration file of the client application.
<?xmlversion = "1.0"encoding = "utf-8" ?>
<configuration>
   <system.serviceModel>
      <client>
         <endpoint address
            ="http://localhost:8090/MyCalculatorServiceProxy/ISimpleCalculator"
            binding = "wsHttpBinding" contract "MyCalculatorServiceProxy.ISimpleCalculator">
            </endpoint>
      </client>
   </system.serviceModel>
</configuration>
Step 3 − Before running the client application, you need to run the service. Shown below is the output of the client application.
Consuming WCF Service Hosted in WAS
Consuming a WCF service that is hosted in WAS is a simple process involving only a few steps. The steps are as follows −
- Add the proxy class and the configuration file to the client application.
- Create the object for the MathServiceClient and call the method.
using System;
using System.Collections.Generic;
using System.Linq;
using System.Text;
namespaceWASHostedClient {
classProgram {
staticvoid Main(string[] args) {
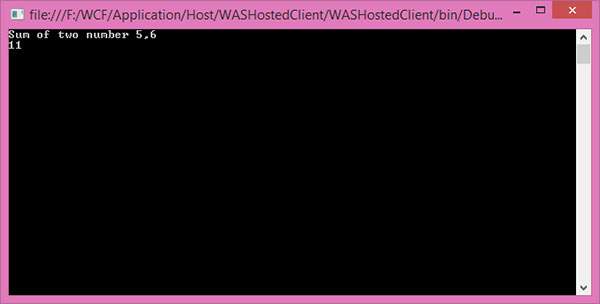
MathServiceClient client = newMathServiceClient();
Console.WriteLine("Sum of two number 5,6");
Console.WriteLine(client.Add(5, 6));
Console.ReadLine();
}
}
}
The output appears as shown below.
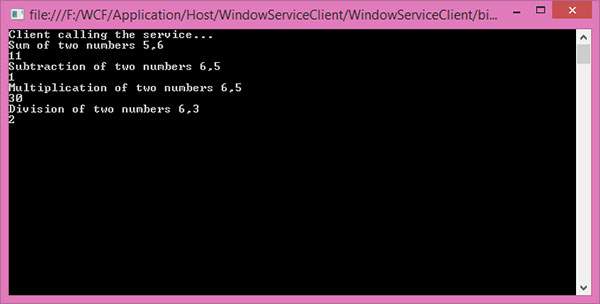
Consuming WCF Service Hosted in Windows Service
The step-by-step process of how to consume a WCF service hosted in Windows Service is expressed below in detail with coding and instructions.
Once it is hosted successfully, we can create a proxy class for the service and start using in the client application. Here, it is shown with the IIS hosting type consuming.
Add the reference of ServiceModel.
using System;
using System.Collections.Generic;
using System.Linq;
using System.Text;

namespaceWindowServiceClient {
   classProgram {
      staticvoid Main(string[] args) {
         //Creating Proxy for the MyService
         MyServiceClient client = newMyServiceClient();
         Console.WriteLine("Client calling the service...");
         Console.WriteLine("Sum of two numbers 5,6");
         Console.WriteLine(client.Add(5, 6));

         Console.WriteLine("Subtraction of two numbers 6,5");
         Console.WriteLine(client.Sub(6, 5));

         Console.WriteLine("Multiplication of two numbers 6,5");
         Console.WriteLine(client.Mul(6, 5));

         Console.WriteLine("Division of two numbers 6,3");
         Console.WriteLine(client.Div(6, 3));
         Console.Read();
      }
   }
}
The output appears as follows −
WCF - Service Binding
WCF service binding is a set of several elements in which each element defines the way the service is communicating with the client. A transport element and a message encoding element are the two most vital components of each binding. In this chapter, we will discuss various WCF service bindings that are commonly used.
Basic Binding
Basic binding is offered by the BasicHttpBinding class. It uses the HTTP protocol to transport and represent a WCF service as an ASP.NET web service (ASMX web service), so that old clients who use ASMX web services can consume the new services conveniently.
Basic binding is set as default binding in a WCF web service enabled by Silverlight and is a standard binding for communications in web service style. It does not support reliable messaging.
Given below is a code snippet depicting the default settings for basic binding.
<basicHttpBinding>
   <binding name = "basicHttpBindingDefaults" allowCookies = "false"
      bypassProxyOnLocal = "false" hostNameComparisonMode = "StrongWildcard"
      maxBufferPoolSize = "524288" maxBufferSize = "65536"
      maxReceivedMessageSize = "65536" messageEncoding = "Text" proxyAddress = ""
      textEncoding = "utf-8" transferMode = "Buffer" useDefaultWebProxy = "true"
      closeTimeout = "00:01:00" openTimeout = "00:01:00" receiveTimeout = "00:10:00"
      sendTimeout = "00:01:00">

      <readerQuotas maxArrayLength = "16384" maxBytesPerRead = "4096"
         maxDepth = "32"
         maxNameTableCharCount = "16384" maxStringContentLength = "8192"/>

      <security mode = "None">
         <transport clientCredentialType = "None" proxyCredentialType = "None" realm = ""/>
         <message algorithmSuite = "Basic256" clientCredentialType = "UserName" />
      </security>
   </binding>

</basicHttpBinding>
The above default settings have their obvious limitations, as the message size is limited and there is no security mode. However, customization of basic binding solves this problem like the one below.
<basicHttpBinding>
   <binding name = "basicHttpSecure" maxBufferSize = "100000" maxReceivedMessageSize = "100000">

      <readerQuotas maxArrayLength = "100000" maxStringContentLength = "100000"/>
      <security mode = "TransportWithMessageCredential" />

   </binding>
</basicHttpBinding>
Web Service Binding
Web Service (WS) binding is provided by the WSHttpBinding class. It is quite similar to basic binding and uses the same protocols for transport, but offers several WS–* specifications such as WS–Reliable Messaging, WS–Transactions, WS–Security, and many more. In a nutshell, WSHttpBinding equals to the sum of basicHttpBinding and WS–* specifications. Given below is a code snippet depicting the default settings for WS Binding −
<wsHttpBinding>
   <binding name = "wsHttpBindingDefaults" allowCookies = "false"
      bypassProxyOnLocal = "false" closeTimeout = "00:01:00"
      hostNameComparisonMode = "StrongWildcard"
      maxBufferPoolSize = "524288" maxReceivedMessageSize = "65536"
      messageEncoding = "Text" openTimeout = "00:01:00"
      receiveTimeout = "00:10:00" proxyAddress = "" sendTimeout = "00:01:00"
      textEncoding = "utf-8" transactionFlow = "false"
      useDefaultWebProxy = "true" >

      <readerQuotas maxArrayLength = "16384" maxBytesPerRead = ."4096"
         maxDepth = "32" maxNameTableCharCount = "16384"
         maxStringContentLength = "8192"/>

      <reliableSession enabled = "false" ordered = "true"
         inactivityTimeout = "oo:10:00" />

      <security mode = "Message">
         <message algorithmSuite = "Basic256" clientCredentialType = "Windows"
            esatalishSecurityContext = "true"
            negotiateServiceCredential = "true" />

         <transport clientCredentialType = "Windows"
            proxyCredentialType = "None" realm = ""/>
      </security>

   </binding>
</wsHttpBinding>
IPC Binding
IPC binding makes use of named pipe and is offered by the netNamedPipeBinding class. This is the fastest binding and the most secure one amidst all the available bindings. Although message-level security is not supported here, messages are secure by default because of a robust transport security. Given below is the code snippet depicting the default settings for IPC binding −
<netNamedPipeBinding>

   <binding name = "netPipeDefaults" closeTimeout = "00:01:00"
      hostNameComparisonMode = "StrongWildcard" maxBufferPoolSize = "524288"
      maxBufferSize = "65536" maxConnections = "10"
      maxReceivedMessageSize = "65536" openTimeout = "00:01:00"
      receiveTimeout = "00:10:00" sendTimeout = "00:01:00" transactionFlow = "false"
      transactionProtocol = "OleTransactions" transferMode = "Buffered">

      <readerQuotas maxArrayLength = "16384" maxBytesPerRead = "4096"
         maxDepth = "32" maxNameTableCharCount = "16384"
         maxStringContentLength = "8192"/>

      <security mode = "Transport">
      </security>

   </binding>
</netNamedPipeBinding>
Other Types of Service Bindings
TCP Binding − Provided by the NetTCPBinding class, this binding makes use of the TCP protocol for communication within the same network and does the message encoding in binary format. This binding is considered as the most reliable in contrast to others.
WS Dual Binding − This type of binding is more like WSHttpBinding with the only exception that it facilitates bidirectional communication, i.e., messages can be sent and received by both clients and services. It is offered by the WSDualHttpBinding class.
Web binding − Web binding is designed to represent WCF services in the form of HTTP requests by the use of HTTP-GET, HTTP-POST, etc. It is offered by the WebHttpBinding class and is used commonly with social networks.
MSMQ Binding − It is offered by the NetMsmqBinding class and is used to provide solutions in case the service processes a message at a distinct time than that sent by the client. MSMQ binding makes use of MSMQ for transportation and provides support to detached message queued. MSMQ is an implementation for message queuing offered by Microsoft.
Federated WS Binding − It is a specific form of WS binding and offers support for federated security. It is offered by the WSFederationHttpBinding class.
Peer Network Binding − Offered by the NetPeerTCPBinding class, it is mainly used in file sharing systems. It uses TCP protocol but makes use of peer networking as transport. In this networking, each machine (node) acts as a client and a server to the other nodes. Peer network binding is used in file sharing systems like torrent.
MSMQ Integration Binding − Offered by the MsmqIntegrationBinding class, it helps communicate with existing systems that communicate via MSMQ (Microsoft Message Queuing).
Apart from these, it is also possible to create custom bindings. However, since it is possible to tweak the configuration properties of each WCF binding, the need for creating custom bindings arises rarely.
WCF - Instance Management
The set of techniques employed by WCF for binding a set of messages (client requests) to service instances is known as Instance Management. WCF supports three types of instance activation and they are discussed in this chapter.
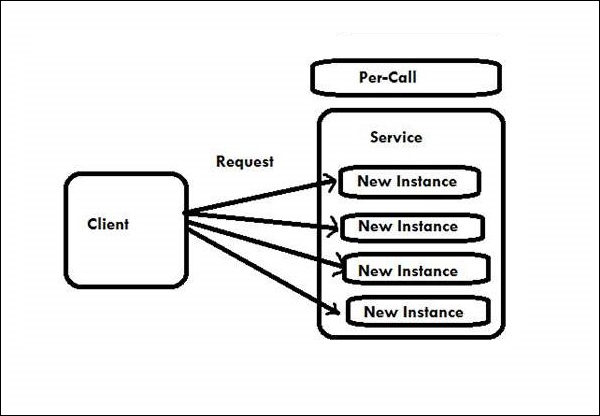
Per-Call Service
Per-call service is the default instance activation mode of WCF. When a WCF service is configured for a per-call service, a CLR object is created for the timespan a client call or request is in progress. CLR stands for Common Language Runtime and it includes service instances in WCF.
In per-call service, every client request achieves a new dedicated service instance and its memory consumption is less as compared to other types of instance activation.
The InstanceContextMode property is required to be set to InstanceContextMode.PerCall, in order to indicate a WCF service to act as a per-call service. The InstanceContextMode property belongs to the ServiceBehavior attribute. Hence, a per-call service can be configured as follows −
[ServiceContract]
interface IMyContract
{...}
[ServiceBehavior (InstanceContextMode = InstanceContextMode.PerCall)]
class MyService : IMyContract
{...}
A service is here expressed as IMyContract. The following figure shows the process of per-call service instance activation.
Implementing a Per-Call Service
[DataContract]
class Param {....}

[ServiceContract]
interface IMyContract {
   [OperationContract]
   void MyMethod(Param objectIdentifier);
}
class MyPerCallService : IMyContract, IDisposable {
   public void MyMethod(Param objectIdentifier) {
      GetState(objectIdentifier);
      DoWork();
      SaveState(objectIdentifier);
   }

   void GetState(Param objectIdentifier) {....}
   void DoWork() {....}
   void SaveState(Param objectIdentifier) {....}
   public void Dispose() {....}
}
Here, Param is the pseudo type parameter invented for the above example.
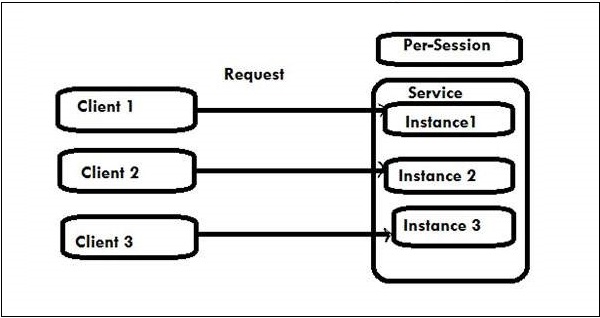
Per-Session Service
In this activation mode of WCF, a private or we can say a confidential session is maintained between the two entities, i.e., the client and a particular service instance. Also known as the private session service, the per-session service offers a new service instance which remains dedicated to each client request and autonomous of all the other instances pertaining to that session-aware service.
To initiate a per-session service, the InstanceContextMode property is required to set to PerSession. Here, the service instance stays in memory all through the session duration.
The activation mode suffers from scalability as the configured service is unable to support any additional outstanding clients other than a few (or maybe up to some hundred) because of the cost involved in each of this dedicated service instance.
A per-session service can be configured as −
[ServiceBehavior (InstanceContextMode = InstanceContextMode.PerSession)]
class MyService : IMyContract
{...}
The process of per-session service can be described as shown in the following figure −
The following code shows a contract and service configured for the usage of a private session. The output indicates that the client indeed got a dedicated service instance.
Service code
[ServiceContract(Session = true)]
interface IMyContract {
   [OperationContract]
   void MyMethod();
}

[ServiceBehavior(InstanceContextMode = InstanceContextMode.PerSession)]
class MyService : IMyContract, IDisposable {
   int m_Counter = 0; MyService() {Console.WriteLine("MyService.MyService()"); }

   public void MyMethod() {
      m_Counter++;
      Console.WriteLine("Counter = " + m_Counter);
   }
   public void Dispose() {
      Console.WriteLine("MyService.Dispose()");
   }
}
Client Code
MyContractProxy proxy = new MyContractProxy(); proxy.MyMethod(); proxy.MyMethod();
proxy.Close();
Output
MyService.MyService() Counter = 1 Counter = 2 MyService.Dispose()
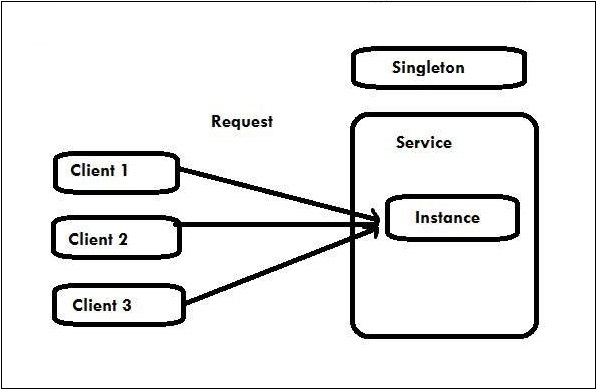
Singleton Service
In this activation mode of WCF, all client requests independent to each other get connected to the same well-known single instance, irrespective of their connection to the service endpoints. The singleton service gets disposed only when the host closes down.
This service is created just for once when the host is created. In case, the host is not provided with any singleton instance, the service returns as NULL. The activation mode is at its best when the work amount in each method call is little and no pending operations are there in the background.
The InstanceContextMode property is required to set to InstanceContextMode.Single to initiate this Singleton service.
Hence, a Singleton service can be configured as −
[ServiceBehavior(InstanceContextMode = InstanceContextMode.Single)]
class MySingleton : ...
{...}
The process of Singleton service is shown in the following figure −
The following code is used for initializing and hosting a singleton instance.
Service code
[ServiceContract]
interface IMyContract {
   [OperationContract]
   void MyMethod( );
}
[ServiceBehavior(InstanceContextMode = InstanceContextMode.Single)]
class MySingleton : IMyContract {
   int m_Counter = 0;

   public int Counter {
      get {
         return m_Counter;
      }
      set {
         m_Counter = value;
      }
   }
   public void MyMethod( ) {
      m_Counter++;
      Trace.WriteLine("Counter = " + Counter);
   }
}
Host code
MySingleton singleton = new MySingleton( );
singleton.Counter = 42;
ServiceHost host = new ServiceHost(singleton);
host.Open( );

//Do some blocking calls then
host.Close( );
Client code
MyContractClient proxy = new MyContractClient( );
proxy.MyMethod( );
proxy.Close( );
Output
Counter = 43
WCF - Transactions
A transaction in WCF is a set of operations that follow some properties, collectively known as ACID. Here, if a single operation fails, the entire system fails automatically. When an order is placed online, a transaction takes place. The following example can be helpful to understand the process of transaction in simpler terms.
Example
Suppose you have ordered an LCD television from an online store and you are going to pay the amount by your credit card. When you enter the requisite information to place the order, two operations occur simultaneously.
One, the specified amount gets debited from your bank account and second, the vendor account is credited with the same amount. Both the operations must execute successfully in order to have a successful transaction.
WCF Transaction Properties
The four properties followed by a WCF transaction are the following −
Atomic − All the operations must act as a single indivisible operation at the completion of a transaction.
Consistency − Whatever may be the operation set, the system is always in a state of consistency, i.e., the outcome of the transaction is always as per the expectation.
Isolation − The intermediary state of system is not visible to any entities of the outer world till the transaction is completed.
Durability − Committed state is maintained regardless of any kind of failure (hardware, power outage, etc.)
While configuring a WCF transaction, there are some factors that demand consideration. These are binding and operation behavior.
Binding − The bindings that support transaction in WCF are only a few and it is vital to make a choice from only these bindings, which remain disabled by default and should be enabled to get the requisite support for transaction. These bindings are as follows −
- NetTcpBinding
- NetNamedPipeBinding
- WSHttpBinding
- WSDualHttpBinding
- WSFederationHttpBinding
Operation behavior − While a binding facilitates the path for transaction propagation, an operation takes care of transaction processing as well as operation configuration. Operation behavior primarily uses two attributes: TransactionFlow and TransactionScopeRequired. Here, it should be noted that TransactionFlow has mainly three values and these are: Allowed, Mandatory, and NotAllowed.
The following code shows whether or not changing the configuration of binding and operation contract facilitates the propagation of client.
<bindings>
   <wsHttpBinding>
      <binding name = "MandatoryTransBinding" transactionFlow = "true">
         <reliableSession enabled ="true"/>
      </binding>
   </wsHttpBinding>
</bindings>
Transaction Protocol
WCF uses three types of protocols for transaction −
- Lightweight
- Ole Transaction
- WS-Atomic Transaction (WS-AT)
Of all the three, WS-AT is an interoperable protocol and enables the flow of distributed transaction across firewalls. However, this protocol should not be used when the transaction is strictly based on Microsoft technology.
Phases of WCF Transaction
There are two phases in a WCF transaction as shown in the following figure.
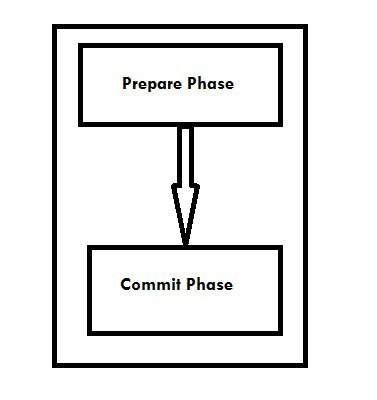
Prepare Phase − In this phase, the transaction manager checks whether all the entities are ready to commit for the transaction or not.
Commit Phase − In this phase, the commitment of entities get started in reality.
The following figure illustrates the functions of both the phases of a WCF transaction.
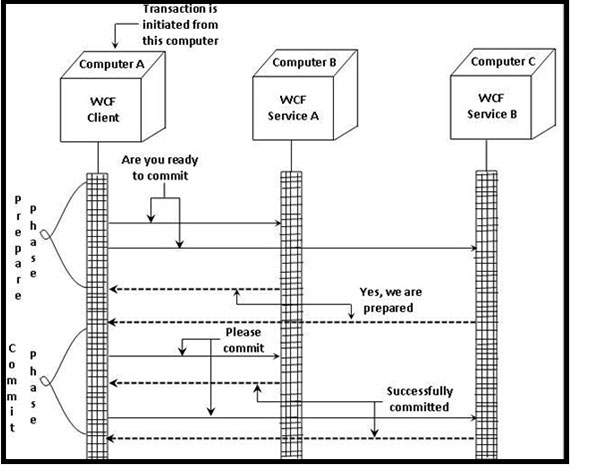
Enabling a WCF Transaction
To enable a WCF transaction successfully, one needs to follow a series of six steps in a sequential manner. The requisite steps are discussed below.
Step 1 − Creation of two WCF Services
The foremost step in this regard is to build two service projects in WCF to participate in a single transaction. Database transactions will be performed on both these services and it will be understood that how they are unified by a WCF transaction. A web application of WCFTransactions has also been created to consume the two created services in a single transaction scope.
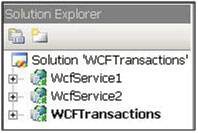
Step 2 − Method creation and its attribution with TransactionFlow attribute
Here, an UpdateData method will be created for both the WCF services to insert into the database with OperationContract attribute. To accomplish this task, an interface class is first created with the help of the ServiceContract attribute. For enabling the transaction in the newly created method, it is attributed with TransactionFlow and transactions are permitted using is Allowed value.
[ServiceContract]
public interface IService1 {
   [OperationContract]
   [TransactionFlow(TransactionFlowOption.Allowed)]
   void UpdateData();
}
Step 3− Implementation of WCF service with TransactionScopeRequired attribute
It is done by using the code shown below −
[OperationBehavior(TransactionScopeRequired = true)]
public void UpdateData() {
   try {
      SqlConnection objConnection = new SqlConnection(strConnection);
      objConnection.Open();

      using(SqlTransaction transaction = Program.dbConnection.BeginTransaction()) {
     	   Boolean doRollback = false;
     	   using(SqlCommand cmd = new SqlCommand(
            "insert into Customer (Customer name, Customer code) values ('sss', 'sss')"objConnection))

     	   try {
            cmd.ExecuteNonQuery();
     	   } catch(SqlException) {
            doRollback = true;
            break;
     	   }
      }

      if(doRollback)
         transaction.Rollback();
      else
         transaction.Commit();
   }
   finally {
      objConection.Close();
   }
}
Step 4 − Enabling Transaction Flow by WCF Service Config File
Its coding is done as follows −
<bindings>
   <wsHttpBinding>
      <binding name = "TransactionalBind" transactionFlow = "true"/>
   </wsHttpBinding>
</bindings>
It is vital to attach the transaction permissible binding with the endpoint to expose the WCF service.
<endpoint address = "" binding = "wsHttpBinding" bindingConfiguration = "TransactionalBind" contract = "WcfService1.IService1">
Step 5 − Calling both the services in a single transaction
Here, the above two services are called in one transaction and for this purpose, the TransactionScope object is used to group both the services. The Complete method of the above object is called to commit a WCF transaction. To rollback, the Dispose method is to be called.
using (TransactionScope ts = new TransactionScope(TransactionScopeOption.RequiresNew)) {
   try {
      // Call your webservice transactions here
      ts.Complete();
   } catch (Exception ex) {
      ts.Dispose();
   }
}
The small piece of the complete code in which WCF transactions have been grouped in one scope is depicted below −
using (TransactionScope ts = new TransactionScope(TransactionScopeOption.RequiresNew)) {
   try {
      ServiceReference1.Service1Client obj = newServiceReference1.Service1Client();
      obj.UpdateData();
      ServiceReference2.Service1Client obj1 = new ServiceReference2.Service1Client();
      obj1.UpdateData();
      ts.Complete();
   } catch (Exception ex) {
      ts.Dispose();
   }
}
Step 6 − Testing WCF transaction
Testing is done in the 6th and final step and after calling the 1st WCF service, an exception is forced.
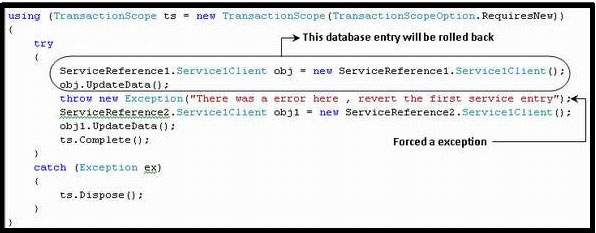
WCF - Ria Services
WCF RIA Service is a higher-level framework and a new component of frameworks like .NET 4 and Silverlight 4 that eases the procedure of building a complex business application in Silverlight by offering client-side validation. RIA stands for Rich Internet Applications.
It must be noted here that Silverlight is a framework offered by Microsoft, ideal for rich internet applications and is available for use as a browser plug-in, just like Adobe Flash.
WCF RIA Service is mainly based on the standard version of WCF service. The following figure illustrates a part of the WCF architecture, where WCF RIA services has its focus in general.

Creating a WCF RIA Service is the next step to have a better understanding of the concept. The step-by-step procedure is given below.
Step 1 − Create a new web project of the name SLWCFRiaServices.Web using Silverlight 5 and then add a new item by selecting ADO.NET Entity Data Model to the same.
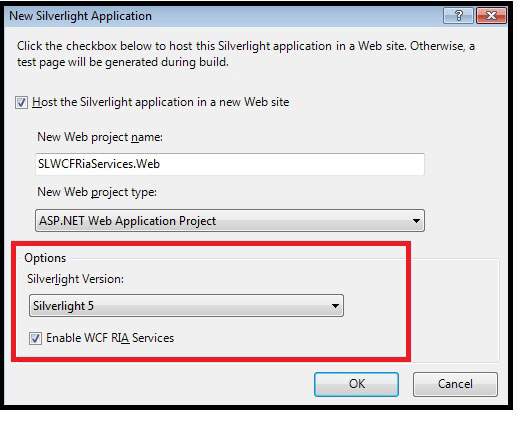
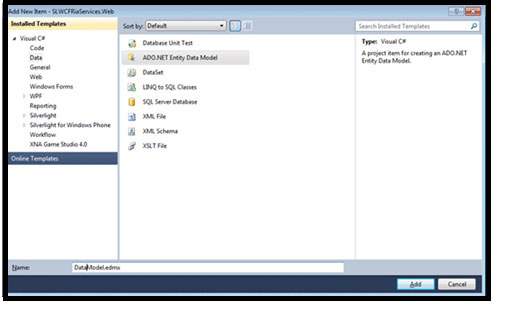
Step 2 − Now choose model contents from the Entity Data Model Wizard by generating the model from the database.
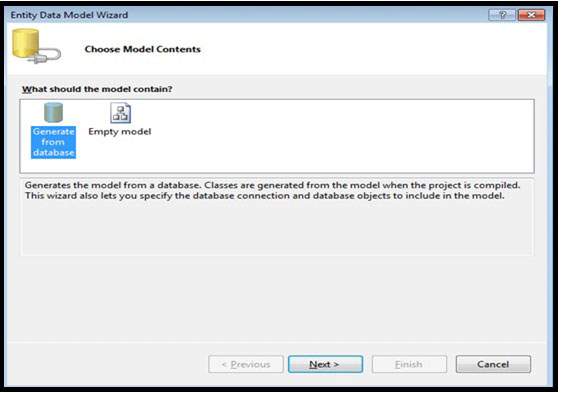
Step 3 − From the same wizard, choose your data connection and database objects.
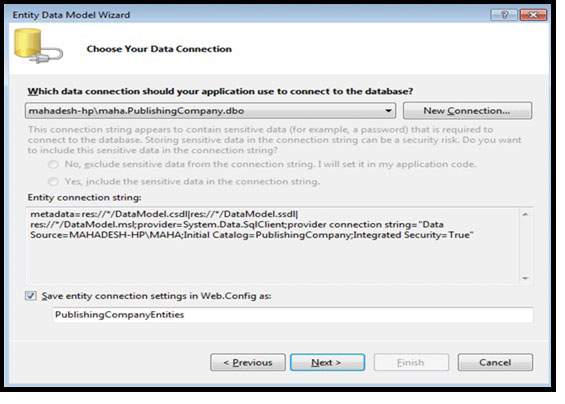
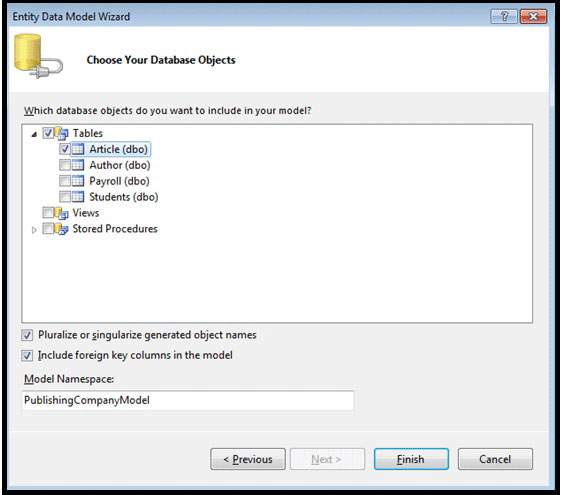
Step 4 − Build the solution so that in future, recognizing the data model will not a problem for the domain service you are going to create.

Step 5 − Now create a domain service in the web project by adding a new item and make sure to enable client access.
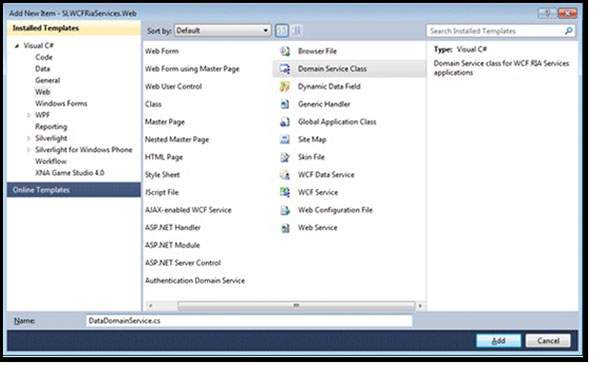
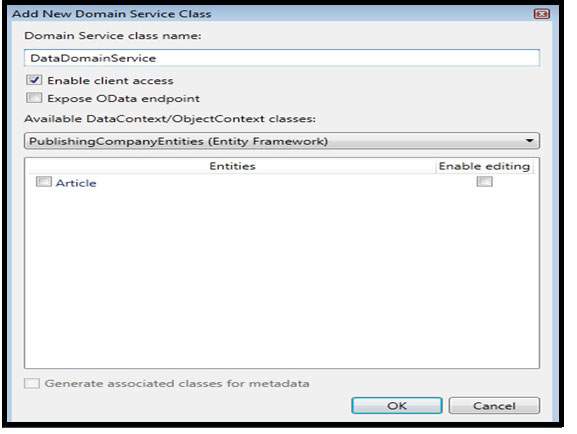
Step 6 − In the very next step, some classes will be generated and it is essential to build them again.
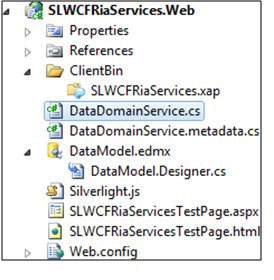
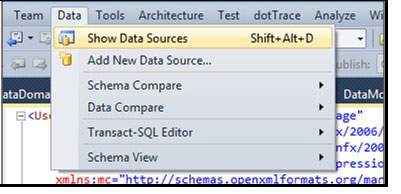
Step 7 − In this step, DataDomainContext is displayed by the Data Sources Panel.
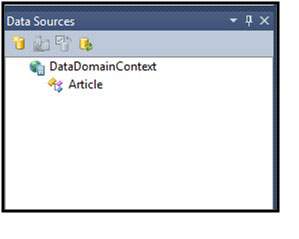
Step 8 − In this step, the article below the DataDomainContext should be selected and customized.
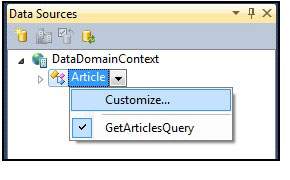
Step 9 − Attaching the DataGrid Control with the Data Source is the step committed here, along with selection of themes. Here BureauBlue theme has been selected.
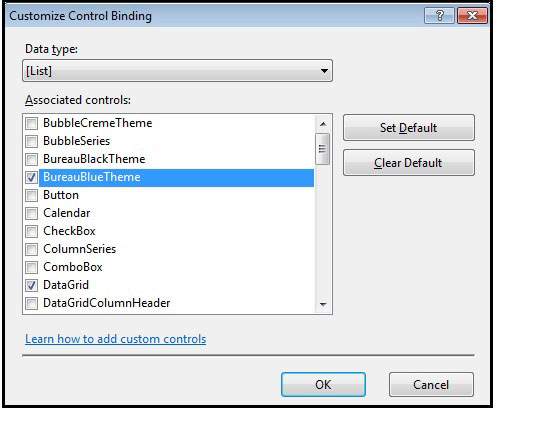
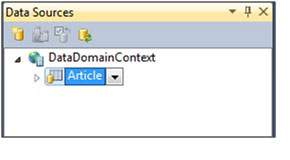
Step 10 − The last and the final step comprises of going to the design screen and adding entity in the layout area of the MainPage by simple drag and drop. It is also vital to ensure AutoGenerateColumns = "True" and to run it to view the output.
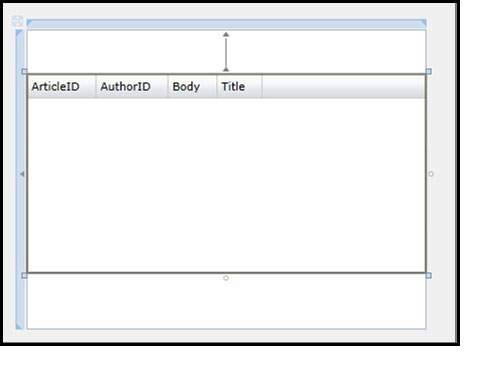
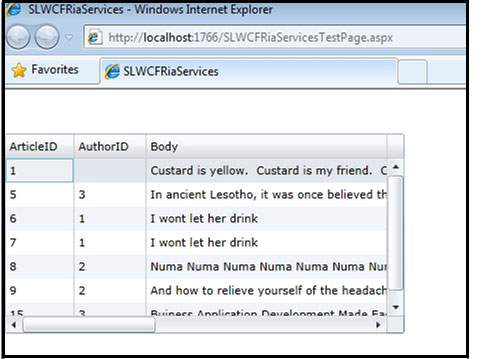
Prerequisites
There are some prerequisites for experiencing the full potential of WCF RIA services −
- Visual Studio 2010 / Visual Studio 2012
- Silverlight Developer Runtime
- Latest version of RIA Services Toolkit
- SDK (Software Development Kit)
WCF RIA Domain Service
A domain service comprises of a set of data operations related to business. It is nothing but a WCF service that exposes any WCF RIA Service application’s business logic.
A WCF RIA Domain Service has the hosting class DomainServiceHost internally, which in turn uses the WCF ServiceHost class for hosting the application. To make the domain service accessible for the client project, it should have the EnableClientAccessAttribute attribute. The attribute is applied automatically whenever a new domain service class is added.
The following figure shows the architecture of a WCF RIA Domain Service −
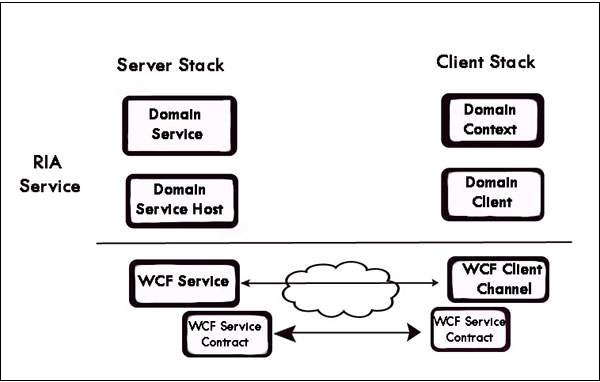
WCF RIA Services – Querying Data
The following figure shows how a query is created on the client side and executed on the server side to return queryable results. DAL stands for Data Access Layer.
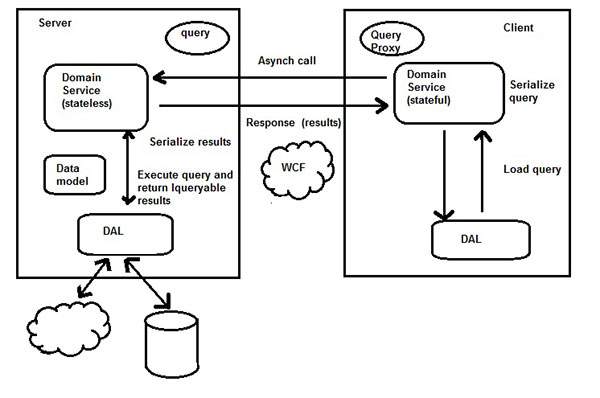
WCF RIA Services – Updating Data
The following figure shows how data is updated by executing the CUD (Create Update Delete) operation on the server side. It should be noted here that WCF RIA service is always stateless on the server side.
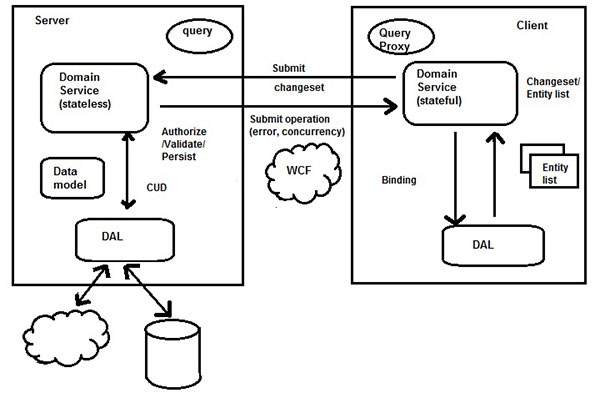
WCF - Security
A WCF service boasts of a robust security system with two security modes or levels so that only an intended client can access the services. The security threats that are common in a distributed transaction are moderated to a large extent by WCF.
Key Security Features
WCF service has four key security features as depicted in the figure below.
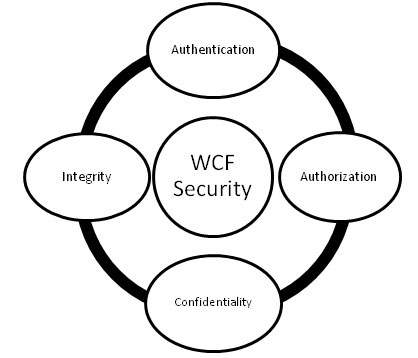
Authentication − Here, authentication is not limited to identifying the sender of the message, but is mutual, i.e., authentication of the message receiver is required to rule out the possibility of any kind of middleman attack.
Authorization − This is the next step taken by a WCF service to ensure security and it is here determined whether the service should authorize the caller to proceed further or not. Although authorization is not dependent on authentication, it normally follows authentication.
Confidentiality − The exchange of information between a caller and a service is kept confidential to restrict its interpretation by others for whom the message is not intended. To make this possible, encryption is used along with a wide variety of other mechanisms.
Integrity − The final key concept is maintaining integrity, i.e., offering the assurance that the message has not been tampered by anyone in its journey from the sender to the receiver.
Transfer Security Mode
WCF offers the following transfer security modes to ensure a secured communication between a client and a server. The diverse transfer security modes are mentioned below.
None − This mode does not guarantee any kind of message security and the service does not get any credentials about the client. This mode is highly risky, as it may allow message tampering and hence not recommended.
<wsHttpBinding>
   <binding name = "WCFSecurityExample">
      <security mode = "None"/>
   </binding>
</wsHttpBinding>
Transport − This mode is the easiest way to achieve a secured transfer of message via the use of communication protocols such as TCP, IPC, Https, and MSMQ. This mode is more effective when the transfer is point-to-point and is used mostly in a controlled environment, i.e., intranet applications.
<wsHttpBinding>
   <binding name = "WCFSecurityExample">
      <security mode = "Transport"/>
   </binding>
</wsHttpBinding>
Message − The security mode allows mutual authentication and offers privacy to a great extent as the messages are encrypted and can be transported through http, which is not considered as a secure protocol. Here the security is provided end-to-end without considering how many intermediaries are involved in a message transfer and whether there is a secured transport or not. The mode is used typically by internet applications.
<wsHttpBinding>
   <binding name = "WCFSecurityExample">
      <security mode = "Message"/>
   </binding>
</wsHttpBinding>
Mixed − This security mode is not used frequently and client authentication is offered only at the client level.
<wsHttpBinding>
   <binding name = "WCFSecurityExample">
      <security mode = "TransportWithMessageCredential"/>
   </binding>
</wsHttpBinding>
Both − This security mode comprises of both transport security and message security to offer a robust security cover, but often results in overloading the overall performance. This one is supported by only MSMQ.
<netMsmqBinding>
   <binding name = "WCFSecurityExample">
      <security mode = "Both"/>
   </binding>
</netMsmqBinding>
All WCF bindings except BasicHttpBinding have some extent of transfer security by default.
Message Security Level
Message level security is not dependent on WCF protocols. It is employed with message data itself by encrypting the data by using a standard algorithm. A number of client credentials are available for different bindings for the message security level and these are discussed below.
Client credentials for message level security in WCF
None − Here, encryption is used to secure the message, whereas no client authentication is performed which means that the service can be accessed by an anonymous client. Except for BasicHttpBinding, all WCF bindings support this client credential. However it should be noted that for NetNamedPipeBinding, this client credential is not available at all.
Windows − Here, both message encryption and client authentication take place for a real-time logged-in user. In this case too, unlike all other WCF bindings, NetNamedPipeBinding is not available and BasicHttpBinding does not lend its support.
UserName − Here, messages are encrypted as well as secured by offering a UserName, and clients are authenticated as they need to offer a password. BasicHttpBinding just like the above two client credentials, does not support UserName and it is not available for NetNamedPipeBinding.
Certificate − Along with message encryption, both the client and the service get an authentication with certificate. This client credential is available and is supported by all WCF bindings except NetNamedPipeBinding.
IssuedToken − Issued Tokens from an authority like Cardspace are used to authenticate the messages. Encryption of messages are also performed here.
The following code shows how client credentials are configured in the WCF message security level/mode.
<netTcpBinding>
   <binding name = "WCFMessageSecurityExample">
      <security mode = "Message">
         <message clientCredentialType = "None"/>
      </security>
   </binding>
</netTcpBinding>

<netMsmqBinding>...</netMsmqBinding>
</bindings>
<behaviors>...</behaviors>
Here, it must be noted that the transport security mode has an edge over the message security level, as the former is faster. It does not require any additional coding and offers interoperability support, and thus does not reduce the overall performance.
However, from security point of view, the message security mode is more robust and is independent of protocols and offers end-to end security.
WCF - Exception Handling
A WCF service developer may encounter some unforeseen errors which require reporting to the client in a suitable manner. Such errors, known as exceptions, are normally handled by using try/catch blocks, but again, this is very technology specific.
Since a client's concern area is not about how an error occurred or the factors contributing to an error, SOAP Fault contract is used to communicate the error message from the service to the client in WCF.
A Fault contract enables the client to have a documented view of the errors occurred in a service. The following example gives a better understanding.
Step 1 − An easy calculator service is created with divide operation which will generate general exceptions.
using System;
usingSystem.Collections.Generic;
usingSystem.Linq;
usingSystem.Runtime.Serialization;
usingSystem.ServiceModel;
usingSystem.Text;

namespace Calculator {
   // NOTE: You can use the "Rename" command on the "Refactor" menu to change
   // the interface name "IService1" in both code and config file together.

   [ServiceContract]

   public interface IService1 {
      [OperationContract]
      int divide(int num1, int num2);
      // TODO: Add your service operations here
   }
}
The coding for the class file is show below −
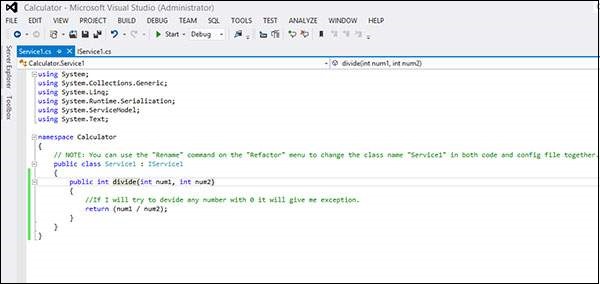
Now, when we try to divide the number 10 by zero, the calculator service will throw an exception.
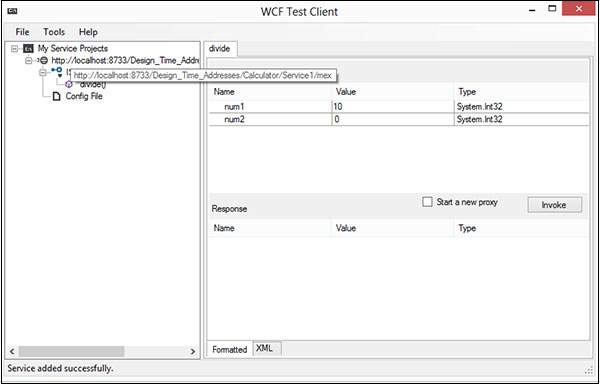
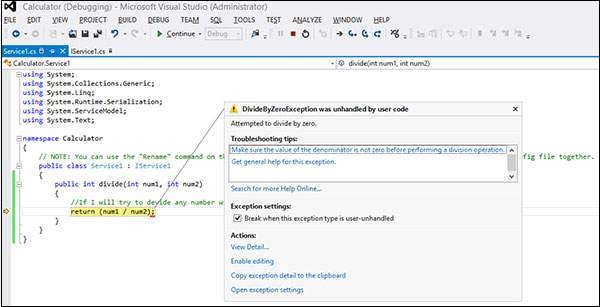
The exception can be handled by try/catch block.
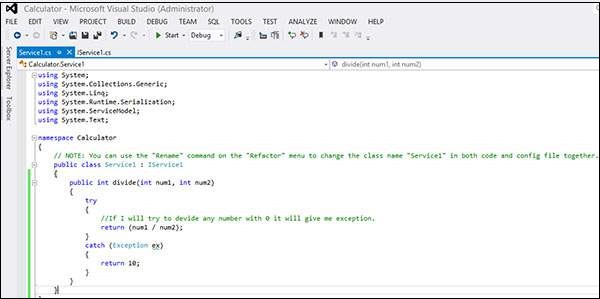
Now, when we try to divide any integer number by 0, it will return the value 10 because we have handled it in the catch block.

Step 2 − FaultException is used in this step to communicate the exception information to the client from the service.
public int Divide(int num1, int num2) {
   //Do something
   throw new FaultException("Error while dividing number");
}

Step 3 − It is also possible to create a custom type to send the error message using FaultContract. The steps essential to create a custom type are mentioned below −
A type is defined by the use of data contract and the fields intended to get returned are specified.
The service operation is decorated by the FaultContract attribute. The type name is also specified.
A service instance is created to raise exceptions and custom exception properties are assigned.