- VueJS Tutorial
- VueJS - Home
- VueJS - Overview
- VueJS - Environment Setup
- VueJS - Introduction
- VueJS - Instances
- VueJS - Template
- VueJS - Components
- VueJS - Computed Properties
- VueJS - Watch Property
- VueJS - Binding
- VueJS - Events
- VueJS - Rendering
- VueJS - Transition & Animation
- VueJS - Directives
- VueJS - Routing
- VueJS - Mixins
- VueJS - Render Function
- VueJS - Reactive Interface
- VueJS - Examples
- VueJS Useful Resources
- VueJS - Quick Guide
- VueJS - Useful Resources
- VueJS - Discussion
VueJS - Rendering
In this chapter, we will learn about conditional rendering and list rendering. In conditional rendering, we will discuss about using if, if-else, if-else-if, show, etc. In list rendering, we will discuss how to use for loop.
Conditional Rendering
Let’s get started and work on a example first to explain the details for conditional rendering. With conditional rendering, we want to output only when the condition is met and the conditional check is done with the help of if, if-else, if-else-if, show, etc.
v-if
Example
<html>
   <head>
      <title>VueJs Instance</title>
      <script type = "text/javascript" src = "js/vue.js"></script>
   </head>
   <body>
      <div id = "databinding">
         <button v-on:click = "showdata" v-bind:style = "styleobj">Click Me</button>
         <span style = "font-size:25px;"><b>{{show}}</b></span>
         <h1 v-if = "show">This is h1 tag</h1>
         <h2>This is h2 tag</h2>
      </div>
      <script type = "text/javascript">
         var vm = new Vue({
            el: '#databinding',
            data: {
               show: true,
               styleobj: {
                  backgroundColor: '#2196F3!important',
                  cursor: 'pointer',
                  padding: '8px 16px',
                  verticalAlign: 'middle',
               }
            },
            methods : {
               showdata : function() {
                  this.show = !this.show;
               }
            },
         });
      </script>
   </body>
</html>
Output
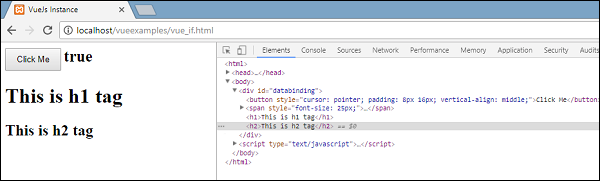
In the above example, we have created a button and two h1 tags with the message.
A variable called show is declared and initialized to a value true. It is displayed close to the button. On the click of the button, we are calling a method showdata, which toggles the value of the variable show. This means on the click of the button, the value of the variable show will change from true to false and false to true.
We have assigned if to the h1 tag as shown in the following code snippet.
<button v-on:click = "showdata" v-bind:style = "styleobj">Click Me</button>
<h1 v-if = "show">This is h1 tag</h1>
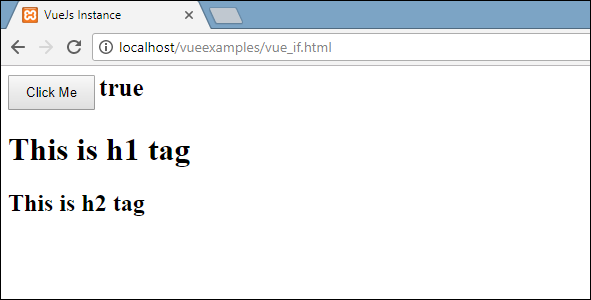
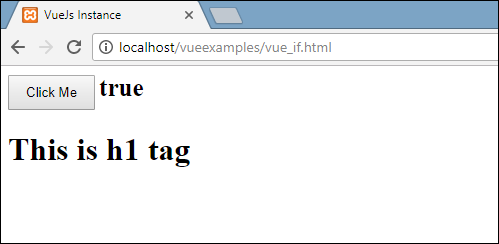
Now what it will do is, it will check the value of the variable show and if its true the h1 tag will be displayed. Click the button and view in the browser, as the value of the show variable changes to false, the h1 tag is not displayed in the browser. It is displayed only when the show variable is true.
Following is the display in the browser.
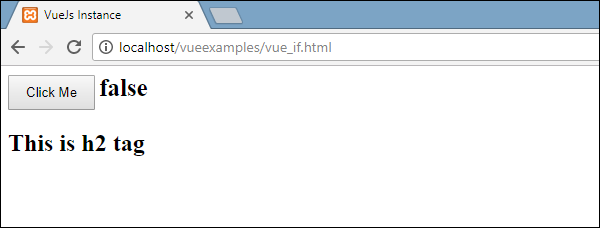
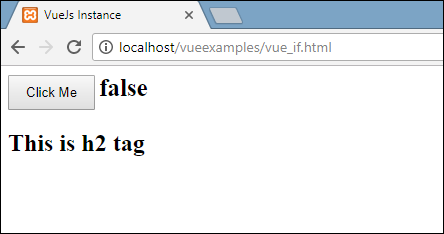
If we check in the browser, this is what we get when show is false.
The h1 tag is removed from the DOM when the variable show is set to false.
This is what we see when the variable is true. The h1 tag is added back to the DOM when the variable show is set to true.
v-else
In the following example, we have added v-else to the second h1 tag.
Example
<html>
   <head>
      <title>VueJs Instance</title>
      <script type = "text/javascript" src = "js/vue.js"></script>
   </head>
   <body>
      <div id = "databinding">
         <button v-on:click = "showdata" v-bind:style = "styleobj">Click Me</button>
         <span style = "font-size:25px;"><b>{{show}}</b></span>
         <h1 v-if = "show">This is h1 tag</h1>
         <h2 v-else>This is h2 tag</h2>
      </div>
      <script type = "text/javascript">
         var vm = new Vue({
            el: '#databinding',
            data: {
               show: true,
               styleobj: {
                  backgroundColor: '#2196F3!important',
                  cursor: 'pointer',
                  padding: '8px 16px',
                  verticalAlign: 'middle',
               }
            },
            methods : {
               showdata : function() {
                  this.show = !this.show;
               }
            },
         });
      </script>
   </body>
</html>
v-else is added using the following code snippet.
<h1 v-if = "show">This is h1 tag</h1>
<h2 v-else>This is h2 tag</h2>
Now, if show is true “This is h1 tag” will be displayed, and if false “This is h2 tag” will be displayed. This is what we will get in the browser.
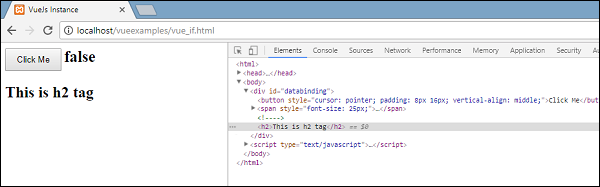
The above display is when the show variable is true. Since, we have added v-else, the second statement is not present. Now, when we click the button the show variable will become false and the second statement will be displayed as shown in the following screenshot.
v-show
v-show behaves same as v-if. It also shows and hides the elements based on the condition assigned to it. The difference between v-if and v-show is that v-if removes the HTML element from the DOM if the condition is false, and adds it back if the condition is true. Whereas v-show hides the element, if the condition is false with display:none. It shows the element back, if the condition is true. Thus, the element is present in the dom always.
Example
<html>
   <head>
      <title>VueJs Instance</title>
      <script type = "text/javascript" src = "js/vue.js"></script>
   </head>
   <body>
      <div id = "databinding">
         <button v-on:click = "showdata" v-bind:style = "styleobj">Click Me</button>
         <span style = "font-size:25px;"><b>{{show}}</b></span>
         <h1 v-if = "show">This is h1 tag</h1>
         <h2 v-else>This is h2 tag</h2>
         <div v-show = "show">
            <b>V-Show:</b>
            <img src = "images/img.jpg" width = "100" height = "100" />
         </div>
      </div>
      <script type = "text/javascript">
         var vm = new Vue({
            el: '#databinding',
            data: {
               show: true,
               styleobj: {
                  backgroundColor: '#2196F3!important',
                  cursor: 'pointer',
                  padding: '8px 16px',
                  verticalAlign: 'middle',
               }
            },
            methods : {
               showdata : function() {
                  this.show = !this.show;
               }
            },
         });
      </script>
   </body>
</html>
v-show is assigned to the HTML element using the following code snippet.
<div v-show = "show"><b>V-Show:</b><img src = "images/img.jpg" width = "100" height = "100" /></div>
We have used the same variable show and based on it being true/false, the image is displayed in the browser.
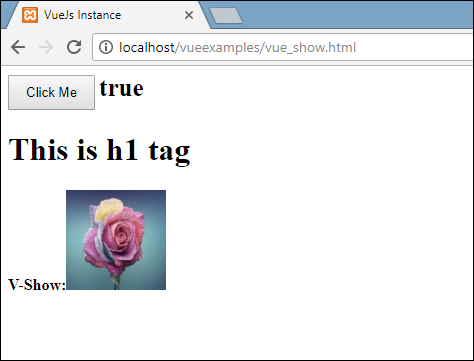
Now, since the variable show is true, the image is as displayed in the above screenshot. Let us click the button and see the display.
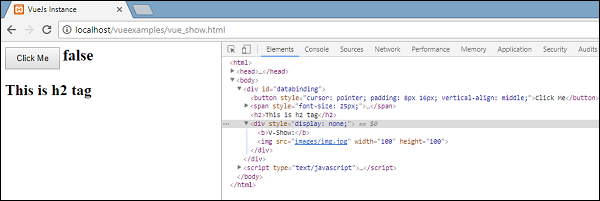
The variable show is false, hence the image is hidden. If we inspect and see the element, the div along with the image is still a part of the DOM with the style property display: none as seen in the above screenshot.
List Rendering
v-for
Let us now discuss list rendering with v-for directive.
Example
<html>
   <head>
      <title>VueJs Instance</title>
      <script type = "text/javascript" src = "js/vue.js"></script>
   </head>
   <body>
      <div id = "databinding">
         <input type = "text" v-on:keyup.enter = "showinputvalue"
            v-bind:style = "styleobj" placeholder = "Enter Fruits Names"/>
         <h1 v-if = "items.length>0">Display Fruits Name</h1>
         <ul>
            <li v-for = "a in items">{{a}}</li>
         </ul>
      </div>
      <script type = "text/javascript">
         var vm = new Vue({
            el: '#databinding',
            data: {
               items:[],
               styleobj: {
                  width: "30%",
                  padding: "12px 20px",
                  margin: "8px 0",
                  boxSizing: "border-box"
               }
            },
            methods : {
               showinputvalue : function(event) {
                  this.items.push(event.target.value);
               }
            },
         });
      </script>
   </body>
</html>
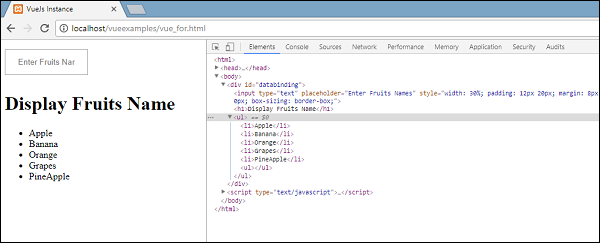
A variable called items is declared as an array. In methods, there is a method called showinputvalue, which is assigned to the input box that takes the names of the fruits. In the method, the fruits entered inside the textbox are added to the array using the following piece of code.
showinputvalue : function(event) {
   this.items.push(event.target.value);
}
We have used v-for to display the fruits entered as in the following piece of code. V-for helps to iterate over the values present in the array.
<ul>
   <li v-for = "a in items">{{a}}</li>
</ul>
To iterate over the array with for loop, we have to use v-for = ”a in items” where a holds the values in the array and will display till all the items are done.
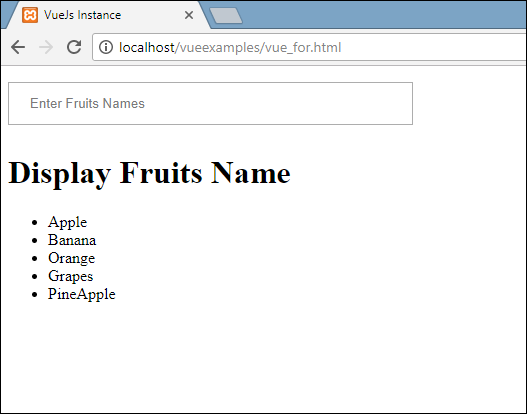
Output
Following is the output in the browser.
On inspecting the items, this is what it shows in the browser. In the DOM, we don’t see any v-for directive to the li element. It displays the DOM without any VueJS directives.
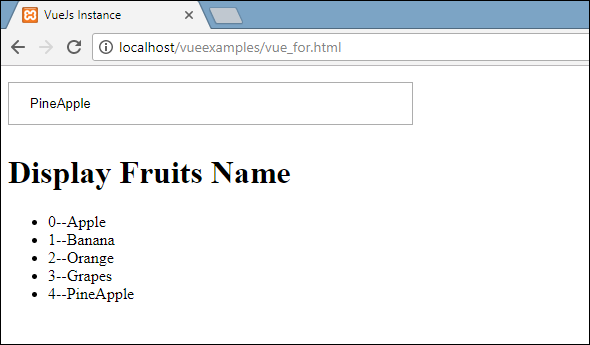
If we wish to display the index of the array, it is done using the following code.
<html>
   <head>
      <title>VueJs Instance</title>
      <script type = "text/javascript" src = "js/vue.js"></script>
   </head>
   <body>
      <div id = "databinding">
         <input type = "text" v-on:keyup.enter = "showinputvalue"
            v-bind:style = "styleobj" placeholder = "Enter Fruits Names"/>
         <h1 v-if = "items.length>0">Display Fruits Name</h1>
         <ul>
            <li v-for = "(a, index) in items">{{index}}--{{a}}</li>
         </ul>
      </div>
      <script type = "text/javascript">
         var vm = new Vue({
            el: '#databinding',
            data: {
               items:[],
               styleobj: {
                  width: "30%",
                  padding: "12px 20px",
                  margin: "8px 0",
                  boxSizing: "border-box"
               }
            },
            methods : {
               showinputvalue : function(event) {
                  this.items.push(event.target.value);
               }
            },
         });
      </script>
   </body>
</html>
To get the index, we have added one more variable in the bracket as shown in the following piece of code.
<li v-for = "(a, index) in items">{{index}}--{{a}}</li>
In (a, index), a is the value and index is the key. The browser display will now be as shown in the following screenshot. Thus, with the help of index any specific values can be displayed.