- TypeORM Tutorial
- TypeORM - Home
- TypeORM - Introduction
- TypeORM - Installation
- TypeORM - Creating a Simple Project
- TypeORM - Connection API
- TypeORM - Entity
- TypeORM - Relations
- TypeORM - Working with Repository
- TypeORM - Working with Entity Manager
- TypeORM - Query Builder
- TypeORM - Query Operations
- TypeORM - Transactions
- TypeORM - Indices
- TypeORM - Entity Listener and Logging
- TypeORM with JavaScript
- TypeORM - Working with MongoDB
- TypeORM with Express
- TypeORM - Migrations
- TypeORM - Working with CLI
- TypeORM Useful Resources
- TypeORM - Quick Guide
- TypeORM - Useful Resources
- TypeORM - Discussion
TypeORM - Quick Guide
TypeORM - Introduction
TypeORM framework is an Object Relational Mapping (ORM) framework. In general, Object part refers to the domain / model in your application, Relational part refers to the relationship between tables in Relational Database Management System (e.g. Oracle, MySQL, MS-SQL, PostgreSQL, etc.) and finally the Mapping part refers to the act of bridging the model and our tables.
ORM is a type of tool that maps entities with database tables. ORM provides simplified development process by automating object-to-table and table-to-object conversion. Once you can write your data model in one place, it becomes easier to update, maintain, and reuse the code.
Since, the model is weakly bound to the rest of the application, you can change it without any hard dependency with other part of the application and can be easily use it anywhere inside the application. TypeORM is very flexible, abstracts the DB system away from the application and allows us to benefits from the use of OOPS concept.
Overview
TypeORM is an Object Relational Mapper library running in node.js and written in TypeScript. TypeScript is an improvement to JavaScript with optional typing. TypeScript is a compiled language. It is not interpreted at run-time. The TypeScript compiler takes TypeScript files (.ts) and compiles them in to JavaScript files (.js).
TypeORM supports multiple databases like MySQL, PostgreSQL, MariaDB, SQLite, MS SQL Server, Oracle, SAP Hana and WebSQL. TypeORM is an easy-to-use ORM to scaffold new apps that connect to databases. TypeORM functionality is RDBMS-specific concepts.
We can quickly create new projects and micro-services. It is inspired from similar tool like Hibernate, Doctrine, Entity framework, etc., from other programming languages.
Features of TypeORM
TypeORM comes with the following features −
- Automatically create database table schemes based on your models.
- Easily insert, update and delete object in the database.
- Create mapping (one-to-one, one-to-many and many-to-many) between tables.
- Provides simple CLI commands.
Benefits of TypeORM
TypeORM is easy to use ORM framework with simple coding. It has the following benefits −
- High quality and loosely-coupled applications.
- Scalable applications.
- Easily integrate with other modules.
- Perfectly fits any architecture from small to enterprise apps.
TypeORM - Installation
This chapter explains about how to install TypeORM on your machine. Before moving to installation, please make sure that npm is installed. To confirm that you have npm, you can run the following command in your terminal.
npm -v
It shows the version. If it is not installed, download the latest version and install on your machine.
Install TypeORM
Let us install TypeORM locally using npm module −
npm install typeorm --save
After executing the above command, you will get a response as given below −
+ typeorm@0.2.24
+
added 1 package and audited 1236 packages in 4.729s
Alternatively, to install TypeORM globally, use the below command −
npm install typeorm -g
After that, install optional package reflect-metadata using npm −
npm install reflect-metadata --save
You could see the following response −
+ reflect-metadata@0.1.13

added 1 package and audited 1236 packages in 2.426s
Now, install another optional package. node typings using the below command −
npm install @types/node --save
You could see the following response −
+ @types/node@12.12.31

added 1 package and audited 1236 packages in 2.167s
Install database driver
In this section, let us install the necessary node packages for our database.
To install MySQL or MariaDB package, use the below command −
npm install mysql --save
You could see the following response −
+ mysql@2.18.1

added 1 package and audited 1236 packages in 4.36s
To install PostgreSQL package, use the below command −
npm install pg --save
You could see the following response −
+ pg@7.18.2

added 1 package and audited 1236 packages in 2.863s
To install SQLite package, use the below command −
npm install sqlite3 --save
You could see the following response −
+ sqlite3@4.1.1
added 48 packages from 45 contributors and audited 1396 packages in 7.31s
To install Microsoft SQL Server package, use the below command −
npm install mssql --save
Your screen looks similar to this,
+ mssql@6.2.0

added 1 package and audited 1655 packages in 2.378s
To install sql.js package, use the below command −
npm install sql.js --save
You could see the following response −
+ sql.js@1.2.1

added 1 package and audited 1655 packages in 6.462s
To install Oracle server package, use the below command −
npm install oracledb --save
You could see the following response −
+ oracledb@4.2.0

added 1 package and audited 1655 packages in 2.265s
To install mongodb package, use the below command −
npm install mongodb --save
You could see the following response −
+ mongodb@3.5.5

added 1 package and audited 1655 packages in 3.716s
TypeORM - Creating a Simple Project
This chapter explains about how to create simple TypeORM application. Let us create a new directory named ‘TypeORM’ and move into the directory.
cd /path/to/TypeORM/
Syntax
Use below command to create new project −
typeorm init --name <project-name> --database <database-name>
Example
typeorm init --name FirstProject --database mysql
Here,
FirstProject is your project name and sqlite3 is database name. After executing the above command, you could see the following response,
Project created inside /path/to/TypeORM/FirstProject directory
Now, move in to our project directory and install project dependencies using npm module,
$ cd FirstProject

$ npm install
Project structure
Let us understand project structure of our newly created project, FirstProject.
FirstProject
├──> src
│ ├──> entity
│ │ └──> User.ts
│ ├──> migration
│ └──> index.ts
├──> node_modules
├──> ormconfig.json
├──> package.json
├──> package-lock.json
└──> tsconfig.json
Here,
- src − contains source code of your application in TypeScript language. It has a file index.ts and two sub directories entity and migration.
- index.ts − Your entry point to the application.
- entity − Contains database models.
- migration − contains database migration code.
- node_modules − locally saved npm modules.
- ormconfig.json − Main configuration file of your application. It contains database configuration details and entities configuration.
- package.json − Contains node module dependencies.
- package-lock.json − Auto generated file and related to package.json.
- tsconfig.json − Contains TypeScript specific compiler options.
ormconfig.json file
Let us check the configuration option available for our application. Open ormconfig.json file and it looks similar to this −
{
   "type": "mysql",
   "host": "localhost",
   "port": 3306,
   "username": "test",
   "password": "test",
   "database": "test",
   "synchronize": true,
   "logging": false,
   "entities": [
      "src/entity/**/*.ts" ],
   "migrations": [ "src/migration/**/*.ts"
   ],
   "subscribers": [ "src/subscriber/**/*.ts"
   ],
   "cli": {
      "entitiesDir":"src/entity", "migrationsDir":"src/migration", "subscribersDir":"src/subscriber
   }
 }
Here,
type, host, username, password, database and port options are related to database setting. mysql can be configured using below configuration −
{
   "type": "mysql",
   "host": "localhost",
   "port": 3306,
   "username": "db_username", "password": "db_password", "database": "db_name"
}
- entities − refers the location of your entity classes.
- migrations − refers the location of your migration classes.
- subscribers − refers the location of your subscriber classes.
- cli − refers the option used by TypeORM CLI to auto generate the code
Start MySql server
Before starting the application, start your MySQL server or any database server used by you and make sure it is running properly.
Run application
Once everything is configured, we can execute the application using the below command −
npm start
You could see the following response −
> FirstProject@0.0.1 start /Users/../../TypeORM/FirstProject

> ts-node src/index.ts

Inserting a new user into the database... Saved a new user with id: 1 Loading users from the database... Loaded users: [ User { id: 1, firstName: 'Timber', lastName: 'Saw', age: 25 }]

Here you can setup and run express/koa/any other framework.
The application inserted a new user into the database and then reverse load it from the database and finally show the loaded user in the console. We have successfully created a new TypeORM application, configured it and run the application.
We will discuss about how the data is executed elaborately in upcoming chapters.
TypeORM - Connection API
To interact with database, we need a connection object to the database. We need to create a connection object before doing the database operation and has to terminate it once thee database operations are done. Let us learn about Connection API provided by TypeORM in this section.
Creating a new connection
Before creating a new connection, we need to configure database connection details in the ormconfig.json configuration file. A sample connection details is shown below −
ormconfig.json
{
   name: "firstconnection",
   type: "mysql",
   host: "localhost",
   port: 3306,
   username: "root",
   password: "root",
   database: "firstDB"
}
Here,
- name − Name of the database connection.
- type − Database type.
- host − Hostname of the database server.
- port − Database server port.
- username − Account name having access to the database.
- password − Password of the above mentioned account.
- database − Name of the database to connect.
createConnection
CreateConnection method is provided by TypeORM to create a new connection. It is defined as below,
import { createConnection, Connection } from "typeorm";

const connection = await createConnection({

});
Here, createConnection will use the configuration details specified in the ormconfig.json file.
Alternatively, you can define the connection URL as arguments to the createConnection method as specified follows −
const connection = createConnection({ type: 'mysql',
     url: 'localhost:8888/firstDB'
})
Here,
createConnection returns an object, which can be used to open / close the connection to the database.
Multiple connections
TypeORM provides an option to create multiple database connection as well. First, the configuration file ormconfig.json can be used to specify the details of the multiple database connection. Let us configure multiple databases in ormconfig.json as specified follows,
ormconfig.json
{  name: "firstconnection",
   type: "mysql",
   host: "localhost",
   port: 3306,
   username: "root",
   password: "root",
   database: "firstDB"
},
{  name: "secondconnection",
   type: "mysql",
   host: "localhost",
   port: 3306,
   username: "root",
   password: "root",
   database: "secondDB"
},
{  name: "thirdconnection",
   type: "mysql",
   host: "localhost",
   port: 3306,
   username: "root",
   password: "root",
   database: "thirdDB"
}
Now, we can use the argument provided by the createConnection method to specify the name of the connection to create connection object as mentioned below −
const firstconnection: Connection = await createConnection("firstconnection");
Here,
createConnection will use the configuration details of the firstconnection specified in the ormconfig.json file to create the connection object.
TypeORM also provides yet another API, createConnections to create multiple connection as once and then, use it whenever necessary as specified below −
import { createConnections, Connection } from "typeorm";

const connections: Connection[] = await createConnections([

]);
Here,
connections hold all the connection objects as an array.
ConnectionManager
TypeORM also provides an another API, connectionManager to create connection. It is defined below −
import {getConnectionManager, ConnectionManager, Connection} from "typeorm";

const connectionManager = getConnectionManager();

const connection = connectionManager.create({

});
await connection.connect();
TypeORM prefers the usage of createConnection over ConnectionManager to create connection objects.
TypeORM - Entity
An entity is a collection of fields and associated database operations. It is used to map database table and its fields with the entities and its attributes. This chapter explains about the TypeORM entities in detail.
Introduction
Let us create a simple Entity class in our code. Move to your project root location and go inside src folder and move to entity folder. Now, create a TypeScript file, Student.ts and enter below code −
Student.ts
import {Entity, PrimaryGeneratedColumn, Column} from "typeorm";

@Entity()
export class Student {

   @PrimaryGeneratedColumn()
   id: number;

   @Column()
   Name: string;

   @Column()
   age: number;
}
Here,
- Entity() decorator class is used to represent that the Student class is an entity.
- PrimaryGeneratedColumn() decorator class is used to represent that the id column is the primary key column of the Student entity.
- Column() decorator class is used to represent other columns such as Name and Age of the Student entity.
Now, Entity class Student is created. TypeORM will auto generate a table corresponding to the Student entity in our database and it will be named as student. Now, move to src/index.ts file and add the following code −
index.ts
import "reflect-metadata";
import {createConnection} from "typeorm";
import {Student} from "./entity/Student"; //import Student entity

createConnection().then(async connection => {

   console.log("Inserting a new record into the student database...");

   //create student object const stud = new Student();

   //Assign student name and age here stud.Name = "student1";
   stud.age = 12;

    //save student object in connection await connection.manager.save(stud); console.log("Saved a new user with id: " + stud.id);

    console.log("Loading users from the database...");

    //Display student saved records const students = await connection.manager.find(Student); console.log("Loaded users: ", students);

    console.log("Here you can setup and run express/koa/any other framework.");
}).catch(error => console.log(error));
Here,
- Line 1 - 3 imports the relevant classes, createConnection and Student
- Line 5 creates a new connection to the database using createConnection and if connection is established, it executes the code inside the then block.
- Line 10 create new Student object, stud.
- Line 13-14 set the attributes of our newly created stud object.
- Line 17 saves the entity to the database using save method available in connection.manager object.
- Line 23 fetches the student details from the database using find method available in connection.manager object.
Start Mysql server and run your application
We have created Student entity and create connection in index.ts. Let us start both MySql server and your application.
npm start
This will return the following output on your screen −
Output

Open mysql server following student table is added inside your database.

Columns
As learned earlier, Entity is actually a collection of attributes. As entity object refers the database table. Its attributes / member variables refer the corresponding database table’s fields / columns. TypeORM supports all type of database fields through Column class. Let us learn the different type of column supported by TypeORM in this chapter.
@Column() decorator class is used to represent the column and its type in the entity.
For example, age attribute of the student entity and the type of the age attribute can be defined as below −
@Column("int") age: integer; // OR @Column({ type: "int" }) age: integer;
Here,
- age is the attribute of the entity. In other word, age is a field / column in the student table in the database.
- int represent the type of the age column in the database.
TypeORM supports nearly all the types available in the popular database engine. Actually, TypeORM enables different set of types for each database engine. We can use any database type supported by our database engine without any issue.
For example, the type supported by TypeORM for postgresql database engine is as follows −
int, int2, int4, int8, smallint, integer, bigint, decimal, numeric, real, float, float4, float8, double precision, money, character varying,

varchar, character, char, text, citext, hstore, bytea, bit, varbit, bit

varying, timetz, timestamptz, timestamp, timestamp without time zone, timestamp with time zone, date, time, time without time zone, time with time zone, interval, bool, boolean, enum, point, line, lseg, box, path, polygon, circle, cidr, inet, macaddr, tsvector, tsquery, uuid, xml, json, jsonb, int4range, int8range, numrange, tsrange, tstzrange, daterange, geometry, geography, cube
Similarly, TypeORM supports a different set of datatype for MySQL.
Column Options
TypeORM provides an extensive set of options other than type to describe the column. For example, length option refers the length of the database field and it can be specified as below −
@Column("varchar", { length: 100 })
Some of the most common column options are as follows −
- name − Name of the database field / column.
- length − Length of the database field / column.
- nullable − Specify whether the database field / column allows null or not.
- default − Default value of the database field / column.
- primary − Specify whether the database field / column is primary key of the table.
- unique − Specify whether the database field / column is unique
- *precision** − Precision of the database field / column
- scale − Scale of the database field / column
- comment − Comment or description of the database field / column
@Generated decorator
TypeORM provides additional decorator, @Generated to auto generate the column values. For example, Universally Unique Identifier (UUID) is quite common to use in database to store unique value in a column. The sample code to generate UUID is as follows −
@Entity()
export class Student {

   @PrimaryColumn()
   id: number;

   @Column()
   @Generated("uuid")
   uuid: string;
}
Here,
uuid is generated automatically and stored inside the database.
Primary columns
At least one primary column field is mandatory for any entity in database. It is classified into different types of decorators. We will discuss it one by one.
@PrimaryColumn()
@PrimaryColumn() decorator is used to create primary column for any type of data. Simple example is shown below,
import {Entity, PrimaryColumn} from "typeorm";

@Entity()
export class Student {
@PrimaryColumn()
   id: number;
}
Here,
id is an integer, which doesn’t accept duplicate values, but we need to assign values.
We can assign primary column for one or more fields as well, if the situation demands.
Example
import {Entity, PrimaryColumn} from "typeorm";

@Entity()
export class Student {

   @PrimaryColumn()
   id: number;

   @PrimaryColumn()
   email: string;

   @PrimaryColumn()
   phone: number;
}
@PrimaryGeneratedColumn()
@PrimaryGeneratedColumn() field is used to specify the primary column as well as to auto generate the column value in the database. It is shown below −
import {Entity, PrimaryGeneratedColumn} from "typeorm";

@Entity()
export class Student {

   @PrimaryGeneratedColumn()
   id: number;
}
Here,
You don’t have to assign id value; it will be generated automatically by the TypeORM in the database table.
@PrimaryGeneratedColumn(“uuid”)
@PrimaryGeneratedColumn also accepts an argument to specify the type of generator. One of the main use is to generate unique id based on UUID.
import {Entity, PrimaryGeneratedColumn} from "typeorm";

@Entity()
export class Student {
   @PrimaryGeneratedColumn("uuid") id: string;
}
simple-array column type
Advanced relational database supports array datatype. To support the array datatype, TypeORM provides a special column type, *simple-array" to store primitive array values. A sample code to use it is as follows −
@Entity()
export class Student {

   @PrimaryGeneratedColumn()
   id: number;

   @Column("simple-array")
   names: string[];
}
simple-json column type
Lot of modern database engine supports JSON database. To use JSON datatype, TypeORM provides a special type, single-json. The sample code to use it is as follows −
@Entity()
export class Student {

   @PrimaryGeneratedColumn()
   id: number;

   @Column("simple-json")
   info: { firstName: string, middleName: string, lastName: string };
}
This value can be defined in index.ts as,
index.ts
const stud = new Student();
stud.info = { firstName: "John", middleName: "peter", lastName: "Michael" };
Special columns
TypeORM supports the following special columns
- @CreateDateColumn − It is a special column to set entity’s insertion date automatically.
- @UpdateDateColumn − It is used to set the entity’s update time automatically.
- @VersionColumn − Set version number for entity automatically.
Entity Inheritance
Entity inheritance is use to reduce duplication of entities. Consider the below entities −
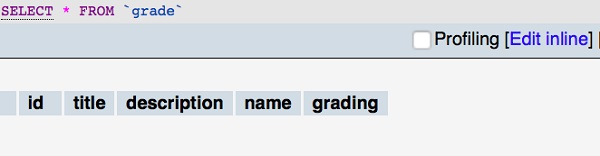
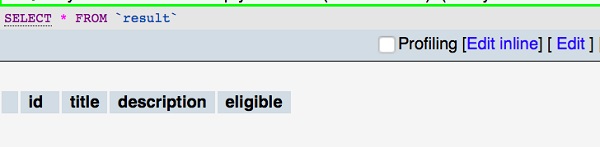
Result.ts
@Entity()
export class Result {

   @PrimaryGeneratedColumn()
   id: number;

   @Column()
   title: string;

   @Column()
   description: string;

   @Column()
   eligible: string
}
Grade.ts
The code for grade.ts is as follows −
@Entity()
export class Grade {

   @PrimaryGeneratedColumn()
   id: number;

   @Column()
   name: string;

   @Column()
   title: string;

   @Column()
   description: string;


   @Column()
   grading : string;
}
Here,
The above two entities have columns id, title and description. Using entity inheritance, we create one base class Details and combine the above two entities as specified below.
Details.ts
export abstract class Details {

   @PrimaryGeneratedColumn()
   id: number;

   @Column()
   title: string;

   @Column()
   description: string;
}
@Entity()
export class Result extends Details{

   @Column()
   eligible: string
}
@Entity()
export class Grade extends Details{

   @Column()
   name : string;

   @Column()
   grading : string;
}
Now start your server, you could see the below response,

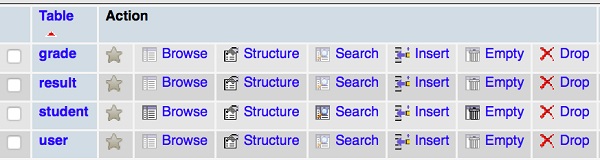
Now open your mysql server and move to your database, you could see the following tables,
Grade table
Result table
TypeORM - Relations
Relations are used to refer the relationship between table in database. In general, a relationship exists between two tables when one of them has a foreign key that references the primary key of the other table. This feature makes relational database more powerful and efficiently store information.
TypeORM allows the entities to be related to each other and subsequently database tables. In general, relationship can be classified into four broader categories. They are as follows,
one-to-one − One object of the given entity relates to only one object of the target entity and vice versa. For example, a country will have only one capital city and similarly a city will be capital of only one country.
many-to-one − Multiple object of the given entity relates to one object of the target entity. For example, city comes under only one country but country can have multiple cities.
one-to-many − Same as many-to-one except the relationship is reversed.
many-to-many − Multiple object of the given entity relates to multiple object of the target entity. For example, an article may be tagged under multiple topic like programming language, finance, etc., and at the same time a particular tag may have multiple articles as well.
TypeORM also provides options to enhance the relationship of the entities. They are as follows −
- eager − Source entity object loads the target entity objects as well.
- cascade − Target entity object gets inserted or updated while the source entity object is inserted or updated.
- onDelete − Target entity objects get deleted as well while the source entity object is deleted.
- primary − Used to specify that the relation column is primary key or not.
- nullable − Used to specify that the relation column is nullable or not.
Let us go through different types of relation mapping in detail.
One-to-One
As we learned earlier, it is referred by the instance of one table field contains the instance of another table field and vice versa. Let us create a Details table −
Details.ts
import {Entity, PrimaryGeneratedColumn, Column} from "typeorm";

@Entity()
export class Details {
   @PrimaryGeneratedColumn()
   id: number;

   @Column()
   gender: string;

   @Column()
   country: string;
}
Let’s create an another entity Customer as follows −
Customer.ts
import {Entity, PrimaryGeneratedColumn, Column, OneToOne, JoinColumn} from "typeorm";

import {Details} from "./Details";

@Entity()
export class Customer {

   @PrimaryGeneratedColumn()
   id: number;

   @Column()
   name: string;

   @OneToOne(type => Details) @JoinColumn()
   details: Details;
}
Here,
We have added mapping OneToOne to Details table. @JoinColumn() contain a “relation id” and foreign key to Customer table. We can save the relation in index.ts as follows −
const details = new Details(); details.gender = "female"; details.country = "india" await connection.manager.save(details);

const customer = new Customer(); customer.name = 'customer1'; customer.details = Details; await connection.manager.save(Customer);
One-to-Many and Many-to-One
As we learned earlier, it is referred by the instance of first table field contains the multiple instances of second table field called One-to-Many mapping and multiple instances of first table contains only one instance of second table called Many-to-One mapping.
Consider an example of Student and project entities whereas, student can work on more than one project but each project is handled by only one student.
Let’s create a Project entity as follows −
Project
import {Entity, PrimaryGeneratedColumn, Column, ManyToOne} from "typeorm"; import {Student} from "./Student";
@Entity()
export class Project {

   @PrimaryGeneratedColumn()
   id: number;

   @Column()
   projects: string;

   @ManyToOne(type => Student, student => student.projects) student: Student;
}
Now, we create Student entity as below −
import {Entity, PrimaryGeneratedColumn, Column, OneToMany} from "typeorm"; import {Project} from "./Project";

@Entity()
export class User {

   @PrimaryGeneratedColumn()
   id: number;

   @Column()
   name: string;

   @OneToMany(type => Project, project => project.student) projects: Project[];
}
Here,
@OneToMany property mapped Project and @ManyToOne property mapped to Student. However, @OneToMany cannot exist without @ManyToOne and @ManyToOne property contain “relation id” and foreign key.
We can save the connection in index.ts as follows −
const proj1 = new Project(); proj1.projects = "database management"; await connection.manager.save(proj1);

const proj2 = new Project(); proj2.projects = "web application"; await connection.manager.save(proj2);

const stud = new Student(); stud.name = "Student1"; stud.projects = [proj1, proj2]; await connection.manager.save(stud);
Many-to-Many
As we learned earlier, it is referred by multiple records in one table are related to multiple records in another table. Consider an example, University student can be enrolled in multiple classes at a time which means student may have four or five classes per semester and a class can have many students.
We can simply conclude, a student has many classes, and a class has many students. Let’s create an entity for Classes as follows −
import {Entity, PrimaryGeneratedColumn, Column} from "typeorm";

@Entity()
export class Classes {

   @PrimaryGeneratedColumn()
   id: number;

   @Column()
   name: string;
}
Now, we create Student entity as below −
import {Entity, PrimaryGeneratedColumn, Column, ManyToMany, JoinTable} from "typeorm";
import {Classes} from "./Classes";

@Entity()
export class Student {

   @PrimaryGeneratedColumn()
   id: number;

   @Column()
   name: string;

   @Column()
   subjects: string;

   @ManyToMany(type => Classes) @JoinTable()
   classes: Classes[];
}
TypeORM - Working with Repository
Repository is specific to an entity. In other words, each entity will have its own, build-in repository and it can be accessed using getRepository() method of connection object as specified below −
const studRepository = manager.getRepository(Student);
Once the student repository object is created, it can be used to do all database operation of student object.
Repository types
Repository is classified into four categories. They are as follows −
Repository
Default repository of an entity and it can be accessed using getRepository() method as specified below −
const studRepository = manager.getRepository(Student);
Now, studRepository can be used to query student table
TreeRepository
Used for tree like structure entities and it can be accessed using getTreeRepository() method as specified below −
const studcaRepository = manager.getTreeRepository(Student);
MongoRepository
Used inside mongoDB operation entities and it can be accessed using getMongoRepository() method as specified below −
const detailsRepository = manager.getMongoRepository(Details);
CustomRepository
Used to customize the repository and it can be accessed using getCustomRepository() method as specified below,
const myUserRepository = manager.getCustomRepository(UserRepository);
Repository API
Let us learn most important method of the EntityManager in this chapter.
manager
We can access EntityManager using manager method as specified below −
const manager = repository.manager;
queryRunner
queryRunner method returns custom query runner object and it is used for database operations by repository. The sample code is as follows −
const queryRunner = repository.queryRunner;
metadata
metadata returns repository’s metadata. The sample code is as follows −
const metadata = repository.metadata;
query
query method executes SQL queries. Simple select query as shown below −
const qur = await repository.query(`select * from students`);
insert
insert method is used to insert a new entity or array of entities to the database. The sample code is as follows −
await repository.insert({
   Name: "Student3",
   Age: 14
});
The above query is equivalent to,
insert into student(Name,age) values("Student3",14)
update
update is used to update the existing records in the database.
await repository.update(1, { Name: "Adam" });
This query works similar to the one mentioned below −
update student SET Name = "Adam" where id = 1
delete
delete method will delete the specified record from the table,
await repository.delete(Student, 1);
This will delete student with id 1 from the student table. It is equivalent to,
delete from student where id=1;
If you want to delete by name then use the below query,
await repository.delete({ Name: "Student1" });
This query will delete all the student having name, Student1
** softDelete and restore **
It is used to soft delete the data and you can restore the record based on the id of the student. The sample code is as follows −
await repository.softDelete(1);
You can restore the student record using below command −
await repository.restore(1);
An alternative option to delete and restore is to use softRemove and recover methods. The sample code is as follows −
//find the entities const enty = await repository.find();

//soft removed entity const entySoftRemove = await repository.softRemove(enty);
And, you can recover them using recover method as specified below,
await repository.recover(entySoftRemove);
save
save is used to save the given entity into the database. Simple Student entity can be save as shown below −
import {Student} from "./entity/Student";

createConnection().then(async connection => {
   console.log("Inserting a new record into the student database...");
   const stud = new Student();
   stud.Name = "student1";
   stud.age = 12;
   await repository.save(stud);
This will add new student record into the database.
remove
remove is used to delete the given entity from the database. Simple Student entity can be deleted as shown below −
await repository.remove(stud);
count
count method will return the number of records available in the table and you can use it pagination purposes. The sample code is as follows −
const cnt = await repository.count(Student, { age: 12 });
find
find method is used for searching purposes. It fetches all the record from database as shown below −
const result = await repository.find({ id: 1 });
findOne
Similar to find method, but returns the first matched record. The sample code is as follows −
const result = await repository.findOne({ id: 1 });
clear
clear method clears all the data from the table. The sample code is as follows −
await repository.clear();
TypeORM - Working with Entity Manager
EntityManager is similar to Repository and used to manage database operations such as insert, update, delete and load data. While Repository handles single entity, EntityManager is common to all entities and able to do operations on all entities.
Entity Manager API
We can access EntityManager using getManager() method as specified below −
import { getManager } from "typeorm"; const entityManager = getManager();
Let us learn most important method of the EntityManager in this chapter.
connection
connection method returns database ORM connection to specific databases. The sample code is as follows −
const connection = manager.connection;
QueryRunner
queryRunner method returns custom query runner object and it is used for database operations by entity manager. The sample code is as follows −
const queryRunner = manager.queryRunner;
transaction
If multiple database requests are called, transaction will execute in a single database transaction. The sample code to get the transaction is as follows −
await manager.transaction(async manager => {
});
query
query method executes sql queries. Simple insert query as shown below −
const qur = await manager.query(`insert into student(name,age) values('stud2',13)`);
insert
insert method is used to insert a new entity or array of entities to the database. The sample code is as follows −
await manager.insert(Student, {
   Name: "Student3",
   Age: 14
});
update
update is used to update the existing records in the database.
await manager.update(User, 1, { Name: "Adam" });
This query works similar to the below SQL query,
UPDATE student SET Name = "Adam" WHERE id = 1
delete
delete method will delete the specified record from the table,
await manager.delete(Student, 1);
This will delete with id 1 of student record.
save
save is used to save the given entity into the database. Simple Student entity can be save as shown below −
import {Student} from "./entity/Student";

createConnection().then(async connection => {
   console.log("Inserting a new record into the student database...");
   const stud = new Student(); stud.Name = "student1";
   stud.age = 12;
   await connection.manager.save(stud);
}
This will add new student record into the database. save method will insert the student, if the given student does not exist in the database. Otherwise, save will update existing student record in the database.
remove
remove is used to delete the given entity from the database. Simple Student entity can be deleted as shown below −
await manager.remove(stud);
count
count method will return the number of records available in the table and you can use it pagination purposes. The sample code is as follows −
const cnt = await manager.count(Student, { age: 12 });
find
find method is used for searching purposes. It fetches all the record from database as shown below −
console.log("Loading users from the database...");
const students = await connection.manager.find(Student); console.log("Loaded users: ", students);
findOne
Similar to find method, but returns the first matched record. The sample code is as follows −
const stud = await manager.findOne(Student, 1);
clear
clear method clears all the data from the table. The sample code is as follows −
await manager.clear(Student);
TypeORM - Query Builder
Query builder is used build complex SQL queries in an easy way. It is initialized from Connection method and QueryRunner objects.
We can create QueryBuilder in three ways.
Connection
Consider a simple example of how to use QueryBuilder using connection method.
import {getConnection} from "typeorm";

const user = await getConnection() .createQueryBuilder()
.select("user")
.from(User, "user")
.where("user.id = :id", { id: 1 }) .getOne();
Entity manager
Let’s create a query builder using entity manager as follows −
import {getManager} from "typeorm";

const user = await getManager() .createQueryBuilder(User, "user") .where("user.id = :id", { id: 1 })    .getOne();
Repository
We can use repository to create query builder. It is described below,
import {getRepository} from "typeorm";

const user = await getRepository(User) .createQueryBuilder("user") .where("user.id = :id", { id: 1 }) .getOne();
Aliases
Aliases are same as SQL alias. We create alias for Student table using QueryBuilder as described below −
import {getConnection} from "typeorm";

const user = await getConnection() .createQueryBuilder()
.select("stud")
.from(Student, "stud")
This query is equivalent to,
select * from students as stud
Parameters
Parameters are used as placeholders for the dynamic values in the query. In many cases, the query to find different entity object will be same except values. For example, the query to find different student is same except the Student ID data. In this case, we can use parameter for Student ID and then change the parameter to get the different student objects.
Another important use of parameter is to prevent SQL injection. It is one of the important security breach in the modern web application. By using parameter in the query, we can survive the SQL injection attacks.
Another important use of parameter is to prevent SQL injection. It is one of the important security breach in the modern web application. By using parameter in the query, we can survive the SQL injection attacks.
For example
"student.id = :id", { id: 1 }
Here,
:id - parameter name.
{ id: 1 } - value of the parameter
Adding expression
This section explains about how to use expressions.
where
where is used to filter the records if the condition is matched.
createQueryBuilder("student") .where("student.id = :id", { id: 1 })
This query is equivalent to,
select * from students student where student.id=1;
We can also use AND, OR, NOT, IN conditions inside.
having
Simple having expression is defined below −
createQueryBuilder("student") .having("student.id = :id", { id: 1 })
This query is equivalent to,
select * from students student having student.id=1;
orderBy
orderby is used to sort the records based on the field.
createQueryBuilder("student") .orderBy("student.name")
This query is equivalent to,
select * from students student order by student.name;
groupBy
It is used to group the records based on the specified column.
createQueryBuilder("student") .groupBy("student.id")
This query is equivalent to,
select * from students student group by student.id;
limit
It is used to limit the selection of rows. Below, example shows how to use limit in query builder,
createQueryBuilder("student") .limit(5)
This query is equivalent to,
select * from students student limit 5;
offset
Offset is used to specify, how many rows to skip the result. It is defined below −
createQueryBuilder("student") .offset(5)
This query is equivalent to,
select * from students student offset 5;
joins
join clause is used to combine rows from two or more tables, based on a related column. Consider the two entities −
Student.ts
import {Entity, PrimaryGeneratedColumn, Column, OneToMany} from "typeorm";
import {Project} from "./Project";

@Entity()
export class User {

   @PrimaryGeneratedColumn()
   id: number;

   @Column()
   name: string;

   @OneToMany(type => Project, project => project.student) projects: project[];
}
Project.ts
import {Entity, PrimaryGeneratedColumn, Column, ManyToOne} from "typeorm";
import {Student} from "./Student";

@Entity()
export class Project {

   @PrimaryGeneratedColumn()
   id: number;

   @Column()
   title: string;

   @ManyToOne(type => Student, student => student.projects) student: Student;
}
Let us perform simple left join using the below query −
const student = await createQueryBuilder("student") .leftJoinAndSelect("student.projects", "project")
.where("student.name = :name", { name: "Student1" })
.getOne();
This query is equivalent to,
SELECT student.*, project.* FROM students student
   LEFT JOIN projects project ON project.student = student.id
   WHERE student.name = 'Student1'
Similarly, we can try inner join as well.
Join without selection
We can join data without using select. Let us try this example using Inner join as follows −
const student = await createQueryBuilder("student") .innerJoin("student.projects", "project")
   .where("student.name = :name", { name: "student1" })
   .getOne();
The above query is equivalent to −
SELECT student.* FROM students student
   INNER JOIN projects project ON project.student = student.id
   WHERE student.name = 'Student1';
Pagination
If you have more data in your application, you need pagination, page slider or scrolling functionalities.
For example, if you want to show first five students projects in your application,
const students = await getRepository(Student) .createQueryBuilder("student") .leftJoinAndSelect("student.projects", "project")
   .take(5)
   .getMany();
subqueries
It is called query within another query or nested query. We use subqueries in FROM, WHERE and JOIN expressions.
Simple example is shown below −
const projects = await connection .createQueryBuilder() .select("project.id", "id")
.addSelect(subQuery => {
   return subQuery
      .select("student.name", "name") .from(Student, "student")
      .limit(1);
}, "name")
.from(Project, "project") .getMany();
Hidden field
If any of your column field is marked as {select: false} then that column is considered as hidden column. Consider the below entity −
import {Entity, PrimaryGeneratedColumn, Column} from "typeorm";

@Entity()
export class Student {

   @PrimaryGeneratedColumn()
   id: number;

   @Column()
   name: string;

   @Column({select: false})
   address: string;
}
Here,
address field is marked as hidden. We can use addSelect method to retrieve the information from the column. It is defined below,
const student = await connection.getRepository(Student) .createQueryBuilder() .select("student.id", "student") .addSelect("student.address") .getMany();
getSql()
This method is used to get the generated SQL query by query builder. It is defined below −
const sql = createQueryBuilder("student") .where("student.name = :name", { name: "Student1" })  .orWhere("student.age = :age", { age: 14 })
.getSql();
TypeORM - Query Operations
Data manipulation is used to manage and view data. This section explains about how to access database queries like insert, update, select and delete queries using QueryBuilder. Let’s go through one by one in detail.
Build insert query
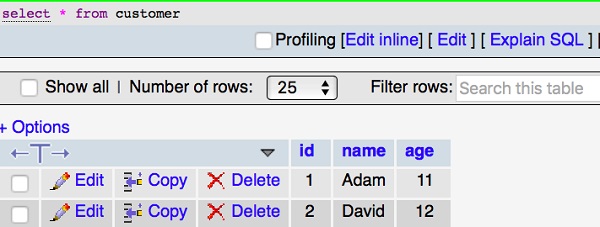
Let us create a Customer entity as follows −
Customer.ts
import {Entity, PrimaryGeneratedColumn, Column} from "typeorm";
@Entity()
export class Customer {

   @PrimaryGeneratedColumn()
   id: number;

   @Column()
   name: string;

   @Column()
   age: number;
}
Let’s add the following changes in index.ts as follows −
index.ts
import "reflect-metadata";
import {createConnection} from "typeorm";
import {Customer} from "./entity/Customer";
import {getConnection} from "typeorm";

createConnection().then(async connection => {
   await getConnection().createQueryBuilder()   .insert()
      .into(Customer)
      .values([ { name: "Adam",age:11},
         { name: "David",age:12} ]) .execute();
}).catch(error => console.log(error));
Now, start your application using the below command −
npm start
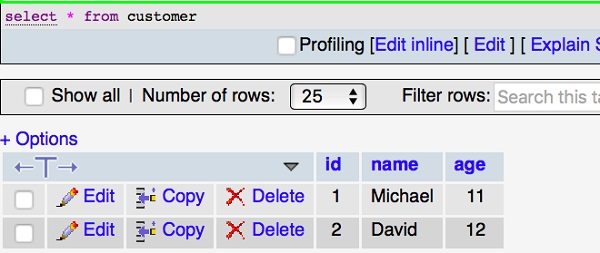
Output
You could see the following output on your screen −

Now open your mysql server, table inserted with two fields as shown below −
Build update query
Last section, we have inserted two rows of data. Let’s check how update query works. Add the following changes in index.ts as follows −
import "reflect-metadata";
import {createConnection} from "typeorm";
import {Customer} from "./entity/Customer";
import {getConnection} from "typeorm";

createConnection().then(async connection => {

await getConnection()
   .createQueryBuilder() .update(Customer)
   .set({ name: "Michael" }) .where("id = :id", { id: 1 }) .execute();
   console.log("data updated");

}).catch(error => console.log(error));
Now, start your application using the below command −
npm start
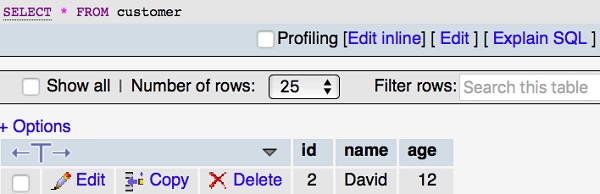
You could see the following output on your screen −

Mysql table is modified as shown below −
Build select query
select query is used to display the records from the table. Let’s add the following code in index.ts as follows −
index.ts
import "reflect-metadata";
import {createConnection} from "typeorm";
import {Customer} from "./entity/Customer";

createConnection().then(async connection => {

   console.log("Display records from Customer table...");
   const cus = new Customer();

   console.log("Loading customers from the database...");
   const customers = await connection.manager.find(Customer); console.log("Loaded users: ", customers);
}).catch(error => console.log(error));
You could see the following output on your screen −

where expression
Let us add where expression in the query to filter the customers. The sample code is as follows −
import "reflect-metadata";
import {createConnection} from "typeorm";
import {Customer} from "./entity/Customer";
import {getConnection} from "typeorm";

createConnection().then(async connection => {
   const customer = await getConnection() .createQueryBuilder() .select("cus")
   .from(Customer, "cus") .where("cus.id = :id", { id: 1 }) .getOne();

   console.log(customer);
})
.catch(error => console.log(error));
The above program will return first id records. You could see the following output on your screen,

Similarly, you can try other expressions as well.
Build delete query
Last section, we have inserted, updated and select data. Let’s check how delete query works. Add the following changes in index.ts as follows −
import "reflect-metadata";
import {createConnection} from "typeorm";
import {Customer} from "./entity/Customer";
import {getConnection} from "typeorm";

createConnection().then(async connection => {
   await getConnection() .createQueryBuilder()
   .delete()
   .from(Customer)
   .where("id = :id", { id: 1 }) .execute();
console.log("data deleted"); }).catch(error => console.log(error));
You could see the following output on your screen −

And your mysql table is modified as follows −
TypeORM - Transactions
Generally, transaction is a logic unit responsible for execution of data retrieval and updates. This section explains about Transactions in detail.
Creating transactions
We can create a transaction using either connection or EntityManage. Below example is used to specify create connection and save data inside it.
import {getConnection} from "typeorm";

await getConnection().transaction(async transactionalEntityManager => {

   await connection.manager.save(students);

});
EntityManager is shown below −
import {getManager} from "typeorm";

await getManager().transaction(async transactionalEntityManager => {
   await transactionalEntityManager.save(students);
});
Decorators
We have three types of transaction related decorators in TypeORM.
- @Transaction - Wraps all the execution in single database transcation.
- @TransactionManager - Used to execute queries inside transaction. It is defined below,
@Transaction({ isolation: "SERIALIZABLE" })

save(@TransactionManager() manager: EntityManager, student: Student) {
   return manager.save(student);
}
Here,
We used SERIALIZABLE isolation level for transaction.
- @TransactionRepository - Used to inject transaction in repository. It is defined below,
@Transaction() save(student: Student, @TransactionRepository(Student) studentRepository:
Repository<Student>) {
   return studentRepository.save(student);
}
Transaction in QueryRunner
QueryRunner is used to execute all database queries. It has single database connection. Database transaction can be organized using QueryRunner. Let’s perform single transaction using QueryRunner.
import {getConnection} from "typeorm";

// get a connection and create a new query runner
const connection = getConnection(); const queryRunner = connection.createQueryRunner();

// establish real database connection using our new query runner
await queryRunner.connect();

// now we can execute any queries on a query runner, for example: await queryRunner.query("SELECT * FROM students");
Now, start transaction using the below statement −
await queryRunner.startTransaction();
Then, commit and rollback the transaction using the below statement,
try {
   await queryRunner.commitTransaction();
}
If there is any error, it is handled by catch(),
catch (err) {

   // since we have errors lets rollback changes we made await queryRunner.rollbackTransaction();
}
Now, release the queryRunner as below −
finally {

   // you need to release query runner which is manually created: await queryRunner.release();
}
TypeORM - Indices
In general, Indexing is a process to optimize the performance of a database by optimizing the data storage. It is used to quickly locate and access the data in a database. This section explains about how to use index in TypeORM. Indices are classified into different types. Let’s go through one by one in detail.
Column indices
We can create index for particular column using @Index. Consider an example of Customer entity as shown below and index defined for firstName column,
import {Entity, PrimaryGeneratedColumn, Column} from "typeorm";

@Entity()
export class Student {

   @PrimaryGeneratedColumn()
   id: number;

   @Index()
   @Column()
   firstName: string;

   @Column()
   lastName: string;

   @Column()
   age: number;

   @Column()
   address: string;
}
@Index allow to specify name for an index as well −
@Index("Name-idx")
@Column()
firstName: string;
Unique indices
To specify Unique constraints in your column, use the below property −
{ unique: true }
For example, below is the code to specify unique index for Name column −
@Index({ unique: true })
@Column()
firstName: string;
To apply indices for more than one columns, we can directly specify it after @Entity(). The sample code is as follows −
@Entity()
@Index(["firstName", "lastName"]) @Index(["firstName", "lastName"], { unique: true })
Spatial indices
Spatial index allows to access spatial objects. MySQL and PostgreSQL supports spacial indices. To enable spatial indices in your column, add the following property −
{ spatial: true }
Spatial type has multiple sub types such as, geometry, point, line string, polygon etc., For example, if you want to add point spatial type in your column, use below code −
@Column("point")
@Index({ spatial: true })
point: string;
Disable synchronization
To disable synchronization, use the below option on @Index decorator −
{ synchronize: false }
TypeORM - Entity Listener and Logging
Entity listener is used in entities which supports custom method and listen specific events. We can define any entity custom method using decorators. Let’s understand decorators in brief.
- @AfterLoad − When the entity is loaded using QueryBuilder or repository/manager, this method will be called.
- @BeforeInsert − This method will call before the entity is inserted using repository/manager.
- @AfterInsert − This method will call after the entity is inserted using repository/manager.
- @BeforeUpdate − This method will call it before an existing entity is updated using repository/manager.
- @AfterUpdate − It will call after an entity is updated.
- @BeforeRemove − It will call before an entity is removed.
- @AfterRemove − It will call after an entity is removed.
Subscriber
Subscriber is used to listen specific entity events. It is implemented from EntitySubscriberInterface. Let’s understand a simple example for how to use entity listener in subscriber. Consider the Student entity is shown below −
Student.ts
import {Entity, PrimaryGeneratedColumn, Column} from "typeorm";

@Entity()
export class Student {

   @PrimaryGeneratedColumn()
   id: number;

   @Column()
   Name: string;

   @Column()
   age: number;
}
Create student subscriber
Subscriber is created using the below command −
typeorm subscriber:create -n StudentSubscriber
The above command creates a subscriber directory inside your project src. Then, StudentSubscriber.ts file is created inside your subscriber. You could see the following response,
Subscriber /Users/workspace/TypeORM/FirstProject/src/subscriber/StudentSubscriber.ts has been created successfully.
Now move to file, you could see the below coding −
StudentSubscriber.ts
import {EventSubscriber, EntitySubscriberInterface} from "typeorm";

@EventSubscriber()
export class StudentSubscriber implements EntitySubscriberInterface<any> {
}
Now, add the following changes in the file,
import {EventSubscriber, EntitySubscriberInterface,InsertEvent} from "typeorm";
import {Student} from "../entity/Student";

@EventSubscriber()
export class StudentSubscriber implements EntitySubscriberInterface<any> {
   listenTo()
   {
      return Student;
   }

   afterInsert(event: InsertEvent<Student>) {
      console.log(event);
   }
}
Here,
We have used afterInsert() method to call the entity event. Similarly, you can use other events as well. We have already configured ormconfig.json file. Now, add the below changes in index.ts file as follows −
index.ts
import "reflect-metadata"; import {createConnection} from "typeorm"; import {Student} from "./entity/Student";

createConnection().then(async connection => {

   console.log('connection established');
}).catch(error => console.log(error));
After executing the application, you could see the below output on your screen,

Logging
Database logging is an important part of your highly available database solution design because database logs make it possible to recover from a failure, and they make it possible to synchronize primary and secondary databases.
All databases have logs associated with them. These logs keep records of database changes. If a database needs to be restored to a point beyond the last full, off-line backup, logs are required to roll the data forward to the point of failure.
Logging options
Logging is enabled by adding {logging: true} in database connection. Logging options are classified into different types. They are as follows −
query − return all log queries. It is defined as given below −
{
   host: "localhost",
   ...
   logging: ["query"]
}
error − return logs for all failed queries and errors. It is defined below −
{
   host: "localhost",
   ...
   logging: ["error"]
}
schema − return logs for the schema.
warn − return internal ORM warnings.
info − return logs internal ORM informative messages.
log − return internal ORM log messages.
Custom logger
Custom logging is simple and highly customizable logging option. We can create our own logger class using the below code −
import {Logger} from "typeorm";

export class MyCustomLogger implements Logger {

   // implement all methods from logger class
}
Connection option is specified in ormconfig.json as follows −
name: "mysql",
type: "mysql",
host: "localhost",
port: 3306,
username: "root",
password: "root",
database: "test",
logger: new MyCustomLogger()
TypeORM with JavaScript
The default language supported by TypeORM is TypeScript. Since, TypeScript supports static typing, classes and decorators, it is easy to define the entity and its attributes. At the same time, JavaScript is necessary as well in certain project where the preferred language is JavaScript. TypeORM provides full support for JavaScript language as well. TypeORM support both es5 and es6 flavors of JavaScript.
In this chapter, let us learn how to write TypeORM application in JavaScript ES5 (ECMAScript 5).
Open a command prompt and go to your workspace.
cd /path/to/workspace/
Run below command to create a TypeORM project.
typeorm init --name typeorm-javascript-student-app --database mysql
Open package.json file to remove the typescipt references.
original
{
   "name": "typeorm-javascript-student-app", "version": "0.0.1",
   "description": "Awesome project developed with TypeORM.", "devDependencies": {
      "ts-node": "3.3.0", "@types/node": "^8.0.29", "typescript": "3.3.3333"
   },
   "dependencies": {
      "typeorm": "0.2.24", "reflect-metadata": "^0.1.10", "mysql": "^2.14.1"
   },
   "scripts": {
      "start": "ts-node src/index.ts" }
}
updated
{
   "name": "typeorm-javascript-student-app", "version": "0.0.1",
   "description": "Awesome project developed with TypeORM.", "dependencies": {
      "typeorm": "0.2.24",
      "mysql": "^2.14.1"
   },
   "scripts": {
   "start": "node src/index.js"
   }
}
Here,
- Removed the devDependencies section and typescript related package in dependences section.
- Changed the start script to point javascript code instead of typescript code.
Run below command to install necessary packages.
npm install
Remove tsconfig.json and index.ts file.
Remove User.ts file inside entity folder and then create student entity in json format, student.json as specified below −
{
   "name": "Student",
   "columns": {
      "id": {
         "primary": true,
         "type": "int",
         "generated": true
      },
      "name": {
         "type": "varchar"
      },
      "age": {
         "type": "integer"
      }
   }
}
Create a new file, src/index.js and put the below code −
var typeorm = require("typeorm"); var EntitySchema = typeorm.EntitySchema;

typeorm.createConnection({
   "type": "mysql",
   "host": "localhost",
   "port": 3306,
   "username": "root",
   "password": "123456",
   "database": "typeorm_test_db",
   "synchronize": true,
   "logging": false,
   entities: [ new EntitySchema(require("./entity/student.json"))
   ]
})
.then(function(connection) {
   return connection.getRepository("Student"); }) .then(function(studentRepository) {
   var student = {
      name: "Student1",
      age: 18
   };
   return studentRepository.save(student) .then(function(savedStudent) { console.log("Student has been successfully saved: ", savedStudent);
   return studentRepository.find(); })
   .then(function(students) { console.log("All students: ", students);
   return;
   })
   .catch(function(error) { console.log("Error: ", error); return;
   })
})
.catch(function(error) { console.log("Error: ", error)
   return; });
Here,
We have used the same typeORM methods except the below mentioned changes,
- Used EntitySchema to configure the student entity.
- Used JavaScript Promise concept (then / catch / finally) blocks.
Now, run the application using below command −
npm start
The application inserts the student information into the database and then fetch all student in the database and show it in the console as shown below −
> typeorm-javascript-student-app@0.0.1 start /path/to/workspace/typeorm-javascript-student-app

> node src/index.js

Student has been successfully saved: { name: 'Student1', age: 18, id: 1 } All students: [ { id: 1, name: 'Student1', age: 18 } ]
TypeORM - Working with MongoDB
This chapter explains the extensive MongoDB database support provided by TypeORM. Hopefully, we have installed mongodb using npm. If it is not installed, use the below command to install MongoDB driver,
npm install mongodb --save
Creating a project
Let’s create a new project using MongoDB as follows −
typeorm init --name MyProject --database mongodb
Configure ormconfig.json
Let’s configure MongoDB host, port and database options in ormconfig.json file as specified below −
ormconfig.json
{
   "type": "mongodb",
   "host": "localhost",
   "port": 27017,
   "database": "test",
   "synchronize": true,
   "logging": false,
   "entities": [
      "src/entity/**/*.ts"
   ],
   "migrations": [ "src/migration/**/*.ts"
   ],
   "subscribers": [ "src/subscriber/**/*.ts"
   ],
   "cli": {
      "entitiesDir": "src/entity", "migrationsDir": "src/migration", "subscribersDir": "src/subscriber"
   }
}
Define entities and columns
Let us create a new entity named Student inside your src directory. Entities and columns are same. To generate primary key column, we use @PrimaryColumn or
@PrimaryGeneratedColumn. This can be defined as @ObjectIdColumn. Simple example is shown below −
Student.ts
import {Entity, ObjectID, ObjectIdColumn, Column} from "typeorm";

@Entity()
export class Student {

   @ObjectIdColumn()
   id: ObjectID;

   @Column()
   Name: string;

   @Column()
   Country: string;
}
To save this entity, open index.ts file and add the following changes −
index.ts
import "reflect-metadata";
import {createConnection} from "typeorm";
import {Student} from "./entity/Student";

createConnection().then(async connection => {

   console.log("Inserting a new Student into the database..."); const std = new Student(); std.Name = "Student1";
   std.Country = "India";
   await connection.manager.save(std); console.log("Saved a new user with id: " + std.id);

   console.log("Loading users from the database...");
   const stds = await connection.manager.find(Student); console.log("Loaded users: ", stds);

   console.log("TypeORM with MongoDB");
}).catch(error => console.log(error));
Now, start your server and you will get the following response −
npm start

MongoDB EntityManager
We can also use EntityManager to fetch data. Simple example is shown below −
import {getManager} from "typeorm";

const manager = getManager();
const result = await manager.findOne(Student, { id:1 });
Similarly, we can also use repository to access data.
import {getMongoRepository} from "typeorm";

const studentRepository = getMongoRepository(Student);
const result = await studentRepository.findOne({ id:1 });
If you want to filter the data using equal option as follows −
import {getMongoRepository} from "typeorm";

const studentRepository = getMongoRepository(Student);
const result = await studentRepository.find({
   where: {
      Name: {$eq: "Student1"},
   }
});
As we seen in this chapter, TypeORM makes it easy to work with MongoDB database engine.
TypeORM with Express
Express is one of the popular JavaScript framework to create web application. Let us learn how to use TypeORM along with express framework in this chapter.
Creating a simple application
TypeORM CLI provides an easy option to create a complete working express web application (Restful API application) integrated with TypeORM. The CLI command to create the application is as follows −
cd /path/to/workspace typeorm init --express --name typeorm-express-sample --database mysql
Above command will create a new web application under typeorm-express-sample folder. The structure of the application is as follows −
│ .gitignore
│ ormconfig.json
│ package.json
│ README.md
│ tsconfig.json
│ └───src
      │ index.ts
      │ routes.ts
      │
      ├───controller
      │      UserController.ts
      │
      ├───entity
      │      User.ts
      │
      └───migration
Here,
As we know, ormconfig.json is the TypeORM configuration file. The code is as follows,
{
   "type": "mysql",
   "host": "localhost",
   "port": 3306,
   "username": "test",
   "password": "test",
   "database": "test",
   "synchronize": true,
   "logging": false,
   "entities": [
      "src/entity/**/*.ts"
   ],
   "migrations": [ "src/migration/**/*.ts"
   ],
   "subscribers": [ "src/subscriber/**/*.ts"
   ],
   "cli": {
      "entitiesDir": "src/entity", "migrationsDir": "src/migration", "subscribersDir": "src/subscriber"
   }
}
Here, change the database setting to match your local database setting.
package.json file is the main configuration of the application.
tsconfig.json file contains the configuration related to TypeScript.
entity folder contains the TypeORM models. A default User model will be created by CLI and it is as follows −
import {Entity, PrimaryGeneratedColumn, Column} from "typeorm";

@Entity()
export class User {

   @PrimaryGeneratedColumn()
   id: number;

   @Column()
   firstName: string;

   @Column()
   lastName: string;

   @Column()
   age: number;
}
controller folder contains the express controllers. CLI create a default user API controller with add / list / delete user details. The code is as follows −
import {getRepository} from "typeorm"; import {NextFunction, Request, Response} from "express"; import {User} from "../entity/User";

export class UserController {

   private userRepository = getRepository(User);

   async all(request: Request, response: Response, next: NextFunction) {
      return this.userRepository.find();
   }

   async one(request: Request, response: Response, next: NextFunction) {
      return this.userRepository.findOne(request.params.id);
   }

   async save(request: Request, response: Response, next: NextFunction) {
      return this.userRepository.save(request.body);
   }

   async remove(request: Request, response: Response, next: NextFunction) {
      let userToRemove = await this.userRepository.findOne(request.params.id);
      await this.userRepository.remove(userToRemove);
   }
}
Here,
all method is used to fetch all users from the database.
one method is used to fetch a single user from the database using user id
save method is used to save the user information into the database.
delete method is used to delete the user from the database using user id
routes.ts file maps the user controller methods to proper URL and the code is as follows −
import {UserController} from "./controller/UserController";

export const Routes = [{
      method: "get",
      route: "/users",
      controller: UserController, action: "all"
   }, {
      method: "get",
      route: "/users/:id", controller: UserController, action: "one"
   }, {
      method: "post",
      route: "/users",
      controller: UserController, action: "save"
   }, {
      method: "delete", route: "/users/:id", controller: UserController,
      action: "remove"
}];
Here,
/users url is mapped to user controller. Each verb post, get and delete are mapped to different methods.
Finally, index.ts is our main web application entry point. The source code is as follows −
import "reflect-metadata";
import {createConnection} from "typeorm";
import * as express from "express"; import * as bodyParser from "body-parser";
import {Request, Response} from "express";
import {Routes} from "./routes"; import {User} from "./entity/User";

createConnection().then(async connection => {

   // create express app const app = express(); app.use(bodyParser.json());

   // register express routes from defined application routes Routes.forEach(route => {
      (app as any)[route.method](route.route, (req:   Request, res: Response, next: Function) => {
         const result = (new (route.controller as any))[route.action](req, res, next);
         if (result instanceof Promise) {
            result.then(result => result !== null && result !== undefined ? res.send(result) : undefined);
         } else if (result !== null && result !== undefined) {
            .json(result);
         }
      });
   });

   // setup express app here
   // ...

   // start express server app.listen(3000);

   // insert new users for test await connection.manager.save(connection.manager.create(User, {
      firstName: "Timber",
      lastName: "Saw",
      age: 27
   }));
   await connection.manager.save(connection.manager.create(User, {
      firstName: "Phantom",
      lastName: "Assassin",
      age: 24
   }));

   console.log("Express server has started on port 3000. Open http://localhost:3000/users to see results");
}).catch(error => console.log(error));
Here, the application configures the routes, insert two users and then start the web application at port 3000. We can access the application at http://localhost:3000
To run the application, follow below steps −
Let us install the necessary packages using below command −
npm install
Output
npm notice created a lockfile as package-lock.json. You should commit this file.
npm WARN typeorm-express-sample@0.0.1 No repository field.
npm WARN typeorm-express-sample@0.0.1 No license field.

added 176 packages from 472 contributors and audited 351 packages in 11.965s

3 packages are looking for funding  run `npm fund` for details

found 0 vulnerabilities
Run the below command to start the application.
npm start
Output
> typeorm-express-sample@0.0.1 start /path/to/workspace/typeorm-express-sample
> ts-node src/index.ts

Express server has started on port 3000. Open http://localhost:3000/users to see results
Let us access our web application API using curl command as below −
curl http://localhost:3000/users
Here,
curl is a command line application to access web application from command prompt. It supports all the HTTP verbs such as get, post, delete, etc.,
Output
[{"id":1,"firstName":"Timber","lastName":"Saw","age":27},{"id":2,"firstName":"Phantom","lastName":"Assassin","age":24}]
To fetch the first record, we can use below command −
curl http://localhost:3000/users/1
Output
{"id":1,"firstName":"Timber","lastName":"Saw","age":27}
To delete a user record, we can use below command −
curl -X DELETE http://localhost:3000/users/1
As we seen in this chapter, TypeORM can be easily integrated into express application.
TypeORM - Migrations
Migrations are like version control for your database. It is used to modify and share application’s database schema. This section explains about how migrations works in TypeORM.
Creating new migration
To create a new migration, first we need to setup connection in ormconfig.json. It is defined below −
ormconfig.json
"type": "mysql",
"host": "localhost",
"port": 8889,
"username": "root",
"password": "root",
"database": "Library",
"entities": ["entity/*.js"], "migrationsTableName": "student_migration_table", "migrations": ["migration/*.js"], "cli": {
   "migrationsDir": "migration"
}
Here,
- migrationsTableName − it refers the migration table name.
- migrations − TypeORM loads migrations from given directory.
- cli − indicates migration will create inside the specific directory.
Create Book entity
Let’s create an entity named Book entity inside src/entity/Book.ts as follows −
import { Entity, Column, PrimaryGeneratedColumn } from 'typeorm';
@Entity()
export class Book {

   @PrimaryGeneratedColumn()
   id: number;

   @Column()
   title: string;

   @Column()
   text: string;
}
Execute CLI to create new migration
Now, we can execute new migration using CLI as follows −
Syntax
typeorm migration:create -n <migration-name>
Example
typeorm migration:create -n myMigration
After executing the above command, you could see the below response −
Migration /path/to/project/src/migration/1587101104904-myMigration.ts has been generated successfully.
Now, move inside src/migration/1587101104904-myMigration.ts file looks similar to this.
import {MigrationInterface, QueryRunner} from "typeorm";

export class myMigration1587101104904 implements MigrationInterface {

   public async up(queryRunner: QueryRunner): Promise<any> {
   }

   public async down(queryRunner: QueryRunner): Promise<any> {
   }
}
Here,
We have two methods up and down. up method is used to add changes to the migration and down method is used to revert changes in your migration.
Let us add up method inside myMigration.ts file as specified below −
import {MigrationInterface, QueryRunner} from "typeorm";

export class Book1587131893261 implements MigrationInterface {

   public async up(queryRunner: QueryRunner): Promise<any> {
      await queryRunner.query(`ALTER TABLE book ADD COLUMN price int`);
   }
   public async down(queryRunner: QueryRunner): Promise<any> { }
}
Here,
We have added a new column price inside book table. Now, execute the CLI to add the above changes.
ts-node ./node_modules/typeorm/cli.js migration:run
The above command executes migrations and run them in a sequence. Now, you could see the below changes in your screen −
Output

Now open your mysql server, new column is added. It is shown below −

Similarly, We can modify column title datatype to varchar(30) as follows,
import {MigrationInterface, QueryRunner} from "typeorm";

export class Book1587131893261 implements MigrationInterface {

   public async up(queryRunner: QueryRunner): Promise<any> {
   await queryRunner.query(`ALTER TABLE book MODIFY COLUMN title varchar(30)`);
      }
   public async down(queryRunner: QueryRunner): Promise<any> {
   }
}
Now, execute the same command and you could the below changes −
ts-node ./node_modules/typeorm/cli.js migration:run
Output

Book table is modified as,
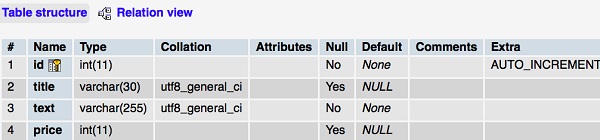
Revert migration
Let’s add the below code inside down method to revert migration −
import {MigrationInterface, QueryRunner} from "typeorm";

export class Book1587131893261 implements MigrationInterface {

   public async up(queryRunner: QueryRunner): Promise<any> {

   }
   public async down(queryRunner: QueryRunner): Promise<any> {

      await queryRunner.query(`ALTER TABLE book drop column price`); // reverts things made in "up" method
   }
}
Now, execute the below command to revert all the changes −
ts-node ./node_modules/typeorm/cli.js migration:revert
You could see the following response −
Output

Book table is modified as,
Output

As we seen in this chapter, TypeORM makes it easy to write database migration script.
TypeORM - Working with CLI
This section explains about TypeORM CLI commands in detail.
Create TypeORM project
typeorm init is the easiest and fastest way to setup a TypeORM project. You can create a new project as,
typeorm init --name Demoproject --database mysql
After executing the command, you will get the following output on your screen −
Project created inside /Users/workspace/TypeORM/Demoproject directory.
Create an entity
To create a new entity using CLI as,
typeorm entity:create -n Person
Now, Person entity is created inside your project src directory.
Entity /Users/workspace/TypeORM/Demoproject/src/entity/Person.ts has been created successfully.
If you have a multi-module project structure with multiple entities in different directories, you can use the below command,
typeorm entity:create -n Person -d src/Person/entity
Create a new subscriber
To create a new subscriber using CLI as follows −
typeorm subscriber:create -n PersonSubscriber
You could see the following response −
Subscriber /path/to/TypeORM/Demoproject/src/subscriber/PersonSubscriber.ts has been created successfully.
Create migrations
You can create a new migration using CLI as mentioned below −
typeorm migration:create -n PersonMigration
The above command created a migration directory inside your project src. Migration files are stored inside it.
Migration /path/to/TypeORM/Demoproject/src/migration/1587395030750-PersonMigration.ts has been generated successfully.
Database schema
To synchronize a database schema, use the below command −
typeorm schema:sync
To completely drop a database schema, use the below command −
typeorm schema:drop
Sql queries
If you want to execute any sql queries, we can execute directly from here. For example, to display all the records of customers, use the below query −
typeorm query "select * from customers"
If you want to clear everything stored in the cache. You can do it using the following command −
typeorm cache:clear
Conclusion
TypeORM is an excellent open source ORM framework to create high quality and scalable applications from small scale applications to large scale enterprise applications with multiple databases.