- TurboGears Tutorial
- TurboGears - Home
- TurboGears - Overview
- TurboGears - Environment
- TurboGears - First Program
- TurboGears - Dependencies
- TurboGears - Serving Templates
- TurboGears - HTTP Methods
- Genshi Template Language
- TurboGears - Includes
- TurboGears - JSON Rendering
- TurboGears - URL Hierarchy
- TurboGears - Toscawidgets Forms
- TurboGears - Validation
- TurboGears - Flash Messages
- TurboGears - Cookies and Sessions
- TurboGears - Caching
- TurboGears - Sqlalchemy
- TurboGears - Creating Models
- TurboGears - Crud Operations
- TurboGears - DataGrid
- TurboGears - Pagination
- TurboGears - Admin Access
- Authorization & Authentication
- TurboGears - Using MongoDB
- TurboGears - Scaffolding
- TurboGears - Hooks
- TurboGears - Writing Extensions
- TurboGears - Pluggable Applications
- TurboGears - Restful Applications
- TurboGears - Deployment
- TurboGears Useful Resources
- TurboGears - Quick Guide
- TurboGears - Useful Resources
- TurboGears - Discussion
TurboGears – ToscaWidgets Forms
One of the most essential aspect of any web application is to present the user interface for a user. HTML provides a <form> tag which is used to design an interface. Form’s elements such as text input, radio, select etc. can be appropriately used. Data entered by the user is submitted in the form of Http request message to server side script by either GET or POST method.
Server side script has to recreate the form elements from http request data. So in this effect, the form elements have to be defined twice – once in HTML and again in server side script.
Another disadvantage of using HTML form is that it is difficult (if not impossible) to render the form elements dynamically. HTML itself provides no way to validate user’s input.
ToscaWidgets2
TurboGears relies on ToscaWidgets2, a flexible form rendering and validation library. Using ToscaWidgets, we can define the form fields in our Python script and render them using a HTML template. It is also possible to apply validation to tw2 field.
ToscaWidgets library is a collection of many modules. Some important modules are listed below −
tw2.core − It provides core functionality. Widgets in this module are not meant to be available for end-user.
tw2.forms − This is a basic forms library. It contains widgets for fields, fieldsets and forms.
tw2.dynforms − This contains dynamic forms functionality.
tw2.sqla − This is an interface for SQLAlchemy database.
tw2.forms
It contains a Form class, which acts as a base for custom forms. There is a TableForm class that is useful in rendering fields in a two column table. ListForm presents its fields in an unordered list.
| Sr.No. | Fields & Description |
|---|---|
| 1 | TextField A single line text input field |
| 2 | TextArea Multi-line text input field |
| 3 | CheckBox Presents a checkable rectangular box with label |
| 4 | CheckBoxList Multi-selectable group pf check boxes |
| 5 | RadioButton A toggle button to select/deselect |
| 6 | RadioButtonList Group of mutually exclusive Radio buttons |
| 7 | PasswordField Similar to Textfield but input keys are not revealed |
| 8 | CalendarDatePicker Lets the user to choose a date |
| 9 | SubmitButton Button to submit a form |
| 10 | ImageButton Clickable button with an image on top |
| 11 | SingleSelectField Enables selection of single item from a list |
| 12 | MultipleSelectField Enables selection of multiple items from the list |
| 13 | FileField Field for uploading file |
| 14 | EmailField An email input field |
| 15 | URLField An input field to enter URL |
| 16 | NumberField A number spinbox |
| 17 | RangeField A number slider |
In the following example, a form using some of these widgets is constructed. While most of these widgets are defined in tw2.forms, CalendarDateField is defined in tw2.Dynforms module. Hence both these modules along with tw2.core are imported in the beginning −
import tw2.core as twc
import tw2.forms as twf
import tw2.dynforms as twd
A ToscaWidgets form is a class derived from tw2.forms.form base class. The required widgets are placed inside a Layout object. In this example, TableLayout is used. The Widgets are rendered in a two column table. First column shows the caption and second column shows the input or selection field.
A TextField object is created using the following constructor −
twf.TextField(size, value = None)
If not mentioned TextField object takes a default size and is initially blank. While declaring TextArea object, the number of rows and columns may be mentioned.
twf.TextArea("",rows = 5, cols = 30)
The NumberField object is a TextField which can accept only digits. Up and down arrows are generated on the right border to increase or decrease the number inside it. Initial value can also be specified as an argument in the constructor.
twf.NumberField(value)
Just to the right of a CalendarDatePicker box, a calendar button is displayed. When pressed a date selector pops up. The user can manually type a date in the box or select from the date selector.
twd.CalendarDatePicker()
EmailField object presents a TextField, but the text in it must be in email format.
EmailID = twf.EmailField()
The following form also has a RadioButtonList. The constructor of this class contains a List object as a value of options parameter. A Radio Button for each option will be rendered. Default selection is specified with the value parameter.
twf.RadioButtonList(options = ["option1","option2"],value = option1)
The CheckBoxList renders check boxes for each option in the list.
twf.CheckBoxList(options = [option1, option2, option3])
The dropdown list is called as a SingleSelectfield in this ToscaWidgets library. Items in a List object corresponding to options parameter form the drop down list. Visible caption is set as a value of prompt_text parameter.
twf.SingleSelectField(prompt_text = 'text', options=['item1', 'item2', 'item3'])
By default, the form displays a Submit button with its caption as ‘save’. In order to display another caption, create a SubmitButton object and specify it as value parameter.
twf.SubmitButton(value = 'Submit')
The form is submitted to a URL, which is specified as a value of action parameter of the form. By default, the form data is submitted by http POST method.
action = 'URL'
In following code, a form named as AdmissionForm is designed using the above explained widgets. Add this code in root.py before RootController class.
class AdmissionForm(twf.Form):
   class child(twf.TableLayout):
      NameOfStudent = twf.TextField(size = 20)
      AddressForCorrespondance = twf.TextArea("", rows = 5, cols = 30)
      PINCODE = twf.NumberField(value = 431602)
      DateOfBirth = twd.CalendarDatePicker()
      EmailID = twf.EmailField()
      Gender = twf.RadioButtonList(options = ["Male","Female"],value = 'Male')
      Subjects = twf.CheckBoxList(options = ['TurboGears', 'Flask', 'Django', 'Pyramid'])

      MediumOfInstruction = twf.SingleSelectField(prompt_text = 'choose',
         options = ['English', 'Hindi', 'Marathi', 'Telugu'])

      action = '/save_form'
      submit = twf.SubmitButton(value ='Submit')
Now save this code below as twform.html in templates directory −
<!DOCTYPE html>
<html xmlns = "http://www.w3.org/1999/xhtml"
   xmlns:py = "http://genshi.edgewall.org/"
   lang = "en">

   <head>
      <title>TurboGears Form Example</title>
   </head>

   <body>
      <div id = "tw form">
         ${form.display(value = dict(title = 'default title'))}
      </div>
   </body>

</html>
In RootController class (in root.py), add the following controller function −
@expose('hello.templates.twform')
def twform(self, *args, **kw):
   return dict(page = 'twform', form = MovieForm)
In the AdmissionForm class, we have stipulated/save_form as action URL. Hence add save_form() function in RootController.
@expose()
def save_movie(self, **kw):
   return str(kw)
Ensure that the server is running (using gearbox serve). Enter http://localhost:8080/twform in the browser.
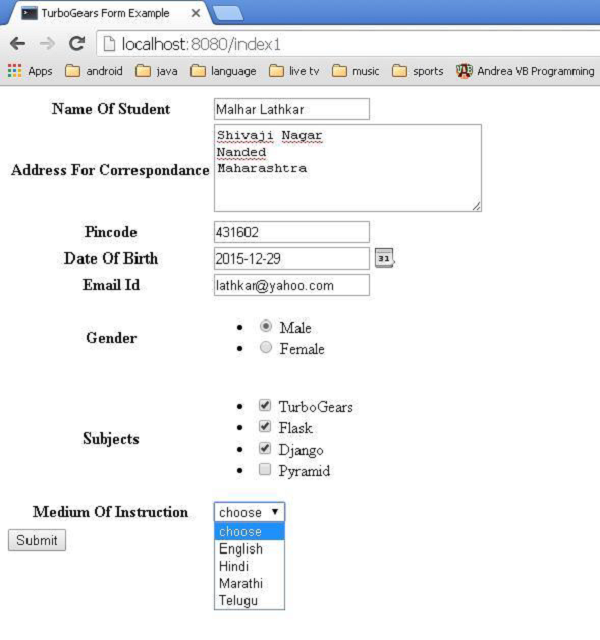
Pressing the submit button will post this data to save_form() URL, which will display the form data in the form of a dictionary object.
{
   'EmailID': u'lathkar@yahoo.com',
   'NameOfStudent': u'Malhar Lathkar',
   'Gender': u'Male',
   'PINCODE': u'431602',
   'DateOfBirth': u'2015-12-29',
   'Subjects': [u'TurboGears', u'Flask', u'Django'],
   'MediumOfInstruction': u'',
   'AddressForCorrespondance': u'Shivaji Nagar\r\nNanded\r\nMaharashtra'
}