- TestNG Tutorial
- TestNG - Home
- TestNG - Overview
- TestNG - Environment
- TestNG - Writing Tests
- TestNG - Basic Annotations
- TestNG - Execution Procedure
- TestNG - Executing Tests
- TestNG - Suite Test
- TestNG - Ignore a Test
- TestNG - Group Test
- TestNG - Exception Test
- TestNG - Dependency Test
- TestNG - Parameterized Test
- TestNG - Run JUnit Tests
- TestNG - Test Results
- TestNG - Annotation Transformers
- TestNG - Asserts
- TestNG - Parallel Execution
- TestNG - Plug with ANT
- TestNG - Plug with Eclipse
- TestNG - TestNG - vs JUnit
- TestNG Useful Resources
- TestNG - Quick Guide
- TestNG - Useful Resources
- TestNG - Discussion
TestNG - Quick Guide
TestNG - Overview
Testing is the process of checking the functionality of an application to ensure it works as per requirements. Unit testing comes into picture at the developer level where adequate measures are taken to test every single entity (class or method) to ensure the final product meets the requirements.
JUnit has driven developers to understand the usefulness of tests, especially of unit tests, when compared to any other testing framework. Leveraging a rather simple, pragmatic, and strict architecture, JUnit has been able to "infect" great number of developers. Do take a look at our tutorial on JUnit to have a good understanding of its features. JUnit, at the same time, has some shortcomings as well, which are listed below −
Initially designed to enable unit testing only, now used for all kinds of testing.
Cannot do dependency testing.
Poor configuration control (setUp/tearDown).
Intrusive (forces you to extend classes and name your methods a certain way).
Static programming model (forces you to recompile unnecessarily).
The management of different suites of tests in complex projects can be very tricky.
What is TestNG?
Definition of TestNG as per its documentation is as follows −
TestNG is a testing framework inspired from JUnit and NUnit, but introducing some new functionalities that make it more powerful and easier to use.
TestNG is an open source automated testing framework; where NG means NextGeneration. TestNG is similar to JUnit (especially JUnit 4), but it is not a JUnit extension. It is inspired by JUnit. It is designed to be better than JUnit, especially when testing integrated classes. The creator of TestNG is Cedric Beust.
Eliminating most of the limitations of the older framework, TestNG gives the developer the ability to write more flexible and powerful tests. As it heavily borrows from Java Annotations (introduced with JDK 5.0) to define tests, it can also show you how to use this new feature of the Java language in a real production environment.
TestNG Features
Supports annotations.
TestNG uses more Java and OO features.
Supports testing integrated classes (e.g., by default, no need to create a new test class instance for every test method).
Separates compile-time test code from run-time configuration/data info.
Flexible runtime configuration.
Introduces ‘test groups’. Once you have compiled your tests, you can just ask TestNG to run all the "front-end" tests, or "fast", "slow", "database" tests, etc.
Supports Dependent test methods, parallel testing, load testing, and partial failure.
Flexible plug-in API.
Support for multi threaded testing.
TestNG - Environment
TestNG is a framework for Java, so the very first requirement is to have JDK installed in your machine.
System Requirement
| JDK | 1.5 or above. |
| Memory | No minimum requirement. |
| Disk Space | No minimum requirement. |
| Operating System | No minimum requirement. |
Step 1 - Verify Java Installation in Your Machine
Open the console and execute a java command based on the operating system you have installed on your system.
| OS | Task | Command |
|---|---|---|
| Windows | Open Command Console | c:\> java -version |
| Linux | Open Command Terminal | $ java -version |
| Mac | Open Terminal | machine:~ joseph$ java -version |
Let's verify the output for all the operating systems −
| OS | Output |
|---|---|
| Windows | java version "1.7.0_25" Java(TM) SE Runtime Environment (build 1.7.0_25-b15) Java HotSpot(TM) 64-Bit Server VM (build 23.25-b01, mixed mode) |
| Linux | java version "1.7.0_25" Java(TM) SE Runtime Environment (build 1.7.0_25-b15) Java HotSpot(TM) 64-Bit Server VM (build 23.25-b01, mixed mode) |
| Mac | java version "1.7.0_25" Java(TM) SE Runtime Environment (build 1.7.0_25-b15) Java HotSpot(TM) 64-Bit Server VM (build 23.25-b01, mixed mode) |
If you do not have Java, install the Java Software Development Kit (SDK) from https://www.oracle.com/technetwork/java/javase/downloads/index.html. We are assuming Java 1.7.0_25 as the installed version for this tutorial.
Step 2: Set JAVA Environment
Set the JAVA_HOME environment variable to point to the base directory location, where Java is installed on your machine. For example,
| OS | Output |
|---|---|
| Windows | Set the environment variable JAVA_HOME to C:\Program Files\Java\jdk1.7.0_25. |
| Linux | Export JAVA_HOME=/usr/local/java-current. |
| Mac | Export JAVA_HOME=/Library/Java/Home. |
Append Java compiler location to System Path.
| OS | Output |
|---|---|
| Windows | Append the string C:\Program Files\Java\jdk1.7.0_25\bin at the end of the system variable, Path. |
| Linux | Export PATH=$PATH:$JAVA_HOME/bin/ |
| Mac | Not required |
Verify Java Installation using the command java -version as explained above.
Step 3: Download TestNG Archive
Download the latest version of TestNG jar file from http://www.testng.org. At the time of writing this tutorial, we have downloaded testng-6.8.jar and copied it onto C:\> TestNG folder.
| OS | Archive name |
|---|---|
| Windows | testng-6.8.jar |
| Linux | testng-6.8.jar |
| Mac | testng-6.8.jar |
Step 4: Set TestNG Environment
Set the TESTNG_HOME environment variable to point to the base directory location, where TestNG jar is stored on your machine. The following table shows how to set the environment variable in Windows, Linux, and Mac, assuming that we've stored testng-6.8.jar at the location C:\>TestNG.
| OS | Description |
|---|---|
| Windows | Set the environment variable TESTNG_HOME to C:\TESTNG. |
| Linux | Export TESTNG_HOME=/usr/local/TESTNG |
| Mac | Export TESTNG_HOME=/Library/TESTNG |
Step 5: Set CLASSPATH Variable
Set the CLASSPATH environment variable to point to the TestNG jar location.
| OS | Description |
|---|---|
| Windows | Set the environment variable CLASSPATH to %CLASSPATH%;%TESTNG_HOME%\testng-6.8.jar. |
| Linux | Export CLASSPATH=$CLASSPATH:$TESTNG_HOME/testng-6.8.jar. |
| Mac | Export CLASSPATH=$CLASSPATH:$TESTNG_HOME/testng-6.8.jar. |
Step 6: Test TestNG Setup
Create a java class file named TestNGSimpleTest at C:\>TestNG_WORKSPACE.
import org.testng.annotations.Test;
import static org.testng.Assert.assertEquals;

public class TestNGSimpleTest {
   @Test
   public void testAdd() {
      String str = "TestNG is working fine";
      AssertEquals("TestNG is working fine", str);
   }
}
TestNG can be invoked in several different ways −
- With a testng.xml file.
- With ANT.
- From the command line.
Let us invoke using the testng.xml file. Create an xml file with the name testng.xml in C:\>TestNG_WORKSPACE to execute Test case(s).
<?xml version = "1.0" encoding = "UTF-8"?>
<!DOCTYPE suite SYSTEM "http://testng.org/testng-1.0.dtd" >

<suite name = "Suite1">
   <test name = "test1">
      <classes>
         <class name = "TestNGSimpleTest"/>
      </classes>
   </test>
</suite>
Step 7: Verify the Result
Compile the class using javac compiler as follows −
C:\TestNG_WORKSPACE>javac TestNGSimpleTest.java
Now, invoke the testng.xml to see the result −
C:\TestNG_WORKSPACE>java -cp "C:\TestNG_WORKSPACE" org.testng.TestNG testng.xml
Verify the output.
===============================================
Suite1
Total tests run: 1, Failures: 0, Skips: 0
===============================================
TestNG - Writing Tests
Writing a test in TestNG basically involves the following steps −
Write the business logic of your test and insert TestNG annotations in your code.
Add the information about your test (e.g. the class name, the groups you wish to run, etc.) in a testng.xml file or in build.xml.
Run TestNG.
Here, we will see one complete example of TestNG testing using POJO class, Business logic class and a test xml, which will be run by TestNG.
Create EmployeeDetails.java in C:\>TestNG_WORKSPACE, which is a POJO class.
public class EmployeeDetails {

   private String name;
   private double monthlySalary;
   private int age;

   // @return the name

   public String getName() {
      return name;
   }

   // @param name the name to set

   public void setName(String name) {
      this.name = name;
   }

   // @return the monthlySalary

   public double getMonthlySalary() {
      return monthlySalary;
   }

   // @param monthlySalary the monthlySalary to set

   public void setMonthlySalary(double monthlySalary) {
      this.monthlySalary = monthlySalary;
   }

   // @return the age

   public int getAge() {
      return age;
   }

   // @param age the age to set

   public void setAge(int age) {
      this.age = age;
   }
}
EmployeeDetails class is used to −
- get/set the value of employee's name.
- get/set the value of employee's monthly salary.
- get/set the value of employee's age.
Create an EmpBusinessLogic.java in C:\>TestNG_WORKSPACE, which contains business logic.
public class EmpBusinessLogic {

   // Calculate the yearly salary of employee
   public double calculateYearlySalary(EmployeeDetails employeeDetails) {
      double yearlySalary = 0;
      yearlySalary = employeeDetails.getMonthlySalary() * 12;
      return yearlySalary;
   }

   // Calculate the appraisal amount of employee
   public double calculateAppraisal(EmployeeDetails employeeDetails) {

      double appraisal = 0;

      if(employeeDetails.getMonthlySalary() < 10000) {
         appraisal = 500;

      } else {
         appraisal = 1000;
      }

      return appraisal;
   }
}
EmpBusinessLogic class is used for calculating −
- the yearly salary of employee.
- the appraisal amount of employee.
Now, let's create a TestNG class called TestEmployeeDetails.java in C:\>TestNG_WORKSPACE. A TestNG class is a Java class that contains at least one TestNG annotation. This class contains test cases to be tested. A TestNG test can be configured by @BeforeXXX and @AfterXXX annotations (we will see this in the chapter TestNG - Execution Procedure), which allows to perform some Java logic before and after a certain point.
import org.testng.Assert;
import org.testng.annotations.Test;

public class TestEmployeeDetails {
   EmpBusinessLogic empBusinessLogic = new EmpBusinessLogic();
   EmployeeDetails employee = new EmployeeDetails();

   @Test
   public void testCalculateAppriasal() {

      employee.setName("Rajeev");
      employee.setAge(25);
      employee.setMonthlySalary(8000);

      double appraisal = empBusinessLogic.calculateAppraisal(employee);
      Assert.assertEquals(500, appraisal, 0.0, "500");
   }

   // Test to check yearly salary
   @Test
   public void testCalculateYearlySalary() {

      employee.setName("Rajeev");
      employee.setAge(25);
      employee.setMonthlySalary(8000);

      double salary = empBusinessLogic.calculateYearlySalary(employee);
      Assert.assertEquals(96000, salary, 0.0, "8000");
   }
}
TestEmployeeDetails class is used for testing the methods of EmpBusinessLogic class. It does the following −
Tests the yearly salary of the employee.
Tests the appraisal amount of the employee.
Before you can run the tests, you must configure TestNG using a special XML file, conventionally named testng.xml. The syntax for this file is very simple, and its contents are as shown below. Create this file in C:\>TestNG_WORKSPACE.
<?xml version = "1.0" encoding = "UTF-8"?>
<!DOCTYPE suite SYSTEM "http://testng.org/testng-1.0.dtd" >

<suite name = "Suite1">
   <test name = "test1">
      <classes>
         <class name = "TestEmployeeDetails"/>
      </classes>
   </test>
</suite>
Details of the above file are as follows −
A suite is represented by one XML file. It can contain one or more tests and is defined by the <suite> tag.
Tag <test> represents one test and can contain one or more TestNG classes.
<class> tag represents a TestNG class. It is a Java class that contains at least one TestNG annotation. It can contain one or more test methods.
Compile the Test case classes using javac.
C:\TestNG_WORKSPACE>javac EmployeeDetails.java EmpBusinessLogic.java TestEmployeeDetails.java
Now TestNG with the following command −
C:\TestNG_WORKSPACE>java -cp "C:\TestNG_WORKSPACE" org.testng.TestNG testng.xml
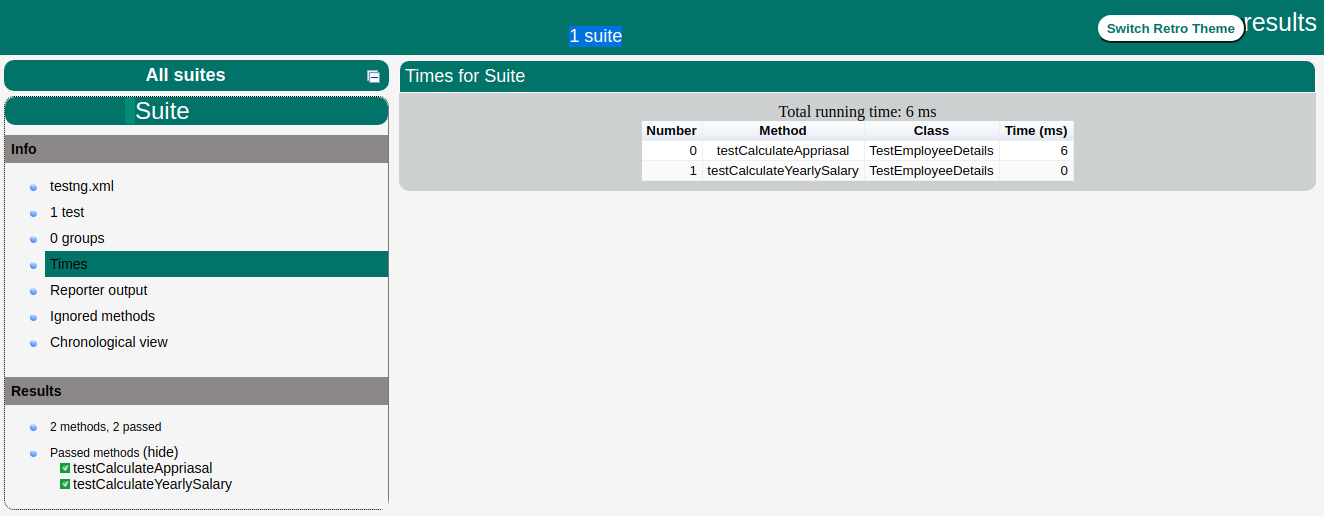
If all has been done correctly, you should see the results of your tests in the console. Furthermore, TestNG creates a very nice HTML report in a folder called test-output that is automatically created in the current directory. If you open it and load index.html, you will see a page similar to the one in the image below −
TestNG - Basic Annotations
The traditional way to indicate test methods in JUnit 3 is by prefixing their names with test. This is a very effective method for tagging certain methods in a class as having a special meaning, but the naming doesn’t scale very well (what if we want to add more tags for different frameworks?) and is rather inflexible (what if we want to pass additional parameters to the testing framework?).
Annotations were formally added to the Java language in JDK 5, and TestNG made the choice to use annotations to annotate test classes.
Here is the list of annotations that TestNG supports −
| Sr.No. | Annotation & Description |
|---|---|
| 1 | @BeforeSuite The annotated method will be run only once before all tests in this suite have run. |
| 2 | @AfterSuite The annotated method will be run only once after all tests in this suite have run. |
| 3 | @BeforeClass The annotated method will be run only once before the first test method in the current class is invoked. |
| 4 | @AfterClass The annotated method will be run only once after all the test methods in the current class have run. |
| 5 | @BeforeTest The annotated method will be run before any test method belonging to the classes inside the <test> tag is run. |
| 6 | @AfterTest The annotated method will be run after all the test methods belonging to the classes inside the <test> tag have run. |
| 7 | @BeforeGroups The list of groups that this configuration method will run before. This method is guaranteed to run shortly before the first test method that belongs to any of these groups is invoked. |
| 8 | @AfterGroups The list of groups that this configuration method will run after. This method is guaranteed to run shortly after the last test method that belongs to any of these groups is invoked. |
| 9 | @BeforeMethod The annotated method will be run before each test method. |
| 10 | @AfterMethod The annotated method will be run after each test method. |
| 11 | @DataProvider Marks a method as supplying data for a test method. The annotated method must return an Object[ ][ ], where each Object[ ] can be assigned the parameter list of the test method. The @Test method that wants to receive data from this DataProvider needs to use a dataProvider name equals to the name of this annotation. |
| 12 | @Factory
Marks a method as a factory that returns objects that will be used by TestNG as Test classes. The method must return Object[ ]. |
| 13 | @Listeners Defines listeners on a test class. |
| 14 | @Parameters Describes how to pass parameters to a @Test method. |
| 15 | @Test Marks a class or a method as a part of the test. |
Benefits of Using Annotations
Following are some of the benefits of using annotations −
TestNG identifies the methods it is interested in, by looking up annotations. Hence, method names are not restricted to any pattern or format.
We can pass additional parameters to annotations.
Annotations are strongly typed, so the compiler will flag any mistakes right away.
Test classes no longer need to extend anything (such as TestCase, for JUnit 3).
TestNG - Excecution Procedure
This chapter explains the execution procedure of methods in TestNG. It explains the order of the methods called. Here is the execution procedure of the TestNG test API methods with an example.
Create a java class file name TestngAnnotation.java in C:\>TestNG_WORKSPACE to test annotations.
import org.testng.annotations.Test;
import org.testng.annotations.BeforeMethod;
import org.testng.annotations.AfterMethod;
import org.testng.annotations.BeforeClass;
import org.testng.annotations.AfterClass;
import org.testng.annotations.BeforeTest;
import org.testng.annotations.AfterTest;
import org.testng.annotations.BeforeSuite;
import org.testng.annotations.AfterSuite;

public class TestngAnnotation {
   // test case 1
   @Test
   public void testCase1() {
      System.out.println("in test case 1");
   }

   // test case 2
   @Test
   public void testCase2() {
      System.out.println("in test case 2");
   }

   @BeforeMethod
   public void beforeMethod() {
      System.out.println("in beforeMethod");
   }

   @AfterMethod
   public void afterMethod() {
      System.out.println("in afterMethod");
   }

   @BeforeClass
   public void beforeClass() {
      System.out.println("in beforeClass");
   }

   @AfterClass
   public void afterClass() {
      System.out.println("in afterClass");
   }

   @BeforeTest
   public void beforeTest() {
      System.out.println("in beforeTest");
   }

   @AfterTest
   public void afterTest() {
      System.out.println("in afterTest");
   }

   @BeforeSuite
   public void beforeSuite() {
      System.out.println("in beforeSuite");
   }

   @AfterSuite
   public void afterSuite() {
      System.out.println("in afterSuite");
   }

}
Next, let's create the file testng.xml in C:\>TestNG_WORKSPACE to execute annotations.
<?xml version = "1.0" encoding = "UTF-8"?>
<!DOCTYPE suite SYSTEM "http://testng.org/testng-1.0.dtd" >

<suite name = "Suite1">
   <test name = "test1">
      <classes>
         <class name = "TestngAnnotation"/>
      </classes>
   </test>
</suite>
Compile the Test case class using javac.
C:\TestNG_WORKSPACE>javac TestngAnnotation.java
Now, run the testng.xml, which will run the test case defined in the provided Test Case class.
C:\TestNG_WORKSPACE>java org.testng.TestNG testng.xml
Verify the output.
in beforeSuite
in beforeTest
in beforeClass
in beforeMethod
in test case 1
in afterMethod
in beforeMethod
in test case 2
in afterMethod
in afterClass
in afterTest
in afterSuite

===============================================
Suite
Total tests run: 2, Failures: 0, Skips: 0
===============================================
Based on the above output, the execution procedure is as follows −
First of all, beforeSuite() method is executed only once.
Lastly, the afterSuite() method executes only once.
Even the methods beforeTest(), beforeClass(), afterClass(), and afterTest() methods are executed only once.
beforeMethod() method executes for each test case but before executing the test case.
afterMethod() method executes for each test case but after executing the test case.
In between beforeMethod() and afterMethod(), each test case executes.
TestNG - Executing Tests
The test cases are executed using TestNG class. This class is the main entry point for running tests in the TestNG framework. Users can create their own TestNG object and invoke it in many different ways such as −
On an existing testng.xml.
On a synthetic testng.xml, created entirely from Java.
By directly setting the test classes.
You can also define which groups to include or exclude, assign parameters, etc. The command line parameters are −
-d outputdir: specify the output directory.
-testclass class_name: specifies one or several class names.
-testjar jar_name: specifies the jar containing the tests.
-sourcedir src1;src2: ; separated list of source directories (used only when javadoc annotations are used).
-target
-groups
-testrunfactory
-listener
We will create the TestNG object an existing testng.xml in our example below.
Create a Class
Create a java class to be tested, say, MessageUtil.java in C:\>TestNG_WORKSPACE.
/*
* This class prints the given message on console.
*/

public class MessageUtil {

   private String message;

   //Constructor
   //@param message to be printed
   public MessageUtil(String message) {
      this.message = message;
   }

   // prints the message
   public String printMessage() {
      System.out.println(message);
      return message;
   }
}
Create Test Case Class
Create a java test class, say, SampleTest.java.
Add a test method testPrintMessage() to your test class.
Add an Annotation @Test to method testPrintMessage().
Implement the test condition and check the condition using assertEquals API of TestNG.
Create a java class file called SampleTest.java in C:\>TestNG_WORKSPACE.
import org.testng.Assert;
import org.testng.annotations.Test;

public class SampleTest {

   String message = "Hello World";
   MessageUtil messageUtil = new MessageUtil(message);

   @Test
   public void testPrintMessage() {
      Assert.assertEquals(message, messageUtil.printMessage());
   }
}
Create testng.xml
Next, let's create testng.xml file in C:\>TestNG_WORKSPACE, to execute test case(s). This file captures your entire testing in XML. This file makes it easy to describe all your test suites and their parameters in one file, which you can check in your code repository or e-mail to coworkers. It also makes it easy to extract subsets of your tests or split several runtime configurations (e.g., testngdatabase.xml would run only tests that exercise your database).
<?xml version = "1.0" encoding = "UTF-8"?>

<suite name = "Sample test Suite">
   <test name = "Sample test">
      <classes>
         <class name = "SampleTest" />
      </classes>
   </test>
</suite>
Compile the test case using javac.
C:\TestNG_WORKSPACE>javac MessageUtil.java SampleTest.java
Now, run the testng.xml, which will run the test case defined in <test> tag.
C:\TestNG_WORKSPACE>java -cp "C:\TestNG_WORKSPACE" org.testng.TestNG testng.xml
Verify the output.
Hello World

===============================================
Sample test Suite
Total tests run: 1, Failures: 0, Skips: 0
===============================================
TestNG - Suite Test
A test suite is a collection of test cases intended to test a behavior or a set of behaviors of software program. In TestNG, we cannot define a suite in testing source code, but it is represented by one XML file, as suite is the feature of execution. It also allows flexible configuration of the tests to be run. A suite can contain one or more tests and is defined by the <suite> tag.
<suite> is the root tag of your testng.xml. It describes a test suite, which in turn is made of several <test> sections.
The following table lists all the legal attributes that <suite> accepts.
| Sr.No. | Attribute & Description |
|---|---|
| 1 | name The name of this suite. It is a mandatory attribute. |
| 2 | verbose The level or verbosity for this run. |
| 3 | parallel Whether TestNG should run different threads to run this suite. |
| 4 | thread-count The number of threads to use, if parallel mode is enabled (ignored other-wise). |
| 5 | annotations The type of annotations you are using in your tests. |
| 6 | time-out The default timeout that will be used on all the test methods found in this test. |
In this chapter, we will show you an example having two test classes, Test1 & Test2, to run together using Test Suite.
Create a Class
Create a java class to be tested, say, MessageUtil.java in C:\>JUNIT_WORKSPACE.
/*
* This class prints the given message on console.
*/

public class MessageUtil {
   private String message;

   // Constructor
   // @param message to be printed
   public MessageUtil(String message) {
      this.message = message;
   }

   // prints the message
   public String printMessage() {
      System.out.println(message);
      return message;
   }

   // add "Hi!" to the message
   public String salutationMessage() {
      message = "Hi!" + message;
      System.out.println(message);
      return message;
   }
}
Create Test Case Classes
Create a java class file named Test1.java in C:\>TestNG_WORKSPACE.
import org.testng.Assert;
import org.testng.annotations.Test;

public class Test1 {
   String message = "Manisha";
   MessageUtil messageUtil = new MessageUtil(message);

   @Test
   public void testPrintMessage() {
      System.out.println("Inside testPrintMessage()");
      Assert.assertEquals(message, messageUtil.printMessage());
   }
}
Create a java class file named Test2.java in C:\>TestNG_WORKSPACE.
import org.testng.Assert;
import org.testng.annotations.Test;

public class Test2 {
   String message = "Manisha";
   MessageUtil messageUtil = new MessageUtil(message);

   @Test
   public void testSalutationMessage() {
      System.out.println("Inside testSalutationMessage()");
      message = "Hi!" + "Manisha";
      Assert.assertEquals(message,messageUtil.salutationMessage());
   }
}
Now, let's write the testng.xml in C:\>TestNG_WORKSPACE, which would contain the <suite> tag as follows −
<?xml version = "1.0" encoding = "UTF-8"?>
<!DOCTYPE suite SYSTEM "http://testng.org/testng-1.0.dtd" >

<suite name = "Suite1">

   <test name = "exampletest1">
      <classes>
         <class name = "Test1" />
      </classes>
   </test>

   <test name = "exampletest2">
      <classes>
         <class name = "Test2" />
      </classes>
   </test>

</suite>
Suite1 includes exampletest1 and exampletest2.
Compile all java classes using javac.
C:\TestNG_WORKSPACE>javac MessageUtil.java Test1.java Test2.java
Now, run the testng.xml, which will run the test case defined in the provided Test Case class.
C:\TestNG_WORKSPACE>java -cp "C:\TestNG_WORKSPACE" org.testng.TestNG testng.xml
Verify the output.
Inside testPrintMessage()
Manisha
Inside testSalutationMessage()
Hi!Manisha

===============================================
Suite1
Total tests run: 2, Failures: 0, Skips: 0
===============================================
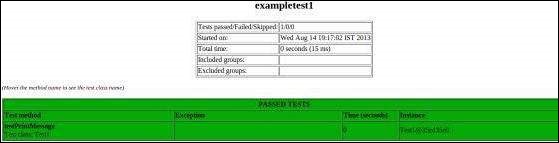
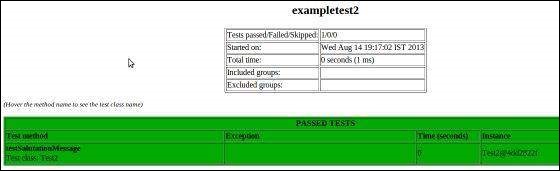
You can also check the test-output folder. Under the Suite1 folder, you can see two html files created, exampletest1.html and exampletest2.html, which would look as follows −
TestNG - Ignore a Test
Sometimes, it happens that our code is not ready and the test case written to test that method/code fails. In such cases, annotation @Test(enabled = false) helps to disable this test case.
If a test method is annotated with @Test(enabled = false), then the test case that is not ready to test is bypassed.
Now, let's see @Test(enabled = false) in action.
Create a Class
Create a java class to be tested, say, MessageUtil.java in C:\>TestNG_WORKSPACE.
/*
* This class prints the given message on console.
*/

public class MessageUtil {

   private String message;

   //Constructor
   //@param message to be printed
   public MessageUtil(String message) {
      this.message = message;
   }

   // prints the message
   public String printMessage() {
      System.out.println(message);
      return message;
   }

   // add "Hi!" to the message
   public String salutationMessage() {
      message = "Hi!" + message;
      System.out.println(message);
      return message;
   }
}
Create Test Case Class
Create a java test class, say, IgnoreTest.java.
Add test methods, testPrintMessage(), and, testSalutationMessage(), to your test class.
Add an Annotation @Test(enabled = false) to the method testPrintMessage().
Create a java class file named IgnoreTest.java in C:\>TestNG_WORKSPACE.
import org.testng.Assert;
import org.testng.annotations.Test;

public class IgnoreTest {
   String message = "Manisha";
   MessageUtil messageUtil = new MessageUtil(message);

   @Test(enabled = false)
   public void testPrintMessage() {
      System.out.println("Inside testPrintMessage()");
      message = "Manisha";
      Assert.assertEquals(message, messageUtil.printMessage());
   }

   @Test
   public void testSalutationMessage() {
      System.out.println("Inside testSalutationMessage()");
      message = "Hi!" + "Manisha";
      Assert.assertEquals(message, messageUtil.salutationMessage());
   }
}
Create testng.xml
Create testng.xml in C:\>TestNG_WORKSPACE to execute test case(s).
<?xml version = "1.0" encoding = "UTF-8"?>
<!DOCTYPE suite SYSTEM "http://testng.org/testng-1.0.dtd" >

<suite name = "Suite1">
   <test name = "test1">
      <classes>
         <class name = "IgnoreTest" />
      </classes>
   </test>
</suite>
Compile the MessageUtil and test case classes using javac.
C:\TestNG_WORKSPACE>javac MessageUtil.java IgnoreTest.java
Now, run the testng.xml, which will not run testPrintMessage() the test case defined in provided the Test Case class.
C:\TestNG_WORKSPACE>java -cp "C:\TestNG_WORKSPACE" org.testng.TestNG testng.xml
Verify the output. testPrintMessage() test case is not tested.
Inside testSalutationMessage()
Hi!Manisha

===============================================
Suite1
Total tests run: 1, Failures: 0, Skips: 0
===============================================
You can also ignore a group of tests, which will be discussed in the next chapter.
TestNG - Group Test
Group test is a new innovative feature in TestNG, which doesn’t exist in JUnit framework. It permits you to dispatch methods into proper portions and perform sophisticated groupings of test methods.
Not only can you declare those methods that belong to groups, but you can also specify groups that contain other groups. Then, TestNG can be invoked and asked to include a certain set of groups (or regular expressions), while excluding another set.
Group tests provide maximum flexibility in how you partition your tests, and doesn't require you to recompile anything if you want to run two different sets of tests back to back.
Groups are specified in your testng.xml file using the <groups> tag. It can be found either under the <test> or <suite> tag. Groups specified in the <suite> tag apply to all the <test> tags underneath.
Now, let's take an example to see how group test works.
Create a Class
Create a java class to be tested, say, MessageUtil.java in C:\> TestNG_WORKSPACE.
/*
* This class prints the given message on console.
*/
public class MessageUtil {
   private String message;

   // Constructor
   // @param message to be printed
   public MessageUtil(String message) {
      this.message = message;
   }

   // prints the message
   public String printMessage() {
      System.out.println(message);
      return message;
   }

   // add "tutorialspoint" to the message
   public String salutationMessage() {
      message = "tutorialspoint" + message;
      System.out.println(message);
      return message;
   }

   // add "www." to the message
   public String exitMessage() {
      message = "www." + message;
      System.out.println(message);
      return message;
   }
}
Create Test Case Class
Create a java test class, say, GroupTestExample.java.
Add test methods, testPrintMessage() and testSalutationMessage(), to your test class.
Group the test method in two categories −
Check-in tests (checkintest) − These tests should be run before you submit new code. They should typically be fast and just make sure no basic functionality is broken.
Functional tests (functest) − These tests should cover all the functionalities of your software and be run at least once a day, although ideally you would want to run them continuously.
Create the java class file named GroupTestExample.java in C:\>TestNG_WORKSPACE.
import org.testng.Assert;
import org.testng.annotations.Test;

public class GroupTestExample {
   String message = ".com";
   MessageUtil messageUtil = new MessageUtil(message);

   @Test(groups = { "functest", "checkintest" })

   public void testPrintMessage() {
      System.out.println("Inside testPrintMessage()");
      message = ".com";
      Assert.assertEquals(message, messageUtil.printMessage());
   }

   @Test(groups = { "checkintest" })

   public void testSalutationMessage() {
      System.out.println("Inside testSalutationMessage()");
      message = "tutorialspoint" + ".com";
      Assert.assertEquals(message, messageUtil.salutationMessage());
   }

   @Test(groups = { "functest" })

   public void testingExitMessage() {
      System.out.println("Inside testExitMessage()");
      message = "www." + "tutorialspoint"+".com";
      Assert.assertEquals(message, messageUtil.exitMessage());
   }
}
Create testng.xml
Create testng.xml in C:\> TestNG_WORKSPACE, to execute test case(s). Here, we would be executing only those tests, that belong to the group functest.
<?xml version = "1.0" encoding = "UTF-8"?>
<!DOCTYPE suite SYSTEM "http://testng.org/testng-1.0.dtd" >

<suite name = "Suite1">
   <test name = "test1">

      <groups>
         <run>
            <include name = "functest" />
         </run>
      </groups>

      <classes>
         <class name = "GroupTestExample" />
      </classes>

   </test>
</suite>
Compile the MessageUtil, Test case classes using javac.
C:\TestNG_WORKSPACE>javac MessageUtil.java GroupTestExample.java
Now, run the testng.xml, which will run only the method testPrintMessage(), as it belongs to the group functest.
C:\TestNG_WORKSPACE>java -cp "C:\TestNG_WORKSPACE" org.testng.TestNG testng.xml
Verify the output. Only the method testPrintMessage() is executed.
Inside testPrintMessage()
.com
Inside testExitMessage()
www..com

===============================================
Suite1
Total tests run: 2, Failures: 1, Skips: 0
===============================================
Group of Groups
Groups can also include other groups. These groups are called MetaGroups. For example, you might want to define a group all that includes checkintest and functest. Let's modify our testng.xml file as follows −
<?xml version = "1.0" encoding = "UTF-8"?>
<!DOCTYPE suite SYSTEM "http://testng.org/testng-1.0.dtd" >
<suite name = "Suite1">
   <test name = "test1">

      <groups>

         <define name = "all">
            <include name = "functest"/>
            <include name = "checkintest"/>
         </define>

         <run>
            <include name = "all"/>
         </run>

      </groups>

      <classes>
         <class name = "GroupTestExample" />
      </classes>

   </test>
</suite>
Executing the above testng.xml will execute all the three tests and will give you the following result −
Inside testPrintMessage()
.com
Inside testSalutationMessage()
tutorialspoint.com
Inside testExitMessage()
www.tutorialspoint.com

===============================================
Suite1
Total tests run: 3, Failures: 0, Skips: 0
===============================================
Exclusion Groups
You can ignore a group by using the <exclude> tag as shown below −
<?xml version = "1.0" encoding = "UTF-8"?>
<!DOCTYPE suite SYSTEM "http://testng.org/testng-1.0.dtd" >
<suite name = "Suite1">
   <test name = "test1">

      <groups>
         <define name = "all">
            <exclude name = "functest"/>
            <include name = "checkintest"/>
         </define>

         <run>
            <include name = "all"/>
         </run>
      </groups>

      <classes>
         <class name = "GroupTestExample" />
      </classes>

   </test>
</suite>
TestNG - Exception Test
TestNG provides an option of tracing the exception handling of code. You can test whether a code throws a desired exception or not. Here the expectedExceptions parameter is used along with the @Test annotation. Now, let's see @Test(expectedExceptions) in action.
Create a Class
Create a java class to be tested, say, MessageUtil.java in C:\> TestNG_WORKSPACE. Add an error condition inside the printMessage() method.
/*
* This class prints the given message on console.
*/
public class MessageUtil {

   private String message;

   //Constructor
   //@param message to be printed
   public MessageUtil(String message) {
      this.message = message;
   }

   // prints the message
   public void printMessage() {
      System.out.println(message);
      int a =0;
      int b = 1/a;
   }

   // add "Hi!" to the message
   public String salutationMessage() {
      message = "Hi!" + message;
      System.out.println(message);
      return message;
   }
}
Create Test Case Class
Create a java test class, say, ExpectedExceptionTest.java.
Add an expected exception ArithmeticException to the testPrintMessage() test case.
Create a java class file named ExpectedExceptionTest.java in C:\> TestNG_WORKSPACE.
import org.testng.Assert;
import org.testng.annotations.Test;

public class ExpectedExceptionTest {
   String message = "Manisha";
   MessageUtil messageUtil = new MessageUtil(message);

   @Test(expectedExceptions = ArithmeticException.class)
   public void testPrintMessage() {
      System.out.println("Inside testPrintMessage()");
      messageUtil.printMessage();
   }

   @Test
   public void testSalutationMessage() {
      System.out.println("Inside testSalutationMessage()");
      message = "Hi!" + "Manisha";
      Assert.assertEquals(message,messageUtil.salutationMessage());
   }
}
Create Test Runner
Create testng.xml in C:\>TestNG_WORKSPACE to execute test case(s).
<?xml version = "1.0" encoding = "UTF-8"?>
<!DOCTYPE suite SYSTEM "http://testng.org/testng-1.0.dtd" >

<suite name = "Suite1">
   <test name = "test1">
      <classes>
         <class name = "ExpectedExceptionTest" />
      </classes>
   </test>
</suite>
Compile the MessageUtil, Test case classes using javac.
C:\TestNG_WORKSPACE>javac MessageUtil.java TestJunit.java
Now, run the Test Runner, which will run test cases defined in the provided Test Case class.
C:\TestNG_WORKSPACE>java -cp "C:\TestNG_WORKSPACE" org.testng.TestNG testng.xml
Verify the output. testPrintMessage() test case will be passed.
Inside testPrintMessage()
Manisha
Inside testSalutationMessage()
Hi!Manisha

===============================================
Suite1
Total tests run: 2, Failures: 0, Skips: 0
===============================================
TestNG - Dependency Test
Sometimes, you may need to invoke methods in a test case in a particular order, or you may want to share some data and state between methods. This kind of dependency is supported by TestNG, as it supports the declaration of explicit dependencies between test methods.
TestNG allows you to specify dependencies either with −
Using attribute dependsOnMethods in @Test annotations, OR.
Using attribute dependsOnGroups in @Test annotations.
Example Using dependsOnMethods
Create a Class
Create a java class to be tested, say, MessageUtil.java in C:\>TestNG_WORKSPACE.
public class MessageUtil {
   private String message;

   // Constructor
   // @param message to be printed
   public MessageUtil(String message) {
      this.message = message;
   }

   // prints the message
   public String printMessage() {
      System.out.println(message);
      return message;
   }

   // add "Hi!" to the message
   public String salutationMessage() {
      message = "Hi!" + message;
      System.out.println(message);
      return message;
   }
}
Create Test Case Class
Create a java test class, say, DependencyTestUsingAnnotation.java.
Add test methods, testPrintMessage() and testSalutationMessage(), and initEnvironmentTest(), to your test class.
Add attribute dependsOnMethods = {"initEnvironmentTest"} to the @Test annotation of testSalutationMessage() method.
Create a java class file name DependencyTestUsingAnnotation.java in C:\>TestNG_WORKSPACE.
import org.testng.Assert;
import org.testng.annotations.Test;

public class DependencyTestUsingAnnotation {
String message = "Manisha";
MessageUtil messageUtil = new MessageUtil(message);

   @Test
   public void testPrintMessage() {
      System.out.println("Inside testPrintMessage()");
      message = "Manisha";
      Assert.assertEquals(message, messageUtil.printMessage());
   }

   @Test(dependsOnMethods = { "initEnvironmentTest" })
   public void testSalutationMessage() {
      System.out.println("Inside testSalutationMessage()");
      message = "Hi!" + "Manisha";
      Assert.assertEquals(message, messageUtil.salutationMessage());
   }

   @Test
   public void initEnvironmentTest() {
      System.out.println("This is initEnvironmentTest");
   }
}
Create testng.xml
Create testng.xml in C:\>TestNG_WORKSPACE to execute test case(s).
<?xml version = "1.0" encoding = "UTF-8"?>
<!DOCTYPE suite SYSTEM "http://testng.org/testng-1.0.dtd" >

<suite name = "Suite1">
   <test name = "test1">
      <classes>
         <class name = "DependencyTestUsingAnnotation" />
      </classes>
   </test>
</suite>
Compile the MessageUtil, Test case classes using javac.
C:\TestNG_WORKSPACE>javac MessageUtil.java DependencyTestUsingAnnotation.java
Now, run the testng.xml, which will run the testSalutationMessage() method only after the execution of initEnvironmentTest() method.
C:\TestNG_WORKSPACE>java -cp "C:\TestNG_WORKSPACE" org.testng.TestNG testng.xml
Verify the output.
This is initEnvironmentTest
Inside testPrintMessage()
Manisha
Inside testSalutationMessage()
Hi!Manisha

===============================================
Suite1
Total tests run: 3, Failures: 0, Skips: 0
===============================================
Example Using dependsOnGroups
You can also have methods that depend on entire groups. Let's have an example to demonstrate this.
Create a Class
Create a java class to be tested, say, MessageUtil.java in C:\>TestNG_WORKSPACE.
public class MessageUtil {
   private String message;

   // Constructor
   // @param message to be printed
   public MessageUtil(String message) {
      this.message = message;
   }

   // prints the message
   public String printMessage() {
      System.out.println(message);
      return message;
   }

   // add "Hi!" to the message
   public String salutationMessage() {
      message = "Hi!" + message;
      System.out.println(message);
      return message;
   }
}
Create Test Case Class
Create a java test class, say, DependencyTestUsingAnnotation.java.
Add test methods, testPrintMessage() testSalutationMessage(), and initEnvironmentTest() to your test class, and add them to the group "init".
Add the attribute dependsOnMethods = {"init.*"} to the @Test annotation of testSalutationMessage() method.
Create a java class file named DependencyTestUsingAnnotation.java in C:\>TestNG_WORKSPACE.
import org.testng.Assert;
import org.testng.annotations.Test;

public class DependencyTestUsingAnnotation {
   String message = "Manisha";
   MessageUtil messageUtil = new MessageUtil(message);

   @Test(groups = { "init" })
   public void testPrintMessage() {
      System.out.println("Inside testPrintMessage()");
      message = "Manisha";
      Assert.assertEquals(message, messageUtil.printMessage());
   }

   @Test(dependsOnGroups = { "init.*" })
   public void testSalutationMessage() {
      System.out.println("Inside testSalutationMessage()");
      message = "Hi!" + "Manisha";
      Assert.assertEquals(message, messageUtil.salutationMessage());
   }

   @Test(groups = { "init" })
   public void initEnvironmentTest() {
      System.out.println("This is initEnvironmentTest");
   }
}
In this example, testSalutationMessage() is declared as depending on any group, matching the regular expression "init.*", which guarantees that the methods testPrintMessage() and initEnvironmentTest() will always be invoked before testSalutationMessage().
If a method depended upon fails, and you have a hard dependency on it (alwaysRun=false, which is the default), the methods that depend on it are not marked as FAIL but as SKIP. Skipped methods will be reported as such in the final report (in a color that is neither Red nor Green in HTML), which is important since skipped methods are not necessarily failures.
Create testng.xml
Create testng.xml in C:\>TestNG_WORKSPACE to execute test case(s).
<?xml version = "1.0" encoding = "UTF-8"?>
<!DOCTYPE suite SYSTEM "http://testng.org/testng-1.0.dtd" >

<suite name = "Suite1">
   <test name = "test1">
      <classes>
         <class name = "DependencyTestUsingAnnotation" />
      </classes>
   </test>
</suite>
Compile the MessageUtil, Test case classes using javac.
C:\TestNG_WORKSPACE>javac MessageUtil.java DependencyTestUsingAnnotation.java
Now, run the testng.xml, which will run the testSalutationMessage() method only after the execution of initEnvironmentTest() method.
C:\TestNG_WORKSPACE>java -cp "C:\TestNG_WORKSPACE" org.testng.TestNG testng.xml
Verify the output.
This is initEnvironmentTest
Inside testPrintMessage()
Manisha
Inside testSalutationMessage()
Hi!Manisha

===============================================
Suite1
Total tests run: 3, Failures: 0, Skips: 0
===============================================
dependsOnGroups Vs dependsOnMethods
On using groups, we are no longer exposed to refactoring problems. As long as we don’t modify the dependsOnGroups or groups attributes, our tests will keep running with the proper dependencies set up.
Whenever a new method needs to be added in the dependency graph, all we need to do is put it in the right group and make sure it depends on the correct group. We don’t need to modify any other method.
TestNG - Parameterized Test
Another interesting feature available in TestNG is parametric testing. In most cases, you'll come across a scenario where the business logic requires a hugely varying number of tests. Parameterized tests allow developers to run the same test over and over again using different values.
TestNG lets you pass parameters directly to your test methods in two different ways −
- With testng.xml
- With Data Providers
Passing Parameters with testng.xml
With this technique, you define the simple parameters in the testng.xml file and then reference those parameters in the source files. Let us have an example to demonstrate how to use this technique to pass parameters.
Create Test Case Class
Create a java test class, say, ParameterizedTest1.java.
Add test method parameterTest() to your test class. This method takes a string as input parameter.
Add the annotation @Parameters("myName") to this method. The parameter would be passed a value from testng.xml, which we will see in the next step.
Create a java class file named ParameterizedTest1.java in C:\>TestNG_WORKSPACE.
import org.testng.annotations.Parameters;
import org.testng.annotations.Test;

public class ParameterizedTest1 {
   @Test
   @Parameters("myName")
   public void parameterTest(String myName) {
      System.out.println("Parameterized value is : " + myName);
   }
}
Create testng.xml
Create testng.xml in C:\>TestNG_WORKSPACE to execute test case(s).
<?xml version = "1.0" encoding = "UTF-8"?>
<!DOCTYPE suite SYSTEM "http://testng.org/testng-1.0.dtd" >

<suite name = "Suite1">
   <test name = "test1">

      <parameter name = "myName" value="manisha"/>

      <classes>
         <class name = "ParameterizedTest1" />
      </classes>

   </test>
</suite>
We can also define the parameters at the <suite> level. Suppose we have defined myName at both <suite> and <test> levels. In such cases, regular scoping rules apply. It means that any class inside <test> tag will see the value of parameter defined in <test>, while the classes in the rest of the testng.xml file will see the value defined in <suite>.
Compile the test case class using javac.
C:\TestNG_WORKSPACE>javac ParameterizedTest1.java
Now, run testng.xml, which will run the parameterTest method. TestNG will try to find a parameter named myName first in the <test> tag, and then, if it can’t find it, it searches in the <suit> tag that encloses it.
C:\TestNG_WORKSPACE>java -cp "C:\TestNG_WORKSPACE" org.testng.TestNG testng.xml
Verify the output.
Parameterized value is : manisha

===============================================
Suite1
Total tests run: 1, Failures: 0, Skips: 0
===============================================
TestNG will automatically try to convert the value specified in testng.xml to the type of your parameter. Here are the types supported −
- String
- int/Integer
- boolean/Boolean
- byte/Byte
- char/Character
- double/Double
- float/Float
- long/Long
- short/Short
Passing Parameters with Dataproviders
When you need to pass complex parameters or parameters that need to be created from Java (complex objects, objects read from a property file or a database, etc.), parameters can be passed using Dataproviders.
A Data Provider is a method annotated with @DataProvider. This annotation has only one string attribute: its name. If the name is not supplied, the data provider’s name automatically defaults to the method’s name. A data provider returns an array of objects.
The following examples demonstrate how to use data providers. The first example is about @DataProvider using Vector, String, or Integer as parameter, and the second example is about @DataProvider using object as parameter.
Example 1
Here, the @DataProvider passes Integer and Boolean as parameter.
Create Java class
Create a java class called PrimeNumberChecker.java. This class checks if the number is prime. Create this class in C:\>TestNG_WORKSPACE.
public class PrimeNumberChecker {
   public Boolean validate(final Integer primeNumber) {

      for (int i = 2; i < (primeNumber / 2); i++) {
         if (primeNumber % i == 0) {
            return false;
         }
      }
      return true;
   }
}
Create Test Case Class
Create a java test class, say, ParamTestWithDataProvider1.java.
Define the method primeNumbers(), which is defined as a Data provider using the annotation. This method returns an array of objects.
Add the test method testPrimeNumberChecker() to your test class. This method takes an Integer and Boolean as input parameters. This method validates if the parameter passed is a prime number.
Add the annotation @Test(dataProvider = "test1") to this method. The attribute dataProvider is mapped to "test1".
Create a java class file named ParamTestWithDataProvider1.java in C:\>TestNG_WORKSPACE.
import org.testng.Assert;
import org.testng.annotations.BeforeMethod;
import org.testng.annotations.DataProvider;
import org.testng.annotations.Test;

public class ParamTestWithDataProvider1 {
   private PrimeNumberChecker primeNumberChecker;

   @BeforeMethod
   public void initialize() {
      primeNumberChecker = new PrimeNumberChecker();
   }

   @DataProvider(name = "test1")
   public static Object[][] primeNumbers() {
      return new Object[][] {{2, true}, {6, false}, {19, true}, {22, false}, {23, true}};
   }

   // This test will run 4 times since we have 5 parameters defined
   @Test(dataProvider = "test1")
   public void testPrimeNumberChecker(Integer inputNumber, Boolean expectedResult) {
      System.out.println(inputNumber + " " + expectedResult);
      Assert.assertEquals(expectedResult, primeNumberChecker.validate(inputNumber));
   }
}
Create testng.xml
Create a testng.xml C:\>TestNG_WORKSPACE to execute Test case(s).
<?xml version = "1.0" encoding = "UTF-8"?>
<!DOCTYPE suite SYSTEM "http://testng.org/testng-1.0.dtd" >

<suite name = "Suite1">
   <test name = "test1">
      <classes>
         <class name = "ParamTestWithDataProvider1" />
      </classes>
   </test>
</suite>
Compile the Test case class using javac.
C:\TestNG_WORKSPACE>.javac ParamTestWithDataProvider1.java PrimeNumberChecker.java
Now, run testng.xml.
C:\TestNG_WORKSPACE>java -cp "C:\TestNG_WORKSPACE" org.testng.TestNG testng.xml
Verify the output.
   2 true
   6 false
   19 true
   22 false
   23 true

===============================================
   Suite1
   Total tests run: 5, Failures: 0, Skips: 0
===============================================
Example 2
Here, the @DataProvider passes Object as parameter.
Create Java class
Create a java class Bean.java, which is a simple object with get/set methods, in C:\>TestNG_WORKSPACE.
public class Bean {
   private String val;
   private int i;

   public Bean(String val, int i) {
      this.val = val;
      this.i = i;
   }

   public String getVal() {
      return val;
   }

   public void setVal(String val) {
      this.val = val;
   }

   public int getI() {
      return i;
   }

   public void setI(int i) {
      this.i = i;
   }
}
Create Test Case Class
Create a java test class, say, ParamTestWithDataProvider2.java.
Define the method primeNumbers(), which is defined as a data provider using annotation. This method returns an array of object.
Add the test method testMethod() to your test class. This method takes an object bean as parameter.
Add the annotation @Test(dataProvider = "test1") to this method. The attribute dataProvider is mapped to "test1".
Create a java class file named ParamTestWithDataProvider2.java in C:\>TestNG_WORKSPACE.
import org.testng.annotations.DataProvider;
import org.testng.annotations.Test;

public class ParamTestWithDataProvider2 {
   @DataProvider(name = "test1")
   public static Object[][] primeNumbers() {
      return new Object[][] { { new Bean("hi I am the bean", 111) } };
   }

   @Test(dataProvider = "test1")
   public void testMethod(Bean myBean) {
      System.out.println(myBean.getVal() + " " + myBean.getI());
   }
}
Create testng.xml
Create testng.xml in C:\>TestNG_WORKSPACE to execute test case(s).
<?xml version = "1.0" encoding = "UTF-8"?>
<!DOCTYPE suite SYSTEM "http://testng.org/testng-1.0.dtd" >

<suite name = "Suite1">
   <test name = "test1">
      <classes>
         <class name = "ParamTestWithDataProvider2" />
      </classes>
   </test>
</suite>
Compile the test case class using javac.
C:\TestNG_WORKSPACE>javac ParamTestWithDataProvider2.java Bean.java
Now, run testng.xml.
C:\TestNG_WORKSPACE>java -cp "C:\TestNG_WORKSPACE" org.testng.TestNG testng.xml
Verify the output.
   hi I am the bean 111

===============================================
   Suite1
   Total tests run: 1, Failures: 0, Skips: 0
===============================================
TestNG - Run Junit Tests
Now that you have understood TestNG and its various tests, you must be worried by now as to how to refactor your existing JUnit code. There's no need to worry, as TestNG provides a way to shift from JUnit to TestNG at your own pace. You can execute your existing JUnit test cases using TestNG.
TestNG can automatically recognize and run JUnit tests, so that you can use TestNG as a runner for all your existing tests and write new tests using TestNG. All you have to do is to put JUnit library on the TestNG classpath, so it can find and use JUnit classes, change your test runner from JUnit to TestNG in Ant, and then run TestNG in "mixed" mode. This way, you can have all your tests in the same project, even in the same package, and start using TestNG. This approach also allows you to convert your existing JUnit tests to TestNG incrementally.
Let us have an example to demonstrate this amazing ability of TestNG.
Create JUnit Test Case Class
Create a java class, which is a JUnit test class, TestJunit.java in C:\>TestNG_WORKSPACE.
import org.junit.Test;
import static org.testng.AssertJUnit.assertEquals;

public class TestJunit {
   @Test
   public void testAdd() {
      String str = "Junit testing using TestNG";
      AssertEquals("Junit testing using TestNG",str);
   }
}
Now, let's write the testng.xml in C:\>TestNG_WORKSPACE, which would contain the <suite> tag as follows −
<?xml version = "1.0" encoding = "UTF-8"?>
<!DOCTYPE suite SYSTEM "http://testng.org/testng-1.0.dtd">

<suite name = "Converted JUnit suite" >
   <test name = "JUnitTests" junit="true">
      <classes>
         <class name = "TestJunit" />
      </classes>
   </test>
</suite>
To execute the JUnit test cases, define the property junit="true" as in the xml above. The JUnit test case class TestJunit is defined in class name.
For JUnit 4, TestNG will use the org.junit.runner.JUnitCore runner to run your tests.
Compile all java classes using javac.
C:\TestNG_WORKSPACE>javac TestJunit.java
Now, run testng.xml, which will run the JUnit test case as TestNG.
C:\TestNG_WORKSPACE>java -cp "C:\TestNG_WORKSPACE:C:\TestNG_WORKSPACE\lib\junit-4.11.jar" org.testng.TestNG testng.xml
Here, we have placed the junit-4.11.jar under C:\TestNG_WORKSPACE\lib\junit-4.11.jar.
Verify the output.
===============================================
   Converted JUnit suite

   Total tests run: 1, Failures: 0, Skips: 0
===============================================
TestNG - Test Results
Reporting is the most important part of any test execution, as it helps the user understand the result of the test execution, point of failure, and the reasons for failure. Logging, on the other hand, is important to keep an eye on the execution flow or for debugging in case of any failures.
TestNG, by default, generates a different type of report for its test execution. This includes an HTML and an XML report output. TestNG also allows its users to write their own reporter and use it with TestNG. There is also an option to write your own loggers, which are notified at runtime by TestNG.
There are two ways to generate a report with TestNG −
Listeners − For implementing a listener class, the class has to implement the org.testng.ITestListener interface. These classes are notified at runtime by TestNG when the test starts, finishes, fails, skips, or passes.
Reporters − For implementing a reporting class, the class has to implement an org.testng.IReporter interface. These classes are called when the whole suite run ends. The object containing the information of the whole test run is passed to this class when called.
In this chapter, we will have four different examples to demonstrate four different cases of reporting and logging −
| Sr.No. | Case & Example |
|---|---|
| 1 | Custom Logging
This example illustrates how to write your own logger. |
| 2 | Custom Reporter
This example illustrates how to write your own reporter. |
| 3 | HTML and XML report
This example illustrates the default HTML and XML report generated by TestNG. |
| 4 | JUnit Reports
This example illustrates how to generate JUnit reports from TestNG reports. |
TestNG - Plug With ANT
In this chapter, we will demonstrate how to run TestNG using ANT. Let's follow the steps given below −
Step 1: Download Apache Ant
Download the latest version of Apache Ant
| OS | Archive Name |
|---|---|
| Windows | apache-ant-1.8.4-bin.zip |
| Linux | apache-ant-1.8.4-bin.tar.gz |
| Mac | apache-ant-1.8.4-bin.tar.gz |
Step 2: Set Ant Environment
Set the ANT_HOME environment variable to point to the base directory location, where ANT libraries are stored on your machine. Let’s assume we've stored the Ant libraries in the folder apache-ant-1.8.4 folder.
| OS | Output |
|---|---|
| Windows | Set the environment variable ANT_HOME to C:\Program Files\Apache Software Foundation\apache-ant-1.8.4 |
| Linux | Export ANT_HOME=/usr/local/apache-ant-1.8.4 |
| Mac | Export ANT_HOME=/Library/apache-ant-1.8.4 |
Append Ant compiler location to System Path as follows −
| OS | Description |
|---|---|
| Windows | Append the string %ANT_HOME\bin at the end of the system variable, Path. |
| Linux | Export PATH=$PATH:$ANT_HOME/bin/ |
| Mac | Not required. |
Step 3: Download TestNG Archive
Download the required jar files http://www.testng.org.
| OS | Archive name |
|---|---|
| Windows | testng-6.8.jar |
| Linux | testng-6.8.jar |
| Mac | testng-6.8.jar |
Step 4: Create Project Structure
Create a folder TestNGWithAnt in C:\>TestNG_WORKSPACE.
Create a folder src in C:\>TestNG_WORKSPACE>TestNGWithAnt.
Create a folder test in C:\>TestNG_WORKSPACE>TestNGWithAnt.
Create a folder lib in C:\>TestNG_WORKSPACE>TestNGWithAnt.
Create MessageUtil class in C:\>TestNG_WORKSPACE>TestNGWithAnt>src folder.
/*
* This class prints the given message on console.
*/

public class MessageUtil {

   private String message;

   //Constructor
   //@param message to be printed
   public MessageUtil(String message) {
      this.message = message;
   }

   // prints the message
   public void printMessage() {
      System.out.println(message);
      return message;
   }

   // add "Hi!" to the message
   public String salutationMessage() {
      message = "Hi!" + message;
      System.out.println(message);
      return message;
   }
}
Create TestMessageUtil class in C:\>TestNG_WORKSPACE>TestNGWithAnt>src folder.
import org.testng.Assert;
import org.testng.annotations.Test;


public class TestMessageUtil {
   String message = "Manisha";
   MessageUtil messageUtil = new MessageUtil(message);

   @Test
   public void testPrintMessage() {
      System.out.println("Inside testPrintMessage()");
      Assert.assertEquals(message,messageUtil.printMessage());
   }

   @Test
   public void testSalutationMessage() {
      System.out.println("Inside testSalutationMessage()");
      message = "Hi!" + "Manisha";
      Assert.assertEquals(message,messageUtil.salutationMessage());
   }
}
Copy testng-6.8.jar in C:\>TestNG_WORKSPACE>TestNGWithAnt>lib folder.
Create ANT build.xml
First, we need to define the TestNG Ant task as follows −
<taskdef name = "testng" classname = "org.testng.TestNGAntTask">
   <classpath>
      <pathelement location = "lib/testng-6.8.jar"/>
   </classpath>
</taskdef>
Then, we'll be using <testng> task in Ant to execute our TestNG test cases.
The build.xml file is as follows −
<project name = "TestNGTest" default = "test" basedir = ".">

   <!-- Define <testng> task -->

   <taskdef name = "testng" classname = "org.testng.TestNGAntTask">
      <classpath>
         <pathelement location = "lib/testng-6.8.jar"/>
      </classpath>
   </taskdef>

   <property name = "testdir" location = "test" />
   <property name = "srcdir" location = "src" />
   <property name = "libdir" location = "lib" />
   <property name = "full-compile" value="true" />

   <path id = "classpath.base"/>
   <path id = "classpath.test">

   <fileset dir = "${libdir}">
      <include name = "**/*.jar" />
   </fileset>

   <pathelement location = "${testdir}" />
   <pathelement location = "${srcdir}" />

   <path refid = "classpath.base" />
   </path>

   <target name = "clean" >
      <delete verbose="${full-compile}">
         <fileset dir = "${testdir}" includes="**/*.class" />
      </delete>
   </target>

   <target name = "compile" depends="clean">
      <javac srcdir = "${srcdir}" destdir = "${testdir}" verbose="${full-compile}">
         <classpath refid = "classpath.test"/>
      </javac>
   </target>

   <target name = "test" depends="compile">
      <testng outputdir = "${testdir}" classpathref="classpath.test">
         <xmlfileset dir = "${srcdir}" includes="testng.xml"/>
      </testng>
   </target>

</project>
Run the following Ant command.
C:\TestNG_WORKSPACE\TestNGWithAnt>ant
Verify the output.
test:
   [testng] [TestNG] Running:
   [testng]   C:\TestNG_WORKSPACE\TestNGWithAnt\src\testng.xml
   [testng]
   [testng] Inside testPrintMessage()
   [testng] Manisha
   [testng] Inside testSalutationMessage()
   [testng] Hi!Manisha
   [testng]
   [testng] ===============================================
   [testng] Plug ANT test Suite
   [testng] Total tests run: 2, Failures: 0, Skips: 0
   [testng] ===============================================
   [testng]

BUILD SUCCESSFUL
Total time: 1 second
TestNG - Plug With Eclipse
To set up TestNG with Eclipse, follow the steps given below −
Step 1: Download TestNG Archive
Download the latest version of TestNG jar file from http://www.testng.org
| OS | Archive name |
|---|---|
| Windows | testng-6.8.jar |
| Linux | testng-6.8.jar |
| Mac | testng-6.8.jar |
We assume you have copied the above JAR file in C:\>TestNG folder.
Step 2: Set Eclipse environment
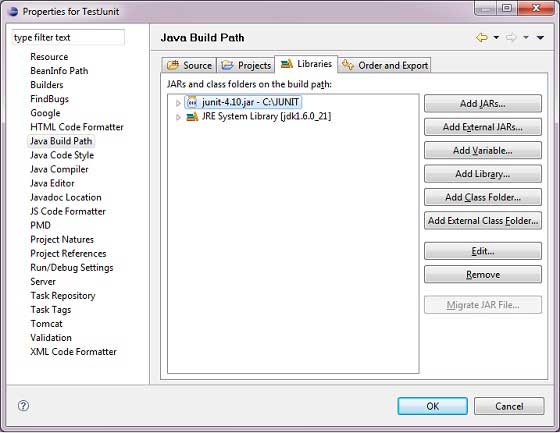
Open eclipse → right click on the project and go to property → Build Path → Configure Build Path and add the testng-6.8.jar in the libraries using Add External Jar button.
We assume that your Eclipse has inbuilt TestNG plug-in; if it is not available, then please get the latest version using the update site.
In your Eclipse IDE, select Help / Software updates / Find and Install.
Search for new features to install.
New remote site.
Make sure the check box next to the URL is checked and click Next.
Eclipse will then guide you through the process.
Now, your Eclipse is ready for the development of TestNG test cases.
Step 3: Verify TestNG Installation in Eclipse
Create a project TestNGProject in Eclipse at any location.
Create a class MessageUtil to test in the project.
/*
* This class prints the given message on console.
*/

public class MessageUtil {

   private String message;

   //Constructor
   //@param message to be printed
   public MessageUtil(String message) {
      this.message = message;
   }

   // prints the message
   public String printMessage() {
      System.out.println(message);
      return message;
   }
}
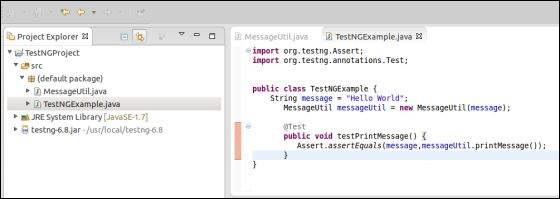
Create a test class TestNGExample in the project.
import org.testng.Assert;
import org.testng.annotations.Test;

public class TestNGExample {
   String message = "Hello World";
   MessageUtil messageUtil = new MessageUtil(message);

   @Test
   public void testPrintMessage() {
      Assert.assertEquals(message,messageUtil.printMessage());
   }
}
The project structure should be as follows −
Finally, verify the output of the program by right-clicking on the program and running as TestNG.
Verify the result.
