- TestLink Tutorial
- TestLink - Home
- TestLink – Introduction
- TestLink – Features
- TestLink – Installation
- TestLink – Login
- TestLink – Add a Project
- TestLink – Dashboard
- TestLink – Projects
- TestLink – Inventory
- TestLink – Test Plan
- TestLink – Build Management
- TestLink – Test Specification
- TestLink – Test Suite
- TestLink – Test Cases
- TestLink – Import Data
- TestLink – Export Data
- TestLink – Test Plan Relation
- TestLink – Search
- TestLink – Keywords
- Test Specification Document
- TestLink – Create Requirement
- TestLink – Requirement Overview
- TestLink – Assign Test Execution
- TestLink – Bulk User Assignment
- TestLink – Platforms
- TestLink – Milestones
- TestLink – Test Execution Setup
- TestLink – Test Execution
- TestLink – Reports & Metrics
- TestLink – Reports
- TestLink – Charts
- TestLink Useful Resources
- TestLink - Quick Guide
- TestLink - Useful Resources
- TestLink - Discussion
TestLink - Test Plan
Test planning, is the most important activity to ensure that there is initially a list of tasks and milestones in a baseline plan to track the progress of the project. It also defines the size of the test effort.
It is the main document often called as the master test plan or a project test plan and is usually developed during the early phase of the project.
Create a Test Plan
To create a test plan, you should have Create Test Plan Permission.
Following are the steps to create a test plan −
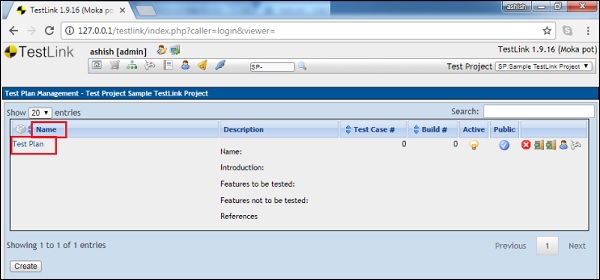
Step 1 − Go to Test Plan → Test Plan Management on the dashboard as shown in the following screenshot.
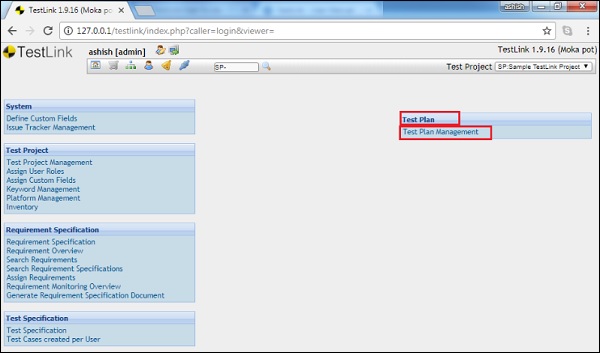
If any test plan is listed for the project, it displays the list of test plans. Otherwise, it displays a message to create a test plan to support the test execution functionality.
Step 2 − Click the Create button as shown in the following screenshot.
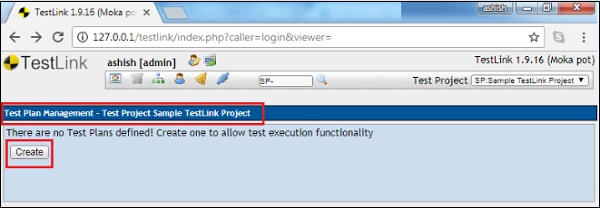
It displays the test plan create form.
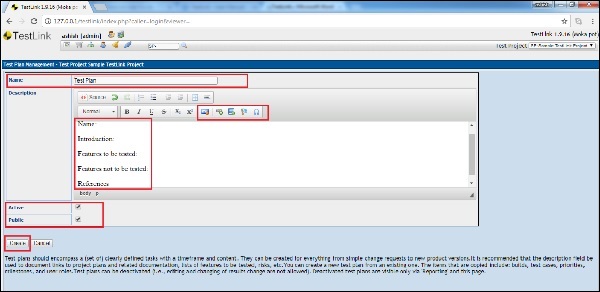
Step 3 − Enter the following details in the form.
Name − It should be the name of the test plan.
Description − This field should contain the detailed information of a test plan. Generally, a test plan consists of the following information.
| Sr.No. | Parameter & Description |
|---|---|
| 1 |
Test plan identifier Unique identifying reference. |
| 2 |
Introduction A brief introduction about the project and of the document. |
| 3 |
Test items A test item is a software item that is the application under test. |
| 4 |
Features to be tested A feature that needs to tested on the testware. |
| 5 |
Features not to be tested Identify the features and the reasons for not including as part of testing. |
| 6 |
Approach Details about the overall approach to testing. |
| 7 |
Item pass/fail criteria Documented whether a software item has passed or failed its test. |
| 8 |
Test deliverables Deliverables that are part of the testing process, such as test plans, test specifications and test summary reports. |
| 9 |
Testing tasks All tasks for planning and executing the testing. |
| 10 |
Environmental needs Defining the environmental requirements such as hardware, software, OS, network configurations, and tools required. |
| 11 |
Responsibilities Lists the roles and responsibilities of the team members. |
| 12 |
Staffing and training needs Captures the actual staffing requirements and any specific skills and training requirements. |
| 13 |
Schedule States the important project delivery dates and key milestones. |
| 14 |
Risks and Mitigation High-level project risks and assumptions as well as a mitigating plan for each identified risk. |
| 15 |
Approvals Captures all approvers of the document, their titles and the sign-off date. |
Testlink supports images, table, links, special characters, etc. to make content rich description.
There are 2 checkboxes as can be seen in the following screenshot.
Active − It will activate the document after creation and you can utilize this document in test execution or any other activities as a reference.
Public − It allows other users to use this document. It will be visible to other users as well who are linked with this project. If this checkbox is unchecked, only the person who has created can use and view this document.
Step 4 − Click the Create button present at the bottom of the form.
Once you click Create, you can see the added Test Plan along with a few icons at the extreme right of screen as seen below.
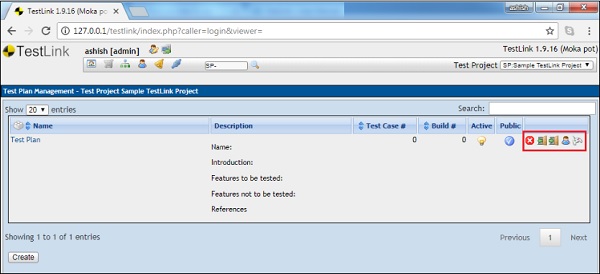
These icons are delete the test plan, export links to the test cases and platform, import links to the test cases and platform, Assign Role and test execution from left to right as displayed in below screenshot.
Edit a Test Plan
To edit a test plan, you should have Edit Permission.
Following are the steps to edit a test plan.
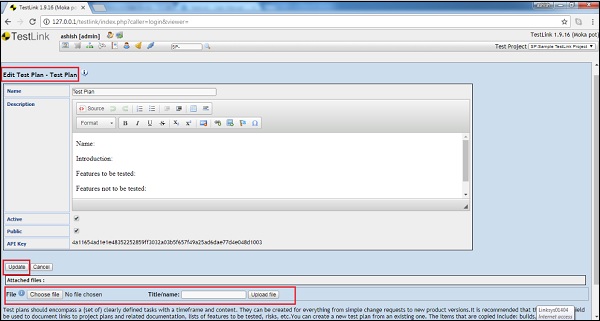
Step 1 − Click the Test Plan name to open the details. The name of the Test Plan is present in the first column and it is hyperlinked as shown in the following screenshot.
Step 2 − It opens the test plan details in edit mode. You can edit the name, description, and selection of Active and Public mode.
Step 3 − Attach a file in the test plan. This feature is available in the edit mode only. While creating the test plan, you can add images/tables into the description. However, attaching a file option is not available.
Step 4 − After updating the details, click Update to finish editing.
Following screenshot displays how to edit a test plan.
Delete a Test Plan
To delete a plan, you should have Delete Permission.
If a test plan is deleted, it deletes both the test plan and all of its corresponding data. Data includes test cases, results, etc.
Following are the steps to delete a build −
Step 1 − Go to the Test Plan Management → Test Plan from the dashboard.
Step 2 − Click the Delete icon corresponding to the row of the test plan that needs to be deleted as seen below.
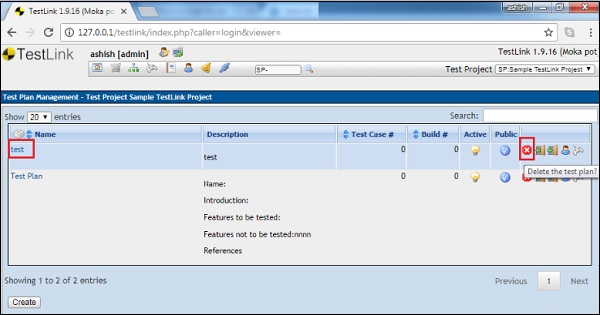
A pop-up will be displayed for a confirmation to delete.
Step 3 − Click Yes as shown below.

The page gets refreshed and the test plan will be deleted.