- Symfony Tutorial
- Symfony - Home
- Symfony - Introduction
- Symfony - Installation
- Symfony - Architecture
- Symfony - Components
- Symfony - Service Container
- Symfony - Events & EventListener
- Symfony - Expression
- Symfony - Bundles
- Creating a Simple Web Application
- Symfony - Controllers
- Symfony - Routing
- Symfony - View Engine
- Symfony - Doctrine ORM
- Symfony - Forms
- Symfony - Validation
- Symfony - File Uploading
- Symfony - Ajax Control
- Cookies & Session Management
- Symfony - Internationalization
- Symfony - Logging
- Symfony - Email Management
- Symfony - Unit Testing
- Symfony - Advanced Concepts
- Symfony - REST Edition
- Symfony - CMF Edition
- Complete Working Example
- Symfony Useful Resources
- Symfony - Quick Guide
- Symfony - Useful Resources
- Symfony - Discussion
Symfony - Advanced Concepts
In this chapter, we will learn about some advanced concepts in Symfony framework.
HTTP Cache
Caching in a web application improves performance. For example, hot products in a shopping cart web application can be cached for a limited time, so that it can be presented to the customer in a speedy manner without hitting the database. Following are some basic components of Cache.
Cache Item
Cache Item is a single unit of information stored as a key/value pair. The key should be string and value can be any PHP object. PHP objects are stored as string by serialization and converted back into objects while reading the items.
Cache Adapter
Cache Adapter is the actual mechanism to store the item in a store. The store may be a memory, file system, database, redis, etc. Cache component provides an AdapterInterface through which an adapter can store cache item in a back-end store. There are lot of built-in cache adapters available. Few of them are as follows −
Array Cache adapter - Cache items are stored in PHP array.
Filesystem Cache adapter - Cache items are stored in files.
PHP Files Cache Adapter - Cache items are stored as php files.
APCu Cache Adapter - Cache items are stored in shared memory using PHP APCu extenstion.
Redis Cache Adapter - Cache items are stored in Redis server.
PDO and Doctrine DBAL Cache Adapter - Cache items are stored in the database.
Chain Cache Adapter - Combines multiple cache adapters for replication purpose.
Proxy Cache Adapter - Cache items are stored using third party adapter, which implements CacheItemPoolInterface.
Cache Pool
Cache Pool is a logical repository of cache items. Cache pools are implemented by cache adapters.
Simple Application
Let us create a simple application to understand the cache concept.
Step 1 − Create a new application, cache-example.
cd /path/to/app
mkdir cache-example
cd cache-example
Step 2 − Install cache component.
composer require symfony/cache
Step 3 − Create a file system adapter.
require __DIR__ . '/vendor/autoload.php';
use Symfony\Component\Cache\Adapter\FilesystemAdapter;
$cache = new FilesystemAdapter();
Step 4 − Create a cache item using getItem and set method of adapter. getItem fetches the cache item using its key. if the key is not persent, it creates a new item. set method stores the actual data.
$usercache = $cache->getitem('item.users');
$usercache->set(['jon', 'peter']);
$cache->save($usercache);
Step 5 − Access the cache item using getItem, isHit and get method. isHit informs the availability of the cache item and get method provides the actual data.
$userCache = $cache->getItem('item.users');
if(!$userCache->isHit()) {
   echo "item.users is not available";
} else {
   $users = $userCache->get();
   var_dump($users);
}
Step 6 − Delete the cache item using deleteItem method.
$cache->deleteItem('item.users');
The complete code listing is as follows.
<?php
   require __DIR__ . '/vendor/autoload.php';
   use Symfony\Component\Cache\Adapter\FilesystemAdapter;

   $cache = new FilesystemAdapter();
   $usercache = $cache->getitem('item.users');
   $usercache->set(['jon', 'peter']);
   $cache->save($usercache);
   $userCache = $cache->getItem('item.users');

   if(!$userCache->isHit()) {
      echo "item.users is not available";
   } else {
      $users = $userCache->get();
      var_dump($users);
   }
   $cache->deleteItem('item.users');
?>
Result
array(2) {
   [0]=>
   string(3) "jon"
   [1]=>
   string(5) "peter"
}
Debug
Debugging is one of the most frequent activity while developing an application. Symfony provides a separate component to ease the process of debugging. We can enable Symfony debugging tools by just calling the enable method of Debug class.
use Symfony\Component\Debug\Debug
Debug::enable()
Symfony provides two classes, ErrorHandler and ExceptionHandler for debugging purpose. While ErrorHandler catches PHP errors and converts them into exceptions, ErrorException or FatalErrorException, ExceptionHandler catches uncaught PHP exceptions and converts them into useful PHP response. ErrorHandler and ExceptionHandler are disabled by default. We can enable it by using the register method.
use Symfony\Component\Debug\ErrorHandler;
use Symfony\Component\Debug\ExceptionHandler;
ErrorHandler::register();
ExceptionHandler::register();
In a Symfony web application, the debug environment is provided by DebugBundle. Register the bundle in AppKernel's registerBundles method to enable it.
if (in_array($this->getEnvironment(), ['dev', 'test'], true)) {
   $bundles[] = new Symfony\Bundle\DebugBundle\DebugBundle();
}
Profiler
Development of an application needs a world-class profiling tool. The profiling tool collects all the run-time information about an application such as execution time, execution time of individual modules, time taken by a database activity, memory usage, etc. A web application needs much more information such as the time of request, time taken to create a response, etc. in addition to the above metrics.
Symfony enables all such information in a web application by default. Symfony provides a separate bundle for web profiling called WebProfilerBundle. Web profiler bundle can be enabled in a web application by registering the bundle in the AppKernel's registerBundles method.
if (in_array($this->getEnvironment(), ['dev', 'test'], true)) {
   $bundles[] = new Symfony\Bundle\WebProfilerBundle\WebProfilerBundle();
}
The web profile component can be configured under web_profile section of the application configuration file, app/config/config.xml
web_profiler:
   toolbar:      false
   position:     bottom
Symfony application shows the profiled data at the bottom of the page as a distinct section.
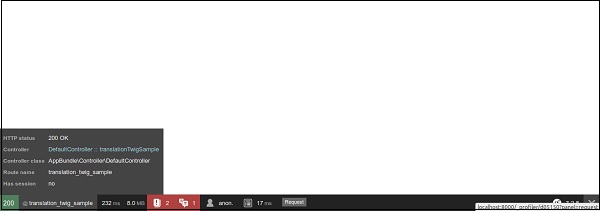
Symfony also provides an easy way to add custom details about the page in the profile data using DataCollectorInterface interface and twig template. In short, Symfony enables a web developer to create a world-class application by providing a great profiling framework with relative ease.
Security
As discussed earlier, Symfony provides a robust security framework through its security component. The security component is divided into four sub-components as follows.
- symfony/security-core - Core security functionality.
- symfony/security-http - Integrated security feature in HTTP protocol.
- symfony/security-csrf - Protection against cross-site request forgery in a web application.
- symfony/security-acl - Advanced access control list based security framework.
Simple Authentication and Authorization
Let us learn the concept of authentication and authorization using a simple demo application.
Step 1 − Create a new web application securitydemo using the following command.
symfony new securitydemo
Step 2 − Enable the security feature in the application using the security configuration file. The security related configuration are placed in a separate file, security.yml. The default configuration is as follows.
security:
   providers:
      in_memory:
         memory: ~
   firewalls:
      dev:
         pattern: ^/(_(profiler|wdt)|css|images|js)/
         security: false
   main:
      anonymous: ~
      #http_basic: ~
      #form_login: ~
The default configuration enables memory-based security provider and anonymous access to all pages. The firewall section excludes the files matching the pattern, ^/(_(profiler|wdt)|css|images|js)/ from the security framework. The default pattern includes stylesheets, images, and JavaScripts (plus dev tools like profiler).
Step 3 − Enable HTTP based security authenticate system by adding http_basic option in main section as follows.
security:
   # ...
   firewalls:
      # ...
      main:
         anonymous: ~
         http_basic: ~
         #form_login: ~
Step 4 − Add some users in the memory provider section. Also, add roles for the users.
security:
   providers:
      in_memory:
         memory:
            users:
               myuser:
                  password: user
                  roles: 'ROLE_USER'
                     myadmin:
                        password: admin
                        roles: 'ROLE_ADMIN'
We have added two users, user in role ROLE_USER and admin in role ROLE_ADMIN.
Step 5 − Add the encoder to get complete details of the current logged-in user. The purpose of the encoder is to get complete details of the current user object from the web request.
security:
   # ...
   encoders:
      Symfony\Component\Security\Core\User\User: bcrypt
      # ...
Symfony provides an interface, UserInterface to get user details such as username, roles, password, etc. We need to implement the interface to our requirement and configure it in the encoder section.
For example, let us consider that the user details are in the database. Then, we need to create a new User class and implement UserInterface methods to get the user details from the database. Once the data is available, then the security system uses it to allow/deny the user. Symfony provides a default User implementation for Memory provider. Algorithm is used to decrypt the user password.
Step 6 − Encrypt the user password using bcrypt algorithm and place it in the configuration file. Since we used bcrypt algorithm, User object tries to decrypt the password specified in configuration file and then tries to match with the password entered by the user. Symfony console application provides a simple command to encrypt the password.
php bin/console security:encode-password admin
Symfony Password Encoder Utility
================================
------------------ -----------------------------------
Key   Value
------------------ ------------------------------------
Encoder used       Symfony\Component\Security\Core\Encoder\BCryptPasswordEncoder
Encoded password
$2y$12$0Hy6/.MNxWdFcCRDdstHU.hT5j3Mg1tqBunMLIUYkz6..IucpaPNO
------------------ ------------------------------------
! [NOTE] Bcrypt encoder used: the encoder generated its own built-in salt.
[OK] Password encoding succeeded
Step 7 − Use the command to generate the encrypted password and update it in the configuration file.
# To get started with security, check out the documentation:
# http://symfony.com/doc/current/security.html
   security:
      # http://symfony.com/doc/current/security.html#b-configuring-how-users-are-loaded
      providers:
         in_memory:
            memory:
               users:
                  user:
                     password: $2y$13$WsGWNufreEnVK1InBXL2cO/U7WftvfNvH
                     Vb/IJBH6JiYoDwVN4zoi
                     roles: 'ROLE_USER'
                     admin:
                        password: $2y$13$jQNdIeoNV1BKVbpnBuhKRuOL01NeMK
                        F7nEqEi/Mqlzgts0njK3toy
                        roles: 'ROLE_ADMIN'

         encoders:
            Symfony\Component\Security\Core\User\User: bcrypt
         firewalls:
            # disables authentication for assets and the profiler,
            # adapt it according to your needs
         dev:
            pattern: ^/(_(profiler|wdt)|css|images|js)/
         security: false
         main:
            anonymous: ~
            # activate different ways to authenticate
            # http://symfony.com/doc/current/security.html#a-co
            nfiguring-howyour-users-will-authenticate
            http_basic: ~
            # http://symfony.com/doc/current/cookbook/security/
            form_login_setup.html
            #form_login: ~
Step 8 − Now, apply the security to some section of the application. For example, restrict admin section to the users in role, ROLE_ADMIN.
security:
   # ...
      firewalls:
         # ...
      default:
         # ...
      access_control:
         # require ROLE_ADMIN for /admin*
         - { path: ^/admin, roles: 'ROLE_ADMIN' }
Step 9 − Add an admin page in DefaultController as follows.
/**
   * @Route("/admin")
*/
public function adminLandingAction() {
   return new Response('<html><body>This is admin section.</body></html>');
}
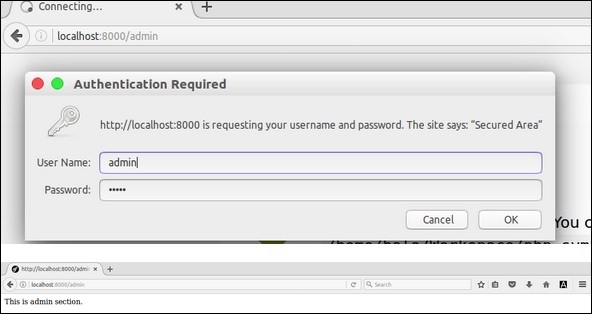
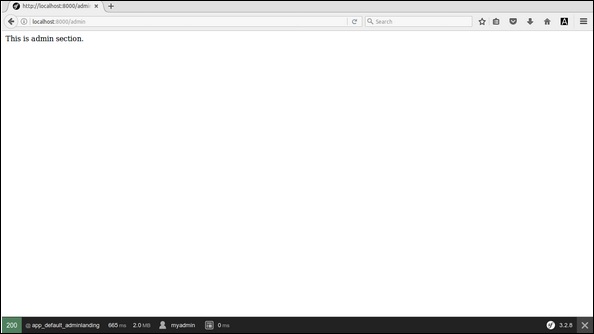
Step 10 − Finally, access the admin page to check the security configuration in a browser. The browser will ask for the username and password and only allow configured users.
Result
Workflow
Workflow is an advanced concept having usage in many enterprise applications. In an ecommerce application, the product delivery process is a workflow. The product is first billed (order creation), procured from the store and packaged (packaging/ready to dispatch), and dispatched to the user. If there is any issue, the product returns from the user and the order is reverted. Order of the flow of action is very important. For example, we can't deliver a product without billing.
Symfony component provides an object-oriented way to define and manage a workflow. Each step in a process is called place and the action required to move from one place to another is called transition. The collection of places and transition to create a workflow is called a Workflow definition.
Let us understand the concept of workflow by creating a simple application for leave management.
Step 1 − Create a new application, workflow-example.
cd /path/to/dev
mkdir workflow-example

cd workflow-example
composer require symfony/workflow
Step 2 − Create a new class, Leave having applied_by, leave_on and status attributes.
class Leave {
   public $applied_by;
   public $leave_on;
   public $status;
}
Here, applied_by refers to the employees who want leave. leave_on refers to the date of leave. status refers to the leave status.
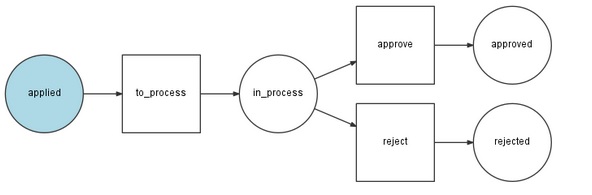
Step 3 − Leave management has four places, applied, in_process and approved / rejected.
use Symfony\Component\Workflow\DefinitionBuilder;
use Symfony\Component\Workflow\Transition;
use Symfony\Component\Workflow\Workflow;
use Symfony\Component\Workflow\MarkingStore\SingleStateMarkingStore;
use Symfony\Component\Workflow\Registry;
use Symfony\Component\Workflow\Dumper\GraphvizDumper;

$builder = new DefinitionBuilder();
$builder->addPlaces(['applied', 'in_process', 'approved', 'rejected']);
Here, we have created a new definition using DefinitionBuilder and added places using addPlaces method.
Step 4 − Define the actions required to move from one place to another place.
$builder->addTransition(new Transition('to_process', 'applied', 'in_process'));
$builder->addTransition(new Transition('approve', 'in_process', 'approved'));
$builder->addTransition(new Transition('reject', 'in_process', 'rejected'));
Here, we have three transitions, to_process, approve and reject. to_process transition accepts the leave application and moves the place from applied to in_process. approve transition approves the leave application and moves the place to approved. Similarly, reject transition rejects the leave application and moves the place to rejected. We have created all transitions using addTransition method.
Step 5 − Build the definition using build method.
$definition = $builder->build();
Step 6 − Optionally, the definition can be dumped as graphviz dot format, which can be converted to image file for reference purpose.
$dumper = new GraphvizDumper();
echo $dumper->dump($definition);
Step 7 − Create a marking store, which is used to store the current places/status of the object.
$marking = new SingleStateMarkingStore('status');
Here, we have used SingleStateMarkingStore class to create the mark and it marks the current status into the status property of the object. In our example, the object is Leave object.
Step 8 − Create the workflow using definition and marking.
$leaveWorkflow = new Workflow($definition, $marking);
Here, we have used Workflow class to create the workflow.
Step 9 − Add the workflow into the registry of the workflow framework using Registry class.
$registry = new Registry();
$registry->add($leaveWorkflow, Leave::class);
Step 10 − Finally, use the workflow to find whether a given transition is applied using can method and if so, apply the transition using apply method. When a transition is applied, the status of the object moves from one place to another.
$workflow = $registry->get($leave);
echo "Can we approve the leave now? " . $workflow->can($leave, 'approve') . "\r\n";
echo "Can we approve the start process now? " . $workflow->can($leave, 'to_process') . "\r\n";

$workflow->apply($leave, 'to_process');
echo "Can we approve the leave now? " . $workflow->can($leave, 'approve') . "\r\n";
echo $leave->status . "\r\n";

$workflow->apply($leave, 'approve');
echo $leave->status . "\r\n";
The complete coding is as follows −
<?php
   require __DIR__ . '/vendor/autoload.php';

   use Symfony\Component\Workflow\DefinitionBuilder;
   use Symfony\Component\Workflow\Transition;
   use Symfony\Component\Workflow\Workflow;
   use Symfony\Component\Workflow\MarkingStore\SingleStateMarkingStore;
   use Symfony\Component\Workflow\Registry;
   use Symfony\Component\Workflow\Dumper\GraphvizDumper;

   class Leave {
      public $applied_by;
      public $leave_on;
      public $status;
   }
   $builder = new DefinitionBuilder();
   $builder->addPlaces(['applied', 'in_process', 'approved', 'rejected']);
   $builder->addTransition(new Transition('to_process', 'applied', 'in_process'));
   $builder->addTransition(new Transition('approve', 'in_process', 'approved'));
   $builder->addTransition(new Transition('reject', 'in_process', 'rejected'));
   $definition = $builder->build();

   // $dumper = new GraphvizDumper();
   // echo $dumper->dump($definition);

   $marking = new SingleStateMarkingStore('status');
   $leaveWorkflow = new Workflow($definition, $marking);
   $registry = new Registry();
   $registry->add($leaveWorkflow, Leave::class);

   $leave = new Leave();
   $leave->applied_by = "Jon";
   $leave->leave_on = "1998-12-12";
   $leave->status = 'applied';

   $workflow = $registry->get($leave);
   echo "Can we approve the leave now? " . $workflow->can($leave, 'approve') . "\r\n";
   echo "Can we approve the start process now? " . $workflow->can($leave, 'to_process') . "\r\n";

   $workflow->apply($leave, 'to_process');
   echo "Can we approve the leave now? " . $workflow->can($leave, 'approve') . "\r\n";
   echo $leave->status . "\r\n";

   $workflow->apply($leave, 'approve');
   echo $leave->status . "\r\n";
?>
Result
Can we approve the leave now?
Can we approve the start process now? 1
Can we approve the leave now? 1
in_process
approved