- SQL Tutorial
- SQL - Home
- SQL - Overview
- SQL - RDBMS Concepts
- SQL - Databases
- SQL - Syntax
- SQL - Data Types
- SQL - Operators
- SQL - Expressions
- SQL Database
- SQL - Create Database
- SQL - Drop Database
- SQL - Select Database
- SQL - Rename Database
- SQL - Show Databases
- SQL - Backup Database
- SQL Table
- SQL - Create Table
- SQL - Show Tables
- SQL - Rename Table
- SQL - Truncate Table
- SQL - Clone Tables
- SQL - Temporary Tables
- SQL - Alter Tables
- SQL - Drop Table
- SQL - Delete Table
- SQL - Constraints
- SQL Queries
- SQL - Insert Query
- SQL - Select Query
- SQL - Select Into
- SQL - Insert Into Select
- SQL - Update Query
- SQL - Delete Query
- SQL - Sorting Results
- SQL Views
- SQL - Create Views
- SQL - Update Views
- SQL - Drop Views
- SQL - Rename Views
- SQL Operators and Clauses
- SQL - Where Clause
- SQL - Top Clause
- SQL - Distinct Clause
- SQL - Order By Clause
- SQL - Group By Clause
- SQL - Having Clause
- SQL - AND & OR
- SQL - BOOLEAN (BIT) Operator
- SQL - LIKE Operator
- SQL - IN Operator
- SQL - ANY, ALL Operators
- SQL - EXISTS Operator
- SQL - CASE
- SQL - NOT Operator
- SQL - NOT EQUAL
- SQL - IS NULL
- SQL - IS NOT NULL
- SQL - NOT NULL
- SQL - BETWEEN Operator
- SQL - UNION Operator
- SQL - UNION vs UNION ALL
- SQL - INTERSECT Operator
- SQL - EXCEPT Operator
- SQL - Aliases
- SQL Joins
- SQL - Using Joins
- SQL - Inner Join
- SQL - Left Join
- SQL - Right Join
- SQL - Cross Join
- SQL - Full Join
- SQL - Self Join
- SQL - Delete Join
- SQL - Update Join
- SQL - Left Join vs Right Join
- SQL - Union vs Join
- SQL Keys
- SQL - Unique Key
- SQL - Primary Key
- SQL - Foreign Key
- SQL - Composite Key
- SQL - Alternate Key
- SQL Indexes
- SQL - Indexes
- SQL - Create Index
- SQL - Drop Index
- SQL - Show Indexes
- SQL - Unique Index
- SQL - Clustered Index
- SQL - Non-Clustered Index
- Advanced SQL
- SQL - Wildcards
- SQL - Comments
- SQL - Injection
- SQL - Hosting
- SQL - Min & Max
- SQL - Null Functions
- SQL - Check Constraint
- SQL - Default Constraint
- SQL - Stored Procedures
- SQL - NULL Values
- SQL - Transactions
- SQL - Sub Queries
- SQL - Handling Duplicates
- SQL - Using Sequences
- SQL - Auto Increment
- SQL - Date & Time
- SQL - Cursors
- SQL - Common Table Expression
- SQL - Group By vs Order By
- SQL - IN vs EXISTS
- SQL - Database Tuning
- SQL Function Reference
- SQL - Date Functions
- SQL - String Functions
- SQL - Aggregate Functions
- SQL - Numeric Functions
- SQL - Text & Image Functions
- SQL - Statistical Functions
- SQL - Logical Functions
- SQL - Cursor Functions
- SQL - JSON Functions
- SQL - Conversion Functions
- SQL - Datatype Functions
- SQL Useful Resources
- SQL - Questions and Answers
- SQL - Quick Guide
- SQL - Useful Functions
- SQL - Useful Resources
- SQL - Discussion
SQL - Cursors

A database cursor solves the problem of impedance mismatch. It acts as a filter between the result of a SQL query and the statements that process this result.
Cursors in SQL
A Cursor is a temporary memory that is allocated by the database server at the time of performing the Data Manipulation Language operations on a table, such as INSERT, UPDATE and DELETE etc. It is used to retrieve and manipulate data stored in the SQL table.
In MySQL, you cannot declare a cursor directly outside of a stored procedure or function. Cursors are generally declared within stored procedures, functions, or blocks of SQL code in MySQL database.
Using cursors, we can perform multiple operations on each row of a result set, with or without returning the original data.
Properties of Cursors
Following are the properties of MySQL Cursors −
READ ONLY − We cannot update or modify any records in the table using the MySQL cursors. We can just fetch and process data from a table.
Non-Scrollable − We can retrieve records from a table in a single direction, i.e. from the first record or the last. We cannot move backward or jump to a specific position within the result set.
Asensitive Cursor − An asensitive cursor operates directly on the actual data in the database, it does not create a copy of the data. If any change is made to the data by other connections, it can affect the data that the cursor is working with.
In addition to the Asensitive cursor there is another type known as Insensitive Cursor. An insensitive cursor uses a temporary copy of the data. Therefore, these cursors are insensitive (not affected) to the changes that are made in the table.
Life Cycle of the Cursor
There are four steps to manage these cursors. Following diagram illustrates the lifecycle of an SQL cursor −
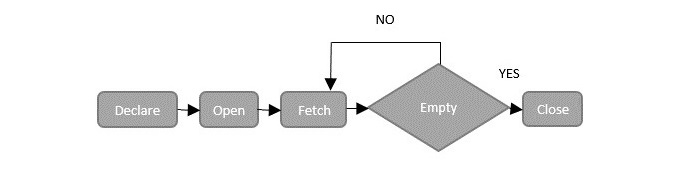
Now, let us discuss the phases of life cycle of the cursor one-by-one.
Declare Cursor Statement
In MySQL we can declare a cursor using the DECLARE statement and associate it with a SELECT statement to retrieve records from a database table.
However, this SELECT statement associated with a cursor does not use the INTO clause, as it's purpose is to fetch and process rows rather than assigning values to variables.
Syntax
Following is the syntax to declare a cursor in MySQL database −
DECLARE cursor_name CURSOR FOR select_statement;
Open Cursor Statement
After declaring a cursor in MySQL, the next step is to open the cursor using the OPEN statement. It initializes the result-set, allowing us to fetch and process rows from the associated SELECT statement in the cursor.
Syntax
Following is the syntax to open a cursor in MySQL database −
OPEN cursor_name;
Fetch Cursor Statement
Then, we can use the FETCH statement to retrieve the current row pointed by the cursor, and with each FETCH, the cursor moves to the next row in the result set. This allows us to process each row one by one.
Syntax
Following is the syntax to fetch a cursor in MySQL database −
FETCH cursor_name INTO variable_list;
Close Cursor Statement
Once all the rows are fetched, we must close the cursor to release the memory associated with it. We can do this using the CLOSE statement.
Syntax
Following is the syntax to close a cursor in MySQL database −
CLOSE cursor_name;
Example
In this example, let us see how to manage a cursor in a stored procedure.
Assume we have created a table with the name CUSTOMERS using the CREATE TABLE statement as follows −
CREATE TABLE CUSTOMERS (
   ID INT NOT NULL,
   NAME VARCHAR (20) NOT NULL,
   AGE INT NOT NULL,
   ADDRESS CHAR (25),
   SALARY DECIMAL (18, 2),
   PRIMARY KEY (ID)
);
Now, let us insert some records into the CUSTOMERS table using the INSERT statement as follows −
INSERT INTO CUSTOMERS VALUES
(1, 'Ramesh', 32, 'Ahmedabad', 2000.00 ),
(2, 'Khilan', 25, 'Delhi', 1500.00 ),
(3, 'Kaushik', 23, 'Kota', 2000.00 ),
(4, 'Chaitali', 25, 'Mumbai', 6500.00 );
Now, we will create a backup table named 'CUSTOMERS_BACKUP' to store customer data −
CREATE TABLE CUSTOMERS_BACKUP (
   ID INT NOT NULL,
   NAME VARCHAR (20) NOT NULL,
   PRIMARY KEY (ID)
);
Here, we are creating a stored procedure named FetchCustomers to fetch customer names from the CUSTOMERS table and inserting them one by one into the BACKUP table. We are using a cursor to iterate through the rows and a handler to detect the end of the result-set, ensuring all names are processed −
DELIMITER //
CREATE PROCEDURE FetchCustomers()
BEGIN
   DECLARE done INT DEFAULT FALSE;
   DECLARE customer_id INT;
   DECLARE customer_name VARCHAR(255);
   DECLARE auto_id INT;

   -- Declare cursor
   DECLARE MY_CURSOR CURSOR FOR
   SELECT id, name FROM CUSTOMERS;

   -- Declare exit handler
   DECLARE CONTINUE HANDLER FOR NOT FOUND SET done = TRUE;

   -- Open cursor
   OPEN MY_CURSOR;

   -- Fetch and insert rows
   read_loop: LOOP
      FETCH MY_CURSOR INTO customer_id, customer_name;
      IF done = 1 THEN
         LEAVE read_loop;
      END IF;

      -- Insert the fetched data into the backup table
      INSERT INTO customers_backup VALUES (customer_id, customer_name);

      -- Get the last auto-generated ID used in the insertion
      SET auto_id = LAST_INSERT_ID();

   END LOOP;

    -- Close cursor
    CLOSE MY_CURSOR;
END //
DELIMITER ;
Once we create the procedure successfully, we can execute it using the CALL statement as shown below −
CALL FetchCustomers();
Verification
You can verify the contents of the CUSTOMERS_BACKUP table using the SELECT statement as shown below −
SELECT * FROM CUSTOMERS_BACKUP;
The contents of the table would be −
| ID | NAME |
|---|---|
| 1 | Ramesh |
| 2 | Khilan |
| 3 | Kaushik |
| 4 | Chaitali |