- Spring Security Tutorial
- Spring Security - Home
- Spring Security - Form Login with Database
- Spring Security - Form Login, Remember Me & Logout
- Spring Security - Taglib
- Spring Security - XML Configuration
- Spring Security - OAuth2
- Spring Security - JWT
- Spring Security Useful Resources
- Spring Security - Quick Guide
- Spring Security - Useful Resources
- Spring Security - Discussion
Spring Security - OAuth2
Contents
- OAuth2.0 Fundamentals
- OAuth2.0 Getting started(Practical Guide)
OAuth 2.0 Fundamentals
OAuth 2.0 was developed by IETF OAuth Working Group and published in October of 2012. It serves as an open authorization protocol for enabling a third party application to get limited access to an HTTP service on behalf of the resource owner. It can do so while not revealing the identity or the long-term credentials of the user. A third-party application itself can also use it on its behalf. The working principle of OAuth consists of the delegation of user authentication to a service hosting the user account and authorizing the third-party application access to the account of the user.
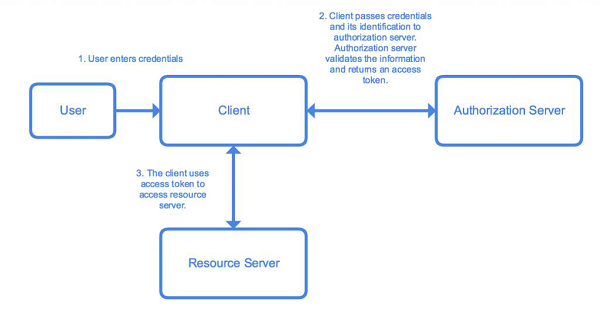
Let us consider an example. Let us say we want to login to a website “clientsite.com”. We can sign in via Facebook, Github, Google or Microsoft. We select any options of the options given above, and we are redirected to the respective website for login. If login is successful, we are asked if we want to give clientsite.com access to the specific data requested by it. We select our desired option and we are redirected to clientsite.com with an authorization code or error code and our login is successful or not depending on our action in the third-party resource. This is the basic working principle of OAuth 2.
There are five key actors involved in an OAuth system. Let’s list them out −
User / Resource Owner − The end-user, who is responsible for the authentication and for providing consent to share resources with the client.
User-Agent − The browser used by the User.
Client − The application requesting an access token.
Authorization Server − The server that is used to authenticate the user/client. It issues access tokens and tracks them throughout their lifetime.
Resource Server − The API that provides access to the requested resource. It validates the access tokens and provides authorization.
Getting Started
We will be developing a Spring Boot Application with Spring Security and OAuth 2.0 to illustrate the above. We will be developing a basic application with an in-memory database to store user credentials now. The application will make it easy for us to understand the workings of OAuth 2.0 with Spring Security.
Let’s use the Spring initializer to create a maven project in Java 8. Let’s start by going to start.spring.io. We generate an application with the following dependencies−
- Spring Web
- Spring Security
- Cloud OAuth2
- Spring Boot Devtools
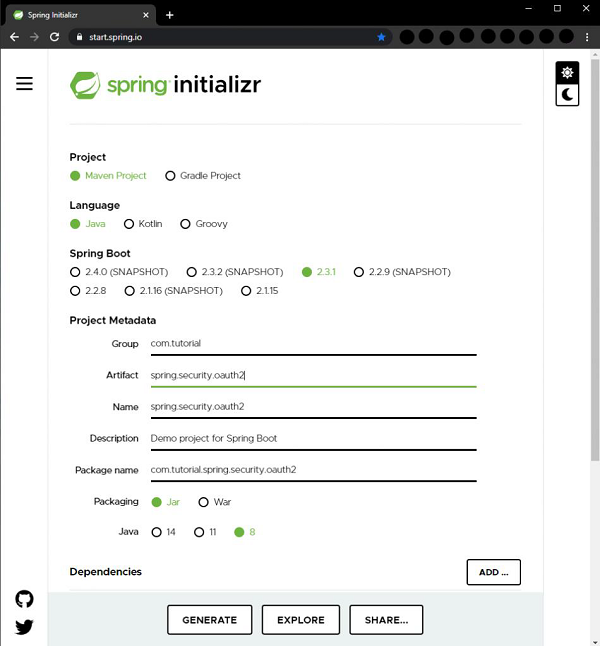

With the above configuration, we click on the Generate button to generate a project. The project will be downloaded in a zip file. We extract the zip to a folder. We can then open the project in an IDE of our choice. I am using Spring Tools Suite here as it is optimized for spring applications. We can also use Eclipse or IntelliJ Idea as we wish.
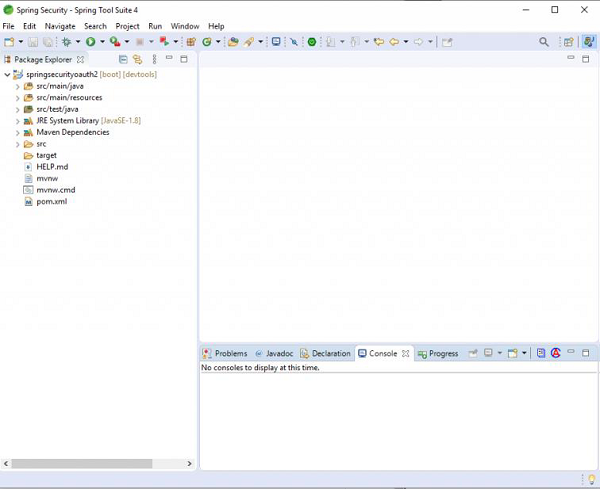
So, we open the project in STS, let the dependencies get downloaded. Then we can see the project structure in our package explorer window. It should resemble the screenshot below.
If we open the pom.xml file we can view the dependencies and other details related to the project. It should look something like this.
<?xml version="1.0" encoding="UTF-8"?>
<project xmlns="http://maven.apache.org/POM/4.0.0"
   xmlns:xsi="http://www.w3.org/2001/XMLSchema-instance"
   xsi:schemaLocation="http://maven.apache.org/POM/4.0.0
   https://maven.apache.org/xsd/maven-4.0.0.xsd">
   <modelVersion>4.0.0</modelVersion>
   <parent>
      <groupId>org.springframework.boot</groupId>
      <artifactId>spring-boot-starter-parent</artifactId>
      <version>2.3.1.RELEASE</version>
      <relativePath/> <!-- lookup parent from repository -->
   </parent>
   <groupId>com.tutorial</groupId>
   <artifactId>spring.security.oauth2</artifactId>
   <version>0.0.1-SNAPSHOT</version>
   <name>spring.security.oauth2</name>
   <description>Demo project for Spring Boot</description>
   <properties>
      <java.version>1.8</java.version>
      <spring-cloud.version>Hoxton.SR6</spring-cloud.version>
   </properties>
   <dependencies>
      <dependency>
         <groupId>org.springframework.boot<groupId>
         <artifactId>spring-boot-starter-security</artifactId>
      </dependency>
      <dependency>
         <groupId>org.springframework.boot</groupId>
         <artifactId>spring-boot-starter-web</artifactId>
      </dependency>
      <dependency>
         <groupId>org.springframework.cloud</groupId>
         <artifactId>spring-cloud-starter-oauth2</artifactId>
      </dependency>
      <dependency>
         <groupId>org.springframework.boot<groupId>
         <artifactId>spring-boot-devtools</artifactId>
         <scope>runtime</scope>
         <optional>true</optional>
      </dependency>
      <dependency>
         <groupId>org.springframework.boot</groupId>
         <artifactId>spring-boot-starter-test</artifactId>
         <scope>test</scope> <exclusions>    <exclusion>
            <groupId>org.junit.vintage</groupId>
            <artifactId>junit-vintage-engine</artifactId>
            </exclusion>
         </exclusions>
      <dependency>
      <dependency>
         <groupId>org.springframework.security</groupId>
         <artifactId>spring-security-test</artifactId>
         <scope>test</scope>
      </dependency>
   </dependencies>
      <dependencyManagement>
   <dependencies>
      <dependency>
         <groupId>org.springframework.cloud</groupId>
         <artifactId>spring-cloud-dependencies</artifactId>
         <version>${spring-cloud.version}</version>
         <type>pom</type>
         <scope>import</scope>
      </dependency>
   </dependencies>
   </dependencyManagement><build>
   <plugins>
      <plugin>
         <groupId>org.springframework.boot</groupId>
         <artifactId>spring-boot-maven-plugin</artifactId>
      </plugin>
   </plugins>
   </build>
</project>
Now, to the base package of our application, i.e., com.tutorial.spring.security.oauth2, let’s add a new package named config where we shall add our configuration classes.
Let’s create our first configuration class, UserConfig which extends the WebSecurityConfigurerAdapter class of Spring Security to manage the users of the client application. We annotate the class with @Configuration annotation to tell Spring that it is a configuration class.
package com.tutorial.spring.security.oauth2.config;
import org.springframework.context.annotation.Bean;
import org.springframework.context.annotation.Configuration;
import org.springframework.security.authentication.AuthenticationManager;
import org.springframework.security.config.annotation.web.builders.HttpSecurity;
import org.springframework.security.config.annotation.web.configuration.WebSecurityConfigurerAdapter;
import org.springframework.security.core.userdetails.User;
import org.springframework.security.core.userdetails.UserDetails;
import org.springframework.security.core.userdetails.UserDetailsService;
import org.springframework.security.crypto.password.NoOpPasswordEncoder;
import org.springframework.security.crypto.password.PasswordEncoder;
import org.springframework.security.provisioning.InMemoryUserDetailsManager;
import org.springframework.security.provisioning.UserDetailsManager;
@Configuration public class UserConfig extends WebSecurityConfigurerAdapter {
   @Bean
   public UserDetailsService userDetailsService() {
      UserDetailsManager userDetailsManager = new InMemoryUserDetailsManager();
      UserDetails user = User.withUsername("john")
         .password("12345") .authorities("read")
      .build(); userDetailsManager.createUser(user); return userDetailsManager;
   }
   @Bean
   public PasswordEncoder passwordEncoder() {
      return NoOpPasswordEncoder.getInstance();
   }
   @Override
   @Bean
   public AuthenticationManager authenticationManagerBean() throws Exception {
      return super.authenticationManagerBean();
   }
}
We then add a bean of the UserDetailsService to retrieve the user details for authentication and authorization. To put it in the Spring context we annotate it with @Bean. To keep this tutorial simple and easy to understand, we use an InMemoryUserDetailsManager instance. For a real-world application, we can use other implementations like JdbcUserDetailsManager to connect to a database and so on. To be able to create users easily for this example we use the UserDetailsManager interface which extends the UserDetailsService and has methods like createUser(), updateUser() and so on. Then, we create a user using the builder class. We give him a username, password and a “read” authority for now. Then, using the createUser() method, we add the newly created user and return the instance of UserDetailsManager thus putting it in the Spring context.
To be able to use the UserDetailsService defined by us, it is necessary to provide a PasswordEncoder bean in the Spring context. Again, to keep it simple for now we use the NoOpPasswordEncoder. The NoOpPasswordEncoder should not be used otherwise for real-world applications for production as it is not secure. NoOpPasswordEncoder does not encode the password and is only useful for developing or testing scenarios or proof of concepts. We should always use the other highly secure options provided by Spring Security, the most popular of which is the BCryptPasswordEncoder, which we will be using later in our series of tutorials. To put it in the Spring context we annotate the method with @Bean.
We then override the AuthenticationManager bean method of WebSecurityConfigurerAdapter, which returns the authenticationManagerBean to put the authentication manager into the Spring context.
Now, to add the client configurations we add a new configuration class named AuthorizationServerConfig which extends AuthorizationServerConfigurerAdapter class of Spring Security. The AuthorizationServerConfigurerAdapter class is used to configure the authorization server using the spring security oauth2 module. We annotate this class with @Configuration as well. To add the authorization server functionality to this class we need to add the @EnableAuthorizationServer annotation so that the application can behave as an authorization server.
package com.tutorial.spring.security.oauth2.config;
import org.springframework.beans.factory.annotation.Autowired;
import org.springframework.context.annotation.Configuration;
import org.springframework.security.authentication.AuthenticationManager;
import org.springframework.security.oauth2.config.annotation.configurers.ClientDetailsServiceConfigurer;
import org.springframework.security.oauth2.config.annotation.web.configuration.AuthorizationServerConfigurerAdapter;
import org.springframework.security.oauth2.config.annotation.web.configuration.EnableAuthorizationServer;
import org.springframework.security.oauth2.config.annotation.web.configurers.AuthorizationServerEndpointsConfigurer; @Configuration @EnableAuthorizationServer
public class AuthorizationServerConfig extends AuthorizationServerConfigurerAdapter {
   @Autowired private AuthenticationManager authenticationManager;
   @Override
   public void configure(ClientDetailsServiceConfigurer clients) throws Exception {
      clients.inMemory() .withClient("oauthclient1") .secret("oauthsecret1") .scopes("read") .authorizedGrantTypes("password") }
   @Override
   public void configure(AuthorizationServerEndpointsConfigurer endpoints) throws Exception {
      endpoints.authenticationManager(authenticationManager);
   }
}
For checking oauth tokens, Spring Security oauth exposes two endpoints – /oauth/check_token and /oauth/token_key. These endpoints are protected by default behind denyAll(). tokenKeyAccess() and checkTokenAccess() methods open these endpoints for use.
We autowire the AuthenticationManager bean we configured in the UserConfig class as a dependency here which we shall be using later.
We then override two of the configure() methods of the AuthorizationServerConfigurerAdapter to provide an in-memory implementation of the client details service. The first method which uses the ClientDetailsServiceConfigurer as a parameter, as the name suggests, allows us to configure the clients for the authorization server. These clients represent the applications that will be able to use the functionality of this authorization server. Since this is a basic application for learning the implementation of OAuth2, we will keep things simple for now and use an in-memory implementation with the following attributes −
clientId − the id of the client. Required.
secret − the client secret, required for trusted clients
scope − the limiting scope of the client, in other words, client permissions. If left empty or undefined, the client is not limited by any scope.
authorizedGrantTypes − the grant types that the client is authorized to use. The grant type denotes the way by which the client obtains the token from the authorization server. We will be using the “password” grant type as it is the simplest. Later, we shall be using another grant type for another use-case.
In “password” authorization grant type, the user needs to provide his/her username, password and scope to our client application, which then uses those credentials along with its credentials for the authorization server we want the tokens from.
The other configure() method that we overrode, uses AuthorizationServerEndpointsConfigurer as a parameter, is used to attach the AuthenticationManager to authorization server configuration.
With these basic configurations, our Authorization server is ready to use. Let’s go ahead and start it and use it. We will be using Postman ( https://www.postman.com/downloads/ ) for making our requests.
When using STS, we can launch our application and start seeing see the logs in our console. When the application starts, we can find the oauth2 endpoints exposed by our application in the console. Of those endpoints, we will be using the following the below token for now −
/oauth/token – for obtaining the token.
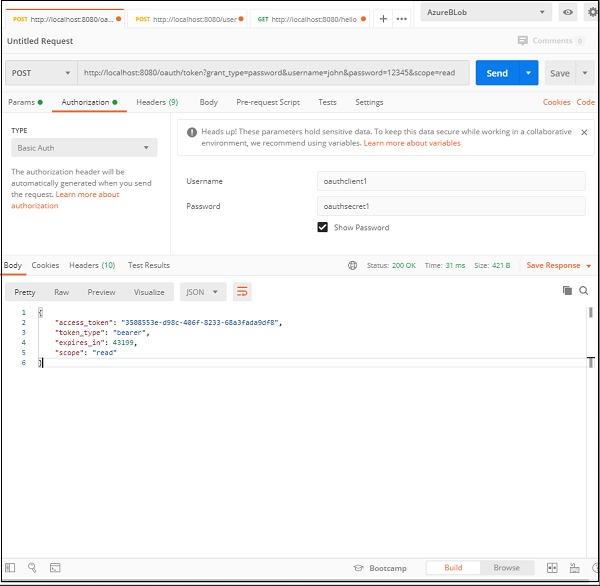
If we check the postman snapshot here, we can notice a few things. Let’s list them down below.
- The URL − Our Spring Boot Application is running at port 8080 of our local machine, so the request is pointed to http://localhost:8080. The next part is /oauth/token, which we know, is the endpoint exposed by OAuth for generating the token.
- The query params− Since this is a “password” authorization grant type, the user needs to provide his/her username, password and scope to our client application, which then uses those credentials along with its credentials to the authorization server we want the tokens from.
- Client Authorization − The Oauth system requires the client to be authorized to be able to provide the token. Hence, under the Authorization header, we provide the client authentication information, namely username and password that we configured in our application.
Let’s take a closer look at the query params and the authorization header −
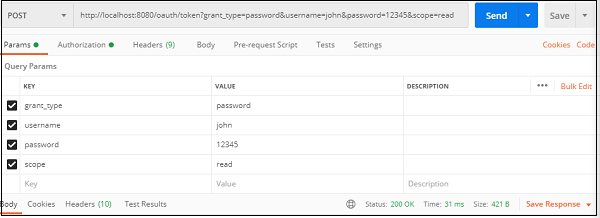
The query params
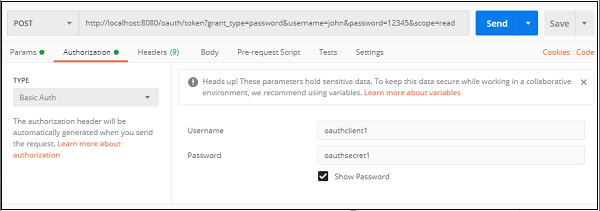
Client credentials
If everything is correct, we shall be able to see our generated token in the response along with a 200 ok status.
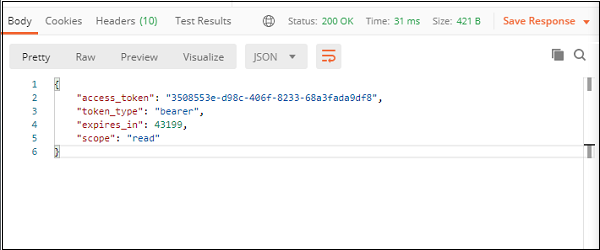
The response
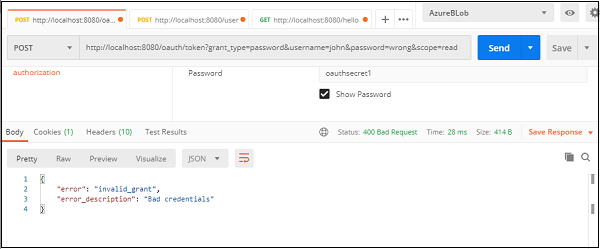
We can test our server, by putting wrong credentials or no credentials, and we will get back an error which would say the request is unauthorized or has bad credentials.
This is our basic oauth authorization server, that uses the password grant type to generate and provide a password.
Next, let’s implement a more secure, and a more common application of the oauth2 authentication, i.e. with an authorization code grant type. We will update our current application for this purpose.
The authorization grant type is different from the password grant type in the sense that the user doesn’t have to share his credentials with the client application. He shares them with the authorization server only and in return authorization code is sent to the client which it uses to authenticate the client. It is more secure than the password grant type as user credentials are not shared with the client application and hence the user’s information stays safe. The client application doesn’t get access to any important user information unless approved by the user.
In a few simple steps, we can set up a basic oauth server with an authorization grant type in our application. Let’s see how.
package com.tutorial.spring.security.oauth2.config;
import org.springframework.beans.factory.annotation.Autowired;
import org.springframework.context.annotation.Configuration;
import org.springframework.security.authentication.AuthenticationManager;
import org.springframework.security.oauth2.config.annotation.configurers.ClientDetailsServiceConfigurer;
import org.springframework.security.oauth2.config.annotation.web.configuration.AuthorizationServerConfigurerAdapter;
import org.springframework.security.oauth2.config.annotation.web.configuration.EnableAuthorizationServer;
import org.springframework.security.oauth2.config.annotation.web.configurers.AuthorizationServerEndpointsConfigurer;
@Configuration
@EnableAuthorizationServer
public class AuthorizationServerConfig extends AuthorizationServerConfigurerAdapter {
   @Autowired private AuthenticationManager authenticationManager;
   @Override
   public void configure(ClientDetailsServiceConfigurer clients) throws Exception {
      clients.inMemory()
      .withClient("oauthclient1")
      .secret("oauthsecret1")
      .scopes("read") .authorizedGrantTypes("password")
      .and() .withClient("oauthclient2") .secret("oauthsecret2")
      .scopes("read") .authorizedGrantTypes("authorization_code")
      .redirectUris("http://locahost:9090");
   }
   @Override public void configure(AuthorizationServerEndpointsConfigurer endpoints) throws Exception {
      endpoints.authenticationManager(authenticationManager);
   }
}
Let’s add a second client for this operation oauthclient2 for this operation with a new secret and read scope. Here we have changed the grant type to authorization code for this client. We also added a redirect URI so that the authorization server can callback the client. So, basically the redirect URI is the URI of the client.
Now, we have to establish a connection between the user and the authorization server. We have to set an interface for the authorization server where the user can provide the credentials. We use the formLogin() implementation of Spring Security to achieve that functionality while keeping things simple. We also make sure that all requests are authenticated.
package com.tutorial.spring.security.oauth2.config;
import org.springframework.context.annotation.Bean;
import org.springframework.context.annotation.Configuration;
import org.springframework.security.authentication.AuthenticationManager;
import org.springframework.security.config.annotation.web.builders.HttpSecurity;
import org.springframework.security.config.annotation.web.configuration.WebSecurityConfigurerAdapter;
import org.springframework.security.core.userdetails.User;
import org.springframework.security.core.userdetails.UserDetails;
import org.springframework.security.core.userdetails.UserDetailsService;
import org.springframework.security.crypto.password.NoOpPasswordEncoder;
import org.springframework.security.crypto.password.PasswordEncoder;
import org.springframework.security.provisioning.InMemoryUserDetailsManager;
import org.springframework.security.provisioning.UserDetailsManager;
@SuppressWarnings("deprecation") @Configuration
public class UserConfig extends WebSecurityConfigurerAdapter {
   @Bean
   public UserDetailsService userDetailsService() {
      UserDetailsManager userDetailsManager = new InMemoryUserDetailsManager();
         UserDetails user = User.withUsername("john")
      .password("12345") .authorities("read") .build();
      userDetailsManager.createUser(user); return userDetailsManager;
   }
   @Bean public PasswordEncoder passwordEncoder() {
      return NoOpPasswordEncoder.getInstance();
    }
   @Override
   @Bean
   public AuthenticationManager authenticationManagerBean() throws Exception {
      return super.authenticationManagerBean();
   }
   @Override protected void configure(HttpSecurity http) throws Exception {
      http.formLogin(); http.authorizeRequests().anyRequest().authenticated();
   }
}
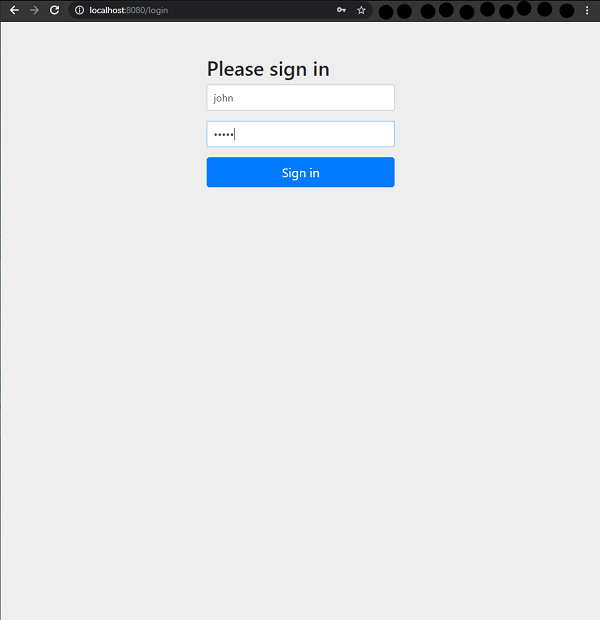
This completes our setup for the authorization grant type. Now to test our setup and launch our application. We launch our browser at http://localhost:8080/oauth/authorize?response_type=code&client_id=oauthclient2&scope=read. We will redirected to the default form login page of Spring Security.
Here, the response type code implies that the authorization server will return an access code which will be used by the client to log in. When we use the user credentials we will be asked if I want to grant the permissions asked by the client, in a similar screen as shown below.
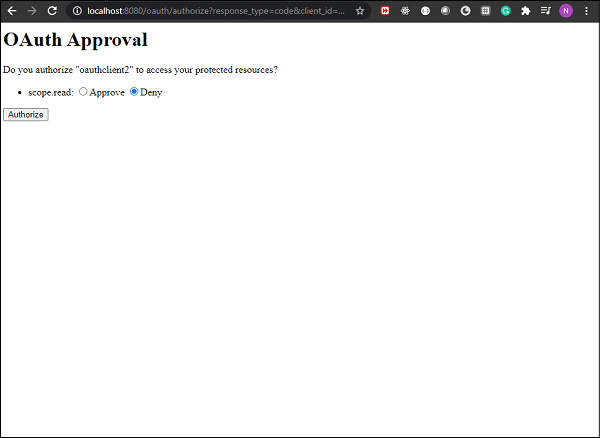
If we approve and click Authorize we shall see we are redirected to our given redirect url along with the access code. In our case the we are redirected to http://locahost:9090/?code=7Hibnw, as we specified in the application. We can use the code now as a client in Postman to login to the authorization server.

As we can see here, we have used the code received from the authorization server in our URL, and the grant_type as authorization_code and scope as read. We acted as the client and provided the client credentials as configured in our application. When we make this request we get back our access_token which we can use further.
So, we have seen how we can configure Spring Security with OAuth 2.0. The application is pretty simple and easy to understand and helps us understand the process fairly easily. We have used two kinds of authorization grant types and seen how we can use them to acquire access tokens for our client application.