- Spring Security Tutorial
- Spring Security - Home
- Spring Security - Form Login with Database
- Spring Security - Form Login, Remember Me & Logout
- Spring Security - Taglib
- Spring Security - XML Configuration
- Spring Security - OAuth2
- Spring Security - JWT
- Spring Security Useful Resources
- Spring Security - Quick Guide
- Spring Security - Useful Resources
- Spring Security - Discussion
Spring Security - Form Login with Database
Contents
- Introduction and Overview
- Basic components of Spring Security
- AuthenticationFilter
- AuthenticationManager
- AuthenticationProvider
- UserDetailsService
- PasswordEncoder
- Spring Security Context
- Form Login
- Login with a Database
- Login Attempts Limit
- Getting Started (Practical Guide)
Introduction and Overview
In addition to providing various inbuilt authentication and authorization options, Spring Security allows us to customize our authentication process as much as we want. Starting from a custom login page to our very own customized authentication providers and authentication filters, we can pretty much customize every aspect of the authentication process. We can define our own authentication process which can range from basic authentication using a username and a password to a complex one such as two-factor authentication using tokens and OTP’s. Also, we can use various databases – both relational and non-relational, use various password encoders, lock malicious users out of their accounts, and so on.
Today, we are going to discuss three such customizations, namely – custom form-login, a database provided authentication, and limiting login attempts. Though these are pretty basic use-cases, yet these still will let us have a closer look into Spring Security’s authentication and authorization process. We are also going to set up a registration page through which the users will be able to register themselves with our application.
First of all, let’s take a look at the architecture of Spring Security. It starts with servlet filters. These filters intercept requests, perform operations on them, and then pass the requests on to next filters in the filter chain or request handlers or block them if they do not meet certain conditions. It is during this process that Spring Security can authenticate requests and perform various authentication checks on the requests. It can also prevent unauthenticated or malicious requests from accessing our protected resources by not allowing them to pass through. Thus our application and resources stay protected.
Components of Spring Security Architecture
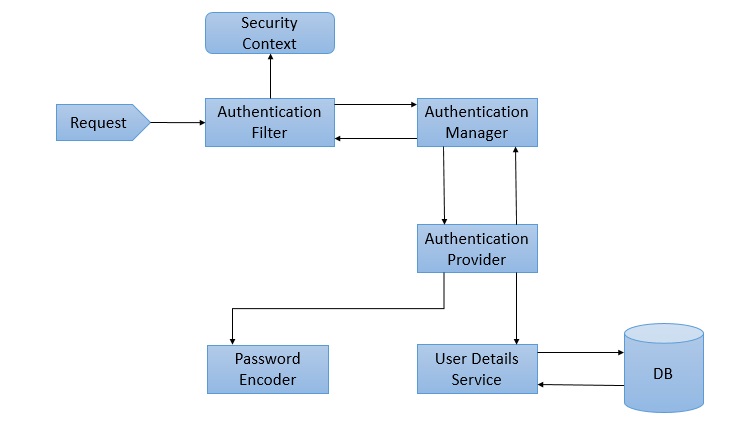
The basic components of Spring Security, as we can see in the above diagram are given below. We shall discuss them briefly as we go along. We shall also discuss their roles in the authentication and authorization process.
AuthenticationFilter
This is the filter that intercepts requests and attempts to authenticate it. In Spring Security, it converts the request to an Authentication Object and delegates the authentication to the AuthenticationManager.
AuthenticationManager
It is the main strategy interface for authentication. It uses the lone method authenticate() to authenticate the request. The authenticate() method performs the authentication and returns an Authentication Object on successful authentication or throw an AuthenticationException in case of authentication failure. If the method can’t decide, it will return null. The process of authentication in this process is delegated to the AuthenticationProvider which we will discuss next.
AuthenticationProvider
The AuthenticationManager is implemented by the ProviderManager which delegates the process to one or more AuthenticationProvider instances. Any class implementing the AuthenticationProvider interface must implement the two methods – authenticate() and supports(). First, let us talk about the supports() method. It is used to check if the particular authentication type is supported by our AuthenticationProvider implementation class. If it is supported it returns true or else false. Next, the authenticate() method. Here is where the authentication occurs. If the authentication type is supported, the process of authentication is started. Here is this class can use the loadUserByUsername() method of the UserDetailsService implementation. If the user is not found, it can throw a UsernameNotFoundException.
On the other hand, if the user is found, then the authentication details of the user are used to authenticate the user. For example, in the basic authentication scenario, the password provided by the user may be checked with the password in the database. If they are found to match with each other, it is a success scenario. Then we can return an Authentication object from this method which will be stored in the Security Context, which we will discuss later.
UserDetailsService
It is one of the core interfaces of Spring Security. The authentication of any request mostly depends on the implementation of the UserDetailsService interface. It is most commonly used in database backed authentication to retrieve user data. The data is retrieved with the implementation of the lone loadUserByUsername() method where we can provide our logic to fetch the user details for a user. The method will throw a UsernameNotFoundException if the user is not found.
PasswordEncoder
Until Spring Security 4, the use of PasswordEncoder was optional. The user could store plain text passwords using in-memory authentication. But Spring Security 5 has mandated the use of PasswordEncoder to store passwords. This encodes the user’s password using one its many implementations. The most common of its implementations is the BCryptPasswordEncoder. Also, we can use an instance of the NoOpPasswordEncoder for our development purposes. It will allow passwords to be stored in plain text. But it is not supposed to be used for production or real-world applications.
Spring Security Context
This is where the details of the currently authenticated user are stored on successful authentication. The authentication object is then available throughout the application for the session. So, if we need the username or any other user details, we need to get the SecurityContext first. This is done with the SecurityContextHolder, a helper class, which provides access to the security context. We can use the setAuthentication() and getAuthentication() methods for storing and retrieving the user details respectively.
Moving on, let’s now discuss the three custom implementations we are going to use for our application.
Form Login
When we add Spring Security to an existing Spring application it adds a login form and sets up a dummy user. This is Spring Security in auto-configuration mode. In this mode, it also sets up the default filters, authentication-managers, authentication-providers, and so on. This setup is an in-memory authentication setup. We can override this auto-configuration to set up our own users and authentication process. We can also set up our custom login method like a custom login form. Spring Security only has to made aware of the details of the login form like – the URI of the login form, the login processing URL, etc.. It will then render our login form for the application and carry out the process of authentication along with the other provided configurations or Spring’s own implementation.
This custom form setup will only have to abide by certain rules to be integrated with Spring Security. We need to have a username parameter and a password parameter and the parameter names should be “username” and “password” since those are the default names. In case, we use our own parameter names for these fields in the custom we have to inform Spring Security of those changes using the usernameParameter() and passwordParameter() methods. Similarly, for every change we do to the login form or the form login method, we will have to inform Spring Security of those changes with appropriate methods so that it can integrate them with the authentication process.
Login with a Database
As we discussed, Spring Security automatically provides an in-memory authentication implementation by default. We can override this by authenticating users whose details are stored in a database. In this case, while authenticating a user, we can verify the credentials provided by the user against those in the database for authentication. We can also let new users register in our application and store their credentials in the same database. Also, we can provide methods to change or update their passwords or roles or other data. As a result, this provides us with persistent user data which can be used for longer periods of time.
Login Attempts Limit
To limit login attempts in our application we can use Spring Security’s isAccountNonLocked property. Spring Security’s UserDetails provides us with that property. We can set up an authentication method wherein, if any user or someone else provides incorrect credentials for more than a certain number of times, we can lock their account. Spring Security disables authentication for a locked user even if the user provides correct credentials. This is an in-built feature provided by Spring Security. We can store the number of incorrect login attempts in our database. Then against each incorrect authentication attempt, we can update and check with the database table. When the number of such attempts exceeds a given number, we can lock the user out of their account. Consequently, the user will not be able to log in again until their account is unlocked.
Getting Started (Practical Guide)
Let’s start with our application now. The tools we will be needing for this application are listed below −
A Java IDE − preferable STS 4, but Eclipse, IntelliJ Idea or any other IDE will do.
MySql Server Community Edition − We need to download and install MySql Community Server in our system. We can go to the official website by clicking here.
MySql Workbench − It is a GUI tool that we can use to interact with MySql databases.
Database Setup
Let’s set up the database first. We will use a MySql database instance for this application. MySql Server Community Edition is available for free download and use. We will use MySql Workbench to connect with our MySql Server and create a database called “spring” to use with our application.
Then we will create two tables – users and attempts– to persist our users and login attempts. As mentioned earlier, the details of the users registering with our application will be stored in the users table. The number of login attempts by any user will be stored in the attempts table against his username. This way we can track the attempts and take necessary action.
Let’s take a the look at the SQL to setup our users table and attempts table.
CREATE TABLE users (
   username VARCHAR(45) NOT NULL , password VARCHAR(45) NOT NULL ,
   account_non_locked TINYINT NOT NULL DEFAULT 1 ,
   PRIMARY KEY (username)
);
CREATE TABLE attempts (
   id int(45) NOT NULL AUTO_INCREMENT,
   username varchar(45) NOT NULL, attempts varchar(45) NOT NULL, PRIMARY KEY (id)
);
We can now add a dummy user to our application.
INSERT INTO users(username,password,account_non_locked)
VALUES ('user','12345', true);
Project Setup
As usual, we will use the Spring Initializer to setup our project. We are going to create a Maven project, with Spring Boot version 2.3.2. Let’s name our project formlogin(we can choose any name we want) and group id as com.tutorial.spring.security. Furthermore, we will use Java version 8 for this project.
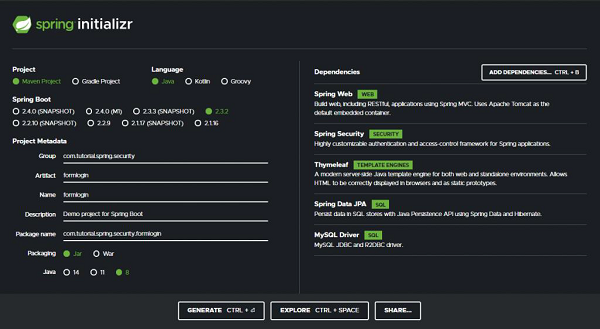
Dependencies
Now, coming to the dependencies, we are going to keep our application as simple as possible for this demo. We will keep our focus on the features we want to explore today. So we will choose the minimum number of dependencies that will help us set up our application and get it up and running quickly. Let’s go through the dependencies −
Spring Web − It bundles all dependencies related to web development including Spring MVC, REST, and an embedded Tomcat Server.
Spring Security − For the implementation of security features provided by Spring Security.
Thymeleaf − A server-side Java template engine for HTML5/XHTML/XML.
Spring Data JPA − In addition to using all features defined by JPA specification, Spring Data JPA adds its own features such as the no-code implementation of the repository pattern and the creation of database queries from the method name.
Mysql Driver − For the MySQL database driver.
With these five dependencies, we can set up our project now. Let’s click on the generate button. This will download our project as a zip file. We can extract it to a folder of our choice. Then we open the project in our IDE. We will be using Spring Tool Suite 4 for this. example.
Let’s load our project into STS. It will take a little time for our IDE to download the dependencies and validating them. Let’s take a look at our pom.xml file.
pom.xml
<?xml version="1.0" encoding="ISO-8859-1"?>
<project xsi:schemaLocation="http://maven.apache.org/POM/4.0.0
   https://maven.apache.org/xsd/maven-4.0.0.xsd"
   xmlns:xsi="http://www.w3.org/2001/XMLSchema-instance"
   xmlns="http://maven.apache.org/POM/4.0.0">
   <modelVersion>4.0.0</modelVersion>
   <parent>
      <groupId>org.springframework.boot</groupId>
      <artifactId>spring-boot-starter-parent</artifactId>
      <version>2.3.1.RELEASE</version>
      <relativePath/>
      <!-- lookup parent from repository -->
   </parent>
   <groupId>com.tutorial.spring.security</groupId>
   <artifactId>formlogin</artifactId>
   <version>0.0.1-SNAPSHOT</version>
   <name>formlogin</name>
   <description>Demo project for Spring Boot</description>
   <properties> <java.version>1.8</java.version>
   </properties>
   <dependencies>
      <dependency>
         <groupId>org.springframework.boot</groupId>
         <artifactId>spring-boot-starter-data-jpa</artifactId>
      </dependency>
      <dependency>
         <groupId>org.springframework.boot</groupId>
         <artifactId>spring-boot-starter-security</artifactId>
      </dependency>
      <dependency>
         <groupId>org.springframework.boot</groupId>
         <artifactId>spring-boot-starter-thymeleaf</artifactId>
      </dependency>
      <dependency>
         <groupId>org.springframework.boot</groupId>
         <artifactId>spring-boot-starter-web</artifactId>
      </dependency>
      <dependency>
         <groupId>org.springframework.boot</groupId>
         <artifactId>spring-boot-devtools</artifactId>
         <scope>runtime<scope> <optional>true</optional>
      </dependency>
      <dependency>
      <groupId>mysql</groupId>
      <artifactId>mysql-connector-java</artifactId>
      <scope>runtime</scope> </dependency>
      <dependency>
         <groupId>org.springframework.boot</groupId>
         <artifactId>spring-boot-starter-test</artifactId>
         <scope>test</scope>
         <exclusions>
         <exclusion>
         <groupId>org.junit.vintage</groupId>
         <artifactId>junit-vintage-engine</artifactId>
         </exclusion>
         </exclusions>
      </dependency>
      <dependency>
         <groupId>org.springframework.security</groupId>
         <artifactId>spring-security-test<artifactId>
         <scope>test</scope>
      </dependency>
   </dependencies>
   <build>
      <plugins>
         <plugin>
            <groupId>org.springframework.boot</groupId>
            <artifactId>spring-boot-maven-plugin</artifactId>
         </plugin>
      </plugins>
   </build>
</project>
We can see that our project details along with our dependencies are enlisted here.
Data Source
We will configure our data source in the application.properties file. As we will be using our local MySQL DB as the data source, so we provide the url, username, and password of our local DB instance here. We have named our database as “spring”.
spring.datasource.url=jdbc:mysql://localhost:3306/spring
spring.datasource.username=root
spring.datasource.password=root
Entities
Let’s create our entities now. We start with the User entity which contains three fields – username, password, and accountNonLocked. This User class also implements the UserDetails interface of Spring Security. This class provides core user information. It is used to store user data which can be later encapsulated into Authentication objects. It is not recommended to implement the interface directly. But for our case, since this is a simple application to demonstrate the login with a database, we have implemented this interface directly here to keep thingssimple. We can implement this interface by using a wrapper class around our User entity.
User.java
package com.tutorial.spring.security.formlogin.model;

import java.util.Collection;
import java.util.List;
import javax.persistence.Column;
import javax.persistence.Entity;
import javax.persistence.Id;
import javax.persistence.Table;
import org.springframework.security.core.GrantedAuthority;
import org.springframework.security.core.userdetails.UserDetails;

@Entity
@Table(name = "users")
public class User implements UserDetails {

   /**
   *
   */
   private static final long serialVersionUID = 1L;

   @Id
   private String username;
   private String password; @Column(name = "account_non_locked")
   private boolean accountNonLocked;

   public User() {
   }
   public User(String username, String password, boolean accountNonLocked) {
      this.username = username;
      this.password = password;
      this.accountNonLocked = accountNonLocked;
   }
   @Override
   public Collection< extends GrantedAuthority> getAuthorities() {
      return List.of(() -> "read");
   }
   @Override
   public String getPassword() {
      return password;
   }
   public void setPassword(String password) {
      this.password = password;
   }
   @Override
   public String getUsername() {
      return username;
   }
   public void setUsername(String username) {
      this.username = username;
   }
   @Override
   public boolean isAccountNonExpired() {
      return true;
   }
   @Override
   public boolean isAccountNonLocked() {
      return accountNonLocked;
   }
   @Override public boolean isCredentialsNonExpired() {
      return true;
   }
   @Override public boolean isEnabled() {
   return true;
   }

   public void setAccountNonLocked(Boolean accountNonLocked) {
      this.accountNonLocked = accountNonLocked;
   }
   public boolean getAccountNonLocked() {
      return accountNonLocked;
   }
}
The accountNonLocked field is to be noted here. Every User in Spring Security has the account unlocked by default. To override that property and to lock the users out of their accounts once they exceed the permissible number of attempts, we shall be using this property. If the user exceeds the number of invalid attempts permissible, we shall use this property to lock him out of his account. Also, during every authentication attempt, we shall be checking this property with the isAccountNonLocked() method along with the credentials to authenticate the user. Any user with a locked account will not be allowed to authenticate into the application.
For the other methods of the UserDetails interface, we can simply provide an implementation that returns true for now as we shall not be exploring these properties for this application.
For the list of authorities for this user, let’s assign him a dummy role for now. We shall not be using this property either for this application.
Attempts.java
Moving on, let’s create our Attempts entity to persist our invalid attempts count. As created in the database, we will have the three fields here – username, an integer named attempts to keep counts of the number of attempts, and an identifier.
package com.tutorial.spring.security.formlogin.model;

import javax.persistence.Entity;
import javax.persistence.GeneratedValue;
import javax.persistence.GenerationType;
import javax.persistence.Id;

@Entity
public class Attempts {
   @Id
   @GeneratedValue(strategy = GenerationType.IDENTITY)
   private int id;
   private String username;
   private int attempts;

   /**
   * @return the id
   */
   public int getId() {
      return id;
   }
   /**
   * @param id the id to set
   */
   public void setId(int id) {
      this.id = id;
   }
   /**
   * @return the username
   */
   public String getUsername() {
      return username;
   }
   /**
   * @param username the username to set
   */
   public void setUsername(String username) {
      this.username = username;
   }
   /**
   * @return the attempts
   */
   public int getAttempts() {
      return attempts;
   }
   /**
   * @param attempts the attempts to set
   */
   public void setAttempts(int attempts) {
      this.attempts = attempts;
   }
}
Repositories
We have created the entities, let’s create the repositories to store and retrieve data. We will have two repositories, one for each entity class. For both the repository interfaces, we will extend the JpaRepository which provides us with in-built implementations to save and retrieve data from the database configured in our application.properties file. We can also add our methods or queries here in addition to the provided ones.
UserRepository.java
package com.tutorial.spring.security.formlogin.repository;

import java.util.Optional;
import org.springframework.data.jpa.repository.JpaRepository;
import org.springframework.stereotype.Repository;
import com.tutorial.spring.security.formlogin.model.User;

@Repository public interface UserRepository extends JpaRepository<User, String> {
   Optional<User> findUserByUsername(String username);
}
As discussed, we have added our method to retrieve a user by username here. This will return our user details including username, password and account locked status.
AttemptsRepository.java
package com.tutorial.spring.security.formlogin.repository;

import java.util.Optional;
import org.springframework.data.jpa.repository.JpaRepository;
import org.springframework.stereotype.Repository;
import com.tutorial.spring.security.formlogin.model.Attempts;

@Repository
public interface AttemptsRepository extends JpaRepository<Attempts, Integer> {
   Optional<Attempts> findAttemptsByUsername(String username);
}
Similarly, for the Attempts, in our AttemptsRepository, we have added a custom method findAttemptsByUsername(String username) to get data about user attempts using the username. This will return us an Attempts object with the username and the number of failed authentication attempts the user has made.
Configuration
Since we are going to use a custom login form, we have to override the default configuration of Spring Security. To do this we create our configuration class which extends the WebSecurityConfigurerAdapter class of Spring Security.
package com.tutorial.spring.security.formlogin.config;

import org.springframework.context.annotation.Bean;
import org.springframework.context.annotation.Configuration;
import org.springframework.security.config.annotation.web.builders.HttpSecurity;
import org.springframework.security.config.annotation.web.configuration.WebSecurityConfigurerAdapter;
import org.springframework.security.crypto.bcrypt.BCryptPasswordEncoder;
import org.springframework.security.crypto.password.PasswordEncoder;
@Configuration
public class ApplicationConfig extends WebSecurityConfigurerAdapter {
   @Bean
   public PasswordEncoder passwordEncoder() {
      return new BCryptPasswordEncoder();
   }
   @Override
   protected void configure(HttpSecurity http) throws Exception {
      http
      .csrf().disable()
      .authorizeRequests().antMatchers("/register**")
      .permitAll() .anyRequest().authenticated()
      .and()
      .formLogin() .loginPage("/login")
      .permitAll()
      .and()
      .logout() .invalidateHttpSession(true)
      .clearAuthentication(true) .permitAll();
   }
}
Here we did two things−
- First, we have specified the implementation of the PasswordEncoder interface that we are going to use. We have used an instance of BCryptPasswordEncoder to encode our passwords for this example. The PasswordEncoder interface has many implementations and we can use any of them. We have chosen BCryptPasswordEncoder here as it the most commonly used implementation. It uses the very strong BCrypt hashing algorithm to encode the passwords. It does so by incorporating a salt to protect against rainbow table attacks. In addition to this, bcrypt is an adaptive function: over time, the iteration count can be increased to make it slower, so it remains resistant to brute-force search attacks even with increasing computation power.
- Secondly, we have overridden the configure() method to provide our implementation of the login method.
- Whenever we use a custom form for authentication in place of the one provided by Spring Security, we have to inform Spring Security of it using the formLogin() method.
- We then also specify our login URL – /login. We will map the URL to our custom login page in our Controller later.
- We have also specified that the endpoints starting with /register, /login and the logout page need not be protected. We did so using the permitAll() method. This allows everyone to access these endpoints. Other than these endpoints, all endpoints are to be authenticated(). That is to say, users must be logged in to access all the other endpoints.
- On logout, we have specified that the session is to be invalidated and authentication stored in the application’s SecurityContext be cleared.
Security Setup
Now, we will setup our authentication process. We are going to setup authentication using a database and locking of user accounts.
Let’s create our implementation of UserDetailsService first. As we have discussed before, we need to provide our custom implementation for authentication using a database. This is because, Spring Security, as we know, only provides an in-memory authentication implementation by default. Therefore, we need to override that implementation with our database based process. To do so, we need to override the loadUserByUsername() method of UserDetailsService.
UserDetailsService
package com.tutorial.spring.security.formlogin.security;

import java.util.Optional;
import org.springframework.beans.factory.annotation.Autowired;
import org.springframework.security.core.userdetails.UserDetails;
import org.springframework.security.core.userdetails.UserDetailsService;
import org.springframework.security.core.userdetails.UsernameNotFoundException;
import org.springframework.security.provisioning.UserDetailsManager;
import org.springframework.stereotype.Service;
import com.tutorial.spring.security.formlogin.model.User;
import com.tutorial.spring.security.formlogin.repository.UserRepository;

@Service
public class SecurityUserDetailsService implements UserDetailsService {
   @Autowired
   private UserRepository userRepository;

   @Override
   public UserDetails loadUserByUsername(String username)
   throws UsernameNotFoundException {
      User user = userRepository.findUserByUsername(username)
         .orElseThrow(() -< new UsernameNotFoundException("User not present"));
         return user;
   }
   public void createUser(UserDetails user) {
      userRepository.save((User) user);
   }
}
As we can see here, we have implemented the loadUserByUsername() method here. Here we are fetching the user from our database using the UserRepository interface. If the user is not found it throws UsernameNotFoundException.
We also have a createUser() method. We will use this method to add users to our database who have registered in our application using UserRepository.
Authentication Provider
We will now implement our custom authentication provider. It will implement the AuthenticationProvider interface. We have two methods here that we have to override and implement.
package com.tutorial.spring.security.formlogin.security;

import java.util.Optional;
import org.springframework.beans.factory.annotation.Autowired;
import org.springframework.security.authentication.AuthenticationProvider;
import org.springframework.security.authentication.BadCredentialsException;
import org.springframework.security.authentication.LockedException;
import org.springframework.security.authentication.UsernamePasswordAuthenticationToken;
import org.springframework.security.core.Authentication;
import org.springframework.security.core.AuthenticationException;
import org.springframework.security.crypto.password.PasswordEncoder;
import org.springframework.stereotype.Component;

import com.tutorial.spring.security.formlogin.model.Attempts;
import com.tutorial.spring.security.formlogin.model.User;
import com.tutorial.spring.security.formlogin.repository.AttemptsRepository;
import com.tutorial.spring.security.formlogin.repository.UserRepository;

@Component public class AuthProvider implements AuthenticationProvider {
   private static final int ATTEMPTS_LIMIT = 3;

   @Autowired
   private SecurityUserDetailsService userDetailsService;
   @Autowired private PasswordEncoder passwordEncoder;
   @Autowired private AttemptsRepository attemptsRepository;
   @Autowired private UserRepository userRepository;
   @Override
   public Authentication authenticate(Authentication authentication)
   throws AuthenticationException {
      String username = authentication.getName();

import com.tutorial.spring.security.formlogin.repository.UserRepository;

@Component public class AuthProvider implements AuthenticationProvider {
   private static final int ATTEMPTS_LIMIT = 3;
   @Autowired private SecurityUserDetailsService userDetailsService;
   @Autowired private PasswordEncoder passwordEncoder;
   @Autowired private AttemptsRepository attemptsRepository;
   @Autowired private UserRepository userRepository;
   @Override
   public Authentication authenticate(Authentication authentication)
   throws AuthenticationException {
      String username = authentication.getName();
      Optional<Attempts>
      userAttempts = attemptsRepository.findAttemptsByUsername(username);
      if (userAttempts.isPresent()) {
         Attempts attempts = userAttempts.get();
         attempts.setAttempts(0); attemptsRepository.save(attempts);
      }
   }
   private void processFailedAttempts(String username, User user) {
      Optional<Attempts>
      userAttempts = attemptsRepository.findAttemptsByUsername(username);
      if (userAttempts.isEmpty()) {
         Attempts attempts = new Attempts();
         attempts.setUsername(username);
         attempts.setAttempts(1);
         attemptsRepository.save(attempts);
      } else {
         Attempts attempts = userAttempts.get();
         attempts.setAttempts(attempts.getAttempts() + 1);
         attemptsRepository.save(attempts);

         if (attempts.getAttempts() + 1 >
         ATTEMPTS_LIMIT) {
            user.setAccountNonLocked(false);
            userRepository.save(user);
            throw new LockedException("Too many invalid attempts. Account is locked!!");
         }
      }
   }
   @Override public boolean supports(Class<?> authentication) {
      return true;
   }
}
- authenticate() − This method returns a fully authenticated object including credentials on successful authentication. This object is then stored in the SecurityContext. To perform authentication we will use the loaduserByUsername() method of the SecurityUserDetailsService class of our Application. Here we perform multiple things −
- First, we extract the user credentials from the Authentication request object which is passed as a parameter to our function. This authentication object was prepared by the AuthenticationFilter class and passed down the AuthenticationProvider through the AuthenticationManager.
- We also fetch the user details from the database using the loadUserByUsername() method.
- Now, first, we check if the user account has been locked due to previous failed authentication attempts. If we find that the account is locked, we throw a LockedException, and the user will be unable to authenticate unless the account is unlocked again.
- If the account is not locked, we match the provided password along with the one stored against the user in the database. This is done using the matches() method of the PasswordEncoder interface.
- If the passwords match, and the account has not been locked by then, we return a fully authenticated object. Here we have used an instance UsernamePasswordAuthenticationToken class (as it is a username-password authentication) that implements Authentication. Meanwhile, we also reset the attempts counter to 0.
- On the other hand, if the password doesn’t match, we check for a few conditions −
- If it is the user’s first attempt, then, probably his name would not be in the database. We check for this using the method findAttemptsByUsername() from the AttemptsRepository.
- If not found, we make an entry for the user in the database, with the number of attempts set to one.
- If a user is found, then we increase the number of attempts by 1.
- We then check against the maximum number of failed attempts allowed, using a constant value we defined earlier.
- If the number is more than the allowed number of attempts, then the user is locked our of the application and a LockedException is thrown.
- supports() − We also have the supports method that checks if our authentication type is supported by our AuthenticationProvider implementation class. It returns true, false, or null if it matches, doesn’t match, or if it can’t decide respectively. We have hardcoded it to be true for now.
Controller
Now let’s create our controller package. It will contain our HelloController class. Using this controller class we will map our views to the endpoints and serve those views when the respective endpoints are hit. We will also autowire the PasswordEncoder and the UserDetailsService classes in this component. These injected dependencies will be used in creating our user. Let’s now create our endpoints.
package com.tutorial.spring.security.formlogin.controller;

import java.util.Map;
import javax.servlet.http.HttpServletRequest;
import javax.servlet.http.HttpSession;
import org.springframework.beans.factory.annotation.Autowired;
import org.springframework.http.MediaType;
import org.springframework.security.authentication.BadCredentialsException;
import org.springframework.security.authentication.LockedException;
import org.springframework.security.crypto.password.PasswordEncoder;
import org.springframework.stereotype.Controller;
import org.springframework.web.bind.annotation.GetMapping;
import org.springframework.web.bind.annotation.PostMapping;
import org.springframework.web.bind.annotation.RequestParam;
import com.tutorial.spring.security.formlogin.model.User;
import com.tutorial.spring.security.formlogin.security.SecurityUserDetailsService;
@Controller
public class HelloController {
   @Autowired private SecurityUserDetailsService userDetailsManager;
   @Autowired
   private PasswordEncoder passwordEncoder;

   @GetMapping("/")
   public String index() {
      return "index";
   }
   @GetMapping("/login")
   public String login(HttpServletRequest request, HttpSession session) {
      session.setAttribute(
         "error", getErrorMessage(request, "SPRING_SECURITY_LAST_EXCEPTION")
      );
      return "login";
   }
   @GetMapping("/register")
   public String register() {
      return "register";
   }
   @PostMapping(
      value = "/register",
      consumes = MediaType.APPLICATION_FORM_URLENCODED_VALUE, produces = {
      MediaType.APPLICATION_ATOM_XML_VALUE, MediaType.APPLICATION_JSON_VALUE }
   )
   public void addUser(@RequestParam Map<String, String> body) {
      User user = new User(); user.setUsername(body.get("username"));
      user.setPassword(passwordEncoder.encode(body.get("password")));
      user.setAccountNonLocked(true); userDetailsManager.createUser(user);
   }
   private String getErrorMessage(HttpServletRequest request, String key) {
      Exception exception = (Exception) request.getSession().getAttribute(key);
      String error = "";
      if (exception instanceof BadCredentialsException) {
         error = "Invalid username and password!";
      } else if (exception instanceof LockedException) {
         error = exception.getMessage();
      } else {
         error = "Invalid username and password!";
      }
      return error;
   }
}
- index ("/") – This endpoint will serve the index page of our application. As we have configured earlier, we shall be protecting this page and allow only authenticated users will be able to access this page.
- login ("/login") – This will be used to serve our custom login page, as mentioned earlier. Any unauthenticated user will be redirected to this endpoint for authentication.
- register("/register") (GET) – We will have two “register” endpoints for our application. One will be to serve the registration page. The other one will be to handle the registration process. So, the former one will use an Http GET and the latter will be a POST endpoint.
- register("/register") (POST) – We will use this endpoint to handle the user registration process. We will get the user name and password from the parameters. Then we will encode the password using the passwordEncoder that we have @Autowired into this component. We also set user account as unlocked at this point. We will then save this user data in our users table with the createUser() method.
In addition to the above, we have the getErrorMessage() method. It is used to determine the last thrown exception to add a message in our login template. This way, we can be aware of authentication errors and display proper messages.
Resources
We have created our endpoints, the only thing left is to create our views.
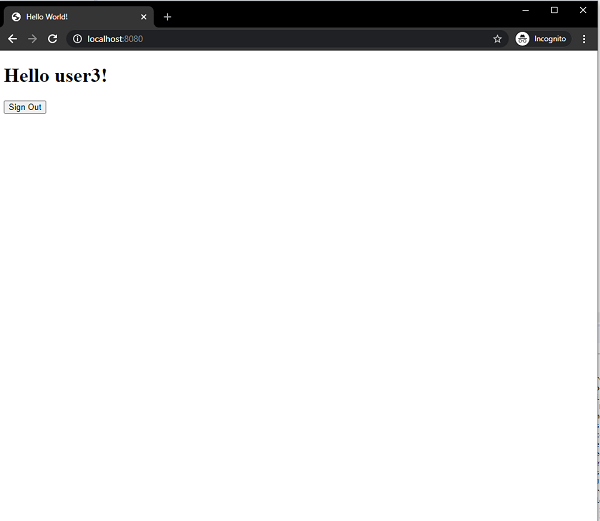
First, we will create our index page. This page will be accessible to users only on successful authentication. This page has access to the Servlet request object using which we can display the user name of the logged in user.
<!DOCTYPE html>
<html xmlns="http://www.w3.org/1999/xhtml" xmlns:th="https://www.thymeleaf.org" xmlns:sec="https://www.thymeleaf.org/thymeleaf-extras-springsecurity3">
   <head>
      <title>
         Hello World!
      </title>
   </head>
   <body>
      <h1 th:inline="text">Hello [[${#httpServletRequest.remoteUser}]]!</h1>
      <form th:action="@{/logout}" method="post">
         <input type="submit" value="Sign Out"/>
         </form>
   </body>
<html>
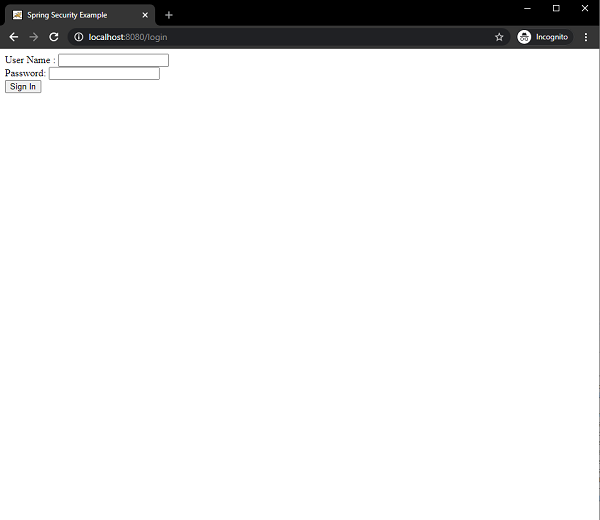
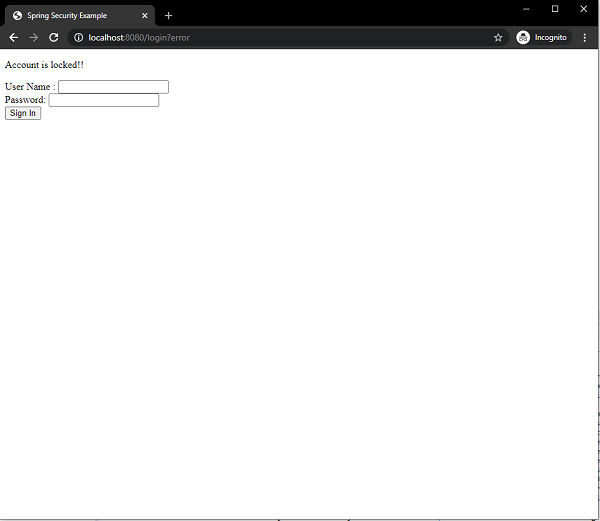
Next, we create our login view. This display our custom login form with the username and password fields. This view will also be rendered in case of a logout or failed authentication and will display appropriate messages for each case.
<!DOCTYPE html>
<html xmlns="http://www.w3.org/1999/xhtml"      xmlns:th="https://www.thymeleaf.org" xmlns:sec="https://www.thymeleaf.org/thymeleaf-extras-springsecurity3">
   <head>
      <title>Spring Security Example</title>
   </head>
   <body>
   <div th:if="${param.error}">
      <p th:text="${session.error}" th:unless="${session == null}">[...]</p>
   </div>
   <div th:if="${param.logout}">You have been logged out.</div>
   <form th:action="@{/login}" method="post>
   <div>
      <label> User Name : <input type="text" name="username" /> </label>
   </div>
   <div>
   <label> Password: <input type="password" name="password" /> </label>
   </div>
   <div>
      <input type="submit" value="Sign In" /> </div>
      </form>
   </body>
</html>
Moving, we create our required view, the register view. This view will let users register themselves with the application. This user data will be stored in the database which will then be used for authentication.
<!DOCTYPE html>
<html>
   <head>
      <meta charset="ISO-8859-1">
      <title>Insert title here</title>
   </head>
   <body>
      <form action="/register" method="post">
         <div class="container">
            <h1>Register</h1>
            <p>Please fill in this form to create an account.</p>
            <hr>

            <label for="username">
            <b>Username</b>
            </label>
            <input type="text" placeholder="Enter Username" name="username" id="username" required>

            <label for="password"><b>Password</b></label>
            <input type="password" placeholder="Enter Password" name="password" id="password" required>

            <button type="submit" class="registerbtn">Register</button>
         </div>

      </form>
   </body>
</html>
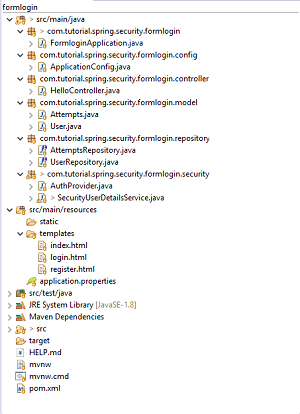
Final Project Structure
Our final project structure should look something similar to this.
Running the Application
We can then run the application as a SpringBootApp. When we go localhost:8080 on our browser it will redirect us back to the login page.
On successful authentication it will take us the index view with a greeting.
Since, we have allowed only three failed attempts before the account gets locked, so on the third failed authentication the user get locked and the message is displayed on the screen.
On hitting the /register endpoint we can also register a new user.

Conclusion
From today’s article, we have learned how to use a custom form for login using a database using an annotation-based configuration. We have also learned how to prevent multiple failed login attempts. While doing we have seen how we can implement our own AuthenticationProvider and UserDetailsService to authenticate users using our custom authentication process.