- Snowflake Tutorial
- Snowflake - Home
- Snowflake - Introduction
- Snowflake - Data Architecture
- Snowflake - Functional Architecture
- Snowflake - How to Access
- Snowflake - Editions
- Snowflake - Pricing Model
- Snowflake - Objects
- Snowflake - Table and View Types
- Snowflake - Login
- Snowflake - Warehouse
- Snowflake - Database
- Snowflake - Schema
- Snowflake - Table & Columns
- Snowflake - Load Data From Files
- Snowflake - Sample Useful Queries
- Snowflake - Monitor Usage and Storage
- Snowflake - Cache
- Unload Data from Snowflake to Local
- External Data Loading (from AWS S3)
- External Data Unloading (Into AWS S3)
- Snowflake Resources
- Snowflake - Quick Guide
- Snowflake - Useful Resources
- Snowflake - Discussion
Snowflake - Quick Guide
Snowflake - Introduction
Snowflake is a cloud-based advanced data platform system, provided as Software-as-a-Service (SaaS). Snowflake provides features of data storage from AWS S3, Azure, Google Cloud, processing complex queries and different analytic solutions. The analytic solutions provided by Snowflake are faster, easy to use and more flexible than traditional databases and their analytics features. Snowflake stores and provide data near time not in actual real time.
Snowflake is advanced solution for OLAP (Online Analytical Processing) technology. OLAP is also known as online data retrieving and data analysis system using historical data. It processes complex and aggregated queries with low number of transactions. For Ex: Getting number of orders, sales amount in last month for a company, number of new users list in the company in last quarter etc. Snowflake is not used as OLTP (Online Transactional Processing) database. OLTP database usually contains real time data with a high volume of small data transactions. For Ex: Inserting customer's order detail, register a new customer, tracking order delivery status etc.
Why Use Snowflake?
Snowflake provides Data Platform as a Cloud Service.
There is no hardware neither virtual nor physical to select, install, configure or manage from client side.
There is no software to install, configure or manage to access it.
All ongoing maintenance, management, upgrades and patching are owned by Snowflake itself.
Traditional databases for analytics solutions are complex in architecture, costly and constrained while Snowflake is rich in concept of Data Engineering, Data Lake concept, data warehouse, Data Science, Data Application and Data Exchange or sharing. It is easy to access and use without having constraint of data size and storage capacity. User must administrate only their data; all data platform related administrations are done by Snowflake itself.
Apart of these, Snowflake also has the following features −
Simple, reliable data pipelines in multi languages like Java, Python, PHP, Spark, Ruby etc.
Secured access, very good performance and security of data lake.
Zero administration for tool, data storage and data size.
Simple data preparation for modeling with any framework.
No operation burden to build data intensive applications.
Share and collaborate live data across company's ecosystem.
Snowflake - Data Architecture
Snowflake data architecture re-invents a new SQL query engine. It is designed for the cloud only. Snowflake doesn't utilize or built on top of any existing database technology. It doesn't even use big data software platforms like Hadoop. Snowflake provides all functionalities of an analytical database plus numbers of additional unique features and capabilities to users.
Snowflake has central data repository for storage of structured and semi-structured data. These data can be accessed from all available compute nodes in the Snowflake platform. It uses virtual warehouse as compute environment for processing the queries. While processing queries, it utilizes multi-cluster, micro-partitioning and advanced cache concepts. Snowflake's cloud services are responsible to provide end to end solution to the user like logging validation of user to result of select queries.
Snowflake's data architecture has three main layers −
- Database Storage
- Query Processing
- Cloud Services
Following is the data architecture diagram of Snowflake −
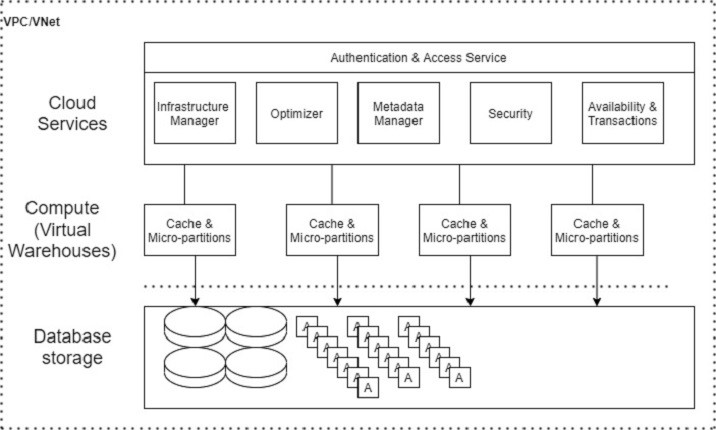
Database Storage
Snowflake supports Amazon S3, Azure and Google Cloud to load data into Snowflake using file system. User should upload a file (.csv, .txt, .xlsx etc.) into the cloud and after they create a connection in Snowflake to bring the data. Data size is unlimited, but file size is up to 5GB as per cloud services. Once data is loaded into Snowflake, it utilizes its internal optimization and compression techniques to store the data into central repository as columnar format. The central repository is based on cloud where data stores.
Snowflake owns responsibilities to all aspects of data management like how data is stored using automatic clustering of data, organization and structure of data, compression technique by keeping data into many micro-partitions, metadata, statistics and many more. Snowflake stores data as data objects and users can't see or access them directly. Users can access these data through SQL queries either in Snowflake's UI or using programming language like Java, Python, PHP, Ruby etc.
Query Processing
Query execution is a part of processing layer or compute layer. To process a query, Snowflake requires compute environment, known as "Virtual Warehouse" in Snowflake's world. Virtual warehouse is a compute cluster. A virtual warehouse consists of CPU, Memory and temporary storage system so that it could perform SQL execution and DML (Data Manipulation Language) operations.
SQL SELECT executions
Updating of data using Update, Insert, Update
Loading data into tables using COPY INTO <tables>
Unloading data from tables using COPY INTO <locations>
However, the number of servers depends on size of virtual warehouses. For example, XSmall warehouse has 1 Server per cluster, while a Small Warehouse has 2 Servers per cluster and it gets double on increasing the size such as Large, XLarge, etc.
While executing a query, Snowflake analyzes the requested query and uses the latest micro-partitions and evaluates caching at different stages to increase performance and decrease the time for bringing the data. Decrease the time means less credit is used of a user.
Cloud Services
Cloud Service is the 'Brain' of the Snowflake. It coordinates and manages activities across Snowflake. It brings all components of Snowflake together to process user requests from logging validation to deliver query's response.
The following services are managed at this layer −
It is the centralized management for all storage.
It manages the compute environments to work with storage.
It is responsible for upgrades, updates, patching and configuration of Snowflake at cloud.
It performs cost-based optimizers on SQL queries.
It gathers statistics automatically like credit used, storage capacity utilization
Security like Authentication, Access controls based on roles and users
It performs encryption as well as key management services.
It stores metadata as data is loaded into the system.
And many more...
Snowflake - Functional Architecture
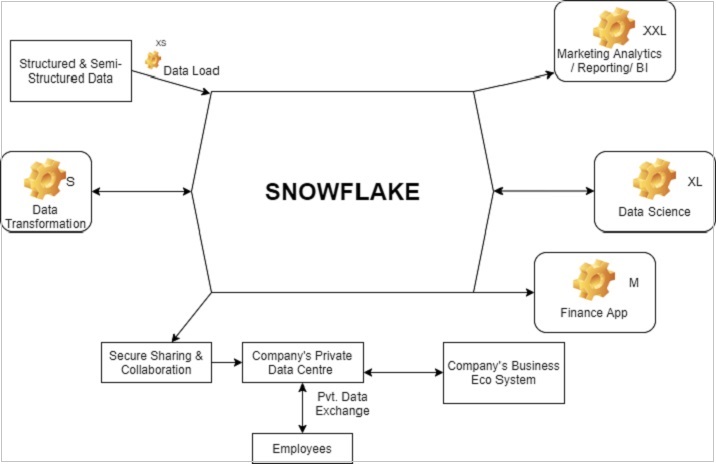
Snowflake supports structured and semi-structured data. Snowflake organizes and structures the data automatically once data loading is completed. While storing the data, Snowflake divides it on his intelligence and saves into different micro-partitions. Even Snowflake stores data into different clusters.
At functional level, to access data from Snowflake, the following components are required −
Choose proper roles after logging
Virtual Warehouse known as Warehouse in Snowflake to perform any activity
Database Schema
Database
Tables and columns
Snowflake provides the following high-level analytics functionalities −
Data Transformation
Supports for Business Application
Business Analytics/Reporting/BI
Data Science
Data Sharing to other data systems
Data Cloning
The following diagram shows the functional architecture of Snowflake −
The symbol of "settings" as in each block can be referred as Warehouse and XS, XXL, XL, L, S as sizes of warehouse requires to perform different operations. Based on requirement and usage, the size of a warehouse can be increased or decreased; even it can be converted from single cluster to multi-clusters.
Snowflake - How to Access
Snowflake is a licensed data platform. It uses the concept of credit to charge to clients. However, it provides 30-days free trial with $400 credits for learning purpose.
Use the following steps to get a free access to Snowflake for 30 days −
Open the URL "www.snowflake.com" and click "START FOR FREE" at the right corner of the page.
It navigates to the registration page where the user needs to provide details such as as First Name, Last Name, Email, Company, and Country. After filling the form, click the "CONTINUE" button.
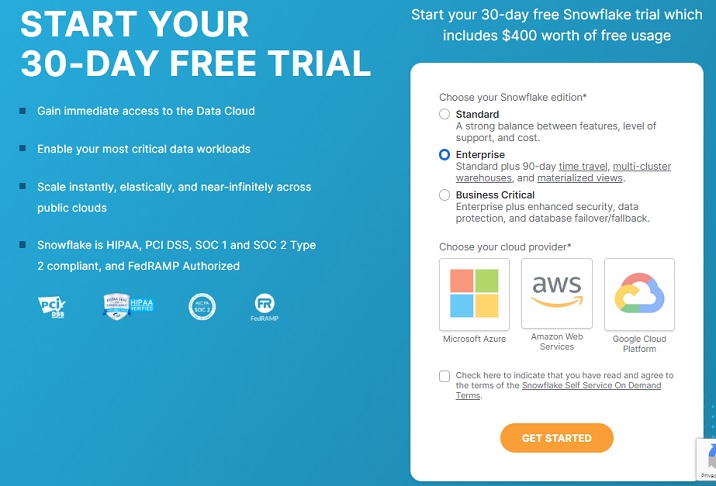
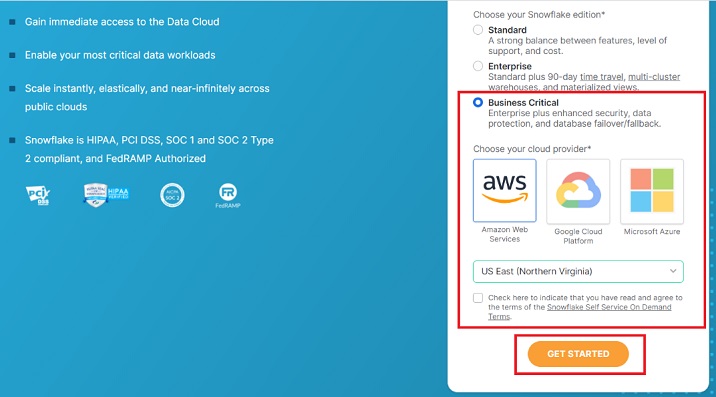
On the next screen, it asks to choose the Snowflake edition. Select the edition based on functionalities you want to perform. For this tutorial, standard version is sufficient but for data loading using AWS S3 we require business critical edition.
Select Business Critical and then click AWS. Select the region where your AWS is present.
Check the Terms & Condition box and click the Get Started button.
The following screenshot demonstrates the above steps −
You will get a message that Account creation is in progress and an email is sent to your address as below screen.
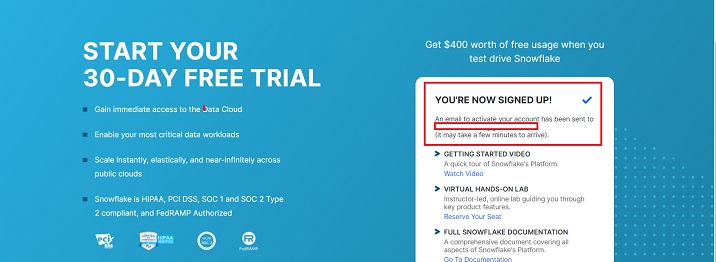
Check your email's inbox. Once you receive the email from Snowflake, usually within 2-3 mins, click the "Click to Activate" button.
It will navigate to Snowflake's page where user requires to set up username and password. This credential will be used to login into Snowflake.
An URL will be provided in your email something like: "https://ABC12345.us-east-1.snowflakecomputing.com/console/login". It is a user-specific URL to access Snowflake at cloud. Whenever you want to work in Snowflake, use the individual URL and login.
Snowflake - Editions
Snowflake provides four different editions based on users'/company's requirement.
- Standard
- Enterprise
- Business Critical
- Virtual Private Snowflake (VPS)
Standard Edition
It is the basic version of Snowflake. It provides the following features in this edition −
- Supports complete SQL Data Warehouse
- Secure Data Sharing
- Premier support for 24×365
- Time travel of 1 day
- Data Encryption
- Dedicated virtual warehouses
- Federated Authentication
- Database Replication
- External Functions support
- Snowsight
- Supporting user's own data exchange creation
- Data Marketplace Access
Enterprise Edition
It is Standard+ edition i.e. all features of Standard edition plus following additional features −
- Multi-cluster warehouses
- Time travel up to 90 days
- Encryption key changes annually
- Materialized Views
- Search Optimization Services
- Dynamic Data Masking
- External Data Tokenization
Business Critical Edition
It is Enterprise+ edition, i.e., all features of Enterprise and Standard edition plus following additional features −
- HIPPA support
- PCI compliance
- Data Encryption everywhere
- AWS Private Link Support
- Azure Private Link Support
- Database Failover and fallback
Virtual Private Snowflake (VPS) Edition
It is Business Critical+ edition and the most advanced version. It supports all the offerings of Snowflake.
Customer dedicated virtual servers where the encryption key is in memory.
Customer dedicated metadata store.
Snowflake - Pricing Model
Snowflake uses three different stages or layers for their services to end-users −
- Storage
- Virtual Warehouse (Compute)
- Cloud Services
Snowflake doesn't have any license cost. However, the pricing is based on the actual usage of these three layers plus serverless features. Snowflake charges a fixed amount plus any additional costs based on the usage of Snowflake credits.
What is Snowflake Credit?
It is the mode of payment for the consumption of the snowflake resources, usually Virtual Warehouses, Cloud Services, and serverless features. Snowflake credit is a unit of measure. It is calculated based on resources utilized, it doesn't charge anything if the customer is not using any resources or resources are in sleep mode. For example, a snowflake credit is used when virtual warehouse is running and the cloud service layer is executing some user-defined task.
Storage Cost
Snowflake charges a monthly fee for the data storage. Storage cost is measured as the average amount of data stored in Snowflake on a monthly basis. This data size is calculated after compression is performed by Snowflake. This cost significantly very low, around $23/1TB data for one month.
Virtual Warehouse (Compute)
It is one or more clusters that is used to load data into Snowflake and execute queries. Snowflake uses Snowflake Credits as a payment from customer.
The snowflake credit is calculated based on Warehouse size, number of clusters and time spent to execute queries. The size of a warehouse determines how fast a query will run. When a virtual warehouse is not running and is in suspended mode, it doesn't spend any Snowflake credit. Different sizes of warehouses spend Snowflake credits at different rates.
| Warehouse Size | Servers | Credit/Hour | Credits/Second |
|---|---|---|---|
| X-Small | 1 | 1 | 0.0003 |
| Small | 2 | 2 | 0.0006 |
| Medium | 4 | 4 | 0.0011 |
| Large | 8 | 8 | 0.0022 |
| X-Large | 16 | 16 | 0.0044 |
| 2X-Large | 32 | 32 | 0.0089 |
| 3X-Large | 64 | 64 | 0.0178 |
| 4X-Large | 128 | 128 | 0.0356 |
Cloud Services
Cloud services manage end-to-end solution of the user's task. It automatically assigns resources based on requirements of a task. Snowflake provides free usage of cloud service up to 10% of daily compute credits.
For example, if a user spends 100 Credit daily as Compute, then 10 Credits used for Cloud Services are free of cost.
Serverless Features
Snowflake provides many additional serverless features. These are managed compute resources and Snowflake consumes credit when it is used.
Snowpipe, Database Replication, Materialized Views Maintenance, Automatic Clustering, Search Optimization Service are serverless features provided by Snowflake.
Snowflake - Objects
Snowflake logically organizes data in three stages − Account, Database and Schema.
Database and Schemas organize data logically within a Snowflake Account. An Account can have multiple databases and schemas, but a database must be tied up with only one schema and vice versa.
Snowflake Objects
Here is the list of Snowflake objects −
- Account
- User
- Role
- Virtual Warehouse
- Resource Monitor
- Integration
- Database
- Schema
- Table
- View
- Stored Procedure
- User Defined Functions (UDF)
- Stage
- File Format
- Pipe
- Sequence
Objects after Schema are tied up with Schema and Schema is tied up with Database. Other entities like User and Role are used for authentication and access management.
Important Points Related to Snowflake Objects
Here is a set of important points regarding Snowflake objects that you should be aware of −
All snowflake objects fall under logical containers where the top level container is Account, i.e., everything is under Snowflake's Account.
Snowflake secures all the objects individually.
Users can perform operations and tasks on objects based on the privileges granted to roles.
Privileges Example −
- Create a virtual warehouse
- List Tables in a schema
- Insert data into a table
- Select data from a table
- Not delete/truncate a table
Snowflake - Table & View Types
Table Types
Snowflake categorizes tables into different types based on its uses and nature. There are four types of tables −
Permanent Table
Permanent tables are created in the database.
These tables persist until deleted or dropped from database.
These tables are designed to store the data that requires highest level of data protection and recovery.
These are default table type.
Time travel is possible in these tables up to 90 days, i.e., that someone can get the data up to 90 days back.
It is Fail-safe and data can be recovered if lost due to fail.
Temporary Table
Temporary tables, as the name indicates, exist for a shorter duration.
These tables persist for a session.
If a user wants a temporary table for his subsequent queries and analytics, then once a session is completed, it automatically drops the temporary table.
It is mostly used for transitory data like ETL/ELT
Time travel is possible in temporary tables but only 0 to 1 day.
It is not fail-safe, which means data cannot be recovered automatically.
Transient Table
These tables persist until the users drop or delete them.
Multiple users can access a transient table.
It is used where "data persistence" is required but doesn't need "data retention" for a longer period. For example, the details of guest visitors of a website, the details of users who visited a website as well as registered on it, so after registration, storing the details in two different tables might not be required.
Time travel is possible in transient tables but only for 0 to 1 day.
It is also not failed safe.
External Table
These tables persist until removed.
Here, the word removed is used, as external tables are like outside of snowflake and they can't be dropped or deleted. It should be removed.
It can be visualized as Snowflake over an external data lake, i.e., the main source of data lake is pointed to Snowflake to utilize the data as per user's need.
Data cannot be directly accessed. It can be accessed in Snowflake via an external stage.
External tables are only meant for reading.
Time travel is not possible for external tables.
It is not fail-safe inside Snowflake environment.
View Types
There are three main categorized views in Snowflake −
Standard View
It is the default view type.
Select queries for tables to view data.
User can execute queries based on role and permissions.
Underlying DDL is available to any role who has access to these view.
Secure View
Secure View means it can be accessed only by authorized users.
Authorized users can view the definition and details.
Authorized users with proper role can access these tables and execute the queries.
In secure view, Snowflake query optimizer bypasses optimizations used for regular view.
Materialized View
Materialized view is more like a table.
These views store the result from the main source using filter conditions. For example, a company has records of all employees who are active, inactive, or deceased from starting of the company. Now, if a user needs the details of active employees only, then the main table can be queried and stored as materialized view for further analytics.
Materialized view is auto-refreshed, i.e., whenever the main table gets additional/new employee records, it refreshes the materialized view as well.
Snowflake supports secure materialized view as well.
Materialized views are maintained automatically, and it can consume significant compute resources.
Total costs for materialized views are based on "data storage + compute + serverless services."
Compute charges per materialized view are calculated based on the volume of data changes.
Snowflake - Login
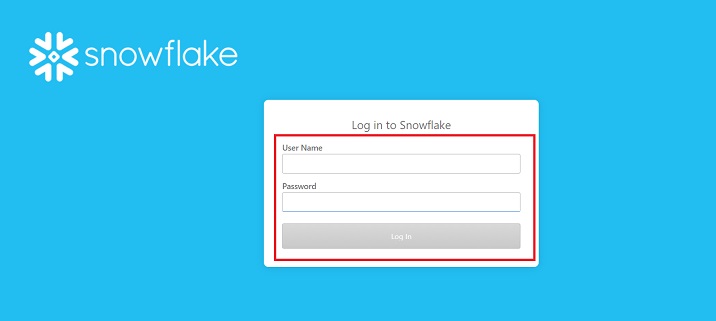
It is quite easy to login to Snowflake as it is a cloud-based platform. The following steps are required to login to Snowflake account −
Go to the email you received from Snowflake while registering and copy the unique url (unique for each user).
Go to the browser and navigate to the URL. It will navigate to the Login page.
Provide the username and password that you have set during registration. Finally, click the Login button.
The following screenshot shows the login screen −
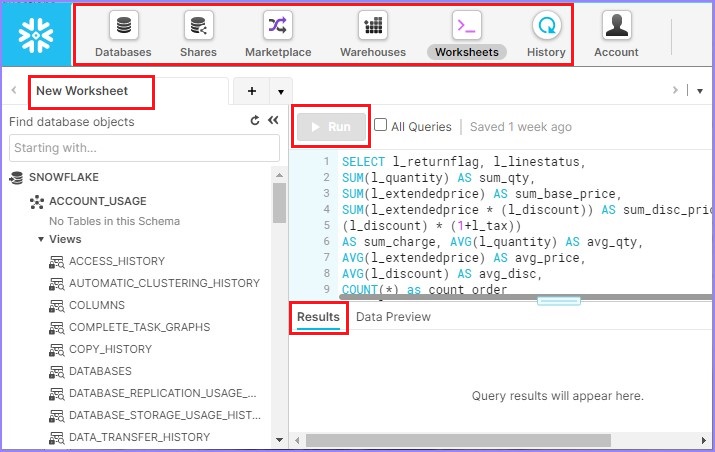
A successful login navigates the users to the Snowflake data platform. Users can see their name at top-right corner as shown in the next screenshot. Along with name, they can see what role is assigned to them.
At the left-top corner, there are some icons like Databases, Shares, Data Marketplace, Warehouses, Worksheet, and History. Users can click there and see the details of those items.
In the left panel, few databases and schemas are provided by Snowflake for hands-on like "DEMO_DB, SNOWFLAKE_SAMPLE_DATA, UTILDB".
The blank white screen adjacent to the Database details are called Worksheet where the users can write queries and execute them using the Run button.
At the bottom, there is a Result panel. The results of a Query will appear here.
The following screenshot shows the different sections of the screen, after logging in −
Snowflake - Warehouse
As Warehouse is important for computing. Let's discuss about how to create warehouse, alter it and view details of warehouse.
Snowflake provides two ways to create/modify/view warehouses – first way is UI and the another one is SQL statements.
Working on Warehouses using Snowflake's UI
Let's start with creating a warehouse −
Create Warehouse
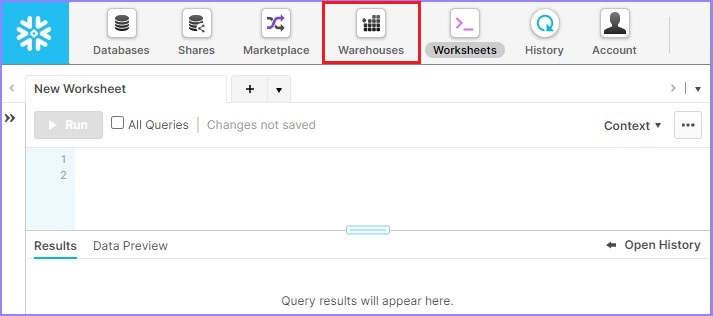
Login into Snowflake using unique URL. Click Warehouses present at top ribbon as shown in the following screenshot −
It navigates to the next screen. Click Create above the list of warehouses as shown in the below.
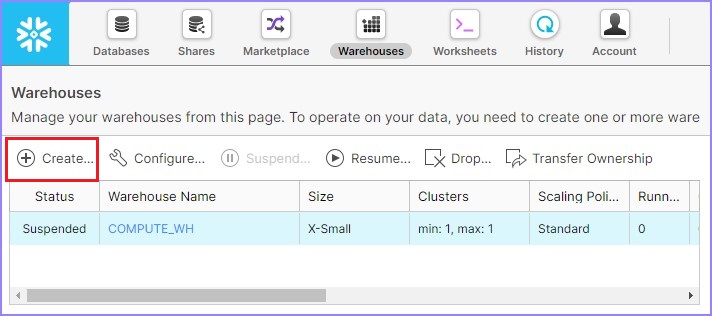
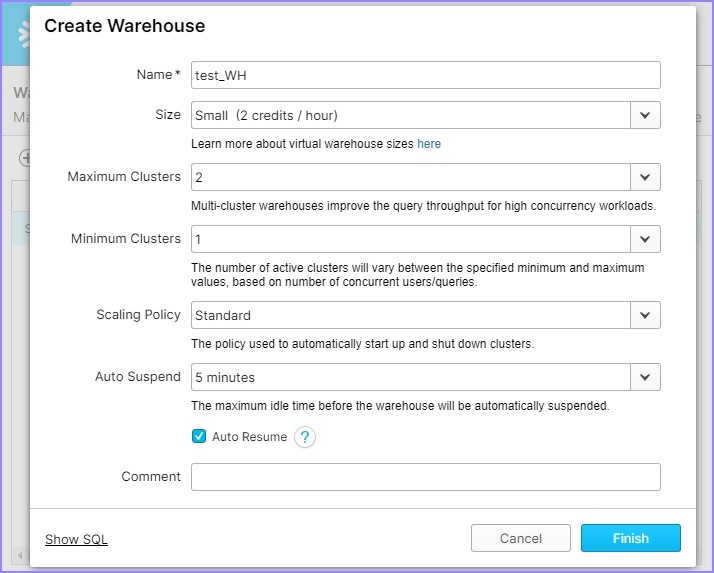
It opens the Create warehouse dialog box. The following fields should be entered to create a warehouse.
- Name − test_WH
- Size − Small
- Set Auto-Suspend to 5 minutes
Then click the Finish button.
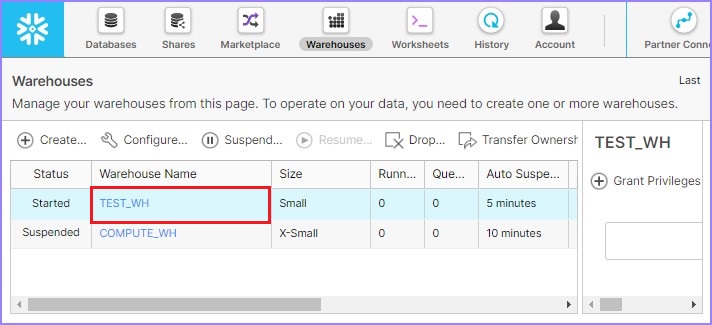
Once the warehouse is created, user can view in the list as shown in the following screenshot −
Edit/Modify/Alter Warehouse
Snowflake provides the facility to modify or alter the Warehouses based on the requirements. For example, after creation and usage, user can update warehouse size, clusters, suspension time.
Click the Warehouse button present at the top ribbon. It displays the warehouse page details. Select the warehouse that requires to be altered from the list of warehouses. Click Configure as shown in the following screenshot −
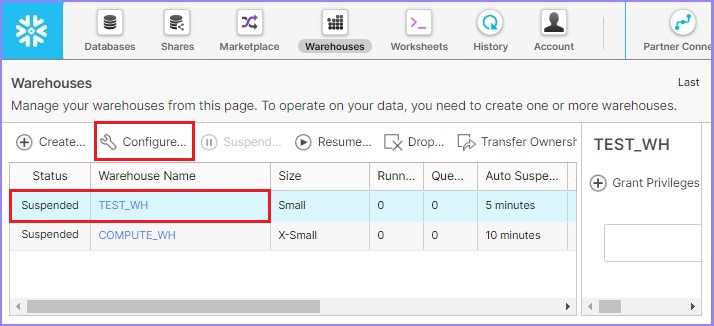
It pop ups the Configure Warehouse dialog box. Users can modify all details other than Name. Update the auto suspend time from 5 minutes to 10 minutes. Click the Finish button as shown in the following screenshot.
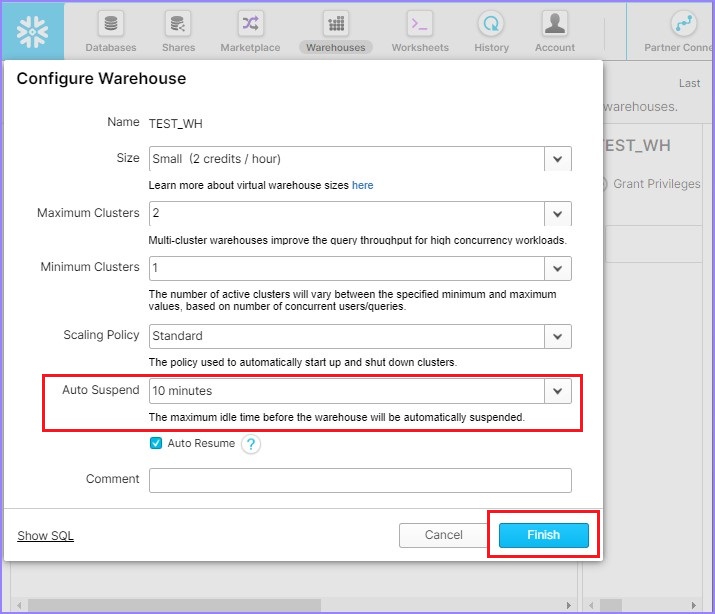
As the users clicks the Finish button, they will be able to see the updated details in the view panel.
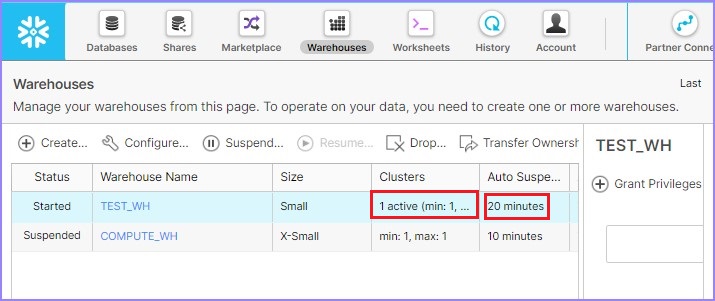
View Warehouse
Click the Warehouses button present at top ribbon. It displays the View panel of warehouses where all the created warehouses are present.
Use the Create button for creating a new warehouse.
Use the Configure button for altering/modifying an existing warehouse.
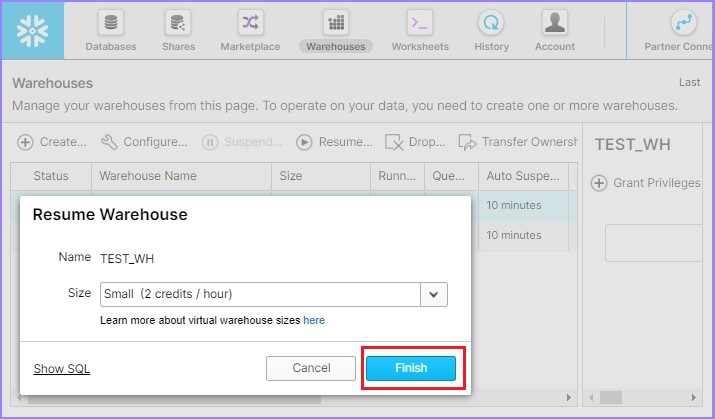
Use the Resume button to activate the selected warehouse, if it is in suspended mode.
The following screenshot demonstrates how you can Resume a warehouse which is in suspended mode −

After clicking the Resume button, its pops up a dialog box. Click on the Finish button there as shown in the following screenshot −
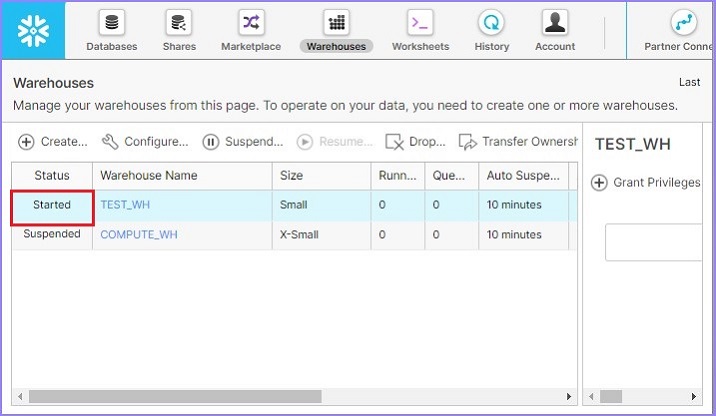
Now the user can see the warehouse is started as shown in the following screenshot −
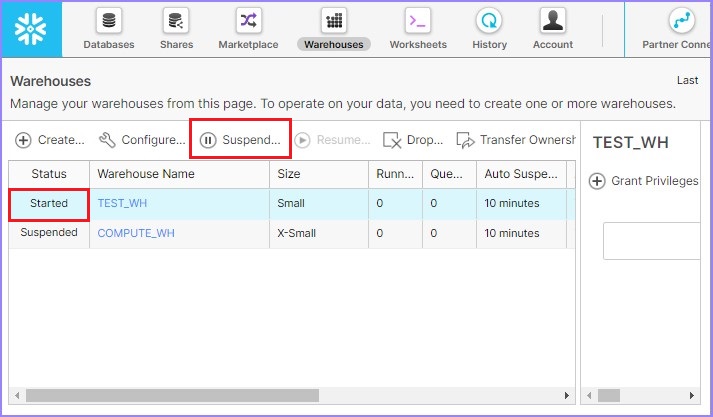
Similarly, user can suspend a warehouse immediately using the Suspend button. This button enables if any of your warehouses are in Started mode. Select the warehouse to suspend and click the Suspend button. It pops up a dialog box, click Yes to suspend, else No.
The following screenshot displays the suspend functionality −
User can delete a warehouse as well, by selecting a warehouse and by clicking the Drop button as shown in the following screenshot −
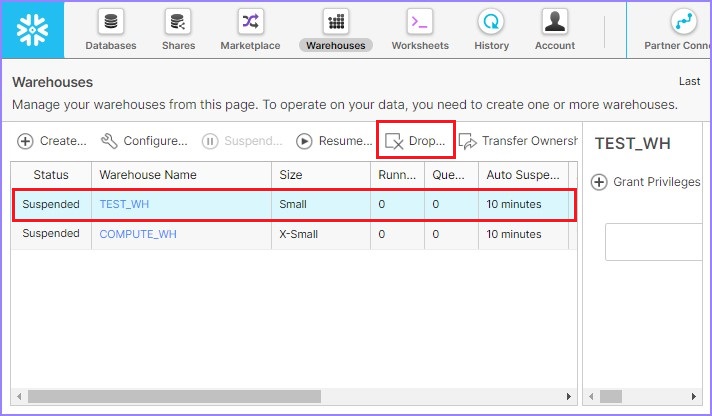
It pops up a dialog box for confirmation. Click Yes for deletion, else No.
Working on Warehouses using Snowflake's SQL Interface
Now let's check how to work with warehouses using Snowflake's SQL Interface.
Create Warehouse
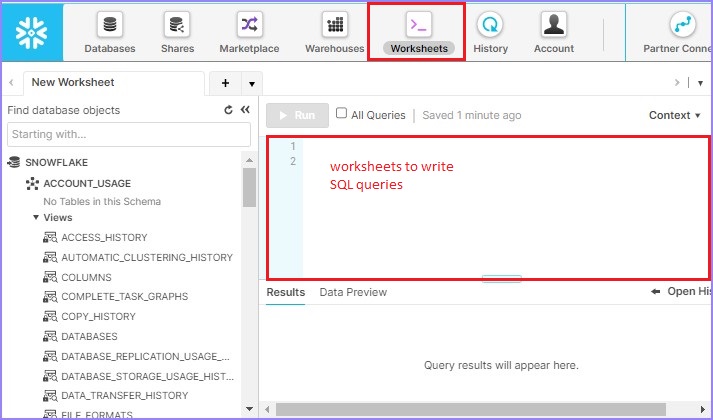
Login into Snowflake and navigate to Worksheets. By default, Worksheet is opened once the user logs in, else click the Worksheets present at the top ribbon as shown in the following screenshot.
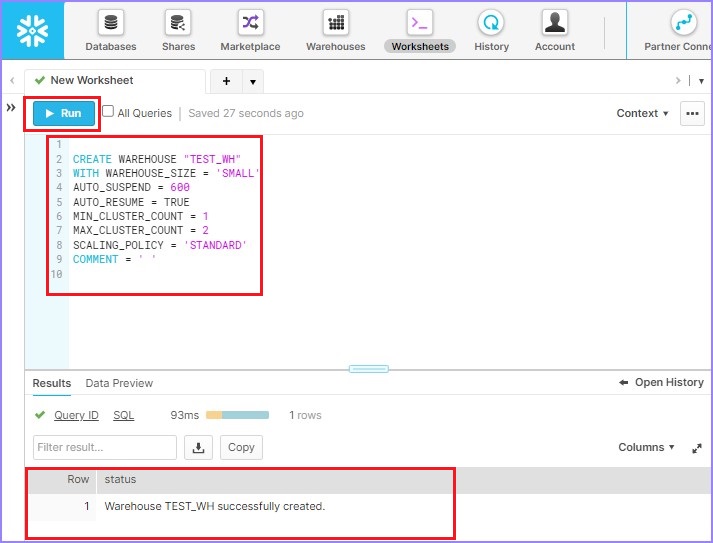
Use the following query to create a warehouse TEST_WH −
CREATE WAREHOUSE "TEST_WH"
WITH WAREHOUSE_SIZE = 'SMALL'
AUTO_SUSPEND = 600
AUTO_RESUME = TRUE
MIN_CLUSTER_COUNT = 1
MAX_CLUSTER_COUNT = 2
SCALING_POLICY = 'STANDARD'
COMMENT = ' '
Click Run to execute the query. Result will be displayed in Results panel as the warehouse "TEST_WH" was successfully created.
The following screenshot displays the output processed by using SQL −
Edit/Modify/Alter Warehouse
To alter/modify the warehouse, use the following query and run it −
ALTER WAREHOUSE "TEST_WH"
SET WAREHOUSE_SIZE = 'SMALL'
AUTO_SUSPEND = 1200
AUTO_RESUME = TRUE
MIN_CLUSTER_COUNT = 1
MAX_CLUSTER_COUNT = 1
SCALING_POLICY = 'STANDARD'
COMMENT = ' '
User can go to the View panel and verify the updated details as shown below −
View Warehouses
To view all listed warehouses, user can use following SQL. It brings details of all listed warehouses.
SHOW WAREHOUSES
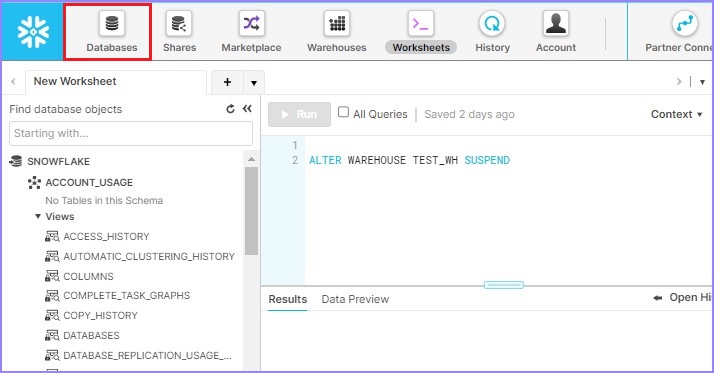
To suspend a warehouse, use following SQL −
ALTER WAREHOUSE TEST_WH SUSPEND
To resume a warehouse, use following SQL −
ALTER WAREHOUSE "TEST_WH" RESUME If SUSPENDED
To delete a warehouse, use the following SQL −
DROP WAREHOUSE "TEST_WH"
Snowflake - Database
A database is a logical grouping of schemas where tables and columns resides. In this chapter, we will discuss about how to create a database, and view details.
Snowflake provides the user two ways to create a database, first way is by using user interface and the second way is by applying SQL query.
Working with Databases using Snowflake's UI
All data in Snowflake is maintained in databases. Each database consists of one or more schemas, which are logical groupings of database objects, such as tables and views. Snowflake does not restrict the limits on the number of databases, you can create schemas (within a database), or objects (within a schema).
Creating a Database
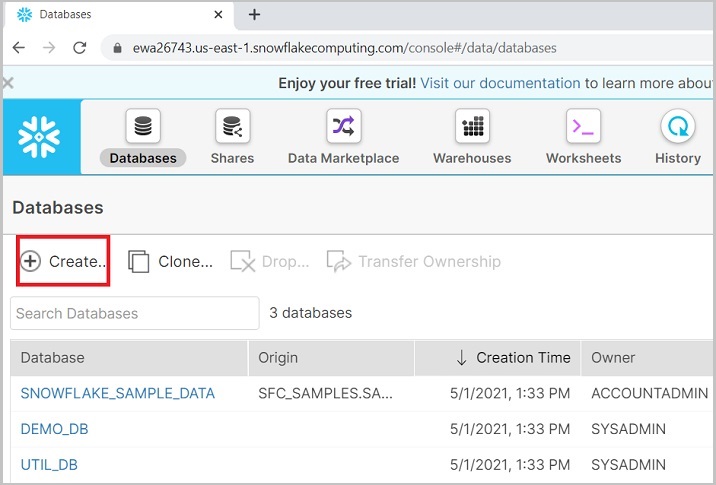
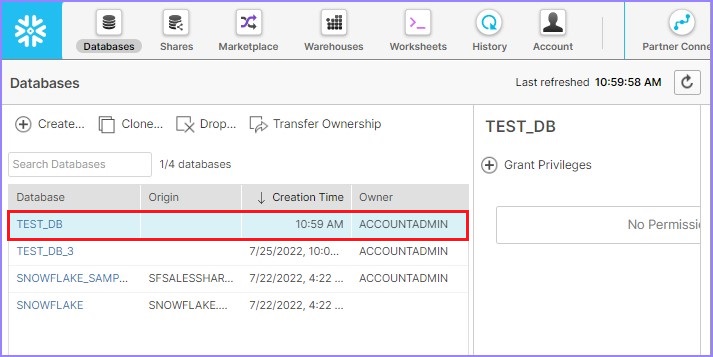
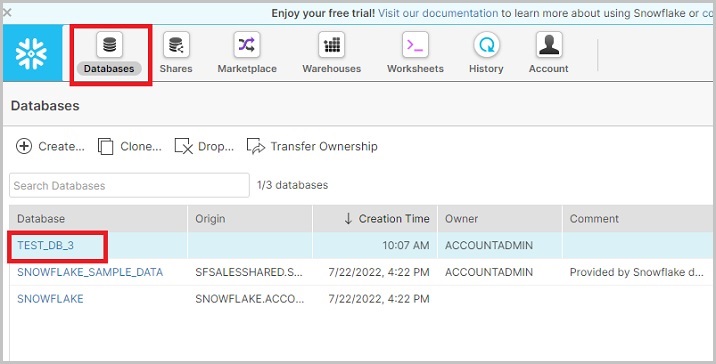
Login into Snowflake account using unique URL. Click Databases present at top ribbon as shown in the following screenshot −
It will navigate to the next screen. Click the Create button above the list of databases as shown below.
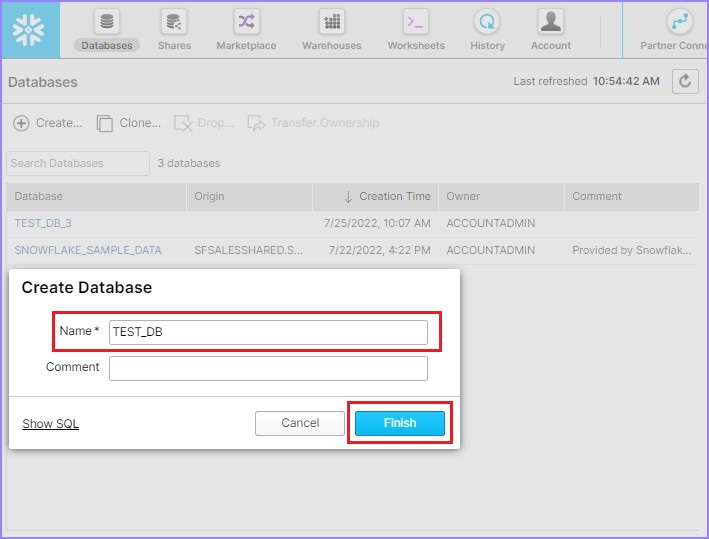
It will take you to the Create Database dialog box. Enter the Database Name and Comment, then click the Finish button.
Once the database is created, user can view in the list as shown in the following screenshot −
View Warehouse
Now for viewing all the created databases, click Databases present at the top ribbon. It displays the View panel of the database where all the created databases are present.
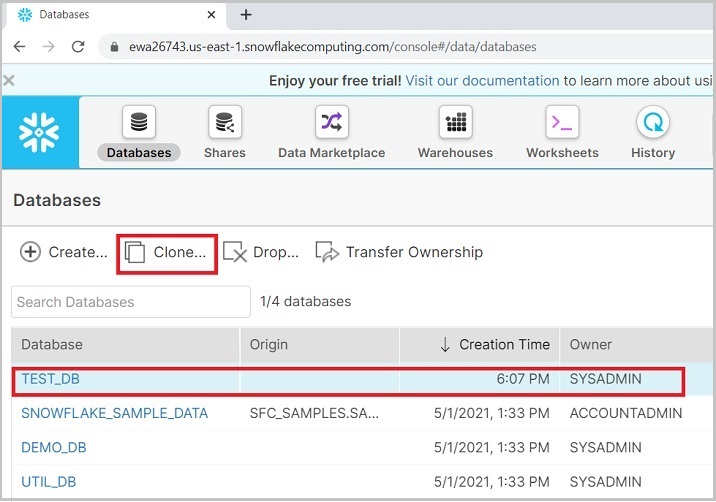
Use the Create button for creating a new warehouse. User can clone a database as well, by selecting a database and clicking Clone as shown in the following screenshot −
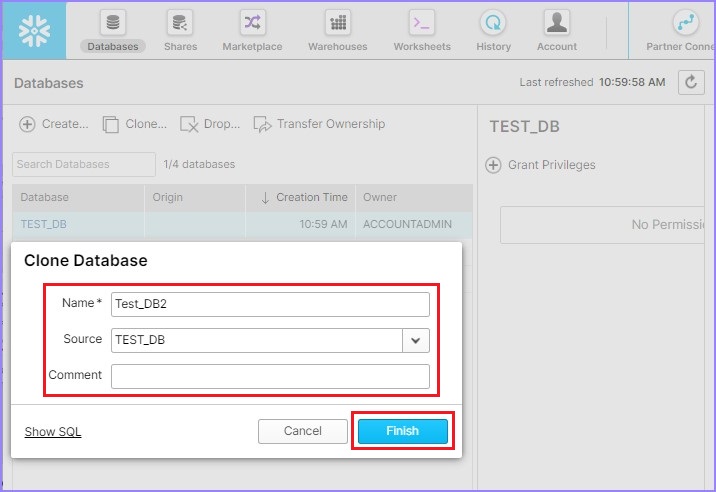
It pops up a Clone Database dialog box to enter some information like Name, Source, Comment. After entering those details click Finish button as shown in the following screenshot −
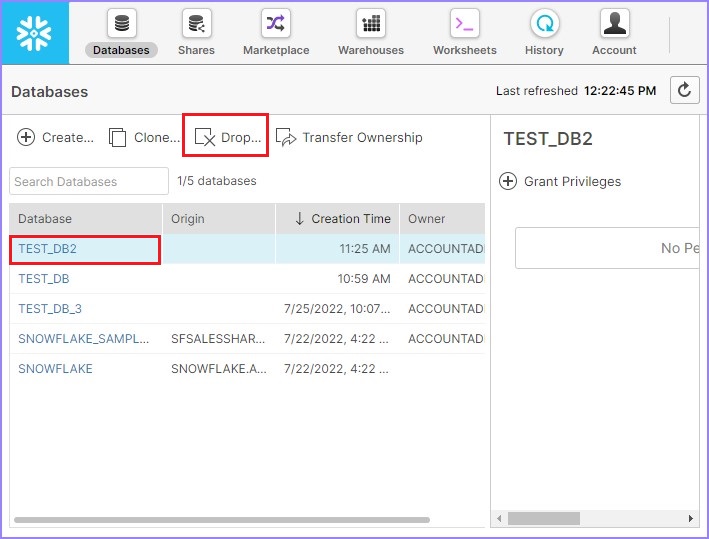
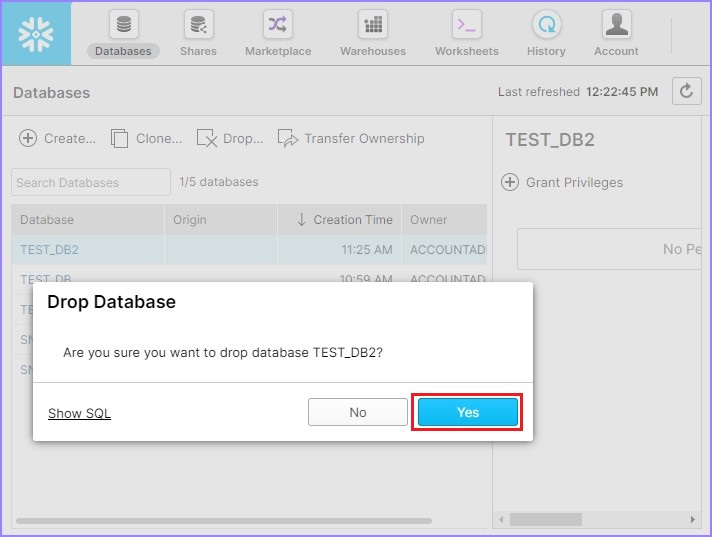
User can see another database is created and it will be visible in view panel. User can also delete a database, by selecting a database and clicking on Drop button as shown in the following screenshot −
It pops up a dialog box for confirmation. Click Yes for deletion, else No.
Working on Databases using Snowflake's SQL Interface
Here, we will learn how to create and view the databases by using the SQL interface of Snowflake.
Create Database
For creating a database, first you need to Login into Snowflake and navigate to Worksheets. By default, Worksheet is opened once the user logs in, else click the Worksheets icon present at the top ribbon.
Write the following query to create a database "TEST_DB_2"
CREATE DATABASE "TEST_DB_2"
Now click the Run button to execute the query. Result will be displayed in the the Results panel as the TEST_DB_2 database was successfully created. The following screenshot displays the output processed by using SQL −

View Databases
To view all the listed warehouses, user can use the following SQL. It brings the details of all listed warehouses.
SHOW DATABASES
To clone a database, user can use the following SQL, here “TEST_DB_3” is a new database named while DEMO_DB is used to clone it −
CREATE DATABASE TEST_DB_3 CLONE "DEMO_DB"
To delete database, use the following SQL −
DROP DATABASE "TEST_DB_3"
User can run SHOW DATABSE query after each operation to verify whether operation is completed.
Snowflake - Schema
Schema is grouping of database objects like tables, views etc. Each schema belongs to a single database. “Database.Schema” is the namespace in Snowflake. While performing any operation, the namespace is required to provide either directly in query or setting up in Snowflake's UI.
In this chapter, we will discuss how to create a database, and view details. Snowflake provides the user two ways to create a database, first one is by using user interface and the second one is by using SQL query.
Working with Schema using Snowflake's UI
Let’s see how to create a Schema using the GUI features.
Creating a schema
Login into Snowflake account using the unique URL. Now click the Databases icon present at the top ribbon. It will navigate to the database view screen. Then click the database name where the you want to create a new schema as shown in the following screenshot −
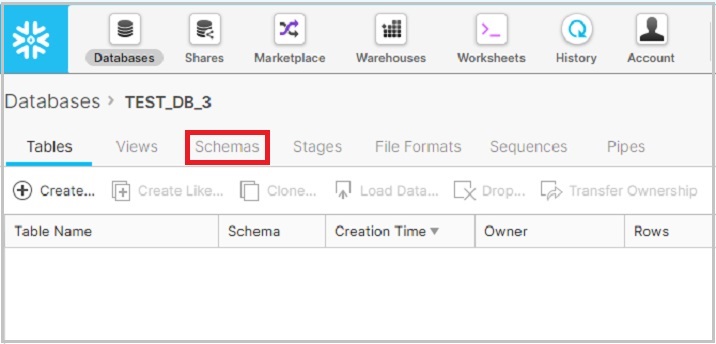
After clicking the database name, it will navigate you to the database properties page where you can see tables/views/schemas, etc., created inside the database. Now click the Schemas icon, by default, Table is selected as shown in the following screenshot −
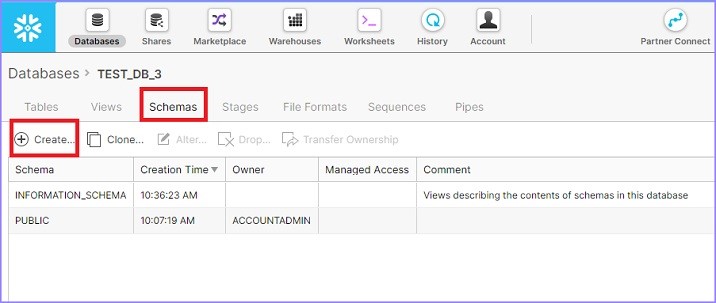
It displays list of schemas already created for selected database. Now click the Create icon above the list of schemas to create a new schema, as shown in the following screenshot −
After you click the Create icon, you will be able to see the Create Schema dialog box. Enter the schema name and click the Finish button, as shown in the following screenshot −
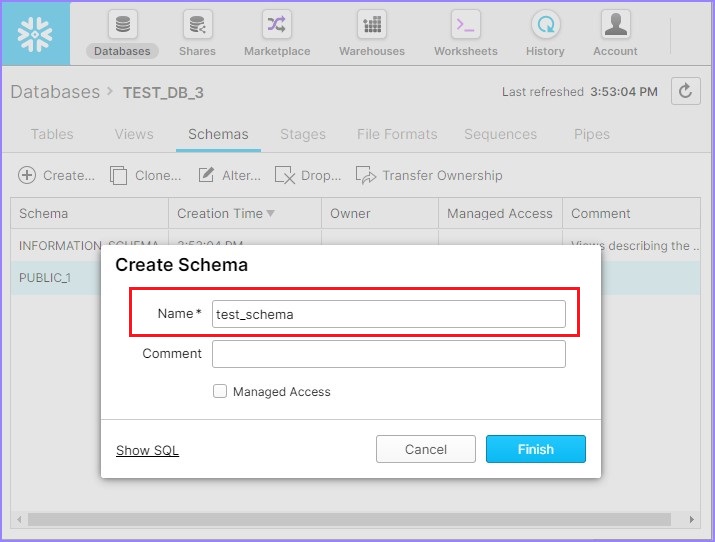
A new schema would be created and available with list of other schemas.
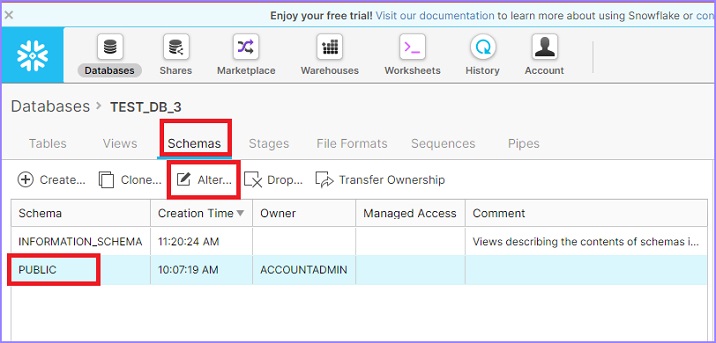
Edit / Modify / Alter Schema
Snowflake provides the facility to modify or alter the schema names. Let's see how we can modifiy a Schema name.
Click the Database icon present at the top ribbon. It displays the database page details. Now click the name of a database. It will navigate you to database properties view page. Click Schemas to see the list of available schemas. Select a schema to alter its name and click the Alter icon as shown below.
Its pop ups the Alter Schema dialog box. User can modify the Name. Click the Finish button as shown below.
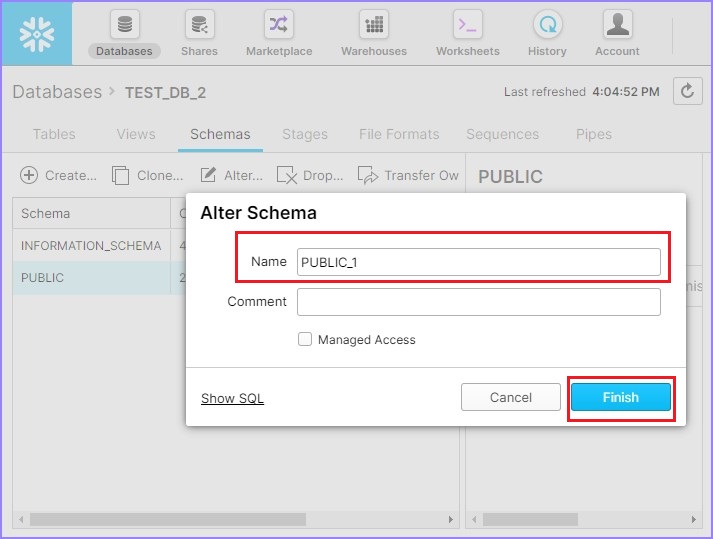
Now, it displays the updated schema name.
View Schema
Schemas are present inside a database. To view schemas, we must navigate to Database. Let's see how you can use the UI to view the schemas.
Click the Databases icon present at the top ribbon. It will display the View panel of Database where all the created databases are present. Select a database and click its name to view the schemas under it.
Click Schemas present just above the list of schemas. It will display all the available schemas. Once a database is created, it will generate two schemas by default – Information Schema and Public. Information Schema contains all the metadata of a database.
Use the Create button to create a new schema under the same database. User can create N number of schemas.
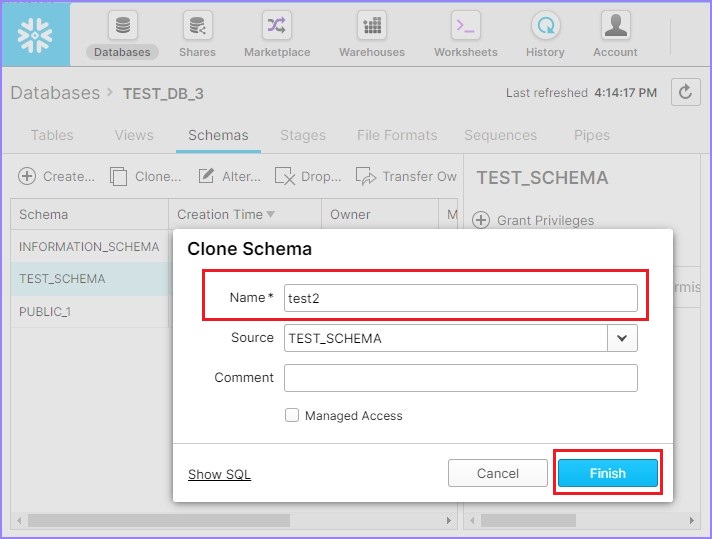
Use the Clone button to create another copy of existing schema. To perform this operation, select a schema and click the Clone icon.
The following screenshot demonstrates this feature −

It pops up the Clone Schema dialog box, enter the name of the new schema and click the Finish button.
The following screenshot displays the clone functionality −
In the View panel, you can see the cloned schema. User can delete a schema as well, by selecting a schema and clicking the Drop icon, as shown in the following screenshot −
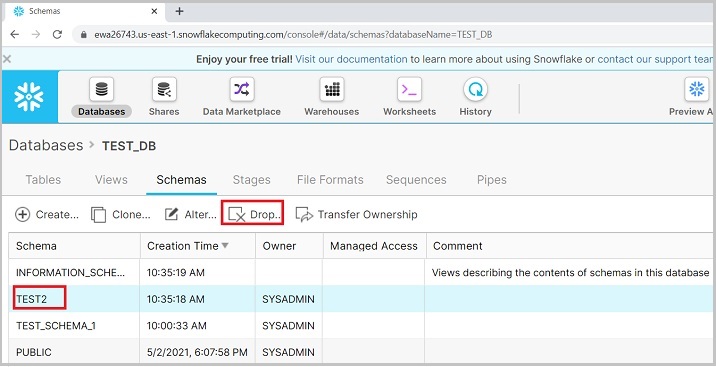
It pops up a dialog box for confirmation. Click Yes for deletion, else No.
Working on Schemas Using Snowflake's SQL Interface
Let’s see how to create a Schema using the SQL interface features.
Create Schema
First login into Snowflake and navigates to Worksheets. By default, Worksheet is opened once the user logs in else click on Worksheets icon present at top ribbon.
Write a following query to create a schema TEST_SCHEMA under database TSET_DB −
CREATE SCHEMA "TEST_DB"."TEST_SCHEMA"
Click the Run button to execute the query. Result will be displayed in result panel as "Schema TEST_SCHEMA" successfully created.
Edit/Modify/Alter Schema
To alter/modify the schema name, use following query and run it −
ALTER SCHEMA "TEST_DB"."TEST_SCHEMA" RENAME TO "TEST_DB"."TEST_SCHEMA_RENAME"
User can go to view panel and verify the updated name.
View Schema
To view all listed schemas, user can use the following SQL. It brings details of all listed schemas.
SHOW SCHEMAS
To clone a schema, use following SQL −
CREATE SCHEMA "TEST_DB"."TEST2" CLONE "TEST_DB"."TEST_SCHEMA_RENAME"
To delete a schema, use following SQL −
DROP SCHEMA "TEST_DB"."TEST2"
User can run SHOW SCHEMAS query after each operation to verify whether operation is completed or not.
Snowflake - Table & Columns
In a database, Schemas are created which are logical grouping of tables. Tables contain columns. Tables and columns are low-level and most important objects of a database. In this chapter, we will discuss about how to create a table and columns in Snowflake.
Snowflake provides the user two ways, to create a table and corresponding columns using user interface and SQL query. Without providing details of columns, user can't create a table.
Working with Tables and Columns using Snowflake's UI
Let's see how to work with tables and columns using Snowflake's UI.
Create Table and Columns
Login into Snowflake account using the unique URL. Click the Databases button, present at top ribbon. It navigates to database view screen.
Click the database name where you want to create a new table. It will navigate to database properties page where you can see tables/views/schemas etc. created inside the database.
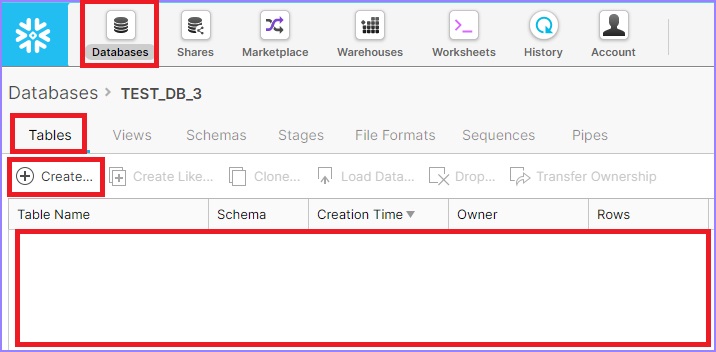
Click the Tables if it is not selected, by default, Table is selected. You can see the list of tables created in the same database, otherwise it is blank.
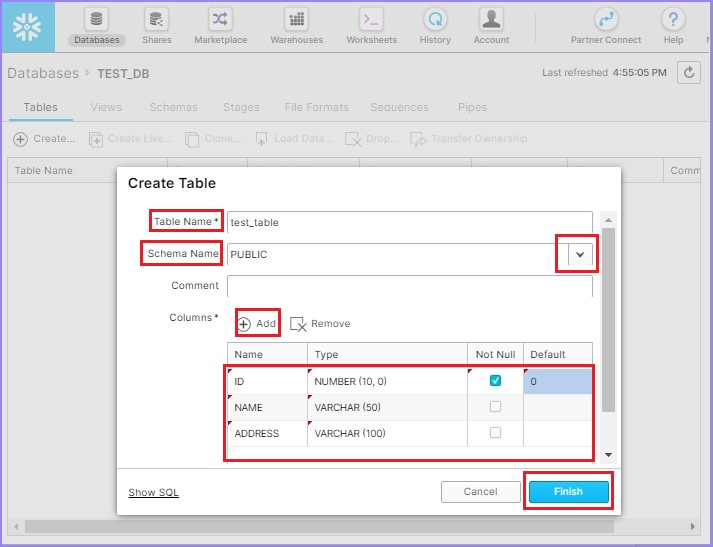
Click the Create button to add a table. It will pop up the Create Table dialog box. Enter the following fields −
Table Name − test_table
Schema Name − select from available list – PUBLIC
Columns − Click the Add button, then enter Name, Type, Not Null or any default value.
To add multiple columns, keep clicking the Add button and then enter details. Now, click the Finish button.
The following screenshot depicts how to add table and columns −
You can see the created table in the view panel.
View Table and Columns
In this section, we will discuss how to view the details of tables and columns, how to create a like table, how to clone it, and how to delete a table.
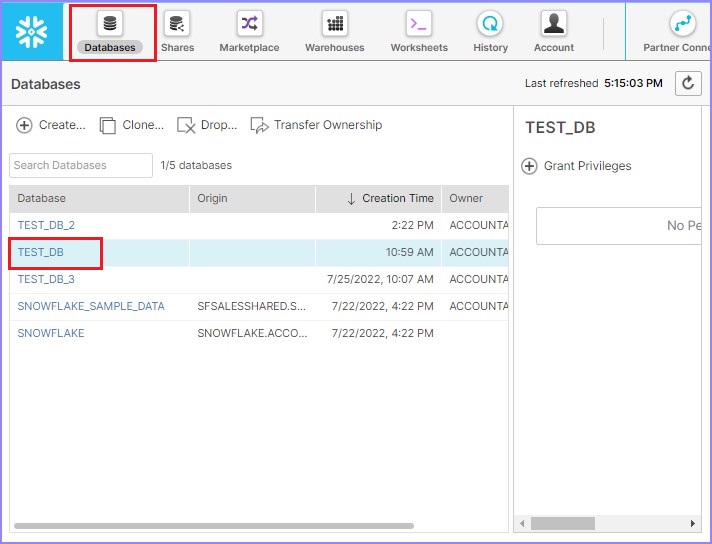
Click Databases present at the top ribbon. It will display the View panel of databases where all the databases are listed. Click the name of a database, where tables are present. For example, TEST_DB as shown in the following screenshot −
It will display all the listed tables in the database. Use the Create button for creating a new table. Use the Create Like button to create a table that has the same metadata as an existing table.
By clicking the Create Like button, the Create Table Like dialog box will pop up. Enter the name of new table and click on Finish button.
The following screenshot explains this functionality −
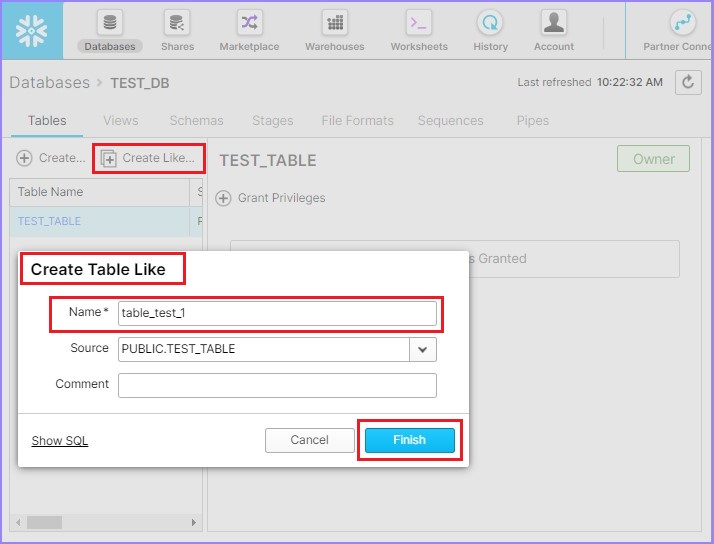
In the View panel, you can see the new table. In this case, TABLE_TEST_1.
Use the Clone button to create another copy of the existing table. To perform this operation, select a table and click the Clone button.
Clone Table dialog box will pop up on the screen. Enter the name of the new table and click the Finish button.
The following screenshot displays the clone functionality.
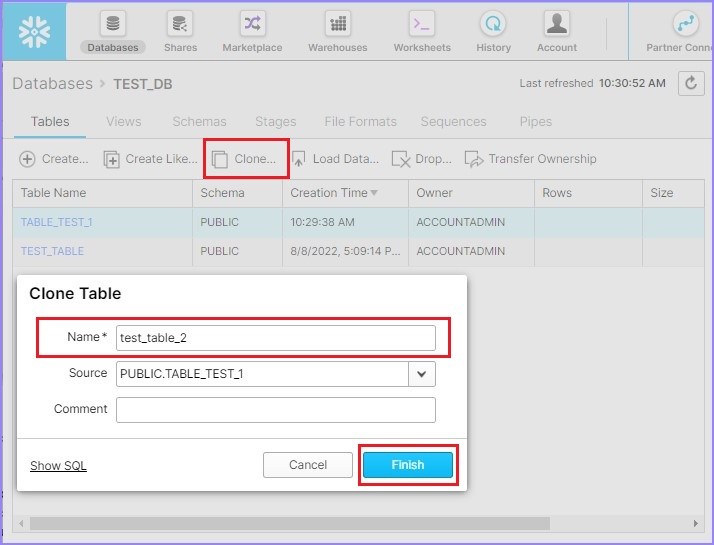
You can see the new table in the View panel.
The difference in Clone and Create Like is "column data". Clone brings the actual data from the existing table, whereas Create Like copies only the metadata of a table. It doesn't copy existing data present in the table.
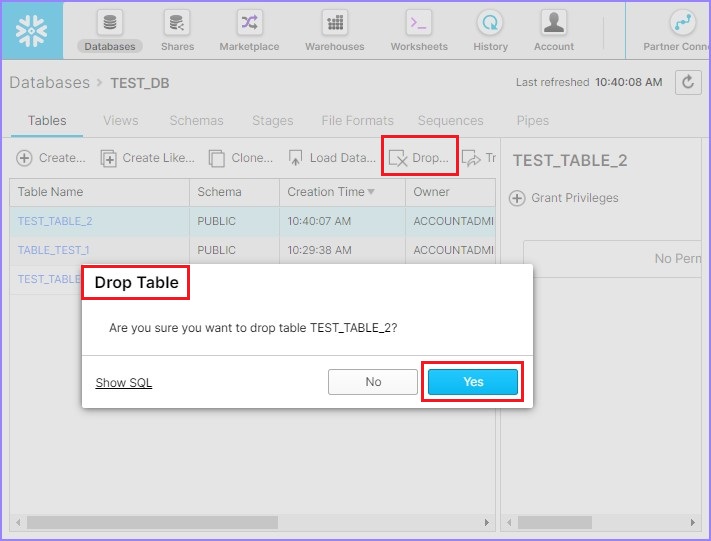
User can delete a table as well, by selecting a table and clicking the Drop button. The Drop Table dialog box pops-up for confirmation. Click YES for deletion, else NO.
Working on Tables and Columns using Snowflake's SQL Interface
Once the user starts working on tables and columns, respective databases and schemas become important factor. If details of database and schema is not provided, query won't execute successfully.
There are two ways to set up database and schema details – One using Snowflake's UI and another is providing database name and schema name before table names in query as shown in following examples −
SELECT * FROM DATABSE_NAME.SCHEMA_NAME.TABLE_NAME.
In the UI, the following steps need to be performed −
Click at the Down arrow present at the top-right corner beside the Select Schema. It pops up a dialog box where the user can provide the following details −
- ROLE
- Warehouse
- Database
- Schema
The following screenshot describes the above steps −

Now, when the user runs a query without providing a database name and schema name in the query, it runs against set up database and schema as shown above. You can change it frequently if you need to switch over to another database/schema.
Setup Database, Warehouse and Schema in SQL
Use the following query to set up a warehouse for a session −
USE WAREHOUSE <WAREHOUSE_NAME>
Use the following query to set up a database for a session −
USE DATABASE <DATABASE_NAME>
Use the following query to set up a schema for a session −
USE SCHEMA <SCHEMA_NAME>
Create TABLE and COLUMNS
Login into Snowflake and navigate to Worksheets. By default, Worksheet is opened once you login, else click the Worksheets icon present at the top ribbon.
Use the following query to create a table and columns under the database TEST_DB and schema TEST_SCHEMA_1 −
CREATE TABLE "TEST_DB"."TEST_SCHEMA_1"."TEST_TABLE"
   ("ID" NUMBER (10,0) NOT NULL DEFAULT 0, "NAME" VARCHAR (50), "ADDRESS" VARCHAR (100))
Click the Run button to execute the query. Result will be displayed in the Results panel as TEST_TABLE was successfully created.
View Table and Columns
To view all the listed tables, you can use the following SQL. It brings details of all listed schemas.
SHOW TABLES
To view the column definition, use the following SQL −
DESCRIBE TABLE TEST_DB.TEST_SCHEMA_1.TEST_TABLE
To clone a table, use the following SQL −
CREATE TABLE "TEST_DB"."TEST_SCHEMA_1".TEST_TABLE_2 CLONE "TEST_DB"."TEST_SCHEMA_1"."TEST_TABL_1"
To create a Like table, use the following query −
CREATE TABLE "TEST_DB"."TEST_SCHEMA_1".TEST_TABL_1 LIKE "TEST_DB"."TEST_SCHEMA_1"."TEST_TABLE"
To delete a table, use the following SQL −
DROP TABLE "TEST_DB"."TEST_SCHEMA_1"."TEST_TABLE_2"
User can run SHOW TABLES query after each operation to verify whether operation is completed.
Snowflake - Load Data From Files
In a database, Schemas are created which are logical grouping of tables. Tables contain columns. Tables and columns are low-level and the most important objects of a database. Now, the most important function of table & columns is storing the data.
In this chapter, we will discuss about how to store data into table and columns in Snowflake.
Snowflake provides the user two ways to store data into a table and corresponding columns using user interface and SQL query.
Load Data into Tables and Columns using Snowflake's UI
In this section, we will discuss the steps that should be followed to load data into a table and its corresponding columns using a file like CSV, JSON, XML, Avro, ORC, Parquet.
This approach is limited to load a small amount of data up to 50 MB.
Create a sample file in any of the format. While creating the file, make sure the number of columns in the file and the table should match, otherwise the operation will fail while loading the data.
In TEST_DB.TEST_SCHEMA.TEST_TABLE, there are three columns: ID, NAME, and ADDRESS.
The following sample data is created in "data.csv" −
| ID | NAME | ADDRESS |
|---|---|---|
| 1 | aa | abcd |
| 2 | ab | abcd |
| 3 | aa | abcd |
| 4 | ab | abcd |
| 5 | aa | abcd |
| 6 | ab | abcd |
| 7 | aa | abcd |
| 8 | ab | abcd |
| 9 | aa | abcd |
Now, click the DATABSES icon present at the top ribbon. Click the table name where you want to upload data. It shows the number of columns and definition.
The following screenshot shows the Load Data functionality −

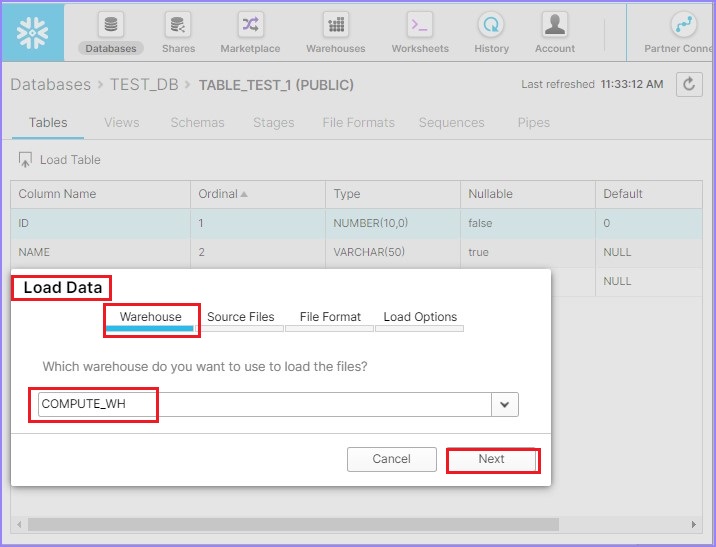
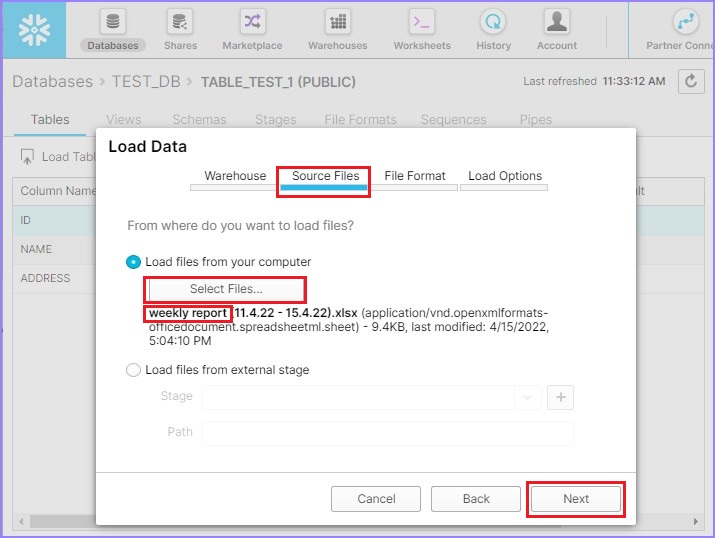
Reverify the sample file with respect to columns. Click the Load Table button at the top of column names. It pops-up Load Data dialog box. At the first screen, select Warehouse Name and click the Next button.
On the next screen, select a file from your local computer by clicking Select Files. Once the file is uploaded, you can see the file name as shown in following screenshot. Click the Next button.
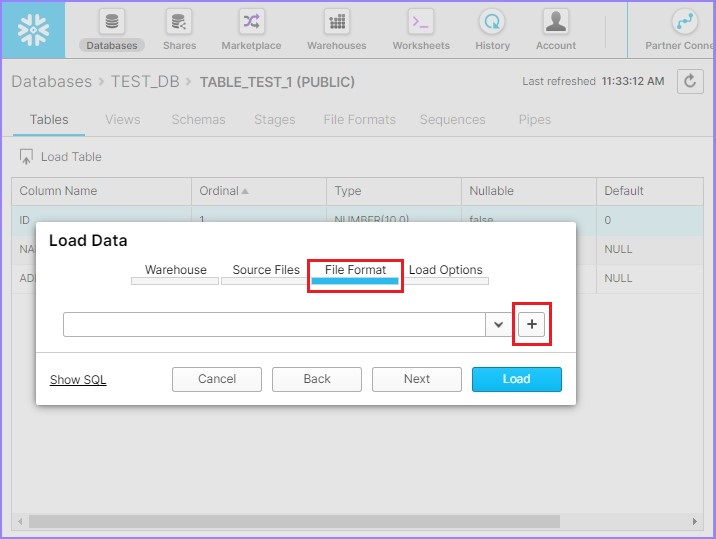
Now create the File Format by clicking + sign as shown in the following screenshot −
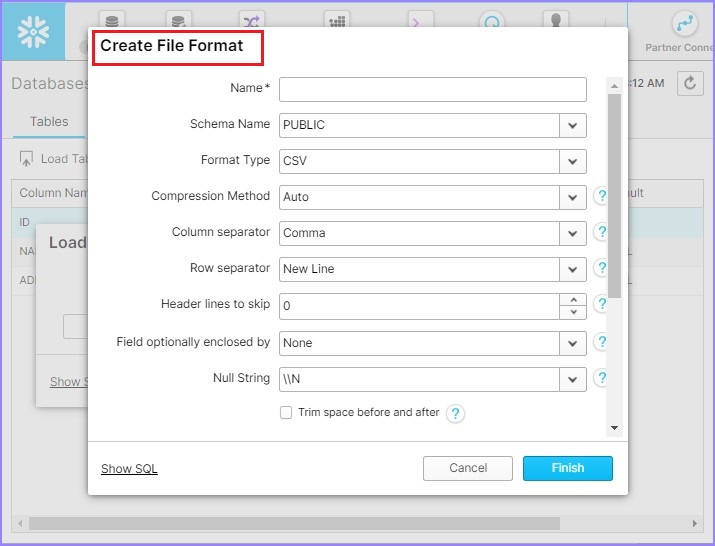
It pops-up the Create File Format dialog box. Enter the following details −
Name − Name of file format.
Schema Name − The create file format can be utilized in the given schema only.
Format Type − Name of file format.
Column separator − If CSV file is separated, provide file delimiter.
Row separator − How to identify a new line.
Header lines to skip − If header is provided, then 1 else 0.
Other things can be left as it is. Click the Finish button after entering details.
The following screenshot displays the above details −
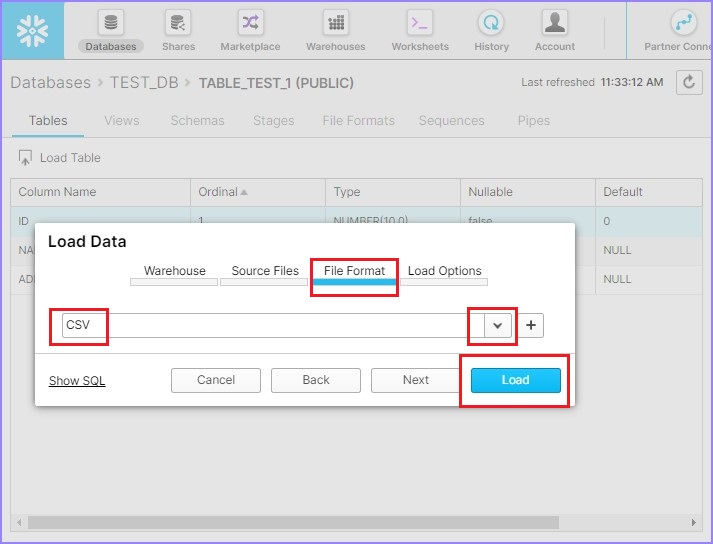
Select the File Format from the dropdown and click Load as shown in the following screenshot −
After loading the results, you will get the summary, as shown below. Click the OK button.
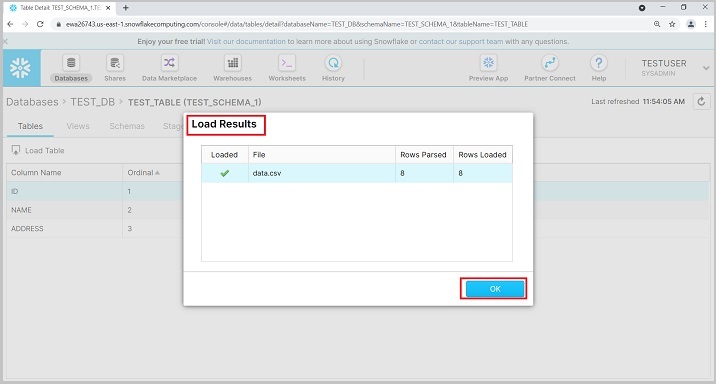
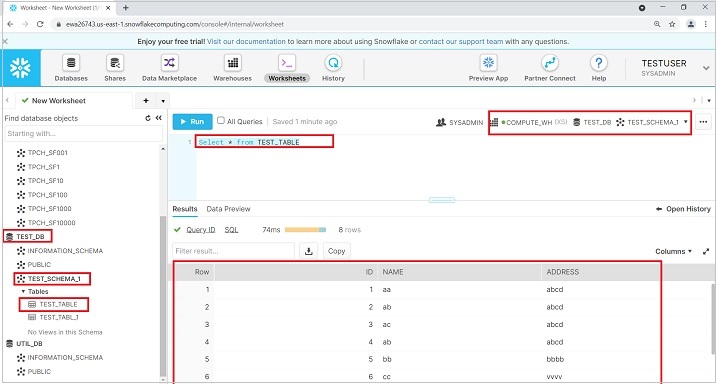
To view the data, run the query "SELECT * from TEST_TABLE". In the left panel also, user can see DB, Schema and table details.
Load Data into Tables and Columns using SQL
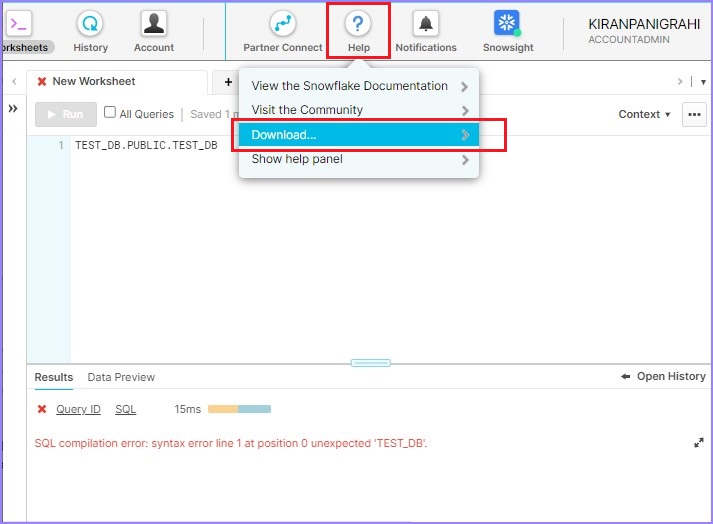
To load data from a local file, you can take the following steps −
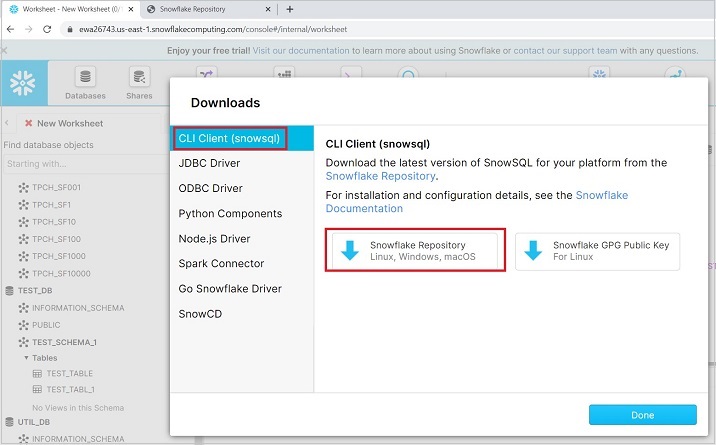
Upload a file into Snowflake's stage using SnowSQL, a plugin provided by Snowflake. To perform it, go to help and click on Download as shown below −
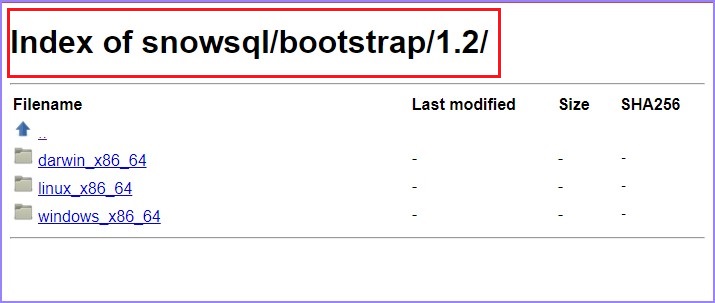
Click the CLI Client (snowsql) and click the Snowflake Repository as shown in the following screenshot −

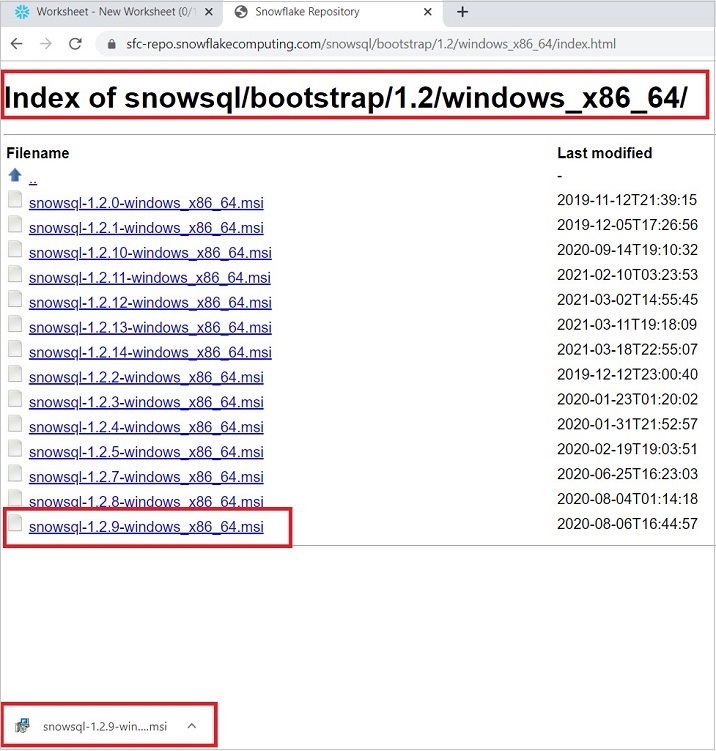
User can move to bootstrap → 1.2 → windows_x86_64 → click to download latest version.
The following screenshot displays the above step −
Now, install the downloaded plugin. After installation, open CMD in your system. Run the following command to check connection −
snowsql -a <account_name> -u <username>
It will ask for password. Enter your snowflake password and press ENTER. You will see successful connection. Now use the command line −
<username>#<warehouse_name>@<db_name>.<schema_name>
Now use the following command to upload the file into snowflake' stage −
PUT file://C:/Users/*******/Documents/data.csv @csvstage;
Don't forget to put the "semicolon" sign at end, else it will run forever.
Once the file got uploaded, user can run the following command into Worksheet −
COPY INTO "TEST_DB"."TEST_SCHEMA_1"."TEST_TABLE" FROM @/csvstage ON_ERROR = 'ABORT_STATEMENT' PURGE = TRUE
Date will be loaded into the table.
Snowflake - Sample Useful Queries
In this chapter, we will some sample useful queries in Snowflake and their outputs.
Use the following query to bring limited data in Select statement −
"SELECT * from <table_name>" Limit 10
This query will display only the first 10 rows.
Use the following query to display the usage of last 10 days.
SELECT * FROM TABLE (INFORMATION_SCHEMA.DATABASE_STORAGE_USAGE_HISTORY
   (DATEADD('days', -10, CURRENT_DATE()), CURRENT_DATE()))
Use the following query to check stages and file format created in Snowflake −
SHOW STAGES
SHOW FILE FORMATS
To check variables, run following queries in sequence −
SELECT * FROM snowflake_sample_data.tpch_sf1.region
JOIN snowflake_sample_data.tpch_sf1.nation
ON r_regionkey = n_regionkey;
select * from table(result_scan(last_query_id()));
SELECT * FROM snowflake_sample_data.tpch_sf1.region
JOIN snowflake_sample_data.tpch_sf1.nation
ON r_regionkey = n_regionkey;
SET q1 = LAST_QUERY_ID();
select $q1;
SELECT * FROM TABLE(result_scan($q1)) ;
SHOW VARIABLES;
Use the following query to find the login history of a database −
select * from table(test_db.information_schema.login_history());
Results provide timestamp, username, how login has done either using password or SSO, errors during login etc.
Use the following command to see all the columns −
SHOW COLUMNS
SHOW COLUMNS in table <table_name>
Use the following command to show all the parameters provided by snowflake −
SHOW PARAMETERS;
Following are the few details which can be viewed by just running the query "SHOW PARAMETERS;"
| Sr.No | Keys & Description |
|---|---|
| 1 | ABORT_DETACHED_QUERY If true, Snowflake will automatically abort queries when it detects that the client has disappeared. |
| 2 | AUTOCOMMIT The auto-commit property determines whether statement should be implicitly wrapped within a transaction or not. If auto-commit is set to true, then a statement that requires a transaction is executed within a transaction implicitly. If auto-commit is false, then an explicit commit or rollback is required to close a transaction. The default auto-commit value is true. |
| 3 | AUTOCOMMIT_API_SUPPORTED Whether auto-commit feature is enabled for this client. This parameter is for Snowflake use only. |
| 4 | BINARY_INPUT_FORMAT input format for binary |
| 5 | BINARY_OUTPUT_FORMAT display format for binary |
| 6 | CLIENT_ENABLE_CONSERVATIVE_MEMORY_USAGE Enables conservative memory usage for JDBC |
| 7 | CLIENT_ENABLE_DEFAULT_OVERWRITE_IN_PUT Set default value of overwrite option to true for put command, if overwrite option is not specified in the sql command. |
| 8 | CLIENT_ENABLE_LOG_INFO_STATEMENT_PARAMETERS Enable info-level logging for Prepared Statement binding parameters |
| 9 | CLIENT_MEMORY_LIMIT Limit the amount of memory used by the client in MB |
| 10 | CLIENT_METADATA_REQUEST_USE_CONNECTION_CTX For client metadata request(getTables()), use session catalog and schema if set to true |
| 11 | CLIENT_METADATA_USE_SESSION_DATABASE For client metadata request(getTables()), use session catalog but multiple schemas if set to true (in conjunction with CLIENT_METADATA_REQUEST_USE_CONNECTION_CTX |
| 12 | CLIENT_PREFETCH_THREADS Customer parameter to control threads, 0=auto |
| 13 | CLIENT_RESULT_CHUNK_SIZE Set the max result chunk size in MB on the client side |
| 14 | CLIENT_RESULT_COLUMN_CASE_INSENSITIVE Column name search is case insensitive in clients |
| 15 | CLIENT_SESSION_CLONE If true, client clones a new session from the previously used tokens for the account and user. |
| 16 | CLIENT_SESSION_KEEP_ALIVE If true, client session will not expire automatically |
| 17 | CLIENT_SESSION_KEEP_ALIVE_HEARTBEAT_FREQUENCY Heartbeat frequency in seconds for CLIENT_SESSION_KEEP_ALIVE. |
| 18 | CLIENT_TIMESTAMP_TYPE_MAPPING If a variable is bound to the TIMESTAMP data type using the bind API determines which TIMESTAMP* type it should map to: |
| 19 | C_API_QUERY_RESULT_FORMAT Format used to serialize query result to send back to C API |
| 20 | DATE_INPUT_FORMAT input format for date |
| 21 | DATE_OUTPUT_FORMAT display format for date |
| 22 | ENABLE_UNLOAD_PHYSICAL_TYPE_OPTIMIZATION Enable physical-type optimizations used in Snowflake to affect the Parquet output |
| 23 | ERROR_ON_NONDETERMINISTIC_MERGE raise an error when attempting to merge-update a row that joins many rows |
| 24 | ERROR_ON_NONDETERMINISTIC_UPDATE raise an error when attempting to update a row that joins many rows |
| 25 | GEOGRAPHY_OUTPUT_FORMAT GEOGRAPHY display format: GeoJSON, WKT, or WKB(case-insensitive) |
| 26 | GO_QUERY_RESULT_FORMAT Format used to serialize query result to send back to golang driver |
| 27 | JDBC_FORMAT_DATE_WITH_TIMEZONE When true, ResultSet#getDate(int columnIndex, Calendar cal) and getDate(String columnName, Calendar cal) will display the date using the Calendar's output. |
| 28 | JDBC_QUERY_RESULT_FORMAT Format used to serialize query result to send back to jdbc |
| 29 | JDBC_TREAT_DECIMAL_AS_INT When scale is 0, whether to treat Decimal as Int in JDBC |
| 30 | JDBC_TREAT_TIMESTAMP_NTZ_AS_UTC When true, Timestamp_NTZ values are always stored in UTC timezone |
| 31 | JDBC_USE_SESSION_TIMEZONE When true, JDBC driver will not display timezone offset between JVM and session. |
| 32 | JSON_INDENT Width of indentation in JSON output (0 for compact) |
| 33 | JS_TREAT_INTEGER_AS_BIGINT If true, the nodejs client will convert all integer columns to bigint type |
| 34 | LANGUAGE The selected language that will be used by UI, GS, Query Coordination and XP. The input languages should be in BCP-47 format. AKA. dash format. See LocaleUtil.java for the details. |
| 35 | LOCK_TIMEOUT Number of seconds to wait while trying to lock a resource, before timing out and aborting the statement. A value of 0 turns off lock waiting i.e. the |
| 36 | MULTI_STATEMENT_COUNT Number of statement included in submitted query text. This parameter is submitted by user to avoid sql injection. Value 1 means one statement, value > 1 means N statements can be executed, if not equal to the value will raise the exception. Value 0 means any number of statements can be executed |
| 37 | ODBC_QUERY_RESULT_FORMAT Format used to serialize query result to send back to ODBC |
| 38 | ODBC_SCHEMA_CACHING When true, enables schema caching in ODBC. This can speed up SQL Columns API calls. |
| 39 | ODBC_USE_CUSTOM_SQL_DATA_TYPES ODBC return snowflake specific sql data types in result set metadata |
| 40 | PYTHON_CONNECTOR_QUERY_RESULT_FORMAT Format used to serialize query result to send back to python connector |
| 41 | QA_TEST_NAME Test name if running in QA mode. Used as a diversifier for shared pools |
| 42 | QUERY_RESULT_FORMAT Format used to serialize query result to send back to client |
| 43 | QUERY_TAG String (up to 2000 characters) used to tag statements executed by the session |
| 44 | QUOTED_IDENTIFIERS_IGNORE_CASE If true, the case of quoted identifiers is ignored |
| 45 | ROWS_PER_RESULTSET maximum number of rows in a result set |
| 46 | SEARCH_PATH Search path for unqualified object references. |
| 47 | SHOW_EXTERNAL_TABLE_KIND_AS_TABLE Change the way external table KIND info is displayed by SHOW TABLES and SHOW OBJECTS. The KIND column of external tables is displayed as TABLE if true, EXTERNAL_TABLE otherwise. |
| 48 | SIMULATED_DATA_SHARING_CONSUMER Data sharing views will return rows as if executed in the specified consumer account. |
| 49 | SNOWPARK_LAZY_ANALYSIS Enable lazy result schema analysis for Snowpark |
| 50 | STATEMENT_QUEUED_TIMEOUT_IN_SECONDS Timeout in seconds for queued statements: statements will automatically be canceled if they are queued on a warehouse for longer than this amount of time; disabled if set to zero. |
| 51 | STATEMENT_TIMEOUT_IN_SECONDS Timeout in seconds for statements: statements are automatically canceled if they run for longer; if set to zero, max value (604800) is enforced. |
| 52 | STRICT_JSON_OUTPUT JSON output is strictly compliant to the specification |
| 53 | TIMESTAMP_DAY_IS_ALWAYS_24H If set, arithmetic on days always uses 24 hours per day, possibly not preserving the time (due to DST changes) |
| 54 | TIMESTAMP_INPUT_FORMAT input format for timestamp |
| 55 | TIMESTAMP_LTZ_OUTPUT_FORMAT Display format for TIMESTAMP_LTZ values. If empty, TIMESTAMP_OUTPUT_FORMAT is used. |
| 56 | TIMESTAMP_NTZ_OUTPUT_FORMAT Display format for TIMESTAMP_NTZ values. If empty, TIMESTAMP_OUTPUT_FORMAT is used. |
| 57 | TIMESTAMP_OUTPUT_FORMAT Default display format for all timestamp types. |
| 58 | TIMESTAMP_TYPE_MAPPING If TIMESTAMP type is used, what specific TIMESTAMP* type it should map to: |
| 59 | TIMESTAMP_TZ_OUTPUT_FORMAT Display format for TIMESTAMP_TZ values. If empty, TIMESTAMP_OUTPUT_FORMAT is used. |
| 60 | TIMEZONE time zone |
| 61 | TIME_INPUT_FORMAT input format for time |
| 62 | TIME_OUTPUT_FORMAT display format for time |
| 63 | TRANSACTION_ABORT_ON_ERROR If this parameter is true, and a statement issued within a non-auto-commit transaction returns with an error, then the non-auto-commit transaction is aborted. All statements issued inside that transaction will fail until an commit or rollback statement is executed to close that transaction. |
| 64 | TRANSACTION_DEFAULT_ISOLATION_LEVEL The default isolation level when starting a starting a transaction, when no isolation level was specified |
| 65 | TWO_DIGIT_CENTURY_START For 2-digit dates, defines a century-start year. |
| 66 | UI_QUERY_RESULT_FORMAT Format used to serialize query result to send back to python connector |
| 67 | UNSUPPORTED_DDL_ACTION The action to take upon encountering an unsupported DDL statement |
| 68 | USE_CACHED_RESULT If enabled, query results can be reused between successive invocations of the same query as long as the original result has not expired |
| 69 | WEEK_OF_YEAR_POLICY Defines the policy of assigning weeks to years: |
| 70 | WEEK_START Defines the first day of the week: |
Snowflake - Monitor Usage and Storage
Snowflake charges customer based on storage, usage and cloud services. It becomes important to monitor the storage data and usage.
Individual user can view the history for long running queries while account admin can view billing for each user, consumption and utilization of services by each user or by date etc.
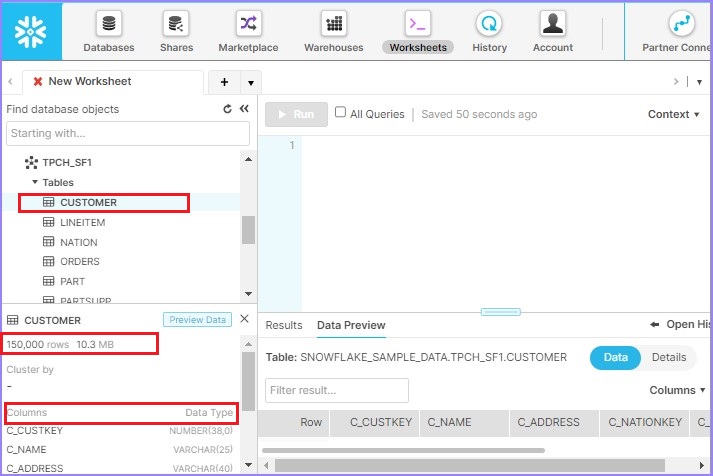
Checking Storage
User can check how many rows are having individual table as well as data size. If user has access of table, he/she can view these details by just selecting a table. In the left down panel, user can see Table Name then number of rows and data storage size. After that, it shows the columns definition of the table.
The following screenshot shows how to check storage details −
History
In this section, users can check their activities in snowflake like what queries are they using, current status of query, how much time it took to run, etc.
To view the history, click the History tab present at the top Ribbon. It will show the user's history. If user has accessed or logged in as Account Admin, they can filter out the history based on individual user. It displays following information −
Status where query is RUNNING/FAILED/SUCCESS
Query ID − Query ID is unique for all queries those are executed
SQL Text − It displays what query user has run.
User − User who has performed the action.
Warehouse − Which warehouse is used to run the query.
Cluster − if it is multi-cluster then number of clusters used
Size − Warehouse size
Session ID − Every worksheet has unique session id.
Start Time − When query started to execute
End Time − When query completed the execution
Total Duration − Total duration of time query ran.
Bytes Scanned − It shows how much data is scanned to bring the result
Rows − Number of rows scanned
The following screenshot displays the History view −
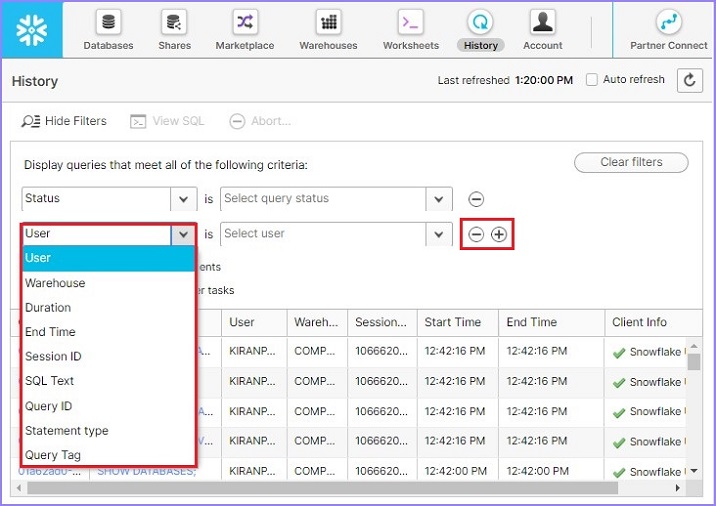
In the Filter, user can place one or many filters by clicking the "+" sign and for removing the filters use the "–" sign. The following screenshot displays list of available filters −
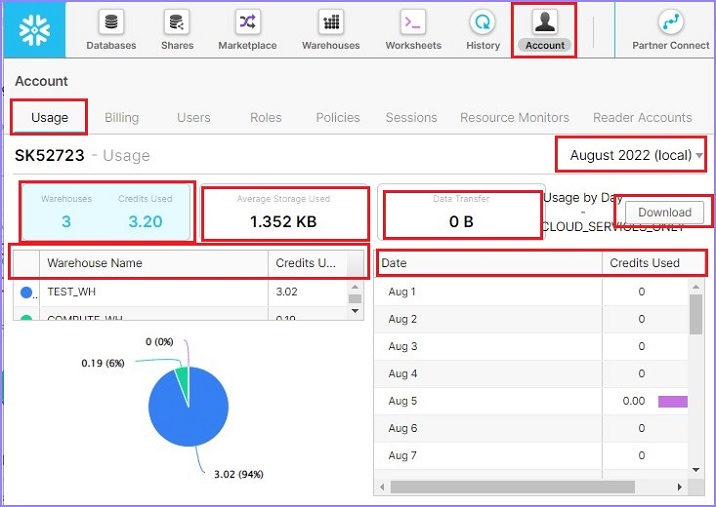
Monitoring
To perform account level monitoring, user must be logged in as an ACCOUNTADMIN role.
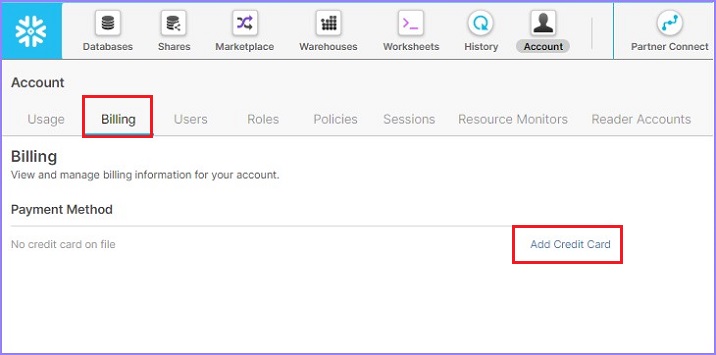
For monitoring purpose, login as Account Admin. Click the Account link present at top ribbon. It will show Account Usage by default. User can see the number of warehouses created, how much credit has been used, average storage used (it means that how much data we scanned during running the query vs overall storage), and how much data transferred.
It also shows credits utilized by each warehouse and it displays a pie-chart as well. On the right side, user can see Date Vs Credit Used in tabular form. User can even download the data by clicking on Download data. Monthly usage can be seen by changing the month at right top side.
The following screenshot displays the Usage tab information −
Click the next tab Billing. Here, the user can see any payment method added previously. User can add a new payment method as well, by clicking Add Credit Card link and then provide regular details like Credit card#, CVV, Expiry, Name etc.
The following screenshot displays Billing section −
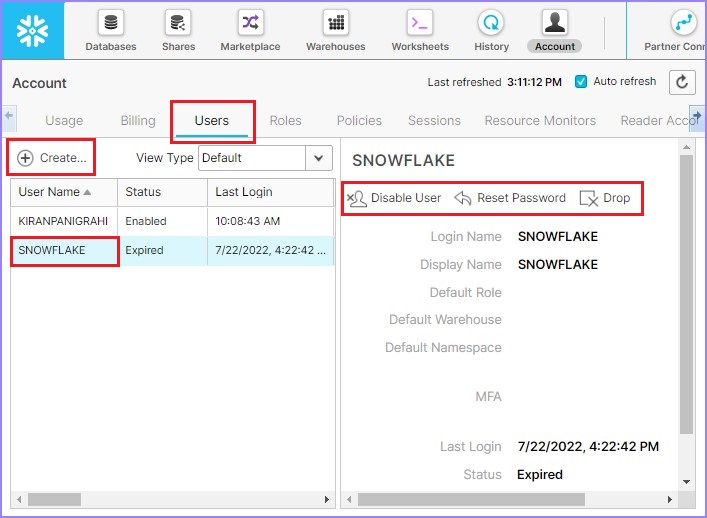
Click the next tab USERS. It displays name of all the users present in the account.
By selecting Users, the account admin can reset user passwords or disable a user or delete a user by using Reset Password, Disable User, and Drop button, respectively. By clicking the Create button, present at the top of user list, the Account Admin can create a new user.
The following screenshot displays Users tab functionality −
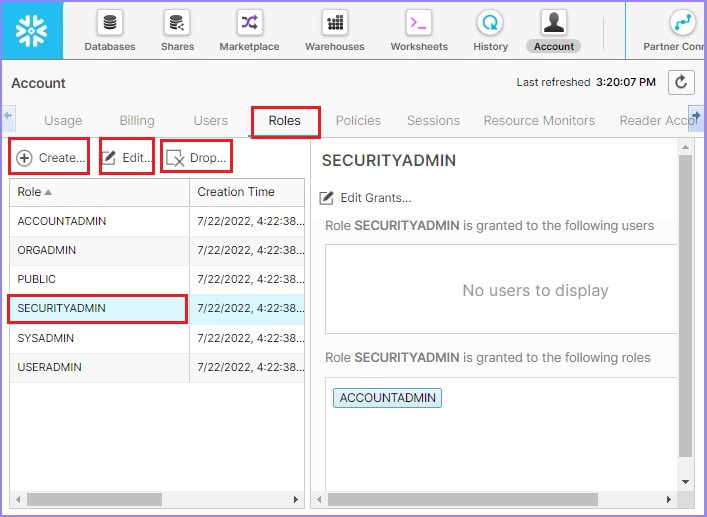
Now click the next tab ROLES. A new role can be created here by clicking the Create button present at top of the role list. By selecting a role, it gives the option to enable or delete the role as well, by clicking Edit button and Drop respectively.
The following screenshot displays functionality of Roles tab −
Apart from these, there are Policies, Sessions, Resource Monitors and Reader Accounts tab as well. Account Admin can create/edit/delete policies, create/edit/delete sessions, create/edit/delete resource monitors and similarly to Reader Accounts.
Snowflake - Cache
Snowflake has a unique feature of caching. It provides fast and quick result with less data scan based on this caching. It even helps the customer to reduce their billing as well.
There are basically three types of caching in Snowflake.
- Metadata Caching
- Query Result Caching
- Data Caching
By default, cache is enabled for all snowflake session. But user can disable it based on their needs. However, user can disable only Query Result caching but there is no way to disable Metadata Caching as well as Data Caching.
In this chapter, we will discuss about the different types of cache and how snowflake decides caching.
Metadata Caching
Metadata stores at Cloud Service Layer hence caching is also at same layer. These metadata caching is always enabled for everyone.
It basically contains the following details −
Row Count in a table.
MIN/MAX value of a column
Number of DISTINCT values in a column>
Number of NULL values in a column
Details of different table versions
References of physical files
This information is basically used by SQL optimizer to execute faster and quicker. There could be a few queries those can be answered completely by metadata itself. For such kind of queries no virtual warehouse is required but Cloud service charges may be applicable.
Such queries are like −
All SHOW commands
MIN, MAX but limited to only Integer/Number/Date data types of columns.
COUNT
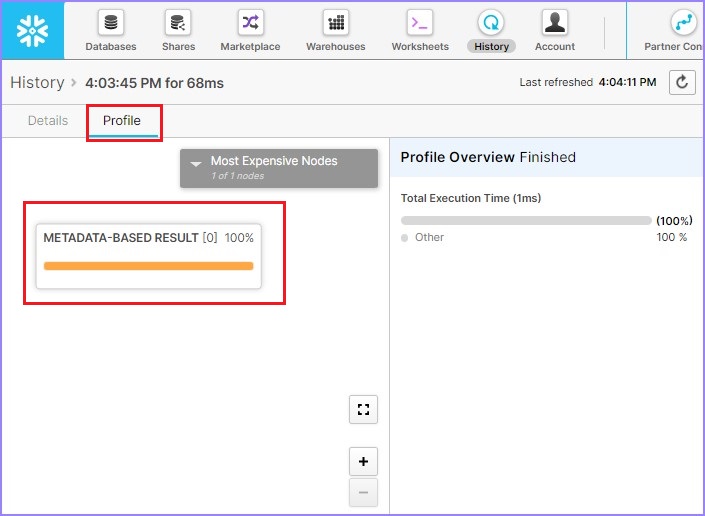
Let's run a query to see how Metadata Caching works and user can validate.
Login into Snowflake and go to Worksheets. Suspend the warehouse by running following query −
ALTER WAREHOUSE COMPUTE_WH SUSPEND;
Now, run following queries sequentially −
USE SCHEMA SNOWFLAKE_SAMPLE_DATA.TPCH_SF100;
SELECT MIN(L_orderkey), MAX(l_orderkey), COUNT(*) FROM lineitem;
User will be able to see the result in less than 100ms as shown in the following screenshot. Click the Query Id. It will display the link of query Id. Then click the link as shown below −
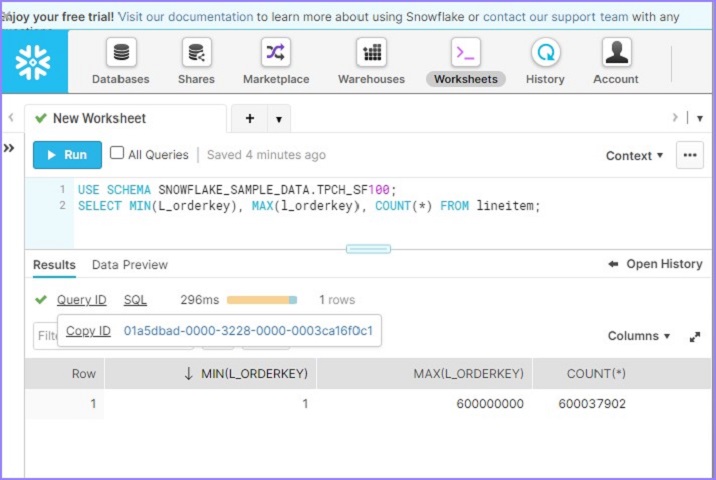
By default, it opens the details page where SQL is mentioned. Click the Profile tab. It displays 100% Metadata-Based Result. It means that without any compute warehouse it ran the result and fetched details based on Metadata caching.
The following screenshot displays above steps −
Query Result Caching
Query Results are stored and managed by Cloud Service Layer. It is very useful if the same query run multiple times, but condition is underlying data or base tables are not changed between time duration when query has to run multiple times. This caching has unique feature that is available for other users within the same account.
For example, If user1 runs a query first time, the result gets stored in caching. When user2 also tries to run same query (by assuming that base tables and data are not changed), it fetches the result from Query Result caching.
Result cached are available for 24hours. But, counter of 24hours get reset each time when the same query re-run. For example, if a query ran at 10AM, its caching will be available until 10AM next day. If the same query re-run at 2PM on same day, now the caching will be available until 2PM next day.
There are some criteria to fulfil to use query result cache −
Exact same SQL query should be re-run.
There should not be any random function in the SQL.
User must have right permissions to use it.
Query result should be enabled while running the query. By default, it's enabled until set otherwise.
Some cases for Query result caching are −
Queries those required massive amount of computing like Aggregate function and semi structured data analysis.
Queries those run very frequently.
Queries those are complex.
Refactor the output of another query like "USE TABLE function RESULT_SCAN(<query_id>)".
Let's run a query to see how Query Result Caching works and user can validate.
Login into Snowflake and go to Worksheets. Resume the warehouse by running following query −
ALTER WAREHOUSE COMPUTE_WH Resume;
Now, run following queries sequentially −
USE SCHEMA SNOWFLAKE_SAMPLE_DATA.TPCH_SF100;
SELECT l_returnflag, l_linestatus,
SUM(l_quantity) AS sum_qty,
SUM(l_extendedprice) AS sum_base_price,
SUM(l_extendedprice * (l_discount)) AS sum_disc_price,
SUM(l_extendedprice * (l_discount) * (1+l_tax)) AS sum_charge,
AVG(l_quantity) AS avg_qty,
AVG(l_extendedprice) AS avg_price,
AVG(l_discount) AS avg_disc,
COUNT(*) AS count_order
FROM lineitem
WHERE l_shipdate <= dateadd(day, 90, to_date('1998-12-01'))
GROUP BY l_returnflag, l_linestatus
ORDER BY l_returnflag, l_linestatus;
Click the Query Id. It will display the link of query Id. Then click on link as shown in previous example (Metadata-Caching). Check the Query profile, it will be displayed as shown below −
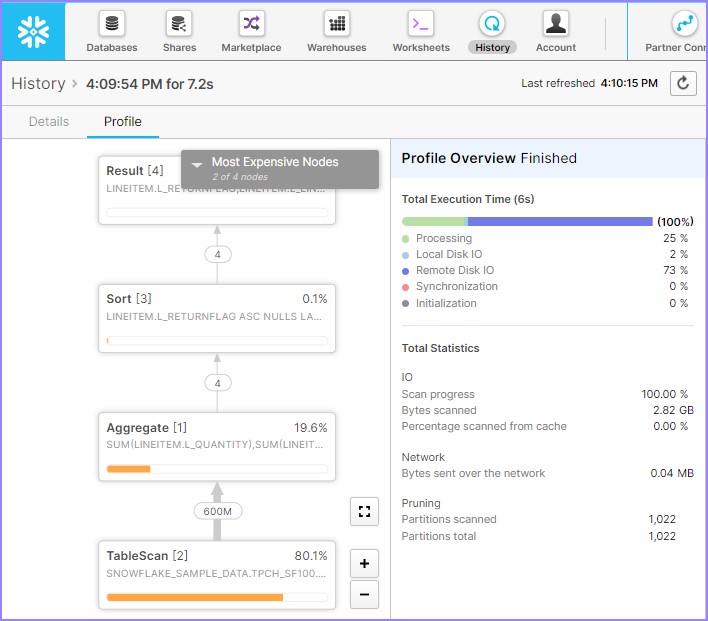
It shows 80.5% data is scanned so no cache was involved. Suspend the warehouse by running following query −
ALTER WAREHOUSE COMPUTE_WH Suspend;
Run the same query again as we previously did −
USE SCHEMA SNOWFLAKE_SAMPLE_DATA.TPCH_SF100;
SELECT l_returnflag, l_linestatus,
SUM(l_quantity) AS sum_qty,
SUM(l_extendedprice) AS sum_base_price,
SUM(l_extendedprice * (l_discount)) AS sum_disc_price,
SUM(l_extendedprice * (l_discount) * (1+l_tax)) AS sum_charge,
AVG(l_quantity) AS avg_qty,
AVG(l_extendedprice) AS avg_price,
AVG(l_discount) AS avg_disc,
COUNT(*) AS count_order
FROM lineitem
WHERE l_shipdate <= dateadd(day, 90, to_date('1998-12-01'))
GROUP BY l_returnflag, l_linestatus
ORDER BY l_returnflag, l_linestatus;
Click the Query Id. It will display the link of query Id. Then click on link as shown in previous example (Metadata-Caching). Check the Query profile, it will be displayed as shown below −
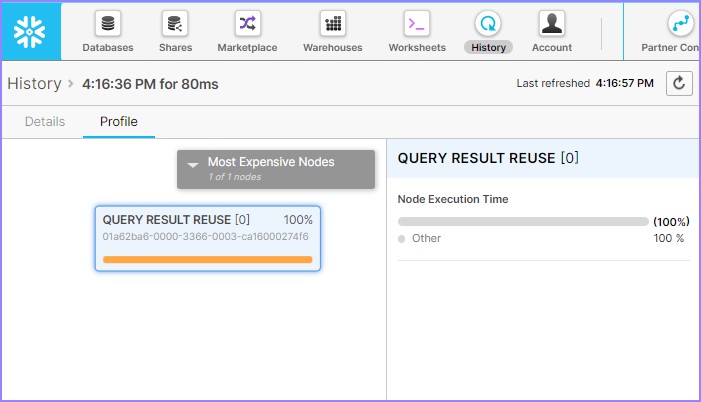
It shows query result reuse. It means that without warehouse query it ran successfully and entire result set has been taken from Query Result Caching.
Data Cache
Data cache takes place at storage layer. It caches storage file headers and column data from queries. It stores the data from all queries but not exactly as query result. It stores these data into SS of virtual warehouses. When similar query runs, Snowflake uses data cache as much as possible. User can not disable data cache. Data cache is available for all queries those run on the same virtual warehouse. It means that Data cache cannot work without virtual warehouse unlike Metadata and Query Result Cache.
When a query runs, it's header and column data are stored on SSD of virtual warehouse. Virtual warehouse first read locally available data (SSD of Virtual warehouse) and then read remaining from remote cloud storage (actual snowflake's storage system). Data keeps dropping on the bases of Least Used fashion when cache storages fills.
Let's run a query to see how Query Result Caching works and user can validate.
Login into Snowflake and go to the Worksheets. Resume the warehouse by running following query −
ALTER WAREHOUSE COMPUTE_WH Resume;
Disable Query_Result cache by using following SQL −
ALTER SESSION SET USE_CACHED_RESULT = FALSE;
Run the following query −
SELECT l_returnflag, l_linestatus,
SUM(l_quantity) AS sum_qty,
SUM(l_extendedprice) AS sum_base_price,
SUM(l_extendedprice * (l_discount)) AS sum_disc_price, SUM(l_extendedprice *
(l_discount) * (1+l_tax))
AS sum_charge, AVG(l_quantity) AS avg_qty,
AVG(l_extendedprice) AS avg_price,
AVG(l_discount) AS avg_disc,
COUNT(*) as count_order
FROM lineitem
WHERE l_shipdate <= dateadd(day, 90, to_date('1998-12-01'))
GROUP BY l_returnflag, l_linestatus
ORDER BY l_returnflag, l_linestatus;
Click the Query Id. It will display the link of query Id. Then click on link as shown in previous example (Metadata-Caching). Check the Query profile, it will be displayed as shown below −
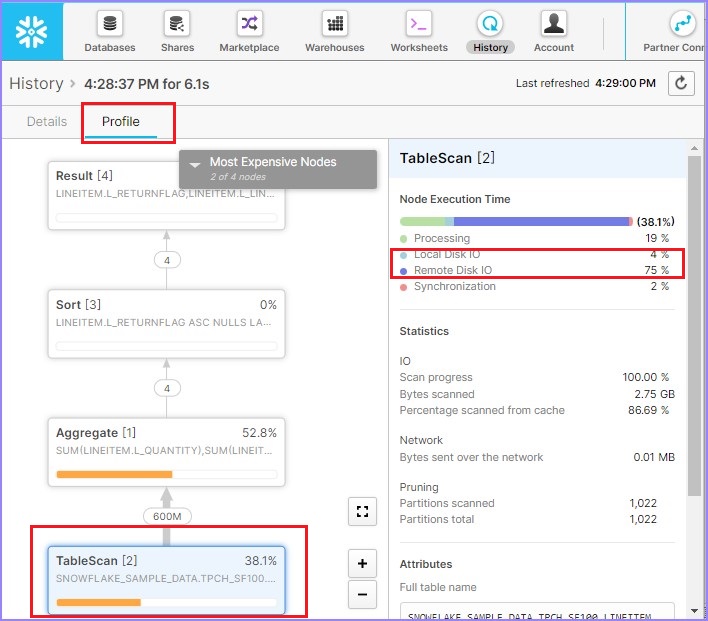
As per query profile, 88.6% data is scanned. If you notice in the right side, Local Disk IO = 2% while Remote Disk IO = 80%. It means that very low or no data caching has been utilized. Now, run the following query. There is a little difference in WHERE clause −
SELECT l_returnflag, l_linestatus,
SUM(l_quantity) AS sum_qty,
SUM(l_extendedprice) AS sum_base_price,
SUM(l_extendedprice * (l_discount)) AS sum_disc_price, SUM(l_extendedprice *
(l_discount) * (1+l_tax))
AS sum_charge,
AVG(l_quantity) AS avg_qty,
AVG(l_extendedprice) AS avg_price,
AVG(l_discount) AS avg_disc,
COUNT(*) as count_order
FROM lineitem
WHERE l_shipdate <= dateadd(day, 90, to_date('1998-12-01'))
and l_extendedprice <= 20000
GROUP BY l_returnflag, l_linestatus
ORDER BY l_returnflag, l_linestatus;
Click the Query Id. It will display the link of query Id. Then click on link as shown in previous example (Metadata-Caching). Check the Query profile, it will be displayed as shown below −
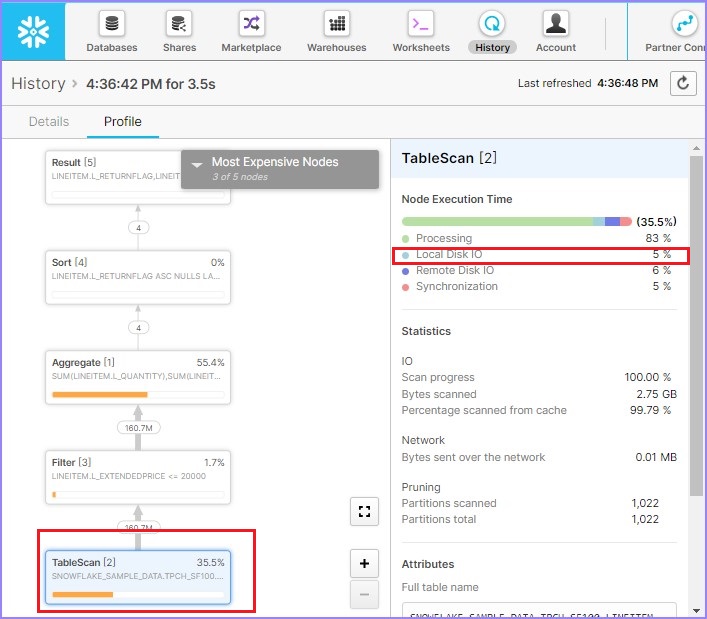
As per query profile, 58.9% data is scanned that is quite lower than 1st time. If you notice in the right side, Local Disk IO is increased to 4% while Remote Disk IO = 0%. It means that very low or no data has been utilized from remote.
Unload Data from Snowflake to Local
In a database, Schemas are created which are logical grouping of tables. Tables contains columns. Tables and columns are low level and most important objects of a database. Now, the most important function of table & columns is storing the data.
In this chapter, we will discuss about how to unload data from table and columns of Snowflake to local file. Snowflake provides the user two ways to unload the data into local file: Using User Interface and Using SQL query.
Unload Data into local file using Snowflake's UI
In this section, we will discuss about steps those should be followed to unload data into local file as csv or tsv. There is a limitation in UI that user can't save entire data directly into local directory.
To save data from UI, user needs to run the query first and then result can be saved as ".csv" or ".tsv" file. However, using SQL and SNOWSQL data can be saved directly into local drive without running the query. Later process we will discuss in next section.
Let's discuss the User Interface approach.
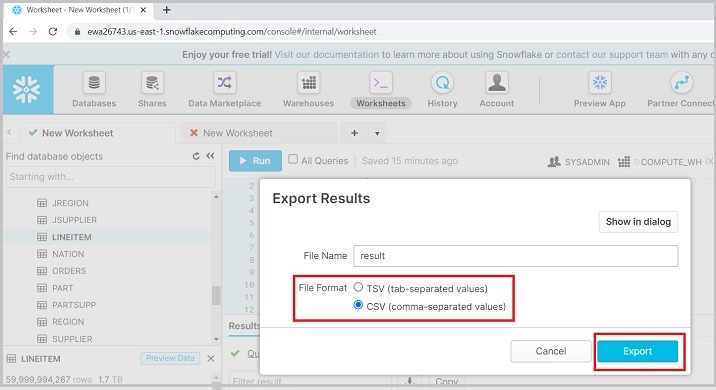
Login into Snowflake. Run a query based on data those required to save into local directory. Once the query runs successfully, click on Download icon as shown in below screenshot −
It populates a dialog box as shown in the below screenshot and ask to select File Format as CSV or TSV. After selecting, click Export. It will download a result file.
The following screenshot shows the unloading data functionality −
Unload Data into Tables and Columns using SQL
To unload data into a local file, first select a column whose data needs to be unloaded. Next, run the following query −
USE SCHEMA "TEST_DB"."TEST_SCHEMA_1";
COPY INTO @%TEST_TABLE
FROM (SELECT * FROM TEST_TABLE)
FILE_FORMAT=(FORMAT_NAME=TEST_DB.TEST_SCHEMA_1.CSV);
Note @% is used for default stage created by Snowflake. If you need to use your own internal stage, just pass as @<stage_name>
On successful execution of query, it means that data is copied into internal stage. Snowflake by default creates a table stage as @%<table_name> for all tables.
Now run the following query to confirm whether file is stored in internal stage or not.
LIST @%TEST_TABLE;
It displays all the files stored at internal stage even the files those are unsuccessful while loading the data.
Now, to bring the file into local directory, we need to use snowsql. Make sure it is downloaded into the system. If it is not downloaded, then follow the steps as shown in the following screenshot to download it.
Click CLI Client (snowsql) and click the Snowflake Repository as shown in the following screenshot −
User can move to bootstrap → 1.2 → windows_x86_64 → click to download latest version. The following screenshot displays above step −
Now, install the downloaded plugin. After installation, open CMD in your system. Run the following command to check connection −
"snowsql -a <account_name> -u <username>"
It will ask for password. Enter your snowflake password. Enter the password and press ENTER. User will see successful connection. Now the command line shows as −
"<username>#<warehouse_name>@<db_name>.<schema_name>"
Now use the following command to upload the file into snowflake' stage −
"GET @%TEST_TABLE file://C:/Users/*******/Documents/"
Note @% is used for default stage created by Snowflake, if user wants to use their own internal stage just pass as @<stage_name>. Date will be unloaded into the local directory.
Snowflake - External Data Loading
Snowflake supports cloud storage from client side as well. It means that client can have data in their clouds, and they can load into Snowflake by referring the location. As of now, Snowflake supports 3 clouds – AWS S3, Microsoft Azure and Google Cloud Platform Location. These are known as External Stages. However, Snowflake provides snowflake managed stages those are known as Internal Stages.
External Stages are client-side location where internal stages are used when user working with their local system directory.
To upload data from external clouds, the following set up is required −
An existing database and schema in the Snowflake where data must load.
An external stage set up pointing to the AWS S3 bucket.
A file format, it defines the structure of files those are loaded into AWS S3.
In this chapter, we will discuss about how to set up these requirements and load the data into tables.
We have already created a database named as TEST_DB, schema as TEST_SCHEMA_1 and table as TEST_TABLE. If these are not available, please create these as explained in the previous chapters.
External stage can be set up through Snowflake's user interface as well as using SQL.
Using UI
To create external stage, follow the instructions shown below −
Login into Snowflake. Click the Databases present at the top ribbon. In the database view, click on database name as TEST_DB. Now, click the Stages tab. Now, click the Create button present at top as shown in the following screenshot −
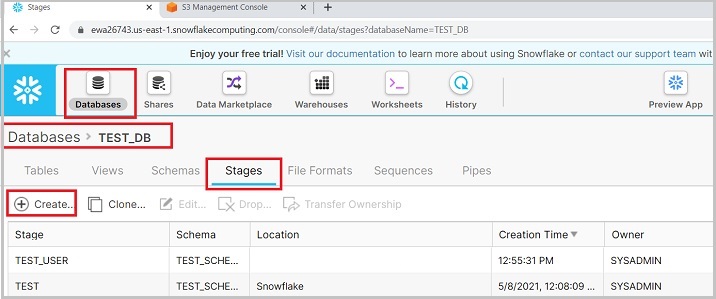
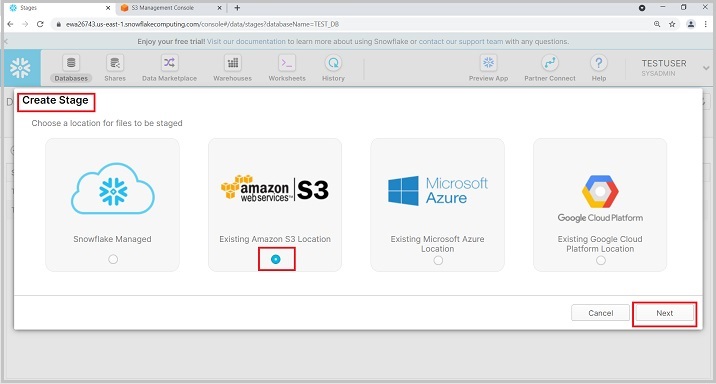
It pops up Create Stage dialog box, select amazon|s3 in the list and click on the Next button as shown below −
It will go to the next screen where the user should enter the following details −
Name − It is the user defined name of external stage. The same name will be used to copy the data from stage to table.
Schema Name − Select the schema name where table resides to load the data.
URL − Provide S3 url from Amazon. It is unique based on bucket name and keys.
AWS Key ID − Please enter your AWS Key ID
AWS Secret Key − Enter your secret key to connect through your AWS
Encryption Master Key − Provide encryption key if any.
After providing these details, click the Finish button. The following screenshot describes the above steps −

User can see newly created external stage in the View panel.
Using SQL
To create the external stage using SQL is very easy. Just run the following query providing all details as Name, AWS Key, Password, Master Key, it will create the stage.
CREATE STAGE "TEST_DB"."TEST_SCHEMA_1".Ext_S3_stage URL = 's3://***/*****
CREDENTIALS = (AWS_KEY_ID = '*********' AWS_SECRET_KEY = '********') ENCRYPTION = (MASTER_KEY = '******');
File format defines the structure of the uploaded file into S3. If the file structure doesn't match with the table structure, then loading will be failed.
Using UI
To create File Format, follow the instructions given below.
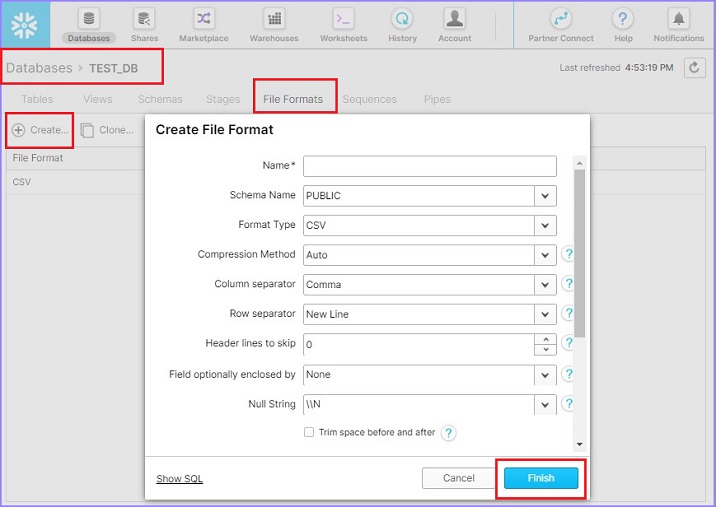
Login into Snowflake. Click Databases present at the top ribbon. In database view, click on the database name as TEST_DB. Now, click the File Format tab. Now, click on Create button present at top. It will pop up the Create File Format dialog box. Enter the following details −
Name − Name of file format
Schema Name − The create file format can be utilized in the given schema only.
Format Type − Name of file format
Column separator − if csv file is separated, provide file delimiter
Row separator − How to identify a new line
Header lines to skip − if header is provided then 1 else 0
Other things can be left as it is. Click the Finish button after entering the details. The following screenshot displays the above details −
User will be able to see created file format in view panel.
Using SQL
To create the file format using SQL is very easy. Just run the following query by providing all details as below.
CREATE FILE FORMAT "TEST_DB"."TEST_SCHEMA_1".ext_csv TYPE = 'CSV' COMPRESSION = 'AUTO'
FIELD_DELIMITER = ',' RECORD_DELIMITER = '\n' SKIP_HEADER = 0 FIELD_OPTIONALLY_ENCLOSED_BY =
'NONE' TRIM_SPACE = FALSE ERROR_ON_COLUMN_COUNT_MISMATCH = TRUE ESCAPE = 'NONE'
ESCAPE_UNENCLOSED_FIELD = '\134' DATE_FORMAT = 'AUTO' TIMESTAMP_FORMAT = 'AUTO' NULL_IF = ('\\N');
Load data from S3
In this chapter, we will discuss how to set up all required parameters like Stages, File Format, Database to load data from S3.
User can run the following query to see what all files present in the given stage −
LS @<external_stage_name>
Now, to load the data, run the following query −
Syntax
COPY INTO @<database_name>.<schema_name>.<table_name>
FROM @<database_name>.<schema_name>.<ext_stage_name>
FILES=('<file_name>')
FILE_FORMAT=(FORMAT_NAME=<database_name>.<schema_name>.<file_format_name>);
Example
COPY INTO @test_db.test_schema_1.TEST_USER
FROM @test_db.test_schema_1.EXT_STAGE
FILES=('data.csv')
FILE_FORMAT=(FORMAT_NAME=test_db.test_schema_1.CSV);
After running the above query, user can verify data into table by running the following simple query −
Select count(*) from Test_Table
If the user wants to upload all files present in external stage, no need to pass "FILES=(<file_name>)"
Snowflake - External Data Unloading
Snowflake supports cloud storage from the client side as well. It means that client can export data in their clouds from snowflake. As of now, Snowflake supports 3 clouds – AWS S3, Microsoft Azure and Google Cloud Platform Location. These are known as External Stages. However, Snowflake provides snowflake managed stages those are known as Internal Stages.
External Stages are client-side location where internal stages are used when user working with their local system directory.
To unload data into external clouds, the following set up is required −
An existing database and schema in the Snowflake from where data must unload into AWS S3.
An external stage set up pointing to the AWS S3 bucket.
A file format defines the structure of files those are loaded into AWS S3.
In this chapter, we will discuss how to set up these requirements and unload the data from tables to S3.
We already created a database named as TEST_DB, schema as TEST_SCHEMA_1 and table as TEST_TABLE. If these are not available, please create these as explained in previous chapters.
External stage can be set up through Snowflake's user interface as well as using SQL.
Using UI
To create external stage, follow the instructions given below −
Login into Snowflake. Click Databases present at the top ribbon. In the Database view, click the database name as TEST_DB. Next, click the Stages tab and click the Create button present at top as shown in the following screenshot −
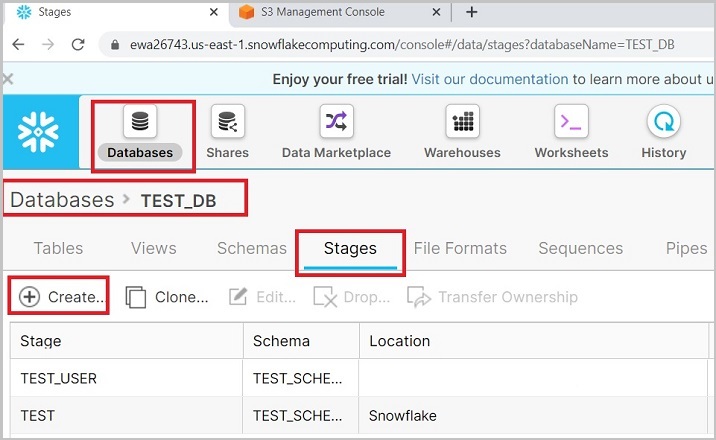
It will pop up the Create Stage dialog box, select amazon|s3 in the list and click on Next as shown below −
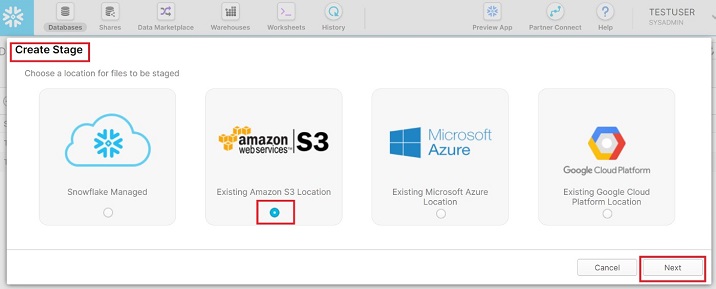
It will go to the next screen where the user should enter the following details −
Name − It is the user defined name of external stage. The same name will be used to copy the data from stage to table.
Schema Name − Select the schema name where table resides to load the data.
URL − Provide S3 url from Amazon. It is unique based on bucket name and keys.
AWS Key ID − Please enter your AWS Key ID.
AWS Secret Key − Enter your secret key to connect through your AWS.
Encryption Master Key − Provide encryption key if any.
After providing details, click the Finish button. The following screenshot describes the above steps −
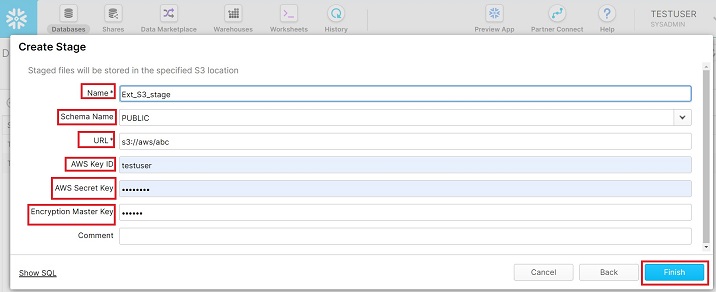
User can see the newly created external stage in the View panel.
Using SQL
It is very easy to create an external stage using SQL. Just run the following query providing all the details such as Name, AWS Key, Password, Master Key, and it will create the stage.
CREATE STAGE "TEST_DB"."TEST_SCHEMA_1".Ext_S3_stage URL = 's3://***/*****
CREDENTIALS = (AWS_KEY_ID = '*********' AWS_SECRET_KEY = '********') ENCRYPTION = (MASTER_KEY = '******');
File Format defines the structure of uploaded file into S3. If the file structure doesn't match with the table structure, loading will be failed.
Using UI
To create a File Format, follow the instructions given below.
Login into Snowflake and click Databases present at the top ribbon. In the database view, click the database name TEST_DB.
Next, click the File Format tab followed by the Create button present at the top. It pops-up the Create File Format dialog box. Enter the following details −
Name − Name of file format.
Schema Name − The create file format can be utilized in the given schema only.
Format Type − Name of file format.
Column separator − if csv file is separated, provide file delimiter.
Row separator − How to identify a new line.
Header lines to skip − if header is provided then 1 else 0.
Other things can be left as it is. Click the Finish button after entering these details.
The following screenshot displays the above details −
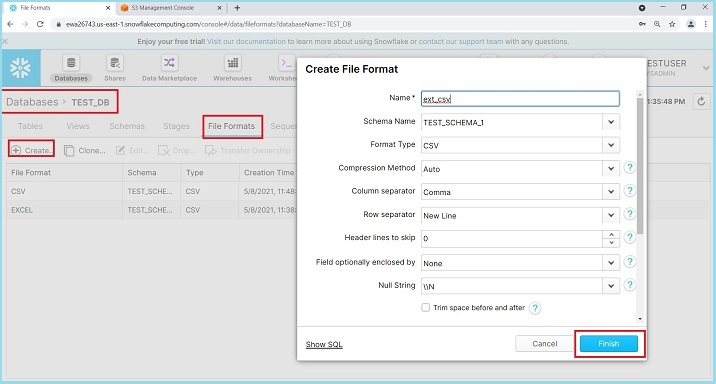
User will be able to see the created File Format in the View panel.
Using SQL
It is very easy to create a File Format using SQL. Just run the following query by providing all the necessary details as shown below.
CREATE FILE FORMAT "TEST_DB"."TEST_SCHEMA_1".ext_csv TYPE = 'CSV' COMPRESSION = 'AUTO'
FIELD_DELIMITER = ',' RECORD_DELIMITER = '\n' SKIP_HEADER = 0 FIELD_OPTIONALLY_ENCLOSED_BY =
'NONE' TRIM_SPACE = FALSE ERROR_ON_COLUMN_COUNT_MISMATCH = TRUE ESCAPE = 'NONE'
ESCAPE_UNENCLOSED_FIELD = '\134' DATE_FORMAT = 'AUTO' TIMESTAMP_FORMAT = 'AUTO' NULL_IF = ('\\N');
Unload Data into S3
In this chapter, we have discussed about setting up all required parameters like Stages, File Format, Database to unload data into S3.
Now, to unload the data, run the following query −
Syntax
COPY INTO @<database_name>.<schema_name>.<external_stage_name>
FROM (SELECT * FROM <table_name>)
FILE_FORMAT=(FORMAT_NAME=<database_name>.<schema_name>.<file_format_name>);
Example
COPY INTO @test_db.test_schema_1.EXT_Stage
FROM (SELECT * FROM TEST_TABLE)
FILE_FORMAT=(FORMAT_NAME=test_db.test_schema_1.CSV);