- Snowflake Tutorial
- Snowflake - Home
- Snowflake - Introduction
- Snowflake - Data Architecture
- Snowflake - Functional Architecture
- Snowflake - How to Access
- Snowflake - Editions
- Snowflake - Pricing Model
- Snowflake - Objects
- Snowflake - Table and View Types
- Snowflake - Login
- Snowflake - Warehouse
- Snowflake - Database
- Snowflake - Schema
- Snowflake - Table & Columns
- Snowflake - Load Data From Files
- Snowflake - Sample Useful Queries
- Snowflake - Monitor Usage and Storage
- Snowflake - Cache
- Unload Data from Snowflake to Local
- External Data Loading (from AWS S3)
- External Data Unloading (Into AWS S3)
- Snowflake Resources
- Snowflake - Quick Guide
- Snowflake - Useful Resources
- Snowflake - Discussion
Snowflake - Monitor Usage and Storage
Snowflake charges customer based on storage, usage and cloud services. It becomes important to monitor the storage data and usage.
Individual user can view the history for long running queries while account admin can view billing for each user, consumption and utilization of services by each user or by date etc.
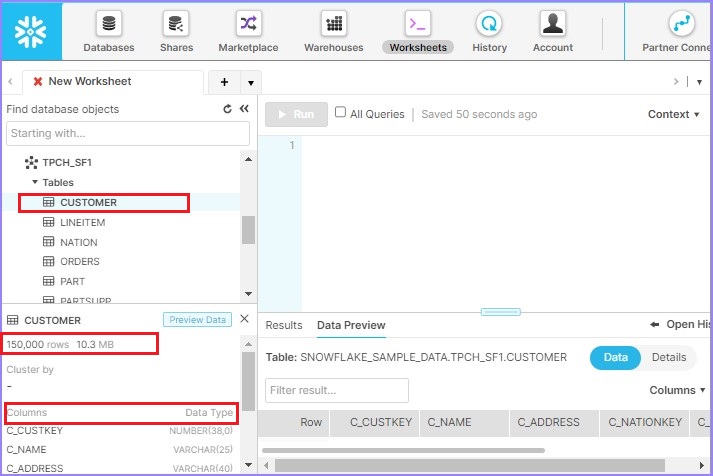
Checking Storage
User can check how many rows are having individual table as well as data size. If user has access of table, he/she can view these details by just selecting a table. In the left down panel, user can see Table Name then number of rows and data storage size. After that, it shows the columns definition of the table.
The following screenshot shows how to check storage details −
History
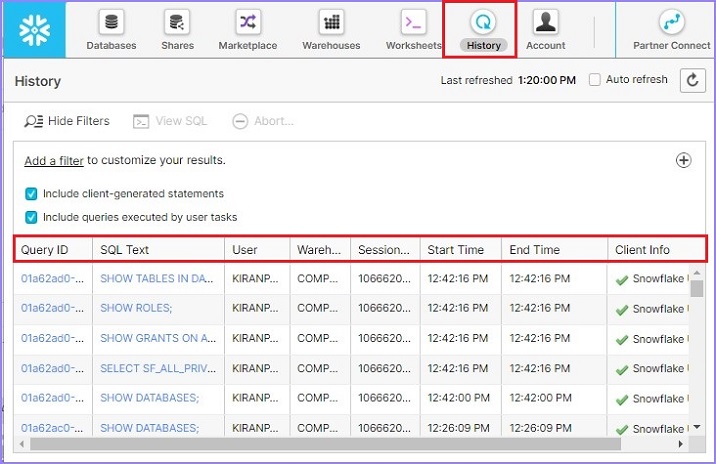
In this section, users can check their activities in snowflake like what queries are they using, current status of query, how much time it took to run, etc.
To view the history, click the History tab present at the top Ribbon. It will show the user's history. If user has accessed or logged in as Account Admin, they can filter out the history based on individual user. It displays following information −
Status where query is RUNNING/FAILED/SUCCESS
Query ID − Query ID is unique for all queries those are executed
SQL Text − It displays what query user has run.
User − User who has performed the action.
Warehouse − Which warehouse is used to run the query.
Cluster − if it is multi-cluster then number of clusters used
Size − Warehouse size
Session ID − Every worksheet has unique session id.
Start Time − When query started to execute
End Time − When query completed the execution
Total Duration − Total duration of time query ran.
Bytes Scanned − It shows how much data is scanned to bring the result
Rows − Number of rows scanned
The following screenshot displays the History view −
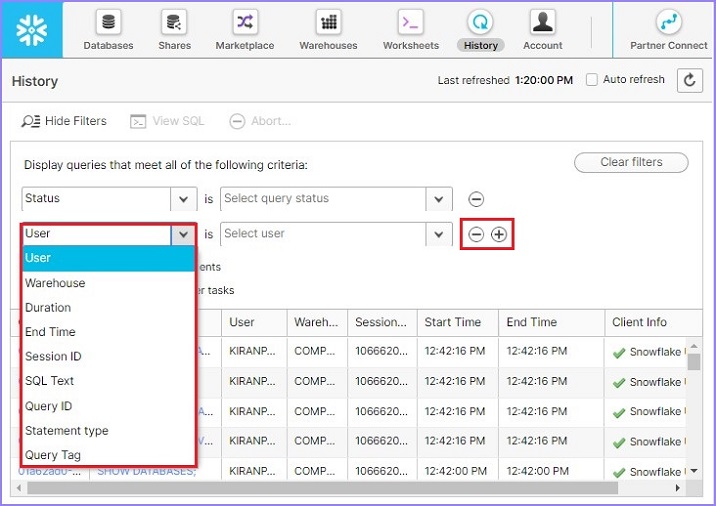
In the Filter, user can place one or many filters by clicking the "+" sign and for removing the filters use the "–" sign. The following screenshot displays list of available filters −
Monitoring
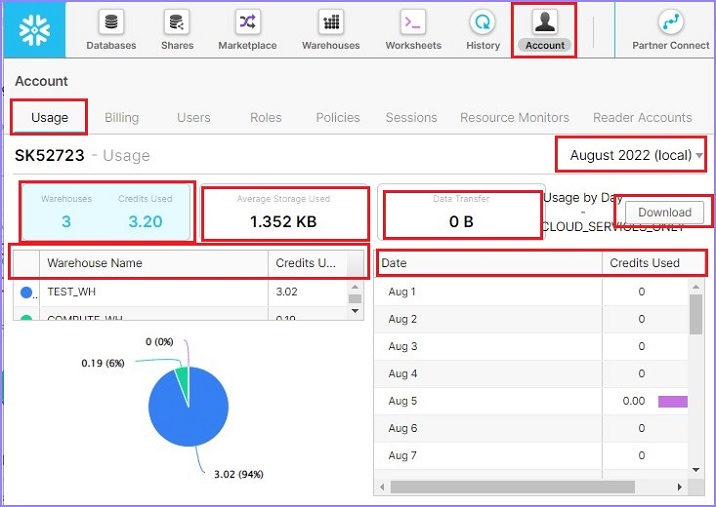
To perform account level monitoring, user must be logged in as an ACCOUNTADMIN role.
For monitoring purpose, login as Account Admin. Click the Account link present at top ribbon. It will show Account Usage by default. User can see the number of warehouses created, how much credit has been used, average storage used (it means that how much data we scanned during running the query vs overall storage), and how much data transferred.
It also shows credits utilized by each warehouse and it displays a pie-chart as well. On the right side, user can see Date Vs Credit Used in tabular form. User can even download the data by clicking on Download data. Monthly usage can be seen by changing the month at right top side.
The following screenshot displays the Usage tab information −
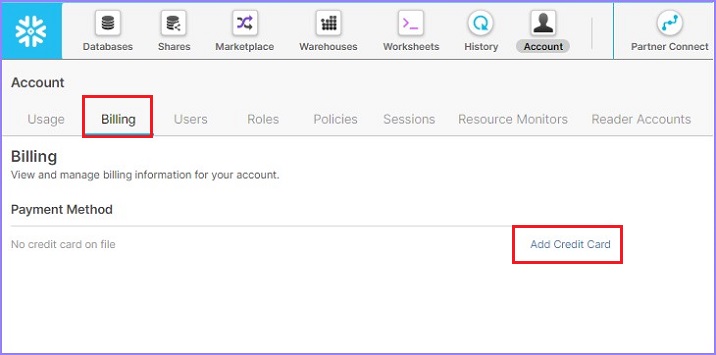
Click the next tab Billing. Here, the user can see any payment method added previously. User can add a new payment method as well, by clicking Add Credit Card link and then provide regular details like Credit card#, CVV, Expiry, Name etc.
The following screenshot displays Billing section −
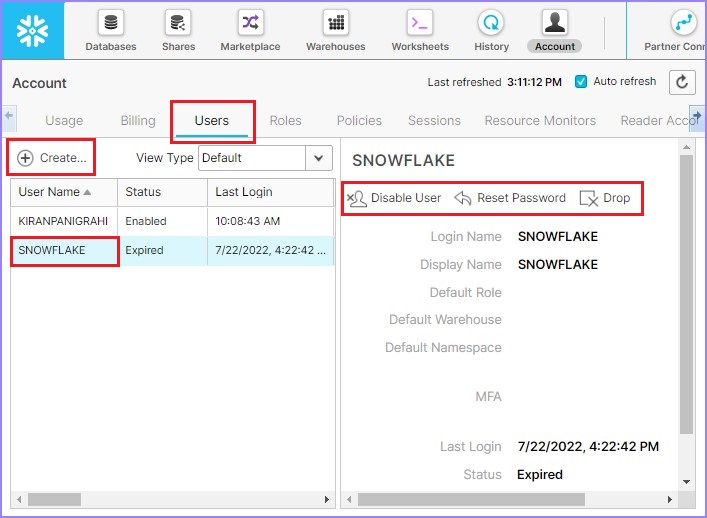
Click the next tab USERS. It displays name of all the users present in the account.
By selecting Users, the account admin can reset user passwords or disable a user or delete a user by using Reset Password, Disable User, and Drop button, respectively. By clicking the Create button, present at the top of user list, the Account Admin can create a new user.
The following screenshot displays Users tab functionality −
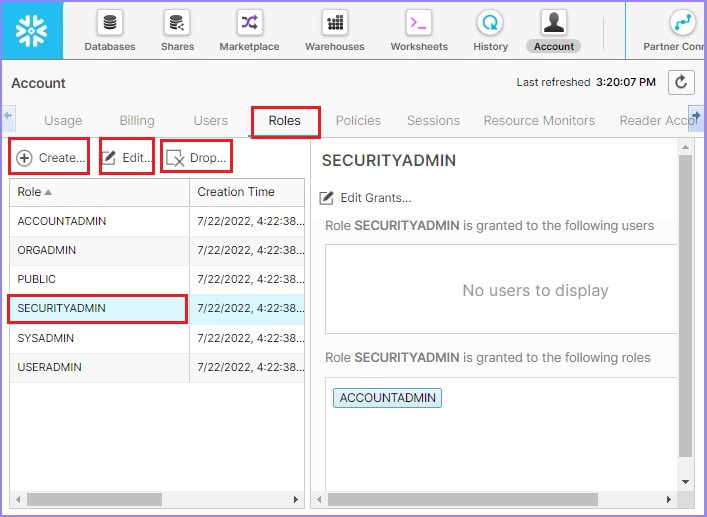
Now click the next tab ROLES. A new role can be created here by clicking the Create button present at top of the role list. By selecting a role, it gives the option to enable or delete the role as well, by clicking Edit button and Drop respectively.
The following screenshot displays functionality of Roles tab −
Apart from these, there are Policies, Sessions, Resource Monitors and Reader Accounts tab as well. Account Admin can create/edit/delete policies, create/edit/delete sessions, create/edit/delete resource monitors and similarly to Reader Accounts.