- Silverlight Tutorial
- Silverlight - Home
- Silverlight - Overview
- Silverlight - Environment Setup
- Silverlight - Getting Started
- Silverlight - XAML Overview
- Silverlight - Project Types
- Silverlight - Fixed Layouts
- Silverlight - Dynamic Layout
- Constrained vs. Unconstrained
- Silverlight - CSS
- Silverlight - Controls
- Silverlight - Buttons
- Silverlight - Content Model
- Silverlight - ListBox
- Silverlight - Templates
- Silverlight - Visual State
- Silverlight - Data Binding
- Silverlight - Browser Integration
- Silverlight - Out-of-Browser
- Silverlight - Applications, Resources
- Silverlight - File Access
- Silverlight - View Model
- Silverlight - Input Handling
- Silverlight - Isolated Storage
- Silverlight - Text
- Silverlight - Animation
- Silverlight - Video and Audio
- Silverlight - Printing
- Silverlight Useful Resources
- Silverlight - Quick Guide
- Silverlight - Useful Resources
- Silverlight - Discussion
Silverlight - Animation
Animation allows you to create truly dynamic user interfaces. It is often used to apply effects, for example, icons that grow when you move over them, logos that spin, text that scrolls into view, and so on.
Sometimes, these effects seem like excessive glitz. If used properly, animations can enhance an application in a number of ways. They can make an application seem more responsive, natural, and intuitive.
For example, a button that slides in when you click it feels like a real, physical button, not just another gray rectangle. Animations can also draw attention to important elements and guide the user through transitions to new content.
Silverlight’s approach to animation is declarative rather than focusing on sequences of frames animations.
Defining Animations
Animations are typically defined in resource sections. In fact, they are usually wrapped in a story board element, which we will see in detail shortly.
It provides a Begin() method, so the animation can be invoked from code.
Animations can also be put inside of the visual state elements in a control template.
Declarative Animation
Animations in Silverlight are declarative. They describe what would like to have happen. Leave it up to Silverlight to work out how to make that happen. So animations typically follow the pattern we tell Silverlight what we would like to change.
This is always some property on some named elements i.e. TargetName and TargetProperty.
<DoubleAnimation
   Storyboard.TargetName = "myRectangle"
   Storyboard.TargetProperty = "Opacity"
   From = "0" To = "1"
   Duration = "0:0:5"
/>
We say how we would like that property to change in this case we are changing the opacity from a value of zero to a value of one. In other words, we like the target elements to fade from opaque to transparent.
Finally, we say how long we would like this to take, in this case it will take five seconds.
the significance of the double in this double animation is that it targets a property which has type double, so a floating point value.
If you want to animate a property representing a color, you use a color animation instead.
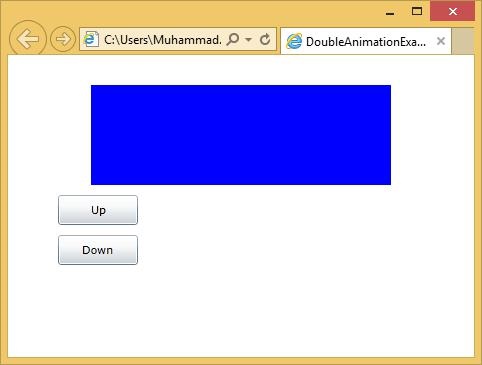
Let us have a look at a simple example of double animation. Given below is the XAML code in which two buttons, one rectangle and two story boards are added.
<UserControl x:Class = "DoubleAnimationExample.MainPage"
   xmlns = "http://schemas.microsoft.com/winfx/2006/xaml/presentation"
   xmlns:x = "http://schemas.microsoft.com/winfx/2006/xaml"
   xmlns:d = "http://schemas.microsoft.com/expression/blend/2008"
   xmlns:mc = "http://schemas.openxmlformats.org/markup-compatibility/2006"
   mc:Ignorable = "d" d:DesignWidth = "640" d:DesignHeight = "480">

   <UserControl.Resources>

      <Storyboard x:Name = "fadeDown">
         <DoubleAnimation
            Storyboard.TargetName = "myRectangle"
            Storyboard.TargetProperty = "Opacity"
            From = "1" To = "0"
            Duration = "0:0:5" />
      </Storyboard>

      <Storyboard x:Name = "fadeUp">
         <DoubleAnimation
            Storyboard.TargetName = "myRectangle"
            Storyboard.TargetProperty = "Opacity"
            From = "0" To = "1"
            Duration = "0:0:5" />
      </Storyboard>

   </UserControl.Resources>

   <Grid x:Name = "LayoutRoot">
      <Rectangle x:Name = "myRectangle"
         Fill = "Blue" Width = "300" Height = "100"
         HorizontalAlignment = "Center"
         VerticalAlignment = "Top" Margin = "0,30" />

      <Button x:Name = "fadeUpButton" Content = "Up" Width = "80"
         Height = "30" HorizontalAlignment = "Left"
         VerticalAlignment = "Top" Margin = "50,140,0,0"
         Click = "fadeUpButton_Click" />

      <Button x:Name = "fadeDownButton" Content = "Down"
         Width = "80" Height = "30" HorizontalAlignment = "Left"
         VerticalAlignment = "Top" Margin = "50,180,0,0"
         Click = "fadeDownButton_Click" />

   </Grid>

</UserControl>
Here is the implementation for different events in C#.
using System.Windows;
using System.Windows.Controls;

namespace DoubleAnimationExample {

   public partial class MainPage : UserControl {

      public MainPage() {
         InitializeComponent();
      }

      private void fadeUpButton_Click(object sender, RoutedEventArgs e) {
         fadeUp.Begin();
      }

      private void fadeDownButton_Click(object sender, RoutedEventArgs e) {
         fadeDown.Begin();
      }
   }
}
When the above code is compiled and executed, you will see the following output.
Repeating and Reversing
Animations offer some properties to automatically repeat and all reverse animations.
If you set the repeat behavior property to a time spam the animation will loop around repeating until the specified amount of time has elapsed or you can just tell it how many times you would like it to repeat.
This supports decimal points so you can repeat four and a half times.
You can repeat forever and you can also tell the animation that once it reaches the end, it should run in reverse back to the start.
Key Frame Animation
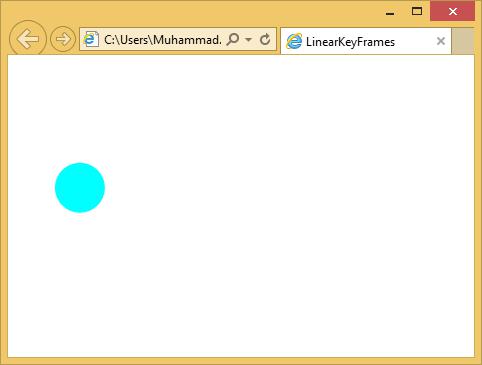
Often a simple animation from A to B is a little too simple. For example, you want to animate a ball bouncing off the ground. This is not a simple point to point movement. The ball drops, speeding up gradually and then reverses its direction as it hits the bottom. Slowing up again as it comes back to the top of its travel.
Let us have a look at a simple example of Key Frame animation.
Given below is the XAML code, which contains an ellipse and double animation with key frames.
<UserControl x:Class = "LinearKeyFrames.MainPage"
   xmlns = "http://schemas.microsoft.com/winfx/2006/xaml/presentation"
   xmlns:x = "http://schemas.microsoft.com/winfx/2006/xaml"
   xmlns:d = "http://schemas.microsoft.com/expression/blend/2008"
   xmlns:mc = "http://schemas.openxmlformats.org/markup-compatibility/2006"
   mc:Ignorable = "d"
   Width = "400" Height = "300">

   <UserControl.Resources>

      <Storyboard x:Name = "ballAnim" SpeedRatio = "0.2">
         <DoubleAnimation From = "0" Duration = "00:00:03" To = "96"
            Storyboard.TargetName = "ellipse"
            Storyboard.TargetProperty = "(Canvas.Left)" />

         <DoubleAnimationUsingKeyFrames
            Storyboard.TargetName = "ellipse"
            Storyboard.TargetProperty = "(Canvas.Top)">

            <LinearDoubleKeyFrame KeyTime = "00:00:00"   Value = "0"/>
            <LinearDoubleKeyFrame KeyTime = "00:00:00.5" Value = "16" />
            <LinearDoubleKeyFrame KeyTime = "00:00:01"   Value = "48"/>
            <LinearDoubleKeyFrame KeyTime = "00:00:01.5" Value = "112"/>
            <LinearDoubleKeyFrame KeyTime = "00:00:02"   Value = "48"/>
            <LinearDoubleKeyFrame KeyTime = "00:00:02.5" Value = "16"/>
            <LinearDoubleKeyFrame KeyTime = "00:00:03"   Value = "0"/>

         </DoubleAnimationUsingKeyFrames>

      </Storyboard>

   </UserControl.Resources>

   <Grid x:Name = "LayoutRoot" Background = "White">
      <Canvas>
         <Ellipse x:Name = "ellipse" Fill = "Aqua" Width = "50" Height = "50" />
      </Canvas>
   </Grid>

</UserControl>
Here is the implementation for mouse left button down event, which will begin animation when user press mouse left button down on the web page.
using System.Windows.Controls;
using System.Windows.Input;

namespace LinearKeyFrames {

   public partial class MainPage : UserControl {

      public MainPage() {
         InitializeComponent();
         this.MouseLeftButtonDown += new MouseButtonEventHandler(Page_MouseLeftButtonDown);
      }

      void Page_MouseLeftButtonDown(object sender, MouseButtonEventArgs e) {
         ballAnim.Begin();
      }
   }
}
When the above code is compiled and executed, you will see the following output.
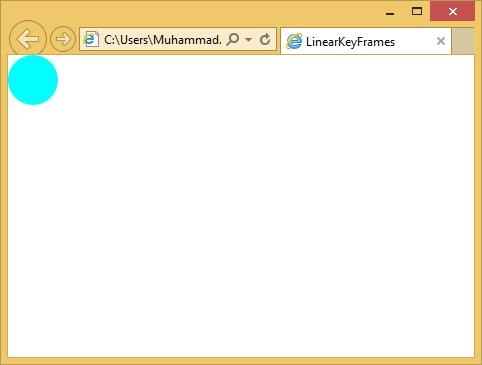
When you click the web page, you will see that the ball starts moving.