
- SAP Web Dynpro Tutorial
- SAP Web Dynpro - Home
- SAP Web Dynpro - Overview
- Configuration & Integration
- Architecture
- Navigation
- Component
- Mapping & Data Binding
- Event & Actions
- Application
- URL of an Application
- Creating an Application
- Component Interfaces
- Faceless Components
- Assistance Class
- Service Call In an Application
- Using a Service Call
- Debugging an Application
- Version Management
- Messages
- Integration Messages
- Personalization & Configuration
- Portal Integration
- Integrate WDA in Portal
- Interactive Forms
- SAP List Viewer(ALV)
- Administration
- Monitoring an Application
- SAP Web Dynpro Useful Resources
- Web Dynpro - Questions Answers
- SAP Web Dynpro - Quick Guide
- SAP Web Dynpro - Useful Resources
- SAP Web Dynpro - Discussion
SAP Web Dynpro - Quick Guide
SAP Web Dynpro - Overview
Web Dynpro is a standard SAP UI technology that allows you to develop web applications using graphical tools and development environment integrated with ABAP workbench. Using graphical tools reduces the implementation effort and you can better reuse and maintain components in ABAP workbench.
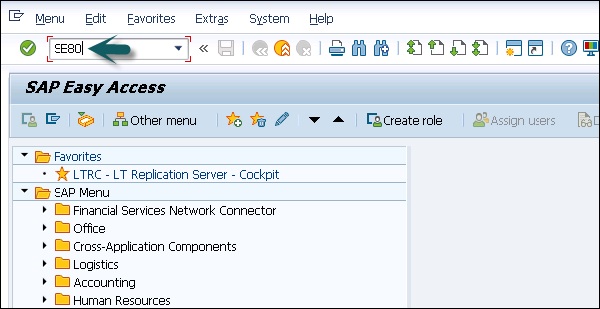
To access Web Dynpro runtime environment and graphical tools in ABAP workbench, you can use Transaction code − SE80


Key Benefits of Using Web Dynpro
Following are the key benefits of using Web Dynpro for developers in ABAP environment −
- You can easily maintain and reuse the components for development.
- Less implementation time with the use of graphical tools.
- You can easily change the layout and navigation using graphical tools.
- Easy structure changes.
- With the use of data binding, you can use automatic data transport.
- Ease of integration in ABAP environment.
Web Dynpro ABAP is the same as Web Dynpro Java and supports the same set of functions for the application development.
Configuration & Integration
Once you install ABAP application server, it is necessary to configure it properly for application development.
To find the details about ABAP configuration, you can go to SAP Reference IMG → SAP NetWeaver → Application Server

If you are using SAP Solman, you can check this configuration by going to T-Code − SOLAR_LIBRARY.
To use Web Dynpro with ABAP application development, you have to make additional configuration for web Dynpro programming.
Internet Communication Manager
You need to set HTTP/HTTPS in ICM service. A service contains following different components −
- Service/Port
- Protocol used in service HTTP/HTTPS
- Processing timeout
- Keep alive timeout
- Service status − Active/inactive
You can choose Go To → Service to create, delete, activate or deactivate services. To display the ICM server cache statistics, choose Goto → Statistics
Internet Communication Framework
You should activate the Internet Communication Framework (ICF) service. You can activate this service by going to SPRO → SAP Reference IMG → SAP NetWeaver → Application Server → Internet Communication Framework → Activate HTTP service
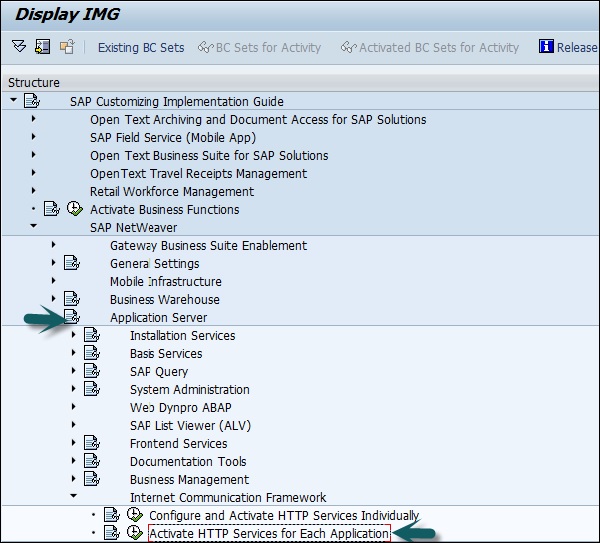
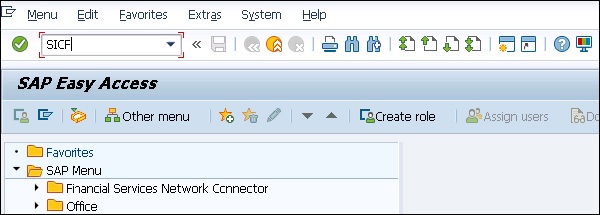
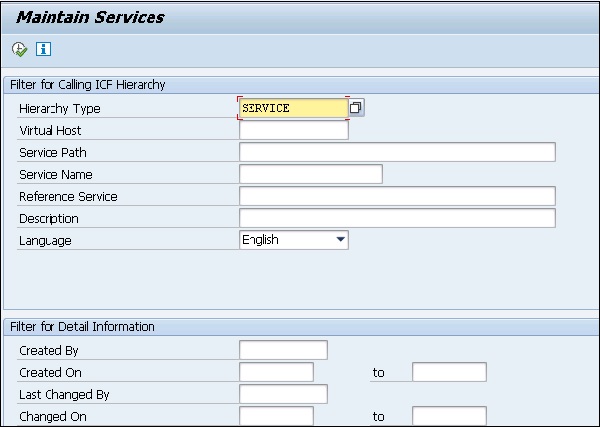
When you install Application server ABAP, all ICF services are in inactive state. You can maintain ICF services using T-code − SICF under ICF tree.
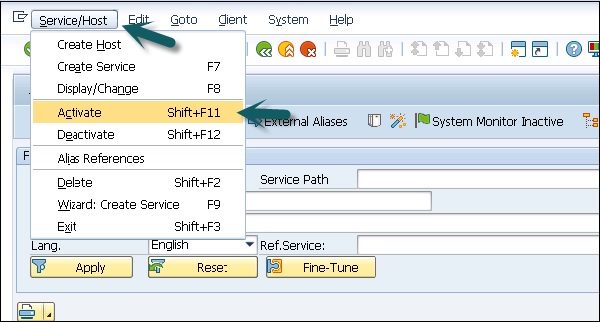
You can activate ICF service in the following ways −
- Using the menu option, Service/Host → Activate
- Using the context menu and choosing Activate Service.
Layout Editor in View Designer
You should activate all the services in SICF for Web Dynpro ABAP to use the layout editor in the view designer.
Single Sign On
You should set SSO on the relevant host.
FQDN
You should use fully qualified domain names FQDN and short forms should be avoided.
SAP Web Dynpro - Architecture
Web Dynpro is an ABAP environment for web development and is based on the Model View Controller (MVC) concept of UI programming. It is available for both Java and ABAP as per the platform, and supports similar functions.
Web Dynpro has the following features −
- Separation of display and business logic
- Easy change in the layout with the use of graphical tools
- No platform dependency of interfaces
Following are the key concepts as part of Web Dynpro architecture −
Metadata
Web Dynpro provides you with an environment for the development of web-based applications and you can use graphical tools to define web Dynpro application in the form of metadata in application development. You can also define your own events; however, event handling should be defined in a separate code and that has to be executed when an event is triggered.
The user interface in Web Dynpro application consists of small elements defined by using Web Dynpro tools. You can also change or enhance the user interface by changing these elements at run time or integrate the elements again.
Graphical Tools
There are a wide range of graphical Web Dynpro tools that you can use to generate webbased applications. You don’t need to create source code for this. Following are the key features of graphical tools in Web Dynpro application −
- Define properties of user interface elements
- Data flow
- User interface layout
For all these properties, you can use graphical tools without creating a source code.
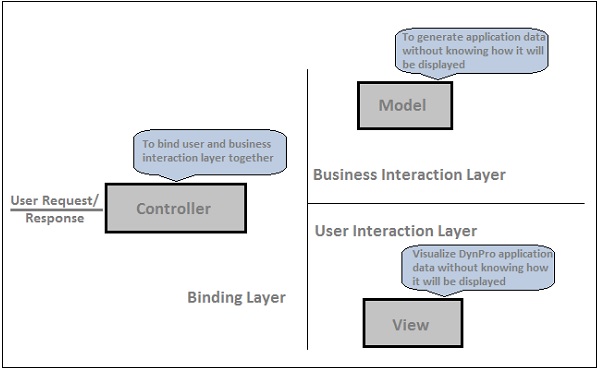
Business and Application Logic
Web Dynpro allows you to run your application on the front-end and the back-end system can be accessed using service locally or via a remote connection. Your user interface is maintained in Dynpro application and persistent logic runs in the back-end system.
You can connect Web Dynpro application to the back-end system using an adaptive RFC service or by calling a web service.
MVC Programming Model
Web Dynpro applications are based on MVC model −
Model − This allows the access to back end data in a Web Dynpro application.
View − This is used to ensure the representation of data in a web browser.
Controller − This is used to control communication between Model and View where it takes input from the users and gets the processes data from the model and displays the data in the browser.
SAP Web Dynpro - Navigation
In Web Dynpro application, you can navigate from one view to the other view using plugs.
Run T-code − SE 80 and create a simple Web Dynpro component −
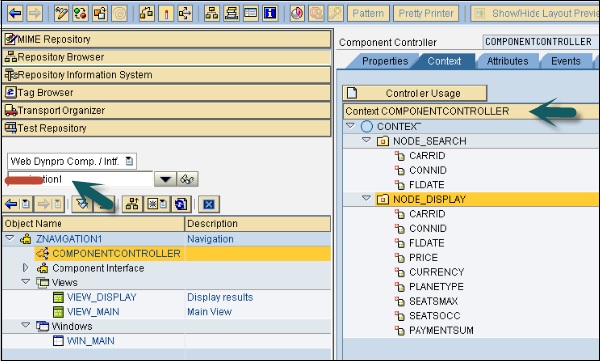
We have created a Web Dynpro component with two nodes and two views.
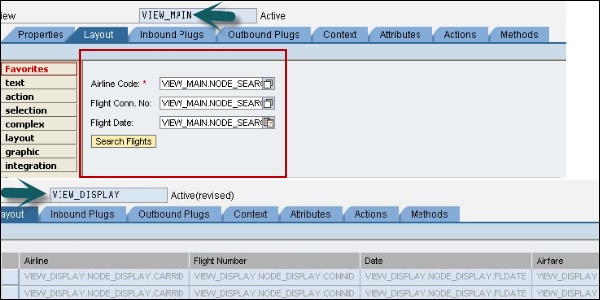
VIEW_DISPLAY displays the output in a tabular format and VIEW_MAIN performs search parameters. In VIEW_MAIN you have configured the search layout and VIEW_DISPLAY contains the display layout.
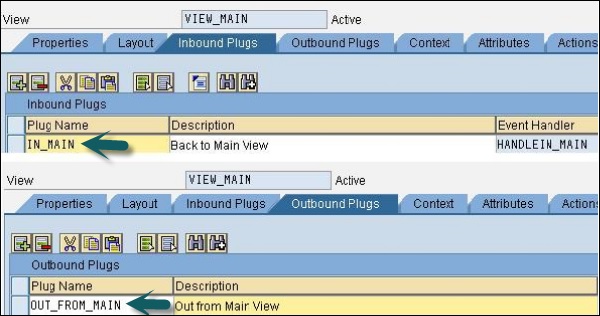
In VIEW_MAIN you have configured inbound plugs IN_MAIN and OUT_FROM_MAIN as outbound plugs. Similarly, create an inbound and outbound plugs for VIEW_DISPLAY.
How to Create a New View?
Step 1 − Click the component in object tree and go to the context menu as shown in the following screenshot −
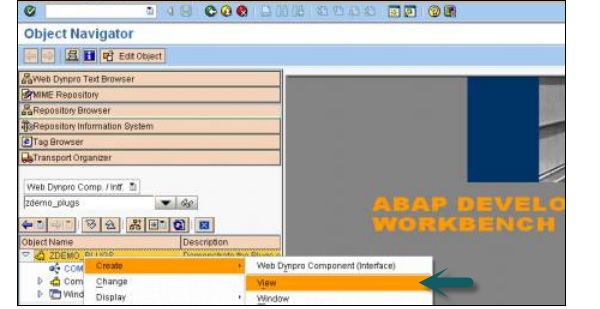
Step 2 − Enter view name and click on tick mark.

SAP Web Dynpro - Component
Web Dynpro component is an entity used to create a Dynpro application. These are reusable entities, which are combined together to create application blocks.
Each Web Dynpro component contains a window, view, and controller pages. You can also embed a Web Dynpro component to other Web Dynrpo component in an application and communication takes place using the component interface.
Lifetime of a component starts when you call it first at runtime and ends with Web Dynpro application.
View
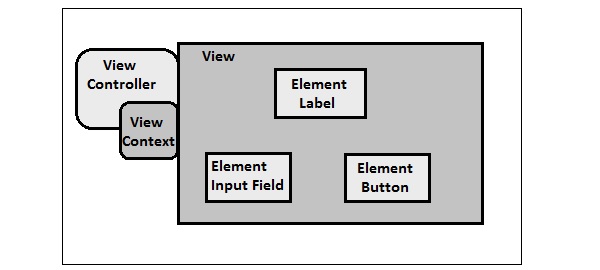
Each Web Dynpro application contains at least one view and it is used to define the layout of a user interface. Each view consists of multiple user elements and a controller and context.
The controller is used to process the user request and processing of data. Context contains data to which the elements of view are bound.
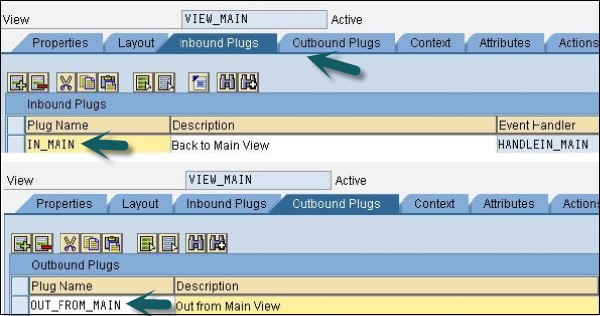
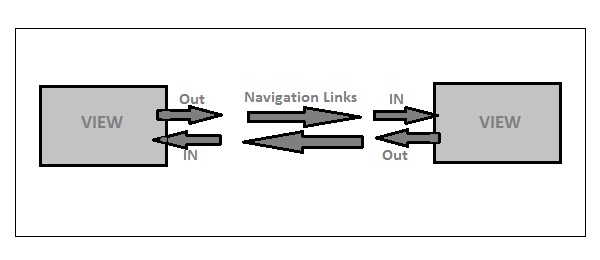
Each view also contains an inbound and outbound plug so you can connect views to each other. Plugs can be linked to each other using navigation links.
Navigation Links and Plug In
You can navigate between different views using inbound and outbound plugs. The inbound and outbound plugs are part of the view controller. The inbound plug defines the starting point of view while the outbound plug tells the subsequent view to be called.
View Set
A view set is defined as a predefined section where you can embed different views in a Web Dynpro application. View set allows you to display more than one view in a screen.
Following are a few advantages of view set in designing an application −
- You can reuse views in a Web Dynpro window.
- You can easily make changes to the layout at a later stage.
- It is a more structured approach to use more than one view.
Web Dynpro Window
In Web Dynpro, the window is for multiple views or view sets. A view can only be displayed when it is embedded in a view and a window always contain one or more views connected by navigation links.
Each window contains an inbound and an outbound plug and they can be included in a navigation chain. Inbound plugs within a window lead from the outbound plug of a view to the embedding window. Just like all other inbound plugs, they represent an event and thus call the event handler assigned to them.
Window Controller

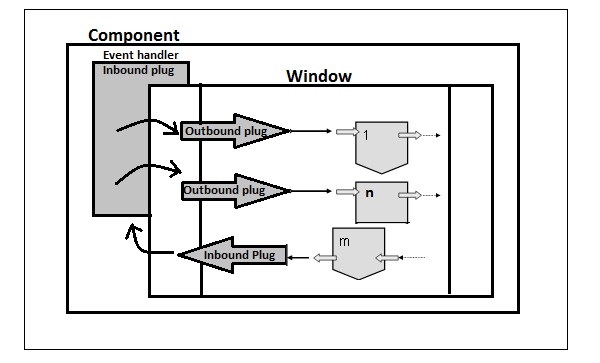
Controller
Controllers are used to define how a Dynpro application responds to user interactions. Each view has one controller which is responsible to perform actions as per the user’s interaction.

SAP Web Dynpro - Mapping & Data Binding
In Dynpro application, you can define mapping between two global controller contexts or from the view context to the global controller context.
Data binding of a UI element property is set up in the view layout. For this purpose, you use the Binding column in the properties table of the embedded UI elements. You click the button to open a dialog box, which provides the context structure of the corresponding view for an element selection.
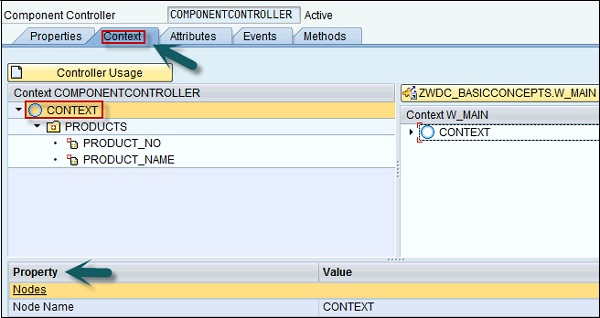
Context element can be defined to link a node to another node of context.
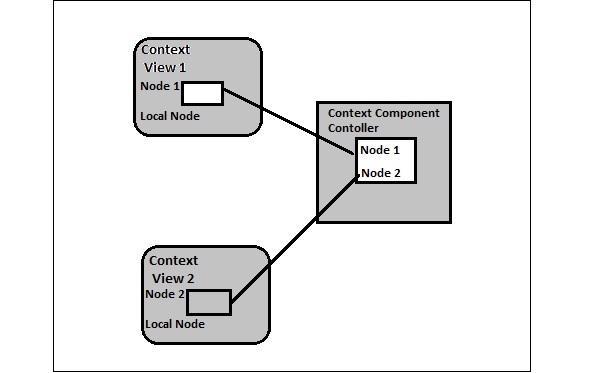
In the above diagram, you can see mapping between Node 1 from the context of View 1 and the node of the same name in the context of the component controller. It also shows the mapping from Node 2 from the context of View 2, also to a node with the same name in the component controller context.
The context of the component controller is available to both the view controllers with readwrite access to all the attributes.
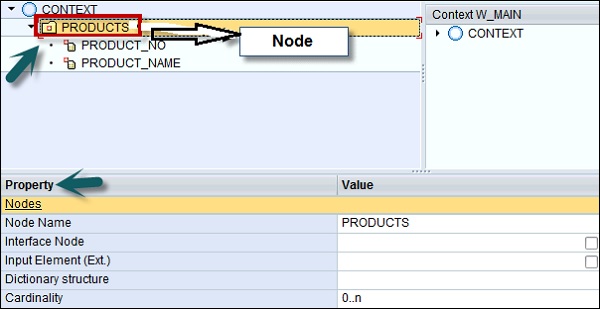
Binding User Interface Elements
To display the context data in the browser, you can also bind UI elements properties in a view to the attributes of the view context. You can bind multiple properties to one context element.
In a view context, all data types are available to bind with different attributes of a view.
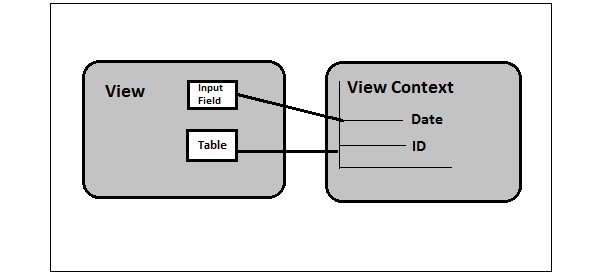

Internal Mapping
Internal mapping is defined as the mapping between contexts of a single component.
External Mapping
External mapping is defined as the mapping between multiple components using the interface controller.
SAP Web Dynpro - Event & Actions
You can create events to enable communication between the controllers. You can allow one controller to trigger events in a different controller. All events that you create in the component controller are available in the component.
Inbound plugs can also act as an event, thus when you call a view using the inbound plug, an event handler is called first.
You can also use some special events like Button to link with the user actions.
Button element like pushbutton can react to a user interaction by clicking on the corresponding pushbutton that can trigger a handling method to be called in the view controller. These UI elements contain one or several general events, which can be linked with a specific action that executes at design time.
When an action is created, an event handler is created automatically. You can associate a UI element with different actions.
You can also reuse actions within a view by linking an action to several UI elements.
Example 1
An onAction event for the button click or onEnter event for the Input field, when the user presses the "Enter" key in the field.
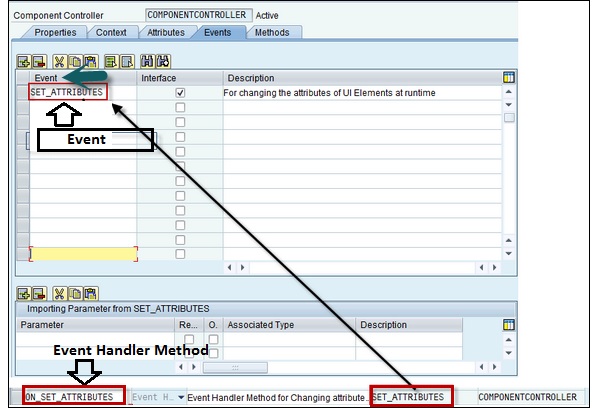
Actions can be created for any UI elements in Web Dynpro framework. To set an action, go to Properties tab → Event section.
You can also create Actions from the actions tab of the view controller. An Event handler is automatically created with naming convention onaction<actionname>
Example 2
Action name is SET_ATTRIBUTES and the event handler for an action would be ON_SET_ATTRIBUTES.

SAP Web Dynpro - Application
A Web Dynpro application can be accessed by the user using a URL with a window in the Dynpro component. A Web Dynpro application connects to an interface view using an inbound plug, which is further connected to the Dynpro component that contains Model View and Controller to process the data for the Web Dynpro application.
MVC model enables you to separate the user interface and application logic. Model is used to get the data from the back-end system as per application logic.
The following image depicts a high level diagram of a Web Dynpro application −
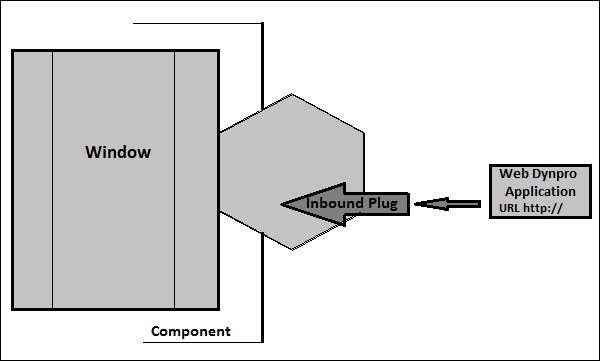
You can use different data sources for a Web Dynpro application −
- Using web service
- SAP data using BAPIs
- From external data sources with tools
To develop a Web Dynpro application, you can use Web Dynpro explorer, which is easily integrated to ABAP workbench.
SAP Web Dynpro - URL of an Application
In a Web Dynpro application, the URL is automatically generated. You can find the URL of an application in the Properties tab. The URL structure can be of two types −
SAP namespace −
<schema>://<host>.<domain>.<extension>:<port>/sap/bc/webdynpro/<namespace>/<application name>
- Custom namespace −
<schema>://<host>.<domain>.<extension>:<port>/abc/klm/xyz/<namespace>/webdynpro/<application name>
<schema>://<host>.<domain>.<extension>:<port>/namespace>/webdynpro/<application name>
where,
<schema> − Defines the protocol to access application http/https
<host> − Defines the name of the application server
<domain><extension> − Defines several hosts under a common name
<port> − It can be omitted if the standard port 80 (http) or 443 (https) is used
You should specify Fully Qualified Domain Name (FQDN) in Web Dynpro application URL.
Example
Application 1 http://xyz.sap.corp:1080/sap/bc/webdynpro/sap/myFirstApp/
Application 2 http://xyz.sap.corp:1080/sap/bc/webdynpro/sap/ mySecondApp/
To check fully qualified domain name, go to Web Dynpro explorer in the ABAP development environment use T-code − SE80 and select the Web Dynpro application from the navigation tree for your Web Dynpro component/interface and check the URL in the administration data. You also need to check the path details in the field URL. It should contain the full domain and host name.
Full Domain name should be used for the following reasons −
- You need a domain to set cookies.
- You should use FQDN for certificate and SSL protocol in https mode.
- For portal integration, domain relation code is used.
SAP Web Dynpro - Creating an Application
To create a Web Dynpro application, we will create a Web Dynpro component that consists of one view. We will create a view context → linked to a table element on the view layout and contains the data from the table.
The table will be shown in the browser at runtime. A Web Dynpro application for this simple Web Dynpro component, which can be run in the browser will be created.
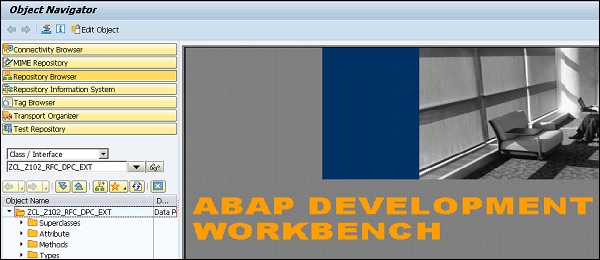
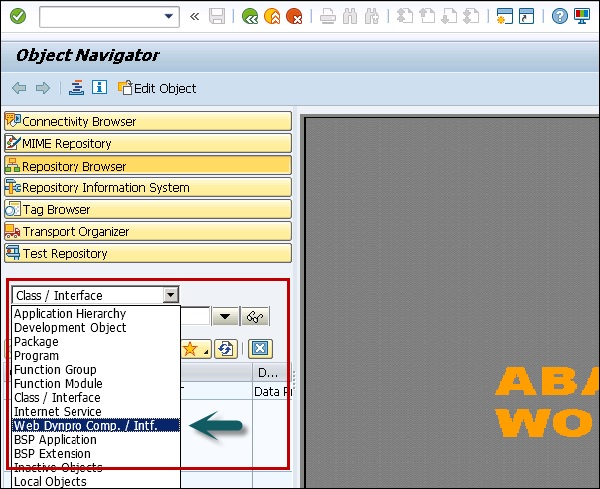
Step 1 − Go to T-Code − SE80 and select Web Dynpro component/intf from the list.

Step 2 − Create a new component as the following.
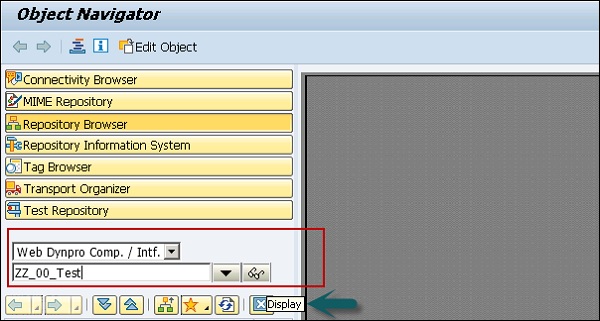
Step 3 − Enter the name of the new component and click on display.
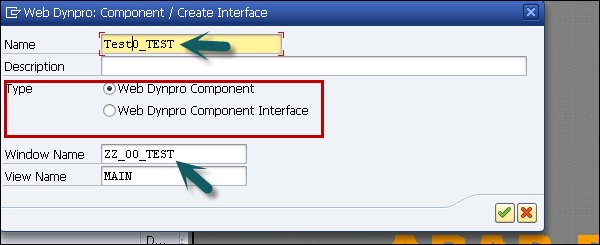
Step 4 − In the next window, enter the following details −
- You can enter a description of this component.
- In type, select a Web Dynpro component.
- You can also maintain the name of the default window.
Step 5 − Assign this component to Package $TMP and click the Save button.
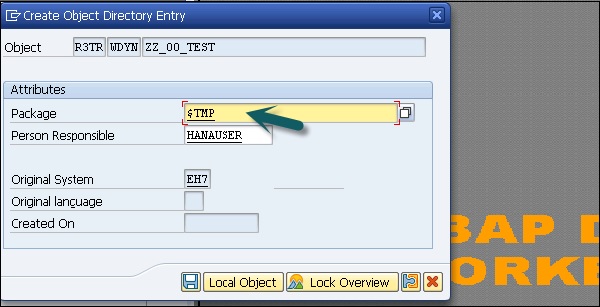
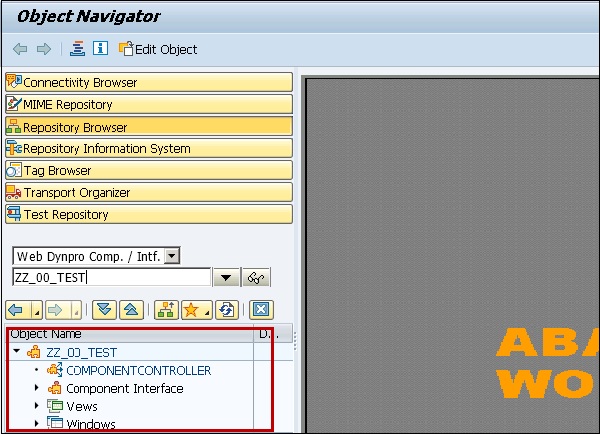
When you click Save, you can see this new component under the object tree and it contains −
- Component Controller
- Component Interface
- View
- Windows
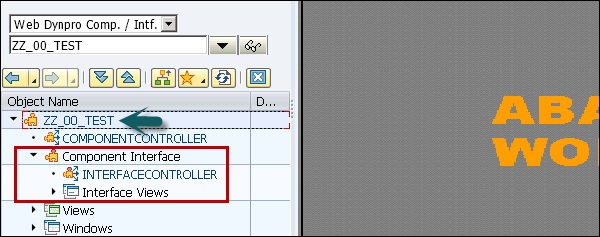
When you expand the component interface, you can see the interface controller and interface views.
How to Create a View and Assign It to a Window?
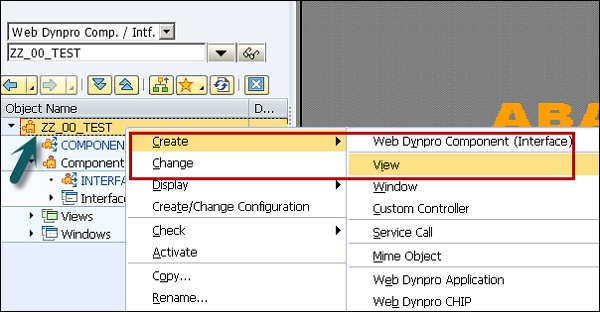
Step 1 − Click on the Web Dynpro component and go to the context menu (right click) → Create → View
Step 2 − Create a view MAINVIEW as the following and click on the tick mark.

This will open view editor in ABAP workbench under the name − MAINVIEW
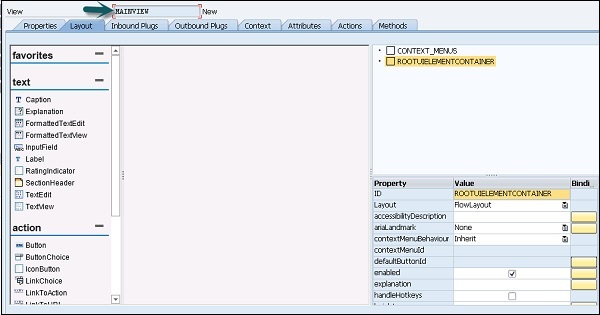
Step 3 − If you want to open the layout tab and view designer, you may need to enter the application server user name and password.
Step 4 − Click the save icon at the top.
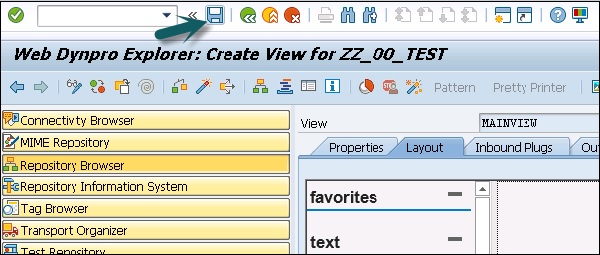

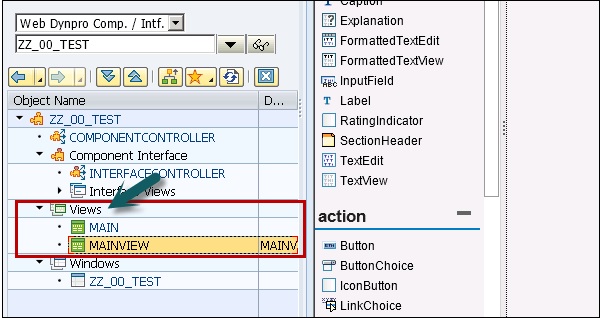
When you save, it comes under the object tree and you can check by expanding the view tab.
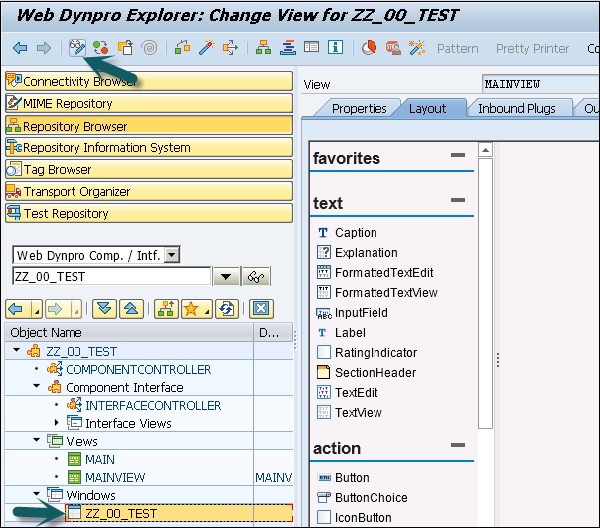
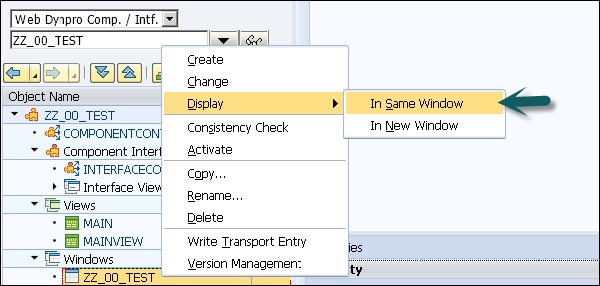
Step 5 − To assign the window to this view, select the window ZZ_00_TEST under the window tab and click on Change mode at the top of the screen.
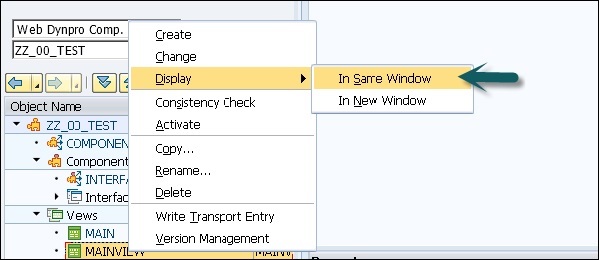
Step 6 − You can right-click → Display → In Same Window.
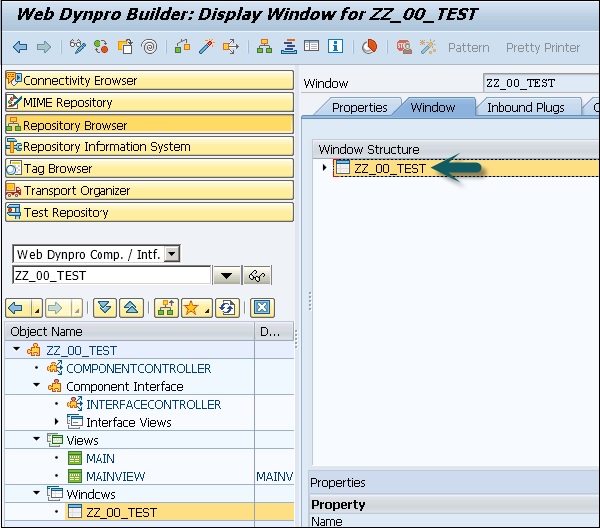
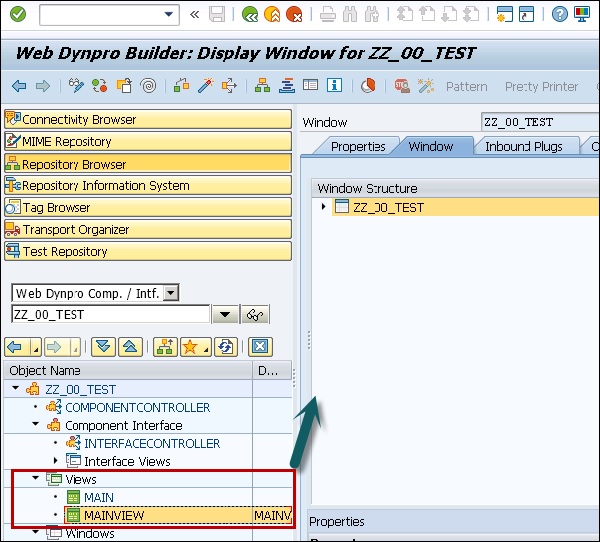
Step 7 − Now open the view structure and move the view MAINVIEW inside the window structure on the right hand side by Drag and Drop.
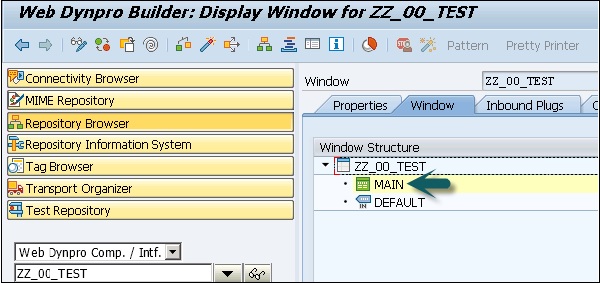
Step 8 − Open the window structure on the right hand side and you will see the embedded MAINVIEW.
Step 9 − Save by clicking the Save icon on top of the screen.
How to Create a View Context for MAINVIEW?
Step 1 − Open the View Editor to view MAINVIEW and switch to tab Context. Create a context node in the View Controller by opening the corresponding context menu.
Step 2 − Select the View in the object tree and click Display.
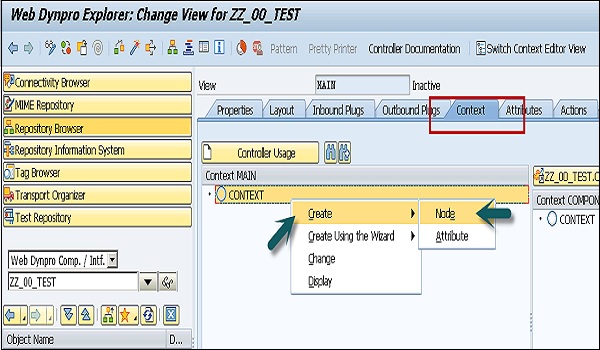
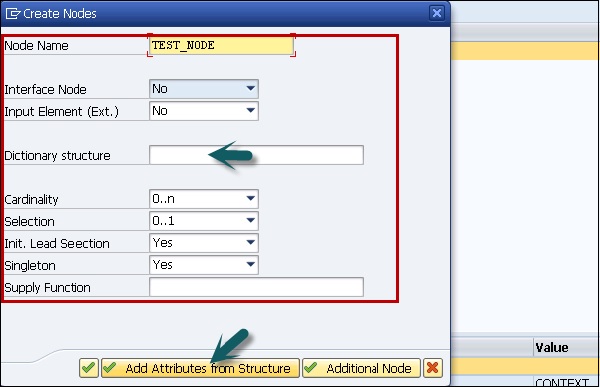
Step 3 − Maintain the Properties in the next window. Select the cardinality and dictionary structure (table). Select Add Attribute from Structure and select the components of the structure.
Step 4 − To select all the components, click Select all option at the top and then click the tick mark at the bottom of the screen.
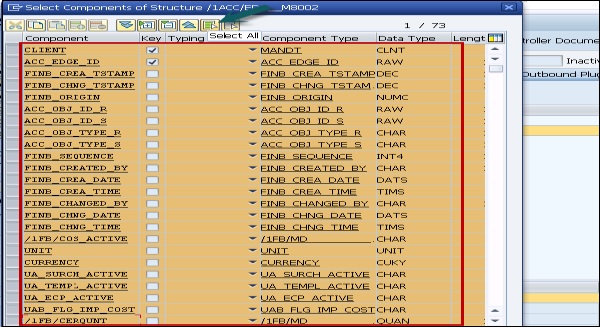

A context node TEST_NODE has been created, which refers to the data structure of the table and which can contain 0 → n entries at runtime. The context node has been created in the view context, since no data exchange with other views is planned hence component controller context usage is not necessary.
Step 5 − Save the changes to MAINVIEW by clicking the Save icon.
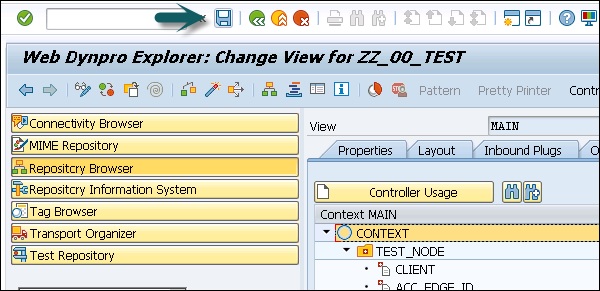
Step 6 − Go to the Layout tab of MAINVIEW. Insert a new UI element of the type table under ROOTUIELEMENT CONTAINER and assign the properties in the given table.

Step 7 − Enter the name of the element and type.

Step 8 − Create the binding of TEST_TABLE with context node TEST_NODE. Select Text View as Standard Cell Editors and activate bindings for all cells.
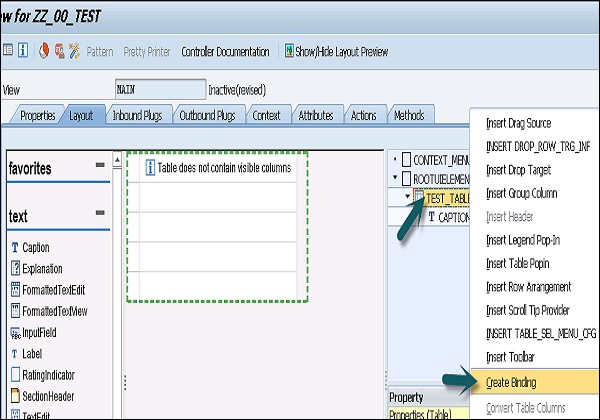
Step 9 − Click the Context button. Select the context node as TEST_NODE from the list.
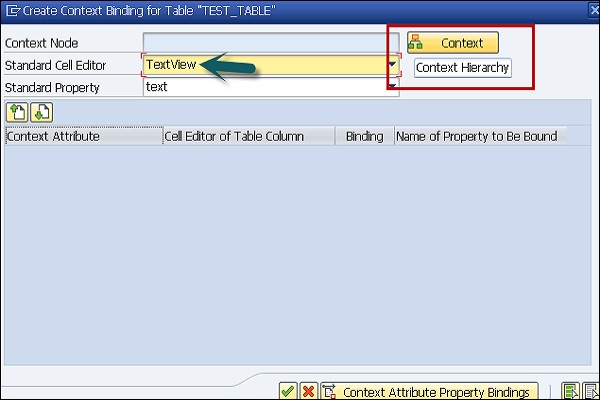
Step 10 − You can see all the attributes by selecting it.

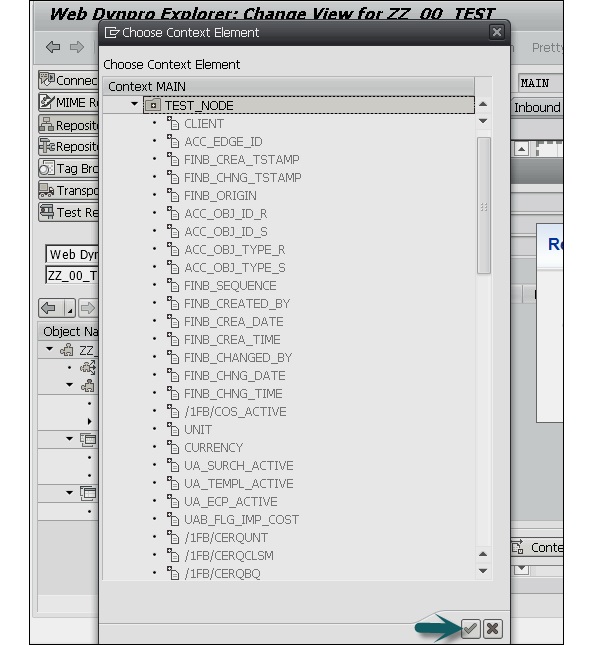
Step 11 − Activate all the checkboxes under Binding for all context attributes by selecting them. Confirm Entry by pressing the Enter key.
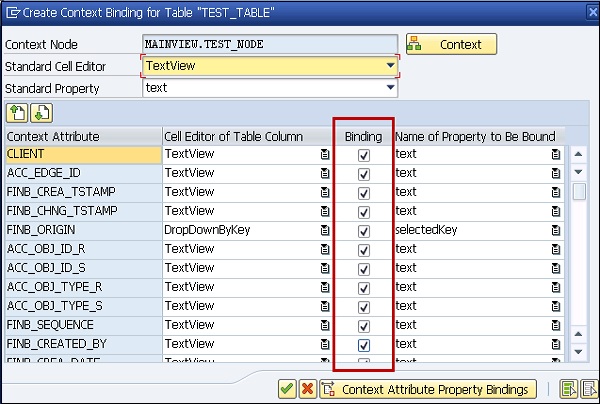
The result should look like this −

Step 12 − Save the changes.
Step 13 − To supply data to TEST table, go to Methods tab and double-click method WDDOINIT. Enter the following code −
method WDDOINIT .
* data declaration
data:
Node_TEST type REF TO IF_WD_CONTEXT_NODE,
Itab_TEST type standard table of TEST.
* get data from table TEST
select * from TEST into table Itab_TEST.
* navigate from <CONTEXT> to <TEST> via lead selection
Node_TEST = wd_Context->get_Child_Node( Name = `TEST_NODE` ).
* bind internal table to context node <TEST>
Node_TEST->Bind_Table( Itab_TEST ).
endmethod.
Web Dynpro applications, you should not access database tables directly from Web Dynpro methods, however, you should use supply functions or BAPI calls for data access.
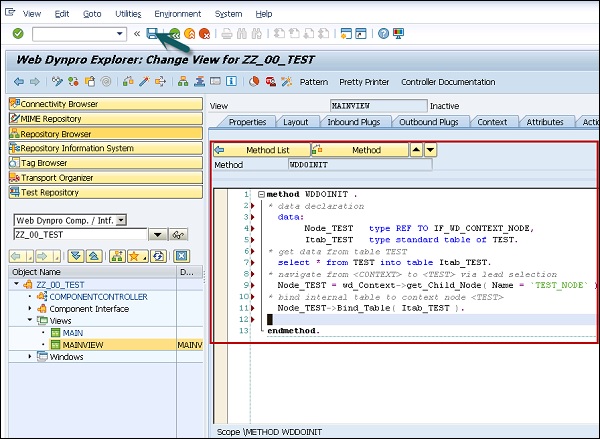
Step 14 − Save the changes by clicking the save icon on top of the screen.
How to Create a Web Dynpro Application?
Step 1 − Select the ZZ_00_TEST component in the object tree → right-click and create a new application.
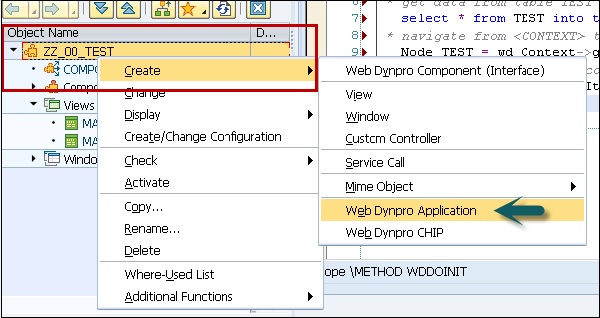
Step 2 − Enter the application name and click continue.

Step 3 − Save the changes. Save as a local object.
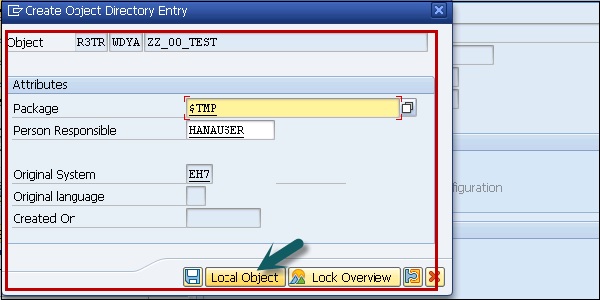

Next is activating objects in Web Dynpro component −
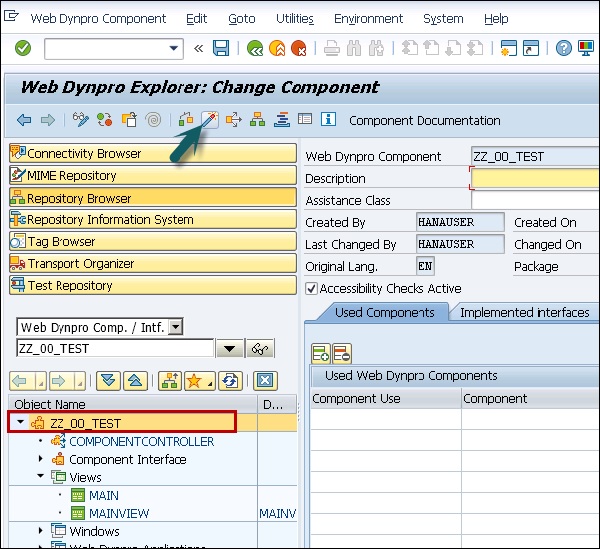
Step 4 − Double-click on the component ZZ_00_TEST and click Activate.
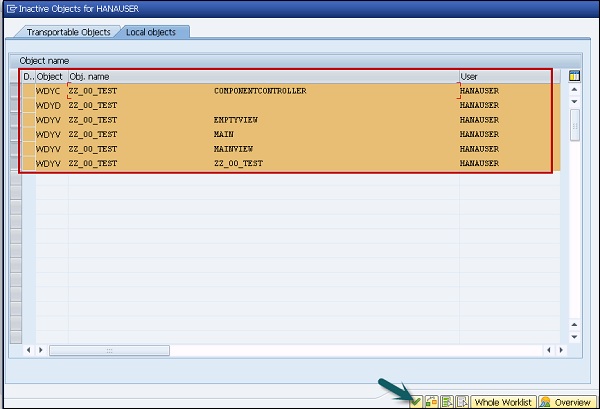
Step 5 − Select all the objects and click continue.
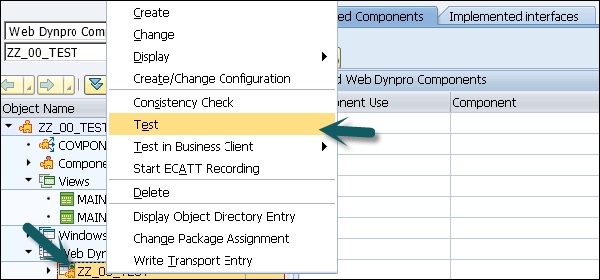
Step 6 − To run the application, select Web Dynpro application → Right-click and Test.
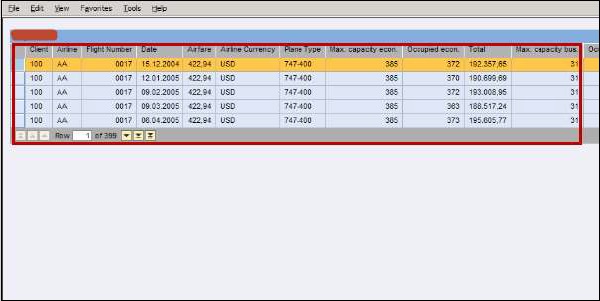
A browser will be started and Web Dypro application will be run.
Calling a Web Dynpro Application
In a Web Dynpro application, the component window has an inbound plug. This inbound plug can have parameters, which have to be specified as URL parameters.
Default values that are overwritten by the URL parameters can be set in the application for these parameters. If neither a default value nor a URL parameter is specified, a runtime error is triggered.
To create a new inbound plug, specify plug as a startup and data type should be a string. Activate the component.
Next is to specify the component to be called, parameters, window, and start-up plug.
Call the application and URL parameters overwrite application parameters.
SAP Web Dynpro - Component Interfaces
When you create a Web Dynpro component, the creation procedure creates a component interface. Each component interface contains exactly one interface controller and one interface view. The interface view has no direct connection with the interface controller and are created automatically.
Using the component interface, you can define the interface structure and you can use in different application components.
The interface controller of a component interface definition and the interface controller of a component are different.
You can add multiple number of interface views to a component interface definition.
Creating a Web Dynpro Component Interface Definition
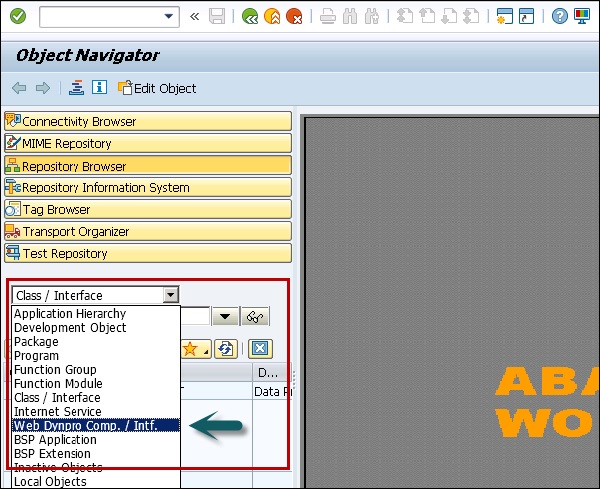
Consider the same screenshot as in the previous chapter.
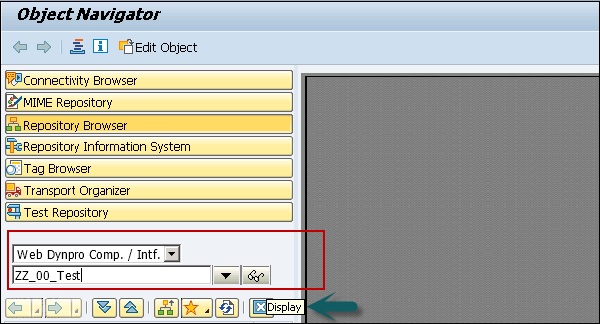
Step 1 − Enter the name of the new component and click display.
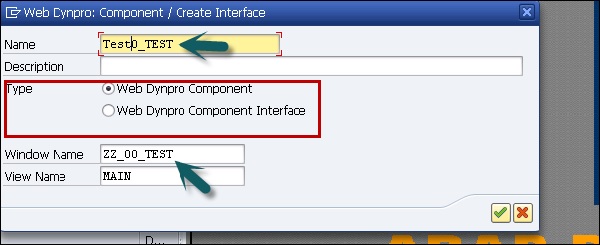
Step 2 − In the next window, enter the following details −
- You can enter a description of this component.
- In type, select a Web Dynpro component.
- You can also maintain the name of default window.
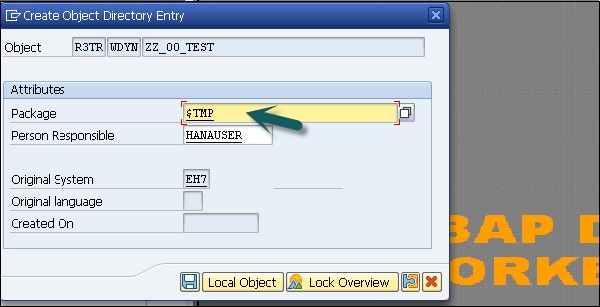
Step 3 − Assign this component to Package $TMP and click the Save button.
When you click on save, you can see this new component under the object tree and it contains −
- Component Controller
- Component Interface
- View
- Windows
SAP Web Dynpro - Faceless Components
Faceless components in Web Dynpro do not contain any graphical components, no views and no windows. It only contains a component controller and you can add an additional custom controller.
Faceless components are specifically used for receiving and structuring the data. Faceless components can be embedded to other components using the component usage and you can supply the required data to these components.
How to Create a Faceless Component?
Step 1 − Create a new Web Dynpro component.
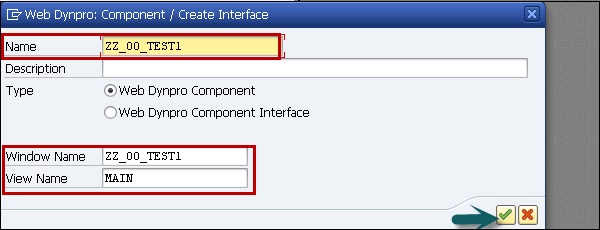
Step 2 − Select the package and click save button.
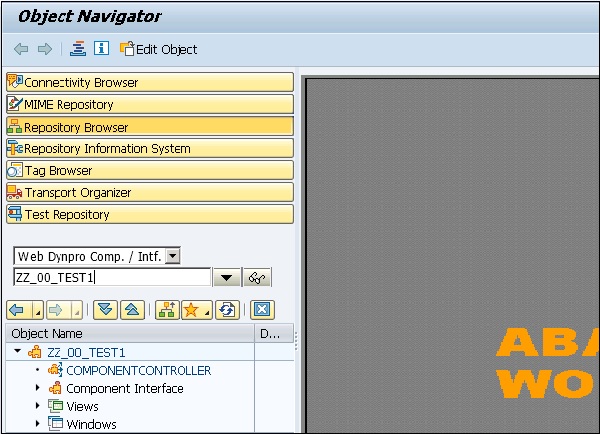
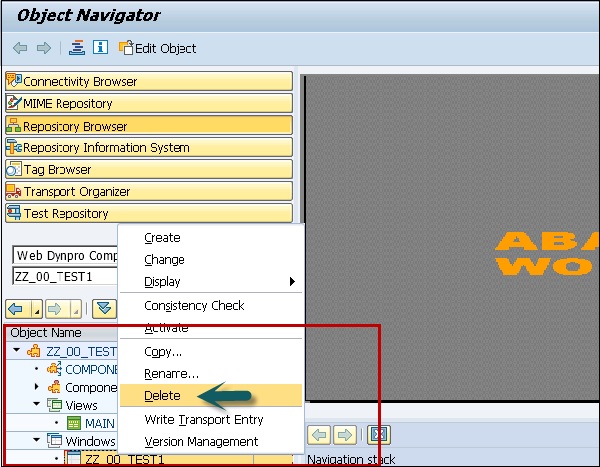
Step 3 − To create a Faceless component, delete the two elements − View and Window.
SAP Web Dynpro - Assistance Class
In Web Dynpro component, you can create a uniquely assigned class inherited from the abstract class. Assistance class can store the coding that is required in a component but is not linked with the layout.
You can store dynamic text in assistance class, text combined at run time or contains variable that can be stored in the text pool.
In Assistance class, you can also save a code that is not directly linked with the layout of the application or with the controller.
Using the method _WD_COMPONENT_ASSISTANCE~GET_TEXT( ) allows you to access text symbols of the assistance class in the controller of your component. When you call the method, 3-digit id of the text symbol is used −
method MY_CONTROLLER_METHOD .
data: my_text type string.
my_text = WD_ASSIST->IF_WD_COMPONENT_ASSISTANCE~GET_TEXT( KEY = ‘001’ ).
Endmethod
You can maintain text symbols in assistance class using each controller. Click on Go to → Text Symbols in the menu.
Note − Each ABAP class can act as assistance class but service integrated with Web Dynpro application is only available if assistance class is derived from class − CL_WD_COMPONENT_ASSISTANCE.
Service Call In an Application
You can call an existing functional module in a Web Dynpro component using a service call. To create a service call, you can use easy-to-use wizard in Web Dynpro tools.
You can launch the wizard in ABAP workbench to create a service call.
Run T-Code − SE80

Step 1 − Select Web Dynpro component → Right-click to open the context menu. Go to create → Service call.
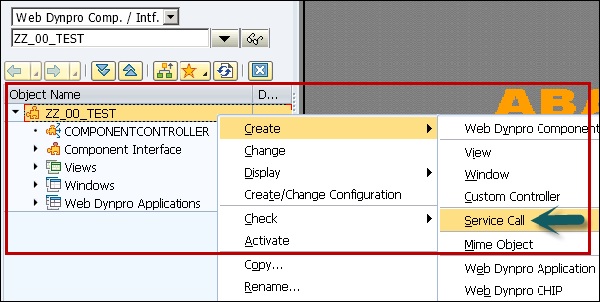
It will open Web Dynpro wizard − Start screen.
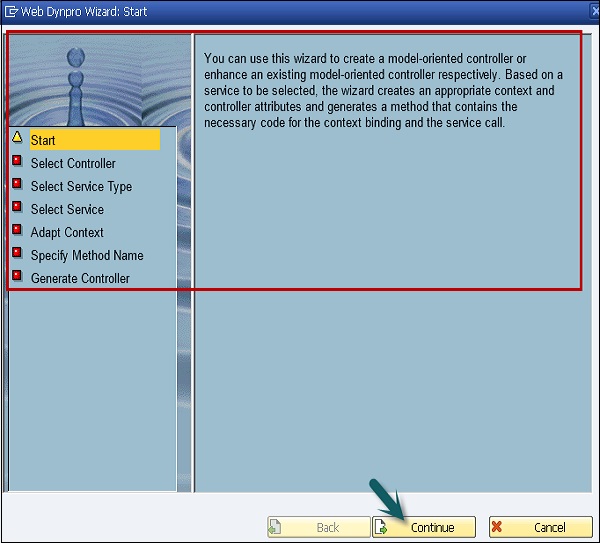
Step 2 − You can select if you want service call to be embedded in an existing controller or you want to create a new controller.
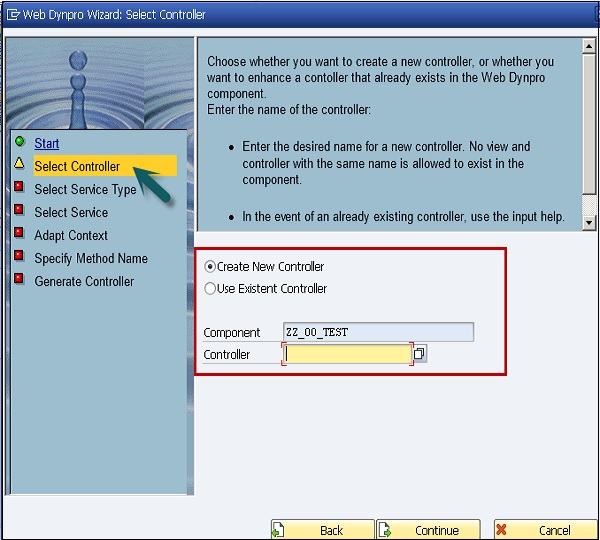
Note − The service calls should be embedded in global controllers and it can’t be used with the view controllers in Web Dynpro.
Step 3 − In the next window, select the service type. Click the Continue button.
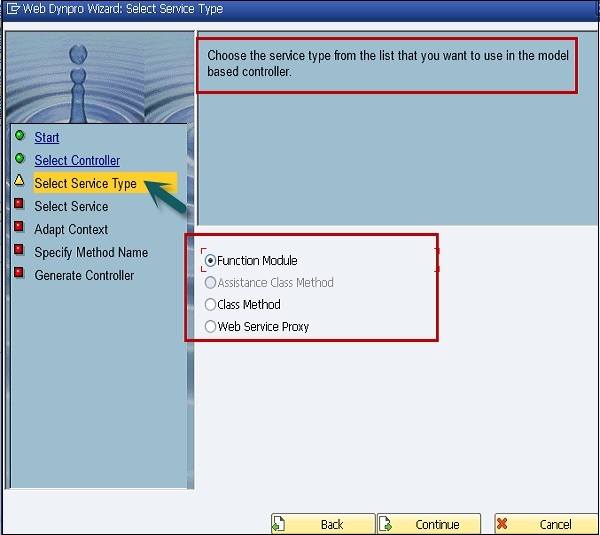
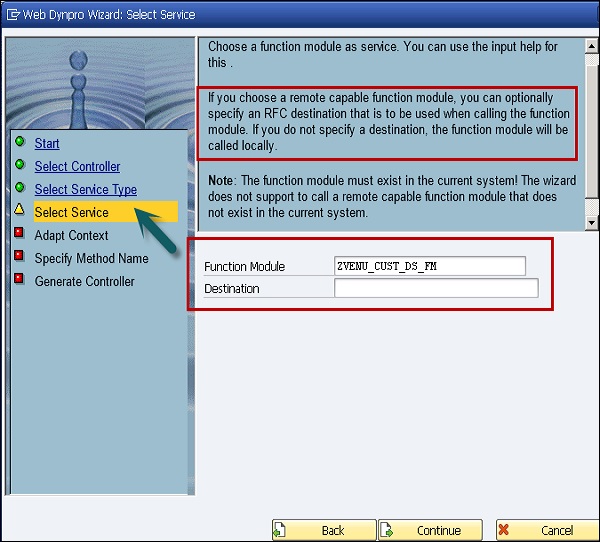
Step 4 − In the next window, select a function module as a service. You can use the input help for this.
If you choose a remote capable function module, you can optionally specify an RFC destination that is to be used when calling the function module. If you do not specify a destination, the function module will be called locally.
Note − The function module must exist in the current system! The wizard does not support to call a remote capable function module that does not exist in the current system.
Step 5 − Click Continue.
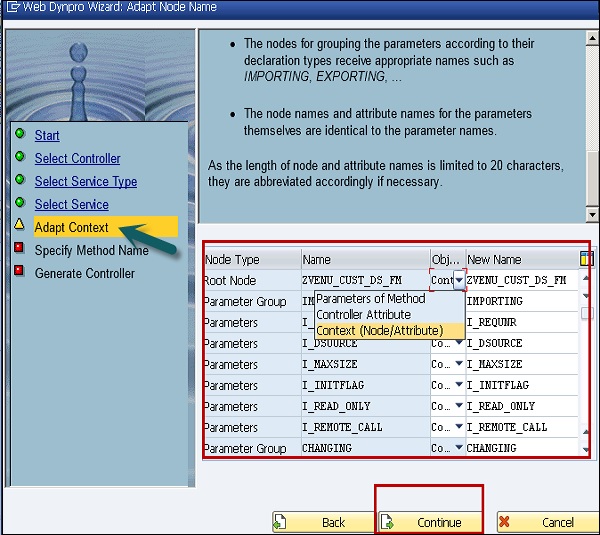
Step 6 − In the next window, you can choose which object type to use to represent the service function parameters in Web Dynpro controller −
- As a parameter of the controller method
- As a controller attribute
- As a context node or a context attribute
To do this, select the required object type from the list box in the relevant lines.
Note − Only UI-relevant data should be stored in the context.
You can also individually name the controller attributes and the context nodes to be created.
The following proposal is generated −
The root node receives the name of the service.
The nodes for grouping the parameters according to their declaration types receive appropriate names such as IMPORTING, EXPORTING, ...
The node names and attribute names for the parameters themselves are identical to the parameter names.
As the length of the node and the attribute names is limited to 20 characters, they are abbreviated accordingly, if necessary.
In the next window, selected service uses types from type groups as parameter types and/or defines implicit table parameters.
For all the types listed below, define (table) types with the same equal structure in the Data Dictionary. These will then be used for typing of controller attributes or method parameters created by the wizard.
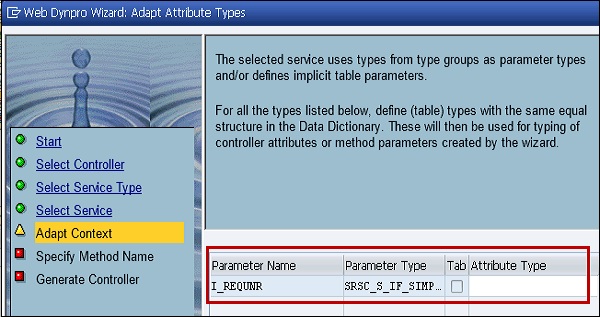
Step 7 − Enter Attribute Type − TEST and click Continue.
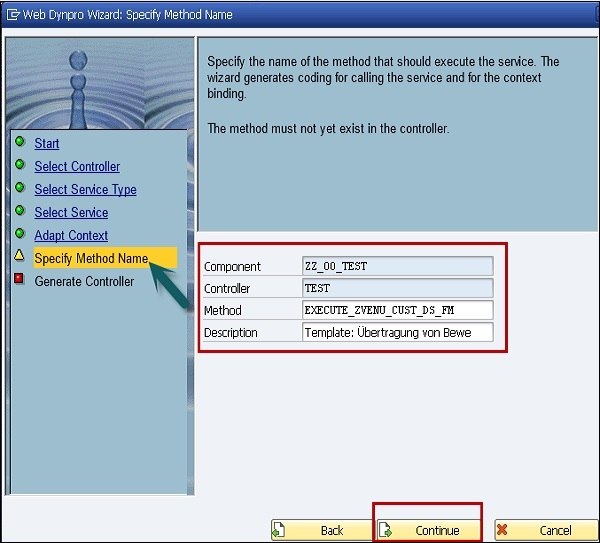
Step 8 − In the next window, specify the name of the method that should execute the service. The wizard generates coding for calling the service and for the context binding.
The method must not yet exist in the controller.
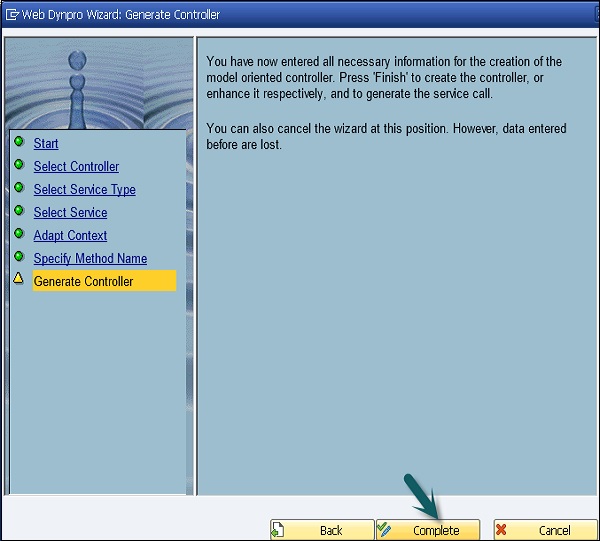
You have now entered all the necessary information for the creation of the model-oriented controller.
Step 9 − Click ‘Complete’ to create the controller, or enhance it respectively, to generate the service call.
You can also cancel the wizard at this position. However, data entered before are lost.
SAP Web Dynpro - Using a Service Call
When a service call is created, a function module is available to the component. Now it is possible to choose a view in order to display the elements of the database table in the browser. Provided the global controller is not the component controller, a use page of the global controller must be entered for the controller of the selected view. Afterwards, there should be mapping of the node.
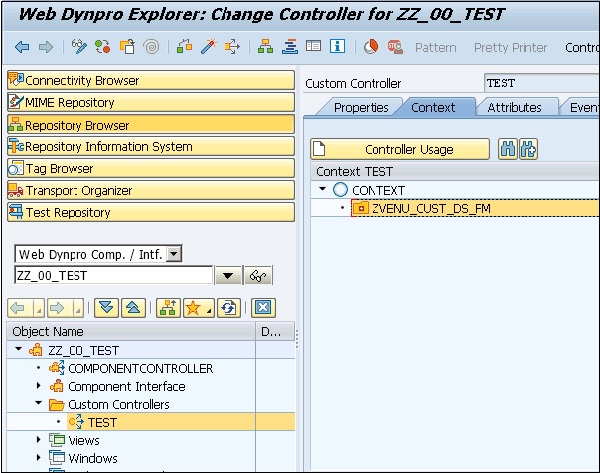
FUNCMODUL1 onto the node with the same name in a view controller context is generated.
To fill the context node FUNCMODUL1 of the view controller context with the data of the database table, the method EXECUTE_FUNCMODULE of the global controller is called its supply function. For this purpose, you must create such a supply function by calling the method EXECUTE_FUNCMODULE1.
SAP Web Dynpro - Debugging an Application
There are various tools in ABAP workbench that you can use for debugging purpose of source code. You can test all source code of Web Dynpro application using a debugger.
Step 1 − To start the debugger, you have to select a new debugger in ABAP workbench.
Step 2 − Go to Utilities → Settings

A dialog box now appears that contains two nested tab page areas.
Step 3 − Choose the “parent” tab page ABAP Editor.
The settings for ABAP Editor always open with the content of the child tab page Editor.
Step 4 − Select the Front End Editor (New).
Step 5 − Now switch to the Debugging tab page in the ABAP Editor settings and select New Debugger.
Step 6 − Save your changes and close the dialog.
How to Start the Debugging Process?
If you want to run an application in debugging mode, you need to set an external breakpoint in one of the methods in Dynpro component.
It is suggested to set the breakpoint in method WDDOMODIFYVIEW under METHODS tab of Dynpro view. Provided that the context of the view controller is not filled using a supply method, the view is fully instantiated in the phase model at this point in time.
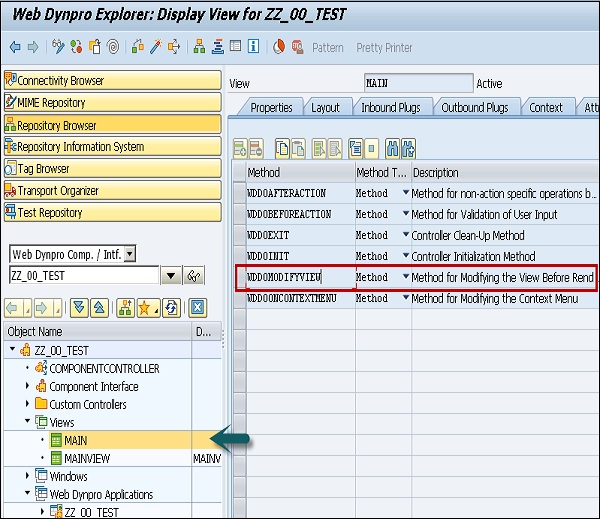
Note − The method in which you set the breakpoint depends on the purpose of the test run and it is advised to set it in WDDMODIFYVIEW.
When you start a Web Dynpro application, a debugger automatically starts in another session.
SAP Web Dynpro - Version Management
You can use version management to manage the older version of an object, compare the versions or you can also reset them. In version management, you can store different versions of ABAP development objects.
In an ABAP workbench, you can compare different versions of −
- Views
- Windows
- Controllers
You can also store a version of an object without releasing it. To perform this, select the object in the editor area and go to Utilities tab → Versions → Generate Version
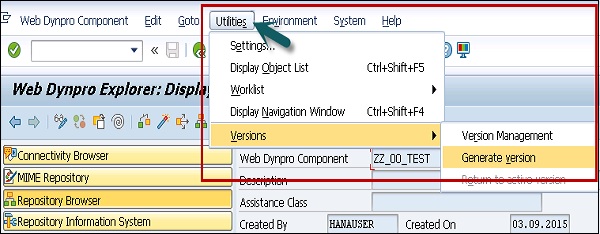
Before version generation, you can see no version in the database, if you go to version management.
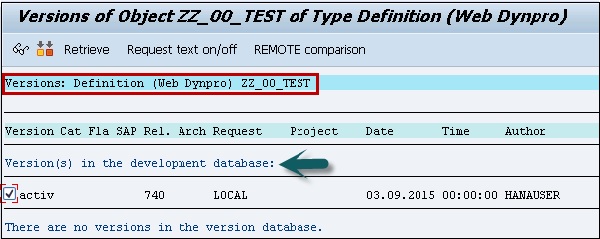
When you click on Generate version, you get a confirmation that a version is created.
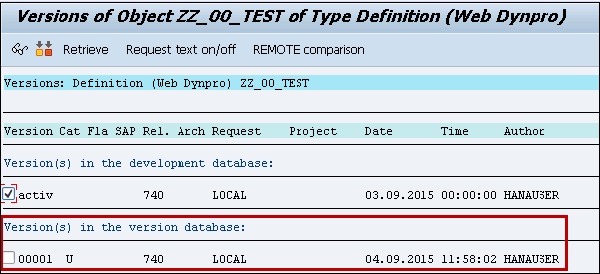
How to Perform Version Comparison?
Go to Utilities → Versions → Version Management

It shows all the stored version of the selected object in version database. It consists of all previously released or all active versions.
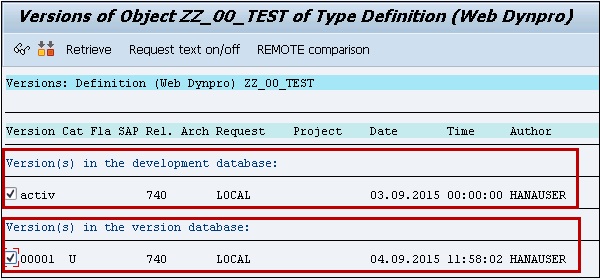
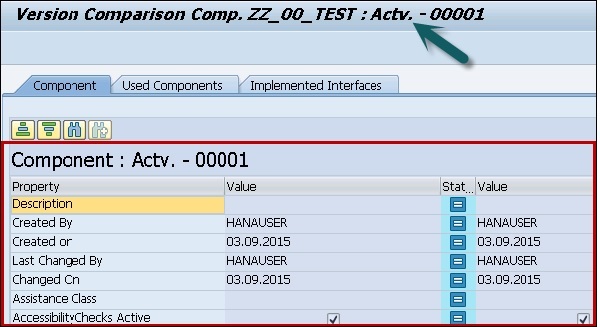
To start comparison of objects, select object and click the comparison button at the top of the screen.

For all versions, a comparison is performed and any difference is highlighted in a table.
SAP Web Dynpro - Messages
In ABAP Workbench, you can also create and show messages that contain information for end users of Dynpro application. These messages are displayed on the screen. These are user interactive messages that display important information about Web Dynpro application.
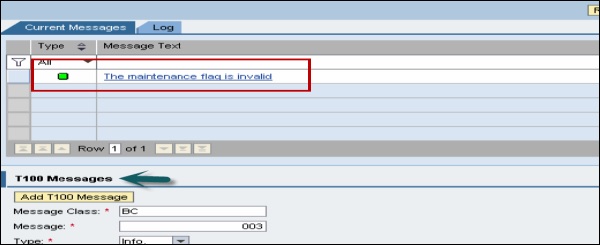
To provide users with information, warning or error details, you can program these methods in ABAP workbench using runtime service.
These messages are configured under Setting on Web Dynpro application. You can assign different settings for handling messages in Web Dynpro application −
Show message component − In this case, if the message exists, it will be displayed.

Always show message component − Even if there is no message, the message component is shown at the top.

The message is displayed without the component − In this setting, one message is displayed and no message log exists.
All these user messages are shown in the status bar. The user can navigate to the UI element to remove the error in the error message.
Messages in popup window − In this configuration, you can set the message to display in the popup window, irrespective of what is configured in Web Dynpro application. You can configure the following popup messages to display −
- Messages belong to specific window
- All the messages till now
- No messages
SAP Web Dynpro - Integration Messages
You can use the message manager to integrate messages into the message log. You can open the message manager using Web Dynpro code wizard.
You can open Web Dynpro code wizard from the tool bar. It is available when your ABAP workbench is in change mode or while editing a view or a controller.
To set ABAP workbench in the change mode, select the view and go to context to Change.


You can use the following methods for triggering messages −
IS_EMPTY − This is used to query if there are any messages.
CLEAR_MESSAGES − This is used to deletes all messages.
REPORT_ATTRIBUTE_ERROR_MESSAGE − This is used to report a Web Dynpro exception to a context attribute.
REPORT_ATTRIBUTE_EXCEPTION − This is used to report a Web Dynpro exception to a context attribute.
REPORT_ERROR_MESSAGE − This is used to report a Web Dynpro message with optional parameters.
REPORT_EXCEPTION − This is used to report a Web Dynpro exception that may come back.
REPORT_FATAL_ERROR_MESSAGE − This is used to report a fatal Web Dynpro message with optional parameters.
REPORT_FATAL_EXCEPTION − This is used to report a fatal Web Dynpro exception.
REPORT_SUCCESS − This is used to report a success message.
REPORT_T100_MESSAGE − This is used to report a message using a T100 entry.
REPORT_WARNING − This is used to report a warning.
Personalization & Configuration
As per the business requirement, you can implement many standard applications and the UI of Web Dynpro application can vary as per the requirement.
Configuration of Application
To configure a Web Dynpro application, you first configure data records for individual Web Dynpro components.
Using the component configuration, it allows you to manage the behavior.
Next is to configure the application. All the components that are created require to be used in the specific configuration. The configuration of Web Dynpro application defines which component is configured in an application.
How to Start Component Configurator?
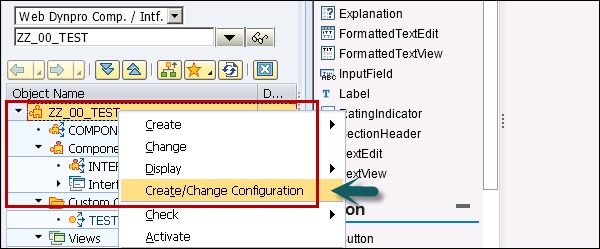
In ABAP object list, select a Web Dynpro component −
Right-click → Create/Change configuration.
This opens a browser with the dialog window of the configurator. The mode Component Configurator is active and you enter a name for your new component configuration.
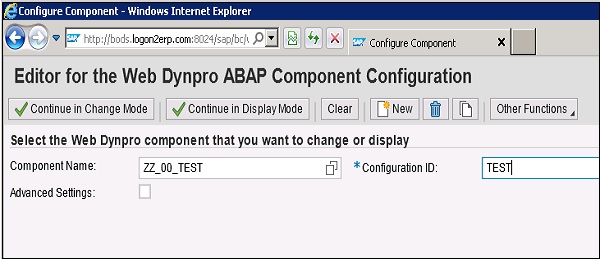
You can also define implicit and explicit configuration. Save the configuration and close the window.
Note − You can save a new configuration only when it actually contains values. An empty configuration file that doesn’t contain any data and has a name is not stored.
As this configurator is not part of the ABAP Workbench and runs separately in the browser, you need to update the hierarchy of the object list in the workbench after completion of the creation or change procedure in a configuration.
This allows you to store different configurations for each object.
Delta Handling in Personalization
When you save the application configuration, you can’t check the changes made by an administrator and an end user. There is a need to store customization and personalization data that allows merged data to be managed.
The following points should be considered −
Application users and administrators should be able to reverse the changes.
Customization changes of an application should be visible to the user for all the pages.
Application administrator should have access to mark the report as final and this should be valid for all users. When an administrator flags a property final, any changes to the value as a personalization of a single user must no longer be permitted.
SAP Web Dynpro - Portal Integration
You can integrate an ABAP application into the enterprise portal. You can also manage portal functions from a Web Dynpro application.
You can call Web Dynpro code wizard to access portal manager methods. This can be used to perform the following functions −
Portal Events − To navigate between Web Dynpro application within the portal or portal content.
Following navigation types are supported −
- Object-based navigation
- Absolute navigation
- Relative navigation
Work Protect Mode − For portal integration, following Web Dynpro applications are available in package SWDP_TEST −
WDR_TEST_PORTAL_EVENT_FIRE
Trigger event
WDR_TEST_PORTAL_EVENT_FIRE2
Trigger free event
WDR_TEST_PORTAL_NAV_OBN
Object-based navigation
WDR_TEST_PORTAL_NAV_PAGE
Page navigation
WDR_TEST_PORTAL_WORKPROTECT
Security monitoring
WDR_TEST_PORTAL_EVENT_REC
Receive portal event
WDR_TEST_PORTAL_EVENT_REC2
Receive free portal event
SAP Web Dynpro - Integrate WDA in Portal
Following are the steps to integrate Web Dynpro ABAP (WDA) in the portal.
Step 1 − Go to ABAP workbench using T-code − SE80 and create Web Dynpro component.
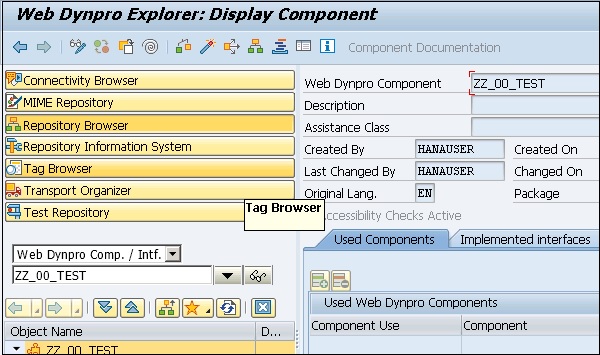
Step 2 − Save the component and activate it.
Step 3 − Define data binding and context mapping. Create a Web Dynpro application and save it.
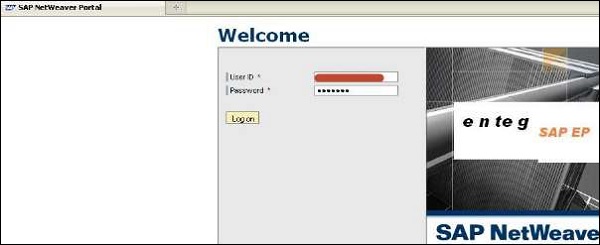
Step 4 − Login to SAP NetWeaver portal.
Step 5 − Go to Portal Content → Content Administration tab.
Step 6 − Right-click on the portal content and create a new folder.
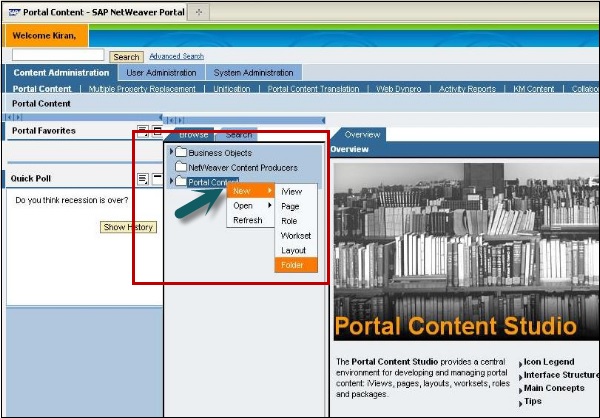
Step 7 − Enter the folder name and click Finish.
Step 8 − Right-click on the created folder and create a new iView.
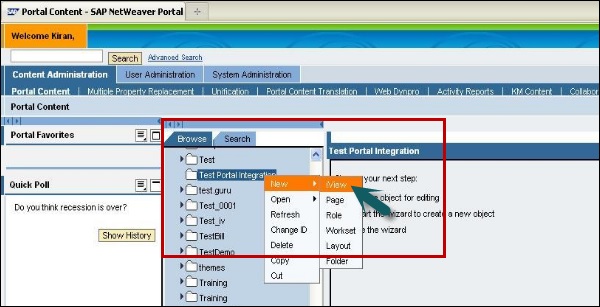
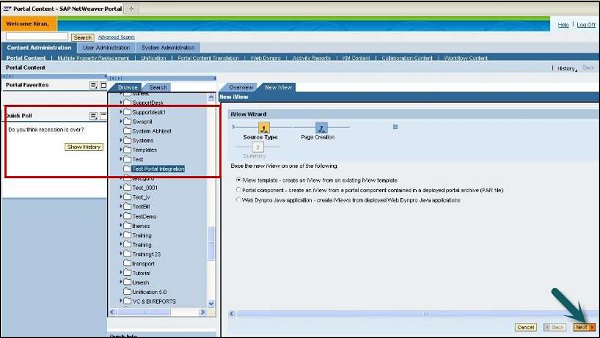
Step 9 − Select iView template. Create an iView from an existing iView template and click Next.
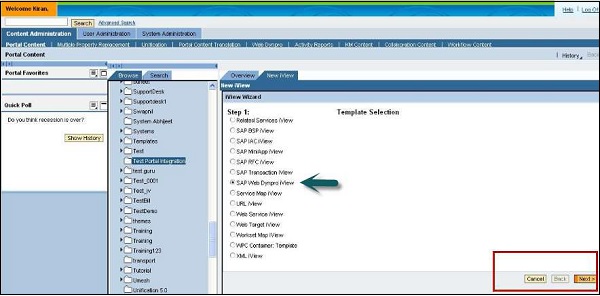
Step 10 − Select SAP Web Dynpro iView as template and click Next.
Step 11 − Enter iView name, iView ID, iView prefix ID and click Next. Enter definition type as ABAP and click Next.
Step 12 − Enter Web Dynpro details and ECC system is created.
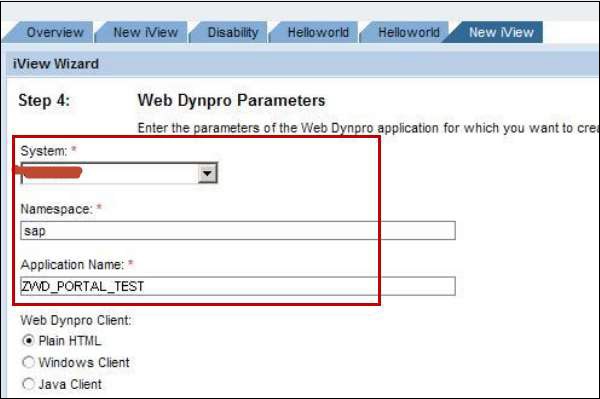
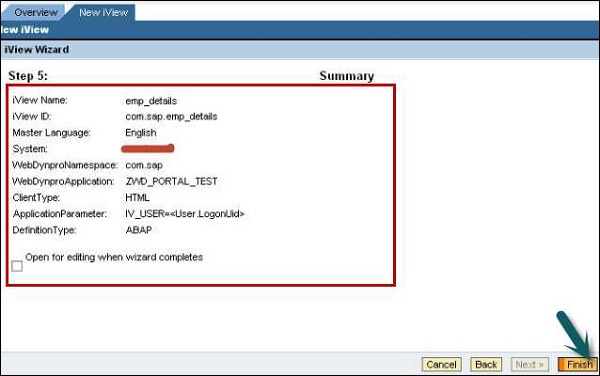
Step 13 − Enter application parameter in the same screen and click Next. You will be prompted to see the summary screen. Click Finish.
SAP Web Dynpro - Interactive Forms
You can create forms based on Adobe software and can use in context for Web Dynpro user interfaces. You can integrate Adobe lifecycle development tool with ABAP editor to ease the development of user interface. Interactive forms using Adobe software allows you to efficiently and easily develop UI elements.
Following scenarios can be used for creating interactive forms −
- Interactive scenario
- Print scenario
- Offline scenario
- Using digital signature
How to Create Web Dynpro Application Using Forms?
You can create forms independently using form editor. Go to T-code − SFP

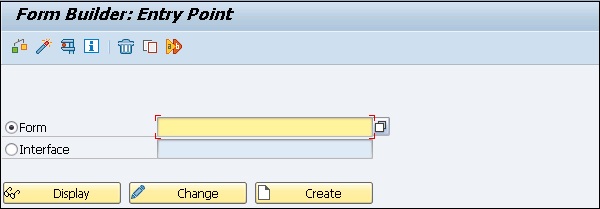
When you click Create, you will be prompted to enter the form name, form description, and interface.
Example
The example component for the interactive scenario in the system are available in the package SWDP_TEST → WDR_TEST_IA_FORMS.
Inserting Forms Using Scenarios
In a Dynpro application, both scenarios - print scenario and interactive scenario − for inserting interactive forms is similar. The form that contains the static components can be used to display data in a Dynpro application using Print scenario.
Using interactive forms, you can reuse entries in Web Dynpro context for Web Dynpro application.
How to Insert an Interactive Form?
Step 1 − Create a view of your Web Dynpro component.

Step 2 − Right-click on View and create a node. This node will be bound to form.
Step 3 − Drag the interactive form from Adobe library to Designer window.
Step 4 − Design the form, enter the name, and bound the attributes.
Step 5 − Once you are done with the form design, go to edit mode in the workbench and define if the form is static content, PDF-based print form, or an interactive form.
SAP Web Dynpro - SAP List Viewer(ALV)
SAP List Viewer is used to add an ALV component and provides a flexible environment to display lists and tabular structure. A standard output consists of header, toolbar, and an output table. The user can adjust the settings to add column display, aggregations, and sorting options using additional dialog boxes.
Following are the key features of ALV −
It supports many properties of the table element as it is based on Web Dynpro table UI element.
ALV output can be filtered, sorted, or you can apply calculations.
The user can perform application specific functions using UI elements in the toolbar.
Allows the user to save the setting in different views.
Allows to configure special areas above and below ALV output.
Allows to define the extent to which ALV output can be edited.
How to Create an ALV?
Following are the steps to create an ALV.
Step 1 − Use T-code: SE80. Select Web Dynpro comp/intf from the list and enter the name. Click on display. You will be prompted create the component. Click on Yes.

Step 2 − Select type as Web Dynpro component. Enter the Window name and the View name.
Step 3 − Click the tick mark.
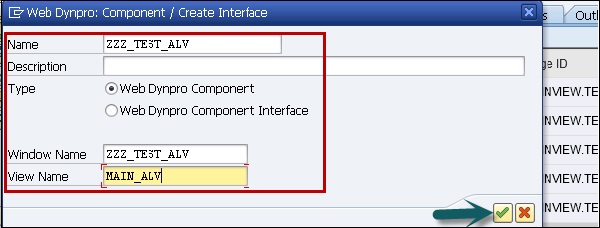
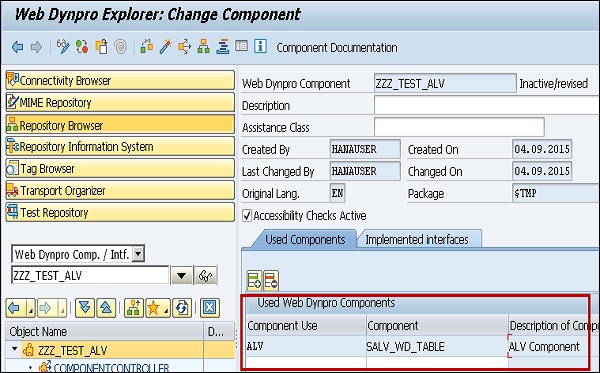
Step 4 − In the change window, enter the component use as ALV, component as SALV_WD_TABLE and description as ALV component.
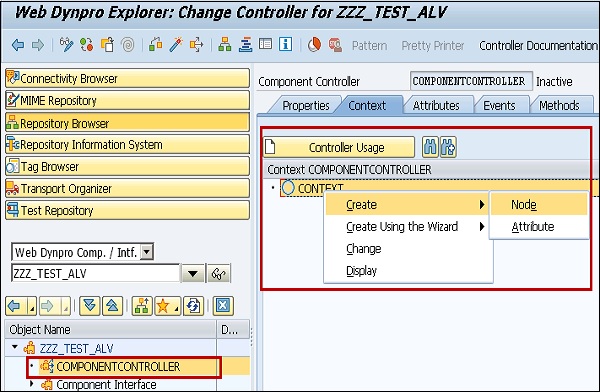
Step 5 − Go to Component Controller and right-click the context. Then select Create Node MAKT with the dictionary structure MAKT.
Step 6 − Select the required attributes from MAKT by using Add Attribute from Structure.
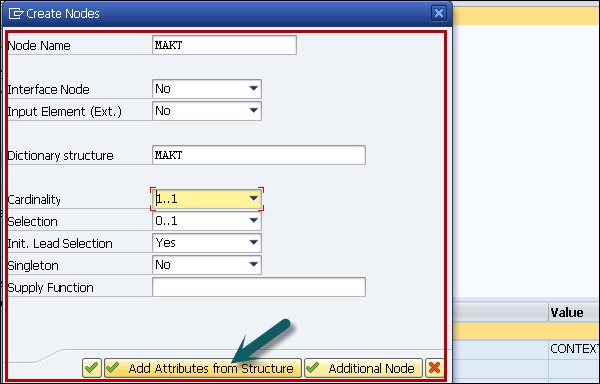

Step 7 − Remove the dictionary structure MAKT from the node MAKT and set the properties as follows (Cardinality, Lead selection, etc.)


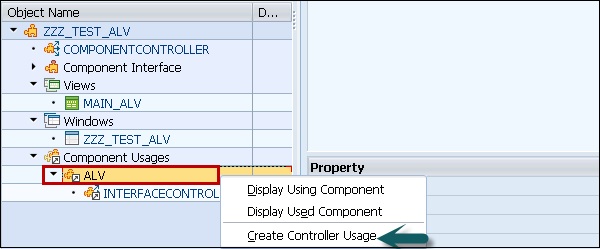
Step 8 − Right-click on Component usage in the Object tree → Create Controller Usage.
Step 9 − Go to View → Context tab and drag MAKT node to the view.
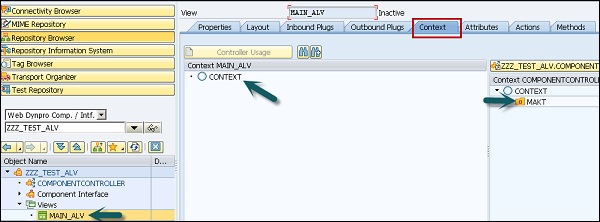
After mapping, it will appear as shown in the following screenshot.

Step 10 − Go to Layout and right-click Insert Element.
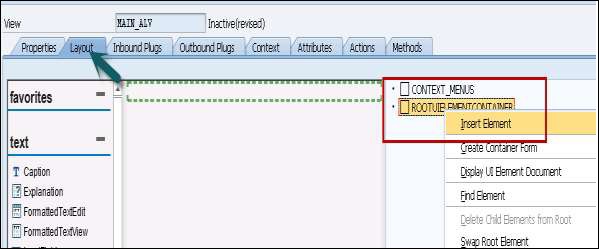

The layout will appear as shown in the following screenshot −

Step 11 − Go to Properties tab, click create controller usage to add the following to View.

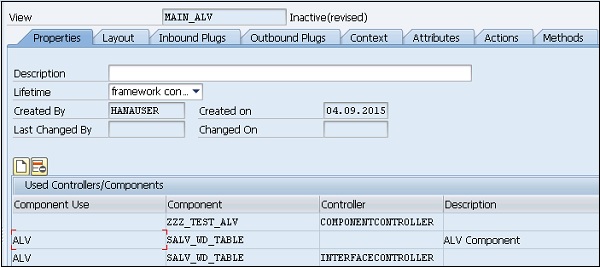
Step 12 − Go to method, use WDDOINIT to write code.
Step 13 − Double-click on the method to enter the code. Enter the following code and initiate the used component ALV.

Use GET_MODEL method in the controller.

Step 14 − Bind the table to the context node using BIND_TABLE method as follows −
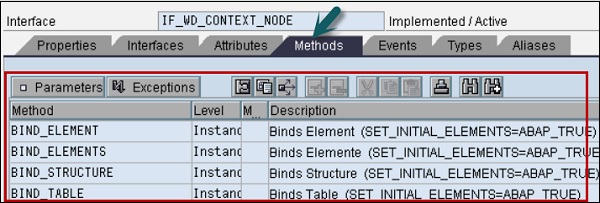
Step 15 − Go to Window in the Object tree and right-click C1 to embed ALV table to the view.

Once you embed the ALV table, it will appear like this −

Step 16 − The last step is to create a Web Dynpro application under the object tree. Enter the name of the application.
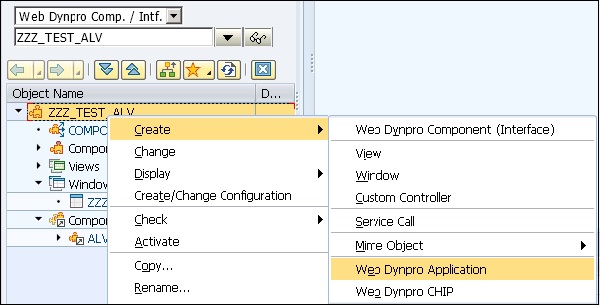
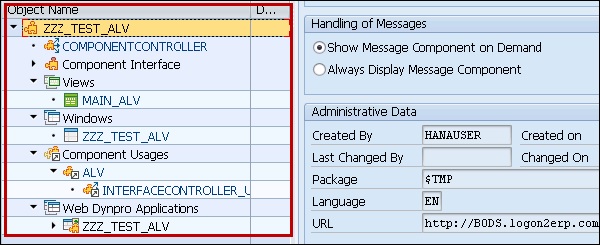
Step 17 − To execute application, double-click and you will see the output.
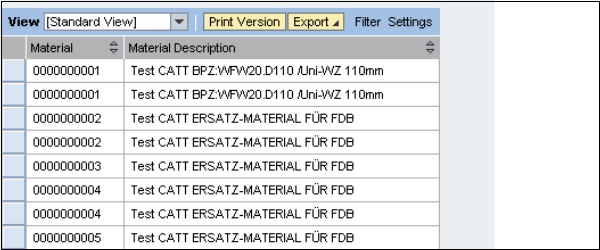
Using Filters in ALV Output
Using filters, you can limit the data in ALV output. You can create multiple number of filter conditions for each field. To create or delete a filter condition, you can use the method of interface class IF_SALV_WD_FILTER.
You can use the following methods for creating, getting, and deleting filter conditions −
| Function | Method |
|---|---|
| Get a specific filter condition | GET_FILTER_RULE |
| Get all filter Conditions of a field | GET_FILTER_RULES |
| Create filter condition | CREATE_FILTER_RULE |
| Delete a specific filter condition | DELETE_FILTER_RULE |
SAP Web Dynpro - Administration
In Web Dynpro ABAP administration, you can perform various administration tasks using different tools −
- ICM Tracing
- Web Dynpro Trace tool
- Browser Tracing
- Logging
- Security
Trace Tool
Web Dynpro trace tool can be used for checking the errors and problems in Dynpro application. You can activate Web Dynpro trace tool for a specific user.
Step 1 − To activate trace tool in SAP GUI client, use T-code − WD_TRACE_TOOL

Step 2 − Click on Activate for this user. This allows to set the trace active for the user.

Step 3 − Select Trace features in the new window and click OK.
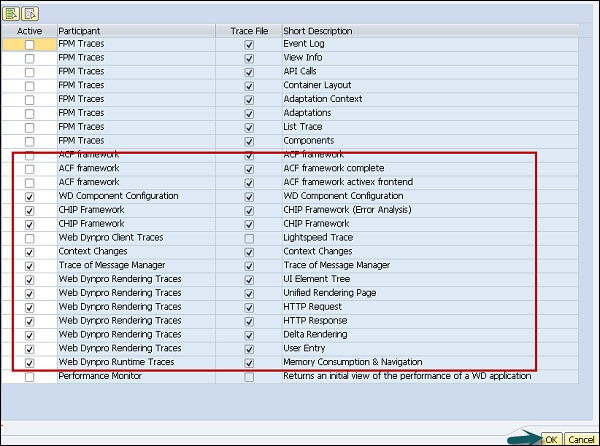
Step 4 − Start Web Dynpro application that you want to trace. You can see a new area Web Dynpro trace tool in Web application.
Step 5 − Execute the application. Enter the details of problem → Choose Continue.
Step 6 − You can also send it with Insert and add a screenshot or you insert a file with additional information. Go to Browse → Select File and click Add File.

Step 7 − You can download the trace file in Zip format and end tracing by clicking on Save Trace as Zip file and Stop Trace.
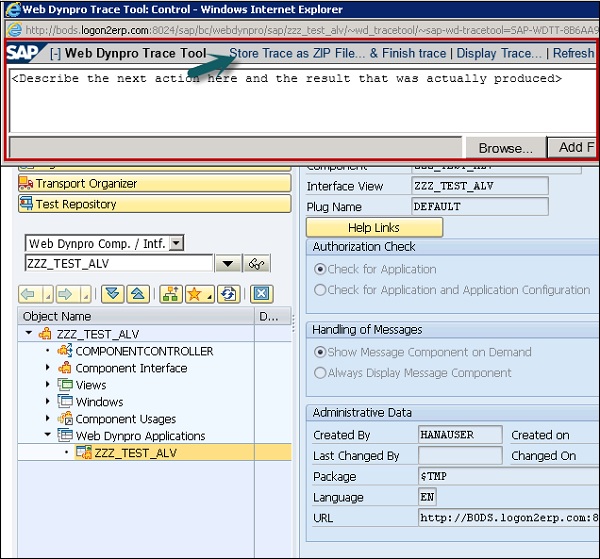
This file can be uploaded to SAP portal and can be sent to SAP for debugging.
ICM Tracing
To analyze the problem, you can also trace the data stream in SAP Web Application server.
Step 1 − Use T-Code − SMICM. In the next window, click on GOTO → Trace File → Display file or start.
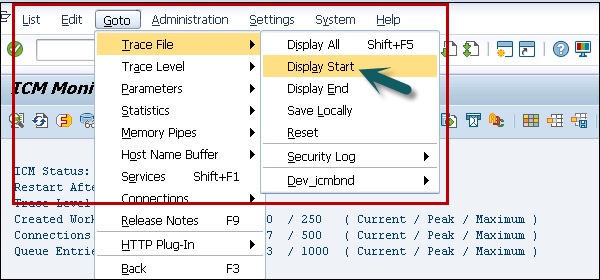
You will see ICM trace result as shown in the following screenshot −
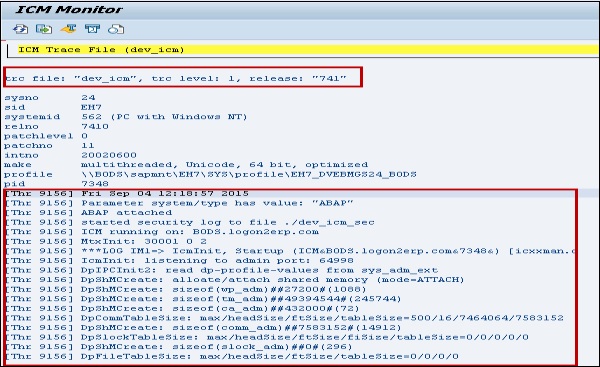
Step 2 − You can also increase the trace level from default level 1. To increase the trace level, GOTO → Trace Level → Increase.

HTTP Browser Tracing
This is used to analyze the dynamic behavior of your code. This can be used as an alternative to ICM tracing.
To use browser tracing, you need to install proxy tool on your local system.
SAP Web Dynpro - Monitoring an Application
You can monitor Web Dynpro application using ABAP monitor. Information is stored about Web Dynpro application. You can view this information using T-code − RZ20.
You can check the following information in Web Dynpro ABAP monitor −
- Session Count
- Application Count
- CPU time
- Data
To view the report, use T-code − RZ20
Step 1 − Go to SAP CCMS Monitor template.
Step 2 − Click the sub node Entire System.
Step 3 − Enter the system ID of the current SAP system where the application you want to monitor is installed.
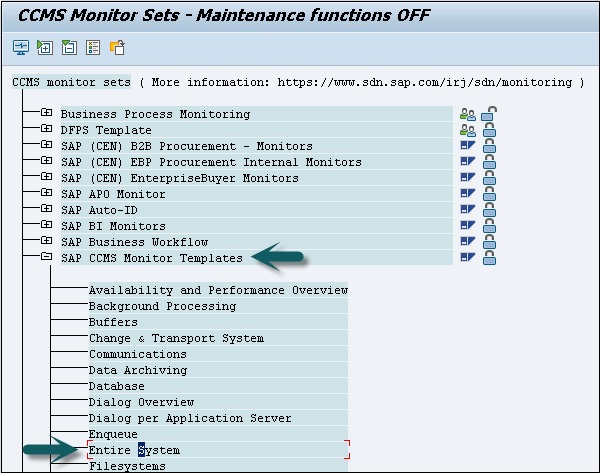
Step 4 − Select Application Server.
Step 5 − Select the name of the relevant application server. For instance, select Web Dynpro ABAP as shown in the following screenshot −
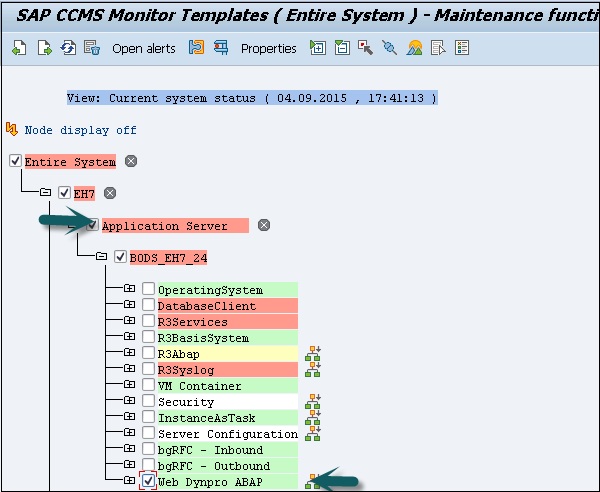
The result will be displayed with the following information when a Web Dynpro application will be called −
- Data
- Application Count
- Session Count
- Round trips
- CPU Time
