- SAP Universe Designer Tutorial
- SAP Universe Designer - Home
- SAP Universe Designer - Introduction
- SAP Universe Designer - Object Types
- SAP Universe Designer - User Interface
- Creating, Editing and Saving
- Creating Parameters
- Creating Schemas
- Table Browser
- Using Derived Tables
- Using Formula Bar
- Universe Building
- List of Values (LOVs)
- OLAP Data Sources
- Using Connection Wizard
- Creating Calculated Measures
- Aggregate Awareness
- Deploying Universe
- Managing Access of Universe
- User and Groups
- UDT vs. IDT Comparison
- unv File to unx File
- Job Responsibilities
- SAP Universe Designer Resources
- SAP Universe Designer - Quick Guide
- SAP Universe Designer - Resources
- SAP Universe Designer - Discussion
SAP Universe Designer - Quick Guide
SAP Universe Designer - Introduction
SAP Universe Design tool allows users to create, edit or delete existing models published in BO repository. With Universe Designer, you can build data foundation and business layer to meet your BI report requirements and perform different functions available in UDT tool before you develop BI reports and dashboards on top of these Universes. Universe Designer helps you to create semantic layer between your Relational database and BI tool.
With Universe Designer, you can build the semantic layer for non-SAP and SAP data sources to build data models for DB objects. Once Semantic later is built, you can publish it to BO server repository and it can be used by different users to create BI reports in Web intelligence/Desktop intelligence tool and also can be used with other SAP BusinessObjects tools.
The benefits of using Universe for BI reporting is that end users can connect to Universe and run queries against database without understanding the complexity of underlying data structures. BI users can use objects used in Universe to create reports. The advantage of using Universe is to provide easy to use interface to business users which are non-technical, and they can simply drag objects to BI reports and perform ad-hoc reporting without any technical knowledge.
Key Components of a Universe
The following are the key components of Universe −
Connection to a database and connection parameters to fetch data.
SQL structure called objects which is mapped to actual objects in database- columns, tables, etc., and they are grouped in to classes and these objects are visible to Web intelligence users.
Universe contains a Schema which is made up of tables and joins created on top of database objects and is not visible to BI users. Only Universe Designer users can view and edit this schema.
Universe created using Universe Designer Tool has “.UNV” extension. Universe contains classes and objects which are defined as follows −
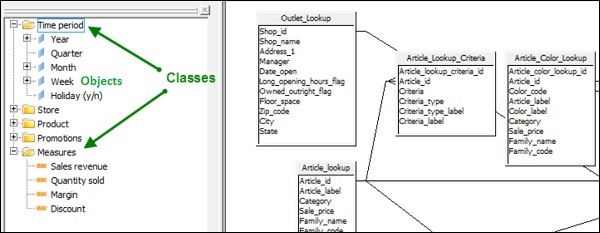
Classes
In Universe, the grouping of objects is known as class. The name of class normally shows objects category it contains. You can also divide classes in to subclasses based on hierarchical structure.
Objects
In Universe, an object is named component derived from a data object in database. The name of the object is usually based on its relevance to business to users. For example, Objects used by customer should be represented as Customer in Universe layer however it can be referred to XYZ column in database.
In the below image, you can see common example of classes and objects in a Universe. They can be renamed as per requirement from business users.
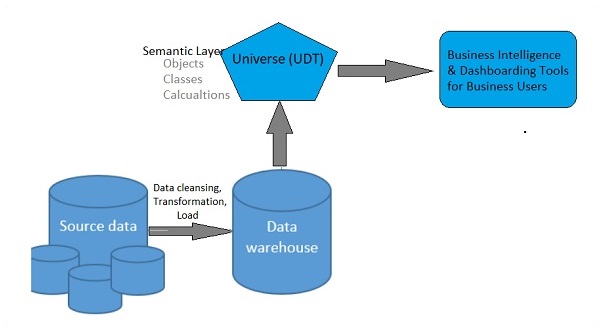
Universe as Semantic Layer
Universe provides a semantic layer between data warehouse and reporting tool to translate source database objects to objects relevant for business users. It can contain all aggregations for measure values, custom calculations, user prompts and filters, and other business rules relevant for reporting and dashboard requirements.
All tables and joins are applied at Universe level, and business users can simply drag objects in query panel to create BI reports.
Below diagram shows the use of Universe as Semantic layer in BI and DW environment −
SAP Universe Designer - Object Types
In a Universe, an object is derived from data in DW system. There are three types of objects used in a Universe as given below −
Dimension
Dimensions are parameters used for analysis and are also linked to hierarchies like time and geography. For example, Product, Customer, Time, Region, etc.
Detail
Detail provides more information about dimensions like Phone number, address, etc.
Measures
Measures are numerical values used in analysis and quantifies a dimension object. Examples include: Profit, Margin, Net Sales, Revenue, etc.
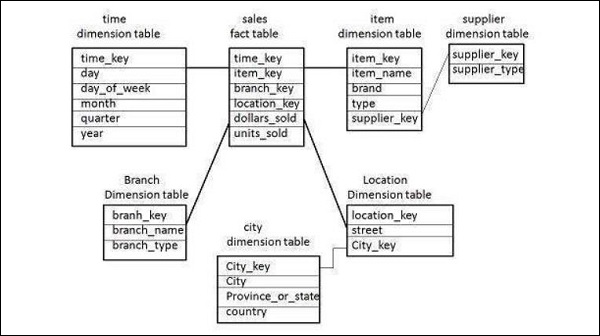
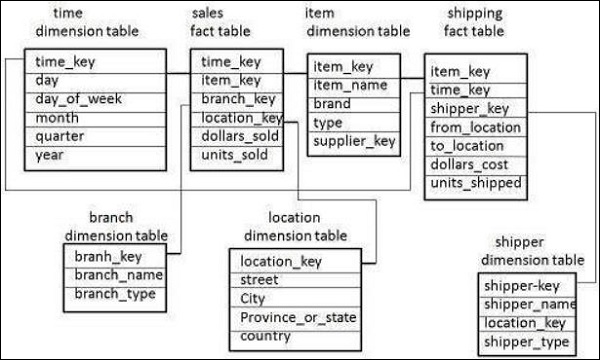
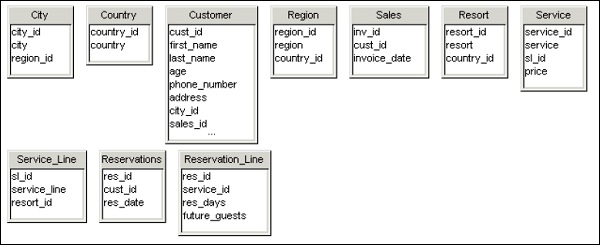
In the above schema, you can see different dimensions and measure values. Measure values are part of Sales fact table.
Schema in Universe designer are created based on tables and joins to return the data in BI report and dashboards. Business users do not see the schema objects, and these are only visible to Universe designers in UDT tool. Schemas are created in structure pane of Universe window in UD tool.
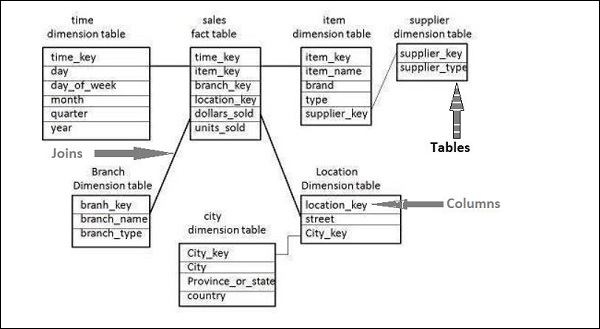
Here you see a schema with tables, joins and columns are used to build it.
SAP Universe Designer - User Interface
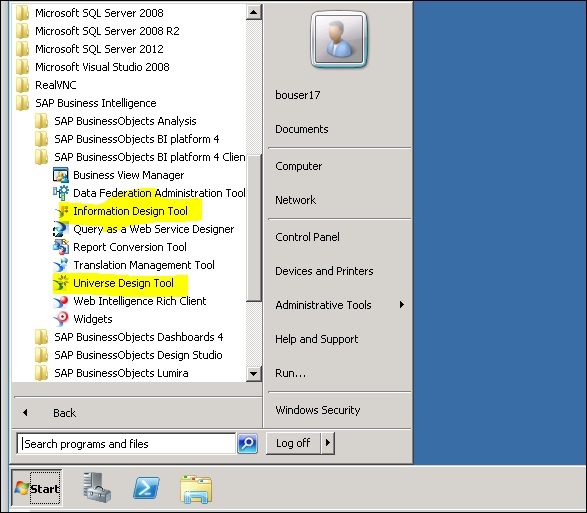
When you install BI client tools, Universe Designer is part of client tools and can be opened under SAP BusinessObjects BI Platform Client Tools → Universe Design Tool as shown in the below image −
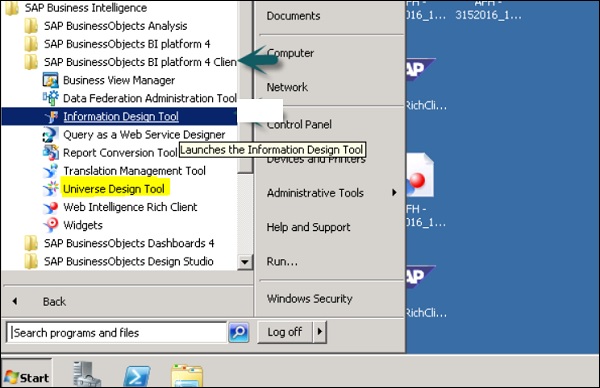
In above image, you can see Information Design Tool and Universe Design tool both available under SAP BusinessOBjects BI platform client tool. In older version of Business Objects, only UDT was available to design the universe. In BO4.0 or later, Information Design Tool was introduced to add universe created on multiple sources.

In the above image, you can see different options available under Universe Design tool user interface. It has both the "Universe" pane” containing objects and classes usually visible in Web Intelligence/Dashboard designer tool and the "Structure pane" which is only visible in Universe designer.
- Universe Pane
- Structure Pane
In Universe pane, you can further expand each of class to see objects created in it. These objects are named as per business requirement and easy to understand for business users.
In Structure pane, Universe designer drags table and join them to create a schema. This schema view is only visible to Universe Designers and not to business users.
To connect to a data source, connection wizard is used in UDT and you can create multiple connections in UDT however each universe is created using single connection.
Universe design tool provides a graphical interface that allows you to select and view tables in a database. The database tables are represented as table symbols in a schema diagram. You can use this interface to manipulate tables, create joins that link the tables, create alias tables, contexts, and solve loops in your schema.
The following schema types are supported:
- Star Schema
- Snowflakes schema
- Multiple Star schema
Universe are stored in CMS repository and user connects to universe using a web browser. When user connects to Universe, he can access all the data in a database.
Creating, Editing and Saving
A Universe Designer usually performs the following tasks −
Conducting user needs analysis
Designing and creating the Universe
Distributing the Universe
Maintaining the Universe
Let us see how you can create a Universe on a BEx query and publish in repository to be used for BI reporting. In the coming section, screenshots are included for easy understanding.
To create a new connection, click on File → New button.
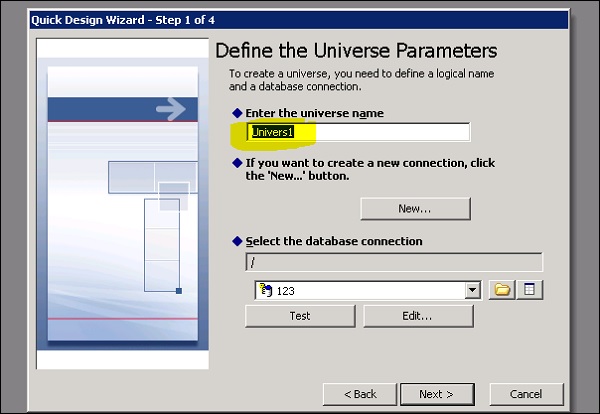
You have to enter the Universe name and click on Next button. You can also use an existing connection from repository using drop-down list.
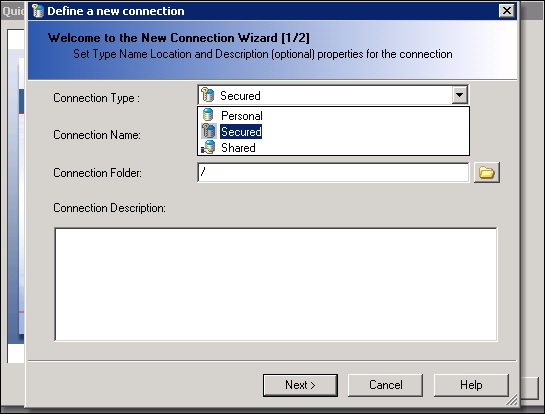
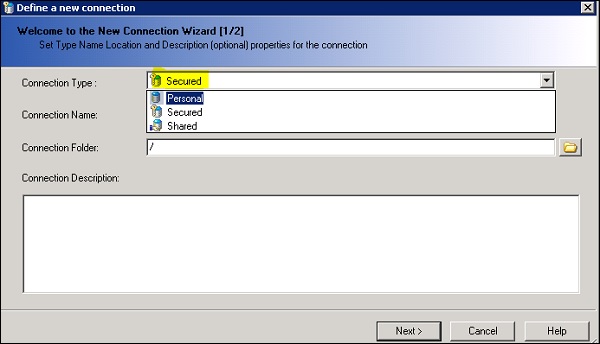
Next step is to select the connection type from drop down as secured and give a connection name and click Next.
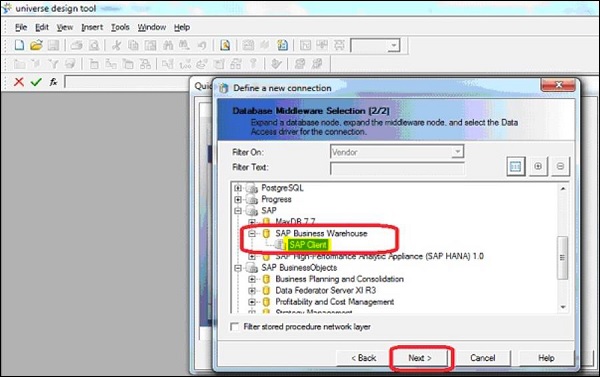
In the next window, select SAP Client → Next. In next window, you have to the enter authentication and BW system details as shown below −
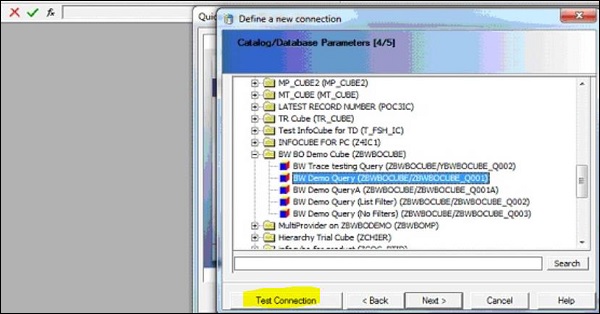
Select Bex query and click Next and Finish. You can also perform a Test Connection and once connection is successful, click on the Next button to complete Universe creation.
It will show number of objects, classes, filters created in Universe from Bex query.
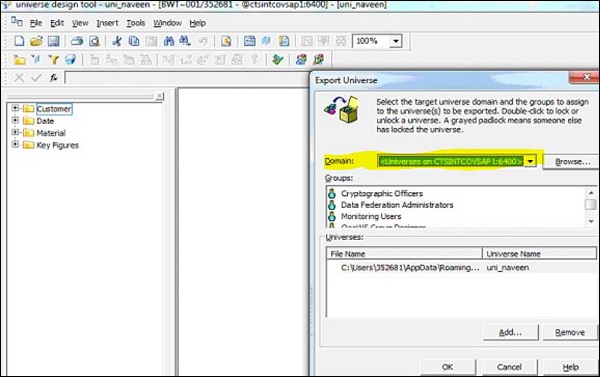
Once Universe is created, it has to be published to Repository. To publish universe, go to File → Export and select available domain from the list.
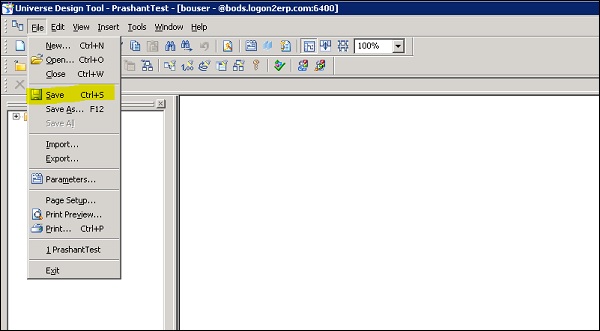
When Universe is created using a connection pointing to a database, you can create schema and click on Save button to save universe. Select File → Save and enter name for the universe file → Click Save.
Following are the parameters of Universe −
File name (8 characters) − This is used to refer Universe in Webi tool.
Long name (35 characters) − This is used by Web Intelligence users.
Description − This is used by Web Intelligence users.
Unique numeric ID − This number is assigned in CMS to identify Universe when it is first exported to CMS.
The following connection types are available −
Personal
Personal connections are not used to build and distribute universe in BO environment. They are unsecured connections and available to the creator and on computer which it is created.
Shared
Shared connections are unsecured connections and also used for data access to all users.
Secured
Secured connections are used to control data access and they are created using Universe design tool. You should use secured connection if you want to distribute Universe using CMS. You can also set a password on any Universe built on a personal or shared connection.
To set the password, navigate to Tools → Options → Save tab.
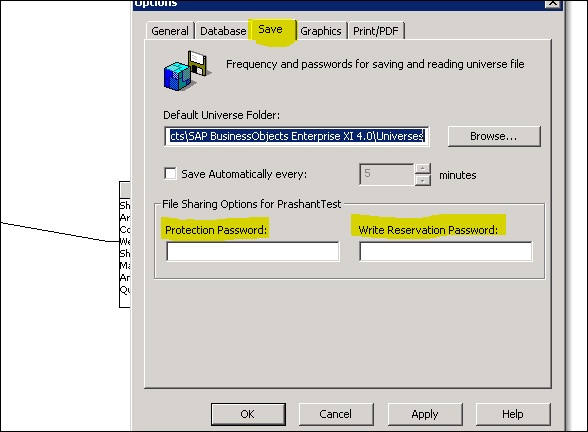
Enter the password in the Protection Password or the Write Reservation Password text boxes. You can enter up to 40 alphanumeric characters → OK.
SAP Universe Designer - Creating Parameters
Universe parameters define the Universe, database connection, query type and control that define use of system resources for Universe. Universe designers can edit parameter values any time.
Following parameters can be defined in a Universe −
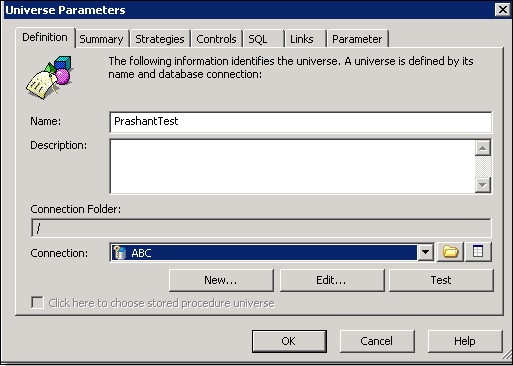
Definition − This includes Universe name, description, connection details and other information.
Summary Information − It maintains version information, statistics and comments added by Universe designer.
Strategies − This defines script to extract structural information from Universe.
Controls − This defines use of system resources.
SQL − This defines type of SQL queries end user can run in query pane.
Links − Define the settings for linked Universe.
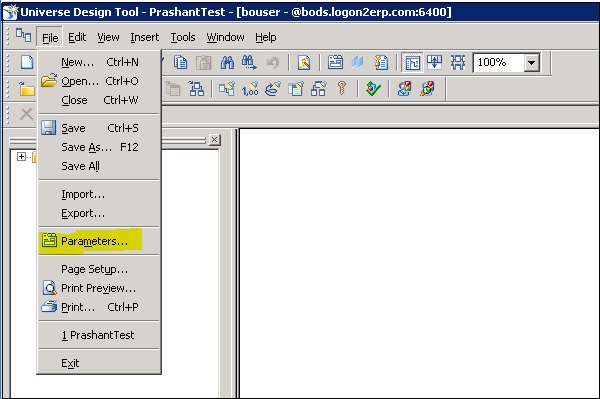
These parameters can be added by navigating to Parameter tab. Go to File → Parameters.
The summary page of a Universe contains the following information −
| Sr.No | Information & Description |
|---|---|
| 1 | Created Universe creation date and the name of the creator. |
| 2 | Modified Date of last modification and the name of the modifier. |
| 3 | Revision Revision number which indicates the number of times the universe has been exported to the CMS |
| 4 | Comments Information about universe for yourself or another designer. This information is only available in the universe design tool. You should include information about the universe for users in the Description field on the "Identification" page. |
| 5 | Statistics List of the number of classes, objects, tables, aliases, joins, contexts, and hierarchies contained in the universe. |
SAP Universe Designer - Creating Schemas
A graphical representation of tables and joins organized to create a database structure is known as schema. Table used in schema contains columns which are mapped to object names in Universe which are used by business users to create reports and analysis dashboards. Schemas are created in structure pane using tables from target database. Tables are added to schema using table browser.
A schema in structure pane usually looks as below −
Following stages are there in a schema design −
- Inserting tables and organizing
- Setting up table joins and cardinalities
- Fixing join issues: loops, chasm traps, and fan traps
- Performing integrating test of schema
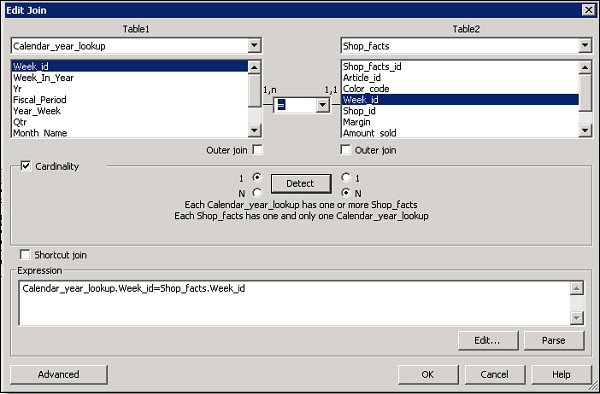
When you drag a table from table browser to Structure pane, you can see all columns and their data types. When you drag tables, you need to set up table joins and cardinalities.
You can select different join types and cardinalities based on data in both tables. You can also click on detect button to select cardinalities automatically.
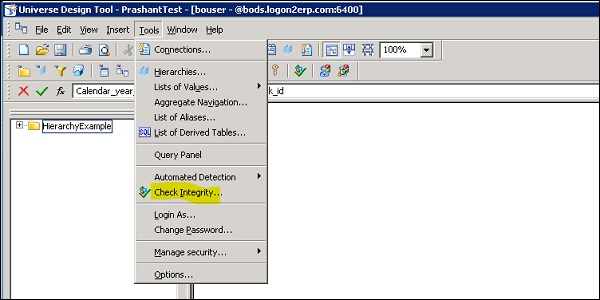
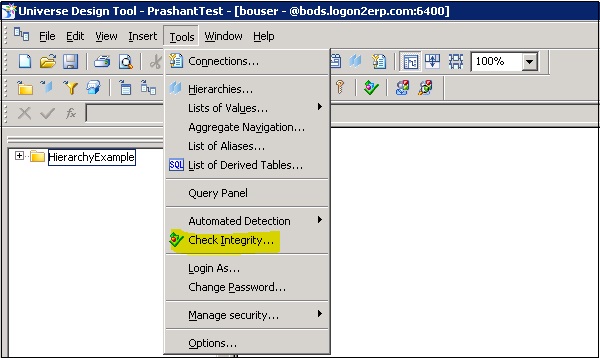
To perform an integrity check, click on Tools → Check Integrity.
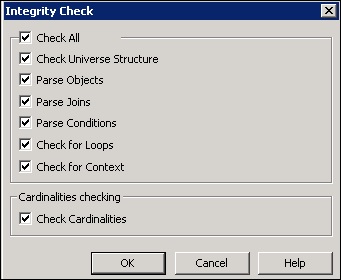
Once you click on check integrity, select all the options that you want to perform a check and click on OK.
SAP Universe Designer - Table Browser
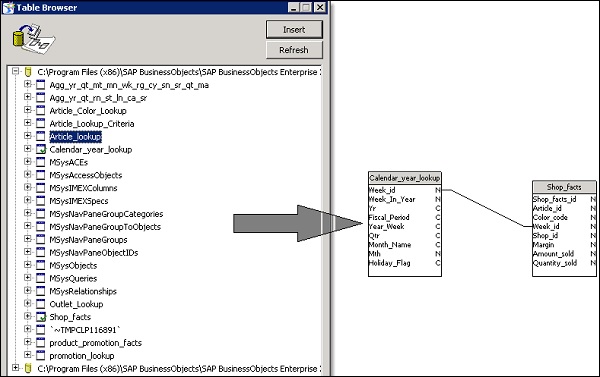
When you want to create schema using table browser, you can see existing view of tables and columns in target database. Using table browser, you can select tables in your database to add to schema. To view columns, you can click on expand button.
Table browser is not visible by default and you need to activate table browser using any of the options given below −
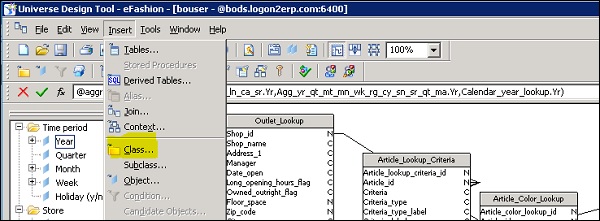
Select Insert → Tables as given in the following image −

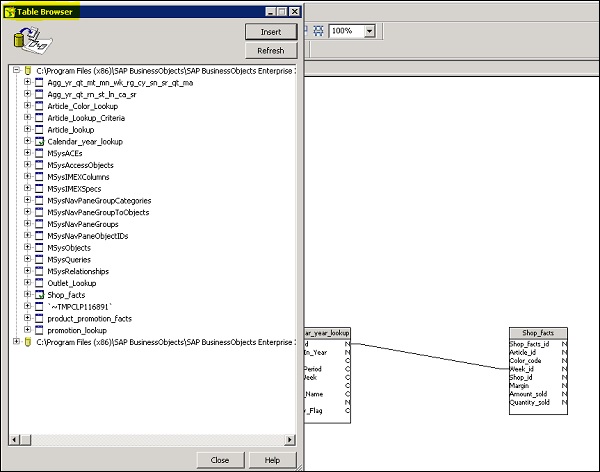
Alternately, you can click on empty space in structure pane as shown below −
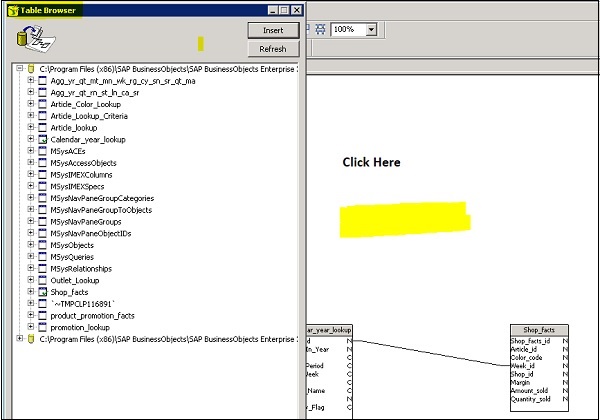
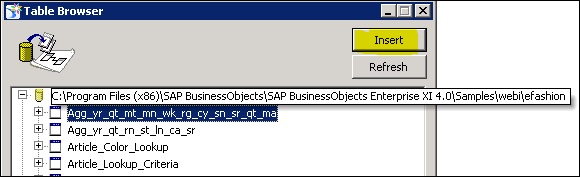
Or Click the Table Browser button. The "Table Browser" window appears in the "Structure" pane. Then, you can insert tables from table browser to Structure pane using any of the below methods −
Click a table and click the Insert button.
Or Right-click on a table and select Insert from the contextual menu
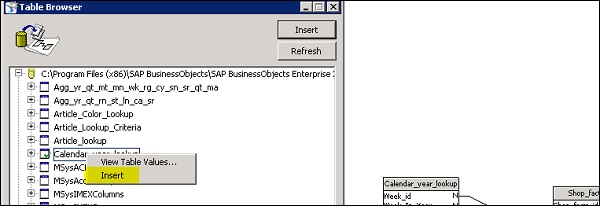
Or
Double-click a table.
Or
Click a table and drag it into the "Structure" pane and table appears in the "Structure" pane.
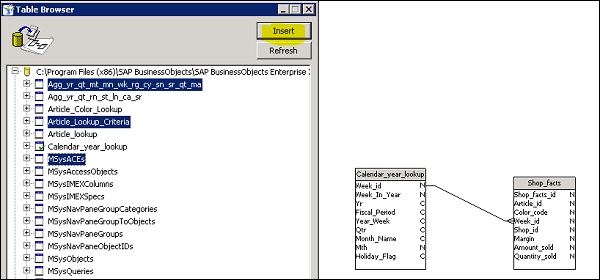
Inserting Multiple Tables
There are many ways to insert multiple tables. First is to hold down CTRL key while you click individual tables.
Second method is that you can also hold down SHIFT key while you click the first table and last table in a continuous block of tables and this will select multiple tables.
To view data from table browser, you can select View Table Values from the contextual menu.
Third way is to select View Column Values from the contextual menu.
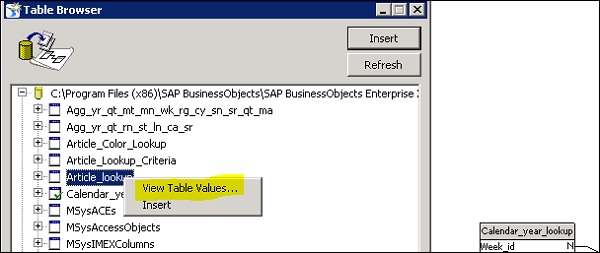
This will open box listing the data contained in the table or column −

Arranging Tables in the Structure Pane
You can also automatically arrange tables in structure pane. Navigate to View → Arrange Tables
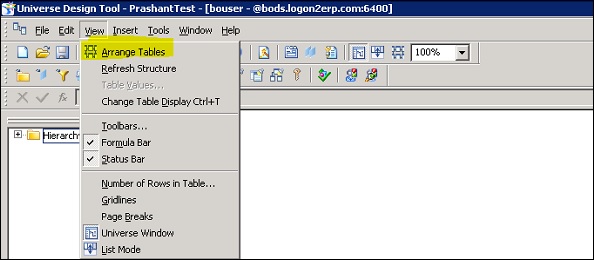
Once you select Arrange tables, this will organize tables in order as shown below −
SAP Universe Designer - Using Derived Tables
Using Derived table, you can limit the data returned from a table in Universe. Derived table are created based on SQL query at Universe level and can be used as logical table while creating Universe.
Following are the advantages of using Derived table in the Universe −
Derived tables can be used to perform complex calculations
They are used to reduce maintenance of database summary fields. Instead of using aggregate tables in Universe, you can use derived tables to return same data.
Adding a Derived Table to Universe
To add a derived table to Universe, navigate to Insert → Derived Tables.
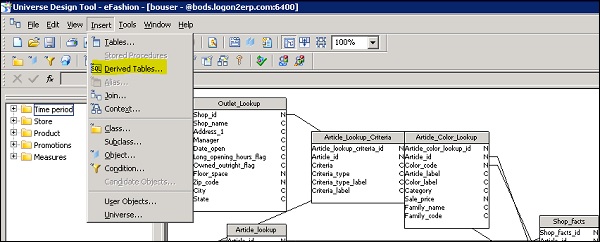
This will open Derived table dialog box. You need to enter Derived table name and SQL query to select data in derived table. You can also make use of tables and columns along with Operators and Functions to create expression for derived table.
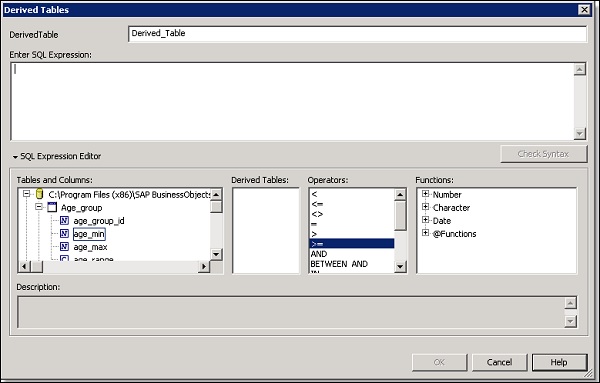
The derived table appears in the schema with the physical database tables and you can build the objects on derived tables.
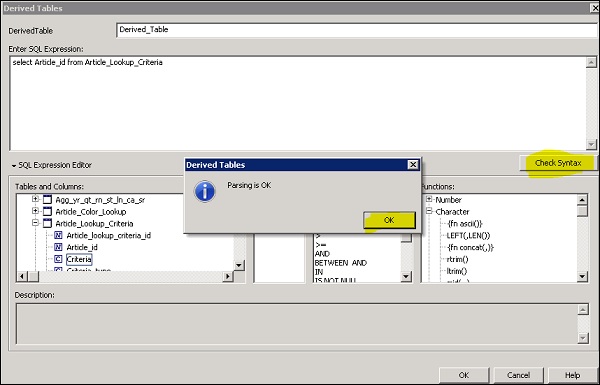
You can click on check syntax button to validate SQL Expression.
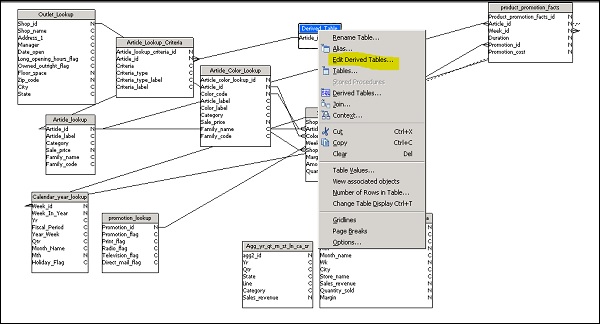
Editing a Derived Table
To edit a derived table, you need to right-click the table in UDT schema and select Edit Derived Table from the shortcut menu as given below −
Deleting a Derived Table
In Universe schema pane, select the derived table that you want to delete, and use delete key to delete the table.
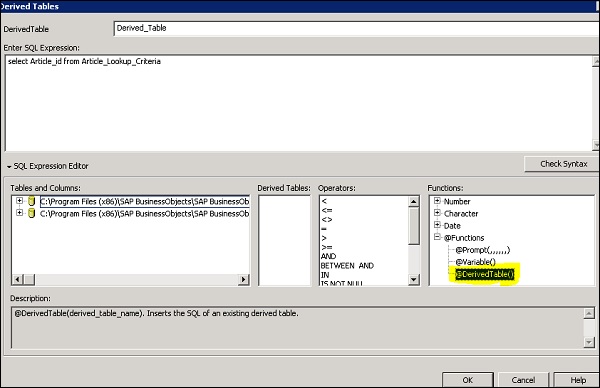
You can also create a nested derive table which is derived from an existing derive table. To create nested derived table, you need to enter SQL expression for the nested derived table based on a derived table. You can also make use of @DerivedTable function as a reference to the derived table in your nested derived table. This function @DerivedTable(Derived_table_name) is included in the functions catalog in the Derived Tables editor.
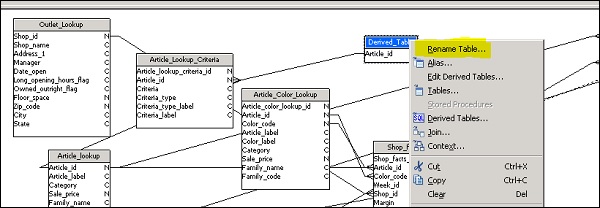
You can also rename a derived table, and new name is updated in all other derived tables that reference it. To rename, select Derived table and right click Rename Table.
SAP Universe Designer - Using Formula Bar
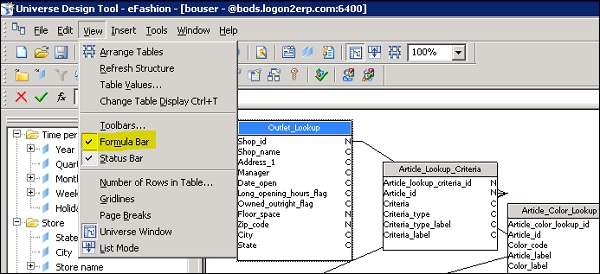
You can view formula bar by navigating View → Formula Bar. It is a text box above universe window and you can also see 3 buttons left to formula bar.
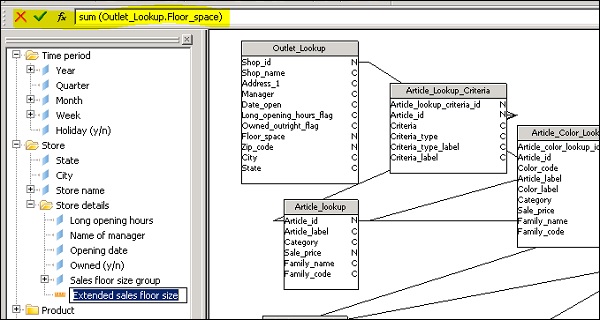
In formula bar, you can see formula or expression of any selected join in the "Structure" pane, or selected object in the "Universe" pane. To see the formula, select the object as shown below and you can see formula used.
Following edit buttons are placed to the left of formula bar −
 |
Cancel last modification that has not been validated. If you make several changes to a join expression without validating the changes, clicking Cancel returns the expression to its original state. If you want to undo any individual modifications, you should use the Edit > Undo option, or click Undo. |
 |
Validate expression. This applies any changes to the join expression. You can undo changes after validation use the Edit > Undo option, or click Undo. |
 |
Open Edit Join dialog box for selected join. |
You can modify a join using the "Formula Bar" by following below steps −
Click a join that you want to edit. The formula for the join appears in the "Formula Bar".
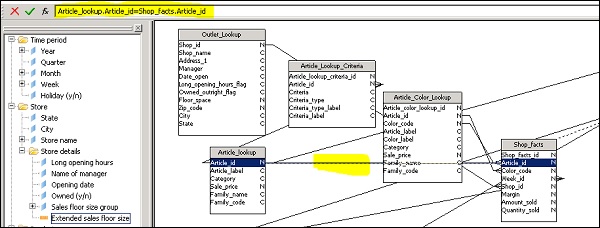
You can modify the expression as required and to apply change, click on validate to apply the changes.
SAP Universe Designer - Universe Building
To build a universe, you need to organize objects and classes in Universe. Universe pane presents a hierarchical view of the classes and objects in the active universe. In UDT, you can use "Universe pane" to view, create, edit, and organize classes and objects.
You can cut, copy, or paste objects in Universe pane. Also, it is possible to hide one or more components in the Universe Pane. These are hidden from Web Intelligence users, but remain visible in the universe design tool.
To hide an object in Universe pane, click on show/hide button.
Creating a class in Universe pane −
There are two ways to create a class in the Universe pane −
You can define a class manually.
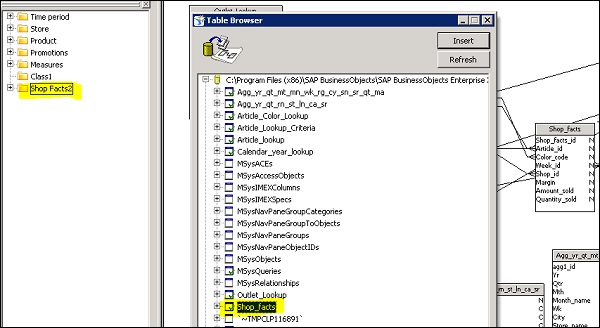
You can drag table from the table browser into the Universe pane and this will create class automatically.
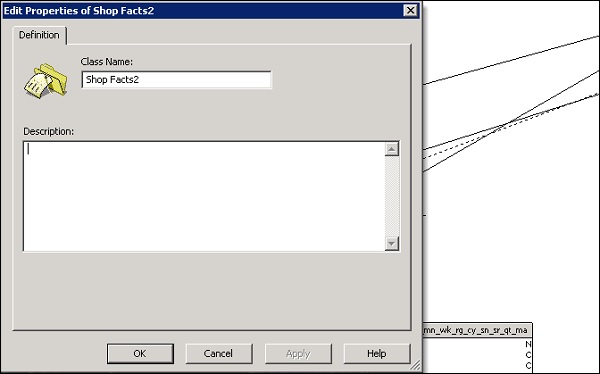
To create class manually, go to Insert → Class and enter the name of class and description −
To create classes using table browser, select the table in the table schema and dragging it into the Universe pane. By default, it takes table name as the class name.
Following properties of a class are defined −
| Name | Can contain special characters. Must be unique in universe. A class name is case sensitive. You can rename a class at any time. |
| Description | Comment that describes a class. This description can be viewed by users in the Query pane. Information in this field should be expressed in the business language of the user, and be relevant to their query needs. You create a line break by pressing CTRL + Return. |
Creating an Object in Universe Pane
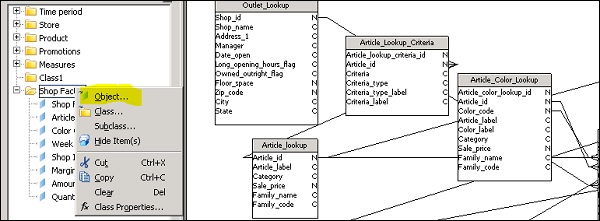
You can also create an object manually inside a class manually. To create an object manually, follow the steps given below −
Right click a class in the Universe pane and select Insert Object. This will insert an object under the selected class and the Edit Properties box for the object appears.
Enter the name of object in name and you need to mention object names are defined as per understanding of business users. It may be different from the actual column names in database schema.
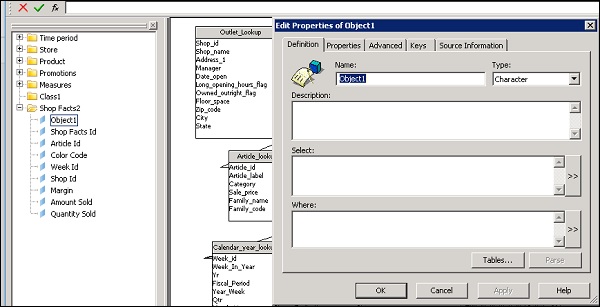
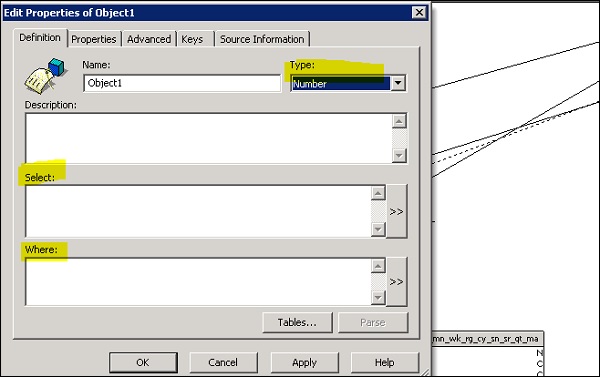
Select the object type − char or num or other type. To define an object, enter a select statement in the Select box → OK.
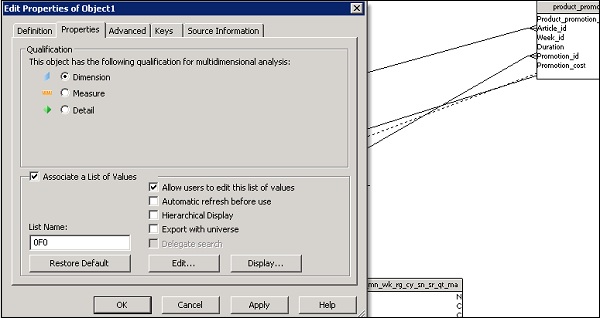
You can also define if the object is a dimension, measure or detail. To do this, navigate to Properties tab under Object Properties. You can also use object as List of values.
You can also edit an object definition. Double click an object → This will open edit Properties dialog box opens to the Definition page.
Make changes to object definition as per requirement and click OK.
You can define an object as given below −
- Dimension
- Measure
- Detail
Following are most common aggregate functions used for measures −
- Sum
- Average
- Count
- Minimum
- Maximum
Defining Hierarchies in Universe −
You can use default hierarchies in Universe Design tool and they are displayed as objects and classes in Universe pane. You can also create customized hierarchies using objects from different classes. New hierarchies are defined in Hierarchy editor.
To create new hierarchy, navigate to Tools → Hierarchies.
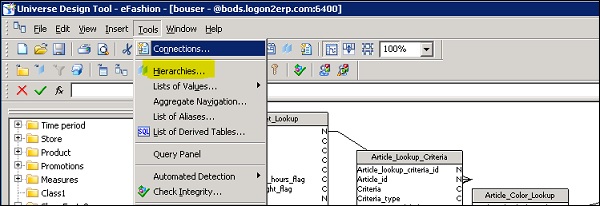
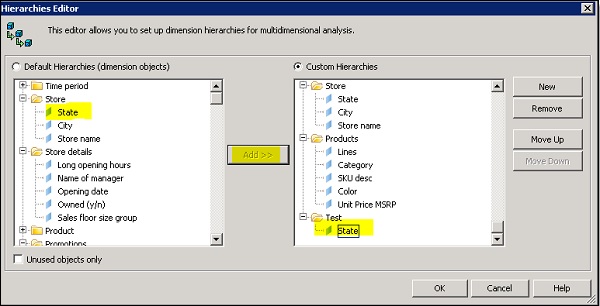
This will open Hierarchy editor. To create new hierarchy, click on New button and enter the name of hierarchy. Add objects to custom hierarchies.
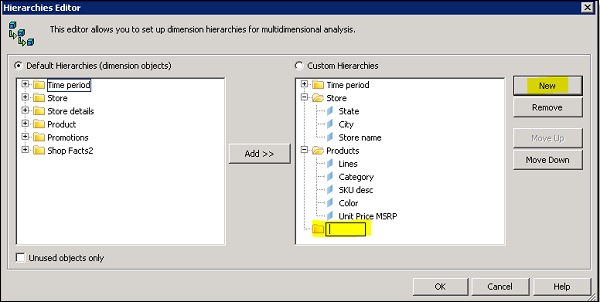
To select a series of dimensions, hold down CTRL and click each dimension. One or more dimensions are highlighted → Add button and you can see one or more dimensions appear in the right pane, under the selected hierarchy.
SAP Universe Designer - List of Values (LOVs)
Using LOVs in Universe, you can allow business users to select associated value with an object while running reports. LOVs take values from database and they are displayed when a designer selects to show list of values for object in Universe.
Follow the below steps to define LOVs for an object −
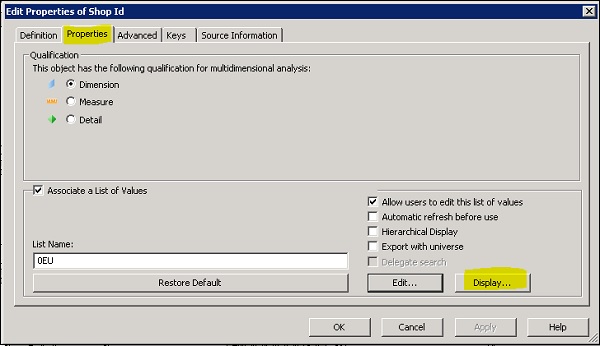
Double click on an object in Universe pane and this will open edit properties dialog box. Go to Properties tab. Select or clear check boxes in the list of values group box at the bottom of the page.
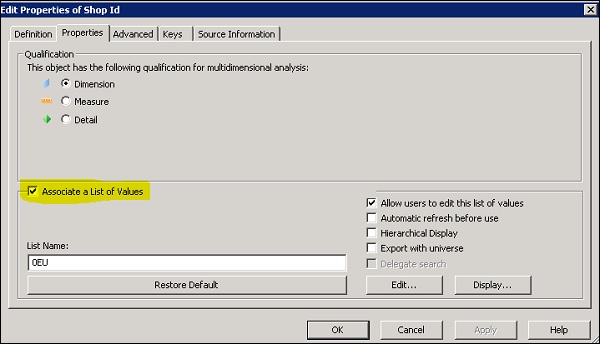
Enter the name for the associated .LOV file in the List Name box as shown in above snapshot. You can also use edit option to define restrictions on the list values. Use query pane to create a query on the list data.
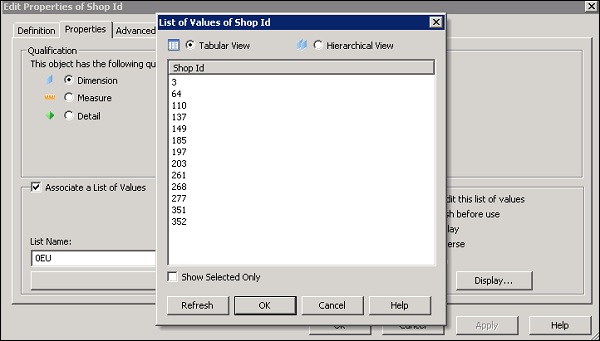
To view list of values associated with an object, double click on an object and navigate to Properties tab. To see values, click on Display tab. You can see table or hierarchical view of associated list of values.
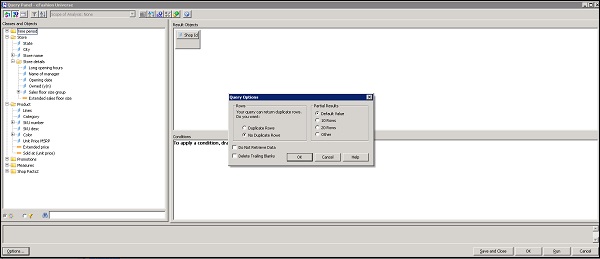
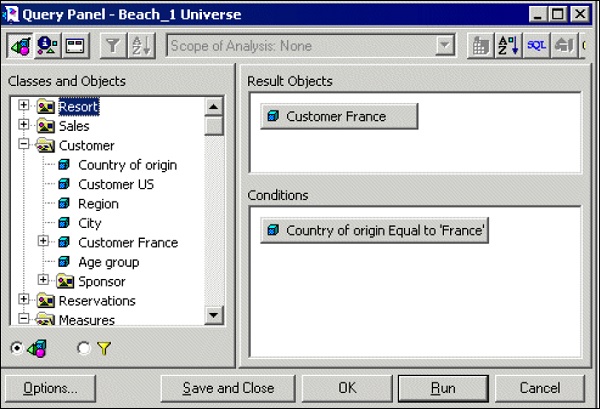
You can also set a condition to LOVs using the below steps −
In query pane, drag an object that you want to serve as a condition on the list of values for the active object over to the Conditions pane and double click the operator in the Operators pane. Double click an operand in the Operand pane → Select or type values as required.
SAP Universe Designer - OLAP Data Sources
You can also create a Universe on top of an OLAP cube or query. When a connection is selected pointing to an OLAP cube, it creates a Universe automatically. Connection to an OALP data source can be created using connection wizard.
Following OLAP data sources can be used to create OLAP Universe automatically −
- SAP Business Warehouse
- Microsoft Analysis Service MSAS
- Hyperion Essbase
While using SAP BW as an OLAP data source for Universe creation, you can create Universe directly on an Info Cube, Bex or on an info Provider. You can use standard and transactional info cubes to create OLAP Universe or you can also use virtual info cubes.
In an OLAP Universe built on SAP BW data source, different Universe features are supported. Below table lists common supported features −
| Characteristics (incl. Time and Unit) | InfoCube/BEx Query |
| Hierarchies | InfoCube/BEx Query |
| Basic Key Figures | InfoCube/BEx Query |
| Navigational Attributes | BEx Query only |
| Display Attributes | InfoCube/BEx Query |
| Calculated Key Figures / Formulas | BEx Query only |
| Restricted Key Figures | BEx Query only |
| Custom Structures | BEx Query only |
| Variables | BEx Query only |
You can see Bex queries supported more Universe features as compared to InfoCube and InfoCube requires more effort to customize Universe.
While using MSAS as data source, you can see features supported in an OLAP Universe in the below table −
| Cube | Supported |
| Local cube | Supported |
| Virtual cube (MSAS 2000) | Supported |
| Perspective (MSAS 2005) | Supported |
| Dimensions | Supported |
| Virtual dimensions (MSAS 2000) | Supported |
| Hierarchies | Supported |
| Levels | Supported |
| Level Property | Supported |
| Attributes (MSAS 2005) | Supported |
| Measures | Supported |
| Measure group (MSAS 2005) | Supported |
| Calculated measures | Supported |
| Display folder (MSAS 2005) | Supported |
| KPI (MSAS 2005) | Not Supported |
While using Hyperion Essbase as data source, you can see features supported in an OLAP Universe in the below table −
| Block storage mode | Supported |
| Aggregate storage mode | Supported |
| Hybrid mode | Not Supported |
| Alias tables | Supported |
| Dimensions | Supported |
| Attribute dimensions | Supported |
| Duplicate members | Supported |
| Generations | Supported |
| Levels | Not Supported |
| User Define Attributes (UDA) | Not Supported |
| Dynamic Time Series (DTS) | Not Supported |
| Essbase Integration Services (EIS) Drill-through | Not Supported |
| Substitution variables | Not Supported |
| Linked partitions | Not Supported |
Using Connection Wizard
You can open connection wizard by clicking on New button in the New Universe creation page or you can navigate to Tools → Connections. Click Add in the "Wizard Connection" dialog box.
In the next window, you need to select Connection Type. The following connection types are supported by SAP Universe −
- Secured
- Shared
- Personal
| Connection Type | Select Secured for controlled access to the connection (recommended). Select Shared to allow uncontrolled access to the connection to all users. Select Personal to restrict access to the universe creator. You can use personal connections to access personal data on a local machine only. |
When you click on Next button → You can see the list of available data access drivers.
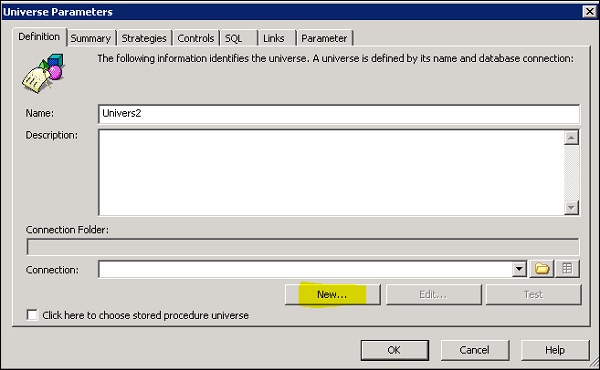
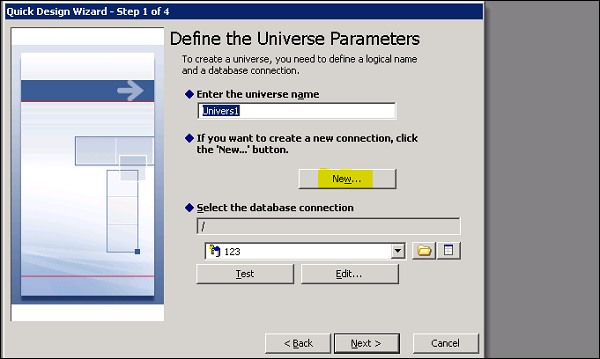
You can also launch connection wizard from Quick Design wizard. Click on Begin button as shown below and it will take you to Define Universe parameter window.

To open connection wizard, click on New button.
You can also check connection properties of an existing connection. Connection properties window of a connection shows the below fields −
- General
- Login Parameters
- Configuration Parameters
- Custom Parameters
- Rights
Creating Calculated Measures
You can also create calculated measures in OLAP Universes built on OLAP data sources. Following OLAP data sources only support calculated measures −
- SAP Business Warehouse (BW)
- MSAS 2000 and 2005
Syntax for calculated measure is shown below −
<EXPRESSION></EXPRESSION>
In UDT, you can use following functions to be used in calculated measure expression −
- @Prompt
- @Select
- @Variable
- @Where
To create an OLAP Universe, use the following steps −
In UDT, open an OLAP Universe and insert a new measure object in the Universe.
Next is to pass the object definition as an XML/MDX expression in Where condition.
Click Parse to review the object definition and fix any errors → OK to save the object definition.
To perform an integrity check, navigate to Tools → Check Integrity. The integrity check validates the XML syntax and any Universe design tool @FUNCTIONS.
SAP Universe Designer - Aggregate Awareness
In UDT, you have an option to run query against the aggregated tables in database. A condition can be set, and that query will run against aggregated tables for query optimization. This method of using aggregated tables is known as aggregate awareness.
To use aggregate awareness in Universe, you can use a function called @Aggregate_Aware in “Select” statement for an object that directs a query to be run against aggregate tables rather than a table containing non aggregated data.
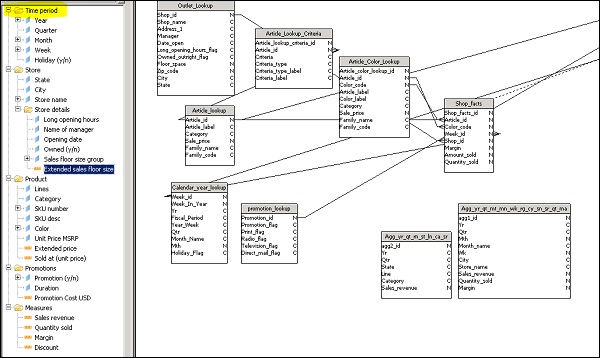
To use aggregate awareness in a Universe, you need to arrange objects by aggregation level and objects are built using @aggregate_awareness function. To build aggregated aware objects, you need to first identify the objects: measure or dimension objects. You need to find out all possible combinations of aggregate objects in all tables and then arrange them in aggregate level order.
For example −
- AAYEAR.Profit is the highest level of aggregation.
- AAQTR.Profit is the next level.
- AAMONTH.Profit is the lowest level of aggregation.
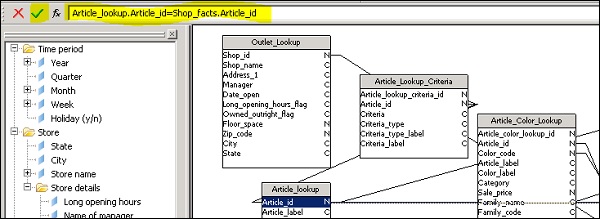
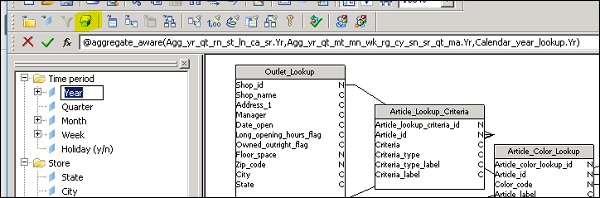
Using @aggregate_aware function directs an object to query all aggregate tables as its parameters. You can see an object using @aggregate_aware function in “Select” statement −
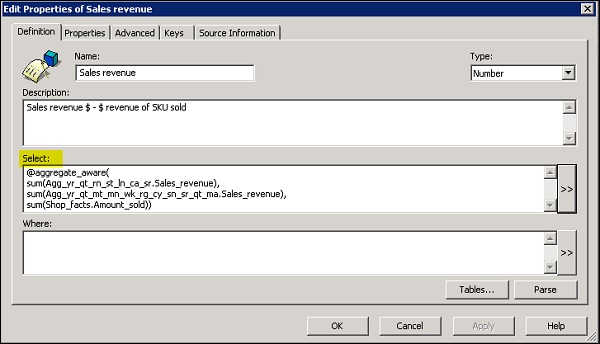
The syntax to be used for aggregate_aware function is as follows −
@Aggregate_Aware(sum(agg_table_1), ... sum(agg_table_n))
Pass the names of all aggregated tables as arguments. Agg_table_1 is aggregate with highest level of aggregation and agg_table_n is aggregate with lowest level of aggregation.
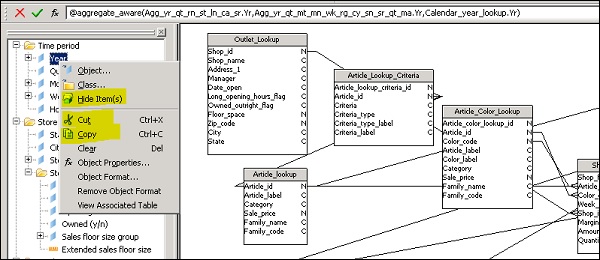
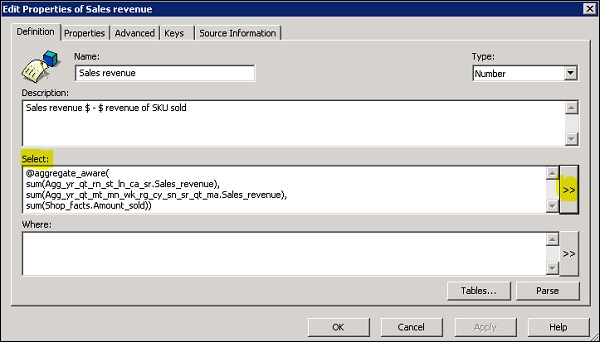
Defining an Object using @aggregate_aware Function
Open edit properties dialog box for the object → Click “>>” button next to the dialog box.
In the "Edit Select Statement" dialog box, you need to click at the beginning of the SELECT statement.
Alternately, click anywhere in the select box if the object does not have a SELECT statement.
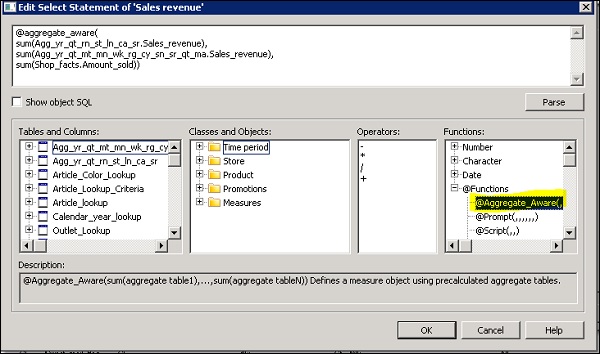
You can see @aggregate_aware function under list of functions on right side. As per description of this function: “@Aggregate_Aware(sum(aggregate table1),...,sum(aggregate tableN)) Defines a measure object using precalculated aggregate tables”.
SAP Universe Designer - Deploying Universe
When a universe is deployed, you make it available to Web intelligence users for reporting. Universe are deployed when they are exported to CMS repository. When a Universe is exported to CMS repository, a unique system identifier is assigned by the CMS.
To make Universe available to all designers, you have to check if the Universe is not built on a secured connection. Secured connections are used to export Universe to CMS repository.
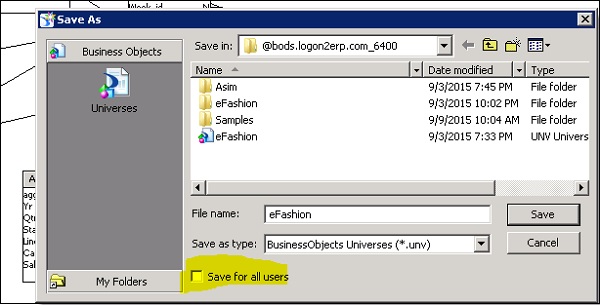
To save Universe for all users, go to File → Save As or use F12.
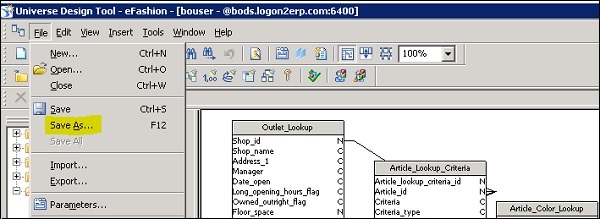
Select the Save For All Users check box → Click OK.
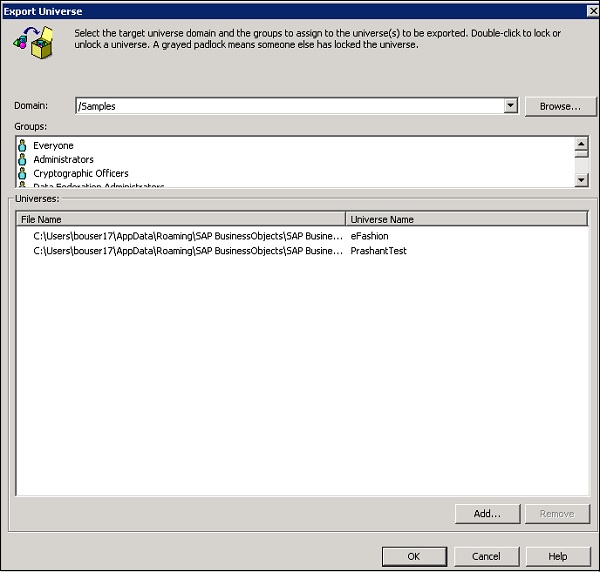
To export a Universe, go to File → Export. You need to select the target Universe domain and a group. If someone else is using Universe, it will be showed as greyed locked. You can double click to lock/unlock a Universe.
Managing Access of Universe
You can manage Universe security either in CSM repository or in Universe level. For Universe in CMS, you can define users who can edit and delete based on access rights assigned to their user group. At the Universe level, you can define users who are allowed to use a particular Universe.
The following security level is applied −
| CMS | From the Central Management Console you can set restrictions that apply to universes stored in a CMS. You can set what universes users can access, and depending on the rights defined for a user group, you can restrict viewing, editing, deleting, and other actions in a universe. This guide does not cover setting restrictions at the CMS level, see the BusinessObjects Enterprise Administrator's Guide for information on using the Central Management System. |
| Universe | You can define restrictions for users allowed to use a universe. A restriction can include object access, row access, query and SQL generation controls, and connection controls. This guide de-scribes the types of restrictions you can define on a universe. |
Access to Universe are managed using restrictions and you can apply multiple restrictions to single dashboard. You can also edit and delete restrictions as per access requirement. The following restrictions can be used −
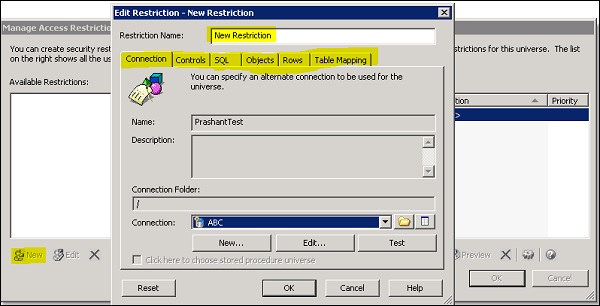
Connection − You can provide an option to use an alternate connection to data source.
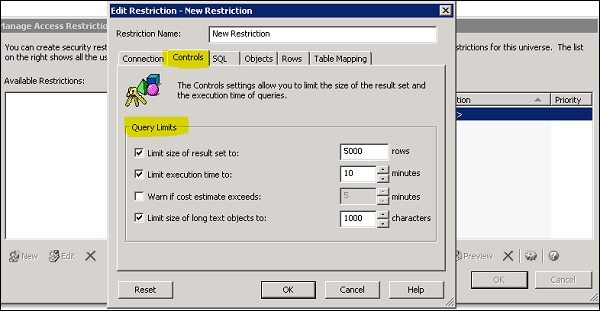
Query Controls − This restriction can be used to limit the size of result and execution time of the query.
Access to Rows − With the use of Where clause, you can limit the result set returned and access the rows.
SQL Generation Options − This is used to control generated SQL from query.
Referencing Different Table − You can set a restriction to replace a table with another table in database.
Object Access − This restriction is used to allow users to select objects which are not used in the Universe.
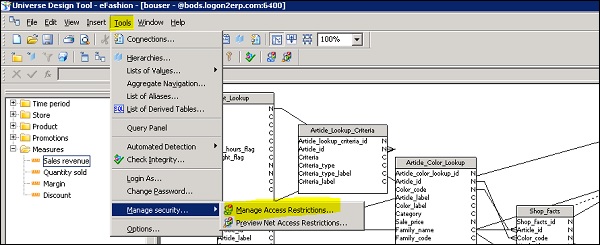
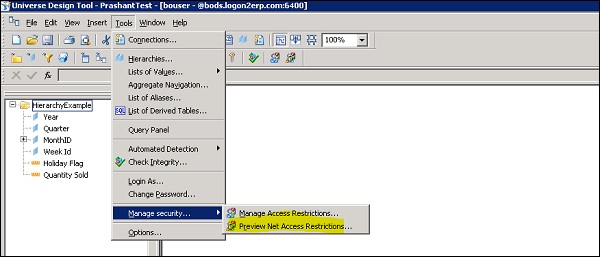
To manage access restrictions, navigation to Tools → Manage Security → Manage Access Restrictions. The dialog box appears.
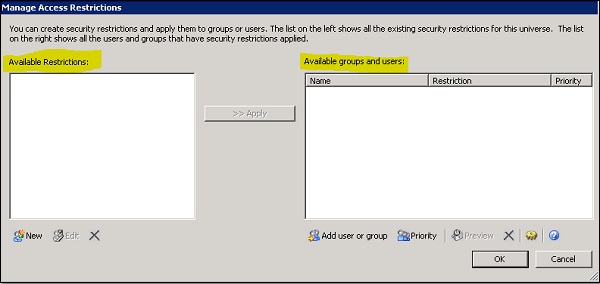
The current restrictions which are applied to Universe are available under available restrictions column. You can find users and user groups that are defined for each restriction under Available Groups and Users pane.
Note − Restrictions can only be applied to Universe which are exported to CMS repository.
To add a user or group, click on add user or group button. In next window, you can see list of all available groups/users that can be added to restrictions.

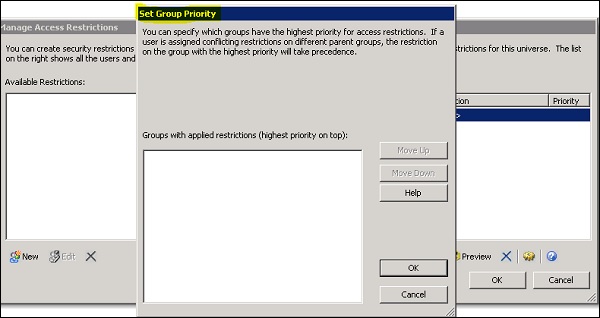
You can also define groups with highest priority of restrictions. Click on Priority button and restriction on group name with highest priority will take precedence.
To create new restrictions, click on New button on left side. This will open Edit restriction dialog box. You have to enter the restriction name and you can see all restriction control tabs below.
From each tab, you can select different restriction types as mentioned above. For example, control settings allow you to limit the size of result set and the execution time of the query.
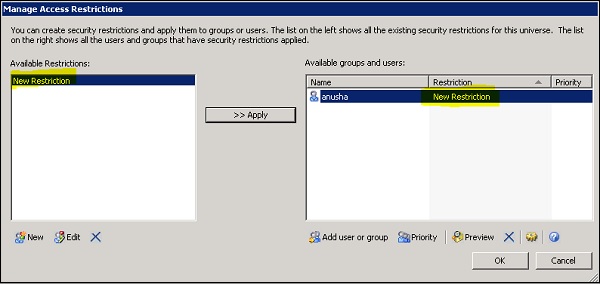
Once you create new restrictions, you can apply to selected user and group. To apply a restriction, select it in left pane and use “Apply” button → to apply on user in right window. Once restriction is applied, it will show restriction name in the right pane.
SAP Universe Designer - User and Groups
In the Universe design tool, the access to users and groups are managed using restrictions. To view restrictions for all Universe users and groups, navigate to Tools → Preview Security Restrictions and this will open preview users and groups dialog box.
UDT vs. IDT Comparison
Both Universe Design tool and Information Design tool are a part of SAP BusinessObjects client tool. In older version of SAP BusinessObjects BOXI R3, BOXI R2, UDT was only tool to create semantic layer between database and reporting tool.
In BO 4.0, IDT was first introduced that allows the use of multisource enabled Universe for reporting. Prior to IDT, the only option to create multisource enabled Universe was the use of linked Universe. Linked Universes are used to share common components such as parameters, classes, objects, or joins from different data sources. From BO 4.x, both IDT and UDT are part of SAP BusinessObjecs client tools.
Key differences between UDT and IDT
In UDT, Universe are created with file extension as .unv. In IDT, Universe file extension is changed to .unx file. To open unv file in IDT, it cannot be directly opened, however, you can convert unv file to unx file to open in Information Design tool. You cannot open an IDT .unx file in Universe Design tool and cannot convert it to unv file.
Universe Design tool is single source enabled. IDT is multi source enabled which means the data can be extracted from different data sources while creating a Universe.
| Universe Design Tool (UDT) | Information Design Tool (IDT) |
|---|---|
| Universe file extension - .unv | Universe file extension - .unx |
| You can't open .unx file and also it can't be converted to unv to open in UDT | You can open unv file by converting unv file to unx file extension |
| It is single source enabled | It is multisource enabled |
| It can't be directly connected to Dashboard designer and Crystal Reports latest version | It can be directly connected to Dashboard designer and Crystal Reports latest version |
SAP Universe Designer - unv File to unx File
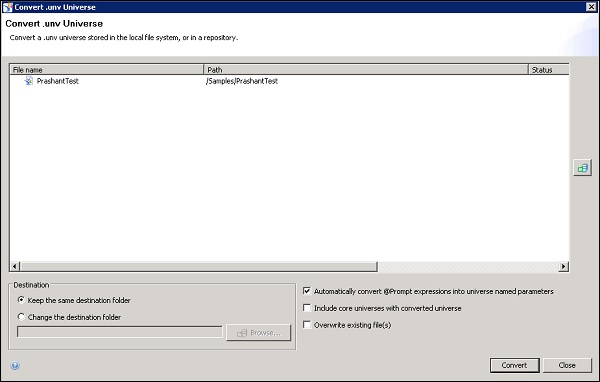
To convert a unv file to unx file, you can use Upgrade Management tool UMT or it can be directly performed in IDT. First login to Information Design tool, and go to File → Convert .unv Universe.
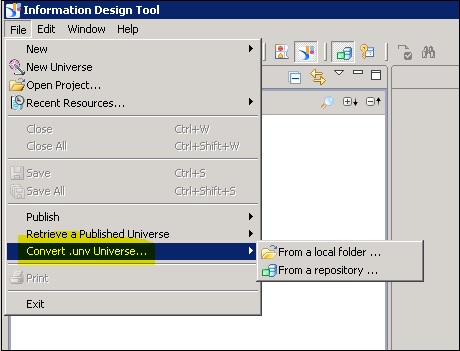
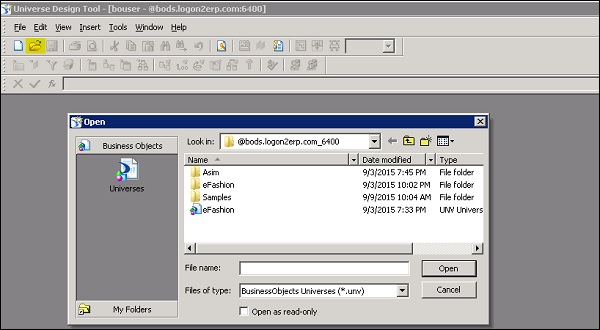
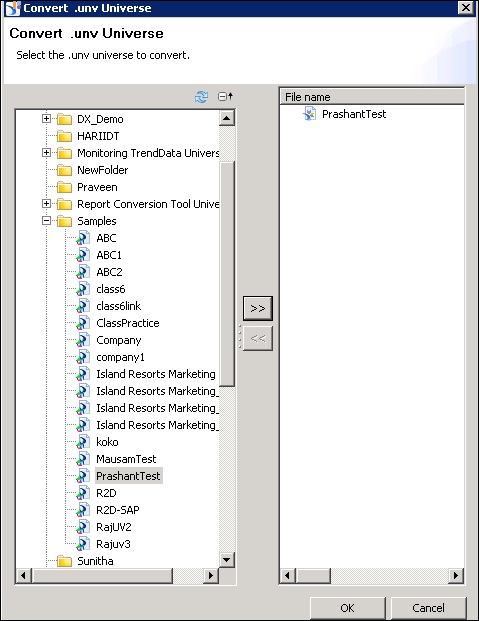
You can select unv file saved in repository or on local folder. Once you connect to BO repository, you can find all Universe published to repository in the left pane.
In the next window, you have an option to select conversion parameters. Select the available checkboxes which are suitable as per requirement → Convert button.
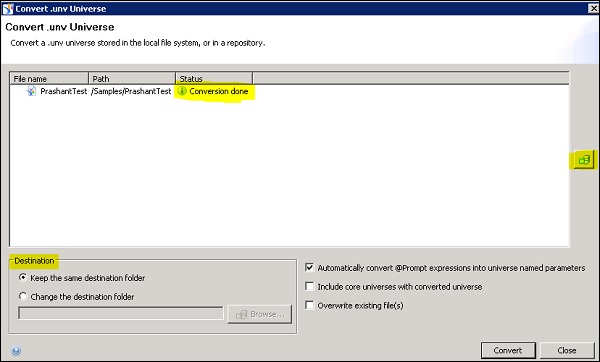
Once conversion is done, under status column, you find “conversion done” message. You can also change the destination folder to save .unx file under Destination field. To select another Universe from repository for conversion, you can click on Universe icon located at the right side as shown below −
SAP Universe Designer - Job Responsibilities
A Universe Designer is normally responsible for the following tasks −
- Conducting user requirement analysis.
- Designing and creating semantic layer based on requirement analysis.
- Distributing and maintaining the Universe.
- Managing objects in BusinessObjects Repository.
- Experience working on UDT and IDT tool.
- Database knowledge: SQL, Joins, Cardinality and other DB concepts.