- SAP Scripts Tutorial
- SAP Scripts - Home
- SAP Scripts - Overview
- SAP Scripts - Smart Forms
- SAP Scripts - Form Painter
- SAP Scripts - Layout Set
- SAP Scripts - Print Program
- SAP Scripts - Creating a Window
- SAP Scripts - Output Area
- SAP Scripts - Text Module
- SAP Scripts - Grouping Text
- SAP Scripts - Format Options
- SAP Scripts - Output Types
- SAP Scripts - Control Print Output
- SAP Scripts - Data Formats
- SAP Scripts - Export
- SAP Scripts - Import
- SAP Scripts - Control Tables
- SAP Scripts - Text & Graphics
- SAP Scripts - Control Commands
- SAP Scripts - Copy Scripts
- SAP Scripts - Standard Text
- SAP Scripts - Word Processing
- SAP Scripts - Create a Document
- SAP Scripts - Update a Document
- SAP Scripts - Find a Document
- SAP Scripts - Save a Document
- SAP Scripts - Delete a Document
- Print Preview of a Document
- SAP Scripts - Format Conversion
- SAP Scripts - Raw Data Interface
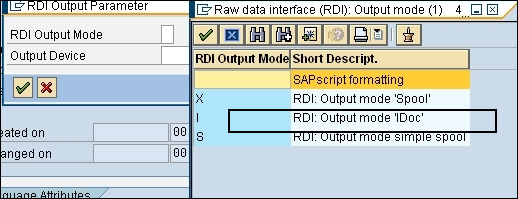
- SAP Scripts - Output Mode Spool
- SAP Scripts - Output Mode IDOC
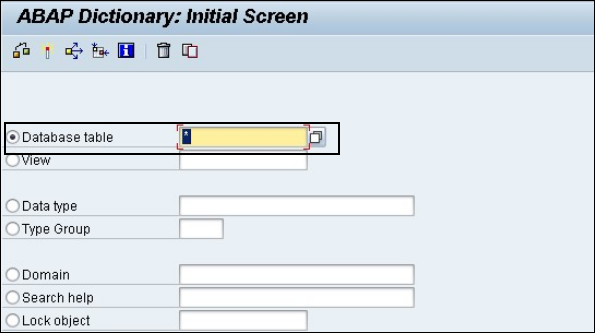
- Create a Script in the System
- SAP Scripts Useful Resources
- SAP Scripts - Quick Guide
- SAP Scripts - Useful Resources
- SAP Scripts - Discussion
SAP Scripts - Quick Guide
SAP Scripts - Overview
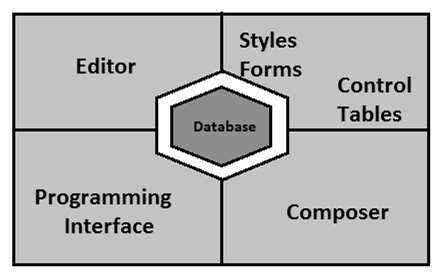
SAP Scripts is used to generate formatted documents and for external purposes to print and transfer business documents. Formatted document contains logos, tables, and other formatting objects. You can print preformatted text in forms which are not possible with normal ABAP codes.
SAP Script consists of the following components −
An Editor for entering and editing the lines of text that is called by application transaction automatically.
An Invisible Composer to prepare a text from an output device and provide different formatting options for printing.
To include Script components to your application program, it contains a Programming Interface.
Use Maintenance transactions to create styles and forms for print layout.
A Central Database to store texts, forms, and other styles for printing format.
When a print program is executed, it retrieves the data from the form and database and prints the output.
The following image shows the key components of SAP Scripting as mentioned above.
To design a script, use Transaction code - SE71
Type the Transaction code in SAP Easy access and the following screen opens.
Enter the name of the program and click the save button to save it.
Create paragraphs, page, and windows, and assign the windows to the element. Create the script and create a report to call the script.
SAP Scripts - Smart Forms
SAP Smart Forms have been introduced by SAP to enhance the capabilities and key features over SAP Scripts. In Smart Forms, you need minimum coding when you compare it with SAP Scripts.
SAP recommends to replace SAP Script by Smart Forms as smart forms provide various advantages over Scripting.
Following are the key differences between SAP Scripts and Smart Forms −
You can create multiple page formats in smart forms which is not possible in case of SAP scripts. All pages follow the same format in SAP script.
You cannot create labels in smart forms.
A smart form can be created without a window.
When you activate a smart form, it generates a functional module. You can also create background graphics using smart forms. However, it is not possible using SAP Scripts.
Maintenance cost is low for smart forms and it is heavy for SAP Scripts.
Less time is required to generate smart forms as compared to SAP Scripts.
Smart forms support web publishing in XML format. However, it is not supported in SAP Script. Smart forms generates XML output, which can be viewed through the web.
SAP Scripts - Form Painter
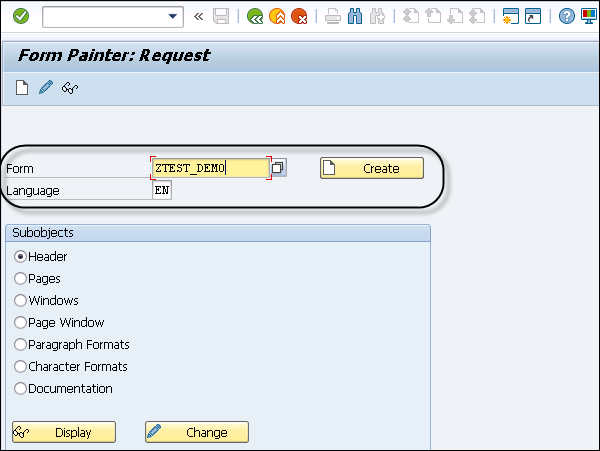
The Form Painter tool provides the graphical layout of a SAPscript form and various functionalities to manipulate the form. In the following example, we will create an invoice form after copying its layout structure from a standard SAPscript form RVINVOICE01, and display its layout by accessing the Form Painter tool.
Open the Form Painter. You may request the screen either by navigating the SAP menu or by using the SE71 Transaction code.
Step 1 − In the Form Painter, request screen, enter a name and language for a SAPscript form in the Form and Language fields, respectively. Let’s enter 'RVINVOICE01' and 'EN' respectively in these fields.
Step 2 − Select the Page Layout radio button in the Subobjects group box as shown in the above screenshot.
Step 3 − Select Utilities → Copy from Client to create a copy of the RVINVOICE01 form.
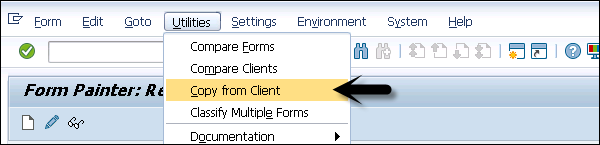
The 'Copy Forms between Clients' screen appears.
Step 4 − In the 'Copy Forms Between Clients' (following) screen, enter the original name of the form, 'RVINVOICE01', in the Form Name field, the number of the source client '000' in the Source Client field, and the name of the target form as 'ZINV_01' in the Target Form field. Make sure that other settings remain unchanged.
Step 5 − Click the Execute icon in the 'Copy Forms Between Clients' screen. The 'Create Object Directory Entry' dialog box appears. Enter the Package name to save the object. Click the Save icon.
The ZINV_01 form is copied from the RVINVOICE01 form and displayed in the 'Copy Forms between Clients screen'.
Click the back icon twice and navigate back to the Form Painter: Request screen, which contains the name of the copied form ZINV_01.
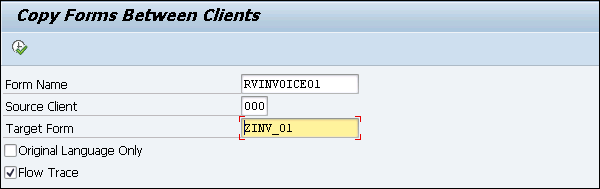
After clicking the Display button, the 'Form ZINV_01: Layout of Page FIRST' window and the 'Form: Change Page Layout: ZINV_01' screen appears as shown in the following screenshot.
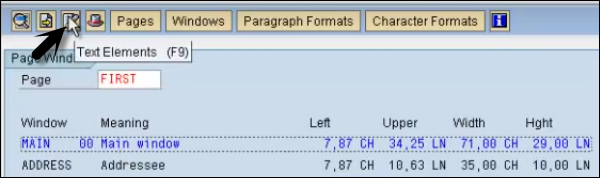
The 'Form ZINV_01: Layout of Page FIRST' window shows the initial layout of the form. The layout of the form contains five windows: HEADER, ADDRESS, INFO, INFO1, and MAIN. The description of these windows can be accessed in PC Editor.
For instance, by just selecting the MAIN window and clicking the Text icon in the 'Form: Change Page Layout: ZINV_01' screen, you can view all the margin values.
SAP Scripts - Layout Set
Layout set is a kind of program to output documents using a programming interface. Layout set is a part of SAP Script and is used to define the layout of print pages and uses text elements to supply the output block that can be called by a Print program. Layout set itself doesn’t contain any data and selection of data for the document is done using the print program.
When a print program is called, data from database is selected and passed to the layout set. When a print program is executed, the document is printed.
Layout set contains the following elements −
Header
Layout set header contains the administrative information and also the settings for the other components.
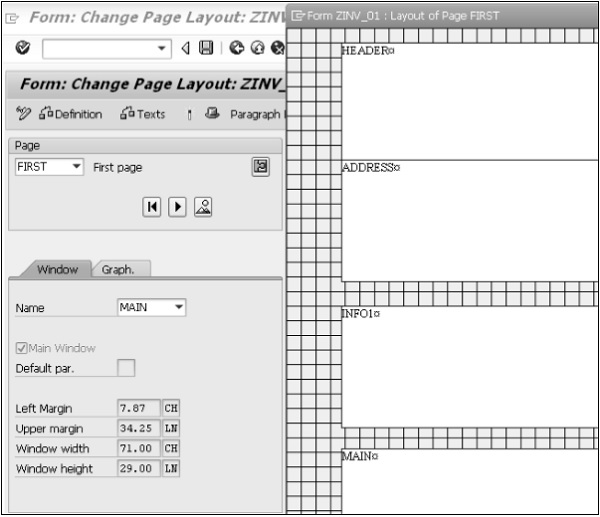
Paragraph
Paragraph provides all the information required to format a paragraph of text and fonts. To create a Paragraph, click the Paragraph format as shown in the following screenshot.
Pages
When you feel your output is too long and it won’t fit in one page, you can create a new page to print the remaining part. You can show the remaining part with different page settings.
To create a page, go to Pages Tab. Enter the page name and provide some description.

Page Window
When you have a full window of type MAIN, a page break is triggered by SAP Script automatically and the remaining text of the output appears in the main window of the subsequent page. Page windows of type MAIN have the same width throughout the layout set.
Character String
These are used to define font settings of the output text. You can override paragraph settings for the specific words in a paragraph.
Windows
An output document can be organized onto pages using Windows. In Layout set, you have the following types of Windows −
Main − There is only one Main window which is created by default. This window can flow over multiple pages.
Constant − There can be multiple number of constant windows and each constant window can be used once per page.
Variable Window − The contents of variable windows are processed again for each page, on which the window appears.
SAP Scripts - Print Program
In SAP Scripts, Print Program is used to print the actual form and get the data from database tables, choosing a form and print the text elements in a defined format. It retrieves the data from the database and combines it with the user input, formats the data and prints it.
All print programs and forms are stored in table TNAPR.
Different functional modules are used in Print Program. To start a print program, OPEN_FORM functional module is used, and to end the program CLOSE_FORM functional module is used.
OPEN_FORM − In Print Program, this function should be called first before any printing can take place. You specify the name of the form and the print language.
CALL FUNCTION 'OPEN_FORM'
START_FORM − This function is called to use different forms with similar characteristics in a single request.
CALL FUNCTION ’START_FORM’
WRITE_FORM − This function is used to write text in a window in the form using text elements.
CALL FUNCTION ‘WRITE_FORM’
CONTROL_FORM − This function is used to insert SAP Script control commands in an ABAP program.
CALL FUNCTION ‘CONTROL_FORM’
END_FORM − This function is called in the end and it has no exporting parameters.
CALL FUNCTION ‘END_FORM’
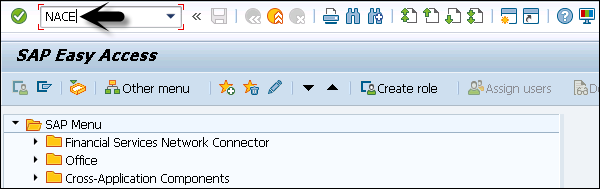
CLOSE_FORM − To view the standard form and the standard Print program, run Transaction Code: NACE
Enter Application Types and click the Output Type at the top.
In the following screenshot, you can see the Application name for the selected service.
Print Program − Example
Following is a sample print program that creates an invoice with company-related information such as customer data, date, flight booking, etc.
Section 1 - Get customer data
TABLES: zcustom, zbook, zpfli.
DATA: bookings like zbook...
select * from...
/In this section, you are reading the data from tables in database./
Section 2 - Open form
CALL FUNCTION 'OPEN_FORM'
EXPORTING
DEVICE     = 'PRINTER'
FORM       = 'EXAMPLE1'
DIALOG     = 'X'
OPTIONS    =
EXCEPTIONS
CANCELLED  = 1
DEVICE     = 2
FORM       = 3
OTHERS     = 11
/In this section, you are calling OPEN_FORM function module to initialize print output./
In the above function module, the parameter −
FORM shows the name of the form.
DEVICE can be PRINTER (print using spool), TELEFAX (fax output) or a SCREEN (output to screen)
OPTIONS shows a structure of type ITCPO to control the various attributes - Print preview, number of copies.
Section 3 - Print table heading
CALL FUNCTION 'WRITE_FORM'
EXPORTING
ELEMENT  = 'textelement’
TYPE     = 'TOP'
WINDOW   = 'MAIN'
FUNCTION = 'SET'
...
/In this section, you use WRITE_FORM function to output general text elements and column
heading/
ELEMENT function module shows the ‘textelement’ to be printed and ‘WINDOW’ shows which window of the form to be printed.
TYPE shows the output area of the window like- TOP, BOTTOM, or BODY.
FUNCTION tells the text to be replaced, added or appended.
Section 4 - Print customer bookings
LOOP AT bookings WHERE
CALL FUNCTION 'WRITE_FORM'
EXPORTING
ELEMENT  = 'BOOKING'
TYPE     = 'BODY'
WINDOW   = 'MAIN'
...
ENDLOOP
/In this section, text element BOOKING is used to output the bookings of a customer from
the loop from BOOKING table in database./
Section 5 - Close form
CALL FUNCTION 'CLOSE_FORM'
IMPORTING
* RESULT    =
EXCEPTIONS
UNOPENED    = 1
OTHERS      = 5
/To end the Print Program/
You call this function module in the end and it has no exporting parameter.
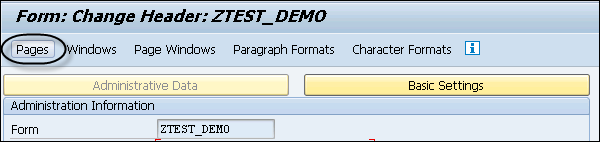
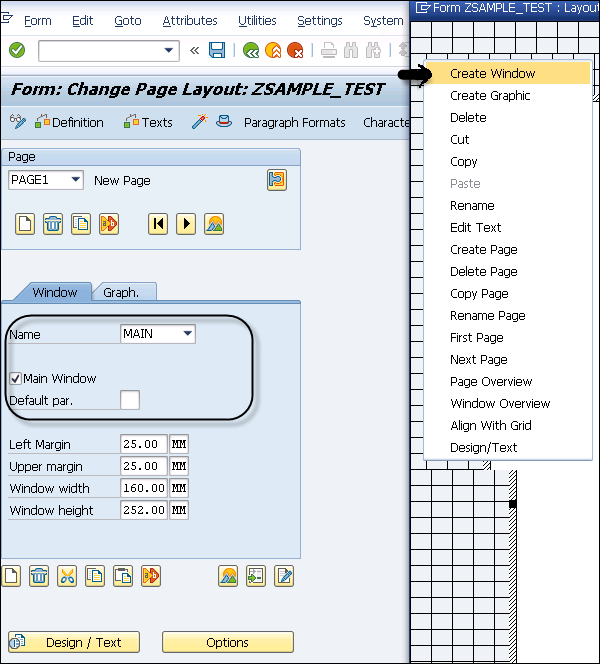
SAP Scripts - Creating a Window
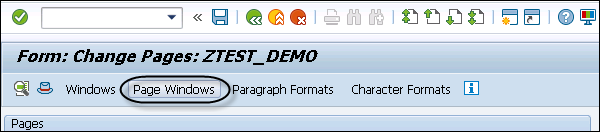
Once you create Pages, you can create a Window on the page. A single page can have multiple windows. To create a window, you have to click the Windows tab.
Run the Transaction SE71 and go to Windows push button.
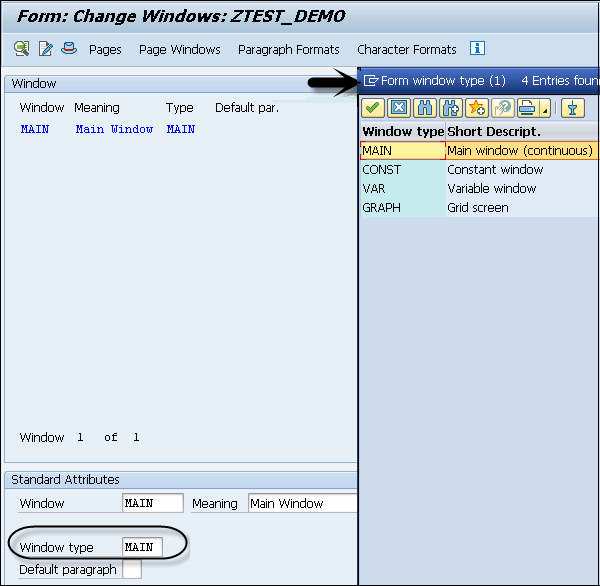
In the next window, it will show a screen list of windows in a page.
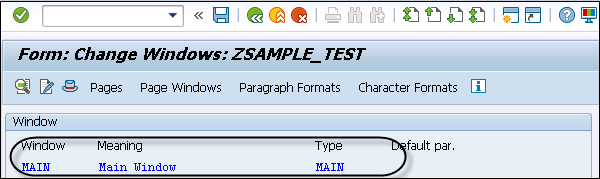
Each form has one window of type MAIN. Such a window is called the main window of the form. For SAPscript forms, the main window has the following functions −
You use it to control the page break.
It contains the text body that can be used for multiple pages.
It allows to fix text elements at the upper and lower margins of the allocated page window.
The text in the main window can extend over several pages. If the text fills one page, the output continues in the window of the next and subsequent pages. You can create max 99 MAIN window 00-98.
Step 1 − To create a new window, click the Edit option in menu bar → Click on create Element.
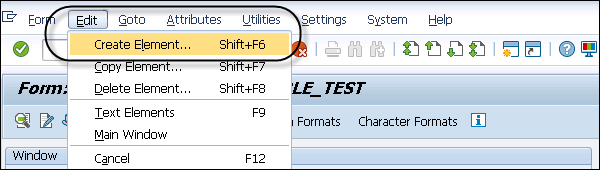
It will generate a popup.
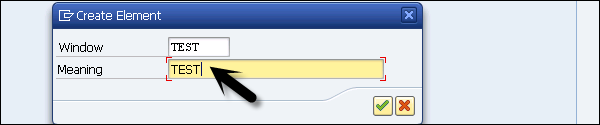
Step 2 − You have to enter the name of window and short description, the press enter. Click the tick mark to create the Window.
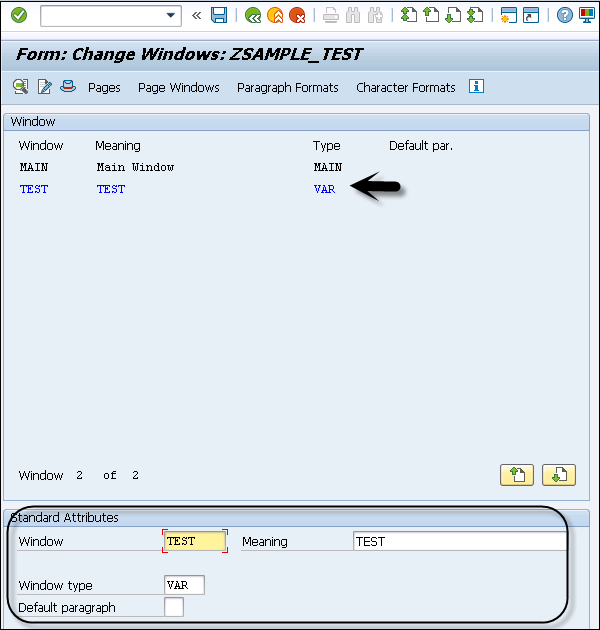
Step 3 − Now to place the Window, you have to click Page Windows button. You will be prompted to know where you want to place that window in the page.
Step 4 − Click the Edit option on the menu bar, Edit → Create Element.
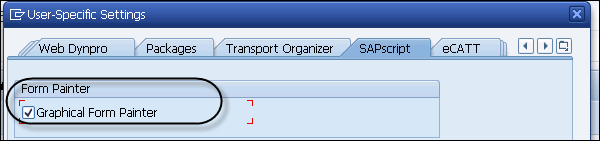
You can also create a new window from the page layout. If you can’t see a Layout option in SE71 Transaction, you have to enable form painter. To enable form painter, go to Settings → Form Painter.

You have to select Graphical Form Painter checkbox option.
Step 5 − Once you select Graphical Form Painter, the Layout option will be available under Transaction SE71. Click the Layout and Page Layout will open.
Using Layout, it gives a GUI editor which makes it easier to drag the window position.
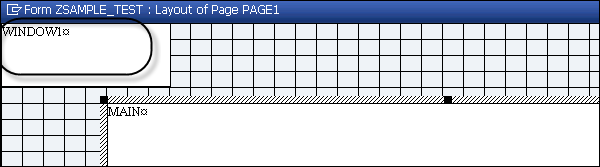
By default, you can see the Main Window in the Layout.
Step 6 − To create a new window, you can right-click on Layout → Create Window.
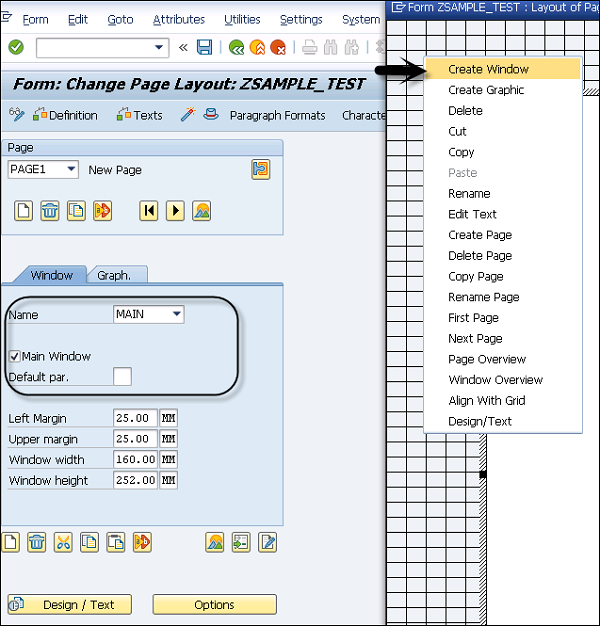
Step 7 − In the next screen, you have to enter the name of the Window.
- Enter Meaning
- Left Margin
- Right Margin
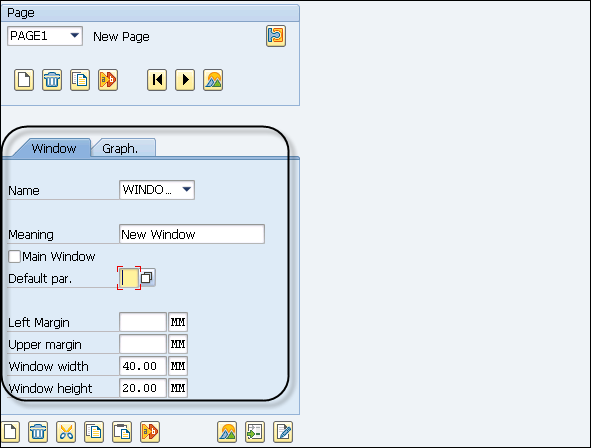
Step 8 − To save this window, select the save option  . A New window is created with the name Window1.
To see the Text linked with Page window, go to Text element option at the top.
SAP Scripts - Output Area
To output the text in the main window, or in the page window there are different output areas that you can select.
- Upper margin (Top area of the main window)
- Bottom margin (Lower area of the main window)
- Body of main window (Area in between the top area and the lower margin)
Upper Margin
In the page layout, the top area always appears at the beginning of the main window. The top area can be used to automatically output headings on the subsequent pages for tables to cover multiple pages.
The output placed into the upper margin area using the print program is not formatted at once, but stored internally in SAP script initially. Formatting occurs only as soon as the print program writes text into the Body area. Variables are retrieved and replaced in that moment as well.
The Body area of the main window is filled before the program reaches the definition part of the upper margin. This definition is used as the top area for the subsequent page. You can say that it is not possible to delete a heading in the Top area after writing text into the Body area.
Bottom Margin
The Bottom margin comes at the end of the Main window. The Bottom area is defined for the current page when you complete the output of the body area. If there is not enough space left on the page, then the Bottom area text of the output is produced on the next page of the page layout.
If the print program produces the output text to the Bottom area of the Main window, it memorizes these lines for subsequent pages (just like Top lines). At the same time, the composer processes these lines to determine the space the Bottom area requires and the space left for the Body area. At this moment, it replaces the variables set in the Bottom area for the current page.
SAP Scripts - Text Module
A text module in SAPscript is created from an administrative information component in the text header and actual text lines. The text header contains information about −
- Title of Text module
- Date and time of creation
- Last changes information
- Allocated Style
- Text Format
You use the text type - Text module of the text node - to refer to an existing text module in the system. This allows you to easily use texts from the text modules in several forms. In addition, it is not necessary to load the entire form description to maintain these texts.
Text modules can be used in two of the following ways −
Refer − This refers to the text module. The text then appears read-only in the PC editor and is included when you print the form.
Copy − This is used to copy the text module. The system then copies the text of the module and automatically converts the text node into an editable text element.
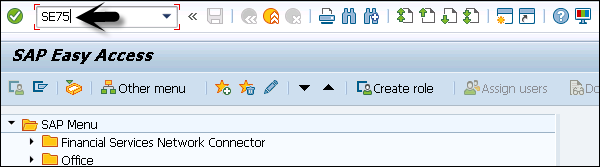
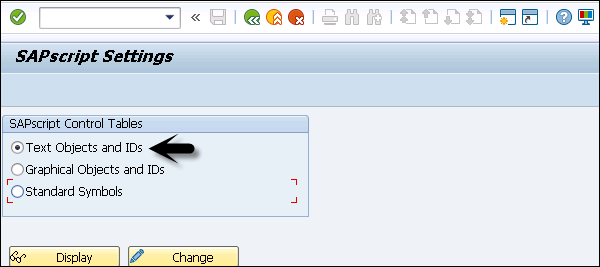
To manage application-specific form texts, applications define their own text objects with subordinate text IDs using Transaction code SE75.
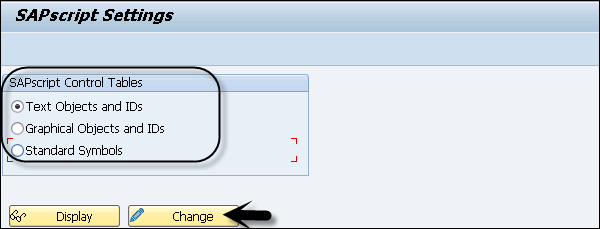
To create text objects and text Id’s for application, select the Radio button and click change.
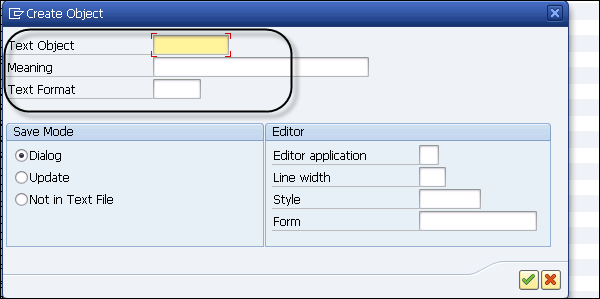
To create text objects, click on Create button. You will be prompted to enter this information. You can use Text object with text ID’s to enter general standard texts.
To maintain standard text, use Transaction code: SO10
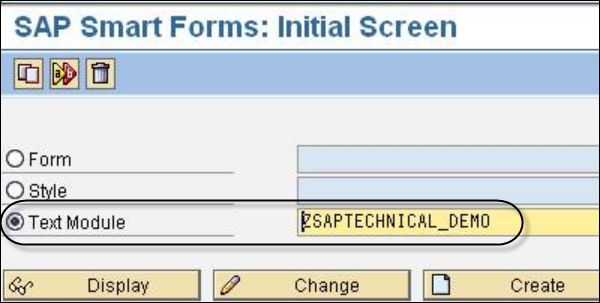
Text module can be used in Smart Forms as well. To create and change text module, use transaction smart forms and select Text module as shown in the following screenshot. Click the Create button.
SAP Scripts - Grouping Text
In SAP Scripts, grouping text provides a better handling of the texts and also facilitates control of internal processes in scripting. Text consists of text objects and text ID’s.
Text Object
Text object can be linked to objects in other business application and defines contextual relation. Apart from this, text objects are also used to determine different processing parameters. When you save a text module, it depends on the object if a text module should be directly written to the text database or not.
Text objects and their respective attributes in SAP Script are defined in the TTXOB table.
Text ID
To differentiate between texts of an object, you need a grouping attribute that is called in SAP Script and is known as Text Id. Text IDs are used to identify different texts describing the same text object. Text IDs and their attributes must be defined in the TTXID table.
As one text is not enough for an object, to define several characteristics of an object you need several texts which are identified by text IDs.
To manage application-specific form texts, applications define their own text objects with subordinate text IDs using Transaction code SE75.
To create Text objects and Text Ids for application, select the Radio button and click change.
SAP Scripts - Format Options
In SAPscript, the text output format is controlled by paragraph formats or you can combine text with styles. In the output format, you can use placeholders to create flexible data. In SAPscript, the placeholders are called symbols and they are used to show the data that is not added to the text until a later point.
These are used to format the output and all the symbols in the text gets replaced with the actual current values. This replacement is done only in the output of the text module and the original text module remains the same.
There are four kinds of symbols in SAPscript −
System Symbols − Different type of system symbols can be retrieved from tables - SAPSCRIPT, SYST, TTSXY. They are global variables and are retrieved from system tables.
Standard Symbols − They are predefined and maintained in TTDTG table. They are based on language settings of script.
Program Symbols − This represents the data from a database table or an internal table. Print programs are used to provide necessary data for these symbols.
Text Symbols − They are defined locally and is used to define recurring terms or text fragments in the document.
Placeholder / Symbol Structure
Each symbol is presented with a name and call to a symbol is made in a line of text that also contains the other text. These symbols are differentiated from the normal text, and the call is performed so that it identifies a call to a symbol or to other section of the module.
Following rules should be used while using symbols −
You shouldn’t use blank characters in the name of a symbol.
Always use ampersand ‘&’ immediately before and after the symbol.
You shouldn’t use editor line break occurs between the symbols.
Note that the symbol names are not case-sensitive and contains a maximum of 130 characters and only the first 32 characters are used to identify the symbol.
Examples of Valid Symbols
- &symbol&
- &MY_symbol&
- &DATE&
Examples of Invalid Symbols
&mysymbol − It doesn’t contain the closing character
&symbol(Z& − No closing parentheses
&my symbol& − In this, symbol name contains a space
&mysymbol)& − In this, name contains an invalid character
Common Symbols Used in SAPScript
| Current Date | &DATE& |
| Current Day Number | &DAY& |
| Current Month Number | &MONTH& |
| Current Year Number | &YEAR& |
| Minutes Component of Current Time | &MINUTES& |
| Seconds Component of Current Time | &SECONDS& |
| Current Page Number | &PAGE& |
| Output Length | &symbol(length)& |
| Omitting the Leading Sign | &symbol(S)& |
| Leading Sign to the Left | &symbol(<)& |
| Leading Sign to the Right | &symbol(>)& |
| Omitting Leading Zeros | &symbol(Z)& |
| Space Compression | &symbol(C)& |
| Number of Decimal Places | &symbol(.N)& |
| Omitting the Separator for ‘Thousands’ | &symbol(T)& |
| Specifying an Exponent for Floating Point Numbers | &symbol(EN)& |
SAP Scripts - Output Types
Using SAPscript, you can configure different output types like a printed form that you need for internal use or an email message sent via email. You can also get output types in PDF format or any other required format.
You can use different output types like printing a form, where when you select output type Print Out, the document is printed. Similarly, you can select Fax, email, PDF as output type. When you select Fax as the output type, a fax of the document is sent.
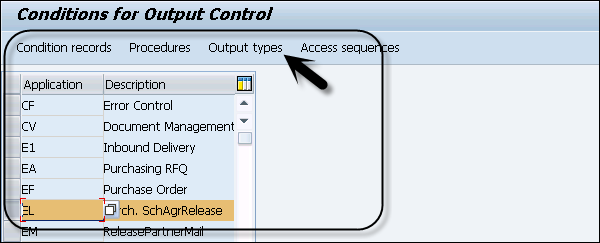
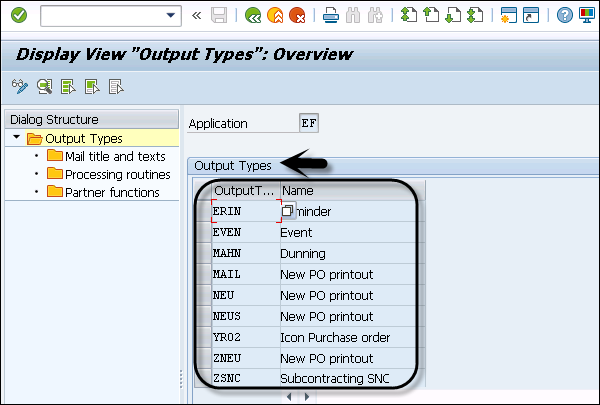
All the output types are stored in NAST table. To see the configured output type, you can use Transaction code – NACE.
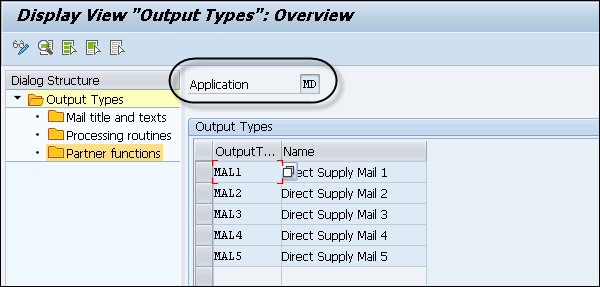
In the new screen, you have to select Application type: V1 for SALES, V3 for BILLING, E1 for Inbound Delivery, etc.
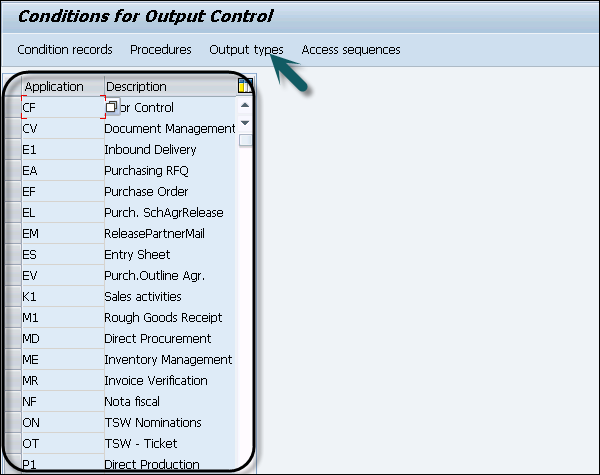
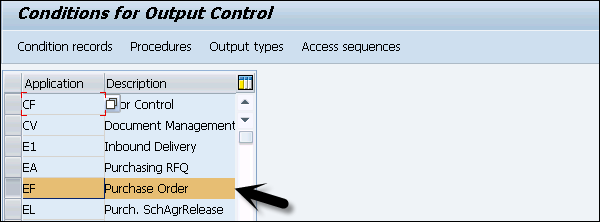
In the following example, Purchase Order Application is selected. Now to see the configured output types, click the Output types button at the top of the screen.
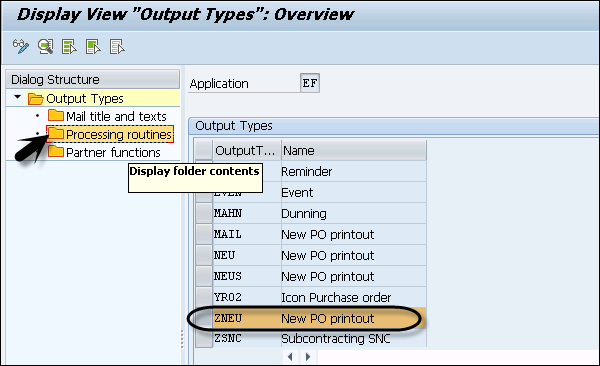
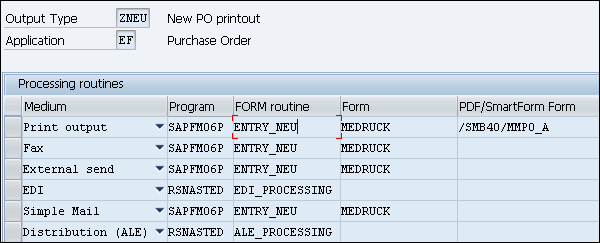
To see the output type in SAPscript, select any output format, click Processing Routines on the left side of the screen as shown in the following screenshot. By going to the details, you can find the exact output type for your SAPscript.
You can see the following details for the configured output type and Form routine.
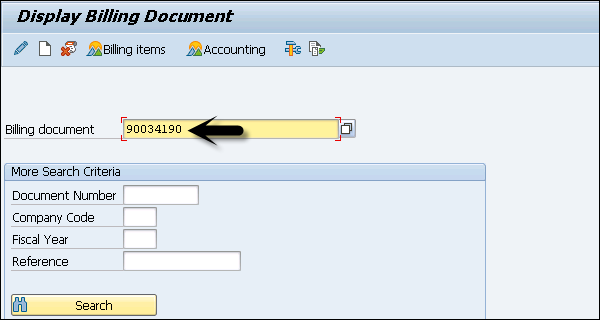
To check any document for output type, use Transaction code- VF03

Select the billing document number and press Enter.
Select the Output under the menu Go to → Header.
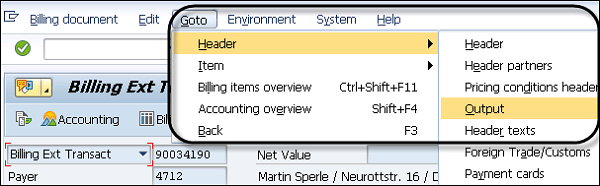
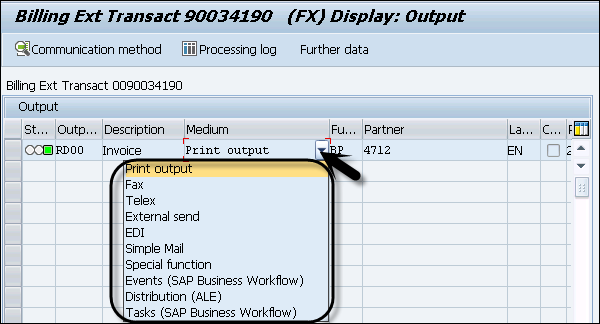
You can see the selected output types from the available list. Available options are −
Print Output − To send the output in a Print form.
Fax − To send the output to a Fax machine.
External Send − To send the output to an external system.
Telex − To send the output to teleprinters.
EDI − To transfer data from one computer system to another by standardized message formatting.
Simple Mail − To send the output in email.
Special Function − To perform any special function such as sending invoice, etc.
Events − To trigger events from workflow to message control.
Distribution − To send the output to applications in your distributed systems to communicate with each other.
Tasks − SAP Business Workflow.
SAP Scripts - Control Print Output
To control the print output of a document, you can pass different parameters with function modules - PRINT_TEXT and OPEN_FORM. PRINT_TEXT function module is used to prepare the text module specified in the parameters HEADER and LINES for an output device and to output it. The output format for print is taken from the fields TDSTYLE and TDFORM in the text header.
You can also use TDPREVIEW field to see the display on the screen in the print format. There are various fields that you can use to control the print output.
| TDPAGESLCT | SAPscript: Select print page |
| TDPREVIEW | SAPscript: Show print view |
| TDNOPREV | SAPscript: Disable print view |
| TDNOPRINT | SAPscript: Disable printing from within print view |
| TDTITLE | SAPscript: Text for title line in the output selection screen |
| TDPROGRAM | SAPscript: Program name for replacing symbols |
| TDTEST | SAPscript: Test printout |
| TDIEXIT | SAPscript: Return immediately after printing |
| TDGETOTF | SAPscript: Return OTF table, no print output |
| TDSCRNPOS | SAPscript: Display position of OTF on screen |
| TDDEST | Spool: Name of the output device |
| TDPRINTE | Spool: Name of the device type |
| TDCOPIES | Spool: Number of copies |
| TDNEWID | Spool: New request |
| TDIMMED | Spool: Print request immediately |
| TDDELETE | Spool: Delete request after printing |
| TDLIFETIME | Spool: Retention time of the request |
| TDDATASET | Spool: Identification of the request |
| TDSUFFIX1 | Spool: Suffix 1 of the request |
| TDSUFFIX2 | Spool: Suffix 2 of the request |
| TDARMOD | Spool: Archiving mode |
| TDCOVER | Spool: Print cover page |
| TDCOVTITLE | Spool: Cover page: Title text |
| TDRECEIVER | Spool: Cover page: Recipient name |
| TDDIVISION | Spool: Cover page: Division name |
Key Function Modules
Following are the key function modules that can be used to control the print output −
TDPREVIEW
This is used to display the output on the screen before you take the printout. This function module always creates a SPOOL request and it is not interpreted in background processing.
‘X’ − Print view wanted
‘ ‘ − No print view wanted
TDPAGESELECT
This function module can be used to select the pages to be printed in the print output. You can select individual pages, or a range of pages, or you can also select combinations. When you don’t select the page number field, all pages are printed.
Note that the page numbers here shows the physical pages of the SAPscript printout and not the logical number in the form.
2 − This prints an individual page number 2
1-5 − This prints all the pages 1 to 5, including both the pages
2- − This prints all the pages from page 2 to end
To combine these values, you can put a comma between these to use the combination. 2, 1-5, 2-
TDTITLE
This function module is used to select the text for title line of print selection.
TDSCHEDULE
This function module is used to determine whether to send a SPOOL request immediately or you want to print it at night.
‘IMM’ − To send the SPOOL request immediately
‘NIG’ − To send request during night
When no value is selected for this field, by default, the system takes it as IMM.
SAP Scripts - Data Formats
Data formats are used to define style and forms and is also known as Interchange Text Format (ITF). All the texts created using SAPscript has a specific data format. The data format consists of two fields −
- Format Field
- Actual Line Contents
Certain elements for this ITF format are fixed, / for a new line.
ITF elements are used to define styles and forms. Even these attributes are not maintained in ITF format. The composer prepares an ITF text for output that is converted into a format that represents the print version and this is called Output Text Format (OTF).
Raw Data Output Format
To get the print output, these techniques can be used −
- SAPScript
- SmartForms
- PDF-based Print Forms
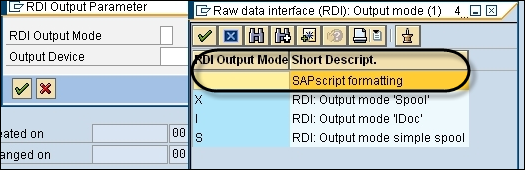
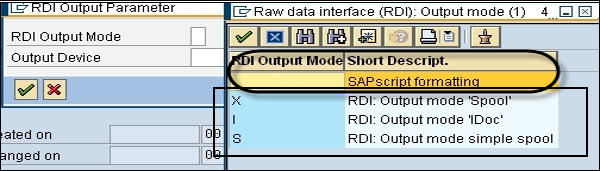
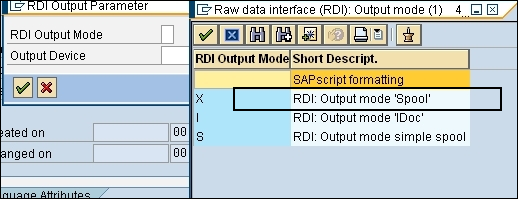
SAPScript allows you to use raw data output format where the output mode is defined in script itself or in runtime in the print program. The preferred format to use here is Raw Data Interface because of less overhead and compact spool files.
You have to select SAPscript formatting in RDI output mode.
When you compare SAPScript formatting with SmartForms and PDF-based print forms, Smartforms are an advancement of SAPScript and are used to get XML-based raw data output in XSF format. PDF-based Print Forms provide raw data output format known as XFP with or without context evaluation.
SAP Scripts - Export
SAPscript doesn’t provide version management so it is suggested to store each version of your script as a file exported to the local system. In case, you want to copy a SAPscript from one client to the other, you can use export/import or copy the option.
Export a File
To export a SAPscript to the local file, use table RSTXSCRP.
Following are the steps to export your SAPscript to the local file on the system that can be changed later to meet the requirements.
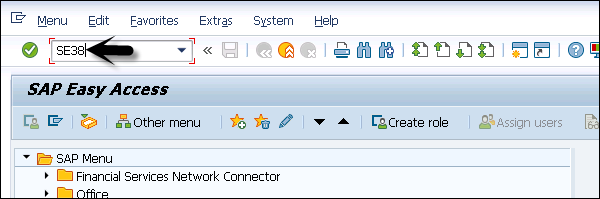
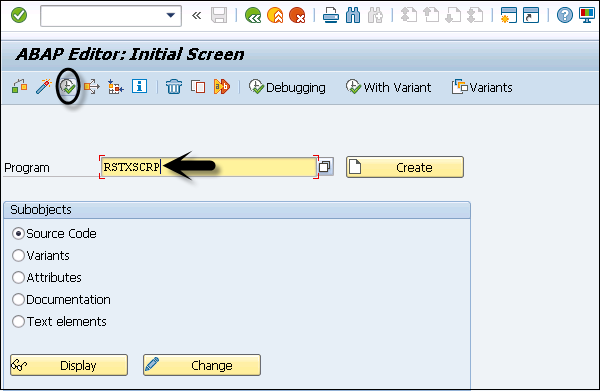
Step 1 − Run Transaction Code - SE38 and execute program RSTXSCRP
Step 2 − Enter the program name and execute.
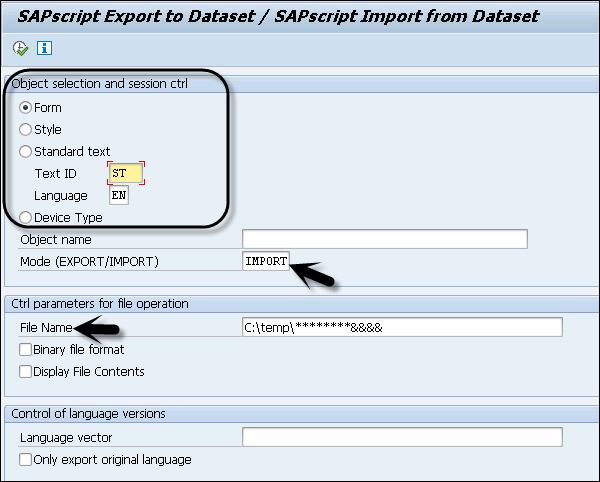
Now you have to select the desired object type - Form / Style / Standard Text / Device Type from the list.
Step 3 − To export a SAP script locally, select Form.
Step 4 − Select the Mode parameter. Here we will select Export as the mode parameter.
- Export means download to local file.
- Import means upload from local file.
Step 5 − Enter the object name that you want to export.
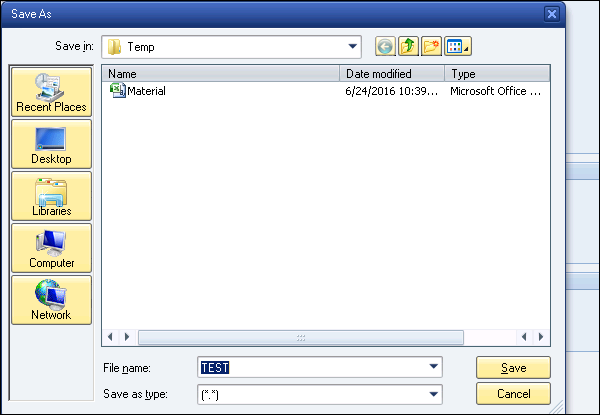
The default export path is in the following format- C:\temp\********&&&&

When you execute the report from the top icon, you will be prompted to select a location to save the script on your local system.
SAP Scripts - Import
Import means to upload from a local file. When you want to get the Script copied from a local file, you can use the Import option.
Import a File
To perform import of SAPscript from the local machine, run Transaction code: SE38.
Step 1 − Execute program RSTXSCRP in Transaction Code SE38.
Step 2 − Enter the program and execute.
Now you have to select the desired object type - Form / Style / Standard Text / Device Type from the list.
Step 3 − To export a SAP script locally, select Form.
Step 4 − Select the Mode parameter. Import means upload from the local file. Select Import in the mode parameter.
Step 5 − Enter the object name that you want to export.
Step 6 − Enter the import path- C:\temp\********&&&&
Using the above method, you can copy SAPscript from one client 512 to client 500 using the following steps −
Step 1 − Login to client 512.
Step 2 − Run the Transaction Code - SE38 or SA38 and execute the ABAP program: RSTXSCRP
Step 3 − Enter the Mode Parameter: EXPORT and save the SAPScript locally on the system.
To import the script −
Step 1 − Login to client 500.
Step 2 − Run the Transaction SE38 or SA38 and execute the ABAP program: RSTXSCRP
Step 3 − Enter the Mode Parameter: IMPORT
Other option to copy a script from one client to another client is by using the following steps.
Step 1 − Use Transaction Code SE71.
Step 2 − Login to Client on which you want to perform a copy 500.
Step 3 − Run Transaction code: SE71 → Click on Utilities → Copy from client

Step 4 − Enter Source Form, Source Client, and Target Client.
Step 5 − Click the Execute button.

SAP Scripts - Control Tables
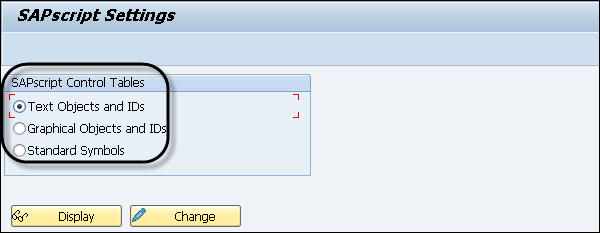
SAPscript contains various control table that are used to define definition of text objects, definition of text IDs and their description.
To maintain Control tables, use Transaction Code: SE75
| TTXOB | Definition of the text objects |
| TTXOT | Description of the text objects |
| TTXID | Definition of the text IDs |
| TTXIT | Description of the text IDs |

Control Table - TTXOB
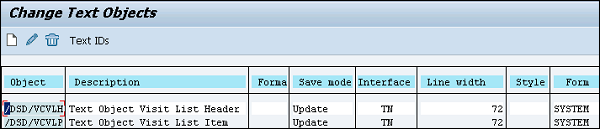
This table contains definition of all text objects supported by SAPscript. When you use SAPscript function modules, you can process texts whose objects are stored in this table. When an object is passed to function whose definition is not maintained in table TTXOB, an exception object is triggered.
This table can be maintained using Transaction SE75.
There are different parameters in the table −
Line Width of Editor − This shows the maximum line width allowed for a text in the editor.
Default Style − When you create a new text module, the system automatically allocates the style specified in this field.
Default Form − When you create a new text module, the system proposes the form specified in it.
Text Format − This is used to determine the format of the text and as per the format, the system calls the appropriate editor.
Control Table - TTXOT
This table contains the short description of text objects.
Control Table - TTXID
This table contains all the text IDs which are allocated to text objects and are supported by SAPscript.
Different parameters that are used in this table include −
TDSHOWNAME − Displays the name of the text.
TDTEXTTYPE − To determine the format of the text.
TDKEYSTRUC − You can store the name of a structure which describes the key structure of the name field of the text module.
TDOBLIGAT − (Reserve)
TDDELPROT − (Reserve)
TDINCLRES − (Reserve)
TDINCLID − To include the contents of a second text into the first text.
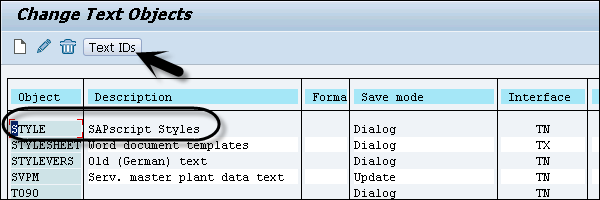
To see the definition of test IDs for object, select any object and click on Text IDs. You can see all the above parameters for each text ID.

Control table - TTXIT
This table contains the short description of text IDs.
SAP Scripts - Text and Graphics
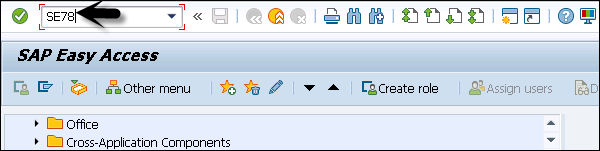
You can also add graphics to SAPscript - logo, images, etc. To use graphics in script, you need to import them to R/3 system. This can be done using Transaction code SE78 or you can also run report RSTXLDMC.
You have to enter the name of the graph and the image type supported is .tmp file or .bmp file. You can directly import images to R/3 system which are in .tif format, as they are stored as standard text and can be included in SAPscript using ‘Include’ statement.
To use the images which are not in .tif format, you need to convert them to this format.
Add Graphs to SAPscript
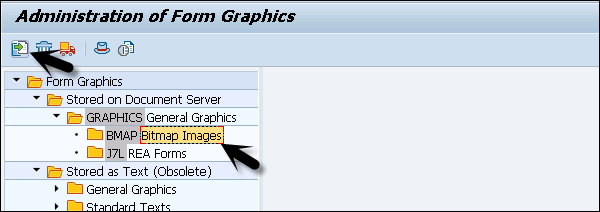
Step 1 − Run Transaction Code SE78.
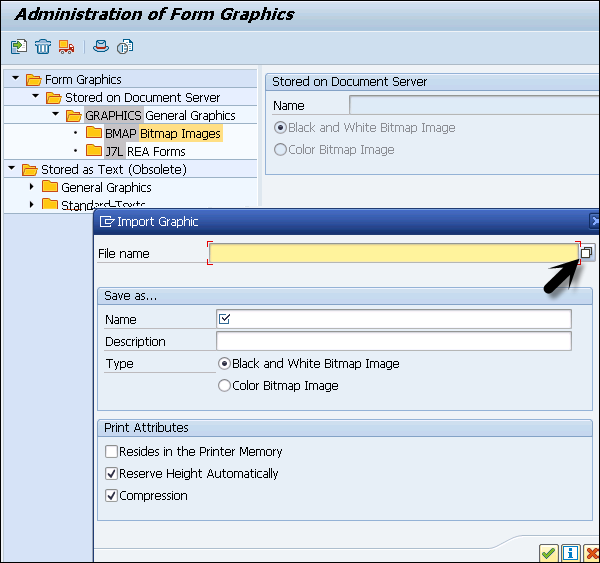
Step 2 − Expand the tree and from the left side select bitmap image. Click the Import button.
Step 3 − To select .bmp image, click the arrow as shown in the following screenshot.
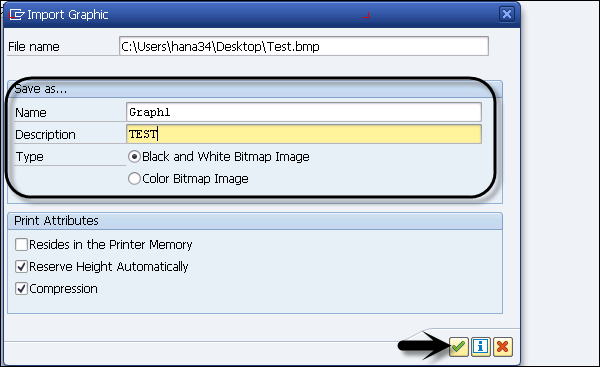
Step 4 − Once you select the file, enter the name of graph and description. Click the continue button.
Step 5 − Click the Preview button on the application toolbar.
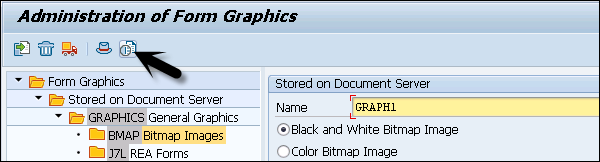
You can see a picture logo as shown in the following screenshot.
This is how you can add logos, images to SAP system.
SAP Scripts - Control Commands
In SAPscript, you can use control commands to control the output formatting handled by the SAPscript composer. The composer converts the text from the form displayed in the editor to the form used for printing.
Control commands are placed in the text editor in the same way as the normal line of text. Following structure is used for control commands −
Control commands are entered in paragraph format /:
You should enter only one control command in each line.
Control commands are entered in text.
You have to ensure that Control Command and its parameters doesn’t take more than one line.
When a control command contains an error, the line containing the control command is considered as the comment line and it is not printed.
Following are the common Control commands that can be used in SAPscript −
Explicit Page Break: NEW-PAGE
You can use this control command to force a page break in the text at any point.
Example
/: NEW-PAGE [page_name]
Note that there shouldn’t be any implicit page break occurrences within the blank lines, otherwise an unexpected blank page may be printed.
Preventing Page Breaks: PROTECT
With this page protect control command, you can print a complete paragraph on one page.
Main Window: NEW-WINDOW
This control command is used when one of the main window fills up. Then, the next main window on that page is taken.
Following are some other common Control commands that you can use in SAPscript for controlling the output −
SET DATE MASK − To format the Date Fields
DEFINE − To assign a Value to a Text Symbol
SET TIME MASK − To format Time Fields
SET COUNTRY − Country Dependent Formatting
SET SIGN − To position the Leading Sign
RESET − To initialize Numbered Paragraphs
TOP − To set a Header Text in the Main Window
BOTTOM − To set a Footer Text in the Main Window
IF − To add a conditional Text
STYLE − To change the Style
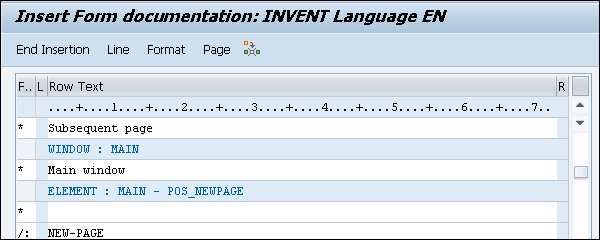
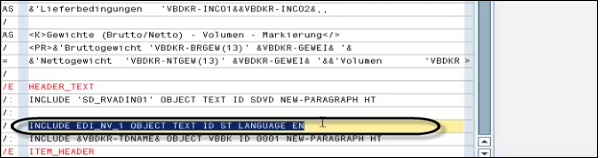
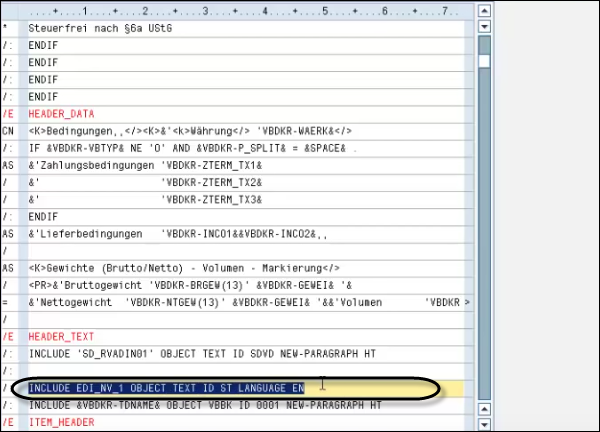
INCLUDE − To include other texts
Example
INCLUDE MYTEXT OBJECT TEXT ID ST
INCLUDE name OBJECT name ID name PARAGRAPH name LANGUAGE name
SAP Scripts - Copy Scripts
In SAP system, you can copy scripts to the local system or from one client to another client. As SAPscript does not provide version management feature, it is required to save the scripts locally.
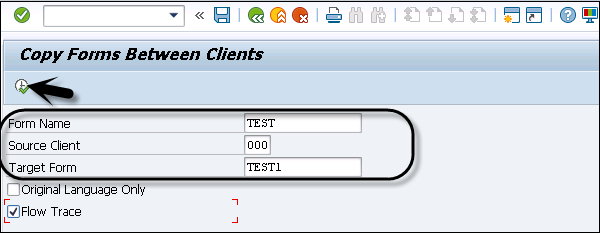
To copy a script from one client to another client, use Transaction Code SE71.
Step 1 − Login to Client on which you want to perform a copy 500
Step 2 − Run T-code: SE71 - Click on Utilities → Copy from client

Step 3 − Enter Source Form, Source Client, Target Client.
Step 4 − Click Execute.
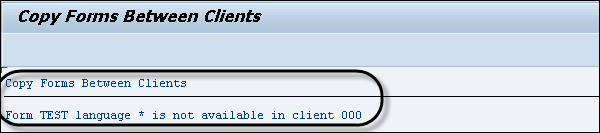
If the source form is not available in client, you will see a message as shown in the following screenshot saying that Form test is not available in client xxx.
SAP Scripts - Standard Text
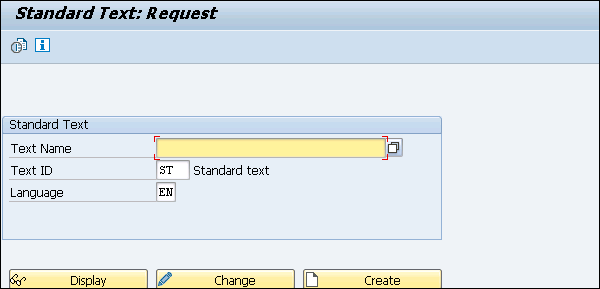
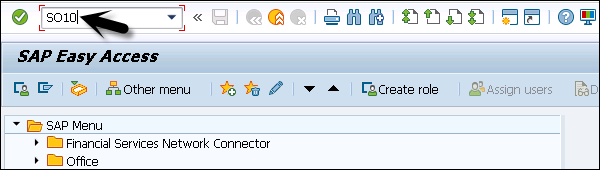
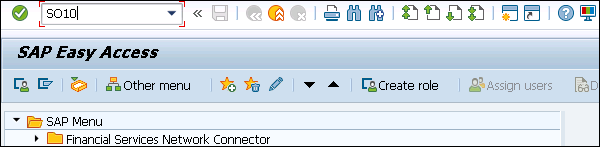
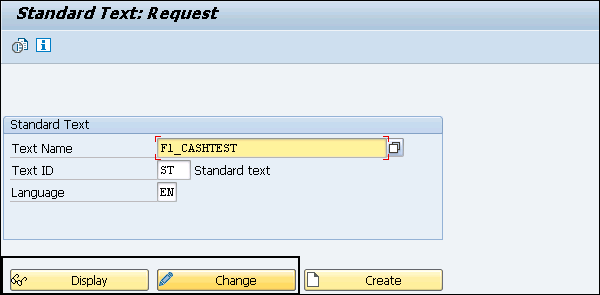
You can use standard texts in SAP to display the database stored value on the output document and this can be done using Transaction Code: SO10
Example
Let us say you want to print terms and conditions on every invoice and you want each invoice to contain these legal terms and conditions directly. You can create a Standard text and use that in the Invoice.
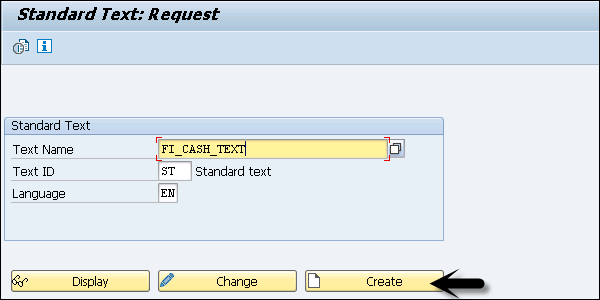
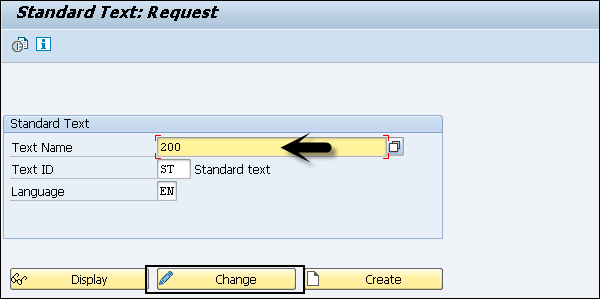
Step 1 − Run Transaction SO10
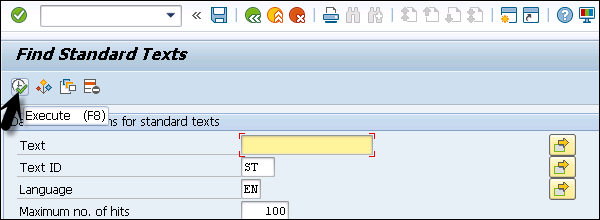
You have different text options. This can be checked using the find option.
Step 2 − Select Standard text and click Enter by clicking the green tick mark.

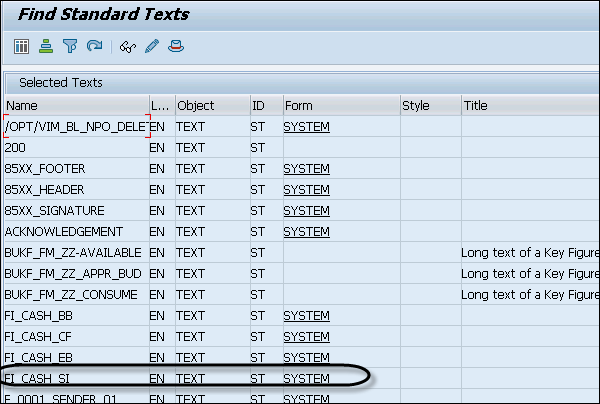
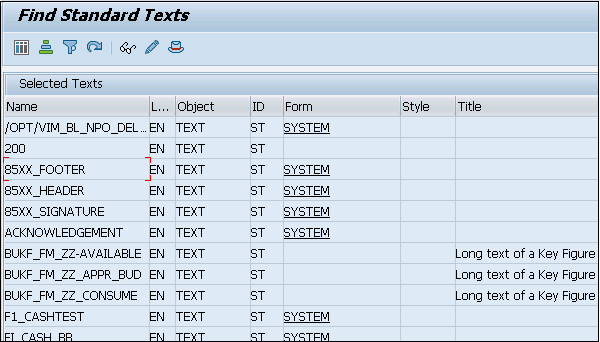
Step 3 − To select any Text, click on Execute. You will see a list of all standard texts.
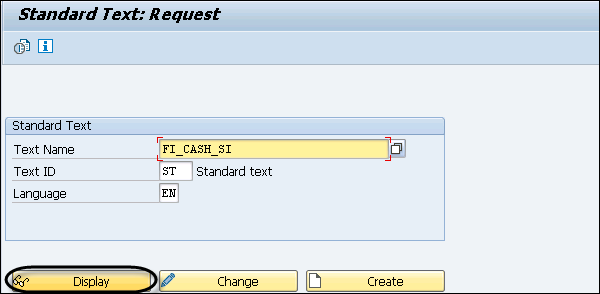
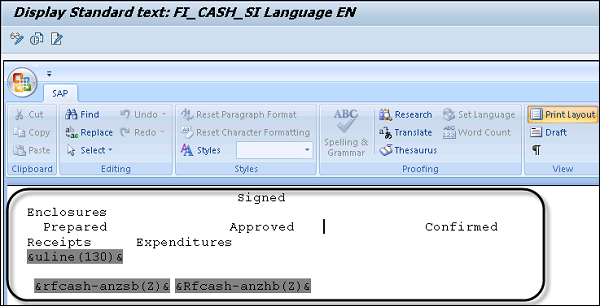
Step 4 − Select any of the following from the list. Here we have selected FI_CASH_SI and click the Display option.
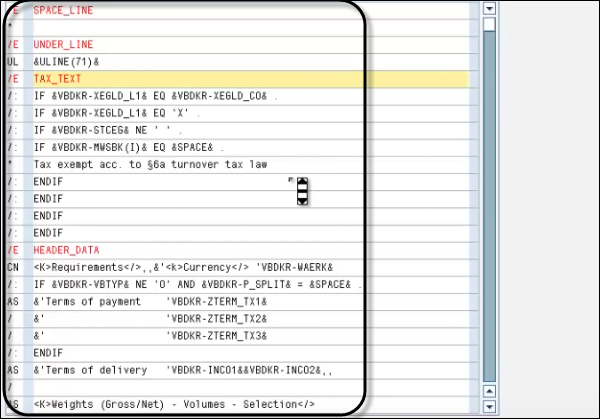
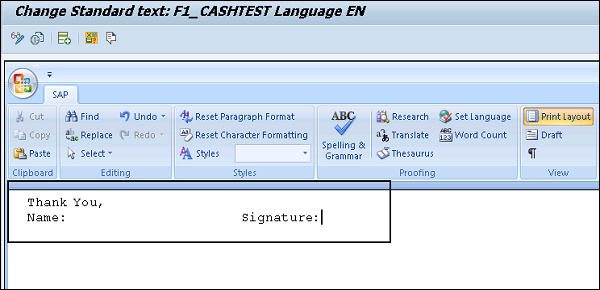
You can see the following text appear by default.
Step 5 − You have to add this to your script.
                    Signed
Enclosures
Prepared           Approved         Confirmed
Receipts    Expenditures
&uline(130)&

&rfcash-anzsb(Z)& &Rfcash-anzhb(Z)&
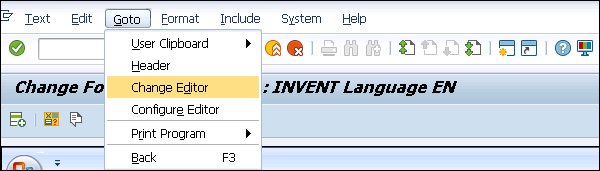
Step 6 − Select the form that you want to change. Select and click the change option at the bottom. Then click on Go to → Change Editor.

Step 7 − Enter the text name, object Id, language, etc.
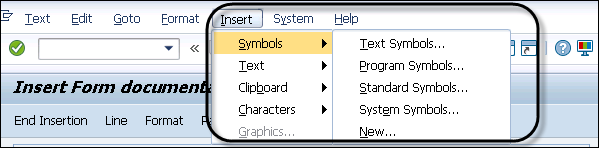
In a similar way, you can insert text symbols, system symbols, documentation, hypertext using the insert option at the top of the screen.
Using SO10 Transaction, you can also create your own standard text and give it a name and later can use it in a script.

You can write something and save it as standard text.
You can directly include this in your form. Open the form and click the Change button. Click Go to → Change Editor.
Using control commands, you can insert standard text created previously in your script.
System Symbols
System symbols are system maintained and their value is provided by the system. Some examples of system symbols are time, date, hours, minutes, seconds, page, etc.
Standard Symbols
You can maintain standard symbols using Transaction SM30. Examples of standard symbols are thank you, sincerely, etc. They are stored in table TTDG.
Program Symbols
They are placeholders for database fields and also act as global program symbols in your Print program.
SAP Scripts - Word Processing
As per requirement, you can use different editors to create your texts. You can use Microsoft Word editor, line editor, or PC editor as per the system configuration and platform. All these editors are used for word processing and to create and edit texts. You can use these editors for printing form and for creating documents.
PC Editor
PC editor is used to create and edit text and they are downward compatible. You can use any text that has been created with Line editor.
When you have Microsoft editor installed, you can switch to PC editor when Line editor is not available. If MS Word editor is not installed, you can switch between PC editor and Line editor. Word Processing using PC editor is similar to the common method of creating a word document in word processing.
Following functions can be used for word processing in PC editor −
You can directly allocate paragraphs and texts.
You can cut/paste the text directly.
Using PC editor, you can perform integrated error check to validate the syntax.
You can use special text structure and display of character format like bold font, different font sizes, etc.
By default, PC editor is called in each application in SAP system. To open Line editor, click Go to → Change Editor.
Line Editor
Line editor is used to create and edit text to print standard forms like standard letters or creating documents like sales order, invoice etc. for printing.
As mentioned, when you have Microsoft editor installed, you can switch to PC editor when line editor is not available. If MS Word editor is not installed, you can switch between PC editor and Line editor. When you create any text in PC editor, the system changes the format and style, and displays the text accordingly.
To switch to any other editor from Line editor, Go to → Change Editor.
Microsoft Word Editor
Microsoft word editor is used to create and edit text to print standard forms like standard letters or creating documents like sales order, invoice, etc. for printing. This editor is only available for Windows 200x and Windows XP.
You can use Microsoft Word editor in all the languages that are supported by SAP in a Unicode system. In non-Unicode system, this editor is available only for Hebrew.
MS word editor can be used to open text that are created in other editor and provide downward compatibility.
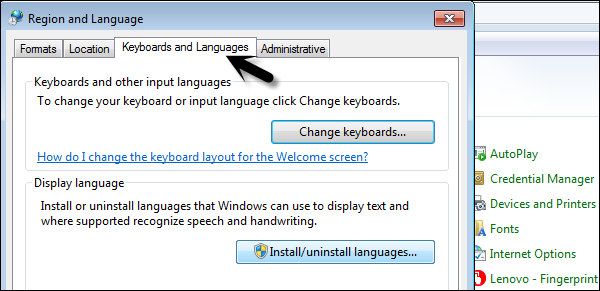
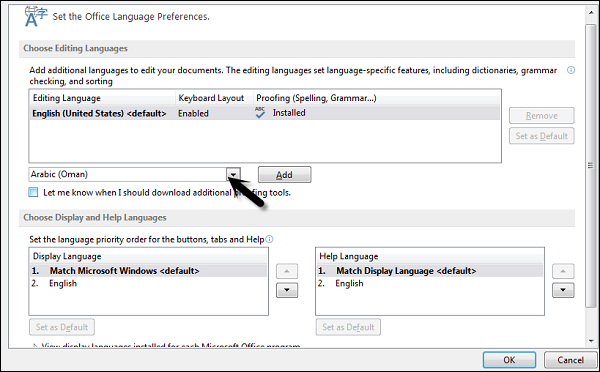
To select the language for MS Word editor, go to Start → Control Panel → Regional and Language Options → Keyboard and Language.
You can also use languages which are not included in SAP system and you need to activate these languages in MS Office language options.
Go to Programs → Microsoft Office → Microsoft Office Tools → Microsoft Office → Language Settings.
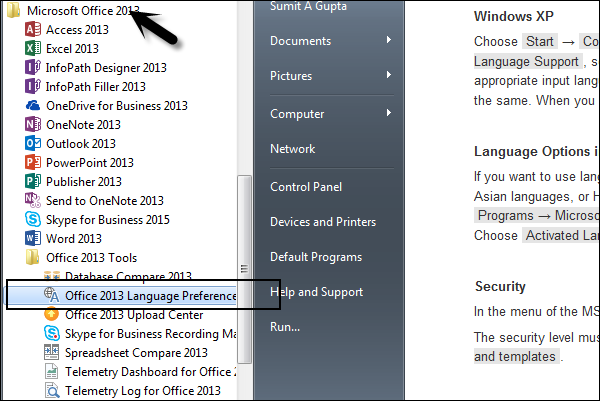
Select the language that you want to add. You can select any language from the list and click the Add button.
To switch to any other editor, Go to → Change Editor.
Setting Microsoft Word as Editor for SAPscript
To set MS Word as editor, you should have Microsoft Office 2000 or the newer version. It should be installed and activated. You can use MS Word as editor for both Unicode and non-Unicode system. You should set the security level as medium and you should install all add-ins and accept the templates.
Step 1 − To define the security level, go to Tools → Macros → Security.
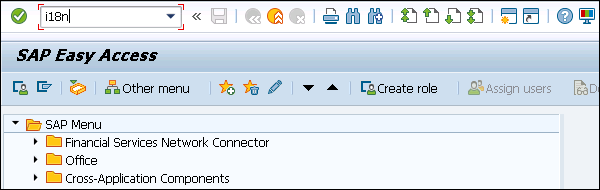
Step 2 − To enable Microsoft Editor in your system, call Transaction i18N
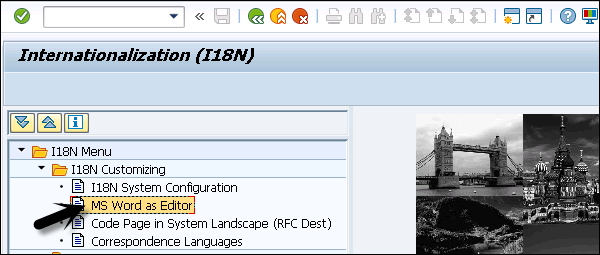
Step 3 − Go to i18N customizing option, and select Microsoft Word Editor.
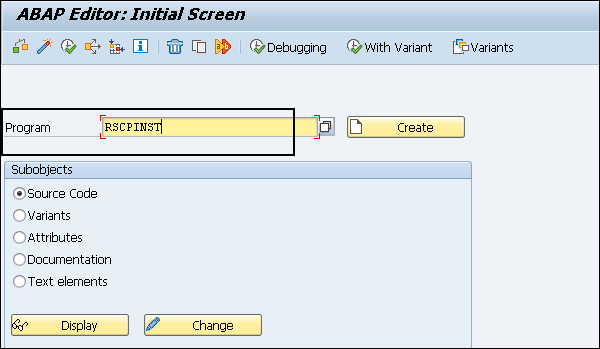
Step 4 − If i18N customizing is not available in your system, you can select the program RSCPINST in Transaction SE38 to set MS Word as editor.
Step 5 − Call Transaction SE38 and enter the program in the following screen.
Step 6 − Enter the program name and Press F8 to move to the new screen. Click on Go to → Set MS Word as Editor as shown in the following screenshot.


SAP Scripts - Create a Document
In SAP system, you can also create and change a document manually if your SAP system doesn’t call the editor. To create a document, you have to follow the below path −
Tools → SAP Script → Standard Text or call Transaction SO10
You have to enter the following details to create a document −
Text name
This shows the name of the document. You can use letters, numbers, spaces, and special characters for the name. However, no special characters like * are not allowed.
Text ID
This defines the application to which the document belongs. Standard texts are documents that are not specific to any SAP application, or system texts and SAP applications use their own text IDs for application-specific documents.
Language
This shows the language under which your document should be stored in the system.
You can set various options in a document. It works like a Word document. To define the properties of a document, go to options.
SAP Scripts - Update a Document
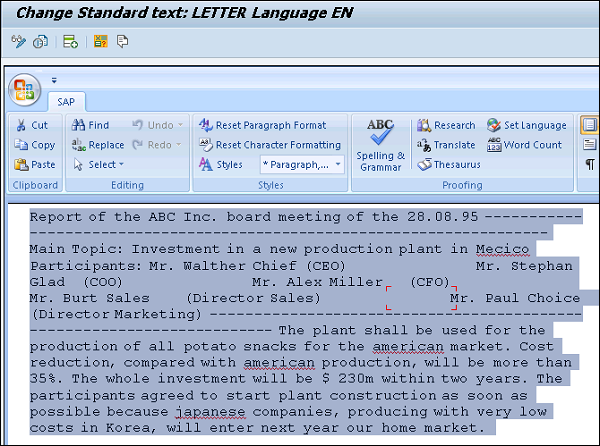
In SAP Script, using SO10 transaction you can update the existing standard text in SAP system. You can use the Change option to make changes to an existing document or the display option to display a document. Click the Allow button in the Warning window.
You can see the document is opened in Change mode. You can copy the following text or make changes directly in the system.
Report of the ABC Inc. board meeting of the 28.08.95
----------------------------------------------------------------------
Main Topic: Investment in a new production plant in Mexico Participants:
Mr. Walther Chief (CEO)
Mr. Stephan Glad  (COO)
Mr. Alex Miller   (CFO)
Mr. Burt Sales    (Director Sales)
Mr. Paul Choice   (Director Marketing)
----------------------------------------------------------------------
The plant shall be used for the production of all potato snacks for the American market.
Cost reduction, compared with American production, will be more than 35%.
The whole investment will be $ 230m within two years.
The participants agreed to start plant construction as soon as possible because Japanese
companies, producing with very low costs in Korea, will enter next year our home market.
There are various word functions that you can use to make changes to the document. Once the document is changed, it will be saved to the default location.
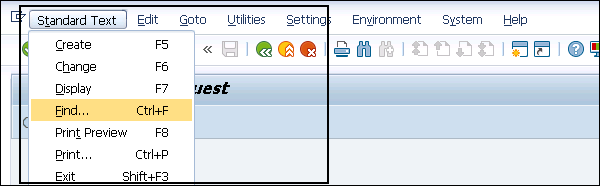
SAP Scripts - Find a Document
It is also possible to search documents in SAP system. You can perform a search based on various parameters such as text Id, text name, language or based on the author name.
To perform a search, go to Tools → SAPscript → Standard text or call Transaction SO10
Enter the Standard Text and click Find. It will open the dialog window and you can select from the following search criteria.
- Text Name
- Text ID
- Language
- Author
SAP Scripts - Save a Document
When you save a document in the SAP system, it is stored in SAP database. Using the find option, you can see a list of all the documents in the database. You can view the predefined document and also the customized documents that are created in the system.
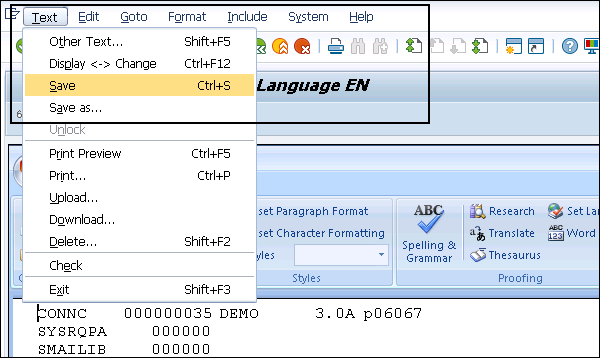
To save a document, go to Text → Save.
Let us say we have opened the following document for editing and made changes to the document.
To save the document, navigate to Text option at the top → Save.
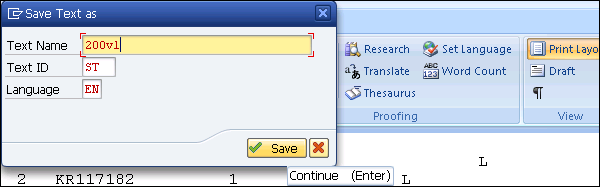
You can also maintain different versions of a document. Also note that documents are not automatically saved and you should save a long document periodically. If you log off from SAP system without saving a document, then the document is lost.
To maintain a version of the document, click Save as and enter the text name, the text ID, and the language.
To view the version, you can find the document in the list of available documents under Find option.
SAP Scripts - Delete a Document
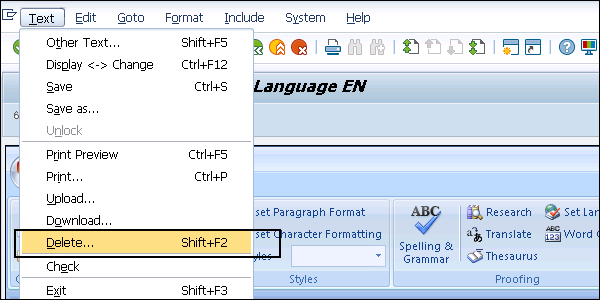
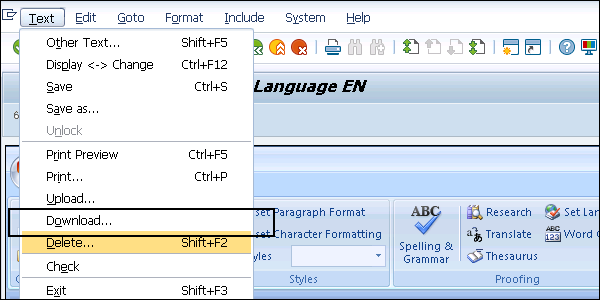
It is possible to delete a document in SAP system. If you want to remove a document, navigate to SAPScript → Standard Text → Enter the Text name and click Change.
The document will open in editor. To delete the document, go to Text → Delete → Yes.
You will get a message - The document has been deleted. You can’t restore a deleted document in SAP system.
SAP Scripts - Print Preview of a Document
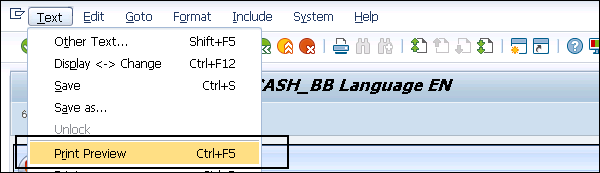
In SAP Script, it is also possible to preview a document before printing. To perform Print Preview of the document, go to Text → Print Preview.
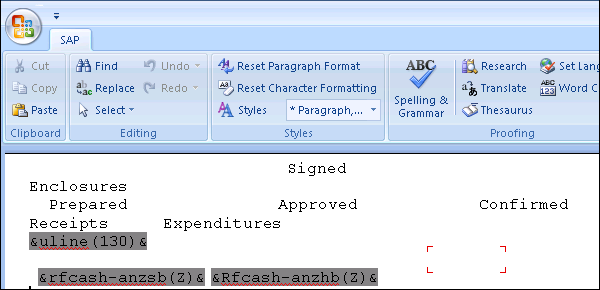
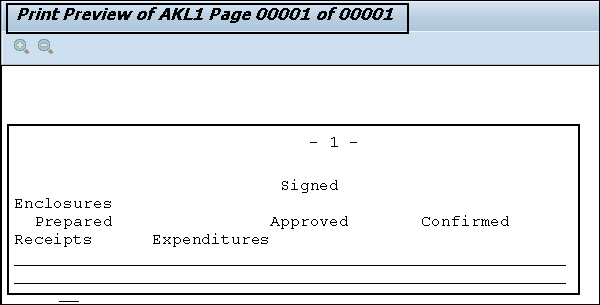
We have opened a document with the following text −
               Signed
Enclosures
Prepared      Approved     Confirmed
Receipts   Expenditures
&uline(130)&

&rfcash-anzsb(Z)& &Rfcash-anzhb(Z)&
When you go to Text → Print Preview, it will show you the printing format of the document. You can select various Print Preview options.
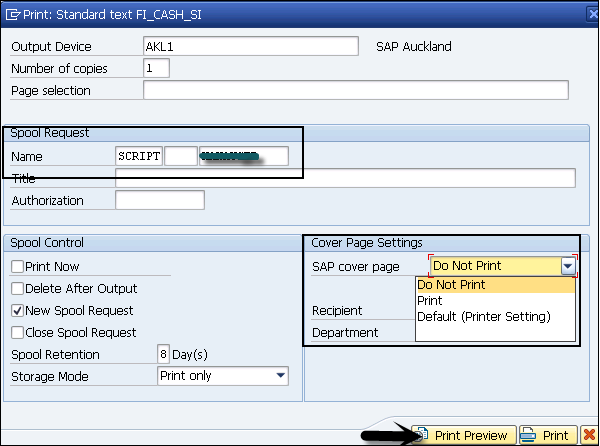
You can select a particular page for Print Preview or printing. When Print Preview is selected from the option, you can see a preview of the existing document as seen in the following screenshot.
SAP Scripts - Format Conversion
SAPscript are stored in Interchange Text Format (ITF) and you can convert them to Rich Text Format (RTF) and ASCII format using Word processors. To perform the format conversion to convert ITF to RTF format, you need to execute a format conversion from document template to SAP Script paragraph.
SAPscript editor allows you to perform the following format conversions −
You can export texts in format RTF, ASCII, HTML to a local file on the system.
You can also import the local files in formats – RTF, ITF and ASCII.
Importing and Exporting RTF Files
While exporting a RTF file, one paragraph or a character format can be mapped to exactly one paragraph or character style.
While importing RTF files, it can be divided into two parts – One-paragraph format is exactly mapped to one paragraph script format and one-character format can be mapped up to four SAP Script character style.
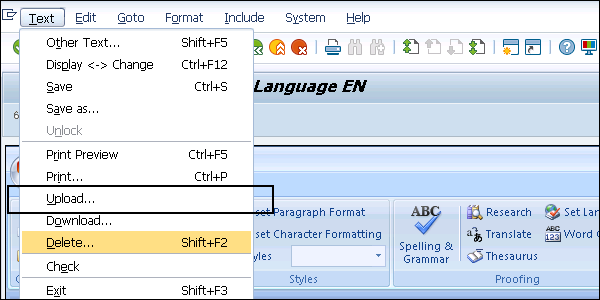
To perform RTF export, go to Text → Download.
You have to choose Rich Text Format (RTF) and click Transfer → Enter complete file path, the document template, and the form or style and select Transfer.
To perform RTF import, go to Text → Upload.
Select Rich Text Format (RTF) and choose Transfer → Select the complete file path and the document template. Then, choose Transfer.
SAP Scripts - Raw Data Interface
Using Raw Data Interface in SAP Scripting, allows you to connect to external text management systems. This interface contains all the data from SAP Script forms in SAP system but doesn’t contain any layout information such as font size, color, type, etc. The external system to which you are connected via interface manages the layout and performs data management.
Using Raw Data Interface, you can easily connect to an external system but there is no mechanism to verify if the form is printed correctly in the external system and the layout is managed.
To enable Raw Data interface (RDI) for external system integration, following settings have to be performed in SAP system −
Output Device − To perform RDI integration, there should be at least one output device that needs to be configured for external printing.
Printing to External System via RDI − You can flag a form for external printing in SAP system and if you don’t select this customizing setting, application settings are applied on the forms.
Form Definition in External System − For each form that is to be printed in the external text system, you have to define the form definition in the external text system.
Print Status Management − All the forms that you print via RDI to an external system, you need to maintain the print status of all the documents with unsuccessful print forms.
Table name STXRDID is used to maintain all the information regarding SAPscript RDI. You can view the information in this table using Transaction Code − SE11 or SE80.
This is Transaction Code: SE11. Mention the database table name and click Display.
This is Transaction code: SE80. Enter the table name and click Execute.
Raw Data Interface Output Formats
To get the print output, these techniques can be used −
- SAPScript
- SmartForms
- PDF-based Print Forms
SAPScript allows you to use raw data output format where the output mode is defined in the script itself or in runtime in the print program. The preferred format to use here is RDI because of less overhead and compact spool files.
You have to select SAPscript formatting in RDI output mode.
When you compare SAPScript formatting with SmartForms and PDF based print forms, Smartforms are advancement of SAPScript and are used to get XML based raw data output in XSF format. PDF based print forms provides raw data output format known as XFP with or without context evaluation.
SAP Scripts - Output Mode Spool
RDI output format consists of four types of record values. Each record contains a flag that tells the record type - Header (H), Data (D), Sort (S) and Control (C).
- Header Record
- Data Record
- Sort Record
- Control Record
Header Record
Each form that you send to an external text system for print, it starts with a flag - H that shows the Header record structure. Header part of the document contains the following fields −
- Form name
- Document number
- RDI version
- Language
- Device type
- Client and many other fields in Header Record structure
Sort Record
This field comes after the sort field and is represented by flag - S. Each form contains 10 internal and 5 external sort fields, 32-characters length for each field.
Data Record
This comes after the sort record and contains a flag - D that shows the data record structure. It contains the following fields −
- Form window name
- Start of the next main window
- Name of the text element
- Start of the text element
- Symbol name to identify symbol in the text element
- Value of the symbol
Control Record
Each document contains a control record represented by flag - C and is used to interpret the data in the form. Control Record provides the following details −
Code Page and Language Information − When you use an insert statement to add a text in other language, the system adds the control record that contains Code Page and Language to write the data record. For code Page - CODEPAGE keyword is used and for Language - LANGUAGE keyword is used.
Example − CCODEPAGE 1000 LANGUAGE DE
Page Name − Using the control record, when you start a new page you add a control record to specify the page name. Keyword used to specify page name - PAGENAME.
Example − CPAGENAME SECOND
SAP Scripts - Output Mode IDOC
IDOC stands for Intermediate Document and is used to transfer the documents/forms for printing from SAP to other system. When this output method is used, the structure of Header, Sort, Data, and Control record remains the same, however, the flags - H, S, D, and C go missing. There is a separate segment that is used for Sort, Data, and Control - E1RDI_BODY and this segment comes before the Control record.
The header segment in E1RDI_BODY doesn’t contain any document number and CLOSE_FORM function module returns the document number.
When you use function modules START_FORM and END_FORM to print multiple documents in a single request, a single IDOC is created and the status of IDOC is set to 30.
SAP Scripts - Create a Script in the System
To start a script, you have to run Transaction SE71 and this will open the Form Painter.
In the Form Painter, request screen, enter a name and language for a SAPscript form in the Form and Language fields, respectively. Let’s enter 'RVINVOICE01' and 'EN' respectively in these fields.
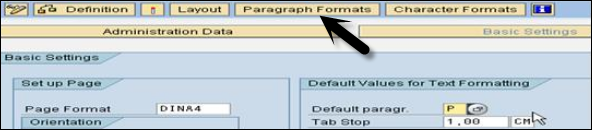
Paragraph provides all the information required to format a paragraph of text and fonts. To create a Paragraph, click the Paragraph Formats tab as shown in the following screenshot.
Enter the left margin, right margin, alignment and line spacing to define the Paragraph format.
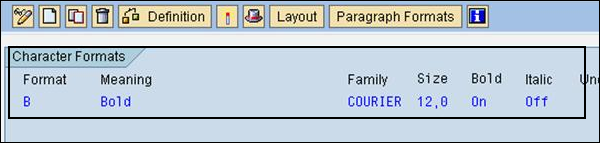
Click the Character Formats tab to enter character format and meaning as shown in the following screenshot.
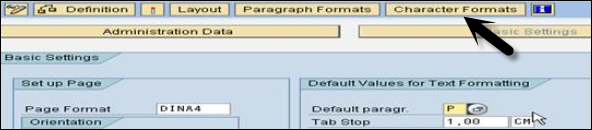
Enter the following settings for format option −
- Format
- Meaning
- Size
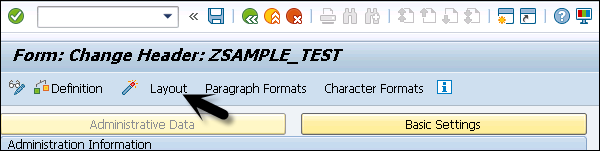
Then, you have to define Layout of the document. Click the Layout tab to design the window.

Using Layout, gives a GUI editor where you can drag the window position and it is easy to use.
By default, you can see the Main Window in the Layout. To create a new window, you can right-click on Layout → Create Window as seen in the following screenshot.
You can also add graph/logo to the layout part. Go to the Graph button next to Window tab and enter the details.
To make an element on the respective window, click the Edit text button.
You can define a driver program under Transaction SE38 to call this script. Use function modules to define the calling program −
- START_FORM
- WRITE_FORM
- END_FORM
- CLOSE_FORM
This is how you can develop a script and add multiple windows and define the paragraph and layout of the form.
Form OPEN_FORM
CALL FUNCTION 'OPEN_FORM'
EXPORTING
Form        = 'FormName'
Endform                    “OPEN_FORM
Form START_FORM
CALL FUNCTION 'START_FORM'
EXPORTING
Form        = 'FormName'.
Endform                    “START_FORM
CALL FUNCTION 'WRITE_FORM'
EXPORTING
Window      = 'GRAPHNAME’
CALL FUNCTION 'WRITE_FORM'
EXPORTING
Element     = 'ELEMENTNAME'
FUNCTION    = 'SET'
TYPE        = 'BODY'
Window      = 'MAIN’
endform.                   " WRITE_FORM
CALL FUNCTION 'END_FORM'
IMPORTING
RESULT      =
EXCEPTIONS
UNOPENED    =  1
OTHERS      =  5
endform.                    " END_FORM
CALL FUNCTION 'CLOSE_FORM'
IMPORTING
RESULT      =
EXCEPTIONS
UNOPENED    =  1
OTHERS      =  5
endform.                    "CLOSE-FORM