- SAP IDT Tutorial
- SAP IDT – Home
- SAP IDT – Overview & User Interface
- SAP IDT – Resources
- SAP IDT – Creating Universe
- SAP IDT – .unv Universe Introduction
- Dealing With Published Universes
- SAP IDT – Projects
- SAP IDT – Managing Connections
- Managing Resources In Repository
- SAP IDT – Data Foundation Layer
- SAP IDT – Building Data Foundation
- SAP IDT – Qualifiers & Owners
- SAP IDT – Joins In Data Foundation
- SAP IDT – Business Layer
- SAP IDT – Business Layer Properties
- SAP IDT – Folders In Business Layer
- SAP IDT – Business Layer View
- Building Query In Query Panel
- Dependency Among Resources
- SAP IDT – Publishing
- SAP IDT – Security
- Running Query Published Universe
- SAP IDT – Format Editor Overview
- SAP IDT Useful Resources
- SAP IDT - Questions Answers
- SAP IDT - Quick Guide
- SAP IDT - Useful Resources
- SAP IDT - Discussion
SAP IDT - Folders In Business Layer
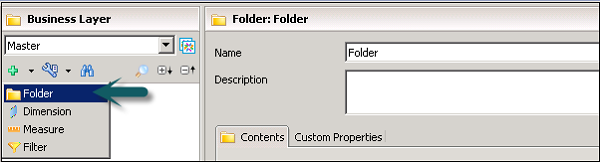
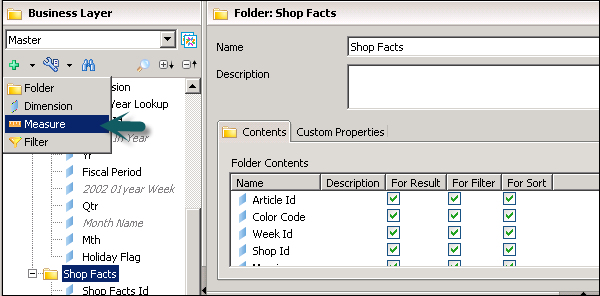
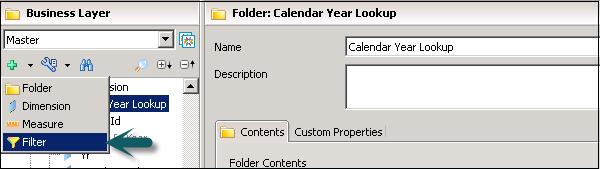
To add a folder in Business Layer, click insert + option and select a folder to insert a folder in Business player.
The following properties can be set for this folder as it appears in the query panel.
- Name and Description
- Active State - Active, hidden, Deprecated
- Contents
A list of objects in the folder that lets you define properties that describe what the object is used for in the query (for result, for filter, for sort). You can change the order of the objects in the folder using the up and down arrow keys to the right of the list.
Custom Properties − Optional field
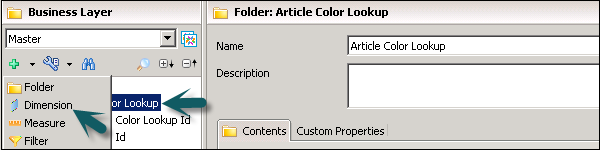
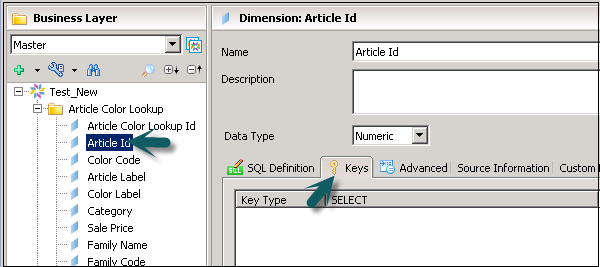
Inserting and Editing Dimensions − You can edit an existing dimension and can also insert a new dimension. To edit an existing dimension, select the dimension in Business Layer.

To insert a new dimension, select the folder in which you want to insert a dimension → click on insert option at the top → Dimension.
It will add a new dimension in the target folder. You can define the properties of an added dimension in Properties pane.
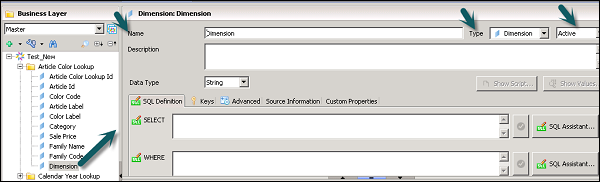
Following are the tabs in the above screenshot −
- Name
- Description
- Data Type
- State
- SQL of OLAP definition
- Keys tab
- Advanced tab
- Source information, etc.
Defining the Keys
This option is available for dimensions that are built on data foundation. To define keys in Business layer, select the dimension in Business layer pane. Under Dimension properties → Keys tab.
To add a key, scroll down in Keys tab and click on Add key button. You can define one primary key and multiple foreign keys.

To detect existing keys in the database, you can click on detect tab. To change the key type, you can click on the dropdown. To change a key to active, click on active column.
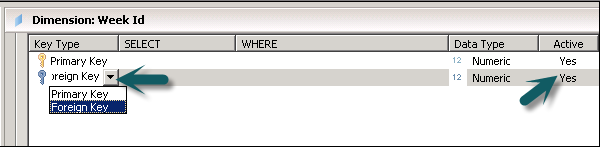
To save the changes, click the Save icon at the top.
Defining the Measures
You can edit an existing measure and can also insert a new measure. To edit an existing measure, select the measure in Business Layer.
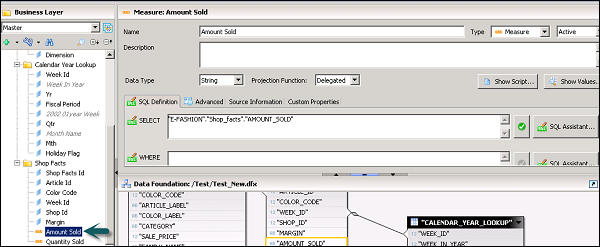
To insert a new measure, select the folder in which you want to insert a measure → click the insert option at the top → measure.
It will add a new measure in the target folder. You can define the properties of an added measure in Properties pane. You can define Projection function for the measures. Similarly, you can define attributes in a Business Layer.
Adding Filters
You can edit an existing filter or add a new filter. To insert a new filter, select the folder and click on insert.
Adding Hierarchies
You can insert hierarchies only in OLAP Business Layer. You can edit an existing hierarchy or add a new hierarchy.
To edit an existing hierarchy |
Select the hierarchy |
To insert a hierarchy |
Select the folder or analysis dimension in which you want to insert the hierarchy. To insert a hierarchy at the top level, select the top node (business layer name) in the tree. Click the Insert object icon |
You can define the following properties of a Hierarchy −
- Name and Description
- State - Active, hidden or deprecated
- MDX definition
- Advance tab
- Custom properties
- Source Information
You can define the following objects in a hierarchy in Business Layer −
- Levels
- Attributes
- Named sets
- Calculated members
Defining Named Sets
You can insert Named set only to OLAP Business layer. You can edit an existing named set or add a new named set.
Once a named set is defined, you can define various properties of Named set −
To edit an existing named set |
Select the named set |
To insert a named set |
Select the folder, analysis dimension, or hierarchy in which you want to insert the named set. To insert a named set at the top level, select the top node (business layer name) in the tree. Click the Insert object icon |
Defining SQL and MDX for an Object
To define SQL/MDX expression of an object in Business layer, select the object. In Object properties pane, select SQL definition tab.

You can enter Select statement directly or click on SQL assistant button to define SQL expression. You can define aggregation for measures like Sum (efashion."Shop_facts"."Amount_sold").
Enter the WHERE statement directly, or click the SQL Assistant button to use the SQL editor to build the statement.
Save the business layer by clicking the Save icon in the main toolbar.
You can edit the MDX expression for objects inserted into the business layer. If you want to edit the definition of a native object (an object generated automatically from the cube when the business layer was created), copy the native object and edit the copy.
Open the business layer in the editor by double-clicking the business layer name in the Local Projects View.
In the Business Layer pane, select the object.
In the object properties pane, select the MDX Definition tab.
Enter the Expression directly, or click the MDX Assistant button to use the MDX editor to build the statement.
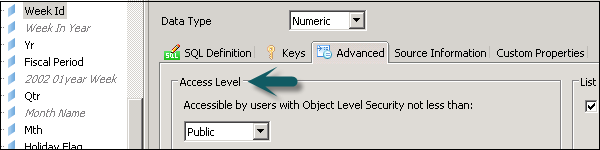
Setting Access Levels
You can define various access levels of an object −
- Private
- Public
- Controlled
- Restricted
- Confidential
When you define an object as public, all users can access the object. If an object is defined as restricted, only those users that are granted access level of restricted or higher can gain access.
To Define Access Level of Objects
Select the object in Business layer for which you want to define the access level. You can use CTRL key to select multiple objects. Right-click on object → Change Access Level.
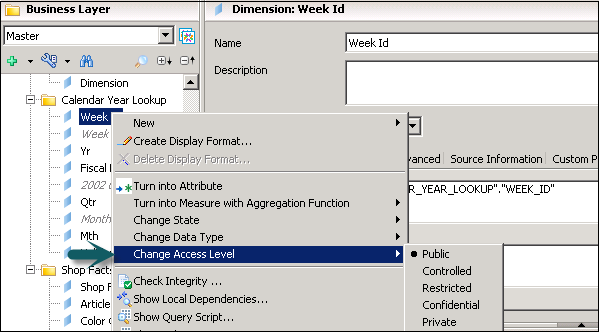
Access level for an object can also be defined in “Advanced” tab.
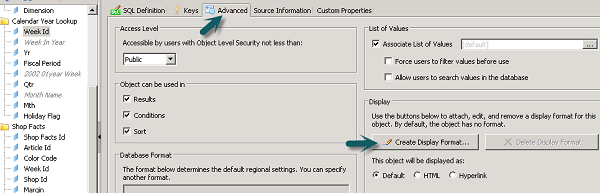
Defining Display Formats for Objects
Display option can be used to create, edit, or remove a display format for an object. By default, the object has no format.
Go to Advanced tab of an object as shown in the following screenshot.