- SAP HR Tutorial
- SAP HR - Home
- SAP HR Overview
- SAP HR - Introduction
- SAP HR - Maintaining Relationships
- SAP HR - Time Constraints
- SAP HR - Maintaining Infotypes
- Personal Administration
- SAP HR - Personnel Administration
- SAP HR - Master Data
- SAP HR - Infotypes
- SAP HR - Personnel Actions
- SAP HR - Changing Infotypes
- Time Management
- SAP HR - Time Management
- SAP HR - Work Schedules
- SAP HR - Public Holiday Calendar
- SAP HR - Attendance Absences
- Benefits
- SAP HR - Benefits
- Payroll
- SAP HR - Payroll Management
- SAP HR - Basic Pay Infotypes
- Primary and Secondary Wage Types
- SAP HR - Payroll Process
- SAP HR - Gross Pay
- SAP HR - Payroll Cycle
- SAP HR - Universal Work List
- SAP HR Useful Resources
- SAP HR - Quick Guide
- SAP HR - Useful Resources
- SAP HR - Discussion
SAP HR - Quick Guide
SAP HR - Introduction
SAP Human Capital Management (SAP HCM) is one of the key modules in SAP and is also called SAP Human Resource (HR) or SAP Human Resource Management System (SAP HRMS). SAP HCM contains many submodules and all these modules are integrated with each other.
The key modules are as follows −
Organizational Management − Organizational Management includes Personnel development, Personnel cost planning and event management.
Time Management − Time management includes time recording, attendance, time schedule, shift management, etc.
Personnel Administration − Personnel Administration includes personal and organizational structure, Infotypes, integration with time and payroll, etc.
Payroll − Payroll deals with payroll types, payroll group configuration, primary and secondary wages, gross pay, bonus, etc.
Recruitment − Recruitment includes hiring an employee, maintaining HR master data, etc.
Training and Event Management − Training and Event Management deals with identifying training needs, scheduling training, training cost management, etc.
Travel Management − Travel Management includes managing official trips, cost management for travel, travel expenses, etc.
Organization Management
Organization Management allows you to manage the enterprise structure and analyze organization plans.
The key features are −
In organization management, you can configure system settings that is required for enterprise structure, personnel cost planning, etc.
You can define plan version to configure various organization plans at the same time.
Only one plan version defines your organizational current plan.
You can edit, change or compare different organization plans using plan version.
You can have two different plan versions, one for marketing and other one for sales hierarchy.
You can compare or edit both the plans but only one plan can be used at a time.
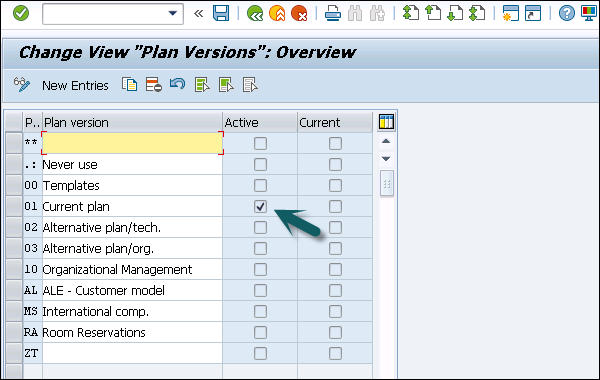
How to set a Plan version as active?
There are two ways to set a plan version.
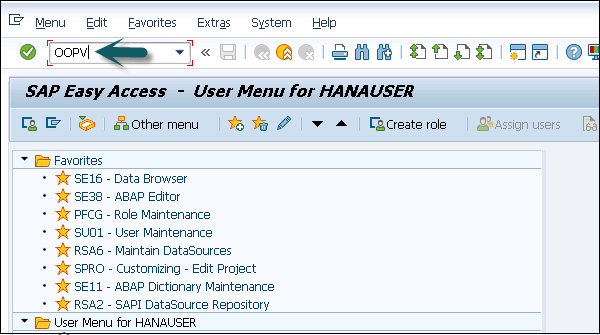
Step 1 − Use the code T-Code: OOPV
Step 2 − Go to IMG → Personnel Management → Global Settings → Plan Version Maintenance → Maintain Plan Versions.
You can select from the list of available plans.
Organizational Object Types
An Organization plan consists of various object types, which define the grouping of similar data together. Each object type consists of a unique object key. All object types are linked together with a relationship among each other.
Example − A person holding a position that is defined by a specific job.
Relationship
In an Organization plan, relationships are used to link different object types.
Example − A person holding a position in an organization and is assigned with cost center. It defines Person to position relationship and position to Organization unit.
While defining an hierarchical organization structure, you are creating a relationship between organization objects. When a person is holding a position in an organization unit, it means there is relationship between the position object and the organization object.
Validity
It determines the life of object types. At the time of object creation, you enter the start and the end time of the project and this determines the validity of the object.
There are various types of object types that can be defined in an organization plan. Given below are most common object types and their keys −
| Object Type | Key |
|---|---|
| Organizational Unit | O |
| Person | P |
| Cost Center | K |
| Position | S |
| Job | C |
Key Features of Organization Objects
The key features are −
You can create or change an existing object types, which are not managed.
Example − Object type person from HR Master Data.
You can also define the relationship between different object types that should be proposed in the course of the authorization check.
It is also possible to define an object type hierarchy to generate reporting.
It is also possible to change the key of standard objects type- "S" for Position, "T" for task.
There are two types of Relationships −
Relationships with the same object types.
Relationships with different object types.
Number Ranges
You can maintain different number ranges for Organization Management and Personnel administration in SAP HR. As discussed in previous topic, OM contains different object types.
| Object Type | Key |
|---|---|
| Organizational Unit | O |
| Person | P |
| Cost Center | K |
| Position | S |
| Job | C |
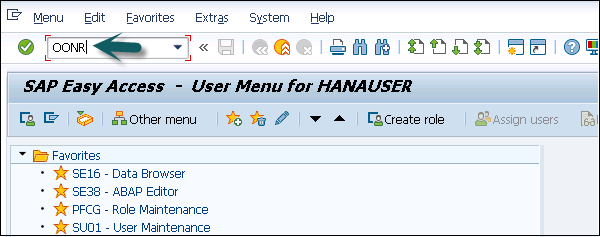
To maintain the different number ranges for OM objects, you can use T-Code: OONR.
You can also choose the following path.
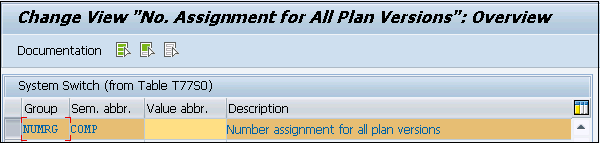
Go to IMG → Personnel management → Organizational management → Basic settings → Maintain number ranges → set up number assignment for all plan versions → Execute.
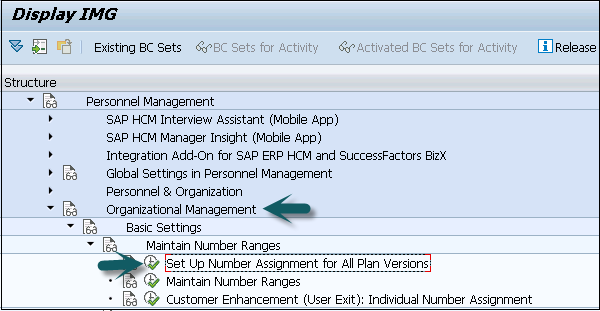
The first two digits represent your plan version and the next two letters represent the object type.
Similarly, you can maintain number ranges for personnel numbers. A Personnel number is generated when an employee is hired. It can be generated internally or externally.
The personnel number range whether internal or external should be defined at the following configuration node.
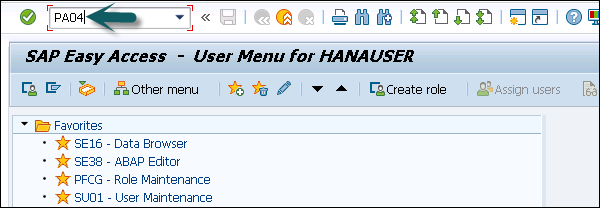
Step 1 − Use T-code: PA04
Step 2 − You can also go to SPRO → IMG → Personnel management → Personnel Administration → Basic settings → Maintain number range intervals for personnel numbers.
Step 3 − A new window opens. You will see Range Maintenance: Human resources. Go to Intervals to display intervals.

Step 4 − It will open a new window, Maintain Intervals: Human resources. You can check different number ranges for personnel number as shown below −
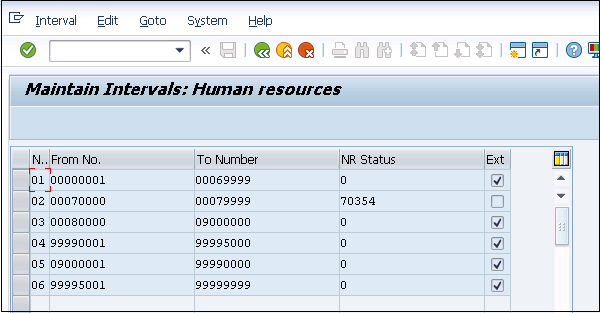
The NR Status indicates the last personnel number assigned/used up for that respective MOLGA. MOLGA Is used to support multi-country human resource management.
SAP HR - Maintaining Relationships
In an Organization plan, relationships are used to link different object types.
Example − A person holding a position in an organization is assigned with cost center. It defines a Person to position relationship and position to Organization unit.
While defining a hierarchical organization structure, it means you are creating a relationship between organization objects. When a person is holding a position in an organization unit, it means there is relationship between position object and organization object.
A relationship can be created in both the ways- top down and bottom approach. These relationships are normally maintained in HRP001 table. If these relationships are not standard, you may need additional tables.
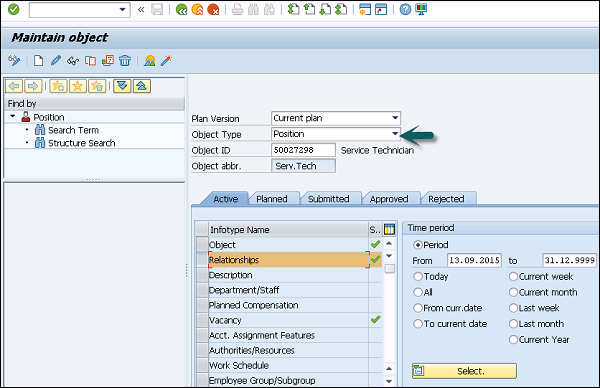
To maintain relationship, use T-Code: PP01 or PP03.
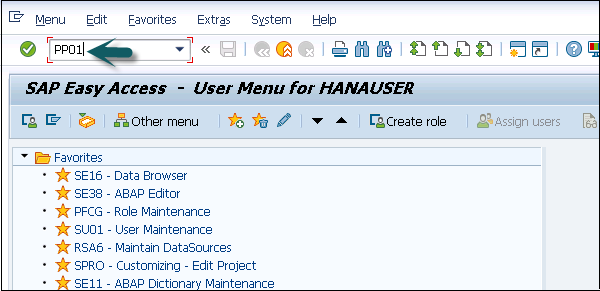
A new window will open with the name Maintain Object.
Select the Object type, enter position number, give relationship and click create (F5).
Object Types and Essential Relationships
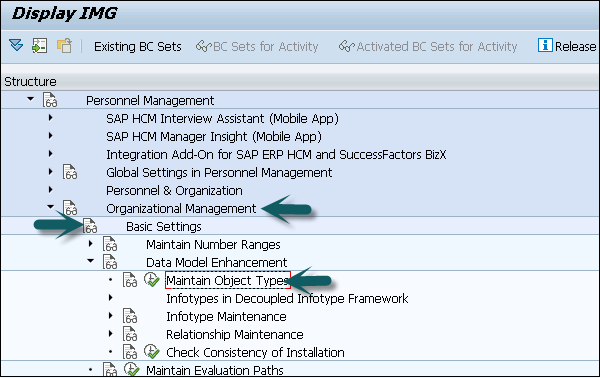
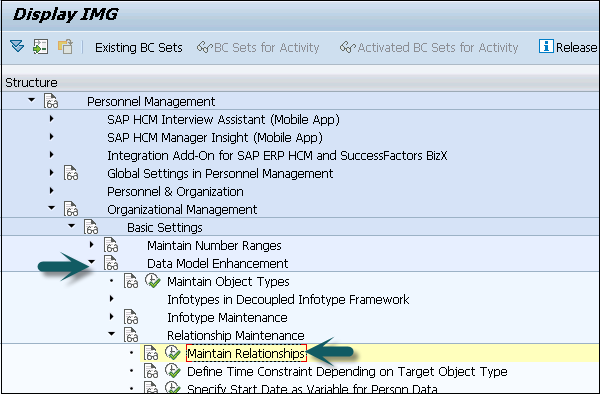
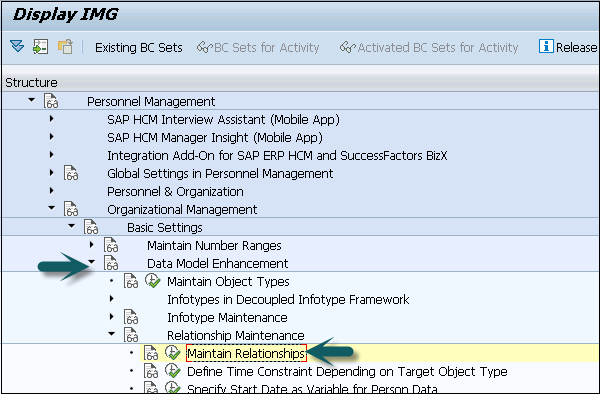
Go to SPRO → IMG → Personnel Management → Organizational Management → Basic Settings → Data model enhancement → Maintain Object Types → Execute
To create new object type and assigning relationships follow the steps given below.
Step 1 − Create new object type and assign essential relationships.
Step 2 − Assign object to the required Infotypes.
Step 3 − Maintain subtypes.
Step 4 − Maintain personnel actions.
Step 5 − Assign number range.
Step 6 − Maintain object via PP03 or PP01.
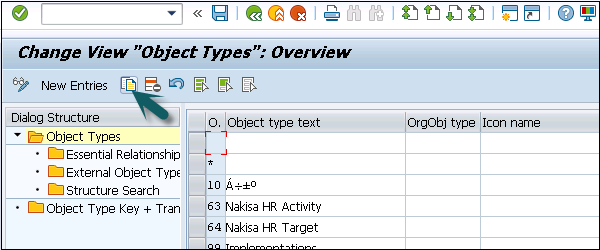
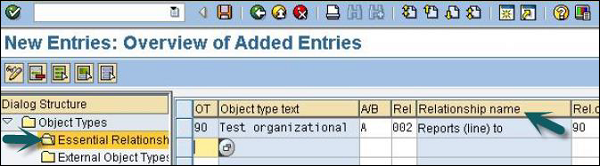
Step 7 − Go to the Change View “Object Types”: Overview window. Click New Entries to create a new object type. You can also copy an existing object type.
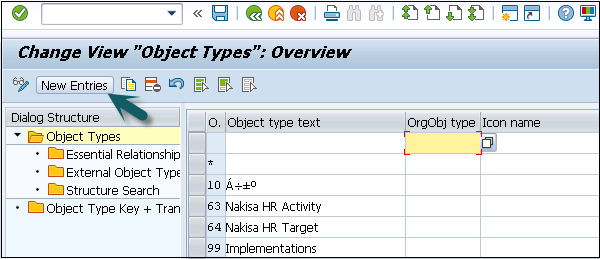
Step 8 − Enter Object type text, code, etc. When the object is created, assign essential relationships to it by clicking on essential relationships on the left side.
Assigning a relationship means that once an object is created, the assigned relationships are mandatory to be maintained.
Maintaining Object types is available in Table: T7780
Maintaining Essential relationship is available in Table: T7750
Relationship Maintenance
For maintaining relationship in SAP HR module, go to SPRO → IMG → Personnel Management → Organizational Management → Basic Settings → Data model enhancement → Relationship Maintenance → Maintain Relationships → Execute
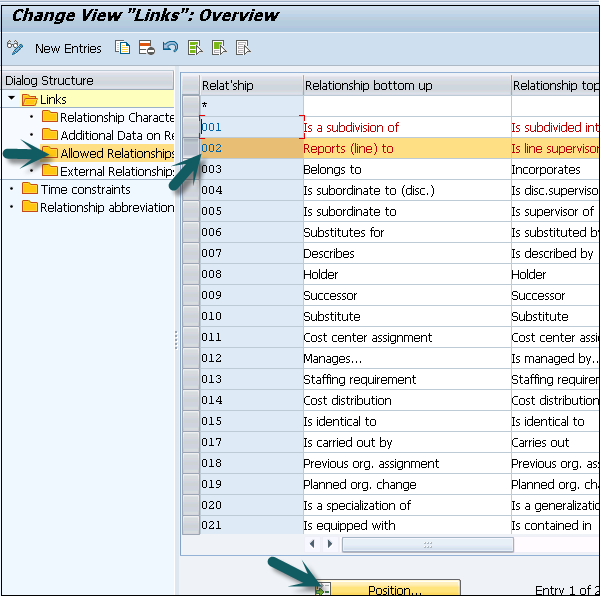
In the left pane, go to Allowed Relationships, select the relationship you want to maintain, click Position.
SAP HR - Time Constraints
Time constraints are used to determine how the object type exists and how they will be updated in the HR system.
You can also define time constraints for object types in Organization management to have a suitable system. You need not to keep orphan object types in the system.
- O - O → Time Constraint 1
- O - S → Time Constraint 2
- O - K → Time Constraint 3
- S - O → Time Constraint 4
- S - P → Time Constraint 5
There are three types of time constraints −
Time Constraint 1 is mandatory for a record to exist in the HR system and can exist one at any point of time.
Time Constraint 2 is not mandatory for a record but only one exists at any point of time.
Time Constraint 3 is not mandatory for a record and can have many at any point of time.
Assigning Time Constraints to a relation
Step 1 − To assign time constraints to a relation, you have to use −
SPRO → IMG → Personnel Management → Organizational Management → Basic Settings → Data model enhancement → Relationship Maintenance → Maintain Relationships → Execute
Step 2 − In the left pane, go to the Time constraint tab as shown in the image given below −
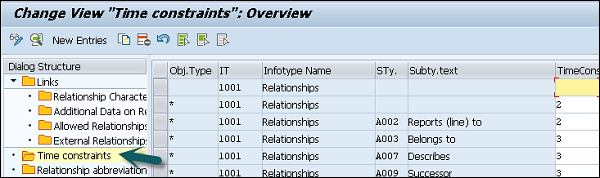
You can assign appropriate time constraints to the given relationship.
Infotypes reactions as per time constraints −
Time Constraint 1 − Record must have no gaps, no overlapping. If you select this Time Constraint, there should not be any gaps nor overlapping. This TC is generally used for Infotypes like, 0001, 0008, 0009 etc. where there is only one valid record.
Time Constraint 2 − This TC includes those records that can include gaps but there should be no overlapping. If you select this TC, it means that you can have gaps but NO overlapping. Consider an example of the marital status of an employee. The employee has a spouse but a gap can occur in case he is divorced.
Time Constraint 3 − This TC includes records that can have gaps and can exist multiple times. For example, Infotype IT0014 can have multiple records in that particular Infotype at the same time with overlapping.
Maintaining Personnel Actions
In SAP HR system, personnel actions are performed for all the Infotypes that require data to be entered in the HR system. Common Infotypes that require a personnel action are hiring a new employee, termination of an employee, etc.
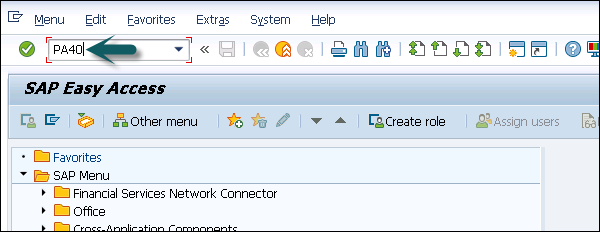
Step 1 − To perform a Personnel action, use T-Code: PA 40 or go to SPRO → IMG → Personnel Management → Personnel Administration → Customizing Procedures → Actions.

Step 2 − A new window ‘Personnel Actions’ opens.
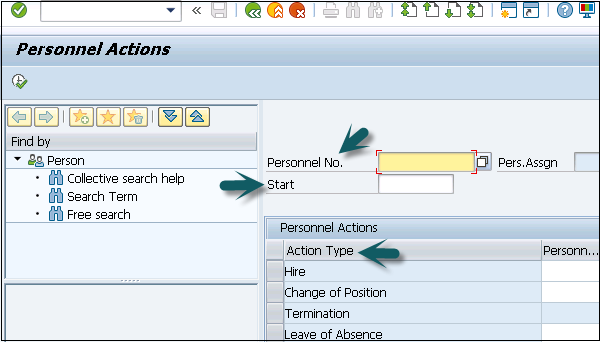
The screen consists of the following fields −
Personnel No − This field has an employee’s personnel number. When a new employee is hired, it is generated automatically by the system.
Start − This field shows the start date of the personnel action.
Action Type − In this field, you have to select the action type that needs to be performed.
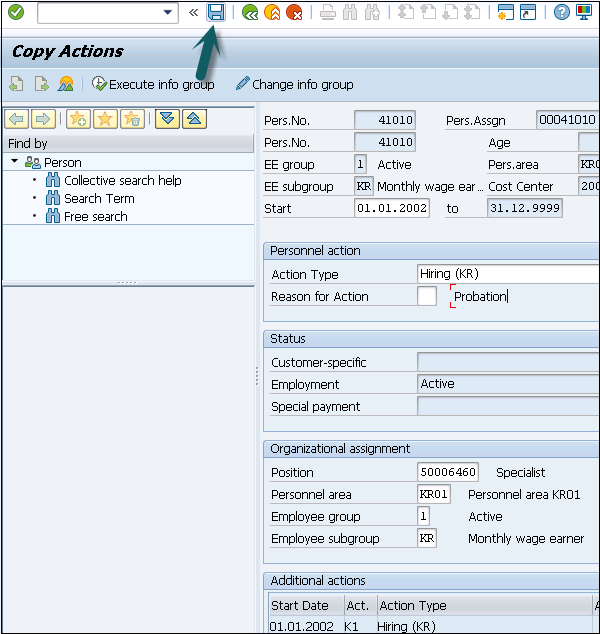
Example
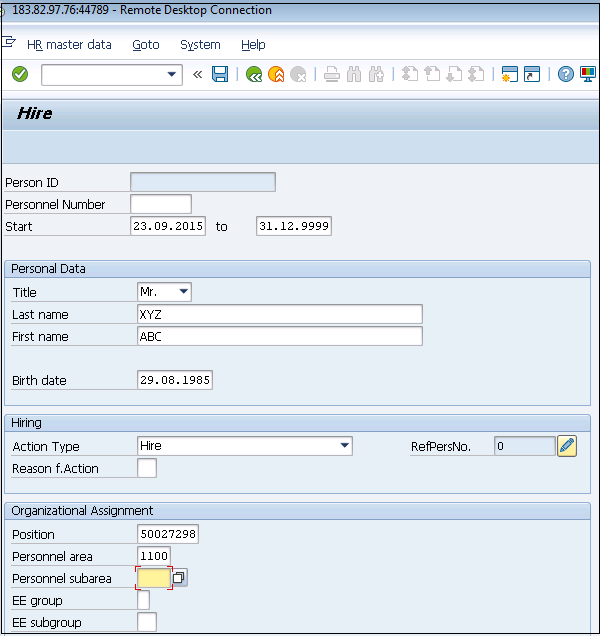
Let us understand how a new employee is hired in SAP HR system.
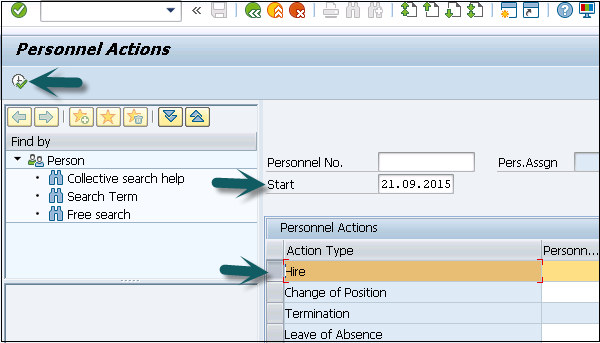
Step 1 − Enter the hiring date as shown below.
Step 2 − From Action type, select Hire.
Step 3 − Click the Execute button given on top.
A new window will open. Enter details like Reason for action, Personnel area, Employee group and sub group, etc. and click the Save icon at the top.
SAP HR - Maintaining Infotypes
In SAP HR system, Infotypes are used to store the data for all the personnel actions and administrative tasks in the system. Infotypes are known as small units of information in SAP HR system.
Infotypes group the similar data together and define structure, enter data and define the information for specific period of time.
Components of Infotypes
An Infotype consists of the following components −
Structure
An Infotype contains a set of similar data records in the form of data structure. Infotype contains series of information like first name, last name, date of birth, marital status, etc. When an Infotype is updated in the system, old data is not removed from the system but time is delimited.
Data Entry
You can enter predefined values for Infotype that helps in fetching and maintaining the data in the system. Entries in HR system are checked automatically for accuracy. Default value checks depend on the employee organization assignment.
Time Dependency
When an Infotype is updated in the system, old data is not erased. It is stored in the system for historical evaluation purpose. This allows each Infotype to have multiple records but all the records may vary as per their validity.
Time based reaction of Infotype is defined in the Time constraint field. Infotype 0000 to 0999 are Personnel Administration Infotypes. It is also possible to define permissibility of Infotype for each country, this allows you to restrict Infotype while editing the master data.
Go to SPRO → IMG → Personnel Management → Personnel Administration → Customizing Procedures → Infotypes → Assign Infotypes to Countries

How to Maintain Infotypes?
To maintain Infotype, follow the steps given below −
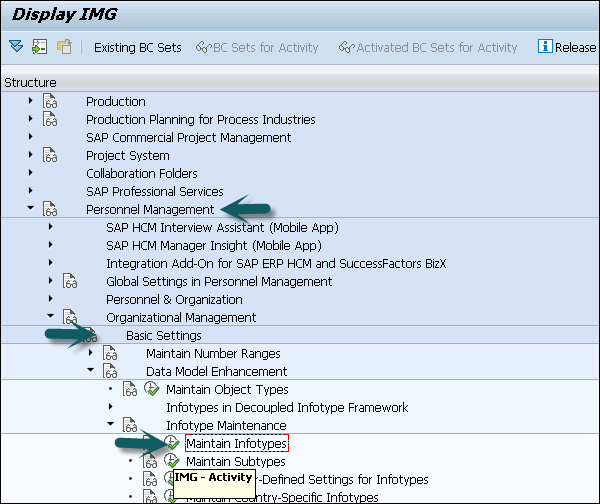
Step 1 − Go to SPRO → IMG → Personnel Management → Organizational Management → Basic Setting → Data model enhancement → Infotype Maintenance → Maintain Infotypes → Execute.
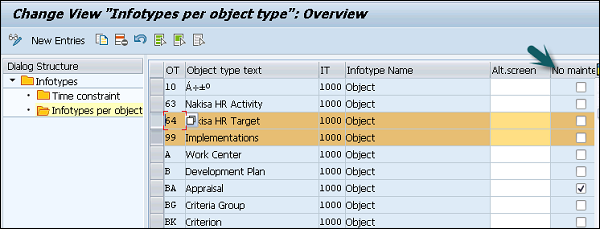
Step 2 − Select the Infotypes to which the newly created custom object needs to be assigned. Select the Infotype and click the Infotypes per object type option.
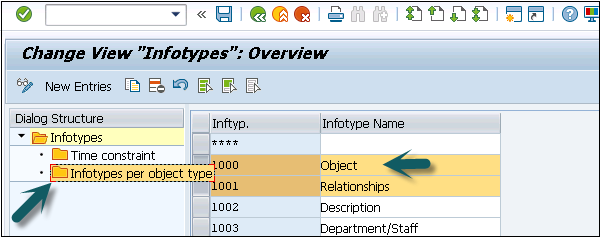
Step 3 − To assign custom objects to Infotype, click the New Entries option. You can uncheck the No Maintenance check box such that you can maintain custom objects via Organization Management transactions PP01.
Maintaining Info Subtypes
Info Subtypes are known as sub units of an Infotype. Using subtype, you can easily manage and access the data in HR system and can control the Infotypes. You can easily assign different features to control the data like time constraints to sub types.
You can assign different control features to sub types as per requirement like TC1, TC2, and TC3.
Example
Consider the example of an Infotype Addresses (0006). Following are the subtypes −
Subtype 1 − Permanent Residence address
Subtype 2 − Temporary address
Subtype 3 − Home address
Considering Control feature – Time constraint for this Infotype, you should use TC-3 for Infotype Addresses, as we need to pass multiple values. Permanent Residence address subtype should be Time Constraint -1. Home address can exist once at any one time, hence it is Time Constraint -2.
How to maintain subtypes?
To maintain subtypes −
Step 1 − Go to SPRO → IMG → Personnel Management → Organizational Management → Data model enhancement → Infotype Maintenance → Maintain subtypes → Execute.

Step 2 − To maintain subtype, select the subtype in the next window. In the left pane, you have an option to add control feature - Time Constraint.
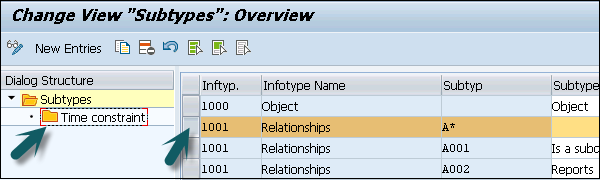
Step 3 − Double click the Time constraint in the left pane, a new window ‘Change View “Time Constraint”: Overview’ will open.

SAP HR - Personnel Administration
SAP HR - Personnel administration consists of many individual pieces of information, which are stored, updated and managed for each employee in HR system.
To manage personnel data related to tasks in HR system, you need Personnel Administration. There are various Infotypes that can be used for Personnel Administration.
Commonly used Personnel Administration Infotypes are −
- Organization Management Infotypes
- Time Management Infotypes
- Recruitment Infotypes
Organization Structure
Organizational structures is used in HR to plan and map the organizational levels of an organization to control and simplify processes such as time recording and payroll. Typical components in an organizational structures include −
- Enterprise structure
- Pay scale structure
- Wage types
- Personnel structure
- User authorizations
In Organization hierarchy, you define the subdivision of company into personnel areas, sub areas, company code, etc. Using different grouping, you can create organizational hierarchies and control functions. Using grouping, you can set up enterprise and personnel structure that are independent of each other.
By assigning an employee to personnel and enterprise structure, you can easily process human resource data of an employee. By using the default values, it is easy to manage data for different fields.
To evaluate human resource data, you can use the Organizational structures for creating evaluations and analyses of employee data for Controlling and departments.
Enterprise Structure
Enterprise structure of an organization is defined as structure to manage Personnel administration, payroll processing, and time management for a company. Enterprise structure defines the key components in a company and their relationship with each other.
Key components in an Enterprise Structure include −
- Client
- Company Code
- Personnel area
- Personnel subarea
- Organizational Key
The enterprise structure in "Personnel Administration" consists of the following −
Client
A client is known as an organizational and data technical isolated unit in SAP ERP system and each unit has separate master records and its own separate record of tables.
Company code
It is called the smallest organizational unit of external accounting in which a complete and isolated financial accounting can be created. Example: Profit and loss calculation, balance sheets are contained within the company code organizational units.
Personnel area
The personnel area is used in Personnel Administration in HR system and is unique within a client.
Important features are −
A Personnel area is subdivided into subareas.
Organizational data and steps to assign it are stored on a personnel area and subarea. The guidelines can include pay scale, legal or collective agreement, etc.
A personnel area is assigned to the company code to manage financial accounting values.
A pay scale area, a pay scale type and a public holiday calendar are precisely defined for a personnel subarea.
Personnel subarea
The personnel subarea is used only in Personnel Administration in SAP ERP. The groupings linked to the personnel subarea determine which entries from the subsequent screen are allowed for an employee of a particular company code.
Example
The personnel area in a software company can be subdivided into development, training and administration personnel subareas.
Groupings are used for validation of master and time data. Groupings are also used to check the plausibility of data that you enter.
Organizational key
Using an Organizational key, you can define the organizational assignment more precisely. An organizational key can consist objects from enterprise structure and personnel structure.
Personnel Structure
Personnel structure is used to define an employee’s position in an organization. Personnel structure can be divided into two parts −
- Administrative Structure
- Organizational Structure
Administrative Personnel Structure
It consists of the following objects −
Employee group
Employee subgroup
Payroll area
Organizational Key − Organizational key consists of both personnel and enterprise structure. Employee group and subgroup can also participate while defining an Organizational key.
Organizational Personnel Structure
It consists of the following elements −
- Position
- Job
- Organizational unit
To assign an employee to the Personnel structure, use hiring as personnel action as mentioned in the previous topic. This is stored in Organizational Infotype 0001.
Hiring an Employee
To perform a Personnel action, follow the steps given below −
Step 1 − Use T-Code: PA 40 or go to SPRO → IMG → Personnel Management → Personnel Administration → Customizing Procedures → Actions.
Step 2 − A new window Personnel Actions opens.
It consists of the following fields −
Personnel No − This field has an employee’s personnel number. When a new employee is hired, it is generated automatically by the system.
Start − This field shows the start-date of the personnel action.
Action Type − In this field, you have to select the action type that needs to be performed.
Step 3 − The next step is to enter the hiring date as shown below. From the menu of Action type, select Hire. Click the Execute option at top.

Step 4 − In the next window, enter the details like Reason for action, Personnel area, Employee group and sub group, etc. and click the Save icon at the top.
SAP HR - Master Data
Maintaining the HR Master Data function allows you to maintain employee data tasks like entering the data, update, etc.
Data related to an employee is entered in various Infotypes. For example, Infotype 0002 contains personal information of an employee like name, date of birth, marital status, etc. Infotypes are used to group similar data and makes it easier to process.
Maintaining HR Master Data function allows you to access an employee’s Infotype records individually. Similarly, you can use fast entry function to maintain employee data simultaneously for multiple employees.
Performing a Personnel action in HR system like hiring an employee, involves entering huge data in the system. You have to enter series of Infotype information related to an employee.
HR Master Data Structure
The key components for HR Master Data in SAP Human Capital Management system are as follows −
- Information type or known as Infotype
- Information subtype or known as Info subtype
- Object Identification to differentiate between data records
- Data structure elements characteristics
- Relationship
Processing HR Master Data
There are many functions, which can be used to process HR master data in system. These allow you to create or edit the existing records in the system.
Create function
The Create function allows you to enter the new Infotype record in the system. You can create new Infotype record and in addition, retain the old records in the system. Validity of new record is defined.
Change function
The Change function is used to edit an existing Infotype without creating a new Infotype. Using the change function, the previous value of Infotype is changed and any previous value is not stored.
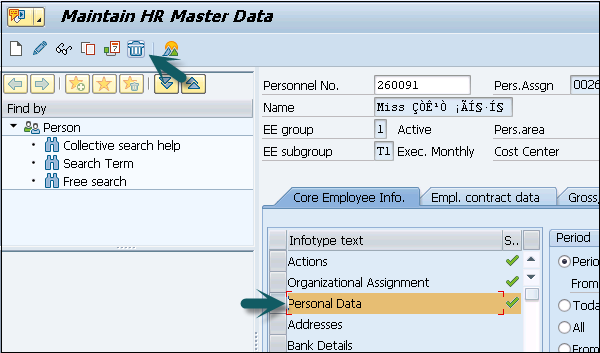
Delete function
The Delete function allows you to delete an Infotype record in the HR system. When you delete an Infotype record with time constraint 1, it extends the previous record automatically.
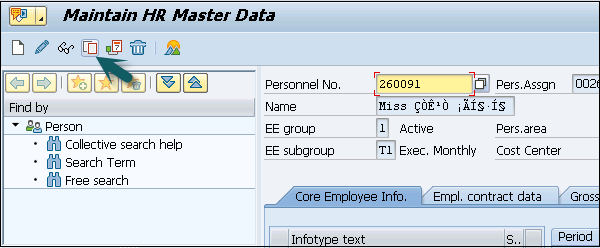
Copy function
The Copy function allows you to create a new Infotype record and update history. This function does not enter data on a new screen but asks to enter information on a screen containing the data.
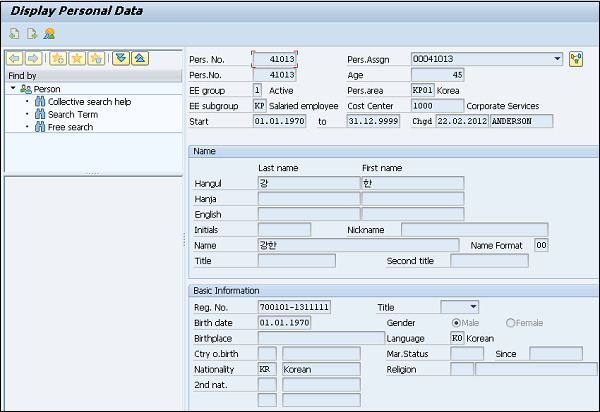
Display function
You can use the Display function to view an Infotype on the screen. In display mode, you cannot process or update data.
Using the List function, you can display an overview of all the records stored for a specified Infotype.
Selecting HR Master Data
To access an employee data, you must enter the employee’s personnel number and the Infotype whose data records you want to process. You can find personnel numbers, even if you do not know them exactly, by using the Search Help for Personnel Numbers.
Once you search an employee, you can check the employee Infotype record in the system. Infotype search can be performed using the following methods −
Selecting an Infotype by name or number − You can perform a search for an Infotype if you know its name or number.
Selecting an Infotype using functional area − You can also search an Infotype using functional area as SAP HCM system contains similar Infotypes group together.
Personal Data
Payroll Data
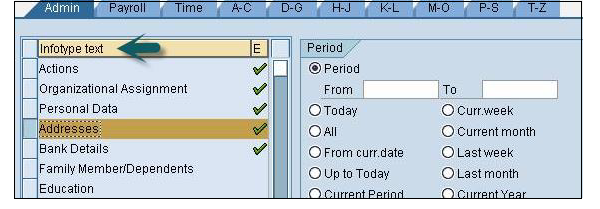
Selecting Infotype using text − You can also search an Infotype by typing text search term. System displays all the Infotype whose name matches the search item.
Selecting an Infotype using Personnel file − You can also search an Infotype using a personnel file.
SAP HR - Infotypes
Infotype is used to store personal data about an employee. An Infotype contains four digit code and name of Infotype.
Example − Infotype 002 contains employee personal data- like name, date of birth, marital status, etc.
Each Infotype has two fields −
Mandate fields − A tick mark sign in the field box represents these fields.
Option fields − These fields are not mandatory and can have a blank value.
There are predefined number ranges that SAP has defined for Infotype.
HR and Payroll Data Infotype → 0000 to 0999
Organizational Data → Infotype 1000 to 1999
Time Data → Infotype 2000 to 2999
You can further divide an Infotype into groups, which are called subtypes. For example, an Infotype Address, Infotype 0006 can be divided into subtypes - Permanent Residence and Emergency address.

Creating an Infotype
To create an Infotype follow the given steps −
Step 1 − Use T-code: PA30.
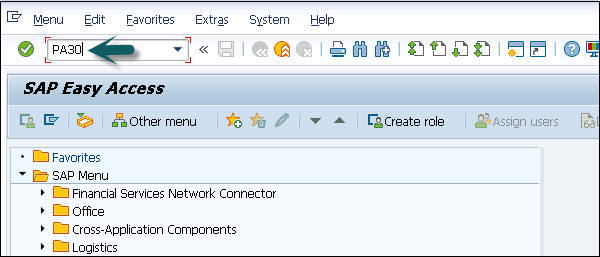
Step 2 − A new window Maintain HR Master Data opens. Enter the personnel number and press Enter.
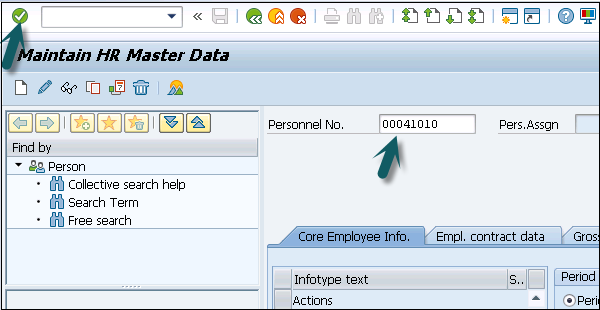
Step 3 − Enter the Infotype you wish to select for a new record and click the Create button.
In the Period section, select the start and the end date for an Infotype.
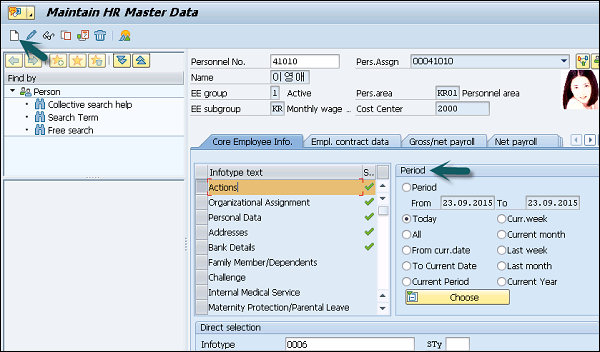
Step 4 − In the next window, select Personnel action. Once you enter all the details click Save.
Display an Infotype
You can search an Infotype by its name or number.
Step 1 − Search an Infotype using Personnel number and T-code: PA30 or PA20.
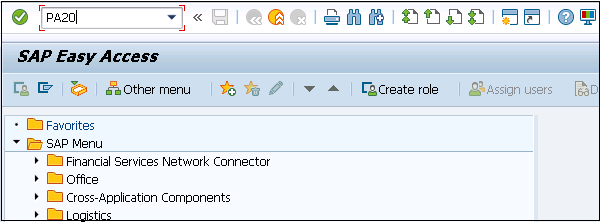
Step 2 − In the new window, enter the personnel number and press Enter.
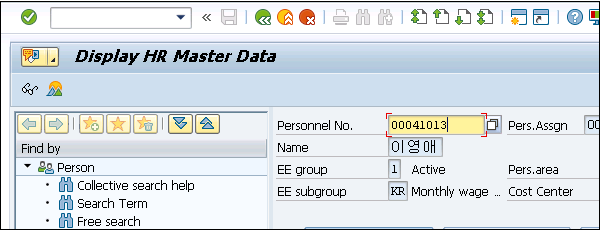
Step 3 − Select the Infotype you want to display. Click F7 or the icon at the top.
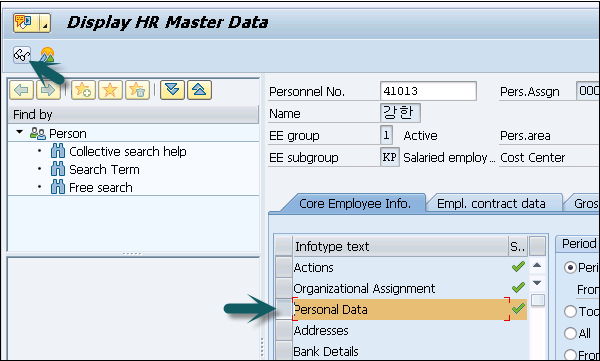
Step 4 − In the new window, all the fields will be deactivated and you will see the details of the selected Infotype.
Step 5 − Similarly, you can copy or change an existing Infotype using T-code: PA30.
Delete an Infotype
To delete an Infotype, follow the steps given below.
Step 1 − To delete an Infotype, use the same T-code: PA30.
Step 2 − Enter the Personnel number and select the Infotype you want to delete.
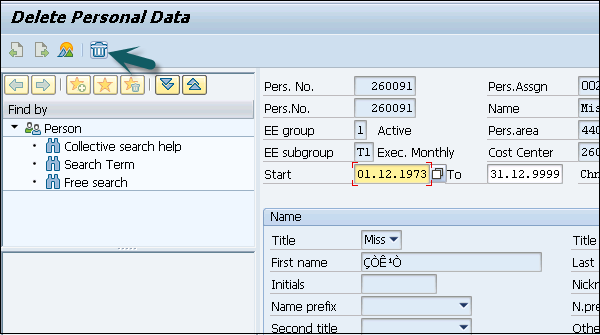
Step 3 − In the next window, you will see a summary of data that will be deleted. Click Delete.
SAP HR - Personnel Actions
In SAP HR system, personnel actions are performed for all the Infotypes that require the data to be entered in HR system. Some common Infotypes that require a personnel action are hiring a new employee, termination of an employee, etc.
To perform a Personnel action follow the steps given below −
Step 1 − Use T-Code: PA 40 or go to SPRO → IMG → Personnel Management → Personnel Administration → Customizing Procedures → Actions.

Step 2 − A new window ‘Personnel Actions’ opens.

The screen consists of the following fields −
Personnel No − This field has an employee’s personnel number. When a new employee is hired, this is generated automatically by the system.
Start − This field presents the start date of the personnel action.
Action Type − In this field, you have to select the action type that needs to be performed.
Example
Let us understand how a new employee is hired in a SAP HR system.
Step 1 − Enter the hiring date as shown in the image given below. Under the Action type, select Hire. Click the Execute option at the top.

Step 2 − In the new window, enter the details like Reason for action, Personnel area, Employee group and sub group, etc. and click the Save icon at the top.
Building Enterprise Structure
The components that define a company’s enterprise structure for Personnel administration are −
- Defining Company code
- Defining Personnel area
- Defining Personnel Subarea
To create a company follow the steps given below −
Step 1 − Go to SPRO → IMG → Enterprise Structure → Definition → Financial Accounting → Define Company.
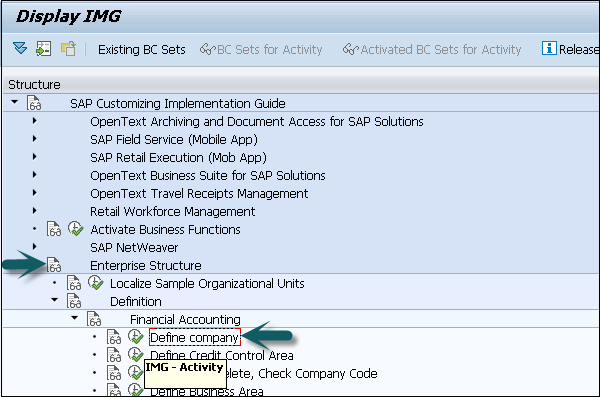
Step 2 − In the new window, Click New Entries.
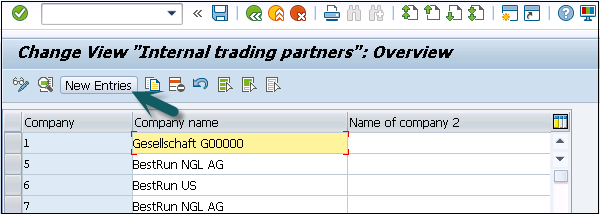
Step 3 − Enter the details like Company, Company Name, Address as shown below −
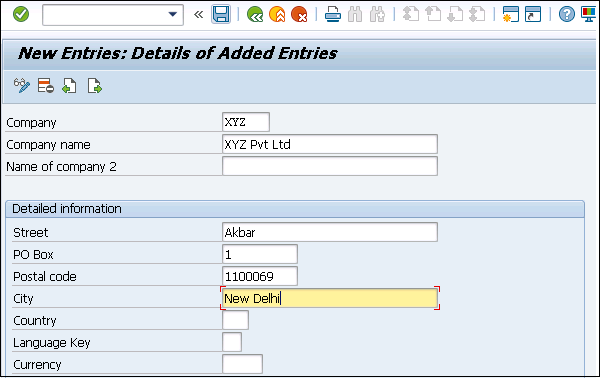
Step 4 − Click the Save icon at the top.
Editing Company Code Data
To edit company code Data −
Step 1 − Select Edit Company code data.
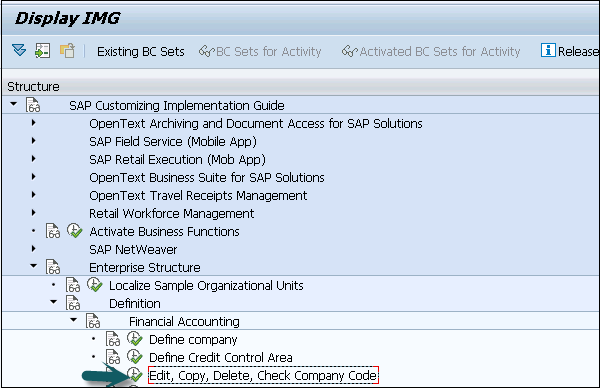
Step 2 − Click on New Entries.
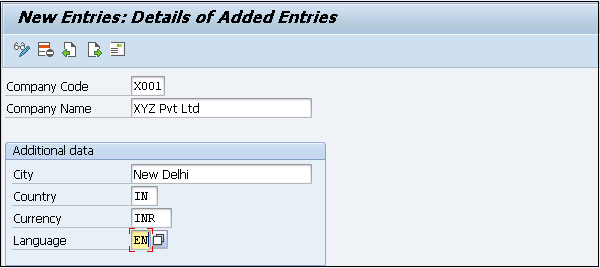
Step 3 − Click the save icon at the top.

Assigning a Company Code
To assign a company code to a company follow the steps given below −
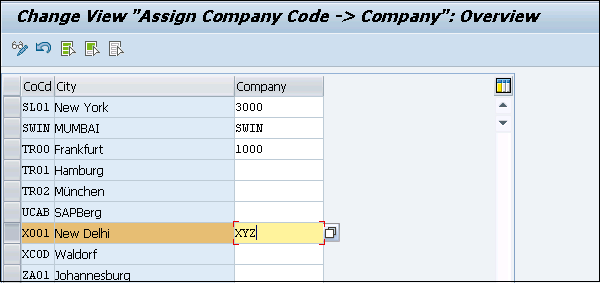
Step 1 − Go to SPRO → IMG → Enterprise Structure → Assignment → Finance Accounting → Assign Company Code to Company → Execute.
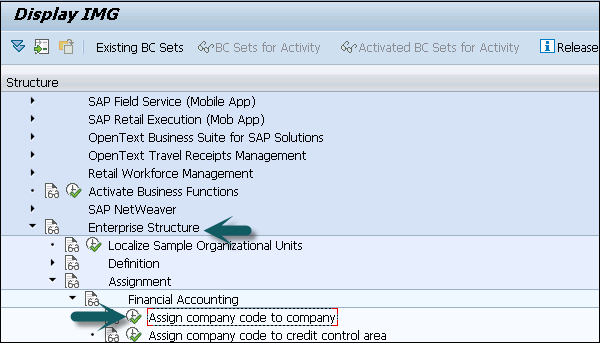
Step 2 − Change the company code in the new window.
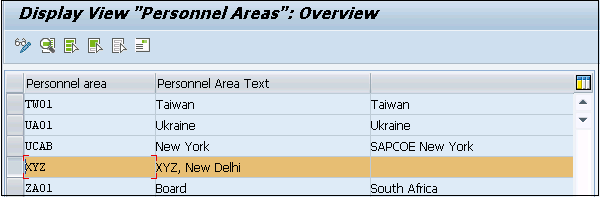
Creating Personnel Areas
To create Personnel Areas follow the steps given below −
Step 1 − Go to SPRO → IMG → Enterprise Structure → Definition → Human Resource Management → Personnel areas.

Step 2 − Go to New Entries and fill the details. Click the save icon at the top.
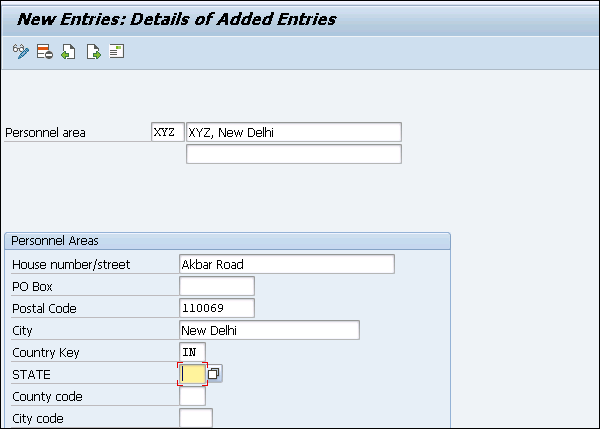
Step 3 − Personnel areas are created.
Assigning Personnel Area to Company Code
To assign Personnel Area to Company Code follow the steps given below.
Step 1 − Go to Assignment → Human Resource Management → Assignment of Personnel Area to company code.
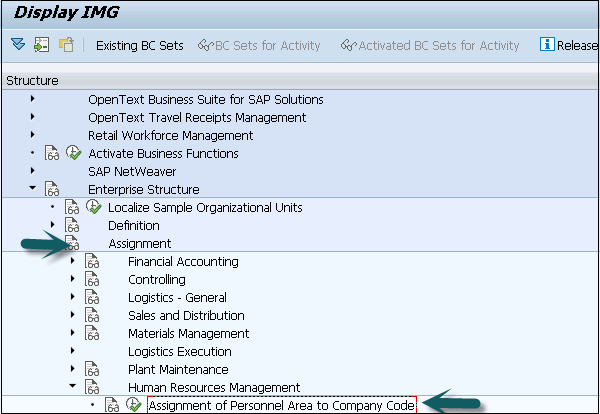
Step 2 − Enter the company code for Personnel area as created earlier.
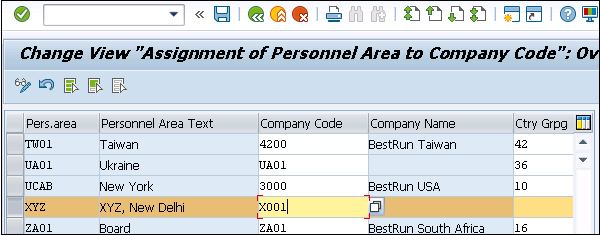
Step 3 − Click the save icon.
SAP HR - Changing Infotypes
As SAP provides various Infotypes that are grouped together for different information groups. Sometimes you need to modify the standard Infotypes as per business requirement.
Customization of Infotypes can be done by hiding standard Infotypes fields as per business requirement or you can also add custom Infotype fields in the structure.
Following are the fields that can be used to configure the Infotype screen −
| Field | Field Name | Field Length |
|---|---|---|
| Subtype | SUBTY | Up to 4 characters |
| Company code | BUKRS | 4 characters |
| Screen number | DYNNR | 4 characters |
| Payroll area | ABKRS | 2 characters |
| Employee group | PERSG | 1 character |
| Country grouping | MOLGA | 2 characters |
| Personnel area | WERKS | 4 characters |
| Employee subgroup | PERSK | 2 characters |
These are fields, which are used to maintain the screen layout and are maintained using the T-code: PE04.
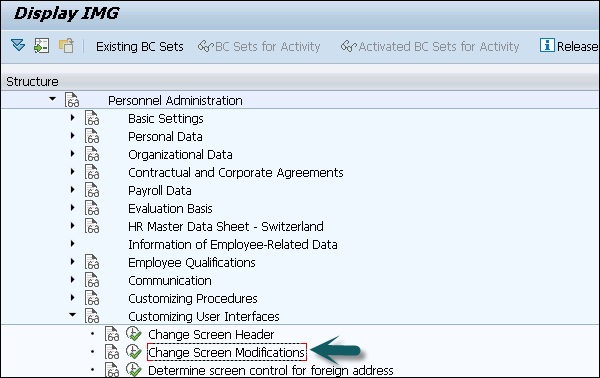
Step 1 − Go to SPRO → IMG → Personnel Management → Personnel Administration → Customizing User Interface → Change Screen Modifications → Execute.
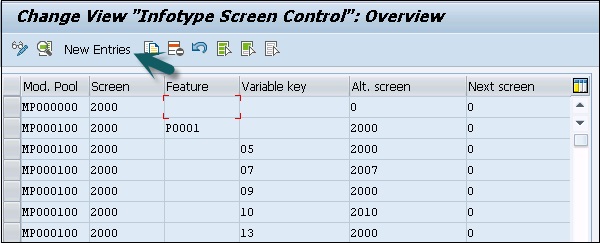
Step 2 − In the next window, you will see all Infotype screen controls like Mod. Pool, Screen, Feature, Variable key, etc. To create a new control, click the tab New Entries.
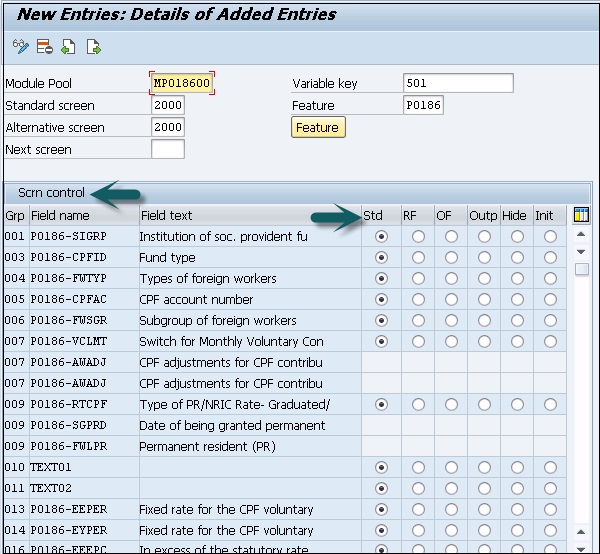
Step 3 − In the new window, enter the values as shown below and press the ENTER key.

Important
Module Pool is MPxxxx00, xxxx represents Infotype no.
Variable key is what is returned by your feature.
Standard Screen will be always 2000.
Feature will be Pxxxx, where xxxx is your Infotype no.
Once you press ENTER, it will show you all the fields of this Infotype. In screen control, you will see five radio buttons against each entry. These radio buttons include −
Std means Standard setting − When you select this option, the field characteristics correspond to the standard setting.
RF means Required field − Select this check box to define the screen field as a required field.
OF means Optional field − Select this option to define the field as an optional field.
Outp means not ready for input − This can be selected to mark the field. It is an output field only and is not used for input.
Hide means hiding a field − This option is selected to hide the screen field.
Init means hide and Initialize − If this option is selected, the screen field is hidden.
Step 4 − To save this setting click the Save icon at the top.

Step 5 − Click the Feature button; you can add values for subtypes.
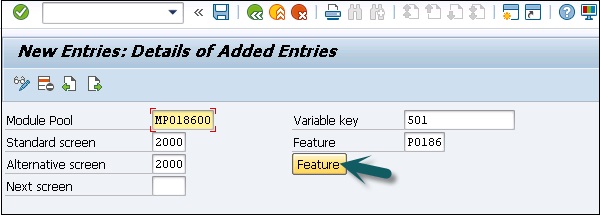
Step 6 − This will take you to the initial screen of Features. Click Change to change the values.
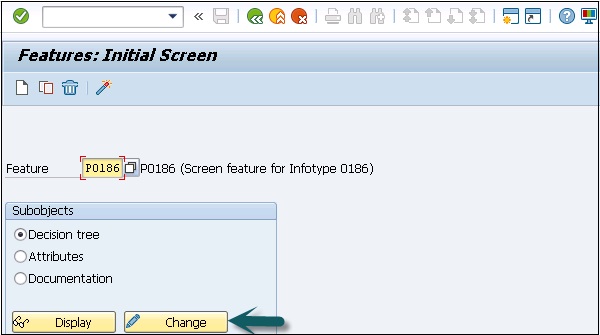
Step 7 − To create a new subtype node, click Create.
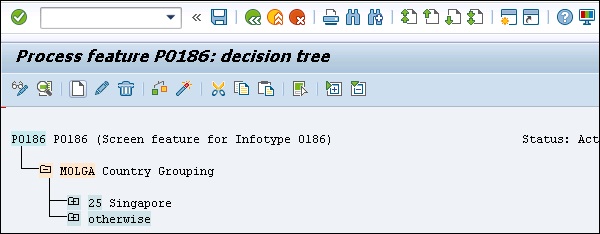
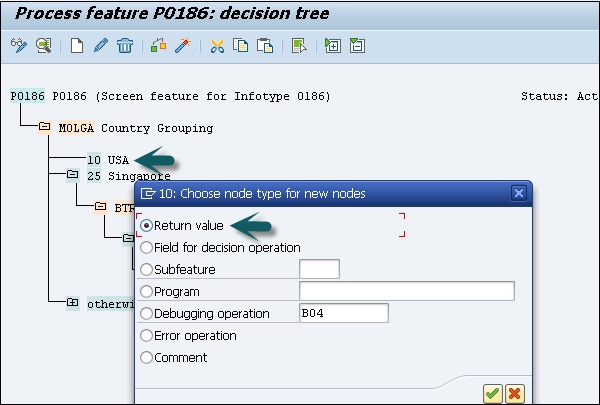
Step 8 − Select the subtype and click Create. Select the Return Value and press ENTER.
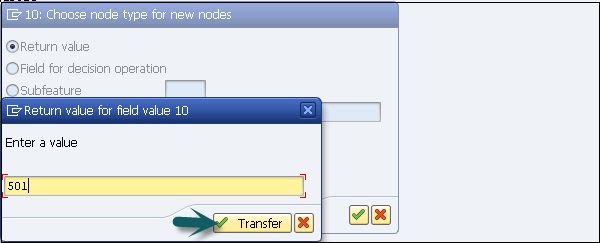
Step 9 − Enter the Return value as Variable key -501 and click Transfer.
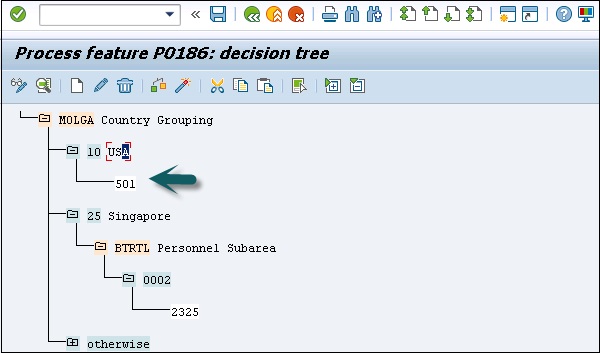
Step 10 − Click Save and press the activate icon at the top.
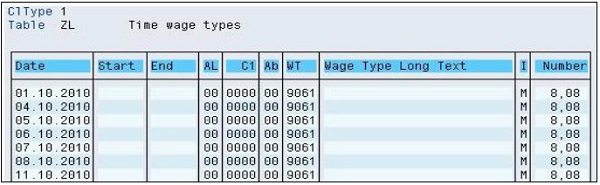
Integration with Time & Payroll
The integration between time management and payroll is performed through time evaluation. It allows you to determine the wages of an employee using time-wage types determined by time evaluation.
The time wage types in tables ZL, ALP, and C1 (Cluster B2) represent the interface between time evaluation(TM) and payroll.
ZL − Contains wage types
C1 − Contains data for cost account assignment
ALP − Contains the specifications on a different rate of payment
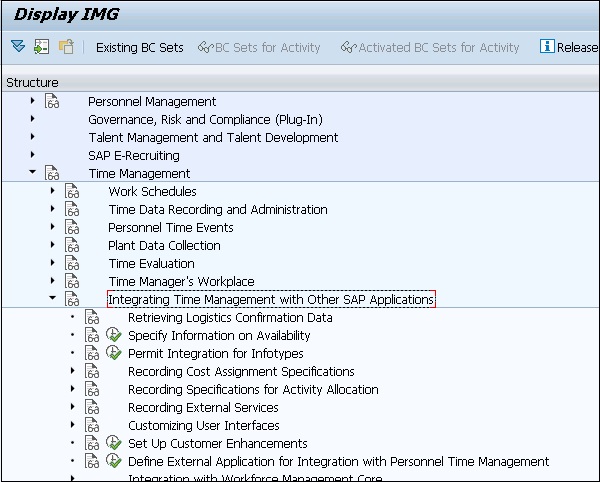
The integration of TM with other components can be found in the following IMG path.
SPRO → IMG → Time Management → Integrating Time Management with other SAP Applications.
SAP HR - Time Management
SAP time management is a module under SAP HR management, which is used by employees for time tracking and management across departments. Time management is one of the main components in any organization as it is necessary to maintain time along with the work performed. This helps an organization to calculate profit and loss, human costs, track time booking in a project, etc.
The key features of SAP Time management are −
- Monitors Human Costs as per time booking for a project.
- Documents Progress of Process.
- Process of Invoices.
- Records External Employees’ Services.
- Maintains Planning and Progress.
- Confirms Service Management Orders.
- Collects Data Plans and Sheets.
Advantages of Time Management
The main advantages or tasks that are performed under SAP Time management are as follows −
- Time Recording and Evaluation.
- Negative & Positive Time Recording.
- Work schedules & work schedules Rules.
- Public holiday Calendar, counting rules.
- Attendance Absences.
- Shift Management in HR.
- Overtime and Breaks Schedules under Time Management.
Time Recording and Evaluation
There are various types of time recordings that can be performed in Time management system i.e. number of hours worked in a project, leave and absence, holidays, business trips, etc.
You can book two types of absences in Time management −
Quota driven absences − This absence type includes the leave taken from the allocated limit in a specific time period. Example: Casual Leaves, Earned Leaves.
Non quota driven absences − This absence type includes all unplanned leaves and are not a part of allocated limit in a time frame. Example: Leave without pay, Study leave. Etc.
Various Infotypes are defined in SAP system for time recording −
| Absences | 2001 |
| Attendance | 2002 |
| Overtime | 2005 |
| Absence – Quota Driven | 2006 |
| Attendance – Quota Driven | 2007 |
| Time Events | 2011 |
Transaction Codes for Time Recording
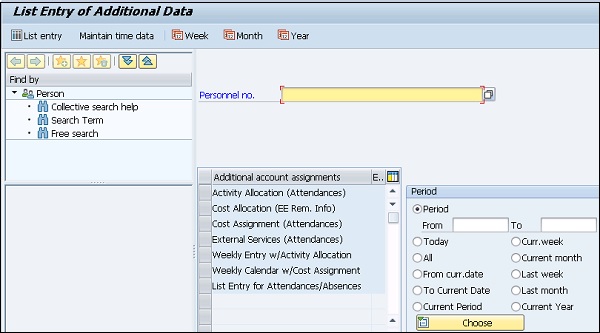
Time Data Maintenance: PA61
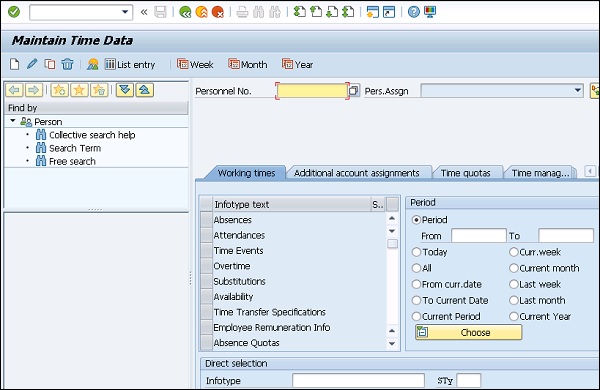
Time Data Display: PA51
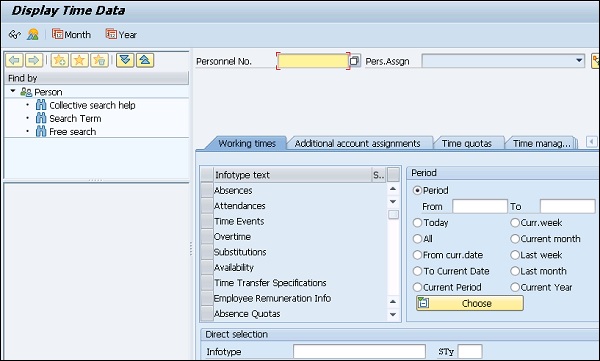
Calendar Entry: PA64

To maintain the list entry of data: PA62
Time Evaluation
Time evaluation is used to record the attendance of an employee and to record his absence from work. Time recording is required to process the payroll. Time evaluation is run for specific employees and all the employees are not required to process time evaluation.
Step 1 − To run time evaluation, use T-code: PT60.
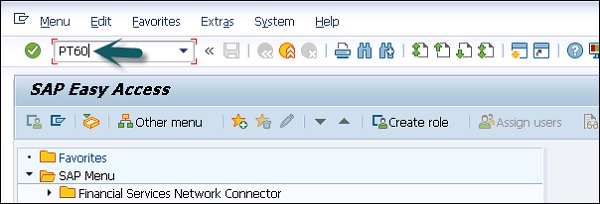
Step 2 − A new window will open, HR Time: Time Evaluation.
Enter details like Personnel Number, Evaluation Schema and Evaluation up to.
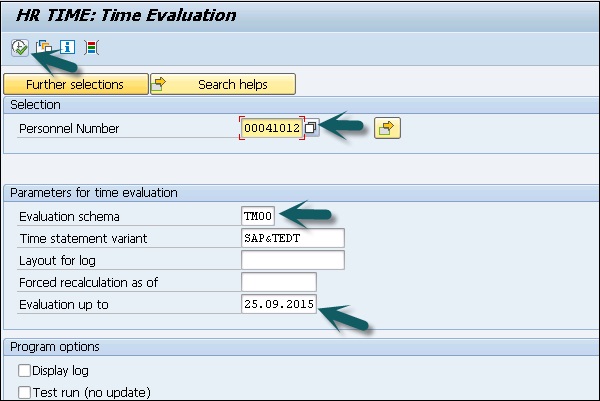
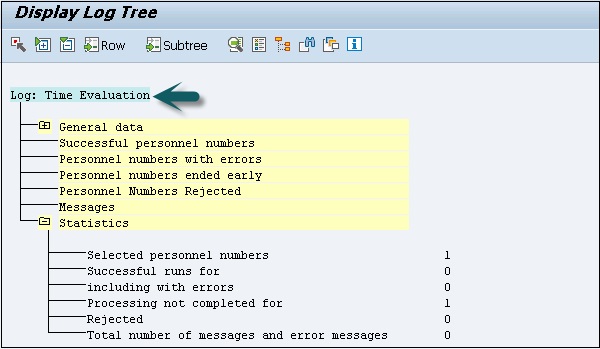
Step 3 − Click Execution. Time will be evaluated and log is displayed.
Positive Time Recording
Positive Time recording plays an important role in the workflow. All the processes related to time are executed automatically in the background.
The key features are −
In positive time recording, you can record two types of time −
With Clock time − In this type of time recording, full time recording is captured.
Without Clock time − It includes capturing only the number of works hours.
Positive time recording is difficult to implement as you need to define each type of attendance.
Positive time recording deals with daily attendance, absence and over time.
Negative Time Recording
Negative Time recording includes all the time related activities like posting of absence for wage deduction, attendance validation etc. are performed manually.
The key features are −
It has less level of integration among the different components of time management.
Negative time recording includes no clock times and assumes employee is working until absences are entered.
Negative time recording reads deviation like absence, compoff, overtime, etc.
SAP HR - Work Schedules
Various elements combine to form a complete work schedule. You can process work schedule elements that provide flexibility while you define and set the time relevant data as per business requirements. With work time elements, you can react to the changes in internal and external work time provisions, with less expenditure on time and cost.
You just need to make the changes to the applicable elements as per new time provision and it allows you to make the changes in work time in the work time schedule automatically.
Let us learn about the Work Schedule elements.
Daily Work Schedules
This contains the work and break times in a particular day. It is the smallest unit of work schedule.
Work time model − It consists of a combination of the working and non-working days. Example – Mon-Friday are working days and Sat-Sun are non-working days. This work time model can repeat itself for a certain period of time.
You can generate work schedules by applying work schedule rule to a calendar. Working times for an employee group and for individual employees are defined as per work schedules.
A period work schedule is assigned to an employee in a work schedule rule. Personal work schedule is also defined for each employee while including individual time data in work schedule for several employees in Infotypes 2001 Absences, 2002 Attendances, etc.
Work Schedule Rules
Work Schedule rules are used to define the period when work schedule is to be used and the day of the period when work schedule is to be generated. Common work schedule rules are early or late shift timing, flexible working time and flextime.
To define employee subgroup groupings −
Step 1 − Go to SPRO → IMG → Time Management → Work Schedules → Work Schedule rule and work schedules → Define employee subgroup grouping.
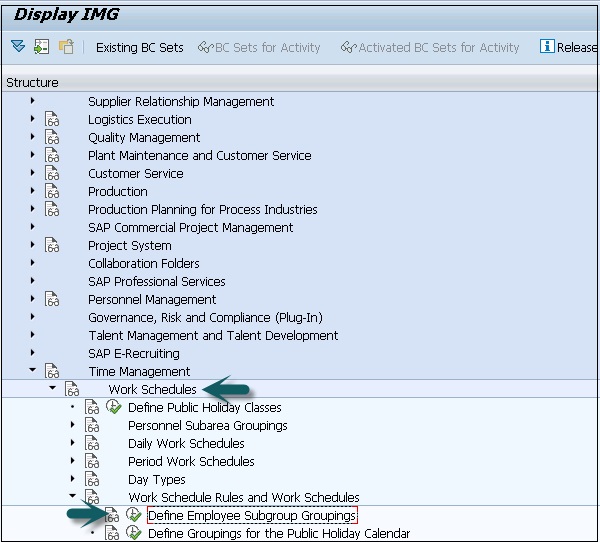
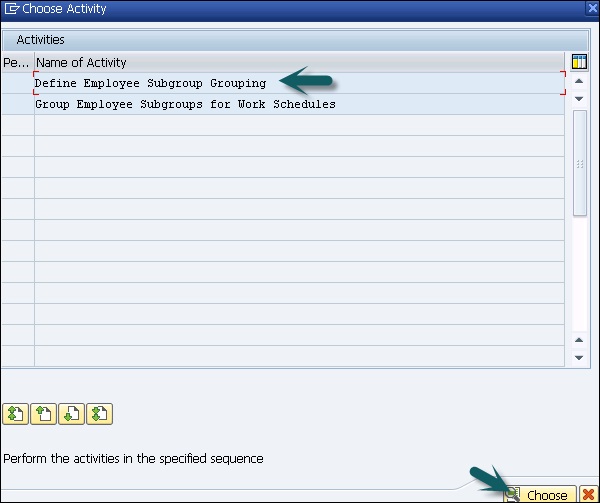
Step 2 − Select Define Employee subgroup grouping.
Step 3 − Click the New Entries tab.
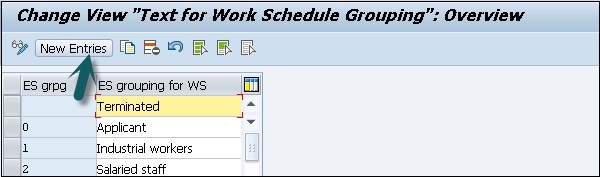
Step 4 − Enter the fields as given below.
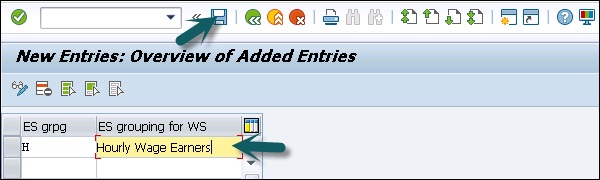
ES grpg − One digit key that identifies employee subgroup grouping.
ES group for WS − Update the text of the employee subgroup and click the save icon.
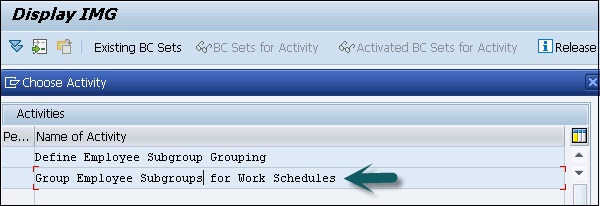
Step 5 − Go back to SPRO → IMG → Time Management → Work Schedules → Work Schedule rule and work schedules → Define employee subgroup grouping.
Select Group Employee subgroups for work schedules.
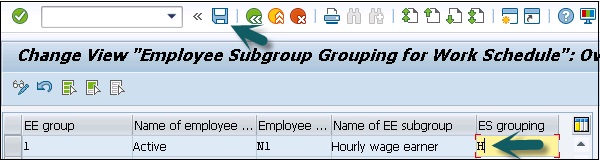
Step 6 − Enter country grouping key and press ENTER.

Step 7 − Enter ES grouping and click the Save icon at the top.
Step 8 − The next step is to set the work schedule rules and work schedules −
Go to SPRO → IMG → Time Management → Work Schedules → Work Schedule rules and work schedules → Set Work schedule rules and work schedule.

Step 9 − Select defined work schedule rule and click Copy As −

Step 10 − Enter the ES grouping key and other details as per your organization requirement. Click the Save icon to save the configuration.

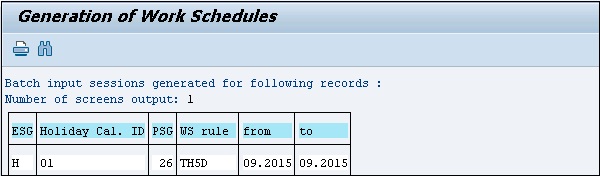
To generate work schedule in batch
Step 1 − Go to SPRO → IMG → Time Management → Work Schedules → Work Schedule rule and work schedules → work schedule in batch.
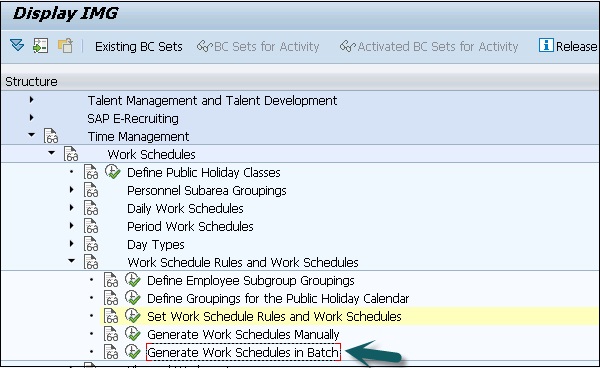
Step 2 − Enter ESG calendar and Holiday Calendar ID and click Execute.
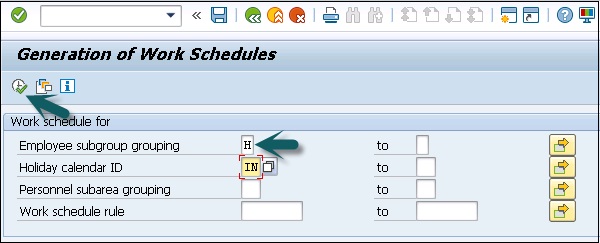
Work schedule is generated.
SAP HR - Public Holiday Calendar
Public Holiday Calendar contains a collection of public holidays, which are valid for a location - Personnel Area and Personnel Subarea. You can say that a company having office in Chennai and Hyderabad will have two different public holiday calendars.
Therefore, it means that a public holiday’s calendar that is valid for Chennai employees will not be applicable for Hyderabad employees.
Follow the steps given below −
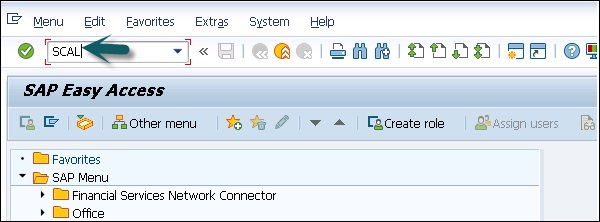
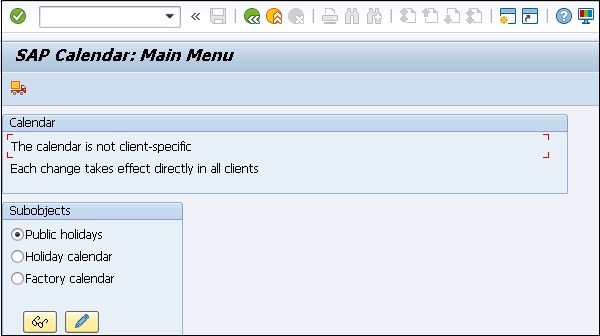
Step 1 − Transaction code to access Public Holiday Calendar: SCAL.
Step 2 − When you execute this transaction code, you see the following screen −
Step 3 − We first create a list of public holidays for a country and then assign these holidays to different locations. For example, one holiday - Republic day is valid for both Chennai and Hyderabad. You have to create one public holiday and assign it to the public holiday calendar for both the locations.
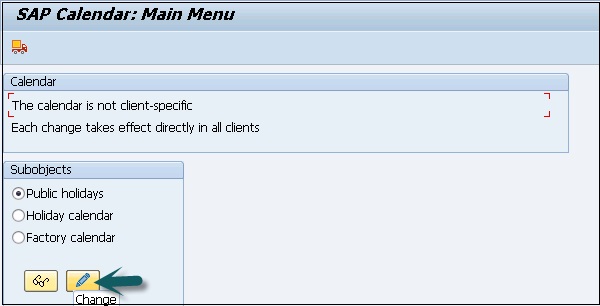
You will see the screen as shown below −
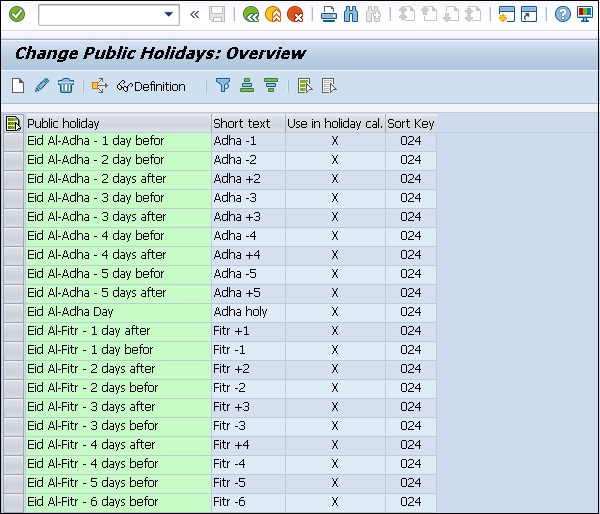
Description of various fields −
Public Holiday − This field displays the long text of the Public Holiday.
Short Text − This field displays the short text of the Public Holiday.
Use in Holiday Cal − This field helps us to check if a public holiday is being used in a public holiday calendar or not. It is not possible to edit a public holiday when it is being used in a public holiday calendar. To edit a calendar, you have to remove it from all the public holiday calendars where it is used and then make the necessary changes and again re-assign the public holiday to the relevant public holiday calendars.
Sort Key − This field helps to group together all the public holidays valid for a country. Sort key is a three-character key. It is recommended that its naming convention should be in the “Znn” format, where “nn” defines the country grouping. For example, the sort keys for public holidays for Australia and India are Australia-Z13 and India-Z40 respectively.
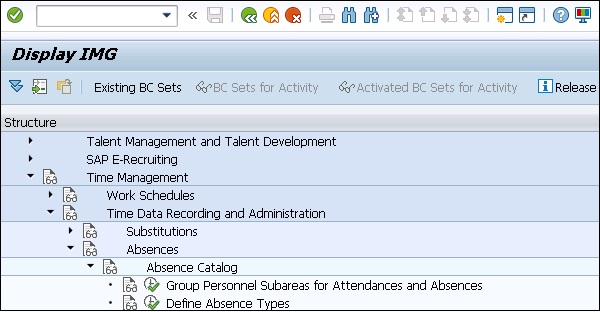
SAP HR - Attendance Absences
SAP HR systems can maintain attendance and absence.
To maintain attendance and absence in SAP HR system, go to SPRO → IMG → Time Management → Time data recording and administration → Absence.
To view attendance quotas and absence quotas of your employee, you can use this query −
Query − 0HCM_PT_T01_Q0001
With quota entitlement, this also includes compensated, deducted and unused quotas.
To obtain details about an employee’s attendances and absences, you can use query −
Query − 0HCM_PT_T01_Q0002
This query is called from manager self-service from attendance and absence quota overview query and the results display the information for the employee that you selected in a query.
Shift Management in HR
Shift management deals with accurately defining the number and the type of resources that are required to run the business operations.
Shift planning is one of the components of Personnel time management. Exchange of data between human resources and personnel management components ensures the data given below −
- Changes relevant to planning in time data recording
- Changes relevant to payroll in shift planning
- Changes relevant to planning in time evaluation
- Integration with HR components
| Function Required | Component Required |
|---|---|
| Access to organizational structures | Organizational Management (PA) |
| Access to employee qualifications | Qualifications/Requirements (PA-PD-QR) |
| Determining an employee’s working times | Time Data Recording and Administration (PT-RC) |
| Simulated evaluation of employee working hours during planning process | Time Evaluation (PT-EV) |
| Running the payroll for an employee | Payroll (PY) |
Shift Planning Component
To start the shift planning component follow the steps given below −
Step 1 − Human Resource → Time Management → Shift Planning → Change Shift Plan.
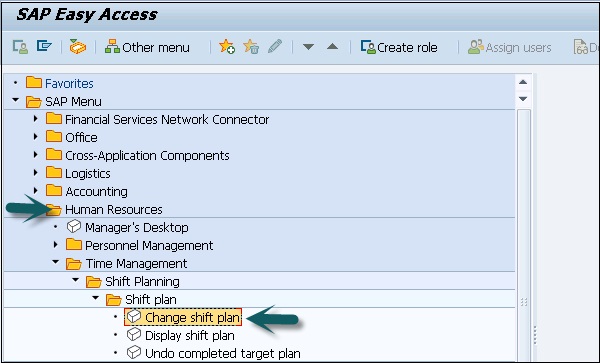
Step 2 − Select the Shift Planning profile and Organizational Unit as shown in the screen shot given below and click Change.
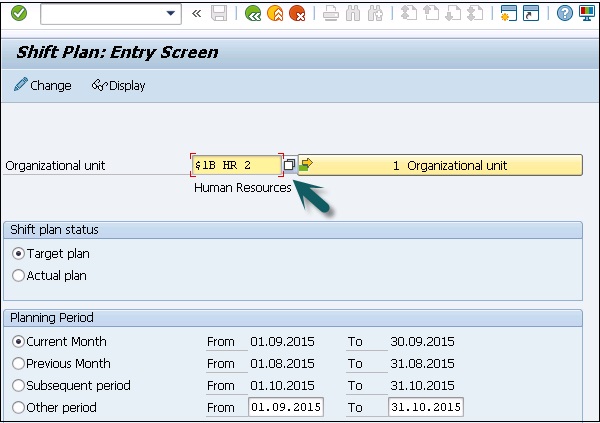
Step 3 − You can select the shift plan. In the Shift plan status field, select the ID of the desired shift plan (either target or actual plan).
In the Planning period section of the screen, select the time period for which you want to plan the shifts.
Change Shift Plans
There are two types of Shift plans namely, target and actual plans.
You can use Shift plans to display the employees who are selected from the evaluation path of the entry profile and the entry objects.
The calendar for the desired planning period can be checked and it can be used to view additional information like organizational unit, personnel number, etc. for a selected employee in a separate information column.
Note that it is possible to change the target plans at any time till a target plan is complete. You can only edit the actual plan once you have completed the target plan. You can change actual plans at any time.
To change a target plan if it is not completed, you need to set target plan complete or partially deleted.
Important T-codes for Time management
- PP61: Change Shift Planning
- PP63: Change Requirements
- PP62: Display Requirements
- PO17: Maintain Requirements Profile
- PP69: Choose Text for Organizational Unit
- PP6B: Attendance List
- PP6A: Personal Shift Plan
- PP72: Shift Planning
- PQ17: Actions for Requirement Profiles
- PP67: Create Requirements
- PP60: Display Shift Planning
- PP64: Choose Plan Version
- PP65: Edit Entry Object
- PP66: Shift Planning: Entry Profile
Overtime and Breaks Schedules
Overtime and Breaks Schedules come under positive and negative time recording. There are four types of break schedules −
- Fixed Break Schedule
- Variable Break Schedule
- Dynamic Break Schedule
- Overtime Break Schedule
Fixed Break Schedule
Fixed break schedule, the timings of the break for an employee is fixed. He is provided with certain time duration. At the same time, every day, say 30 min, 60 min and only in this time-frame, an employee has to take a break.
Example − Break timings are fixed, i.e. 1:30 PM to 2:30 PM and an employee has to take a break daily during this time interval.
Variable Break Schedule
In this break schedule, the timing of break is not fixed. Employee is provided with a time duration. The employee can take a break within this duration only.
Example − Break duration - 12:30 PM to 2:30 PM. An employee can take any one hour as break and if the break time exceeds the fixed break time, the salary is reduced.
Dynamic Break Schedule
In Dynamic break schedule, no certain time range is given and break can be taken after working for a certain number of hours.
Example − An Employee can take a break after working continuously for 4 hours from the start of the shift. In this case, if an employee’s shift starts at 9:00 AM, he can take the break at 1:00 PM.
Overtime Break Schedule
In overtime break schedule, you define the break time, which is taken during over-time of the shift. This can be a fixed break schedule, which is taken during over-time.
Example
09:00 AM to 05:00 PM − Routine working Hours.
05:00 PM to 9:00 PM − Overtime Hours.
7:30 PM to 08:00 PM − Overtime Break.
Following are the T-Codes that can be used to manage work schedule −
T-Code to Generate the Work Schedule PT01.
T-Code to Change the Work Schedule PT02.
T-Code to Display the Work Schedule PT03.
SAP HR - Benefits
The Benefit section in SAP HR management allows you to use the benefit tools for custom benefits provided by an organization to its employees. Benefits play an important role in employee retention to keep the best possible employees in a company.
Benefits Management in SAP HR is integrated with the international Payroll component. However, integration is not supported for every country version of SAP Payroll.
To use Benefits Management for a country payroll, which is not integrated, in conjunction with non-SAP payroll software or an external payroll service, you must provide your own interface for the transfer of data.
Enrollment Overview
Enrollment is a process of enrolling employees of an organization under the benefit management. Enrollment Plan selection for an employee depends on employee eligibility.
The Enrollment function allows you to enroll the employees and to make changes to the employee benefit selection as required for the following tasks −
u2022 − Enrollment of employees during an open enrollment period in plans for the coming Season.
u2022 − Enrollment of new hires in plans that are automatically offered.
u2022 − Enrollment of new hires in default plans as an interim measure, until they have made their benefits choices.
u2022 − Adjustment of plan enrollments as a result of employee life or job changes.
Types of Enrollment
Following are the types of enrollment that can be used −
Open Enrollment Offer
An open Enrollment offer is the most unrestricted type of offer.
Important features −
Open enrollment type is generated by the system when you start enrollment for a date that lies within an open enrollment period.
It includes only those enrollment plans, which require the employees to meet some certain criteria. This is defined in customizing the field in SAP HR system.
Open Enrollment period is called the time period when an organization allows its employees to enroll in new benefits plans or change any existing enrollment plan.
Enrollment plans, which are available for selection during the open enrollment start on some specific future data and normally at the start of the new financial year.
The benefits offer set up for open enrollment is valid only during the open enrollment period.
Example
Consider an organization that allows an employee to select its benefits on an annual basis for the coming year. The open enrollment period is 1 Sep 2015 - 30 Sep 2015 and any new benefits that are elected by employees are valid from 1 Apr 2016 to 31 Mar 2017.
Default Enrollment Offer
A dynamic enrollment offer is called when employees can be enrolled before they communicate their benefits elections to the benefits office.
These default plans are commonly used for giving short-term coverage to new hires and therefore often allow little flexibility to the employee regarding the plan terms.
Automatic Enrollment Offer
Automatic enrollment plan is one in which the employees are enrolled without the requirement that they consent to the enrollment or make any elections within the plan. It allows an employee to enroll in all relevant automatic plans at all times.
Automatic Enrollment plans are normally provided to the employees at no extra cost and also allow little flexibility to the employee regarding the plan terms.
Adjusted Enrollment Offer
An organizational change or a personal change for an employee that allows an employee to change his/her current benefit elections.
The adjustment reason is normally a user-defined parameter to which certain adjustment permissions are assigned for different types of benefit plan.
Some examples of adjustment reasons are Marriage, Hiring (initial enrollment), New dependent, Job change etc.
Benefit Area
Using Benefit areas, you can have separate administration of different benefit plan pools. The division is performed primarily for administrational purposes and would not normally be used for eligibility. This is a primary subdivision of plan set up within the benefits component.
Benefit areas in SAP HR are independent from each other. They are configured and function independently. Typically, employees will be enrolled in a benefit area that groups them according to common attributes such as country or organizational assignment.
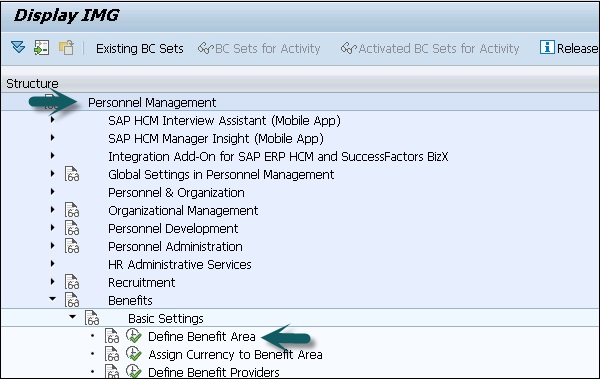
Step 1 − To define benefit area, go to SPRO → IMG → Personnel Management → Benefits → Basics Settings → Define Benefit Area → Execute.
| 01 | Germany |
| 02 | Switzerland |
| 03 | Austria |
| 04 | Spain |
| 05 | The Netherlands |
| 06 | France |
| 07 | Canada |
| 08 | Great Britain |
| 09 | Denmark |
| 10 | USA |
| 11 | Ireland |
| 12 | Belgium |
| 13 | Australia |
| 14 | Malaysia |
| 15 | Italy |
| 16 | South Africa |
| 17 | Venezuela |
| 18 | Czech Republic |
| 19 | Portugal |
| 20 | Norway |
| 21 | Hungary |
| 22 | Japan |
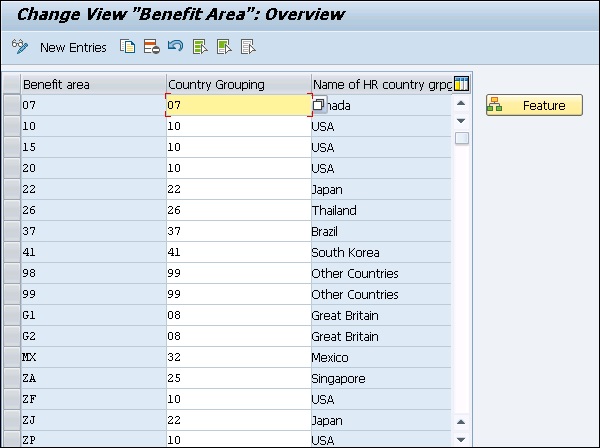
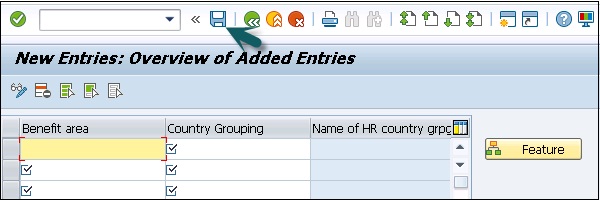
Step 2 − To create a new Benefit area, click New Entries. Enter the fields - Benefit Area, Country Grouping, Name of HR country grpg.
Once you enter the details, click Save.
Benefit Category
Benefit category defines the classification of benefit plans. Benefit category is always maintained in SAP HR system. Given below are the key benefit categories −
- Health Plans
- Insurance Plans
- Savings Plans
- Stock Purchase Plans
- Flexible Spending Accounts
- Credit Plans
- Miscellaneous Plans
In SAP HR system, all these categories are predefined and HR system handles each category differently. Benefit plan types are defined within each category to reflect your requirements.
Benefit Category is at the highest level in Benefit Plan structure. Benefit Categories are again divided into Plan types and every category can contain one or more Benefit Plan types.
Benefit Plan type
The grouping of different benefit plans is done in Benefit Plan type. You identify each benefit plan with a unique identifier - maximum four characters.
Following are common Benefit plan types −
MEDI − stands for Medical plan and belongs to Health Plan Category
SAVE − stands for Savings and belongs to Savings Plans Category
STPC − stands for Stock purchase and belongs to stock Option Category
DCAR − stands for dependent care spending and belongs to flexible spending Accts
LIFE − stands for Life Insurance and belongs to Insurance Plans Category
CRED − stands for flex credit and belongs to Credit Plans Category
CAR − stands for Company car and belongs to Miscellaneous Plans Category
Benefit Plan types are used for enrollment and the system does not allow an employee to enroll in more than one benefit plan per plan type.
Benefit Plans
Benefit plan structure at the granularity level is defined by Benefit Plans. You can group multiple Benefit plans under a particular plan type. All the benefit Plans are identified with a unique identifier, which consists of maximum of four characters as mentioned above.
Example
MEDI, VISI, DENT represents health Plans Category for medical MEDI Plan Type.
Benefit plans within the health plan category cover the basic health needs of an employee. A typical health plan might provide an employee with medical, dental or vision coverage.
Similarly, you can have an Insurance plan, which is used to provide monetary amounts of coverage payable to the employees in an organization.
To setup account balance to meet spending needs, a spending account can be used that provides an employee with the opportunity to establish account balances. Most common needs that can be associated with spending account includes health, dependent care, and legal benefit, etc.
Example
Following are the common benefit plan types for each of the plan categories −
Health Plans
- General medical care
- Dental care
- Vision care plan
Insurance Plans
- Life insurance
- Dependent life insurance
- Supplemental life insurance
Savings Plans
- Retirement plan
- Savings plan
Stock Purchase Plans
- Own company stock plan
- Flexible Spending Accounts
Health care spending account
- Dependent care spending account
Credit Plans
- Cafeteria plan
Miscellaneous Plans
- Company car
SAP HR - Payroll Management
Payroll is one of the key components in SAP HR module and is used to process payroll of employees in an organization.
Important features are as follows −
Payroll can be integrated with Personnel administration, time management, wages and accounting.
Data retention allows you to use master data and other payroll related data from Personnel Administration.
Time data from Time Management is included in Payroll and is used during the payroll run.
Incentive Wages component is used to process payroll directly.
Expenses and payable information from SAP Payroll component is posted directly in Financial Accounting FICO to assign a cost center for all the costs.
SAP Payroll system also calculates the gross pay and the net pay. It consists of payments for each employee and deductions made during a payroll period. All payments and deductions are included in the remuneration calculation using different wage types.
Payroll Control Record
Payroll control record is used to run the payroll process in HR system. Payroll Control record is used to lock the master data during the payroll run and thus lock the changes during payroll processing.
You have to set up Payroll control record manually for each part of payroll run.
Follow the steps to set up the Payroll control record.
Step 1 − Use the T-Code: PA03. Select the Payroll area and click the change icon.
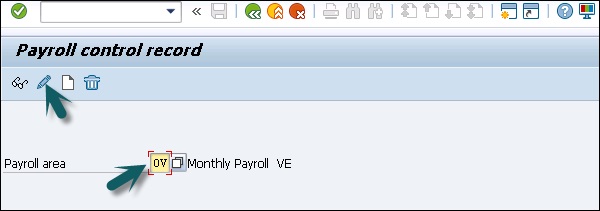
Step 2 − A new window opens as depicted in the screenshot.
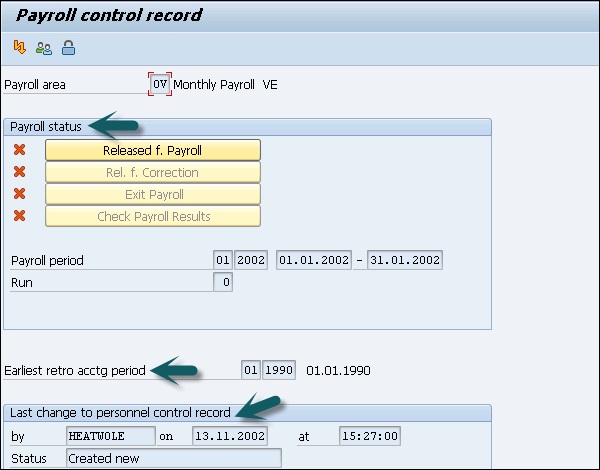
Payroll Status − When you want to check status of Payroll run, this option is used. Using this option you can also check the count payroll has been run and current payroll period.
Earliest retro acctg period − In retroactive accounting, this option can be used to show earliest payroll period.
Last change to personnel control record − In order to find person detail who has changed Payroll Control Record and to check the changes performed, this option can be used in Payroll Management system.
Options in Payroll Control Record
When you navigate to Payroll Control Record window, you have the following options −
Incorrect Personnel Numbers − When you have incorrect Personnel numbers in Payroll run, this option can be used to check the number of employees rejected.

List Personnel Numbers − When you want to check the list of employees in Payroll area, this option can be used.

Locked Personnel Numbers − When you want to get the list of employees locked out of payroll with Infotype 0003, this option can be used in Payroll management system.

The Payroll control record is necessary for payroll run −
Release mode − If you want to run payroll in update status, release mode should be used.
Corrections − means data can be changed. Must subsequently move into release mode to update that data change.
Check payroll results − You can’t change the data in this mode. It is used to run the reports related to payroll.
Exit mode − When payroll run is completed, exit model is selected.
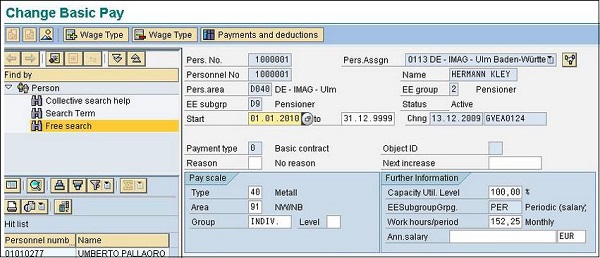
SAP HR - Basic Pay Infotypes
Basic pay information of an employee is stored in basic pay Infotype (0008). An employee’s payroll history can be checked using Infotype history.
In case an employee leaves an organization, the basic payroll data for that employee remains in the system to ensure accuracy of any retroactive account runs to be performed. A basic pay Infotype 0008 can be processed itself with a personnel action. To create a new record you need to enter payment type on maintain HR master data screen.
The standard system contains the following payment types as subtypes −
- Basic contract
- Increase basic contract
- Comparable domestic pay
- Refund of costs in foreign currency
- Local weighting allowance
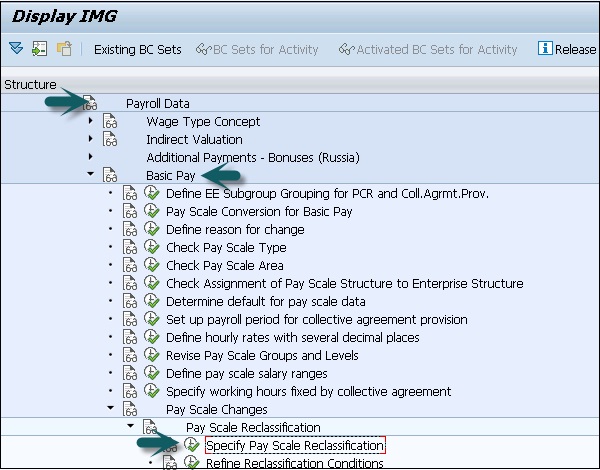
Pay Scale Reclassification
A pay scale reclassification involves moving an employee to a new pay scale group and to a different pay scale level. In this case, an employee receives the remuneration for the new pay level assignment.
A pay scale reclassification is performed in a payroll period prior to running the payroll. The pay scale reclassification must always take place before the standard pay increase.
To perform pay scale reclassification, go to SPRO → IMG → Personnel Management → Personnel Administration → Payroll Data → Basic Pay → Pay Scale Changes → Pay Scale reclassification → Specify pay scale reclassification.
Pay Scale Structure
A pay scale Structure consists of the following components −
Pay Scale Area
A pay scale area is used to define a geographical area where a collective agreement is valid. The geographical area is determined by the size of pay scale area.
A pay scale area is defined in Customizing Personnel administration and is identified by four character alphanumeric identifier per country. You also define pay scale groups and levels for each pay scale type and employee subgroup grouping in a pay scale area.
The default values are suggested for payscale type and groups and linked to personnel subarea when you create a record in basic pay Infotype (0008).
Pay Scale Type
A Pay scale type is used to define the area of economic activity for which an agreement is valid. The geographical area in which it is valid is applied to the full company.
Pay scale type is also defined in customizing Personnel administration and is identified by four character alphanumeric identifier per country. You define pay scale groups and level for each pay scale area and employee subgroup grouping in each pay scale type.
Pay Scale Group and Level
A Pay scale groups and pay scale levels are used to define the criteria to classify data for job evaluations and indirect valuations. Each pay scale groups is further divided in pay scale levels.
In customizing for Personnel administration, you define pay scale groups and levels per country grouping, pay scale area, type and employee subgroup grouping.
A pay scale group is defined with an alphanumeric identifier with a maximum of eight characters and pay scale levels are described with a two-character alphanumeric identifier.
SAP HR - Primary & Secondary Wage Types
Wage type is one of the key components in payroll processing. Based on the way they store information, wage type can be divided into two categories.
Primary Wage Type
Primary wage type is defined as wage type for which data is entered in Infotype. Primary wage types are created by copying model wage types provided by SAP. There are different type of primary wage types −
Time wage type
Time wage type is used to store the time related information. This wage type is used to combine payroll and time management. Time wage type is generated at time evaluation and configure through T510S or using custom PCR.
Dialogue Wage Type
These wage type includes basic pay IT0008, recurring payments and deductions IT0014, and additional payments IT0015.
Secondary Wage or Technical Wage Type
Secondary wage types are predefined wage types in SAP system and starts with a slash (/). These wage types are created during payroll run.
These wage types are system generated and cannot be maintained online.
/559 Bank Transfer
Wage type Elements:
Key elements of a wage type include −
- Amount AMT
- Rate RTE
- Number NUM
As per processing type each element can have one, two or all element values.
Example
Basic pay can have Rate and Number. However, a bonus pay can have only amount.
SAP HR - Payroll Process
Payroll is processed to calculate the basic salary for the employees and other payments like overtime, shift allowance, and other bonuses. A payroll is processed at certain point of time.
You need to mention the payroll area for which payroll should run. To execute payroll run for multiple payroll areas, you need to run the individually for each payroll area. To lock a payroll for a particular employee, you should use lock Personnel number function.
Payroll control record is used to control the payroll process as mentioned in previous topics and status of payroll control record is automatically changed with each step performed in payroll run.
Payroll Areas to Run Payroll
When a payroll is run for a payroll area, SAP system increases the period number in the payroll control record by one. It is not possible to change the master and time data for the personnel numbers belonging to the current payroll area if it affects the payroll past or present.
Payroll Run
This is used to determine the current payroll period from the payroll control record and performs payroll using the values you entered in the payroll program.
You have to check if the payroll process has completed successfully or any errors have occurred. When the payroll runs with errors, system displays error messages. You can get a descriptive payroll log.
You can put the payroll status to check the payroll results during this phase. This way you make sure that no changes are made to the payroll-relevant data which could affect the payroll past or present.
You can put a check on the results of payroll run after completion.
You can also get a report that tells you the stored payroll result. Using this report, each employee can see the contents of all internal tables that has payroll results and you can also check all partial runs.
Correcting master or time data for payroll run errors
In the Payroll Status Infotype (0003), the system also flags the payroll correction field for all the rejected personnel numbers. In case you correct the master or time data for a personnel number, this field is also flagged.
All personnel numbers for which the master data is corrected are grouped again in a list- Matchcode W. The next step is the payroll correction run, which involves payroll run for this matchcode W (only for corrected personnel numbers).
Release payroll
When you have many employees in the correction run, you can run the correction payroll run as a background job. However, if there are only few employees, it can also be run online like a regular payroll run.
Posting to Accounting
In few cases, errors can popup, which means that you should change the master and time data again. If it occurs then run the payroll correction and this means posting to accounting again. In the end, you exit the payroll.
SAP HR - Gross Pay
In SAP HR system, a gross salary is known as an agreed compensation that an organization agrees to pay to an employee on a monthly basis for the work that he does for that company in that specific period.
You can define net salary as gross salary minus all the deductions that are made because of statutory compliances of a country and organization such as EPF, ESI, Income Tax, etc. It includes other dues like home loans, car loans and advance salary taken, which you owe to the company and any legal dues that an employee has to pay.
CTC or Cost to Company is defined as gross salary + Benefits, Perks and is called as total Cost to company.
Example
Consider the following example −
| Basic Salary | INR 12000 |
| House Rent Allowance | INR 5000 |
| Conveyance Allowance | INR 1000 |
| Magazine Allowance | INR 500 |
| Education Allowance | INR 500 |
GROSS SALARY INR 19000
Deductions
| Provident Fund | INR 1440 |
| Income Tax | INR 310 |
| Loan Deduction | INR 1080 |
| Total Deductions | INR 2830 |
NET SALARY INR 16170
| Leave Travel Allowance | INR 10000 per annum |
| Medical Reimbursement | INR 10000 per annum |
| Premium for mediclaim | INR 1500 per annum |
| PF contribution | INR 16332 per annum |
CTC (Cost to Company) INR 2, 65,832 annually (i.e. CTC = Monthly Gross Salary × 12 + Annual benefits)
Bonuses and Recurring Payments
For recurring payment/deductions, an Infotype 0014 is used. Recurring payments and deductions are the payment types that are not deducted or paid in every payroll.
To execute the recurring payment, below information is required
Wage type − It requires wage type to process the payment.
Number/Unit − This depends on the wage type and the system checks the combination entered.
Currency − The currency varies as per the company code. The system automatically suggests the currency to be used as per the company code.
First payment date and interval/unit − This determines the recurring payment to be made and it automatically identifies when the payments are to be made. When there is no entry for this field, by default, the system makes payment as per wage type in each payroll period.
Payroll Cycle & Time Management Data
To use all the features in SAP HR system, you need to store master data for all employees in SAP Human Resource system.
| 001 | Organizational Data |
| 002 | Name |
| 007 | Planned Working Time |
| 024 | Qualification |
| 105 | Communication Note that it is important to map the user ID to the employee in intype 105. |
| 301 | Time Sheet Default Values |
| 2001 | Absences |
| 2002 | Attendances |
During payroll run in the Payroll Status Infotype (0003), the system also flags the payroll correction field for all the rejected personnel numbers. In case you correct the master or the time data for a personnel number, this field is also flagged.
All personnel numbers for which the master data is corrected are grouped again in a list - Matchcode W. The next step is the payroll correction run, which involves payroll run for this matchcode W (only for corrected personnel numbers).
Payroll Run
This is used to determine the current payroll period from the payroll control record and performs payroll using the values you entered in the payroll program.
You have to check if the payroll process has completed successfully or any errors have occurred. When the payroll runs with errors, system displays error messages. You can get a descriptive payroll log.
You can put the payroll status to check the payroll results during this phase. This way you make sure that no changes are made to the payroll-relevant data which could affect the payroll past or present.
You can put a check on the results of payroll run after completion.
You can also get a report that tells you the stored payroll result. Using this report, each employee can see the contents of all internal tables that has payroll results and you can also check all partial runs.
Payroll Integration
Payroll is normally integrated to these systems - FI/CO, Benefits, Time Management and Expenses.
Integration with FICO and Infotype
Following are the key activities in SAP FI/CO that can be integrated with payroll.
Defining organizational accounting structure.
Creation of General Ledger G/L accounts.
Defining automatic account assignments.
Defining primary cost elements.
Infotype 0001 master code assignment and organizational assignment.
Infotype 0027 Cost centers and cost Distribution.
Infotype 2002 for cost distribution and activity allocation and for time management.
Integration with Time Management
Organization Management − Organization Administration Organizational Reporting
Attendance
Conditions
Time Managers
Administration
Working Time
Workplace
Integration with benefits and payroll
Administration
Payroll Processing
Payroll
Reporting
Benefit plans
Insurance plans
Health plans
Miscellaneous plans
SAP HR - Payroll Cycle
Payroll is processed to calculate the basic salary for the employees and other payments like overtime, shift allowance, and other bonuses. A payroll is processed at certain point of time.
You need to mention the payroll area for which payroll should run. To execute payroll run for multiple payroll areas, you need to run the individually for each payroll area. To lock a payroll for a particular employee, you should use lock Personnel number function.
Payroll control record is used to control the payroll process as mentioned in previous topics and status of payroll control record is automatically changed with each step performed in payroll run.
Payroll Areas to Run Payroll
When a payroll is run for a payroll area, SAP system increases the period number in the payroll control record by one. It is not possible to change the master and time data for the personnel numbers belonging to the current payroll area if it affects the payroll past or present.
Payroll Run
This is used to determine the current payroll period from the payroll control record and performs payroll using the values you entered in the payroll program.
You have to check if the payroll process has completed successfully or any errors have occurred. When the payroll runs with errors, system displays error messages. You can get a descriptive payroll log.
You can put the payroll status to check the payroll results during this phase. This way you make sure that no changes are made to the payroll-relevant data which could affect the payroll past or present.
You can put a check on the results of payroll run after completion.
You can also get a report that tells you the stored payroll result. Using this report, each employee can see the contents of all internal tables that has payroll results and you can also check all partial runs.
Correcting master or time data for payroll run errors
In the Payroll Status Infotype (0003), the system also flags the payroll correction field for all the rejected personnel numbers. In case you correct the master or time data for a personnel number, this field is also flagged.
All personnel numbers for which the master data is corrected are grouped again in a list- Matchcode W. The next step is the payroll correction run, which involves payroll run for this matchcode W (only for corrected personnel numbers).
Release payroll
When you have many employees in the correction run, you can run the correction payroll run as a background job. However, if there are only few employees, it can also be run online like a regular payroll run.
Posting to Accounting
In few cases, errors can popup, which means that you should change the master and time data again. If it occurs then run the payroll correction and this means posting to accounting again. In the end, you exit the payroll.
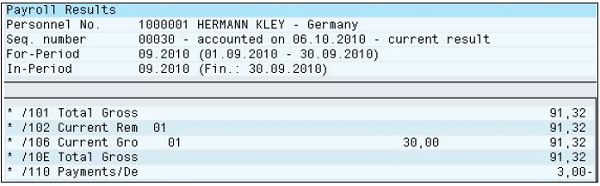
Remuneration Statement
When the payroll is run, a pay slip is generated and this is the first report that is used after payroll processing. Pay slip is also called Remuneration statement.
Processing of payroll and generating statements vary each month as per the different input types and payment type in each month.
Following are the steps to configure for remuneration statement −
Step 1 − Use the T-Code: PE51.
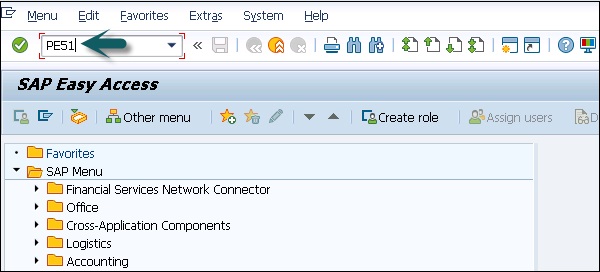
Step 2 − A new window HR form Editor: Initial Screen opens. Enter the code for Country grouping, Form name and click Create.
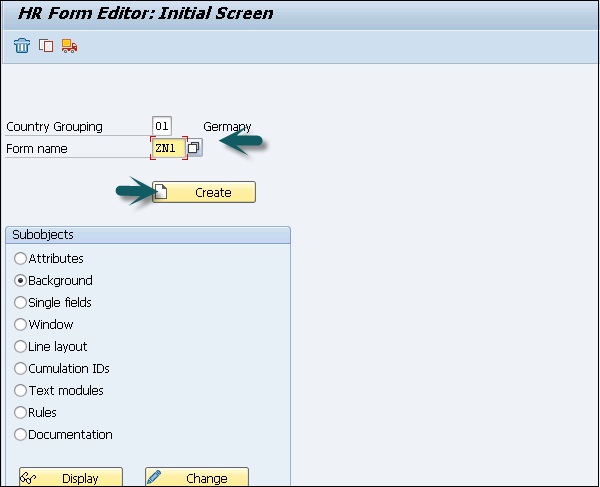
Step 3 − Select the Form class.
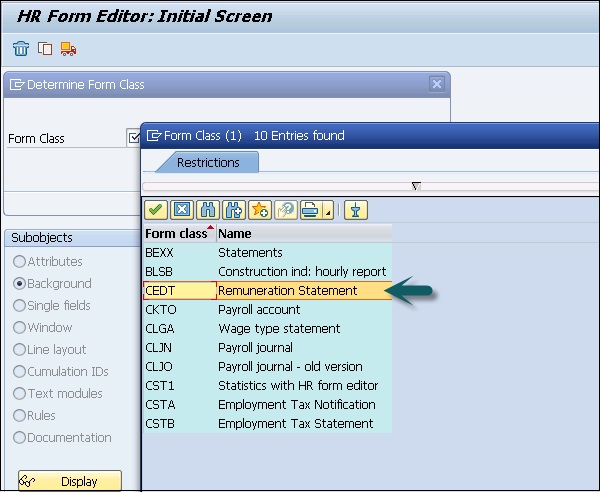
Step 4 − This will create a new form or you can also copy an existing form.
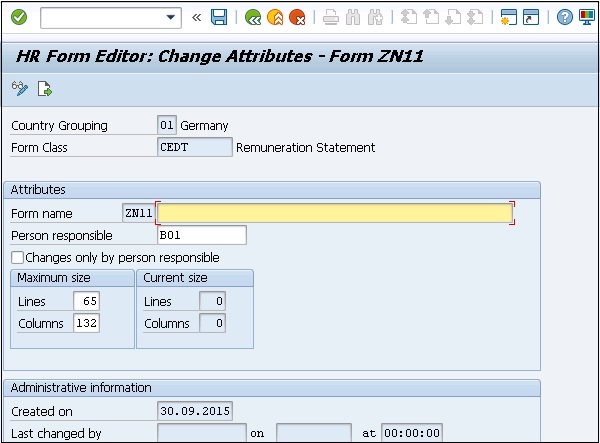
You can find administrative information like when and who has created the form.
The required fields are −
Attribute Area − This is used to determine the size of the form, name and type.
Person responsible − This shows the person responsible and who can make the changes. There is a Check box, Changes only by person responsible. Using this, you can restrict the changes in the form by unauthorized persons, allowing modification only by the creator.
You can also change the following properties of the form −
- Background
- Single fields
- Window
- Line Layout
- Cumulation IDs
- Text Modules
- Rules
- Documentation
To create a variant in Payroll Driver
Step 1 − Use T-Code: PC00_M40_CEDT.
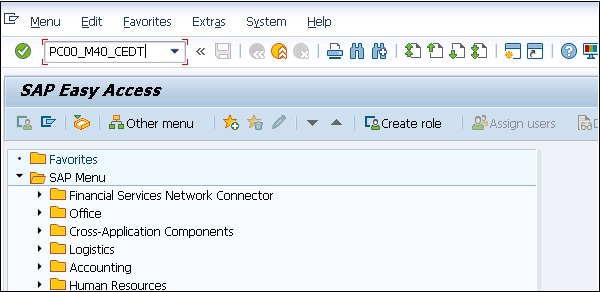
Step 2 − A new window HR: India Remuneration Statements opens.
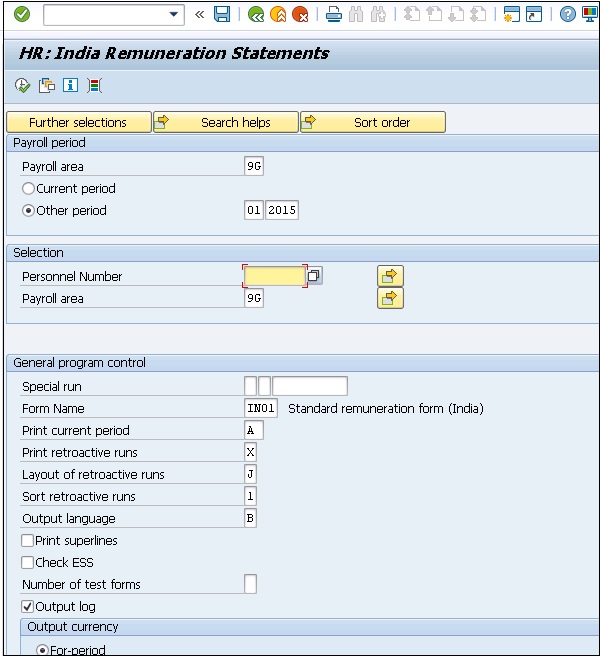
Step 3 − Click the save icon at the top and it will open the Variant Attributes screen.
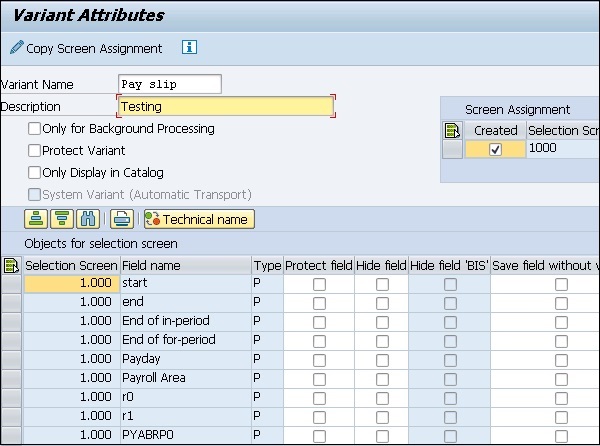
Step 4 − To use the Payroll driver, use the Variant − T-Code: PC00_M40_CALC_SIMU.
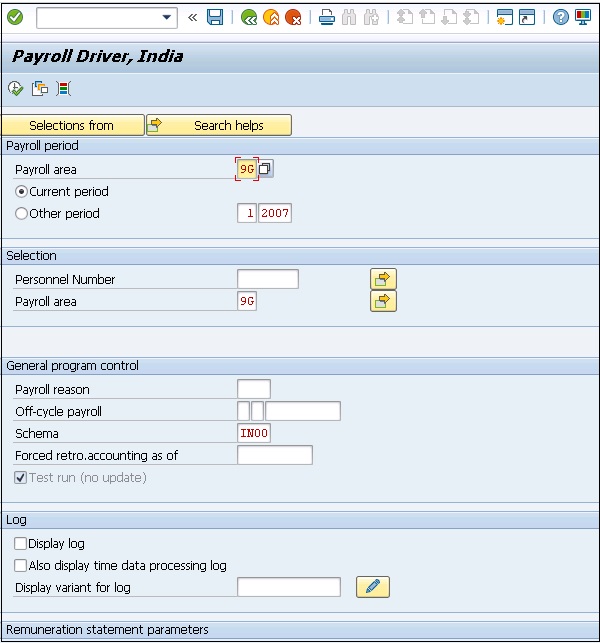
You can use this pay slip now. Note that the pay slip type is form class CEDT.
SAP HR - Universal Work List
Universal Work List (UWL) is a SAP Enterprise Portal element, the users can personalize as their central point of access to their tasks. Universal worklist UWL allows the use of current work items that are generated by the system when running SAP HR process in the system.
Uses of UWL
Universe worklist is used for all the portal roles that are used in all the processes in SAP HCM Processes and Forms.
You cannot set up a Universal worklist UWL for the roles that trigger the process start and are not involved in other process steps.
Universal worklist UWL is normally integrated with HR Administrator and Manager portal roles and is set up to enable the system to display work items from HCM Processes and Forms.
To set up the additional roles using SAP HR Processes and Forms, Universal Worklist must be configured accordingly integrated with portal roles in the system.
Universal Work List – Setup
UWL is used to group the different workflow tasks and alerts that are relevant for HR Administrator.
To set up UWL- go to portal → Select System Administration → System Configuration → Universal Worklist and workflow → Universal Worklist → UWL System Configuration.
You can set up a new connector if you do not have a connector in the system connected to system alias otherwise you can also use an existing one.
Advantages
Following are the key advantages of using UWL −
You can access guided Procedure work items in common UWL inbox.
You can launch new items, open items in the same window or in new window.
To manage the work items you can use inbox customization flexibility.
You can use the pull mechanism that allows you to use auto or manual refresh options for work items.
Security in SAP HCM
Security in SAP HR system is one of the most important feature as it involves securing critical information and personal data of employees. Security also covers securing internal information in an organization like department details, vacancy, job details, salary information, etc.
There are various critical data in HR system that needs to be secured. For example, Employee Personal data, Pay slips, Time sheets, Expense Details, Salary account Details, HR system configuration details, HR policies, etc.
Transaction Codes used to maintain security in SAP HR system −
OOSP − Defined PD profile
OOAW − Evaluation path definition
PP01 − To maintain PD data
PPOC − Create Organizational Unit
PPOS − Display Organization
Authorization Objects
Authorization objects are used to perform complex check of authorizations when a user performs some actions. An authorization object groups multiple authorization fields. Authorization objects are used to restrict the access on personal data.
There are various authorization levels −
Authorization Field
Long Text
PERSA
Personnel Area
PERSG
Employee Group
PERSK
Employee Subgroup
INFTY
Infotype
SUBTY
Subtype
VDSK1
Organizational Key
AUTHC
Authorization Level
R (Read) − This is used for read access.
M (Matchcode) − This is used for read access to input helps.
Enqueue and Dequeue E and D − is used for write access using the asymmetrical double verification principle.
E is used to allow the users to create and change locked data records.
D is used to allow the users to change the lock indicators.
W (Write) − This is used for write access.
S is used for write access using the Symmetric Double Verification Principle.
Data Migration in SAP HR
SAP data migration includes the facts and figures to be migrated from non-SAP system to a SAP system.
Data migration involves the following steps −
Data Preparation and Analysis − This includes the fact and figures that are available in HR system.
Data Mapping − It includes mapping of data from data sources from non-SAP system to a SAP system.
Data Extraction and Conversion − This includes data extraction from legacy system and converting the data to a format, which is acceptable by SAP system.
Data Upload − It involves incorrect configuration, incorrect mapping, incorrect data and finding data mistakes. Reloading of facts and figures in case there is any error.
Testing and data validation − Once the data is uploaded, you can validate the data like SAP Standard Reports and SAP Database Tables.