
- SAP HANA Tutorial
- SAP HANA - Home
- SAP HANA Introduction
- SAP HANA - Overview
- In-Memory Computing Engine
- SAP HANA - Studio
- Studio Administration View
- SAP HANA - System Monitor
- SAP HANA - Information Modeler
- SAP HANA - Core Architecture
- SAP HANA Modeling
- SAP HANA - Modeling
- SAP HANA - Data Warehouse
- SAP HANA - Tables
- SAP HANA - Packages
- SAP HANA - Attribute View
- SAP HANA - Analytic View
- SAP HANA - Calculation View
- SAP HANA - Analytic Privileges
- SAP HANA - Information Composer
- SAP HANA - Export and Import
- SAP HANA Reporting
- SAP HANA - Reporting View
- Bi 4.0 Connectivity to HANA Views
- SAP HANA - Crystal Reports
- SAP HANA - Excel Integration
- SAP HANA Security
- SAP HANA - Security Overview
- User Administration & Management
- SAP HANA - Authentications
- SAP HANA - Authorization methods
- SAP HANA - License Management
- SAP HANA - Auditing
- SAP HANA Data Replication
- SAP HANA - Data Replication Overview
- SAP HANA - ETL Based Replication
- SAP HANA - Log Based Replication
- SAP HANA - DXC Method
- SAP HANA - CTL Method
- SAP HANA - MDX Provider
- SAP HANA Monitoring
- SAP HANA - Monitoring and Alerting
- SAP HANA - Persistent Layer
- SAP HANA - Backup & Recovery
- SAP HANA - High Availability
- SAP HANA - Log Configuration
- SAP HANA SQL
- SAP HANA - SQL Overview
- SAP HANA - Data Types
- SAP HANA - SQL Operators
- SAP HANA - SQL Functions
- SAP HANA - SQL Expressions
- SAP HANA - SQL Stored Procedures
- SAP HANA - SQL Sequences
- SAP HANA - SQL Triggers
- SAP HANA - SQL Synonym
- SAP HANA - SQL Explain Plans
- SAP HANA - SQL Data Profiling
- SAP HANA - SQL Script
- SAP HANA Useful Resources
- SAP HANA - Questions and Answers
- SAP HANA - Quick Guide
- SAP HANA - Useful Resources
- SAP HANA - Discussion
SAP HANA - Tables
Tables in HANA database can be accessed from HANA Studio in Catalogue tab under Schemas. New tables can be created using the two methods given below −
- Using SQL editor
- Using GUI option
SQL Editor in HANA Studio
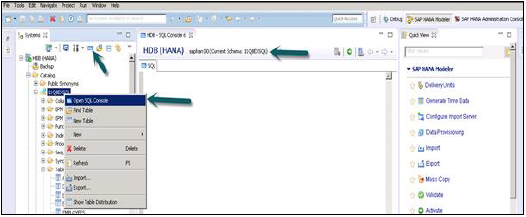
SQL Console can be opened by selecting Schema name, in which, new table has to be created using System View SQL Editor option or by Right click on Schema name as shown below −
Once SQL Editor is opened, Schema name can be confirmed from the name written on the top of SQL Editor. New table can be created using SQL Create Table statement −
Create column Table Test1 (
   ID INTEGER,
   NAME VARCHAR(10),
   PRIMARY KEY (ID)
);
In this SQL statement, we have created a Column table “Test1”, defined data types of table and Primary Key.
Once you write Create table SQL query, click on Execute option on top of SQL editor right side. Once the statement is executed, we will get a confirmation message as shown in snapshot given below −
Statement 'Create column Table Test1 (ID INTEGER,NAME VARCHAR(10), PRIMARY KEY (ID))'
successfully executed in 13 ms 761 μs (server processing time: 12 ms 979 μs) − Rows Affected: 0
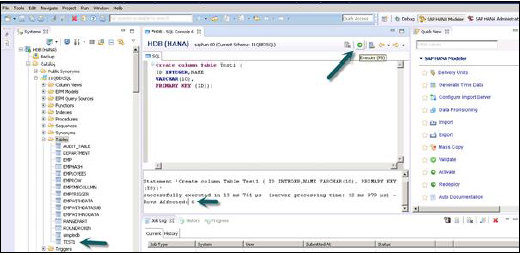
Execution statement also tells about the time taken to execute the statement. Once statement is successfully executed, right click on Table tab under Schema name in System View and refresh. New Table will be reflected in the list of tables under Schema name.
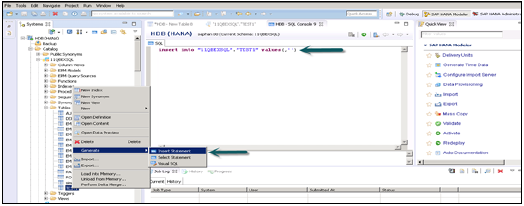
Insert statement is used to enter the data in the Table using SQL editor.
Insert into TEST1 Values (1,'ABCD')
Insert into TEST1 Values (2,'EFGH');
Click on Execute.
You can right click on Table name and use Open Data Definition to see data type of the table. Open Data Preview/Open Content to see table contents.
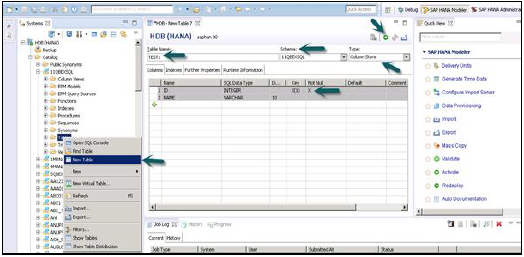
Creating Table using GUI Option
Another way to create a table in HANA database is by using GUI option in HANA Studio.
Right Click on Table tab under Schema → Select ‘New Table’ option as shown in snapshot given below.
Once you click on New Table → It will open a window to enter the Table name, Choose Schema name from drop down, Define Table type from drop down list: Column Store or Row Store.
Define data type as shown below. Columns can be added by clicking on + sign, Primary Key can be chosen by clicking on cell under Primary key in front of Column name, Not Null will be active by default.
Once columns are added, click on Execute.
Once you Execute (F8), Right Click on Table Tab → Refresh. New Table will be reflected in the list of tables under chosen Schema. Below Insert Option can be used to insert data in table. Select statement to see content of table.
Inserting Data in a table using GUI in HANA studio
You can right click on Table name and use Open Data Definition to see data type of the table. Open Data Preview/Open Content to see table contents.
To use tables from one Schema to create views we should provide access on the Schema to the default user who runs all the Views in HANA Modeling. This can be done by going to SQL editor and running this query −
GRANT SELECT ON SCHEMA "<SCHEMA_NAME>" TO _SYS_REPO WITH GRANT OPTION