- SAP EWM Tutorial
- SAP EWM - Home
- SAP EWM - Overview
- SAP EWM - Organization Units
- SAP EWM - Master Data
- SAP EWM - Structure Elements
- SAP EWM - Work Center
- Warehouse Process Types
- Selling and Receiving Goods
- Maintaining Serial Numbers
- SAP EWM - Value Added Services
- Direct Goods Issue Process
- SAP EWM - Storage Control
- SAP EWM - Deconsolidation
- Pick, Pack, and Pass of Goods
- SAP EWM - Replenishment
- SAP EWM - Physical Inventory
- SAP EWM - Slotting
- SAP EWM - Labor Management
- SAP EWM - Production Supply
- SAP EWM - Expected Good Receipts
- SAP EWM - Cross Docking
- SAP EWM - RF Framework
- SAP EWM - Warehouse Monitoring
- Inbound and Outbound Delivery
- SAP EWM Useful Resources
- SAP EWM - Questions Answers
- SAP EWM - Quick Guide
- SAP EWM - Useful Resources
- SAP EWM - Discussion
SAP EWM - Quick Guide
SAP EWM - Overview
SAP Extended Warehouse Management (EWM) is used to efficiently manage inventory in the Warehouse and for supporting processing of goods movement. It allows the company to control their Warehouse inbound and outbound processes and movement of goods in the Warehouse.
The main process in a Warehouse is incoming and outgoing materials, goods receipt and goods issue, fulfil customer orders, and distribution of goods. When a company doesn’t store any goods, then there is no need of Warehouse management to manage goods.
Inbound process involves storage of goods in warehouse and their location and Outbound process involves picking up the goods. Whenever a material is stored in a warehouse, it is stored in the storage bin and you can find its current location.
With the help of SAP EWM all the goods movement are controlled by a warehouse management system and provides you the tools to monitor warehouse activities. You can also manage additional functions in the Warehouse like creating a serial number, batch number, vendor management inventory, resource optimization and value added services. SAP Extended Warehouse Management allows you to not only monitor the quantity of goods in Warehouse but to manage other critical functions and delivery of goods efficiently.
SAP Warehouse Management is opposite to Inventory management. Inventory management tells the count of goods in the storage location and its physical location is unknown. Warehouse management deals with goods movement and monitoring the physical location of the goods recorded with specific documents.
SAP EWM is different from SAP Warehouse Management
SAP EWM is a part of SAP Supply Chain Management like Warehouse management system but provides more robust and advanced features to manage key activities in the Warehouse.
SAP Extended Warehouse Management is similar to Warehouse management but it provides more features like picking, put away, RF framework, Warehouse structure and more flexible options to manage the warehouse functions.
You can create new elements like an activity area, resources, labor management and work centers in SAP EWM which were not available in WM.
SAP EWM provides more a robust solution to manage warehouse functions in an organization. It is also a part of SAP Supply Chain Management and also supports all the processes within logistics and supply chain.
SAP EWM ─ Key Features
The following are the key features in SAP EWM −
Using SAP EWM, you can control the warehouse activities like picking, posting and managing storage bin and good receipts.
You can set alert for changed data before goods receipt from EWM to the ERP system, reversal or correction of the goods receipt from EWM to the ERP system and an inbound delivery split from EWM to the ERP system.
You can perform deconsolidation of handling units which contain different products before putting them away in different storage sections.
You can determine storage concepts using slotting for products and optimize arrangement of goods warehouse automatically.
It allows you to perform executable tasks like work packages, consisting of warehouse tasks warehouse employees should perform as part of warehouse management activities.
It allows you to manage and track vehicles as well as other transportation units from the yard check-in to yard check-out, including movements and other tasks within the yard.
SAP EWM also includes storage and handling of hazardous substances and their transportation in accordance with the regulations from SAP Environmental Health & Safety EHS.
In SAP EWM, you can also plan labor times and resources more effectively and hence you can make your Warehouse efficient by managing key resource management tasks effectively.
In SAP EWM, you can use Warehouse cockpit that allows you to display warehouse key figures graphically and to evaluate or monitor activities using defined chart types.
You can use cross-docking that allows you to perform transportation of handling units across different distribution centers or warehouses till they reach final location in the Warehouse.
Deployed Options in SAP EWM
SAP EWM can be considered as deployed in an ERP server or you can also consider it as an application in the Supply Chain Management landscape.
SAP Extended Warehouse Management is integrated with ERP to access transaction and master data and use of features like slotting, availability check also requires its integration with CRM.
It is considered as a separate application and shares the same server with the SCM applications. You can also run SAP EWM in its own SCM environment which is suitable to get improved performance.
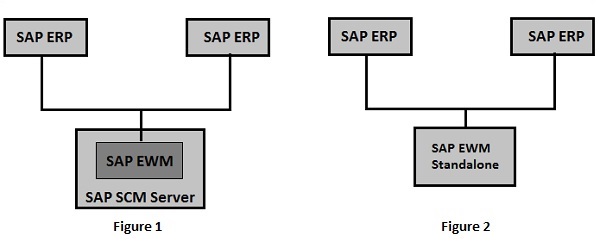
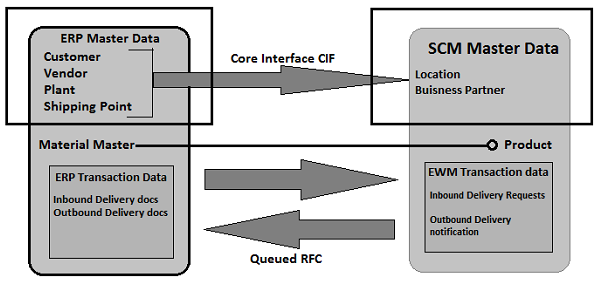
EWM Deployment Options
The following image shows the deployment options for SAP EWM −
- Figure 1 shows SAP EWM on SCM Server.
- Figure 2 shows SAP EWM as Standalone.
Communication Method
SAP ERP and EWM are closely integrated with each other for transfer of transaction and master data. There are two different ways of communication.
Core Interface (CIF) − Core interface is one of the common method for communication between SAP SCM system and SAP Advanced Planning and Optimization APO. Master data maintained in ERP system like customer, material and vendor which are available in ERP system are transferred to EWM system use Core Interface CIF communication.
For transaction data (inbound/outbound delivery docs), a separate integration model is used for communication. This model uses iDocs or queued remote function call RFC.
How to check various menu structure of EWM system?
Login to the SCM system and navigate to the Extended Warehouse management node in the SAP menu. You can use various transactions to manage basic functions in Warehouse management −
| Warehouse Monitor | /SCWM/MON |
| Maintain Inbound Delivery | /SCWM/PRDI |
| Maintain Outbound Delivery | /SCWM/PRDO |
| RF Environment | /SCWM/RFUI |
| Creating Storage Bin | /SCWM/LS01 |
| Confirm Warehouse Task | /SCWM/TO_CONF |
| Warehouse product Maintenance | /SCWM/MAT1 |
SAP EWM - Organization Units
In SAP ERP, a warehouse number is used to represent the physical warehouse where all the material is stored. A Warehouse number is a 3 or 4 character field in Warehouse management or EWM respectively. Warehouse numbers are created in the ERP system and to activate it, you use a combination of plant and storage location assigned to this plant with the respective warehouse number.
Types of Organization Units
There are different organization units in a Warehouse system at different levels −
Warehouse Number − Each warehouse consists of a warehouse number which is at the highest level in a warehouse management system. Each warehouse number consists of a sub structure that maps the warehouse relationship.
Storage Type − There are different types of storage where products are physically stored in a warehouse such as open storage, goods issue and goods receipt, racks.
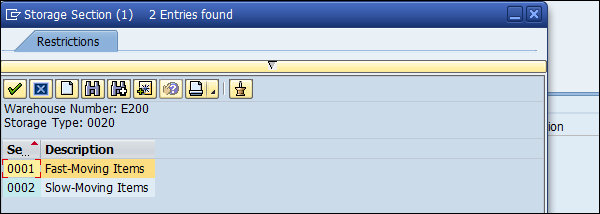
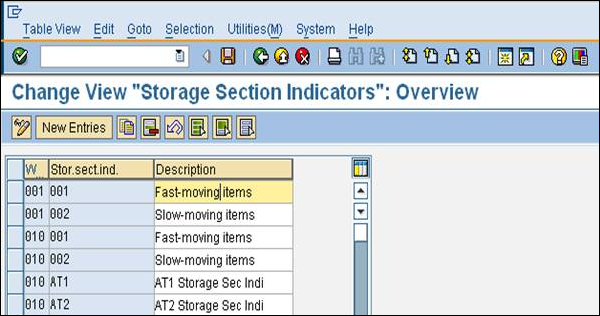
Storage Section − This is a part of storage type and represents a group of bins with same characteristics. Commonly used storage sections are fast moving or slow moving items, etc.

Storage Bin − The Storage bins represent the physical location of storage space where the products are stored in Warehouse. They are at the lowest level of the organization structure and when you store an item in a Warehouse you need to mention its exact location.
Activity Areas − Storage bins are further categorized in this activity area. It includes activities like picking, put away or a physical inventory. As per the activity, you can assign the same storage bin to multiple activity areas.
Quant − The quantity of goods in the storage bin is represented by Quant. The quant is used for managing inventory in storage bin.
How to Create Storage Bins and Block them for Put Away?
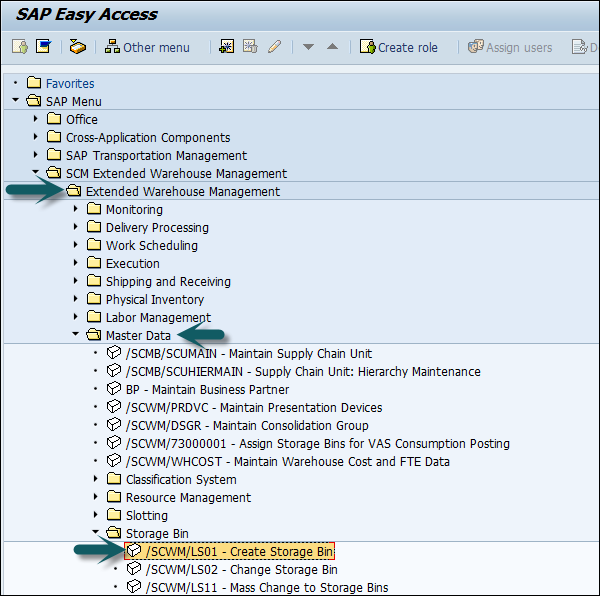
To create a Storage bin, you can use T-Code: /SCWM/LS01 or
Navigate to the Extended Warehouse Management → Master data → Storage Bin → Create Storage Bin.
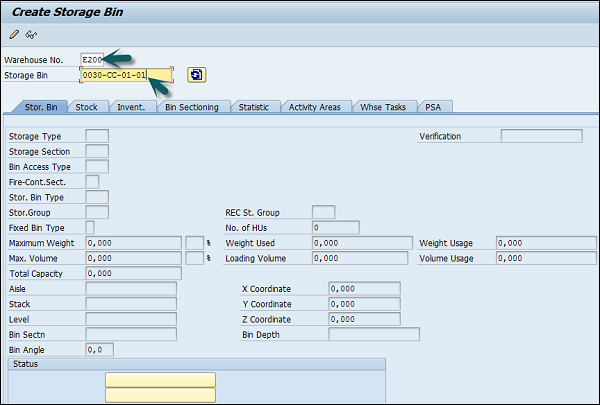
Enter your Warehouse number and Storage bin as per the requirement → Press Enter as shown in the following screenshot.
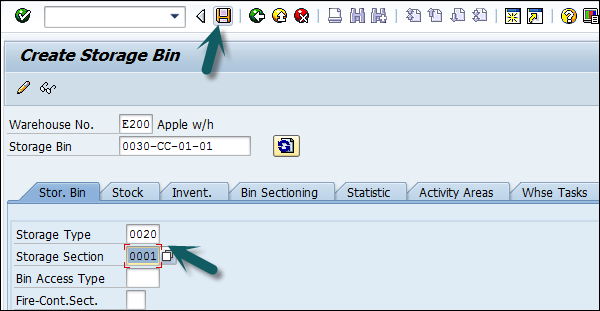
Enter the Storage type and Storage section as per the requirement and then click on the Save icon as shown in the following screenshot.

How to Change the Storage Bin?
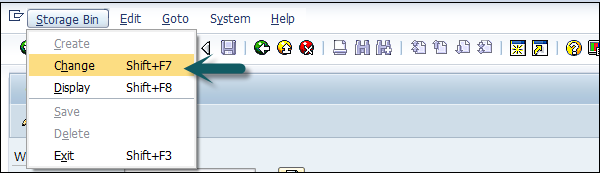
To change the storage bin, click on Storage bin → Change
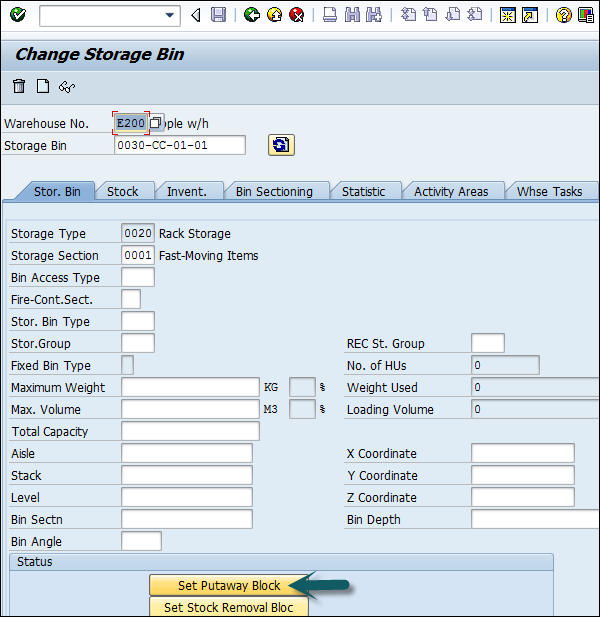
Now to lock this Storage bin for put away, go to the Status box and select Putaway block at the bottom → Save your entry.

You can also remove the put-away block by going to Warehouse monitor again.
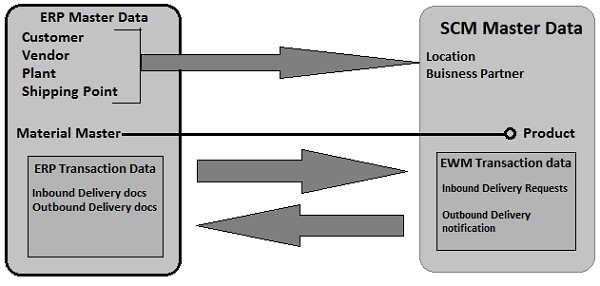
SAP EWM - Master Data
In the ERP system, you have master data which includes the details of the customer, vendor, plant and shipping point which are also used by the SCM. At the time of data transfer using CIM, this data is copied to the corresponding to SCM master data. For example, the location.
The master data that is transferred from the ERP system to the SCM system consists of fields like material description, unit of measures, weight volume details, etc. The product and location master data is used in all the applications of the SCM.
An integration model is created to perform data transfer, you can define master data type and selection criteria to find the material master data. Once this model is created you need to save and execute the model. To perform data transfer to the SCM system, you have to activate the model.
Create and Update the WPM in ERP and SCM
In this section we will discuss how to create and update the Warehouse Product Master in the ERP and the SCM.
Let us maintain a pilferable flag in the ERP system and confirm that it was transferred to the product master in SCM.
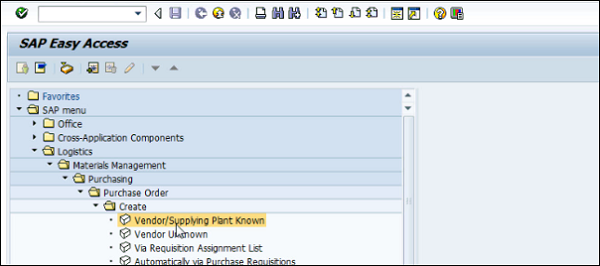
Navigate to Easy Access → Logistics → Materials Management → Material Master → Change → Immediately.
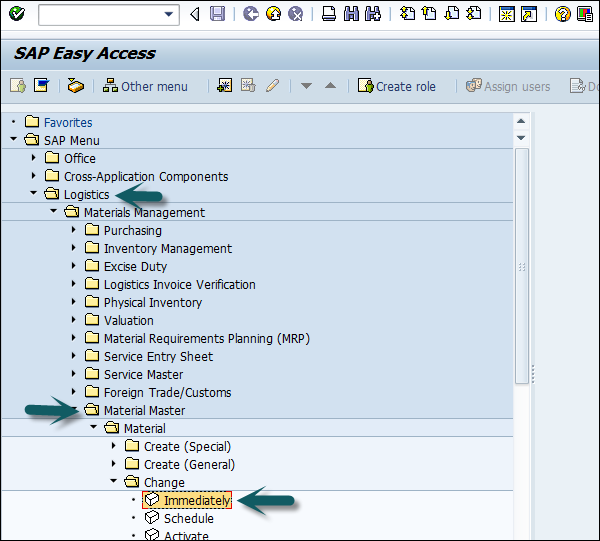
Enter the Product number and press Enter as shown in the following screenshot.
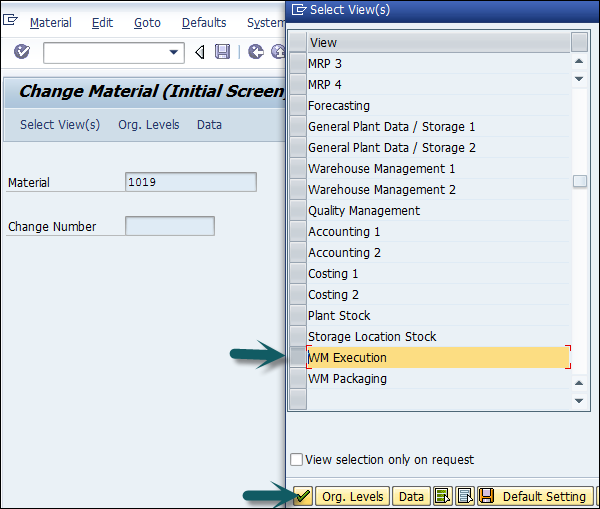
Click on WM Execution → Continue
The next step is to select the pilferable flag filed → Enter → Yes in popup window
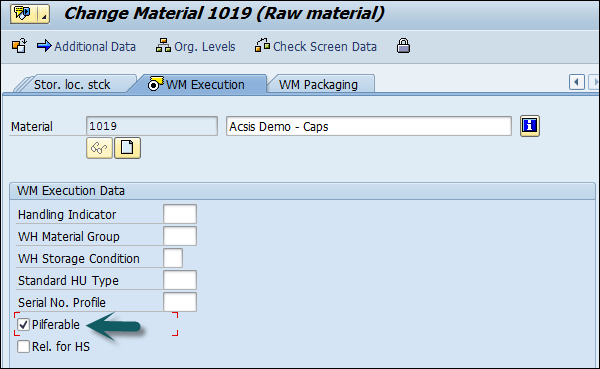
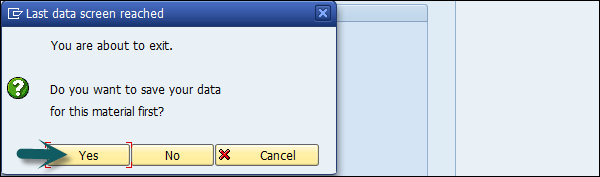
You will get a confirmation that the material has been changed.
To confirm that this flag is transferred to the product master in the SCM, navigate to Extended Warehouse Management → Master Data → Product → Maintain Product.
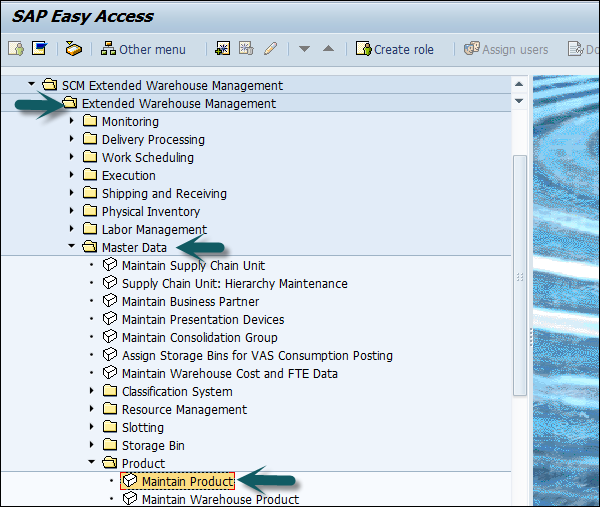
Enter the Product as shown in the previous screenshot and then check view Global data. Click on Display.
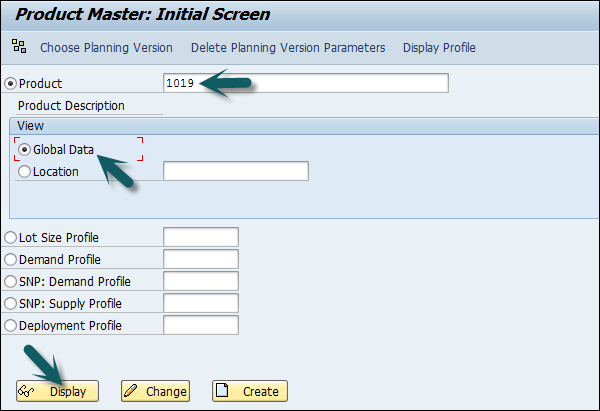
Go to the Storage tab → check if the field pilferable is flagged.
Create WPM for Material Master Record Transfer via CIF?
Here we will discuss on how to create a Warehouse Product Master (WPM) for a Material Record Transfer via the CIF.
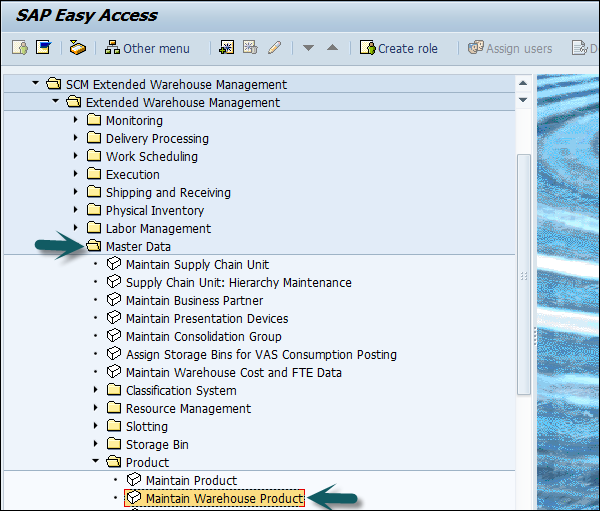
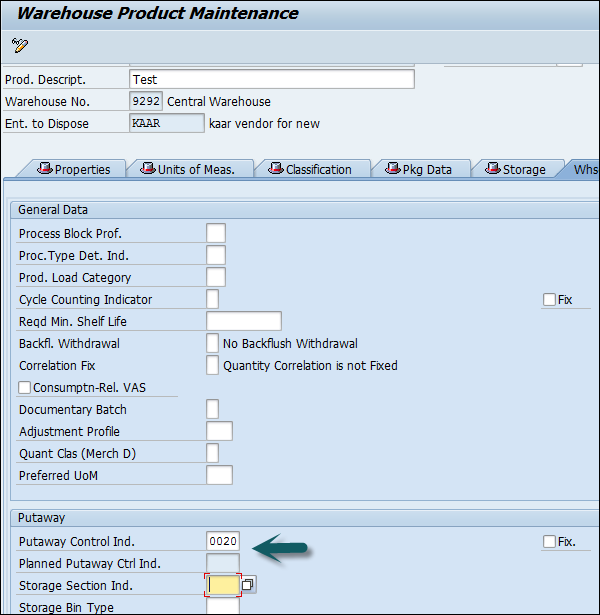
Navigate to Extended Warehouse Management → Master Data → Product → Maintain warehouse product
In the next window, enter the following details −
- Enter Product Number
- Warehouse and party entitled to dispose
After entering these details, click on the Create button.

Go to the Warehouse data tab and enter the following details for the product master −
- Putaway Control Indicator
- Stock Removal Indicator
After entering the details, click on the save button.

SAP EWM - Structure Elements
In this chapter, we will discuss regarding the different structure elements that are available in SAP Extended Warehouse Management.
Types of Structure Elements
As discussed in the previous chapter, there are various organization elements in SAP Extended Warehouse Management. These elements are also known as structure elements of a warehouse system.
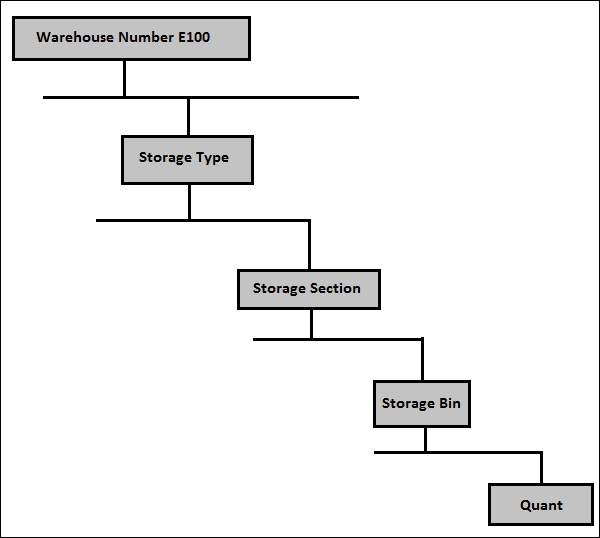
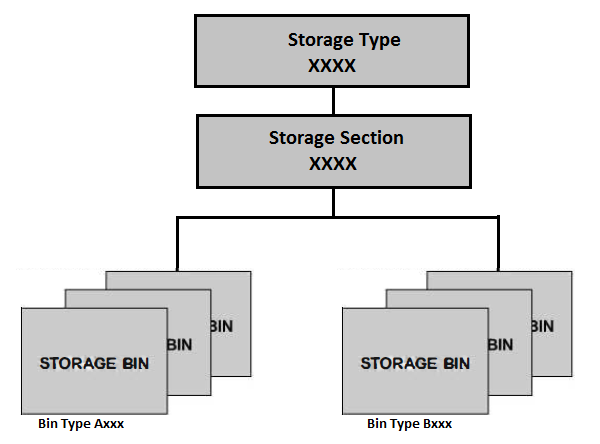
The Warehouse consists of the following elements in the hierarchical structure −
- Warehouse Number
- Storage Type
- Storage Section
- Storage bin
- Activity Area
The highest unit in a Warehouse is the Warehouse number and the smallest unit is a storage bin. A Storage Bin tells the exact location of a product in a warehouse.
Warehouse Number − Each warehouse consists of a warehouse number which is at the highest level in a warehouse management system. Each warehouse number consists of a sub structure that maps the warehouse relationship.
Storage Section − This is a part of storage type and represents a group of bins with the same characteristics. The commonly used storage sections are fast moving or slow moving items, etc.
Storage Bin − The storage bins represent the physical location of a storage space where the products are stored in a Warehouse. They are at the lowest level of organization structure and when you store an item in a Warehouse you need to mention its exact location.
Activity Areas − Storage bins are further categorized in activity areas. It includes activities like picking, put away or a physical inventory. As per the activity, you can assign the same storage bin to multiple activity areas.
Quant − The quantity of goods in a storage bin is represented by Quant. The quant is used for managing inventory in a storage bin.
Storage Types
There are different types of storage where products are physically stored in a warehouse such as −
- Open storage
- Goods Issue
- Goods Receipt
- Racks
A Storage type is a four-character name and shows a physical or a logical subdivision of a warehouse. A Storage type can consist of one or more storage sections and bins. A storage type is defined by the role it is used for in a warehouse.
A storage type can be used for the following roles −
Standard Storage Type − Physical area where products are stored in a warehouse.
Identification Point − An area where products are labeled, identified or cross checked during a goods receipt process.
Pick Point − Goods are packed when a goods pick-up process is performed.
Work Center − This represents an area in the warehouse where deconsolidation, inspection or VAS processing is done.
Apart from the above mentioned, there are storage types like Yard, Doors, Staging Area and many more.
SAP EWM - Work Center
A work center in a Warehouse is assigned to a storage type and a physical unit to perform packing, deconsolidation or weighing activities. Storage type assigned to a work center has a role of the work center, pick point or pick point and identification. You can also configure more than one work center in a storage type.
A Work Center can be used for the following processes −
- Packing
- Deconsolidation
- Counting
- Quality check
It is also possible to combine work centers into work center groups. This allows you to send individual products to a work center group.
Creating a Work Center
To create a work center, you first need to create a storage type with a role as mentioned above that will be used to show a work center. You also need to define various configuration activities related to the master data to use work center in warehouse functions.
There are various transactions that can be performed in a Work Center −
- Deconsolidation
- Packing
- Value added Service VAS
- Quality Inspection
- How to create a work center for packing?
- To create a work center for packing, you need information:
- Warehouse #
- Storage Type
- Inbound section
- Outbound Section
To define a work center, navigate to the Extended Warehouse management → Master Data → Work Center → Define Work Center.

In a new window, select Warehouse # and work center to copy.
Click on copy as, and this will overwrite the new work center with an existing work center.
Enter the other details like −
- Storage Type
- Inbound Section
- Outbound Section
- Choose Enter
- Choose Save and Exit
SAP EWM - Warehouse Process Types
A Warehouse process type is used to define the activity or movement of each process in a warehouse. It deals with each warehouse process like packing, good receipt, good issue and is assigned to each warehouse task document.
Example
For simple movements, warehouse process type defines the storage type and bin for the movement of goods. Warehouse process type is defined at the point of creation of the warehouse document or in separate step.
All warehouse process types are further grouped into warehouse process categories. Warehouse process categories are used to define the goods movement in a warehouse.

There are different warehouse process categories that are predefined in the EWM system −
- Stock Removal
- Putaway
- Internal Movement
- Goods receipt posting
- Goods issue posting
- Physical inventory
- Cross Line putaway
How to Create a Warehouse Process Type for Picking?
To create a Warehouse Process Type for Picking, navigate to EWM → Cross Process Settings → Warehouse task → Define warehouse process type.
You can then select warehouse process type to copy. Click on Copy button at the top.
In stock/putaway removal section enter the storage bin and type and click Enter.
To save the warehouse process type, click on the save icon.
SAP EWM - Selling and Receiving Goods
This involves goods shipping and receiving and they are stored in a warehouse. Receiving goods process starts in the ERP system when a purchase requisition is detected and purchase order is created. A purchase order consists of the quantity of material and store and plant location. There are two ways to handle a purchase order request, which are −
First is to send the purchase order to supplier for goods delivery and once goods are received, goods receipt is posted.
Other way is to receive an announcement from supplier about the goods arrival as per purchase order request.
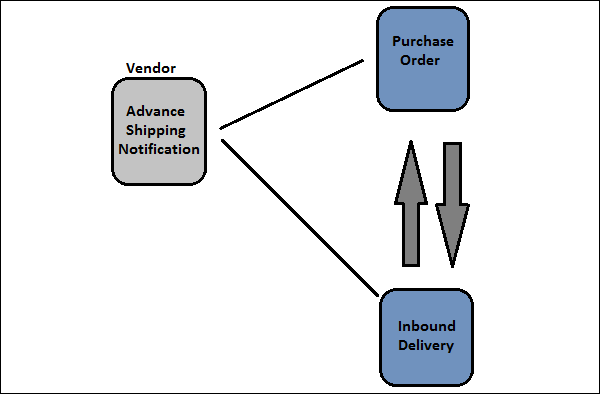
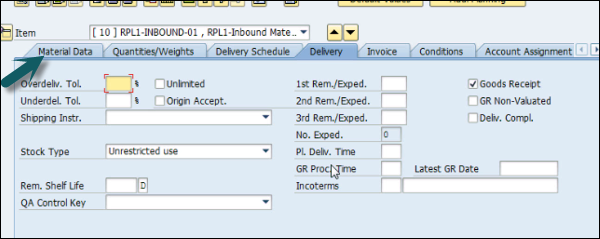
When a purchase order is created, you can set a CTRL key to enable notification from supplier. When you set the control key, an inbound delivery must be created on the basis of the purchase order. When a control key is set and an inbound delivery is not created, you can put the goods receipt.
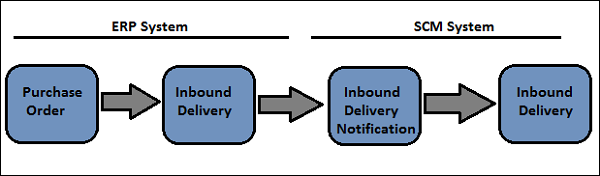
An inbound delivery contains the information about the goods arrival, quantity of goods, store and plant location. The system checks the combination of the plant and storage location to check if the warehouse is in the EWM and then the system replicates an inbound delivery notification in the EWM system.
An Inbound Processing includes −
- Good receipt and optimization
- Transportation unit inspection
- Quality Inspection
- Routing of goods in warehouse
Process Flow
Whenever you make any changes in the inbound delivery document, these changes are reverted in the ERP system. The status of the inbound delivery is updated as per goods delivery. If the status of an inbound delivery document is execution completed, it shows proof of delivery in the ERP.
SAP EWM - Maintaining Serial Numbers
Using serial numbers, you can easily track the location of goods in the warehouse. A serial number can be used to identify the vendor and receiver details who has sent and received goods in a warehouse.
A serial number is a series of characters that have been assigned to each product in the warehouse so that it remains separate and are identified in the warehouse system. You can use serial numbers up to a length of 30 characters in an EWM system. However, SAP recommends to use a maximum of 18 characters to make it compatible with the ERP system.
Types of Serial Number Profiles
To assign serial numbers to a product, you use a serial number profile that determines transactions for issuing a serial number to the products.
There are two different types of serial number profiles that can be used −
Sales General Plant − This serial number profiles are used in the ERP system and must be defined to use serial numbers in the delivery documents for goods issue or receipts.
LES Serial Number − This is maintained in the product master data view.
When you click on the WM execution, you need to select serial number profile which is sent to SCM system and is used in EWM.
A serial number profile is maintained in the ERP or in the EWM system. There are four types of serial number requirement available in the system −
Serial Number for Document items − This serial number is used for returns. When a customer complains about a product and return is raised, you can perform a check if this is the same product that is supplied to him. This serial number is not used for other warehouse tasks.
Serial Numbers on warehouse number level − This serial number requirement type is used to check which serial number is available in your warehouse.
Serial number of warehouse movement − This serial number requirement type is used to know the exact storage bin information for products. Serial numbers are used in each warehouse task and must be entered before posting goods receipt or goods issue.
No Serial number requirement − This requirement type is used when some products are serialized in few of the warehouses.
Issuing a Provisional Serial Number
It is required to enter serial numbers before posting a goods issue or a goods receipt. In this scenario, you can configure the system to use provisional serial numbers.
The provisional serial numbers are 30 characters and always start with a $ sign. When you post goods receipt, provisional serial number is assigned and when you confirm putaway warehouse tasks, you must replace the provisional serial number with the real ones.
SAP EWM - Value Added Services
The Value Added Services define the product processing to be performed in a warehouse and includes activities like packing, labeling, assembling, etc.
To perform interim steps in the goods issue or goods receipt, you can use storage control to perform interim steps.
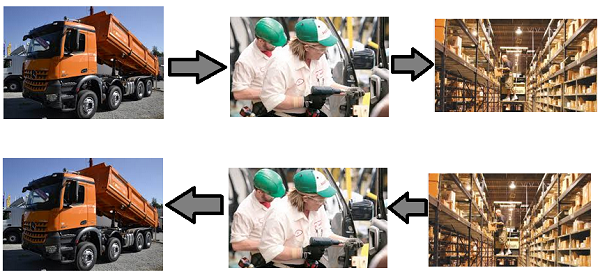
In the following illustration, you can see the process flow of the Value Added Services in a warehouse function −
Value Added Services Order
This is used to inform the warehouse employees about the work that they have to do as part of the delivery and packing specifications. A VAS order is an instruction to perform value added service for one or more products and to link delivery items to the packing instructions.
A Value added services order consists of the following components −
- Order Header
- VAS activities to be performed
- Items
- Auxiliary products (Packing material, labels, oil, etc.)
A VAS order can be printed for employee use to inform what VAS activities has to be performed and on which product.
An auxiliary product posting includes use of other products like packing material, hangers, oil, etc. and quantity of these products used to perform VAS.
How to Manage Packaging Specifications?
Go to SAP Easy access → EWM → Master Data → Packaging Specification → Maintain Packaging specification.

Enter the packaging specification and perform search.
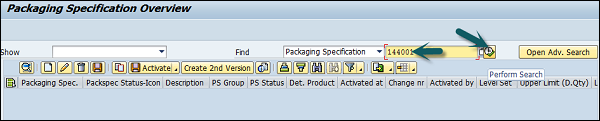
Select Packaging specification and click on Copy As.
Enter the product and click on Continue. Select new Packaging specification → Activate.
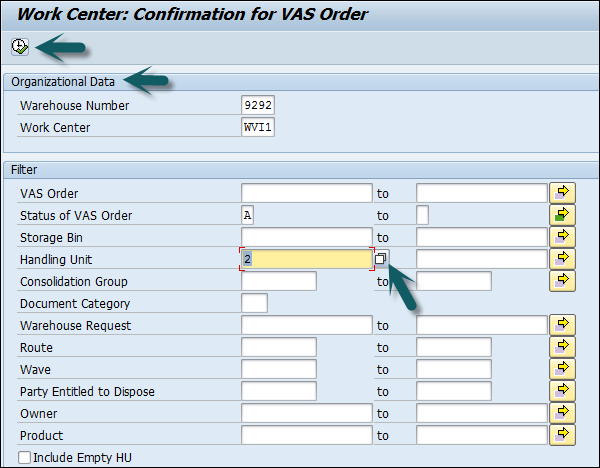
How to Confirm a VAS order and Processing of a Handling Unit?
Go to Extended Warehouse Management → Execution → Create confirmation for VAS
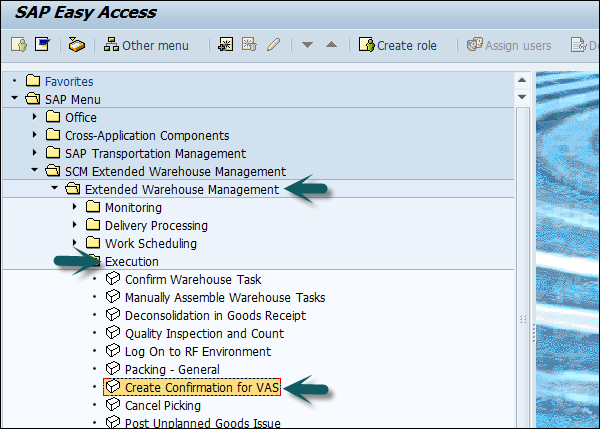
Enter the following details and then click on Execute.
- Warehouse #
- Work Center
- Handling Unit and click on Execute.
Go to VAS oiling tab → select the End button w/o variances in right frame on VAS Activity and Items tab.
Select Handling unit → Confirm Process step for HU.
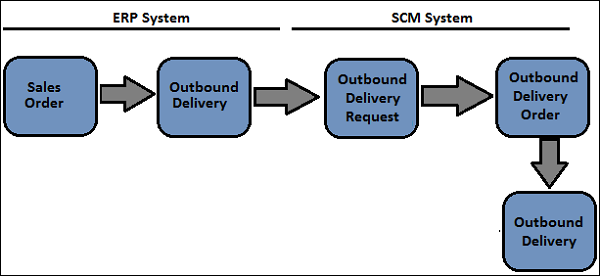
SAP EWM – Direct Goods Issue Process
The goods issue process in extended warehouse management starts with outbound delivery request. When an outbound delivery document is created, this process starts in the ERP system. For items that are relevant in the EWM, delivery document is replicated in the SAP EWM system.
How is a Goods Issue Carried out?
In this SAP EWM system, goods issue is carried out because of the outbound delivery request (ODR), which is a copy of the outbound delivery document in the ERP system and carries the same number.
A warehouse process type is defined for each line item when an outbound delivery request is created. This process type is used in picking warehouse task.
For goods issue, the following things are required −
- Warehouse Process Category 2
- Activity Pick
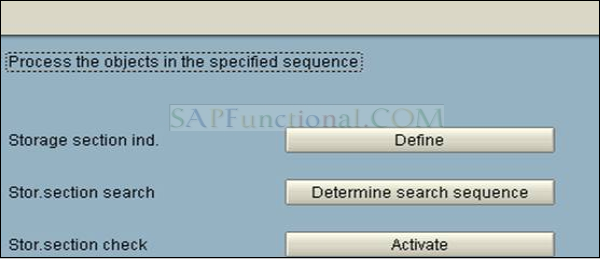
To perform this, the system determines the source location of the goods to be picked from. To configure this, the following steps have to be performed.
- Define storage type search sequence
- Configure storage type search sequence determination table
Parameters to Perform a Storage Type Search Sequence
The following parameters are used to determine the storage type search sequence −
- Warehouse Number
- 2 Step picking flag
- Stock Removal control indicator (This is taken from the product master)
- Warehouse Process Type
- Quantity Classification
- Stock Type
- Stock Usage
- Hazard rating
How to configure storage type search in goods issue?
Navigate to EWM → Goods Issue Process → Strategies → Specify Storage type search sequence.
Click on New entries and enter the following details −
- Warehouse #
- Storage type search sequence
- Other description and press ENTER key
- Select the entry and click on Assign storage type to storage type search sequence
- Click on New Entries
- Enter the storage type details
- Click on Save
Stock Removal Strategies
Stock removal strategy is a method of determining storage bins for one or more products to be picked. You can customize the stock removal rule definition table in customizing for SCM extended warehouse management.
How to Create Stock Removal Rules?
Navigate to Extended Warehouse management → Goods Issue Process → Strategies → Specify stock removal rule.
Denial Scenario
When an outbound delivery request is created, EWM system does not create a warehouse task or task is created with a partial quantity, this is called as the Denial scenario.
The following are the common denial scenarios in a warehouse while processing a goods issue −
When a warehouse task can’t meet the quantity requested in the outbound delivery request, the system can be configured to raise a pick denial.
In case of stock discrepancy picked by an employee, a smaller quantity as per outbound delivery and no other stock is available in the warehouse, you can set the system to execute a pick denial.
To configure EWM for pick denial, navigate to Extended Warehouse Management → Goods Issue Process → Pick Denial → Activate pick denial at warehouse number level.

In the next window, find your warehouse in the table and select the activation checkbox.
Click save and exit.
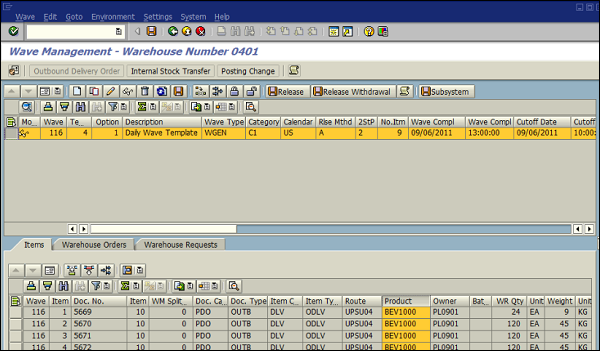
Waves in Warehouse for Outbound Delivery
In SAP EWM, you can combine warehouse request items and divide them into waves as per the possible criteria like activity area, route or product. Waves can be created automatically in SAP extended warehouse management system or manually using defined waves templates.
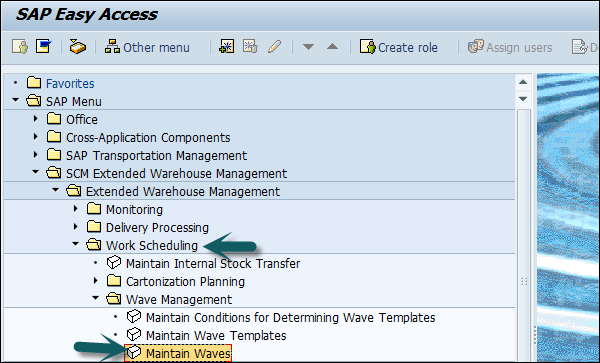
To create a wave manually, navigate to Extended Warehouse Management → Work Scheduling → Wave Management → /SCWM/WAVE Maintain Waves and click on Create.
SAP EWM - Storage Control
Storage Control is used to determine product movements in a warehouse. It is used to execute put away or stock removal process in the warehouse.
Types of Storage Control
These activities are performed as per the physical structure of the warehouse. There are two types of storage control −
- Layout Oriented
- Process Oriented
In SAP Extended Warehouse Management, process oriented storage control is executed first and layout storage control is executed to check if the put away step is possible in the warehouse layout view and also adjust the put away or stock removal as per the layout view.
How to Setup Process Oriented Storage control?
Navigate to Extended Warehouse Management → Cross Process Settings → Warehouse task → Define Process oriented storage control.
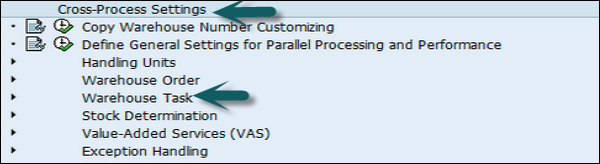
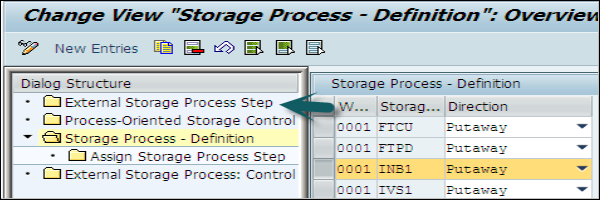
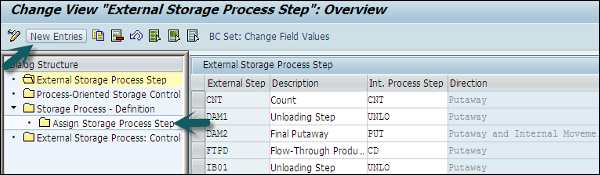
On the left side, select the external storage process step.
Click on the New Entry and enter new external process steps.
Click on the save button at the top.
Once this is created, you need to assign the external process step to storage process and warehouse #. To do this, go to Storage process definition dialog box and click on New entries at the top.

In the next window, enter warehouse #, storage process and other details and press ENTER.
Click on Assign Storage Process Step → New Entries.
Enter the new external process steps and click on save button.
SAP EWM - Deconsolidation
The deconsolidation function can be used to divide handling units across different putaway handling units. This is required when the deconsolidate handling unit contains different products and these products has to be put away in different storage sections.
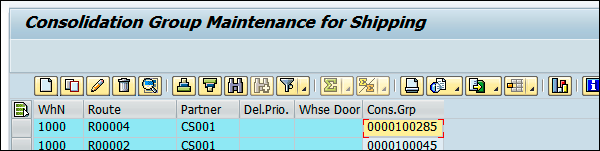
This is defined under consolidation groups for storage control.
Navigate to Extended Warehouse management → Goods Issue Process → Define Consolidation Group.
When a deconsolidation is defined in EWM, it is required for the following reasons in warehouse management −
The activity areas for the products within an HU are different.
The activity areas for the products within an HU are the same, but the consolidation groups are different.
The activity areas and consolidation groups for the products within an HU are the same, but the maximum number of warehouse tasks for the HU has been exceeded.
Deconsolidation Feature − When extended warehouse performs deconsolidation, a warehouse task is created for each handling unit item, which deconsolidation takes into account.
SAP EWM - Pick, Pack, and Pass of Goods
This module is used to manage picking, packing and transportation of goods in the activity areas in the warehouse. This can be used in RF environment commonly and process flow is same as for the standard RF process. In pick, pack and pass goods are moved from activity area to activity area till it arrives at destination point in the system.
Pick, pack, and pass can be used in two ways −
- System Controlled
- User Controlled
You need a warehouse order creation rule that supports the top warehouse order creation for the pick, pack, and pass process. The creation categories for this are −
System-driven
For the system-driven option, the sequence of the warehouse orders in the top warehouse order is determined according to the sort sequence of the assigned in the configuration settings for joining the activity areas.
User-driven
For the user-driven option, the sequence is manually determined during the execution, which means it can also be done by the Material Flow System (MFS).
SAP EWM - Replenishment
Replenishment is defined as the movement of goods from the warehouse to the shipment locations. In SAP EWM, you can use predefined techniques for replenishment of storage bins. There are different replenishment control fields defined at the storage type level or storage bin level. The data for control fields can be entered manually in the system or you can use slotting process to define these fields.
Following are the common control fields for Replenishment −
- Minimum stocking quantity
- Maximum stocking quantity
- Replenishment quantity
After the replenishment control data has been entered or determined, replenishment processing can begin. The replenishment control type is assigned to the storage type in Customizing. Some of the replenishment control types require additional settings in Customizing.
Types of Replenishment
Following are the different types of replenishments in SAP EWM.
Planned Replenishment − Planned replenishment can be performed either interactively or in the background. The system calculates the replenishment in accordance with the defined minimum quantity and maximum quantity. Replenishment control is triggered when the stock is less than the minimum quantity.
Order Related Replenishment − Order related replenishment is performed when stock figure is less than required quantity. The system rounds up the replenishment quantity to a multiple of minimum replenishment quantity. The maximum quantity can be exceeded and order related replenishment can be performed in the background or interactively.
Automatic Replenishment − The system starts automatic replenishment when a warehouse task is confirmed. Replenishment is calculated as per the maximum and minimum activity.
Direct Replenishment − Direct Replenishment is started during a pick denial and is only possible for fixed bin scenario. The system calculates replenishment as per maximum and minimum quantity. Direct replenishment is performed by picket and it assumes zero storage bin quantity.
How to Perform a Planned Replenishment?
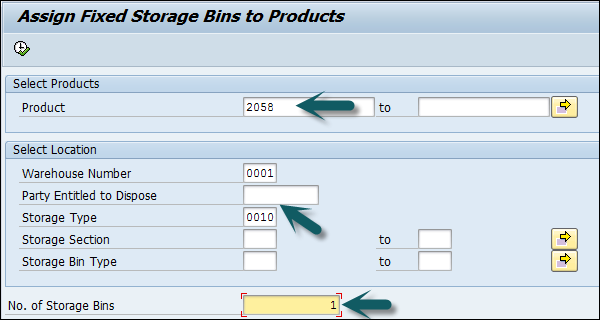
The first step is to assign one fixed bin to your product. Go to Extended Warehouse Management → Master Data → Storage Bin → Assign fixed storage bins to products.
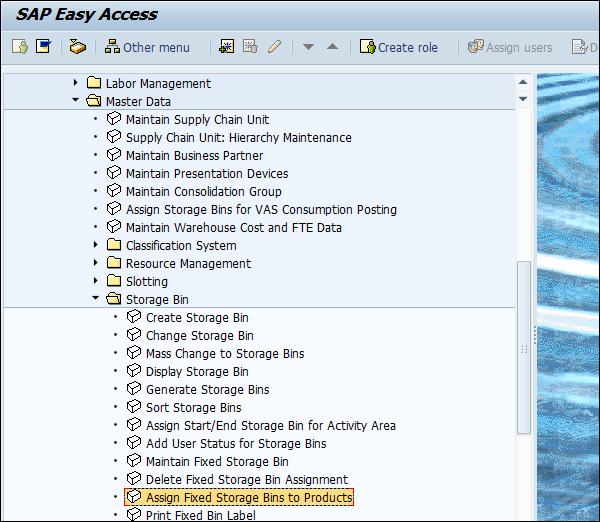
Enter the following details −
- Product#
- Warehouse #
- Storage type
- Number of Storage bins
Once the details are entered, click on Execute.
To check the warehouse product master data and check which fixed bin is assigned to it.
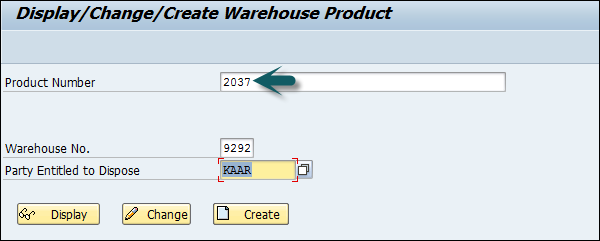
Navigate to Extended Warehouse Management → Master Data → Product → Maintain Warehouse Product.
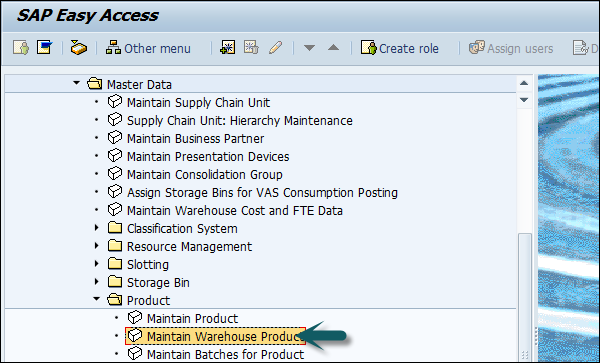
Enter Product #, Warehouse Number E100 and Party Entitled to Dispose SPCW. Click on change or Create.
How to Find out the Assigned Fixed Bin?
To find out the assigned fixed bin, choose navigate to Display Fixed Bins from the menu bar.
Select the tab Storage Type Data and enter the following details −
- Storage type
- Min quantity
- Unit of measure
- Maximum quantity
Once these details are entered, click on Adopt data and save your warehouse product.
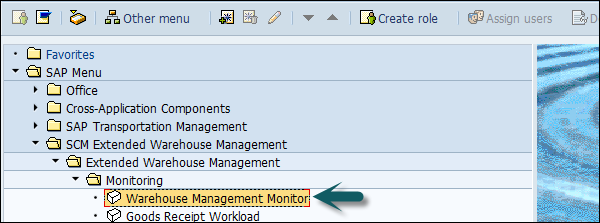
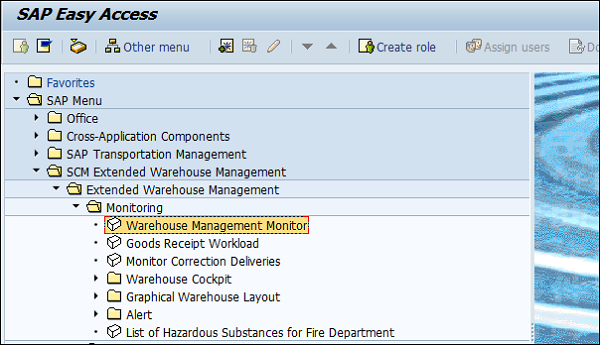
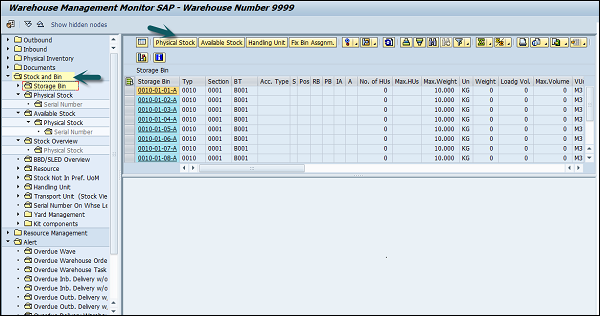
The next step is to check warehouse task for replenishment. Navigate to EWM → Monitoring → Warehouse Management Monitor.
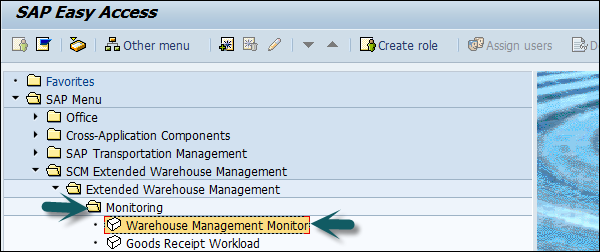
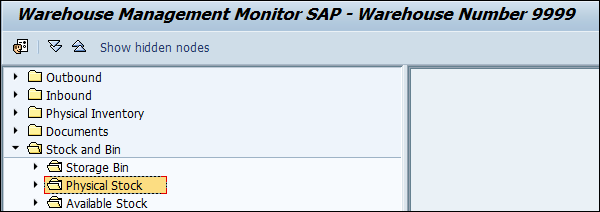
Enter the warehouse # and the monitoring type, once done, click on Continue.
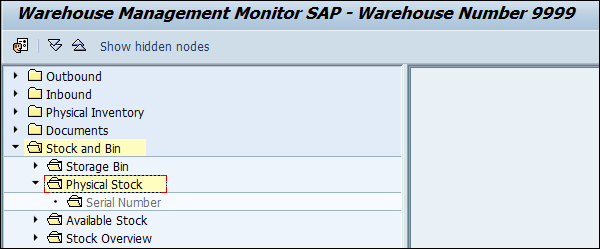
Go to Stock and bin → Double click physical stock.
Enter the product number and click on Execute.
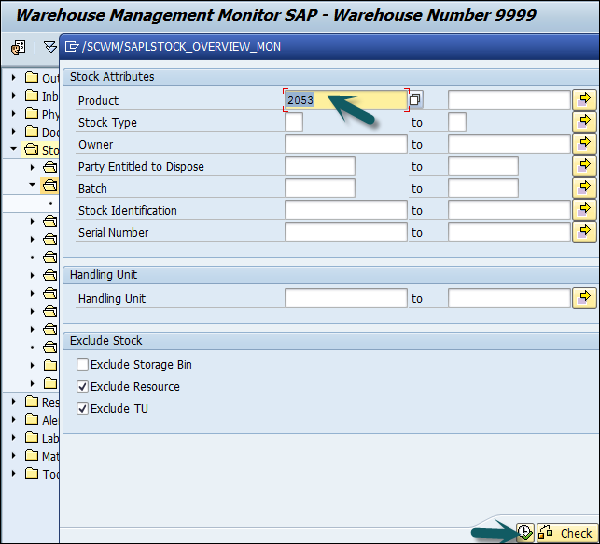
You can see the complete stock in the storage type.
How to Perform Replenishment?
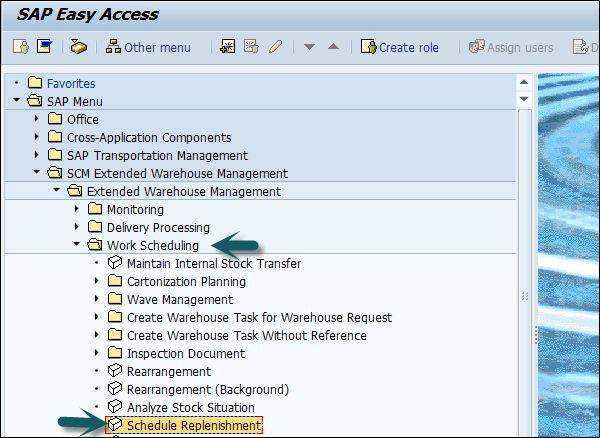
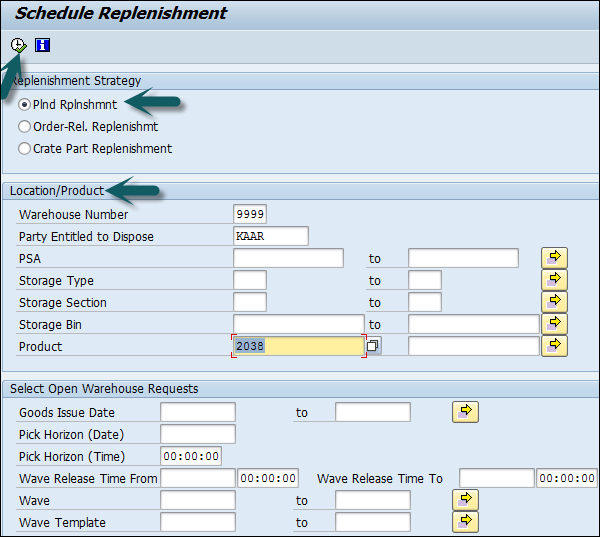
To perform the Replenishment, navigate to EWM → Work Scheduling → Schedule Replenishment.
Select the following details −
- Replenishment strategy
- Warehouse #
- Party entitled to dispose
- Product #
Once all these are done then click on Execute.
Click on Execute → Perform Replenishment.
The system generates a warehouse task #.
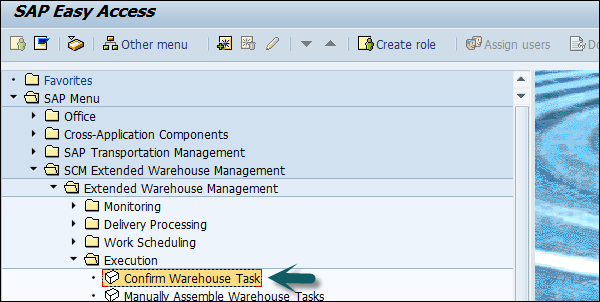
To confirm the warehouse task #, go to EWM → Execution → Confirm warehouse task.
Change the selection criterion to Warehouse Task, enter the warehouse task number in the search field and select Execute Search.

Mark the warehouse order and select Confirm + Save.
SAP EWM - Physical Inventory
To perform financial accounting and tax regulations, you may need to perform accurate inventory to get the value of an inventory in warehouse. Physical inventory process deals with counting physical inventory of a warehouse and to get counting results.
Benefits of Physical Inventory
Physical inventory can be used by the management to count inventory so that the products can be stocked or corrected.
There are two types of physical inventory that can be performed −
- Storage bin specific
- Product Specific
You can perform physical inventory in EWM on the following stock types −
- Unrestricted-use stock in putaway
- Unrestricted-use stock in the warehouse
- Blocked stock in putaway
- Blocked stock in the warehouse
- Quality inspection stock in putaway
- Quality inspection stock in the warehouse
Procedures to Perform Physical inventory
SAP EWM supports three types of physical inventory procedures −
Periodic − The system is configured to perform an inventory on a specific day or over a short time period.
Continuous − This can be executed anytime during the physical period year.
Cycle Counting − You have divided the objects in categories – A, B, C, D. In customizing, you define the cycle counting indicator codes with an interval (in work days) after which a new physical inventory should be performed.
Ad-hoc Inventory
Ad-hoc Physical Inventory is a type of continuous physical inventory and it can be executed anytime during the fiscal year. You can perform an ad-hoc physical inventory in various scenarios, for example, if a product has been damaged. This procedure can be performed at the storage bin level or it can be product-specific.
Navigate to EWM → Monitoring → Warehouse Management monitor.
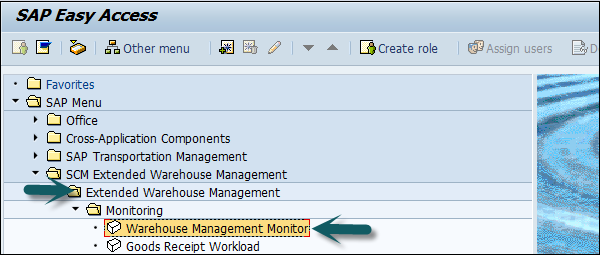
Enter the Warehouse Number # and Monitor, SAP → Execute.
Go to Stock and Bin node and then double-click on Physical Stock.
Enter Product ## and execute.

You can note down the inventory and storage type.
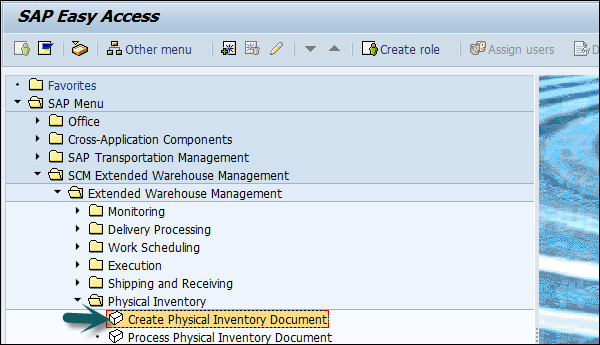
How to Create an Ad-Hoc Physical Inventory Document?
To create an ad-hoc physical inventory document, go to EWM → Physical Inventory → Create Physical Inventory Document.
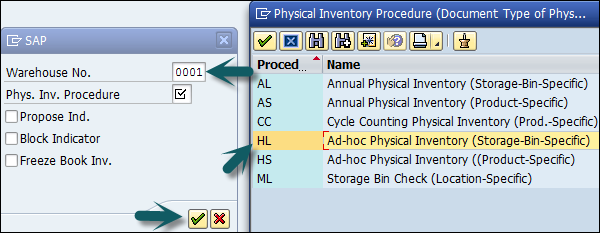
Enter Warehouse No. El##.
Select Phys. Inv. Procedure HL (Ad-hoc Physical Inventory: Storage-Bin-Specific).
Choose Continue.
Select Storage Bin in the Find field. Enter the storage bin from the previous step. Choose Perform Search.
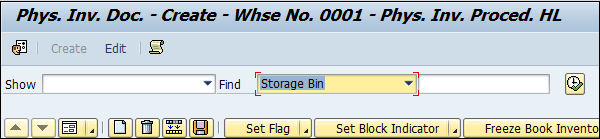
Select the checkbox for the Block Indicator. Then, select the line and choose Set Flag.
Choose Save.
Note − The Pl document number that was created (in the task bar the Pl document number is followed by the current year).
SAP EWM - Slotting
Slotting is a process in the EWM that helps to define the most suitable putaway parameters such as – storage type, section, etc. Slotting places the goods in a warehouse in the manner that provides the most optimal storage and picking of goods.
Different Parameters of Slotting
There are different parameters that are used in the slotting process −
- Storage Requirement Data
- Product Data
- Packaging Data
- Demand Forecast
Product related data used for slotting
The following table shows the product related data for slotting −
| 1 | Storage Condition | 3(not outside) |
| 2 | Rotate Indicator | T |
| 3 | Theft-prone | N |
| 4 | Handling code | 200(metal) |
| 5 | Demand quality | 700(per month) |
| 6 | Number of order lines | 50 |
| 7 | Recommended storage quality | 2100 |
| 8 | Storage class | 13(Non-flammable solids) |
| 9 | Water pollution storage quality | 2100 |
| 10 | Nesting factor(s) | 0.5 |
| 11 | Packing type | Default packing material(wooden pallets) |
| 12 | Material length | 0.05m |
| 13 | Material width | 0.01m |
| 14 | Material height | 0.01m |
| 15 | Material weight | 10g |
Optimizing Resources
You can perform various activities in SAP Extended Warehouse Management System for optimizing resources.
Some of the key activities that can be performed are as follows −
- Wave Management Function
- Cross docking
- RF framework
- Labor Management
SAP EWM - Labor Management
Labor Management helps you to lower down the cost by making suitable use of resources in managing warehouse activities. Labor management tool can be used to record and measure employee’s productivity and you can also visualize reports in warehouse cockpit based on key figures. Using Labor management, you can also compare productivity of the warehouse employees.
In LM (Labor Management), you have to enter the master data processor which represents the warehouse employee and is defined as a Business Role Processor.
Here are a few important factors in the Master Data Processor −
- Process Steps
- Rate
- Role in a group, etc.
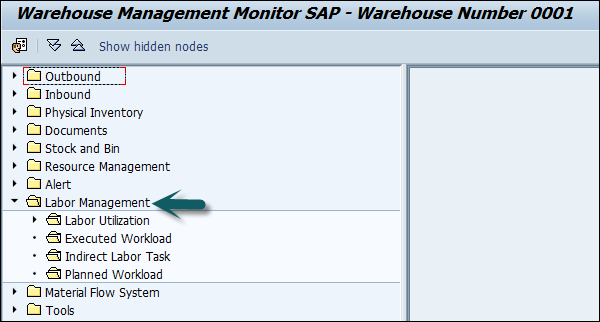
You can check the information related to the Processor in a Warehouse Monitor tab in the EWM system. When you activate Labor Management in EWM, you can find additional nodes in the Monitor Tab → Labor Management.
Labor Utilization
This includes the following features −
- Executed Workload
- Indirect Labor Task
- Planned Workload
Labor Time in Labor Management
You can track three types of time in Labor management.
Direct Labor − This includes the time to perform warehouse activities like picking, packing, put away, etc.
Indirect Labor − This includes extra activities to manage warehouse like Sweeping, cleaning, housekeeping etc.
Unproductive Time − Breaks, etc.
Note − Visualization feature in Labor management tool is used for BI reporting.
How to Create a Processor Business Partner?
To create a processor business partner, you can follow the subsequent path.
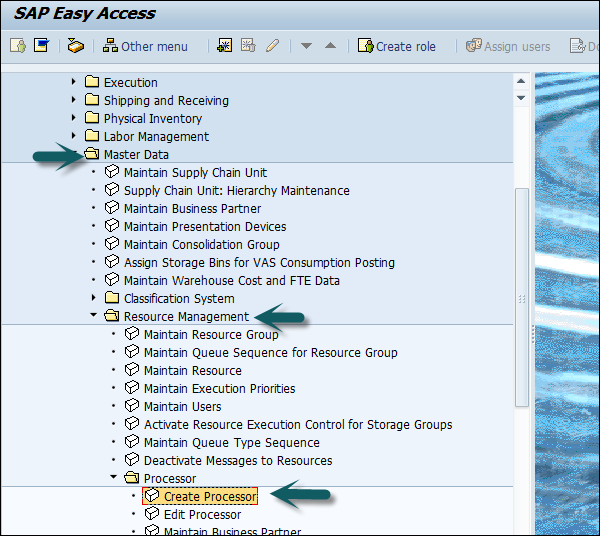
Navigate to EWM → Master Data → Resource Management → Processor → Create Processor.
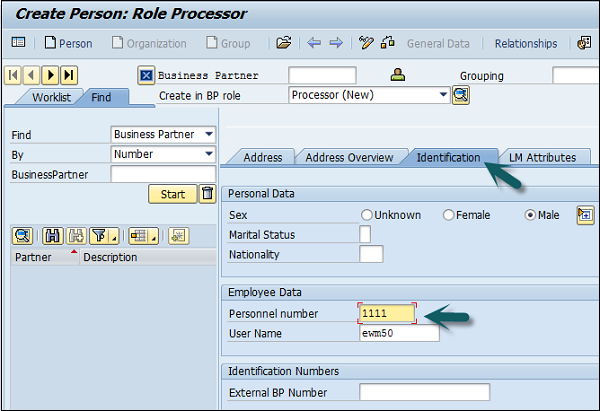
Go to Identification tab and enter the Personal data
In the LM attribute tab, enter the warehouse # and supply chain unit. In the Warehouse assignment tab, select warehouse# line and then click on Create external step.
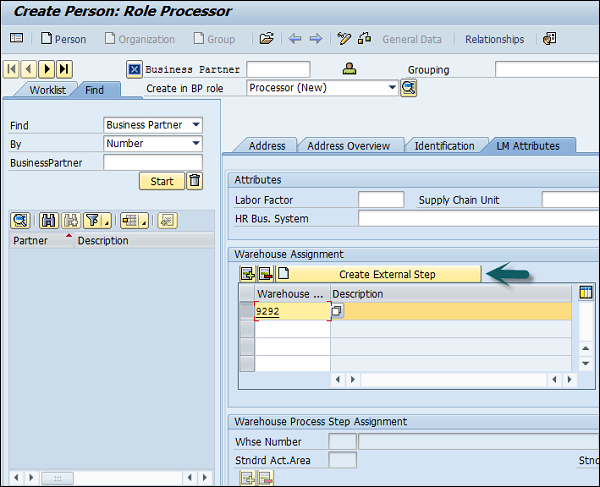
Enter the external steps as required. You can click on Insert row to add multiple rows. Click on the save button and note down the processor number.
SAP EWM - Production Supply
The production in a warehouse is based on the production order. The production order tells what needs to be produced and quantity and time of production.
When a production order is raised, all the components that are required for production is listed in the bill of material. You need to stage the products for a production order. Production Supply Area (PSA) is an area where products are staged in a warehouse.
There are different staging types that can be used, some of them are −
- Pick Parts
- Release Order Parts
- Crate Parts
Each PSA contains storage bin to stage the products for production order. Each PSA can contain one or multiple storage bins.
How to Setup a Master Data for Production Supply Process?
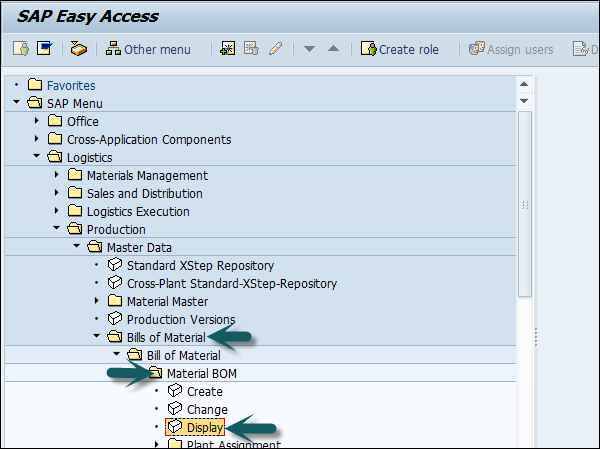
The first step is to review the bill of material. Then go to SAP ERP system, Easy access Go to Logistics → Production → Master Data → Bills of Material → Bill of Material → Material BOM → Display.
Enter the following details −
- Material
- Plant and BOM usage
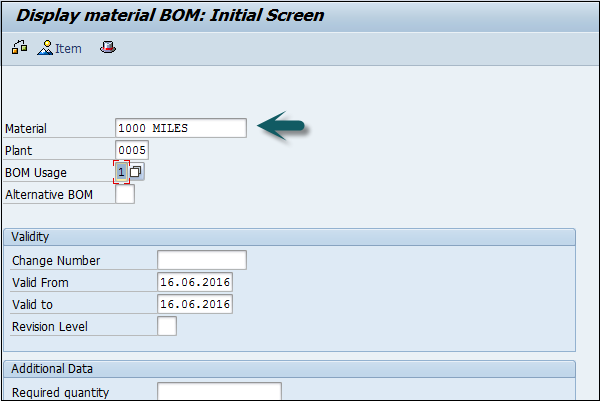
You can select each material and choose Item for the details. The Prod.stor.location and the Supply Area can be found on the tab Status/Lng text.
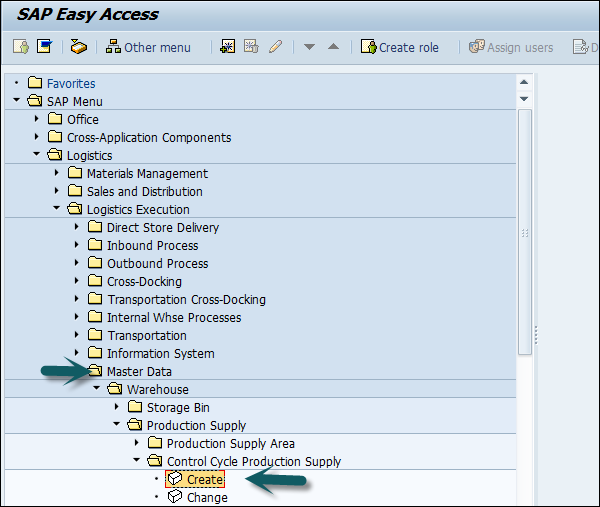
The next step is to create a control cycle production supply. Go to Logistics → Logistics Execution → Master Data → Warehouse → Production Supply → Control cycle production supply → Create.
Enter the following details −
- Plant
- Supply Area and press ENTER
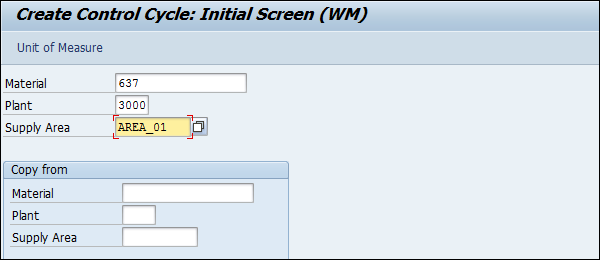
Enter the Staging Indicator and click on save.

SAP EWM – Expected Good Receipts
Expected receipts are used to create inbound deliveries. You can also create a goods receipt in the EWM system without an inbound delivery.
Advantages of Using a Good Receipt
This process occurs in the EWM system only.
If your ERP system is down, you can still execute the expected goods receipt in EWM. An expected goods receipt is based on the data in production order, so it can be used as a preview of the goods receipt.
This process requires two documents to be used in the EWM system, which are −
- Notification Expected goods receipt
- Expected goods receipt
These documents can be created and transferred using the following two methods −
Push Scenario − The process is triggered in ERP by executing the report /SPE/INB_EGR_CREATE.
Pull Scenario − The process is triggered in EWM by executing the report /SCWM/ERP_DLV_DELETE.
Create a Document for Expected Goods Receipt in EWM
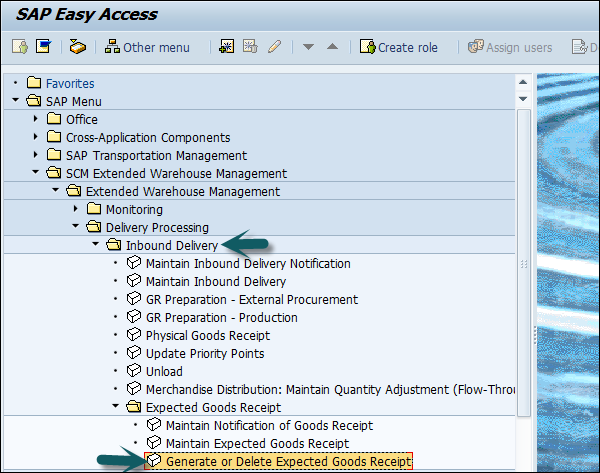
Go to EWM → Delivery Processing → Inbound Delivery → Expected Goods Receipt → Generate or delete expected goods receipt
Enter warehouse #. Then go to special selection parameters, go to Production number and enter the number there.
In the area “Selection Time Period” activate Free Interval and enter a date 2 weeks in the future in the Field to Period. In the area Technical Settings choose the option Delete and Create.
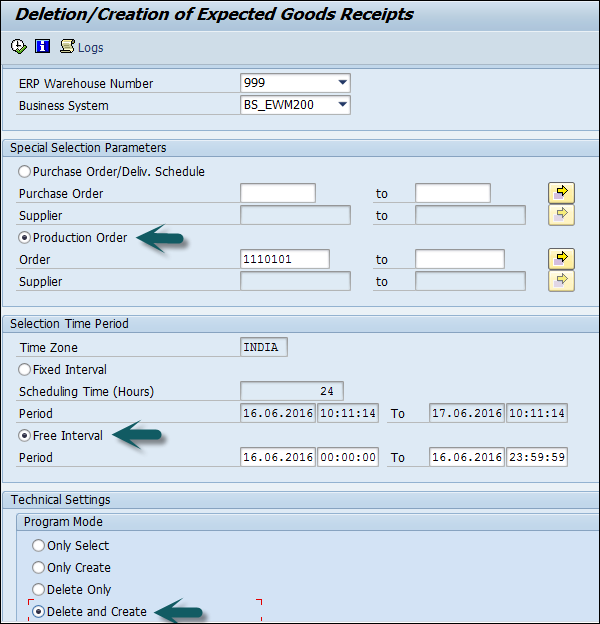
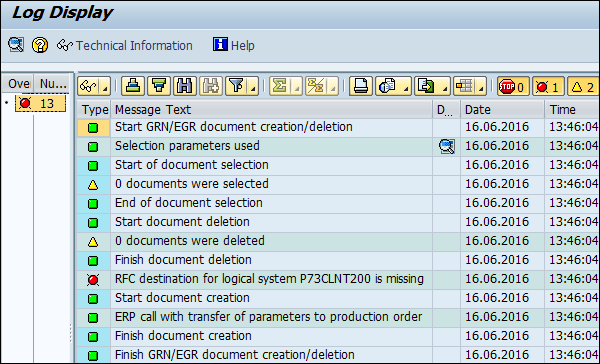
Click on Execute and you can see that expected goods receipt documentation is successful.
How to Check the Expected Goods Receipt Document?
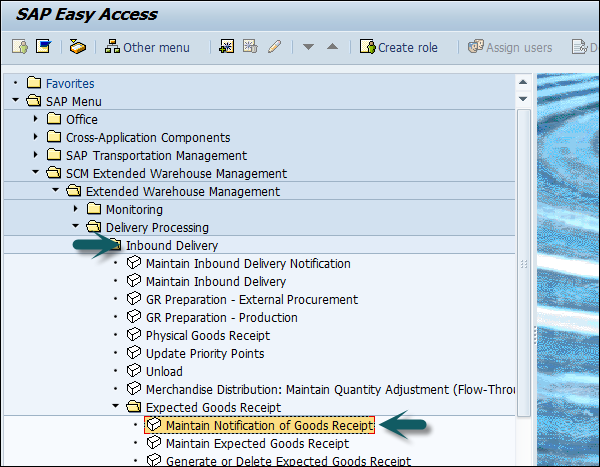
To check the expected goods receipt document, go to EWM → Inbound Delivery → Expected goods receipt → Maintain Notifications of goods receipt.
Enter the Production Order number and click on the Search button.

Click on Execute Search option.
You can note down the document numbers created for production order.
SAP EWM - Cross Docking
Cross Docking allows you to reduce the costs of goods transportation in a warehouse and shorten the time needed for delivery. Cross docking only creates one movement – GR Zone to GI Zone and can only be used if the stock for removal is not determined by First in – first out.
There are different types of cross docking available in a SAP system −
- Transportation cross docking
- Merchandise Distribution
- Push deployment
- Pick from goods receipt
- Opportunistic Cross docking
Performing Opportunistic Cross Docking
This is the only cross docking method that doesn’t require any other application or system. By using a product group and product group types in the master data, you can control the method by product.
Process
Create a purchase order and a sales order with the corresponding delivery documents. Post the goods receipt and move the required quantity directly to the GI-Zone.
The next step is to create the inbound delivery.
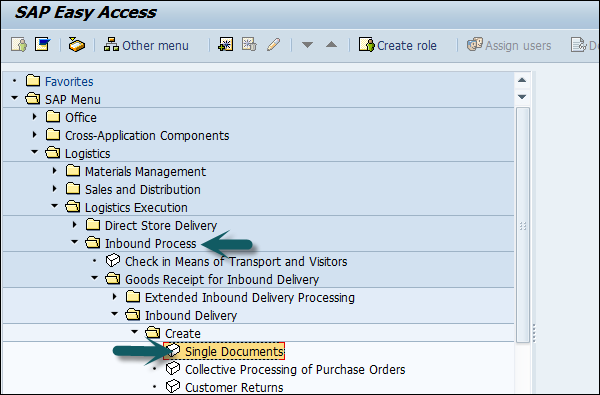
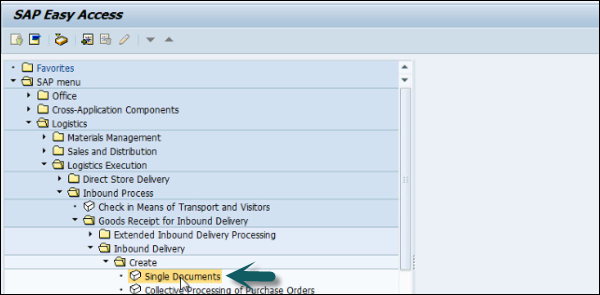
To do this, go to Easy Access Menu of your ERP system: Logistics → Logistics Execution → Inbound Process → Goods Receipt for Inbound Delivery → Inbound Delivery → Create → Single Documents
The next step is to post the goods receipt in the EWM.
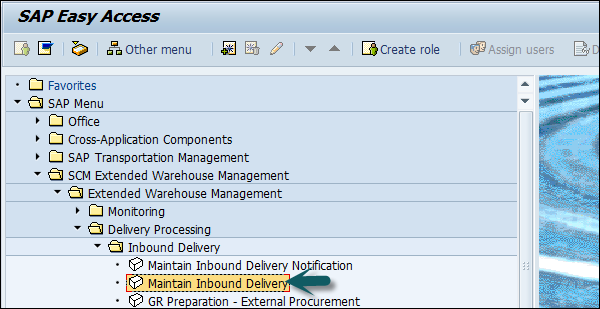
To do this, go to Extended Warehouse Management → Delivery Processing → Inbound Delivery → Maintain Inbound Delivery.
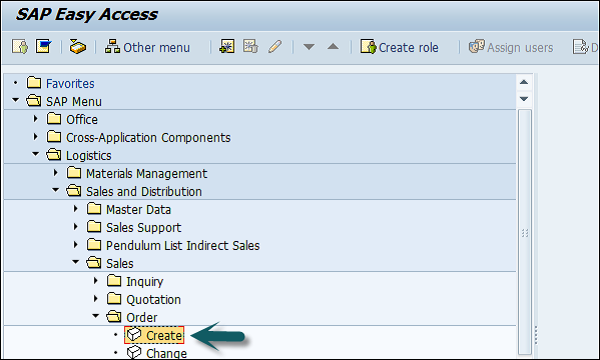
The next step is to create a Sales Order. For doing this, go to the ERP system → Easy Access Menu of your ERP system → Logistics → Sales and Distribution → Sales → Order → Create.
The next step is to create an Outbound delivery and confirm the outbound delivery order number.
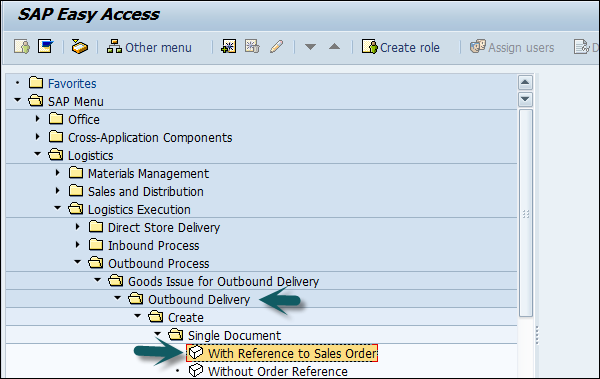
For doing this, navigate to the Easy Access Menu of your ERP system −
Logistics → Logistics Execution → Outbound Process → Goods Issue for Outbound Delivery → Create → Single Document → With Reference to Sales Order.
Create a Warehouse task using this outbound delivery number for picking.
Create and confirm the warehouse task for the inbound delivery. Note that two warehouse tasks are created. Check the source and destination storage types.
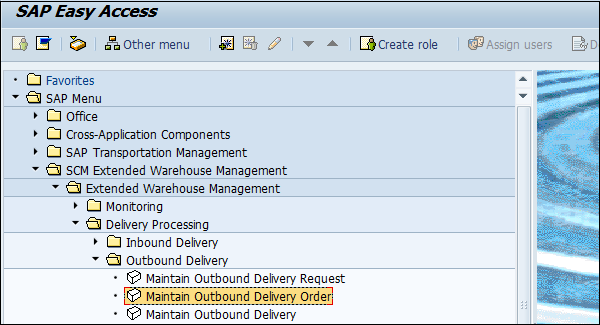
The next step is to post the goods issue for outbound delivery order. To do this, navigate to Extended Warehouse Management → Delivery Processing → Outbound Delivery → Maintain Outbound Delivery Order.
SAP EWM - RF Framework
In SAP EWM, RF stands for Radio Frequency Mobile Data Entry that allows real time communication between the warehouse employees and the EWM system.
The RF framework supports both browser based and GUI devices to connect to the SAP system. You can create screen templates and merge them to a so called display profile. This display profile is assigned to the presentation device.
The RF framework in SAP EWM system provides all the warehouse functionalities, which are −
- Loading
- Unloading
- Deconsolidation
- Put away
- Picking
- Packing
- Replenishment
- Physical inventory
In the RF framework there are various functions that can be triggered through with function keys, some of these are mentioned in the following table −
| S.No. | Function Key & Description | 1. | F5 To display the next pushbuttons in the sequence (in case of more than four push buttons for a screen). |
|---|---|
| 2. | F6 To clear a selected input Field, or all input fields. |
| 3. | F7 To return to previous screen |
| 4 | F8 To display list screen for a selected field |
| 5. | F9 To display full message on a separate screen |
SAP EWM - Warehouse Monitoring
A Warehouse Monitor provides an option to monitor the tasks and to take necessary actions accordingly. It is a centralized tool to manage all the activities in a warehouse.
The EWM Warehouse Monitor is a central tool for keeping warehouse managers constantly up-to-date as to the current situation in the warehouse, and to enable them to initiate appropriate responses in light of this situation. The warehouse monitor also contains alert monitoring capabilities, which highlights the warehouse managers towards the actual and potential problematic situations in the warehouse, and provide exception handling tools to assist in the correction of these situations.
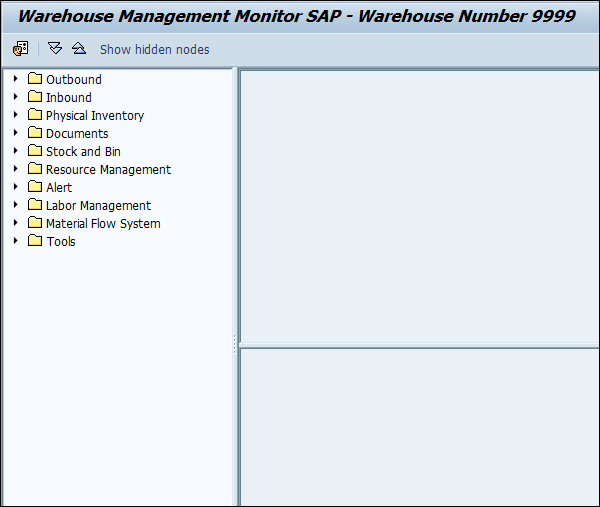
Warehouse Monitor Components
Warehouse monitor screen is divided into three parts, which are −
- Node hierarchy tree on left side
- Parent data at right side
- Child data at bottom
To open the Warehouse monitor, select the Warehouse and monitoring type. You can select SAP Standard Monitor.
You can similarly drill down to the lower-level nodes from the lower view area.
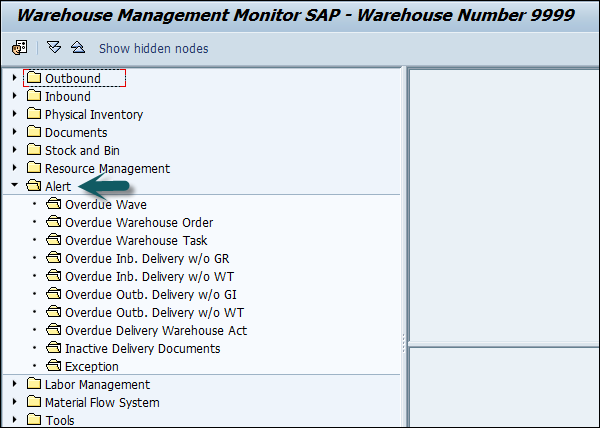
In the following screenshot, an example shows a display of resource management queue data. There are different ways to be notified about alert situations.
For example − There are Alert Nodes in the Warehouse Monitor and then there are Alerts in the SCM Alert Monitor.
How to Display Stock Balance?
Another common use of the Warehouse Monitor is to display stock balances. Physical and available stocks can be displayed using a variety of selection parameters from the Stock and Bin node.
From the Warehouse Monitor all the stocks are visible −
In storage bins − the capacity checks are also available for warehouse doors and staging areas.
On resources − forklift, pick HU's.
In TU's − the transportation units that are in the yard.
In the differences Analyzer − the physical inventory processing.
SAP EWM – Inbound and Outbound Delivery
In this chapter, we will discuss in detail about the Inbound and Outbound Delivery and its modules.
How to Open a Purchase Order for Inbound Query?
Go to the ERP System and create a Purchase order as shown in the following screenshot or use the command – T-code: me21
Enter the following details −
- Vendor
- Purchase Org
- Company Code
- Enter the material details

You can scroll to the bottom of the screen and the information is automatically filled.
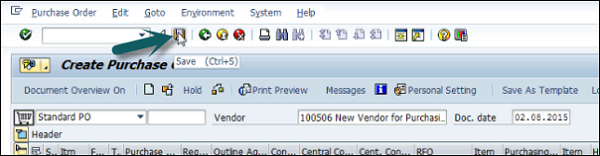
Click on save at the top to save the PO and then the PO number is created.
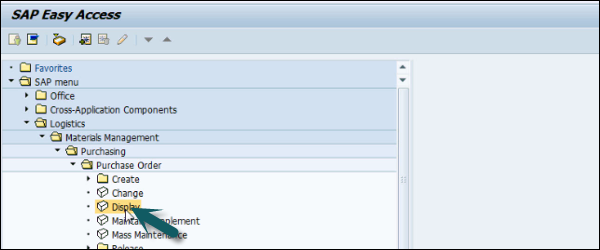
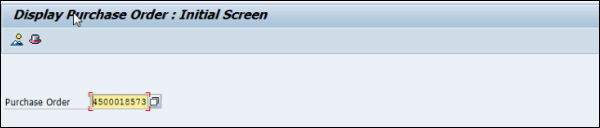
To see this purchase order, go to the diplay tab as shown in the following screenshot or use T-code: me23.
How to Create an Inbound Delivery?
The following screenshots have been lined up to explain how to create an Inbound Delivery.
Enter the vendor and PO details.
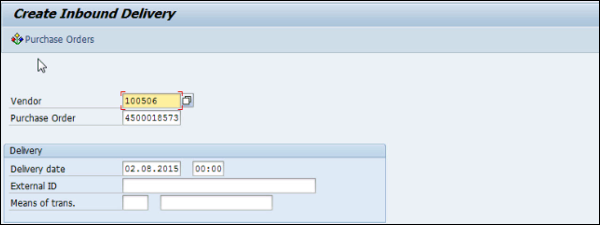
Now you can see all the details like the shipment, stock placement, etc.


Click on the save button and you will get the confirmation.
The next step is to go to the EWM system and see that this inbound delivery notification is replicated in the EWM.
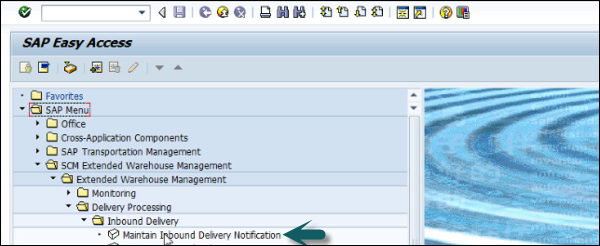
Login to the EWM system. Go to Maintain Inbound delivery notification as shown in the following screenshot.
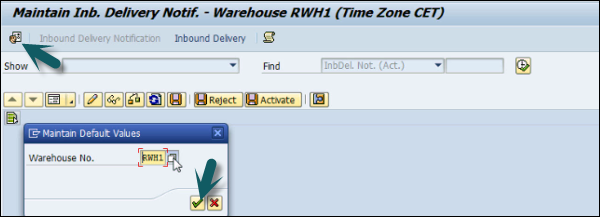
Select the warehouse number. If you want to change the default value, click on the default value. Select the warehouse # and click on the tick mark.
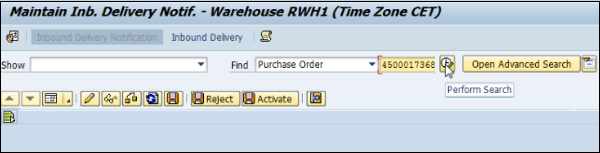
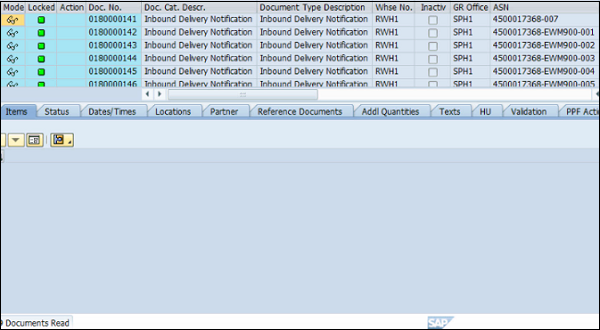
Perform a search using the purchase order created in the previous step.
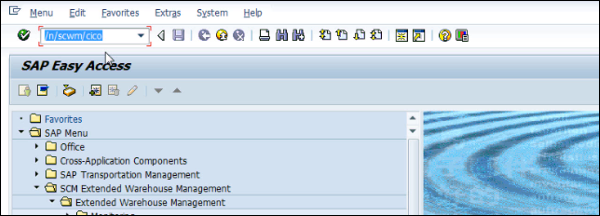
To perform check in, check out in EWM, go to EWM system and use T-code: /scwm/cico. You can perform checkpoint using various parameters.
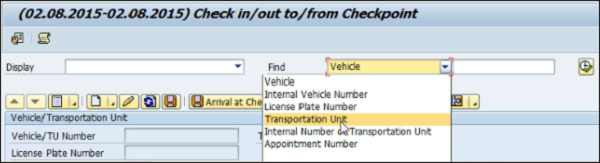
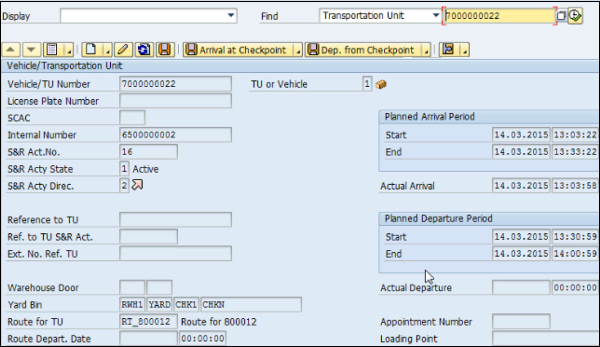
You can enter the transport unit or any of these parameters and can check the Vehicle number, planned arrival and departure period, etc.
To see yard movement, you can use T-code: /scwm/ymove.

As in the previous step, you can perform a search based on various parameters. Enter the TU number and click on the Search button.

In a similar way, you can perform unload task using Transaction Code: /scwm/unload and perform a search on the TU number or any other parameters. The next step is to perform deconsolidation and put up activity.