- SAP Business Workflow Tutorial
- SAP Business Workflow - Home
- Introduction
- Challenges
- Benefits/Features
- Layers
- Architecture
- Linking Process, Business Logic & People
- Business Object
- Start & Termination
- Condition Editor
- Administration
- Event Manager Administration
- Workflows With Errors
- Workflow Configuration
- Workflow Builder
- Import/Export
- Creating Steps
- Business Object Builder
- Abap Classes
- Extended Notifications
- Notifications Configuration
- Integration With Non-Sap Workflow Apps
- Universal Worklist
- Creating Workflows
- Archiving Workitems
- Using Swi2_Diag Diagnosis
- Using The Event Trace
- Transactions
- Function Modules
- Job Responsibilities
- SAP Business Workflow Resources
- Quick Guide
- SAP Business Workflow - Resources
- SAP Business Workflow - Discussion
SAP Business Workflow - Condition Editor
To pass a start condition to a workflow, the Condition editor is used. There are two ways to use a condition editor −
Direct Text Entry Mode − In this mode you can directly pass the expressions and operators using F4 Input help.
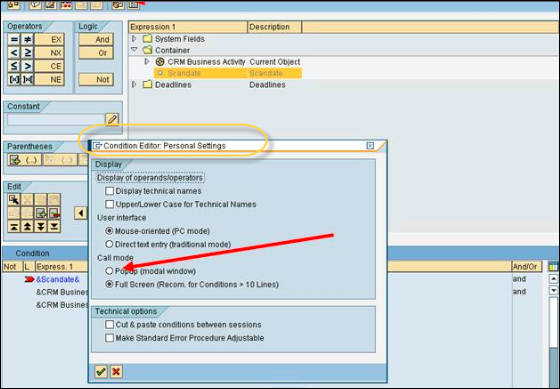
PC Mode − This is also called the mouse-oriented mode. The screen of the condition editor is divided into three areas, namely operators, expression, and processing.
Following is general form of a Condition −
[<Not>] <Expression> <Operator> <Expression> [<And/Or>
<Not> <Expression> <Operator> <Expression> …]
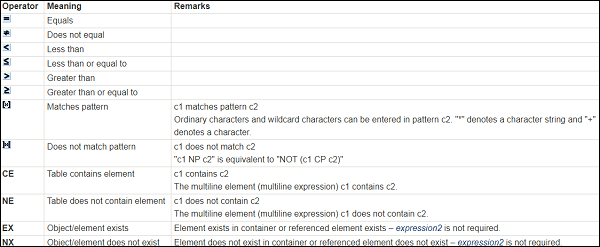
Logical Operators

Note − “NOT” is stronger than “AND”, and “AND” is stronger than “OR” operator.
You have the following input fields for Expression −
- System fields
- Container elements
You can also define the personal settings of the Condition Editor as below. This includes settings related to −
- Display
- User Interface
- Call mode
- Technical Options
Advertisements