- SAP BODS Tutorial
- SAP BODS - Home
- SAP BO Data Services
- SAP BODS - Overview
- SAP BODS - Architecture
- SAP BODS - Data Services Designer
- SAP BODS Repository
- SAP BODS - Repository Overview
- Repository Creating & Updating
- Data Services Management Console
- SAP BODS - DSMC Modules
- SAP BODS - DS Designer Introduction
- SAP BODS - ETL Flow in DS Designer
- SAP BODS Datastores & Formats
- SAP BODS - Datastore Overview
- SAP BODS - Changing a Datastore
- SAP BODS - Memory Datastore
- SAP BODS - Linked Datastore
- SAP BODS - Adapter Datastore
- SAP BODS - File Formats
- COBOL Copybook File Format
- Extracting Data from DB Tables
- Data Extraction from Excel Workbook
- Data Flow & Work Flow
- SAP BODS - Dataflow Introduction
- BODS - Dataflow Changing Properties
- SAP BODS - Workflow Introduction
- SAP BODS - Creating Workflows
- SAP BODS Transforms
- SAP BODS - Transforms Types
- Adding Transform to a Dataflow
- SAP BODS - Query Transform
- SAP BODS Administration
- SAP BODS - Data Services Overview
- Creating Embedded Dataflow
- Debugging & Recovery Mechanism
- Data Assessment & Data Profiling
- SAP BODS - Tuning Techniques
- Multi-user Development
- BODS - Central vs Local Repository
- BODS - Central Repository Security
- Creating a Multi-user Environment
- SAP BODS Useful Resources
- SAP BODS - Questions Answers
- SAP BODS - Quick Guide
- SAP BODS - Useful Resources
- SAP BODS - Discussion
SAP BODS - Quick Guide
DW - Overview
A Data warehouse is known as a central repository to store the data from one or multiple heterogeneous data sources. Data warehouse is used for reporting and analyzing of information and stores both historical and current data. The data in DW system is used for Analytical reporting, which is later used by Business Analysts, Sales Managers or Knowledge workers for decision-making.
The data in DW system is loaded from an operational transaction system like Sales, Marketing, HR, SCM, etc. It may pass through operational data store or other transformations before it is loaded to the DW system for information processing.
Data Warehouse - Key Features
The key features of a DW System are −
It is central data repository where data is stored from one or more heterogeneous data sources.
A DW system stores both current and historical data. Normally a DW system stores 5-10 years of historical data.
A DW system is always kept separate from an operational transaction system.
Data in DW system is used for different types of analytical reporting range from Quarterly to Annual comparison.
Need of a DW System
Suppose you have a home loan agency where data is coming from multiple applications like- marketing, sales, ERP, HRM, MM etc. This data is extracted, transformed and loaded in Data Warehouse.
For example, if you have to compare the Quarterly/Annual sales of a product, you cannot use an Operational transactional database, as this will hang the transaction system. Therefore, a Data Warehouse is used for this purpose.
Difference between DW and ODB
The differences between a Data Warehouse and Operational Database (Transactional Database) are as follows −
A Transactional system is designed for known workloads and transactions like updating a user record, searching a record, etc. However, Data Warehouse transactions are more complex and present a general form of data.
A Transactional system contains the current data of an organization and Data warehouse normally contains the historical data.
Transactional system supports parallel processing of multiple transactions. Concurrency control and recovery mechanisms are required to maintain consistency of the database.
An Operational database query allows to read and modify operations (delete and Update) while an OLAP query needs only read-only access of stored data (Select statement).
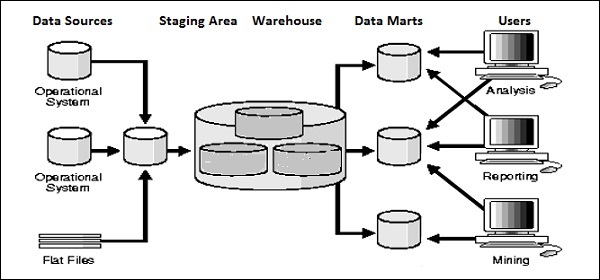
DW Architecture
Data Warehousing involves data cleaning, data integration, and data consolidations.
A Data Warehouse has a 3-layer architecture − Data Source Layer, Integration Layer, and Presentation Layer. The illustration given above shows the common architecture of a Data Warehouse system.
DW - Types
There are four types of Data Warehousing system.
- Data Mart
- Online Analytical Processing (OLAP)
- Online Transactional Processing (OLTP)
- Predictive Analysis (PA)
Data Mart
A Data Mart is known as the simplest form of a Data Warehouse system and normally consists of a single functional area in an organization like sales, finance or marketing, etc.
Data Mart in an organization and is created and managed by a single department. As it belongs to a single department, the department usually gets data from only a few or one type of sources/applications. This source could be an internal operational system, a data warehouse or an external system.
Online Analytical Processing
In an OLAP system, there are less number of transactions as compared to a transactional system. The queries executed are complex in nature and involves data aggregations.
What is an Aggregation?
We save tables with aggregated data like yearly (1 row), quarterly (4 rows), monthly (12 rows) or so, if someone has to do a year to year comparison, only one row will be processed. However, in an un-aggregated table it will compare all rows.
SELECT SUM(salary)
FROM employee
WHERE title = 'Programmer';
Effective Measures in an OLAP system
Response time is known as one of the most effective and key measure in an OLAP system. Aggregated stored data is maintained in multi-dimensional schemas like star schemas (When data is arranged into hierarchical groups, often called dimensions and into facts and aggregate facts, it is called Schemas).
The latency of an OLAP system is of a few hours as compared to the data marts where latency is expected closer to a day.
Online Transaction Processing
In an OLTP system, there are a large number of short online transactions such as INSERT, UPDATE, and DELETE.
In an OLTP system, an effective measure is the processing time of short transactions and is very less. It controls data integrity in multi-access environments. For an OLTP system, the number of transactions per second measures the effectiveness. An OLTP data warehouse system contains current and detailed data and is maintained in the schemas in the entity model (3NF).
Example
Day-to-Day transaction system in a retail store, where the customer records are inserted, updated and deleted on a daily basis. It provides very fast query processing. OLTP databases contain detailed and current data. Schema used to store OLTP database is the Entity model.
Differences between OLTP and OLAP
The following illustrations shows the key differences between an OLTP and OLAP system.
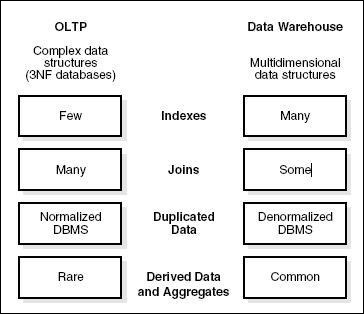
Indexes − OLTP system has only few indexes while in an OLAP system there are many indexes for performance optimization.
Joins − In an OLTP system, large number of joins and data are normalized. However, in an OLAP system there are less joins and are de-normalized.
Aggregation − In an OLTP system, data is not aggregated while in an OLAP database more aggregations are used.
Predictive Analysis
Predictive analysis is known as finding the hidden patterns in data stored in DW system by using different mathematical functions to predict future outcomes.
Predictive Analysis system is different from an OLAP system in terms of its use. It is used to focus on future outcomes. An OALP system focuses on current and historical data processing for analytical reporting.
DW - Products & Vendor
There are various Data Warehouse/database systems available in the market that meet the capabilities of a DW system. The most common vendors for data warehouse systems are −
- Microsoft SQL Server
- Oracle Exadata
- IBM Netezza
- Teradata
- Sybase IQ
- SAP Business Warehouse (SAP BW)
SAP Business Warehouse
SAP Business Warehouse is a part of SAP NetWeaver release platform. Prior to NetWeaver 7.4, it was referred to as SAP NetWeaver Business Warehouse.
Data warehousing in SAP BW means data integration, transformation, data cleansing, storing and data staging. DW process includes data modeling in BW system, staging and administration. The main tool, which is used to manage DW tasks in BW system, is the administration workbench.
Key Features
SAP BW provides capabilities like Business Intelligence, which includes Analytical Services and Business Planning, Analytical Reporting, Query processing and information, and Enterprise data warehousing.
It provides a combination of databases and database management tools that helps in making decision.
Other key features of BW system include Business Application Programming Interface (BAPI) that supports connection to non-SAP R/3 applications, automated data extraction and loading, an integrated OLAP processor, metadata repository, administration tools, multi-language support, and a web enabled interface.
SAP BW was first introduced in 1998 by SAP, a German company. SAP BW system was based on a model-driven approach to make Enterprise Data Warehouse easy, simple and more efficient for SAP R3 data.
From last 16 years, SAP BW has evolved as one of the key system for many companies to manage their enterprise data warehousing needs.
The Business Explorer (BEx) provides an option for flexible reporting, strategic analysis and operative reporting in the company.
It is used to perform reporting, query execution and analysis function in BI system. You can also process current and historical data up to various degree of details over Web and in Excel format.
Using BEx information broadcasting, BI content can be shared via email as document or in the form of links as live data or you can also publish using SAP EP functions.
Business Objects & Products
SAP Business Objects in known as the most common Business Intelligence tool and is used for manipulating data, user access, analyzing, formatting and publishing information on different platforms. It is a front-end based set of tools, which enables business users and decision makers to display, sort, and analyze business intelligence current and historical data.
It comprises of the following tools −
Web Intelligence
Web Intelligence (WebI) is called as the most common Business Objects detailed reporting tool that supports various features of data analysis like drill, hierarchies, charts, calculated measures, etc. It allows end-users to create ad-hoc queries in query panel and to perform data analysis both online and offline.
SAP Business Objects Xcelsius / Dashboards
Dashboards provide data visualization and dash-boarding capabilities to the end-users and you can create interactive dashboards using this tool.
You can also add various types of charts and graphs and create dynamic dashboards for data visualizations and these are mostly used in financial meetings in an organization.
Crystal Reports
Crystal Reports are used for pixel-perfect reporting. This enables the users to create and design reports and later use it for printing purpose.
Explorer
The Explorer allows a user to search the content in BI repository and best matches are shown in the form of charts. There is no need to write down the queries to perform search.
Various other components and tools introduced for detailed reporting, data visualization and dash-boarding purpose are Design Studio, Analysis edition for Microsoft Office, BI Repository and Business Objects Mobile platform.
ETL - Introduction
ETL stands for Extract, Transform and Load. An ETL tool extracts the data from different RDBMS source systems, transforms the data like applying calculations, concatenate, etc. and then load the data to Data Warehouse system. The data is loaded in the DW system in the form of dimension and fact tables.
Extraction
A staging area is required during ETL load. There are various reasons why staging area is required.
The source systems are only available for specific period of time to extract data. This period of time is less than the total data-load time. Therefore, staging area allows you to extract the data from the source system and keeps it in the staging area before the time slot ends.
Staging area is required when you want to get the data from multiple data sources together or if you want to join two or more systems together. For example, you will not be able to perform a SQL query joining two tables from two physically different databases.
Data extractions’ time slot for different systems vary as per the time zone and operational hours.
Data extracted from source systems can be used in multiple data warehouse system, Operation Data stores, etc.
ETL allows you to perform complex transformations and requires extra area to store the data.
Transform
In data transformation, you apply a set of functions on extracted data to load it into the target system. Data, which does not require any transformation is known as direct move or pass through data.
You can apply different transformations on extracted data from the source system. For example, you can perform customized calculations. If you want sum-of-sales revenue and this is not in database, you can apply the SUM formula during transformation and load the data.
For example, if you have the first name and the last name in a table in different columns, you can use concatenate before loading.
Load
During Load phase, data is loaded into the end-target system and it can be a flat file or a Data Warehouse system.
SAP BODS - Overview
SAP BO Data Services is an ETL tool used for Data integration, data quality, data profiling and data processing. It allows you to integrate, transform trusted data-to-data warehouse system for analytical reporting.
BO Data Services consists of a UI development interface, metadata repository, data connectivity to source and target system and management console for scheduling of jobs.
Data Integration & Data Management
SAP BO Data Services is a data integration and management tool and consists of Data Integrator Job Server and Data Integrator Designer.
Key Features
You can apply various data transformations using Data Integrator language to apply complex data transformations and building customized functions.
Data Integrator Designer is used to store real time and batch jobs and new projects in repository.
DI Designer also provides an option for team based ETL development by providing a central repository with all basics functionality.
Data Integrator job server is responsible to process jobs that are created using DI Designer.
Web Administrator
Data Integrator web administrator is used by system administrators and database administrator to maintain repositories in Data services. Data Services includes Metadata Repository, Central Repository for team-based development, Job Server and Web Services.
Key functions of DI Web Administrator
- It is used to schedule, monitor and execute batch jobs.
- It is used for the configuration and start and stop real-time servers.
- It is used for configuring Job Server, Access Server, and repository usage.
- It is used for configuring adapters.
- It is used for configuring and controlling all the tools in BO Data Services.
Data Management function emphasizes on data quality. It involves data cleansing, enhancing and consolidating the data to get correct data in the DW system.
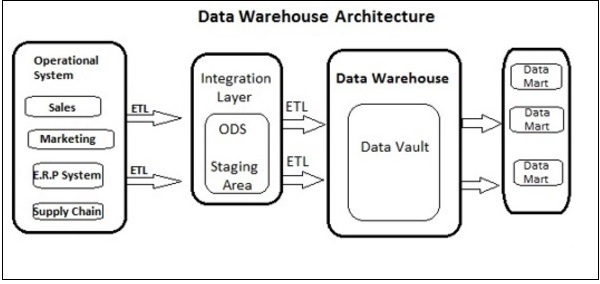
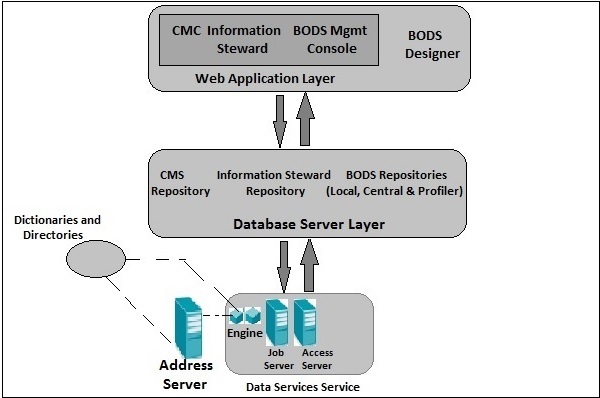
SAP BODS - Architecture
In this chapter, we will learn about the SAP BODS architecture. The illustration shows the architecture of BODS system with Staging area.
Source Layer
The source layer includes different data sources like SAP applications and non-SAP RDBMS system and data integration takes place in staging area.
SAP Business Objects Data Services includes different components like Data Service Designer, Data Services Management Console, Repository Manager, Data Services Server Manager, Work bench, etc. The target system can be a DW system like SAP HANA, SAP BW or a non-SAP Data warehouse system.
The following screenshot shows the different components of SAP BODS.
You can also divide BODS architecture in the following layers −
- Web Application Layer
- Database Server Layer
- Data Services Service Layer
The following illustration shows the BODS architecture.
Product Evolution – ATL, DI & DQ
Acta Technology Inc. developed SAP Business Objects Data Services and later Business Objects Company acquired it. Acta Technology Inc. is a US based company and was responsible for development of first-data integration platform. The two ETL software products developed by Acta Inc. was the Data Integration (DI) tool and the Data Management or Data Quality (DQ) tool.
Business Objects, a French company acquired Acta Technology Inc. in 2002 and later, both the products were renamed as Business Objects Data Integration (BODI) tool and Business Objects Data Quality (BODQ) tool.
SAP acquired Business Objects in 2007 and both the products were renamed as SAP BODI and SAP BODQ. In 2008, SAP integrated both the products into single software product named as SAP Business Objects Data Services (BODS).
SAP BODS provides data integration and data management solution and in the earlier version of BODS, the text data-processing solution was included.
BODS – Objects
All the entities that are used in BO Data Services Designer are called Objects. All the objects like projects, jobs, metadata and system functions are stored in the local object library. All the objects are hierarchical in nature.
The objects mainly contain the following −
Properties − They are used to describe an object and do not affect its operation. Example − Name of an object, Date when it is created, etc.
Options − Which control the operation of objects.
Types of Objects
There are two types of objects in the system − Reusable objects and Single Use objects. The type of object determines how that object is used and retrieved.
Reusable Objects
Most of the objects that are stored in the repository can be reused. When a reusable object is defined and saved in the local repository, you can reuse the object by creating Calls to the definition. Each reusable object has only one definition and all the calls to that object refer to that definition. Now, if definition of an object is changed at one place you are changing the object definition at all the places where that object appears.
An object library is used to contain object definition and when an object is dragged and dropped from library, a new reference to an existing object is created.
Single Use Objects
All the objects that are defined specifically to a job or data flow are known as single use objects. For example, specific transformation used in any data load.
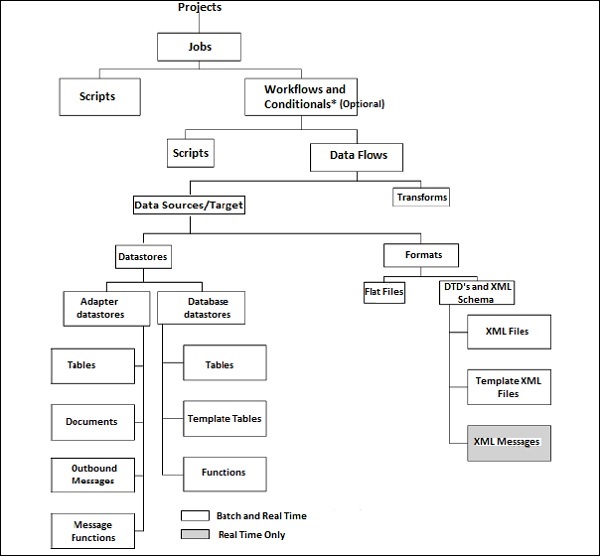
BODS – Object Hierarchy
All the objects are hierarchical in nature. The following diagram shows the object hierarchy in SAP BODS system −
BODS - Tools and Functions
Based on the architecture illustrated below, we have many tools defined in SAP Business Objects Data Services. Each tool has its own function as per system landscape.
At the top, you have Information Platform Services installed for users and rights security management. BODS depends on Central Management console (CMC) for user access and security feature. This is applicable to the 4.x version. In the previous version, it was done in Management Console.
SAP BODS - Data Services Designer
Data Services Designer is a developer tool, which is used to create objects consisting of data mapping, transformation, and logic. It is GUI based and works as a designer for Data Services.
Repository
Repository is used to store metadata of objects used in BO Data Services. Each Repository should be registered in Central Management Console and is linked with single or many job servers, which are responsible for executing jobs that are created by you.
Types of Repositories
There are three types of Repositories.
Local Repository − It is used to store the metadata of all objects created in Data Services Designer like projects, jobs, data flow, work flow, etc.
Central Repository − It is used to control the version management of the objects and is used for multiuse development. Central Repository stores all the versions of an application object. Hence, it allows you to move to previous versions.
Profiler Repository − This is used to manage all the metadata related to profiler tasks performed in SAP BODS designer. CMS Repository stores metadata of all the tasks performed in CMC on BI platform. Information Steward Repository stores all the metadata of profiling tasks and objects created in information steward.
Job Server
Job server is used to execute the real time and batch jobs created by you. It gets the job information from respective repositories and initiates the data engine to execute the job. Job server can execute the real time or scheduled jobs and uses multithreading in memory caching, and parallel processing to provide performance optimization.
Access Server
Access Server in Data Services is known as real time message broker system, which takes the message requests, moves to real time service and displays a message in specific time frame.
Data Service Management Console
Data Service Management Console is used to perform administration activities like scheduling the jobs, generating the quality reports in DS system, data validation, documentation etc.
BODS – Naming Standards
It is advisable to use standard naming conventions for all the objects in all systems as this allows you to identify objects in Repositories easily.
The table shows the list of recommended naming conventions that should be used for all jobs and other objects.
| Prefix | Suffix | Object |
|---|---|---|
| DF_ | n/a | Data Flow |
| EDF_ | _Input | Embedded data flow |
| EDF_ | _Output | Embedded data flow |
| RTJob_ | n/a | Real-time job |
| WF_ | n/a | Work flow |
| JOB_ | n/a | Job |
| n/a | _DS | Datastore |
| DC_ | n/a | Data configuration |
| SC_ | n/a | System configuration |
| n/a | _Memory_DS | Memory datastore |
| PROC_ | n/a | Stored procedure |
SAP BODS - Repository Overview
BO Data Service basics includes key objects in designing Work flow like Project, Job, Work flow, data flow, Repositories.
BODS – Repository & Types
Repository is used to store metadata of objects used in BO Data Services. Each Repository should be registered in Central Management Console, CMC, and is linked with single or many job servers, which are responsible to execute the jobs that are created by you.
Types of Repositories
There are three types of Repositories.
Local Repository − It is used to store the metadata of all objects created in Data Services Designer like projects, jobs, data flow, work flow, etc.
Central Repository − It is used to control the version management of the objects and is used for multiuse development. Central Repository stores all the versions of an application object. Hence, it allows you to move to previous versions.
Profiler Repository − This is used to manage all the metadata related to profiler tasks performed in SAP BODS designer. CMS Repository stores metadata of all the tasks performed in CMC on BI platform. Information Steward Repository stores all the metadata of profiling tasks and objects created in information steward.
SAP BODS - Repository Creating & Updating
To create BODS Repository, you need to have a database installed. You can use SQL Server, Oracle database, My SQL, SAP HANA, Sybase, etc.
Creating Repository
You have to create the following users in database while installing BODS and to create Repositories. These users are required to login to different servers such as the CMS Server, Audit Server etc.
Create User BODS Identified by Bodsserver1
- Grant Connect to BODS;
- Grant Create Session to BODS;
- Grant DBA to BODS;
- Grant Create Any Table to BODS;
- Grant Create Any View to BODS;
- Grant Drop Any Table to BODS;
- Grant Drop Any View to BODS;
- Grant Insert Any table to BODS;
- Grant Update Any table to BODS;
- Grant Delete Any table to BODS;
- Alter USER BODS QUOTA UNLIMITED ON USERS;
Create User CMS Identified by CMSserver1
- Grant Connect to CMS;
- Grant Create Session to CMS;
- Grant DBA to CMS;
- Grant Create Any Table to CMS;
- Grant Create Any View to CMS;
- Grant Drop Any Table to CMS;
- Grant Drop Any View to CMS;
- Grant Insert Any table to CMS;
- Grant Update Any table to CMS;
- Grant Delete Any table to CMS;
- Alter USER CMS QUOTA UNLIMITED ON USERS;
Create User CMSAUDIT Identified by CMSAUDITserver1
- Grant Connect to CMSAUDIT;
- Grant Create Session to CMSAUDIT;
- Grant DBA to CMSAUDIT;
- Grant Create Any Table to CMSAUDIT;
- Grant Create Any View to CMSAUDIT;
- Grant Drop Any Table to CMSAUDIT;
- Grant Drop Any View to CMSAUDIT;
- Grant Insert Any table to CMSAUDIT;
- Grant Update Any table to CMSAUDIT;
- Grant Delete Any table to CMSAUDIT;
- Alter USER CMSAUDIT QUOTA UNLIMITED ON USERS;
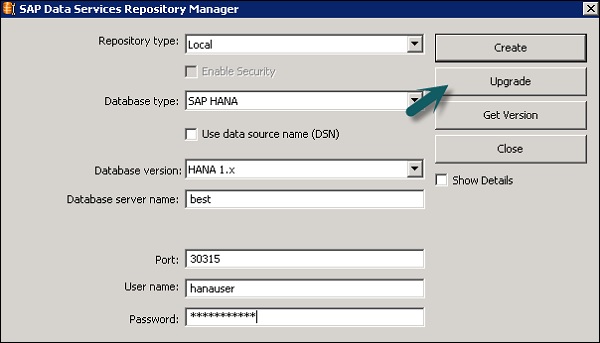
To create a new Repository after installation
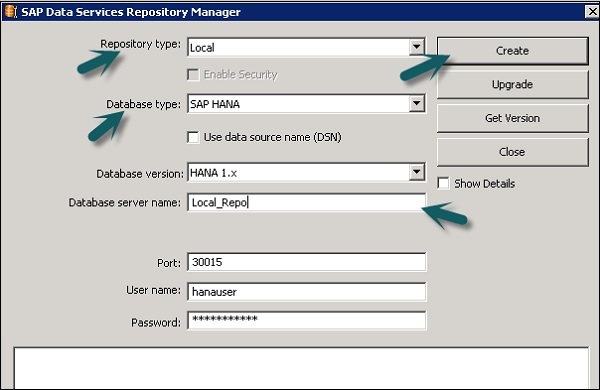
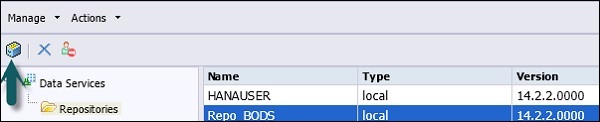
Step 1 − Create a database Local_Repo and go to Data Services Repository Manager. Configure database as local repository.
A new window will open.
Step 2 − Enter the details in the following fields −
Repository type, Database type, Database server name, Port, User name and password.
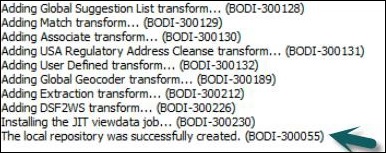
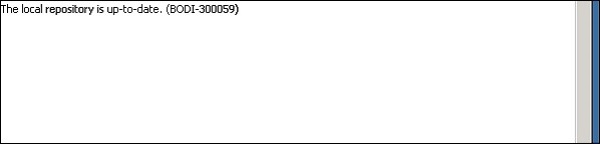
Step 3 − Click the Create button. You will get the following message −
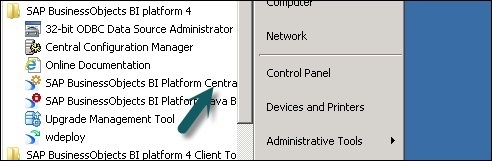
Step 4 − Now login to Central Management Console CMC in SAP BI Platform with User name and Password.
Step 5 − On the CMC Home page, click Data Services.

Step 6 − From the Data Services menu, Click Configure a new Data Services Repository.
Step 7 − Enter the details as given in the new window.
- Repository Name: Local_Repo
- Data Base Type: SAP HANA
- Data Base Server Name: best
- Database Name: LOCAL_REPO
- User Name:
- Password:*****
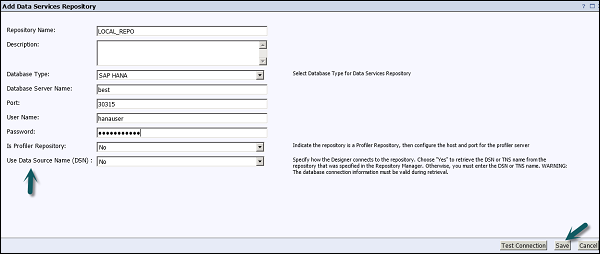
Step 8 − Click the button Test Connection and if it is successful, click Save. Once you save, it will come under Repository tab in CMC.
Step 9 − Apply access rights and security on local repository in CMC → User and Groups.
Step 10 − Once access is given, go to Data Services Designer → Select Repository → Enter User name and password to login.
Updating the Repository
To update a repository, follow the given steps.
Step 1 − To update a Repository after installation, create a database Local_Repo and go to Data Services Repository Manager.
Step 2 − Configure database as local repository.
A new window will open.
Step 3 − Enter the details for the following fields.
Repository type, Database type, Database server name, Port, User name and password.
You will see the output as shown in the screenshot shown below.
Data Services Management Console
Data Service Management Console (DSMC) is used to perform administration activities like scheduling the jobs, generating quality reports in DS system, data validation, documentation etc.
You can access Data Services Management Console in the following ways −
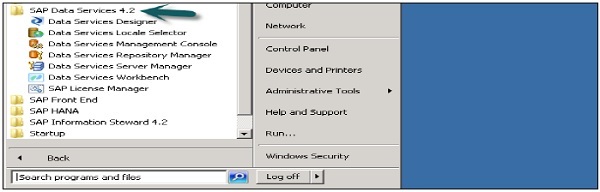
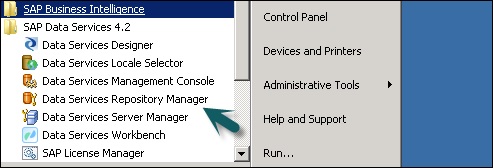
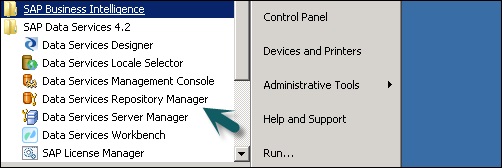
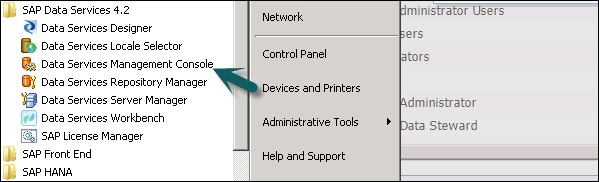
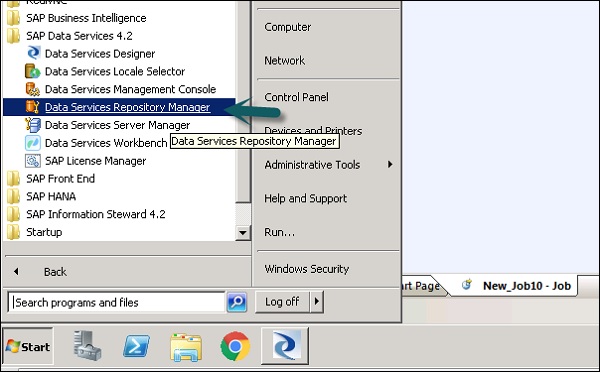
You can access Data Services Management Console by going to Start → All Programs → Data Services → Data Service Management Console.
You can also access data services management console via Designer if you are already logged in.
To access data services management console via Designer Home Page follow the steps given below.
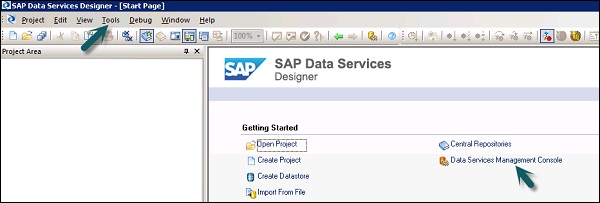
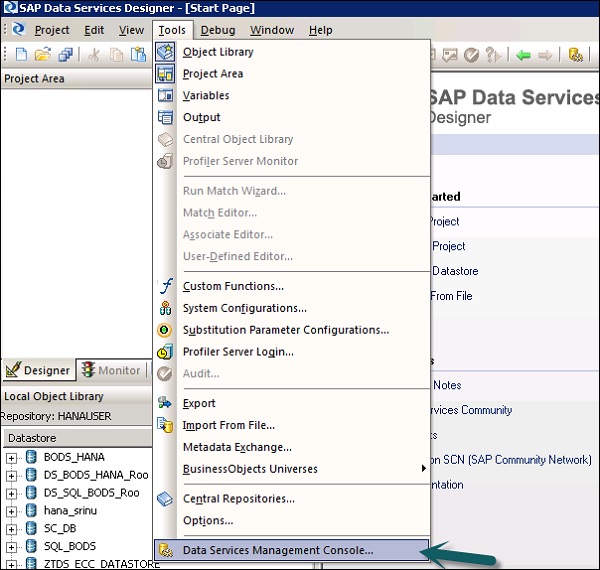
To access data services management console via Tools follow the given steps −
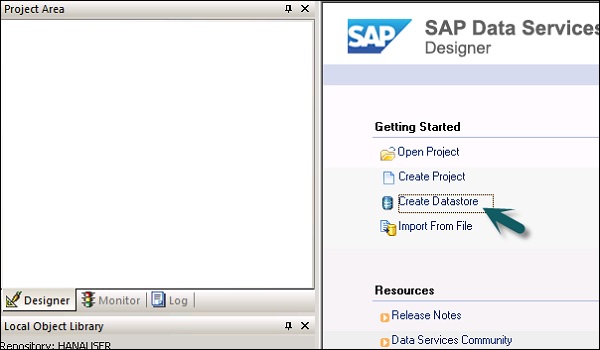
Step 1 − Go to Tools → Data Services Management Console as shown in the following image.
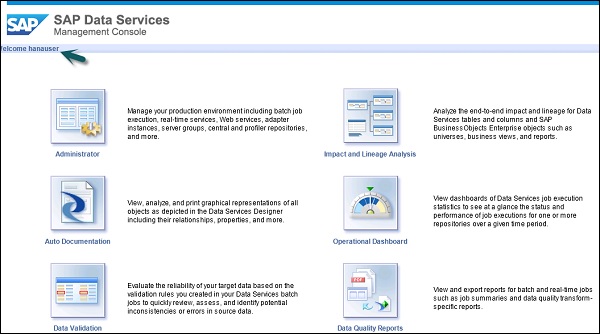
Step 2 − Once you login to Data Services Management Console, the home screen will open as shown in the screenshot given below. At the top, you can see the user name through which you are logged in.
On the home page, you will see the following options −
- Administrator
- Auto Documentation
- Data Validation
- Impact and Lineage Analysis
- Operational Dashboard
- Data Quality Reports
SAP BODS - DSMC Modules
The key functions of each module of Data Services Management Console are explained in this chapter.
Administrator Module
An Administrator option is used to manage −
- Users and Roles
- To add connections to access servers and repositories
- To access job data published for web services
- For scheduling and monitoring of batch jobs
- To check access server status and real time services.
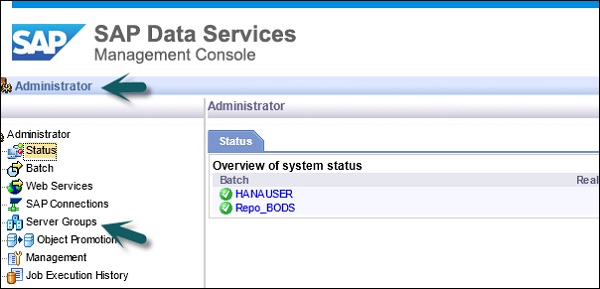
Once you click the Administrator tab, you can see many links in the left pane. They are − Status, Batch, Web Services, SAP Connections, Server Groups, Profiler Repositories Management and Job Execution History.
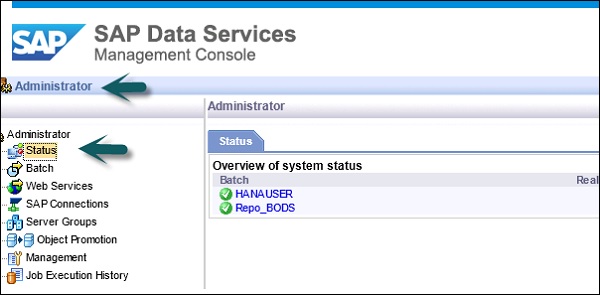
Nodes
The various nodes are under the Administrator module are discussed below.
Status
The Status node is used to check the status of batch and real time jobs, access server status, adapter and profiler repositories, and other system status.
Click Status → Select a Repository
On the right pane, you will see the tabs of the following options −
Batch Job Status − It is used to check the status of the batch job. You can check the job information such as Trace, Monitor, Error, and Performance Monitor, Start Time, End Time, Duration, etc.
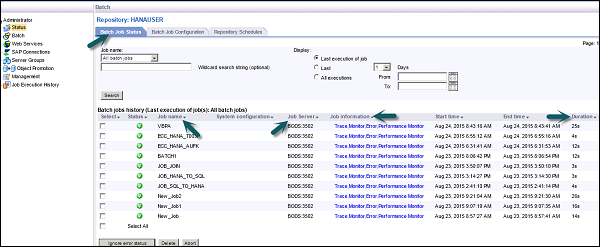
Batch Job Configuration − Batch job Configuration is used to check the schedule of individual jobs or you can add an action such as Execute, Add Schedule, Export Execution Command.
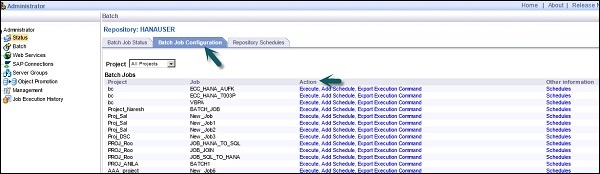
Repositories Schedules − It is used to view and configure schedules for all the jobs in the repository.
Batch Node
Under the Batch Job node, you will see the same options as above.
| Sr. No. | Option & Description |
|---|---|
| 1 | Batch Job Status View the status of the last execution and in-depth information about each job. |
| 2 | Batch Job Configuration Configure execution and scheduling options for individual jobs. |
| 3 | Repository Schedules View and configure schedules for all jobs in the repository. |
Web Services Node
Web Services is used to publish real time jobs and batch jobs as web service operation and to check the status of these operations. This is also used to maintain security for jobs published as web service and to view WSDL file.

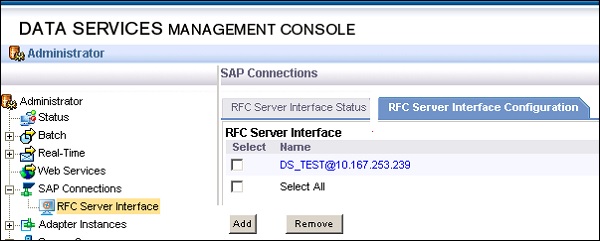
SAP Connections
SAP Connections is used to check the status or to configure RFC server interface in Data Services Management Console.
To check the status of RFC server interface, go to RFC Server Interface Status tab. To add a new RFC Server Interface, on the configuration tab, click Add.
When a new window opens, enter RFC server configuration details click Apply.
Server Groups
This is used to group all the job servers that are associated with same repository into one server group. This tab is used for load balancing while executing the jobs in data services.
When a job is executed, it checks for corresponding job server and if it is down it moves the job to other job server in the same group. It is mostly used in production for load balancing.
Profile Repositories
When you connect profile repository to the administrator, it allows you to expand the profile repository node. You can go to Profile Tasks status page.
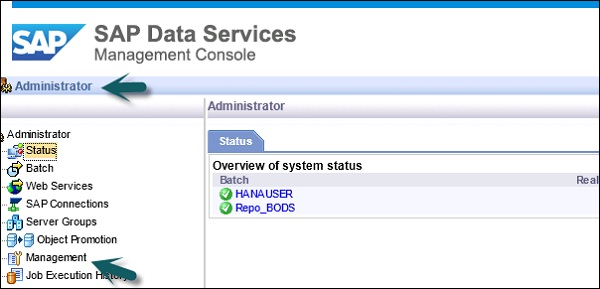
Management Node
To use the feature of the Administrator tab, you need to add connections to the Data services using management node. Management Node consists of different configuration options for administration application.
Job Execution History
This is used to check the execution history of a job or a data flow. Using this option, you can check the execution history of one batch job or all the batch jobs created by you.
When you select a job, information is displayed in the form of table, which consists of Repository name, Job name, start time, end time, execution time, status, etc.

SAP BODS - DS Designer Introduction
Data Service Designer is a developer tool, which is used to create objects consisting of data mapping, transformation, and logic. It is GUI based and works as a designer for Data Services.
You can create various objects using Data Services Designer like Projects, Jobs, Work Flows, Data Flows, mapping, transformations, etc.
To start the Data Services Designer follow the steps given below.
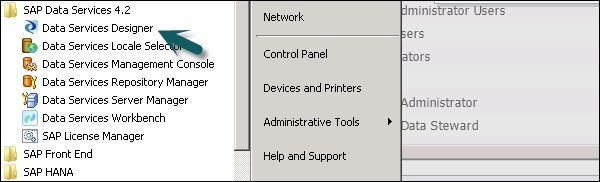
Step 1 − Point to Start → All Programs → SAP Data Services 4.2 → Data Services Designer.
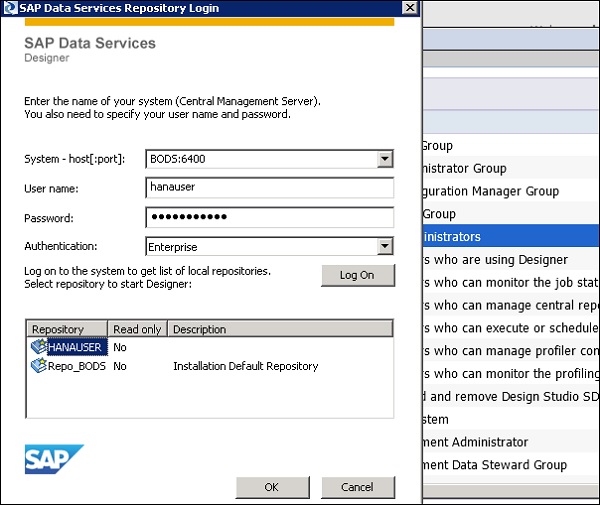
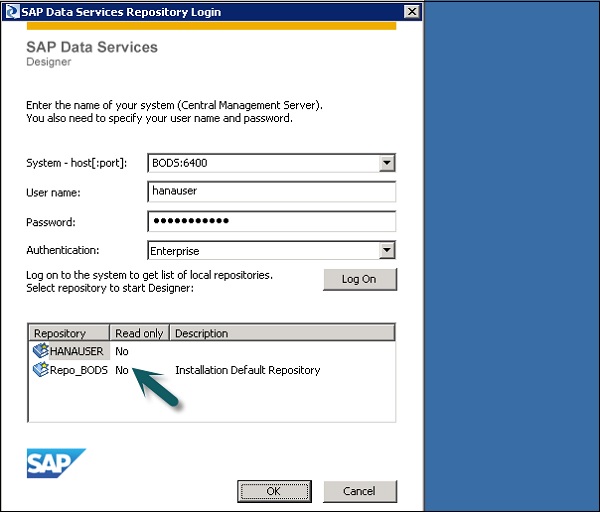
Step 2 − Select the Repository and enter the password to login.
Once you select the Repository and login to the Data Services Designer, a home screen will appear as shown in the image below.
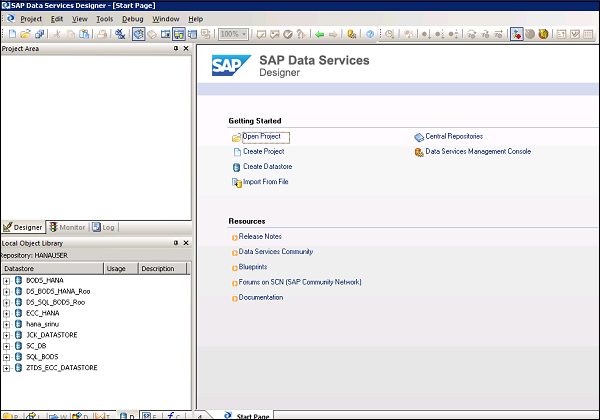
In the left pane, you have the project area, where you can create a new project, Job, data flow, work flow etc. In the Project area, you have Local Object library, which consists of all the objects created in Data Services.
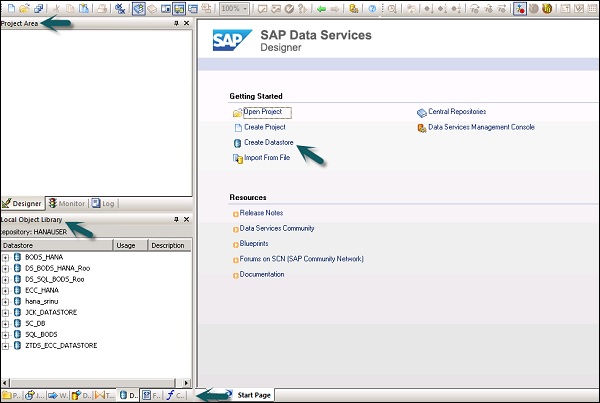
In the bottom pane, you can open the existing objects by going to specific options like Project, Jobs, Data Flow, Work Flow, etc. Once you select any of the object from the bottom pane, it will show you all the similar objects already created in Repository under local object library.
On the right side, you have a home screen, which can be used to −
- Create Project
- Open Project
- Create Data stores
- Create Repositories
- Import from flat file
- Data Services Management Console
SAP BODS - ETL Flow in DS Designer
To develop an ETL flow, you first need to create data stores for the source and the target system. Follow the steps given to develop an ETL flow −
Step 1 − Click Create Data Stores.
A new window will open.
Step 2 − Enter the Datastore name, Datastore type and database type as shown below. You can select different database as source system as shown in the screenshot below.
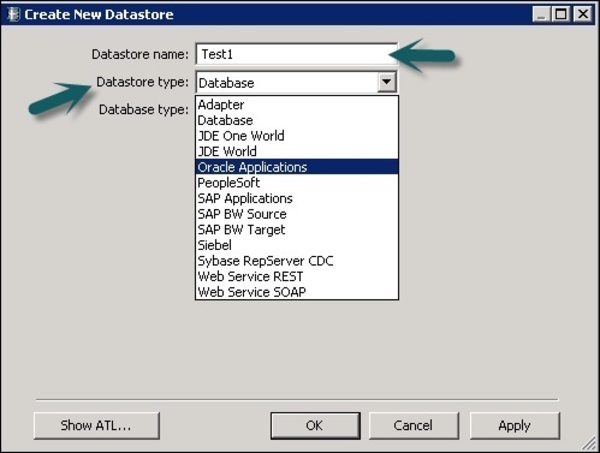
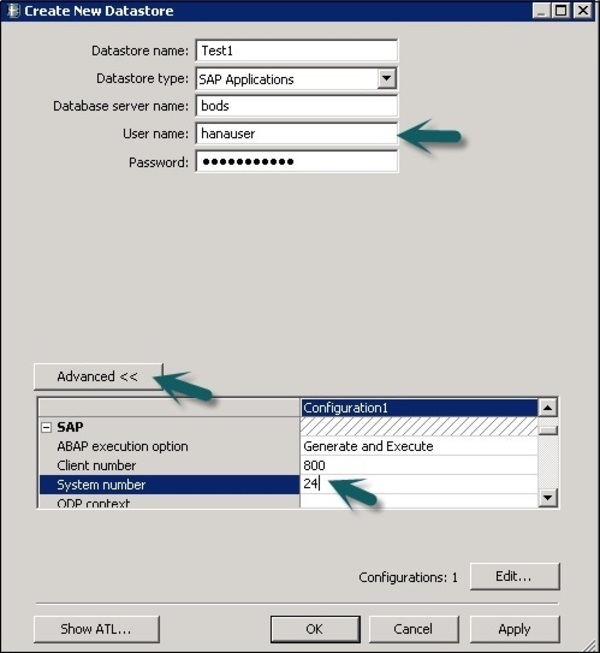
Step 3 − To use ECC system as the data source, select SAP Applications as Datastore type. Enter user name and password and on the Advance tab, enter the system number and client number.
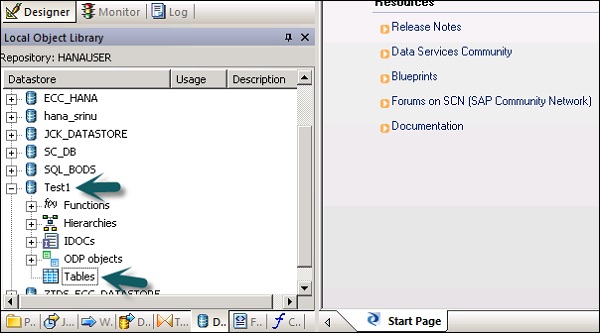
Step 4 − Click OK and the Datastore will be added to the Local object library list. If you expand Datastore, it does not show any table.
Step 5 − To extract any table from ECC system to load on the target system, Right-click on Tables → Import by Names.
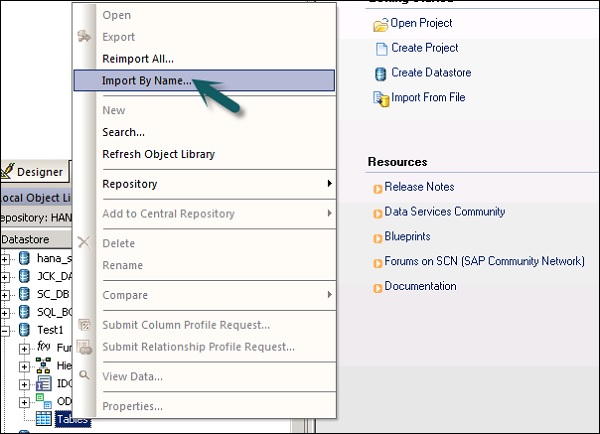
Step 6 − Enter the table name and click Import. Here, Table–Mara is used, which is a default table in the ECC system.
Step 7 − In a similar way, create a Datastore for the target system. In this example, HANA is used as a target system.
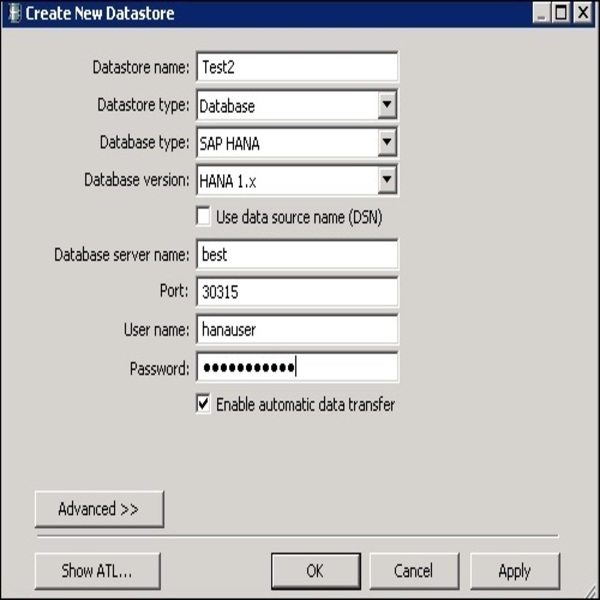
Once you click OK, this Datastore will be added to the local object library and there will be no table inside it.
Create an ETL Flow
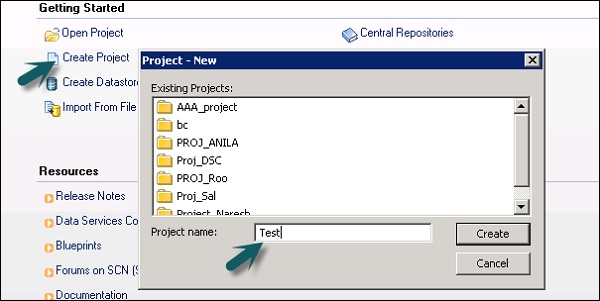
To create an ETL flow, create a new project.
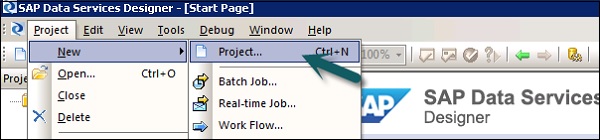
Step 1 − Click the option, Create Project. Enter the Project Name and click Create. It will be added to the Project Area.
Step 2 − Right click on the Project name and create a new batch job/real time job.
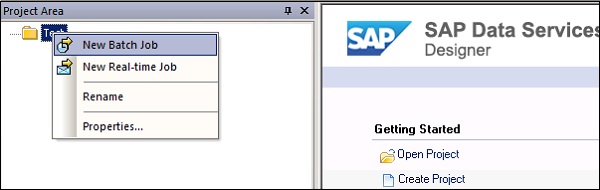
Step 3 − Enter the name of the job and press Enter. You have to add Work flow and Data flow to this. Select a workflow and click the work area to add to the job. Enter the name of the workflow and double-click it to add to the Project area.
Step 4 − In a similar way, select the Data flow and bring it to the Project area. Enter the name of the data flow and double-click to add it under the new project.

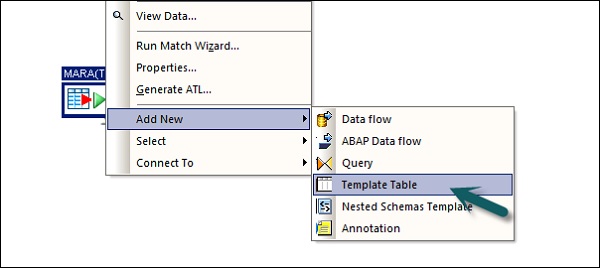
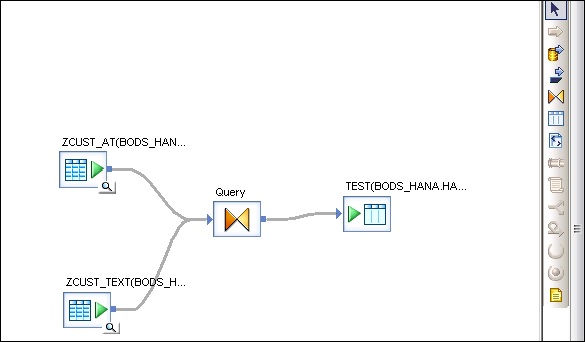
Step 5 − Now drag the source table under datastore to the Work area. Now you can drag the target table with similar data-type to the work area or you can create a new template table.
To create a new template table right click the source table, Add New → Template Table.
Step 6 − Enter the table name and select the Datastore from the list as target Datastore. The Owner name represents the Schema name where the table has to be created.
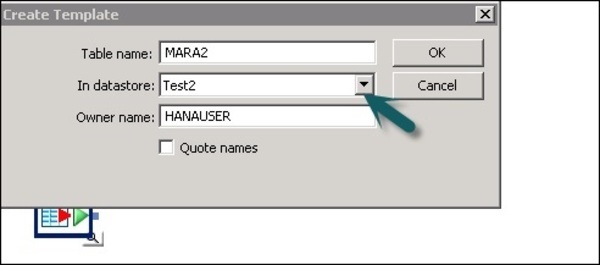
The table will be added to the work area with this table name.
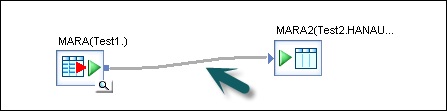
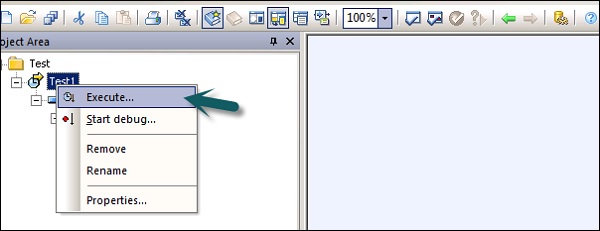
Step 7 − Drag the line from the source table to the target table. Click the Save All option at the top.
Now you can schedule the job using Data Service Management Console or you can manually execute it by right clicking on the Job name and Execute.
SAP BODS - Datastore Overview
Datastores are used to setup connection between an application and the database. You can directly create Datastore or can be created with the help of adapters. Datastore allows an application/software to read or write metadata from an application or database and to write to that database or application.
In Business Objects Data Services, you can connect to the following systems using Datastore −
- Mainframe systems and Database
- Applications and software with user written adapters
- SAP Applications, SAP BW, Oracle Apps, Siebel, etc.
SAP Business Objects Data Services provides an option to connect to the Mainframe interfaces using Attunity Connector. Using Attunity, connect the Datastore to the list of sources given below −
- DB2 UDB for OS/390
- DB2 UDB for OS/400
- IMS/DB
- VSAM
- Adabas
- Flat Files on OS/390 and OS/400
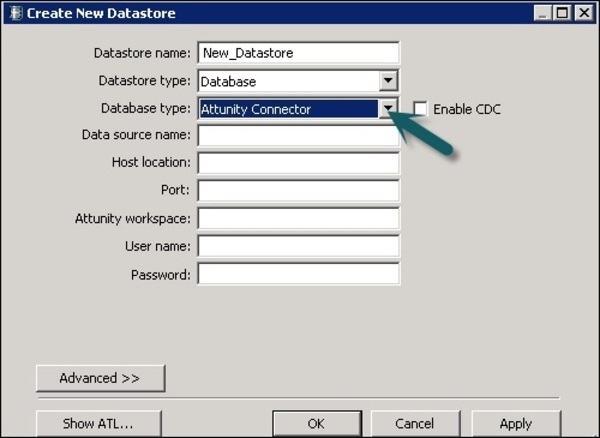
Using Attunity connector, you can connect to the mainframe data with the help of a software. This software needs to be installed manually on the mainframe server and the local client job server using an ODBC interface.
Enter the details like Host location, Port, Attunity workspace,etc.
Create Datastore for a Database
To create Datastore for a database follow the steps given below.
Step 1 − Enter the Datastore name, Datastore type and database type as shown in the image given below. You can select different database as source system given in the list.

Step 2 − To use ECC system as the data source, select SAP Applications as the Datastore type. Enter user name and password. Click the Advance tab and enter the system number and client number.
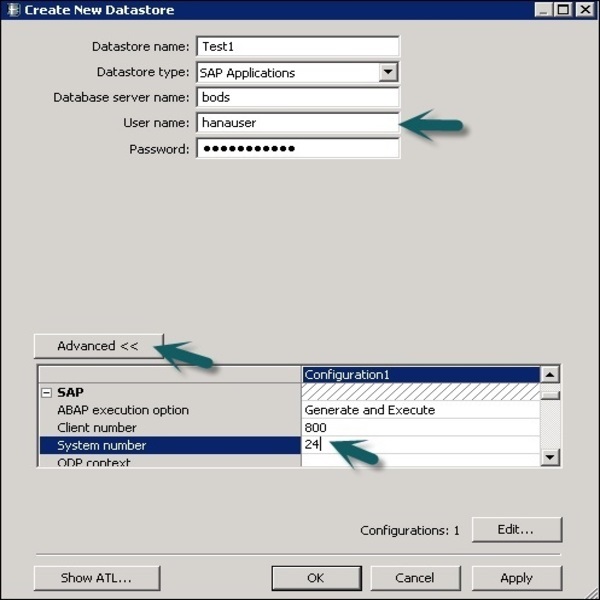
Step 3 − Click OK and the Datastore will be added to the Local object library list. If you expand the Datastore, there is no table to display.
SAP BODS - Changing a Datastore
In this chapter, we will learn how to edit or change the Datastore. To change or edit the Datastore, follow the steps given below.
Step 1 − To edit a Datastore, right click on the Datastore name and click Edit. It will open the Datastore editor.
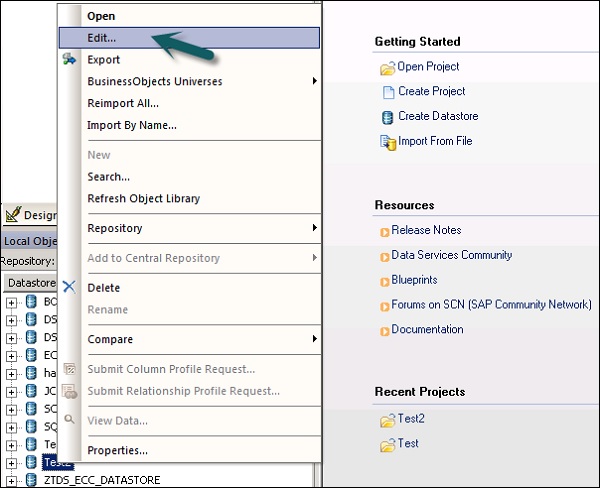
You can edit the connection information for the current Datastore configuration.
Step 2 − Click the Advance button and you can edit client number, system id and other properties.
Step 3 − Click the Edit option to add, edit, and delete the configurations.
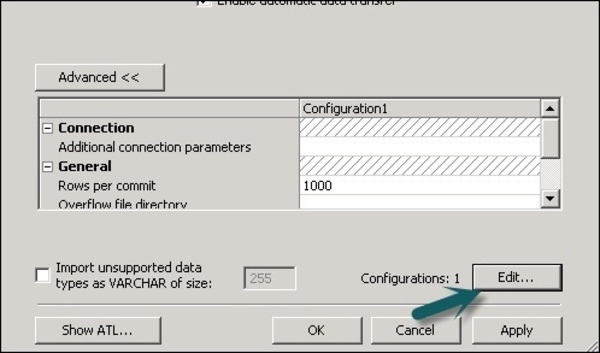
Step 4 − Click OK and the changes will be applied.
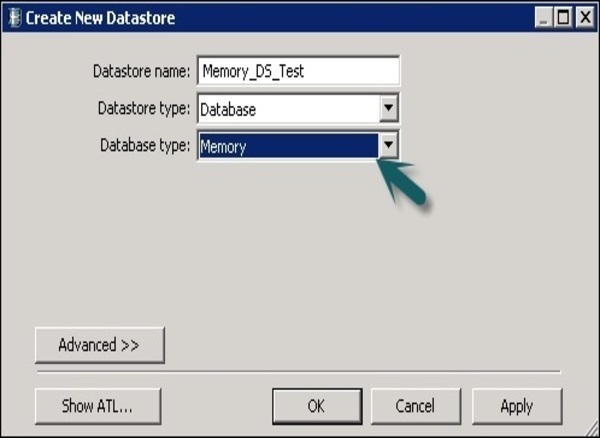
SAP BODS - Memory Datastore
You can create a Datastore using memory as the database type. Memory Datastores are used to improve the performance of data flows in real time jobs as it stores the data in the memory to facilitate quick access and does not require to go to original data source.
A memory Datastore is used to store memory table schemas in the repository. These memory tables get data from tables in Relational database or using hierarchical data files like XML message and IDocs. The memory tables remain alive until the job is executed and the data in memory tables cannot be shared between different real time jobs.
Creating a Memory Datastore
To create Memory Datastore, follow the steps given below.
Step 1 − Click Create Datastore and enter the name of the Datastore “Memory_DS_TEST”. Memory tables are presented with normal RDBMS tables and can be identified with naming conventions.
Step 2 − In Datastore Type, Select Database and in the database type select Memory. Click OK.
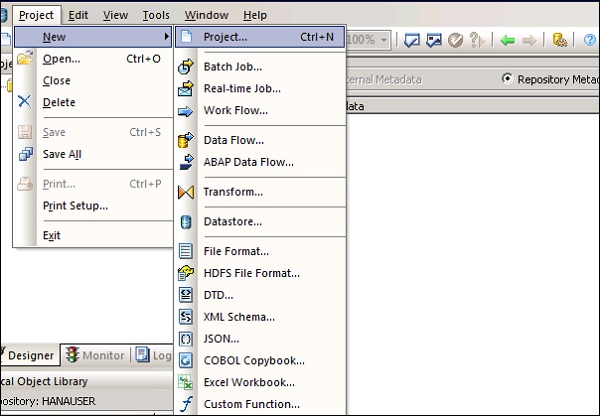
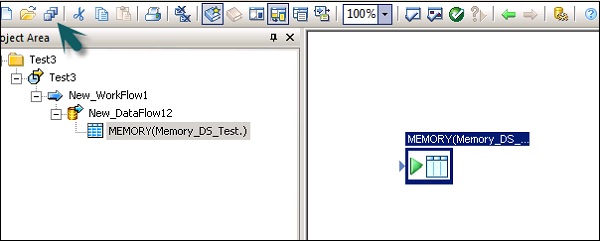
Step 3 − Now go to Project → New → Project as shown in the screenshot given below.
Step 4 − Create a New Job by Right-clicking. Add Work flow and Data Flow as shown below.
Step 5 − Select a Template table and drag and drop to the work area. A Create table window will open.
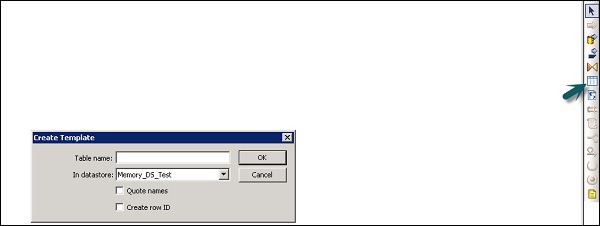
Step 6 − Enter the name of the table and In Datastore, select Memory Datastore. If you want a system generated row id, select the create row id check box. Click OK.
Step 7 − Connect this Memory table to the dataflow and click Save All at the top.
Memory Table as Source and Target
To use a Memory Table as a Target −
Step 1 − Go to the local object library, click Datastore tab. Expand the Memory Datastore → Expand tables.
Step 2 − Select the Memory table you want to use as a source or target table and drag it to the work flow. Connect this memory table to as source or target in data flow.
Step 3 − Click the save button to save the job.
SAP BODS - Linked Datastore
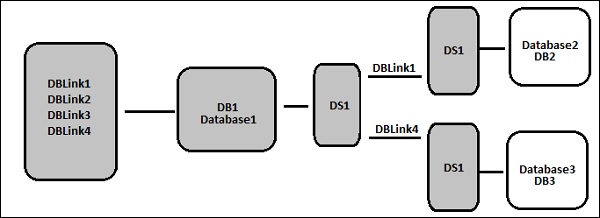
There are various database vendors, which only provide one-way communication path from one database to another database. These paths are known as database links. In SQL Server, Linked server allows one-way communication path from one database to other.
Example
Consider a local database Server named “Product” stores database link to access information on remote database server called Customer. Now, users that are connected to the remote database server Customer cannot use the same link to access data in database server Product. Users that are connected to “Customer” should have a separate link in data dictionary of the server to access the data in Product database server.
This communication path between the two databases is called the database link. The Datastores, which are created between these linked database relationships are known as linked Datastores.
There is a possibility of connecting one Datastore to another Datastore and importing an external database link as option of Datastore.
SAP BODS - Adapter Datastore
Adapter Datastore allows you to import application metadata into repository. You can access application metadata and move the batch and real time data between different applications and software.
There is an Adapter Software Development Kit − SDK provided by SAP that can be used to develop customized adapters. These adapters are displayed in the Data Services designer by Adapter Datastores.
To extract or load the data using an adapter, you should define at least one Datastore for this purpose.
Adapter Datastore - Definition
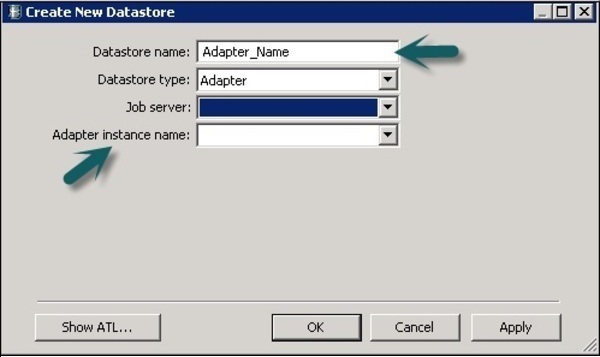
To define Adaptive Datastore follow the given steps −
Step 1 − Click Create Datastore → Enter the name for Datastore. Select Datastore Type as Adapter. Select the Job Server from the list and Adapter Instance Name and click OK.
To browse application metadata
Right click on the Datastore name and click Open. It will open a new window showing the source metadata. Click on + sign to check objects and right click on the object to import.
SAP BODS - File Formats
File format is defined as a set of properties to present the structure of flat files. It defines metadata structure. File format is used to connect to the source and target database when data is stored in the files and not in the database.
File format is used for the following functions −
- Create a file format template to define structure of a file.
- Create a specific source and target file format in dataflow.
Following type of files can be used as a source or target file using file format −
- Delimited
- SAP Transport
- Unstructured Text
- Unstructured Binary
- Fixed Width
File Format Editor
File Format Editor is used to set the properties for the file format templates and source and target file formats.
The following modes are available in file format editor −
New mode − It allows you to create a new file format template.
Edit mode − It allows you to edit an existing file format template.
Source mode − It allows you to edit the file format of a particular source file.
Target mode − It allows you to edit the file format of a particular target file.
There are three work areas for File Format Editor −
Properties Values − It is used to edit the values for file format properties.
Column Attributes − It is used to edit and define the columns or fields in the file.
Data Preview − It is used to view how the settings affect sample data.
Creating a File Format
To create a File Format follow the steps given below.
Step 1 − Go to Local Object Library → Flat files.
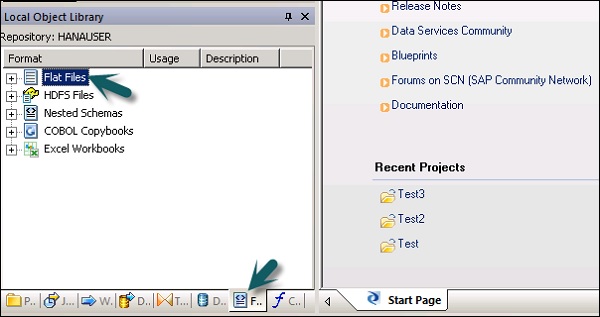
Step 2 − Right click on the Flat Files option → New.
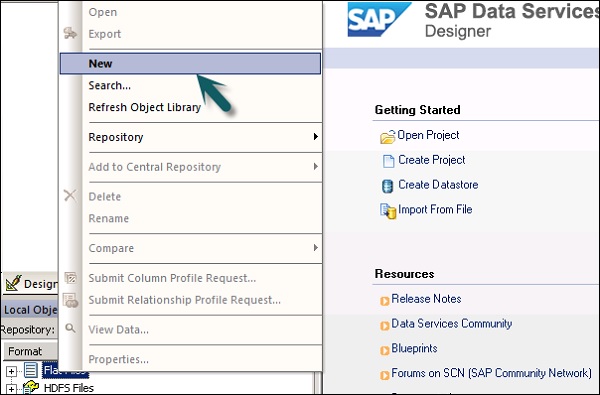
A new window of File Format Editor will open.
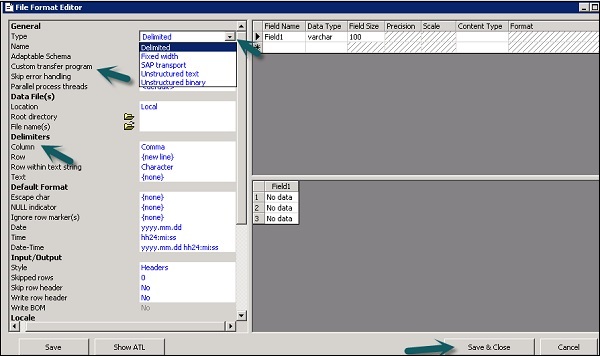
Step 3 − Select the type of File Format. Enter the name that describes the file format template. For Delimited and Fixed width files, you can read and load using Custom transfer Program. Enter the other properties to describe the files that this template represents.
You can also specify the strucutre of columns in column attributes work-area for few specific file formats. Once all the properties are defined, click the Save button.
Editing a File Format
To edit the File Formats, follow the steps given below.
Step 1 − In Local Object Library, go to the Format tab.

Step 2 − Select the File format you want to edit. Right click the Edit option.
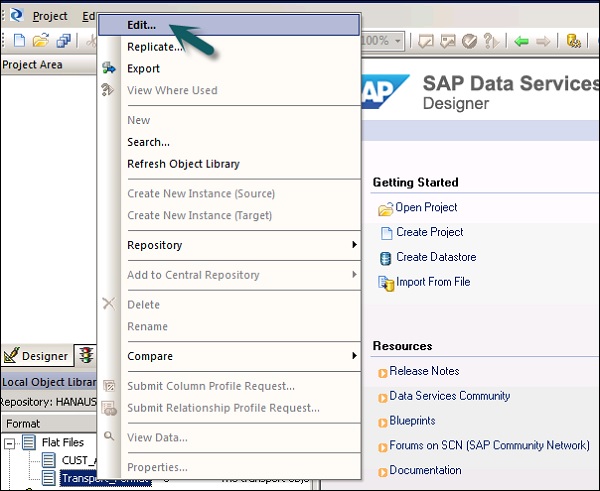
Make changes in the file format editor and click the Save button.
SAP BODS - COBOL Copybook File Format
You can create a COBOL copybook file format that slows you to create just the format. You can configure the source later once you add the format to the dataflow.
You can create the file format and connect it to data file at the same time. Follow the steps given below.
Step 1 − Go to Local Object Library → File Format → COBOL Copybooks.
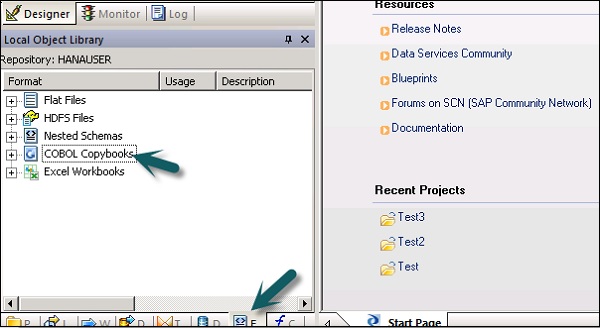
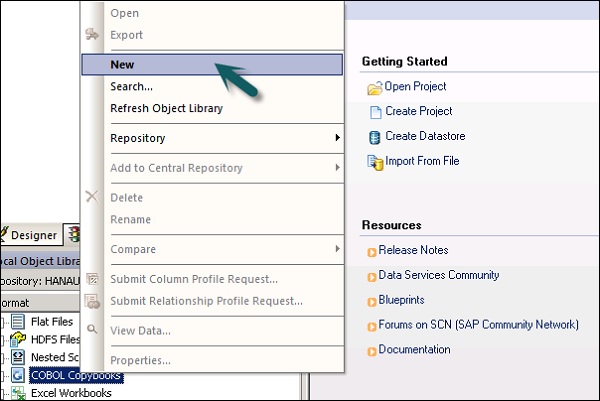
Step 2 − Right click the New option.
Step 3 − Enter the Format name. Go to Format tab → Select COBOL copybook to import. The extension of the file is .cpy.

Step 4 − Click OK. This file format is added to Local Object library. The COBOL Copybook Schema name dialog box opens up. If required, rename the schema and click OK.
Extracting Data from Database Tables
By using database datastores, you can extract the data from tables and functions in database. When you perform data import for metadata, Tool allows you to edit the column names, data types, description, etc.
You can edit the following objects −
- Table Name
- Column Name
- Table Description
- Column Description
- Column Data Type
- Column Content Type
- Table Attributes
- Primary Key
- Owner Name
Importing Metadata
To import Metadata, follow the steps given below −
Step 1 − Go to Local Object Library → go to Datastore that you want to use.
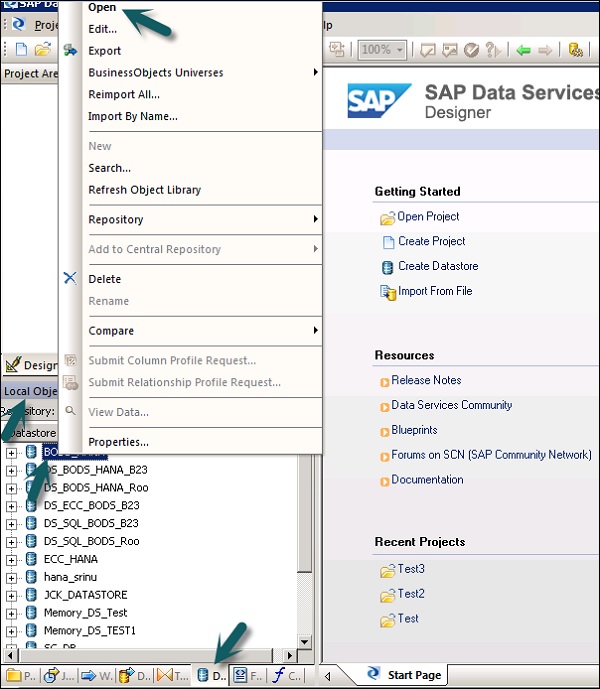
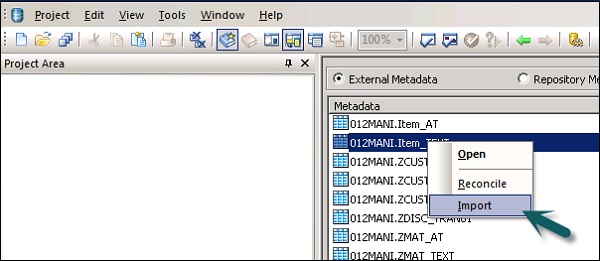
Step 2 − Right Click on Datastore → Open.
In the workspace, all the items that are available for import will be displayed. Select the items for which you want to import the metadata.
In the Object library, go to the datastore to see the list of imported objects.
Data Extraction from Excel Workbook
You can use Microsoft Excel workbook as data source using the file formats in Data Services. The Excel workbook should be available on Windows file system or Unix File system.
| Sr.No. | Access & Description |
|---|---|
| 1 | In the object library, click the Formats tab. An Excel workbook formal describes the structure defined in an Excel workbook(denoted with a .xls extension). You store format templates for Excel data ranges in the object library. You use the template to define the format of a particular source in a data flow. SAP Data Services acesses Excel workbooks as source only(not as targets). |
Right click the New option and select Excel Workbook as shown in the screenshot below.

Data Extraction from XML FILE DTD, XSD
You can also import XML or DTD schema file format.
Step 1 − Go to Local object Library → Format tab → Nested Schema.
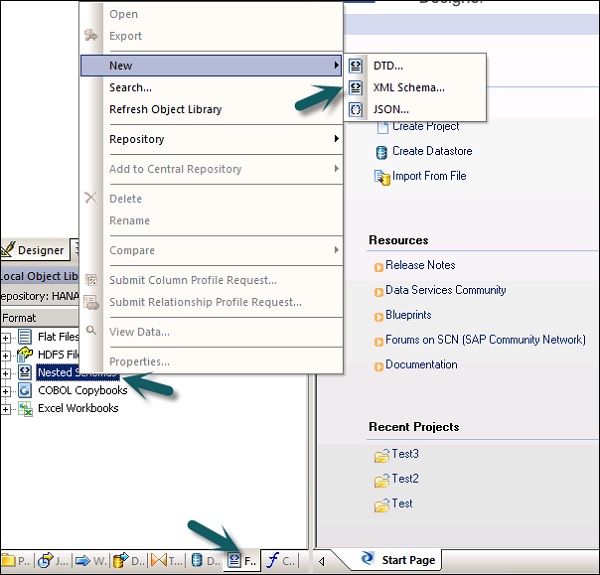
Step 2 − Point to New (You can select DTD file or XML Schema or JSON file format). Enter the name of the file format and select the file that you want to import. Click OK.
Data Extraction from COBOL Copybooks
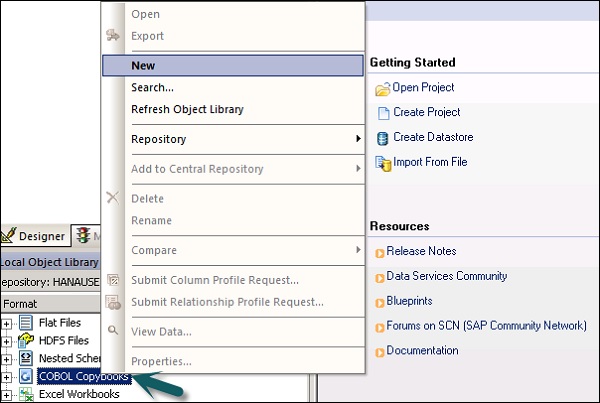
You can also import file format in COBOL copybooks. Go to Local Object Library → Format → COBOL Copybooks.
SAP BODS - Dataflow Introduction
Data flow is used to extract, transform and load data from the source to the target system. All the transformations, loading and formatting occurs in dataflow.
Once you define a data flow in a project, this can be added to a workflow or an ETL job. Data flow can send or receive objects/information using parameters. Data flow is named in format DF_Name.

Example of Data Flow
Let us assume that you want to load a fact table in DW system with data from two tables in the source system.
Data Flow contains the following objects −
- Two Source Table
- Join between two tables and defined in Query transform
- Target table
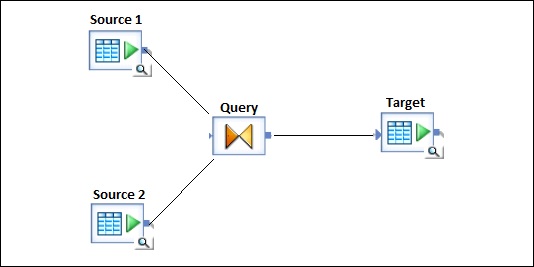
There are three types of objects that can be added to a Data flow. They are −
- Source
- Target
- Transforms
Step 1 − Go to the Local Object Library and drag both the tables to work space.
Step 2 − To add a Query Transformation, drag from the right tool bar.
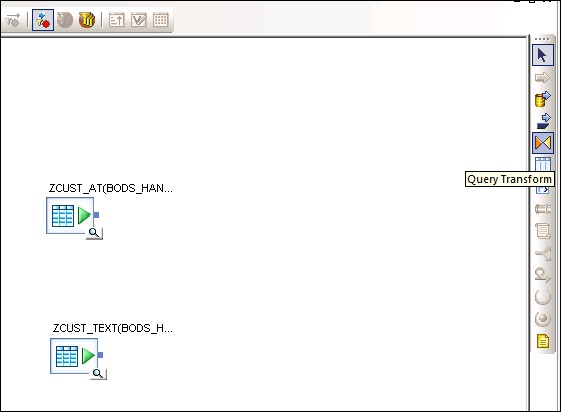
Step 3 − Join both the tables and create a template target table by right clicking the Query box → Add New → New Template table.
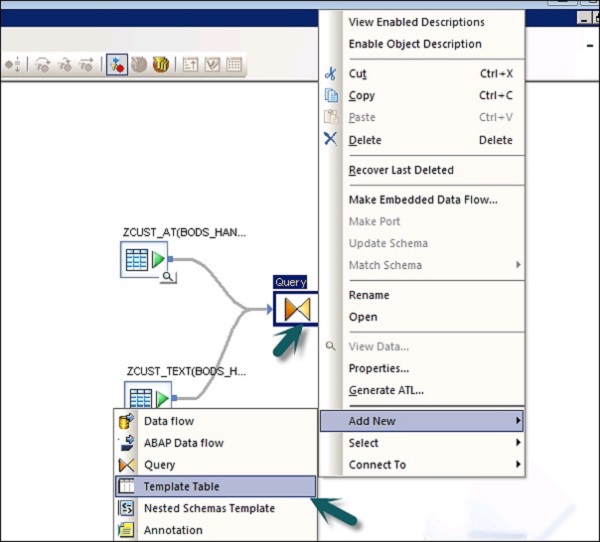
Step 4 − Enter the name of the Target table, Data store name and Owner (Schema name) under which the table is to be created.
Step 5 − Drag the target table in front and join it to the Query transform.
Passing Parameters
You can also pass different parameters in and out of the data flow. While passing a parameter to a data flow, objects in data flow reference those parameters. Using parameters, you can pass different operations to a data flow.
Example − Suppose you have entered a parameter to a table about last updated. It allows you to extract only rows modified since the last update.
SAP BODS - Dataflow Changing Properties
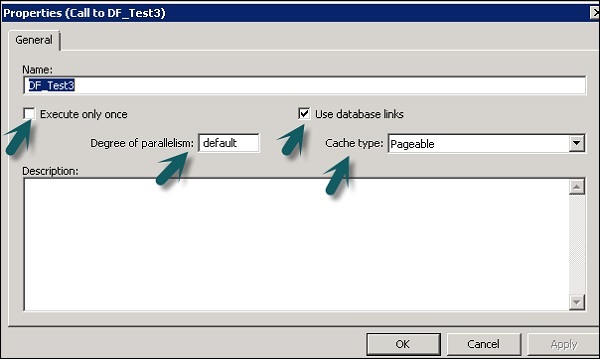
You can change the properties of a dataflow like Execute once, cache type, database link, parallelism, etc.
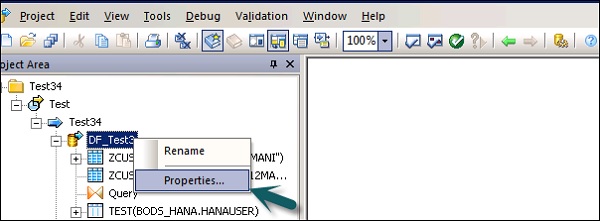
Step 1 − To change the properties of data flow, right click on Data flow → Properties
You can set various properties for a dataflow. The properties are given below.
| Sr. No. | Properties & Description |
|---|---|
| 1 | Execute only once When you specify that a dataflow should only execute once, a batch job will never re-execute that data flow after the data flow completes successfully, except if the data flow is contained in a work flow that is a recovery unit that re-executes and has not completed successfully elsewhere outside the recovery unit. It is recommended that you do not mark a dataflow as Execute only once if a parent work flow is a recovery unit. |
| 2 | Use database links Database links are communication paths between one database server and another. Database links allow local users to access data on a remote database, which can be on the local or a remote computer of the same or different database type. |
| 3 | Degree of parallelism Degree Of Parallelism (DOP) is a property of a data flow that defines how many times each transform within a data flow replicates to process a parallel subset of data. |
| 4 | Cache type You can cache data to improve performance of operations such as joins, groups, sorts, filtering, lookups, and table comparisons. You can select one of the following values for the Cache type option on your data flow Properties window −
|
Step 2 − Change the properties such as Execute only once, Degree of parallelism and cache types.
Source and Target Objects
A data flow can extract or load a data directly using the following objects −
Source objects − Source objects define the source from which data is extracted or you read the data.
Target objects − Target Objects defines the target to which you load or write the data.
The following type of source object can be used and different access methods are used for the source objects.
| Table | A file formatted with columns and rows as used in relational databases | Direct or through adapter |
| Template table | A template table that has been created and saved in another data flow(used in development) | Direct |
| File | A delimited or fixed-width flat file | Direct |
| Document | A file with an application-specific format(not readable by SQL or XML parser) | Through adapter |
| XML file | A file formatted with XML tags | Direct |
| XML message | Used as a source in real-time jobs | Direct |
The following Target objects can be used and different access method can be applied.
| Table | A file formatted with columns and rows as used in relational databases | Direct or through adapter |
| Template table | A table whose format is based on the output of the preceding transform(used in development) | Direct |
| File | A delimited or fixed-width flat file | Direct |
| Document | A file with an application-specific format(not readable by SQL or XML parser) | Through adapter |
| XML file | A file formatted with XML tags | Direct |
| XML template file | An XML file whose format is based on the preceding transform output(used in development, primarily for debugging data flows) | Direct |
SAP BODS - Workflow Introduction
Workflows are used to determine the process for execution. The main purpose of workflow is to prepare for executing the data flows and to set the state of system, once the data flow execution is completed.
The Batch jobs in ETL projects are similar to the Workflows with the only difference that the job does not have parameters.
Various objects can be added to a work flow. They are −
- Work flow
- Data flow
- Scripts
- Loops
- Conditions
- Try or Catch Blocks
You can also make a work flow call other work flow or a work flow can call itself.
Note − In workflow, steps are executed in a left to right sequence.
Example of Work Flow
Suppose there is a fact table that you want to update and you have created a data flow with the transformation. Now, if you want to move the data from source system, you have to check the last modification for fact table so that you extract only rows that are added after last update.
In order to achieve this, you have to create one script, which determines the last update date and then pass this as input parameter to the data flow.
You also have to check if the data connection to a particular fact table is active or not. If it is not active, you need to setup a catch block, which automatically sends an email to the administrator to notify about this problem.
SAP BODS - Creating Workflows
Workflows can be created using the following methods −
- Object Library
- Tool Palette
Creating a Workflow using Object Library
To create a work flow using Object Library, follow the steps given below.
Step 1 − Go to the Object Library → Workflow tab.
Step 2 − Right click the New option.
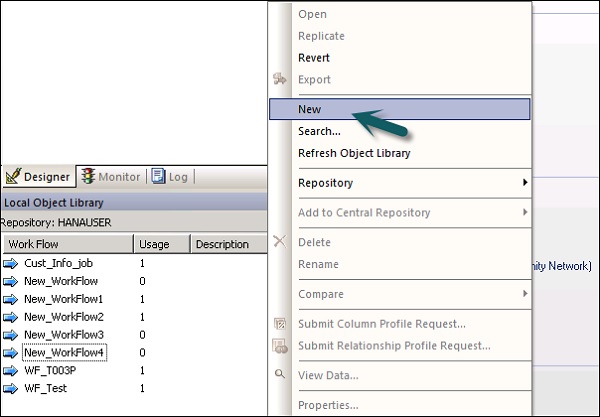
Step 3 − Enter the name of the Workflow.
Creating a workflow using tool palette
To create a workflow using tool palette, click the icon on the right side and drag work flow in the work space.
You can also set to execute workflow only once by going to the properties of workflow.
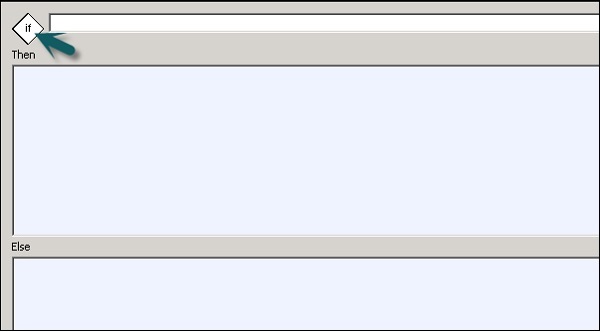
Conditionals
You can also add Conditionals to workflow. This allows you to implement the If/Else/Then logic on the workflows.
| Sr.No. | Conditional & Description |
|---|---|
| 1 | If A Boolean expression that evaluates to TRUE or FALSE. You can use functions, variables, and standard operators to construct the expression. |
| 2 | Then Work flow elements to execute if the If expression evaluates to TRUE. |
| 3 | Else (Optional) Work flow elements to execute if the If expression evaluates to FALSE. |
To define a Conditional
Step 1 − Go to Workflow → Click the Conditional icon on the tool palette on the right side.
Step 2 − Double click the name of Conditional to open the If-Then–Else conditional editor.
Step 3 − Enter the Boolean Expression that controls the Conditional. Click OK.
Step 4 − Drag the Data flow you want to execute the Then and Else window as per the expression in IF condition.
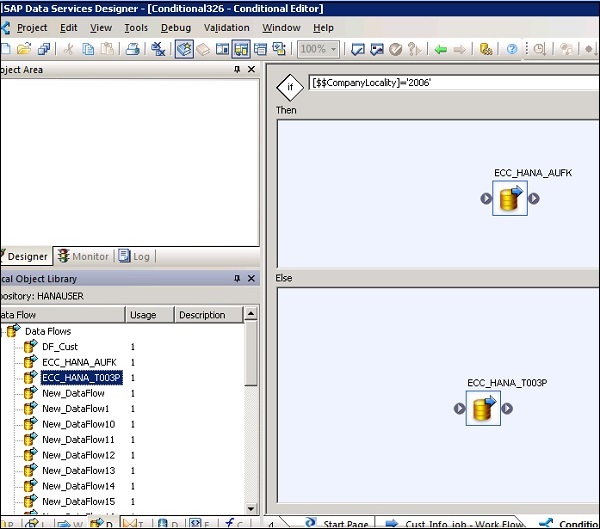
Once you complete the condition, you can debug and validate the conditional.
SAP BODS - Transforms Types
Transforms are used to manipulate the data sets as inputs and creating one or multiple outputs. There are various transforms, which can be used in Data Services. The type of transformations depend on the version and product purchased.
Following types of Transformations are available −
Data Integration
Data Integration transforms are used for data extraction, transform and load to DW system. It ensures data integrity and improves developer productivity.
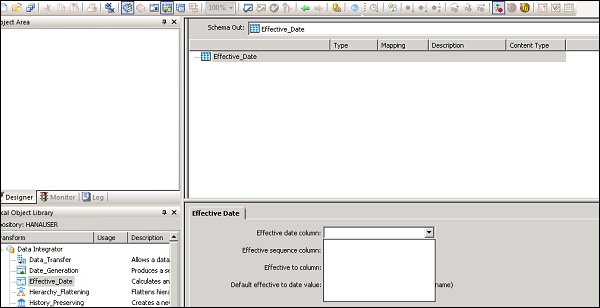
- Data_Generator
- Data_Transfer
- Effective_Date
- Hierarchy_flattening
- Table_Comparision, etc.
Data Quality
Data Quality transforms are used to improve the data quality. You can apply parse, correct, standardized, enrich data set from the source system.
- Associate
- Data Cleanse
- DSF2 Walk Sequencer, etc.
Platform
Platform is used for the movement of dataset. Using this you can generate, map, and merge rows from two or more data sources.
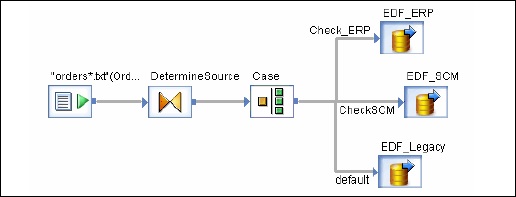
- Case
- Merge
- Query, etc.
Text Data Processing
Text Data Processing allows you to process large volume of text data.
SAP BODS - Adding Transform to a Dataflow
In this chapter, you will see how to add Transform to a Data Flow.
Step 1 − Go to Object Library → Transform tab.
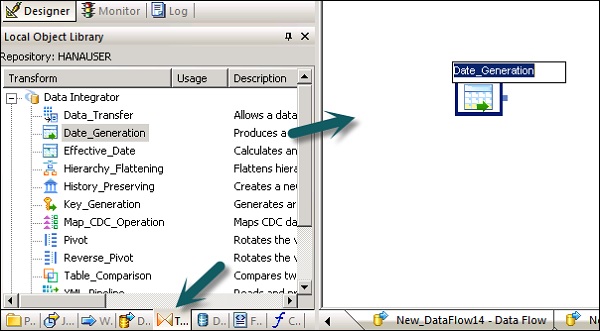
Step 2 − Select the Transform that you want to add to the data flow. If you add a transformation that has option to select configuration, a prompt will open.
Step 3 − Draw the data flow connection to connect the source to a transform.
Step 4 − Double click the Transformation name to open the transformation editor.
Once the definition is complete, click OK to close the editor.
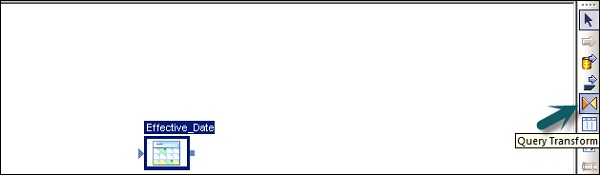
SAP BODS - Query Transform
This is the most common transformation used in Data Services and you can perform the following functions −
- Data filtering from sources
- Joining data from multiple sources
- Perform functions and transformations on data
- Column mapping from input to output schemas
- Assigning Primary keys
- Add new columns, schemas and functions resulted to output schemas
As Query transformation is the most commonly used transformation, a shortcut is provided for this query in the tool palette.
To add Query transform, follow the steps given below −
Step 1 − Click the query-transformation tool palette. Click anywhere on the Data flow workspace. Connect this to the inputs and outputs.
When you double click the Query transform icon, it opens a Query editor that is used to perform query operations.
The following areas are present in Query transform −
- Input Schema
- Output Schema
- Parameters
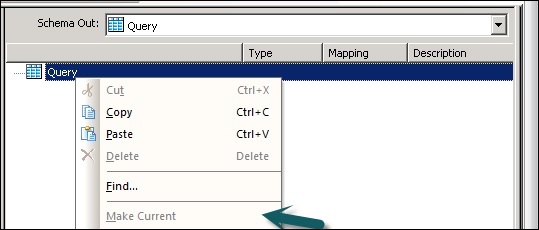
The Input and Output schemas contain Columns, Nested Schemas and Functions. Schema In and Schema Out shows the currently selected schema in transformation.
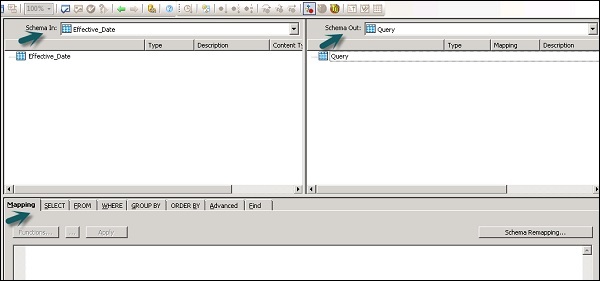
To change the output schema, select the schema in the list, right click and select Make Current.
Data Quality Transform
Data Quality Transformations cannot be directly connected to the upstream transform, which contains nested tables. To connect these transform you should add a query transform or XML pipeline transform between transformation from nested table and data quality transform.
How to use Data Quality Transformation?
Step 1 − Go to Object Library → Transform tab

Step 2 − Expand the Data Quality transform and add the transform or transform configuration you want to add to data flow.
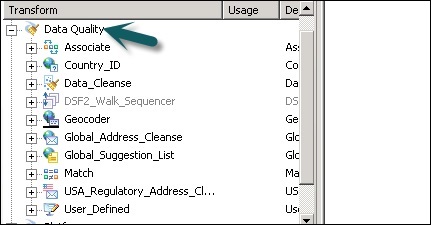
Step 3 − Draw the data flow connections. Double click the name of the transform, it opens the transform editor. In input schema, select the input fields that you want to map.
Note − To use Associate Transform, you can add user defined fields to input tab.
Text Data Processing Transform
Text Data Processing Transform allows you to extract the specific information from large volume of text. You can search for facts and entities like customer, product, and financial facts, specific to an organization.
This transform also checks the relationship between entities and allows the extraction. The data extracted, using text data processing, can be used in Business Intelligence, Reporting, query, and analytics.
Entity Extraction Transform
In Data Services, text data processing is done with the help of Entity Extraction, which extracts entities and facts from unstructured data.
This involves analyzing and processing large volume of text data, searching entities, assigning them to appropriate type and presenting metadata in standard format.
The Entity Extraction transform can extract information from any text, HTML, XML, or certain binary-format (such as PDF) content and generate structured output. You can use the output in several ways based on your work flow. You can use it as an input to another transform or write to multiple output sources such as a database table or a flat file. The output is generated in UTF-16 encoding.
Entity Extract Transform can be used in the following scenarios −
Finding a specific information from large amount of text volume.
Finding structured information from unstructured text with existing information to make new connections.
Reporting and analysis for product quality.
Differences between TDP and Data Cleansing
Text data processing is used for finding relevant information from unstructured text data. However, data cleansing is used for standardization and cleansing structured data.
| Parameters | Text Data Processing | Data Cleansing |
|---|---|---|
| Input Type | Unstructured Data | Structured Data |
| Input Size | More than 5KB | Less than 5KB |
| Input Scope | Broad domain with many variations | Limited variations |
| Potential Usage | Potential meaningful information from unstructured data | Quality of data for storing in to Repository |
| Output | Create annotations in form of entities, type, etc. Input is not changed | Create standardized fields, Input is changed |
SAP BODS - Data Services Overview
Data Services administration includes creating real time and batch jobs, scheduling jobs, embedded data flow, variables and parameters, recovery mechanism, data profiling, Performance tuning, etc.
Real Time Jobs
You can create real time jobs to process real time messages in Data Services designer. Like a batch job, real time job extracts the data, transforms and loads it.
Each real time job can extract data from a single message. You can also extract data from other sources like tables or files.
Real time jobs are not executed with the help of triggers unlike batch jobs. They are executed as real time services by administrators. Real time services wait for messages from access server. Access server receives this message and passes it to real time services, which is configured to process the message type. Real time services execute the message and returns the result and continues to process the messages until they get an instruction to stop executing.
Real Time vs Batch Jobs
Transforms like the branches and control logic are used more often in real time job, which is not the case with batch jobs in designer.
Real time jobs are not executed in response of a schedule or internal trigger unlike the batch jobs.
Creating Real Time Jobs
Real time jobs can be created using same objects like data flows, work flows, loops, conditionals, scripts, etc.
You can use the following data models for creating real time jobs −
- Single data flow model
- Multiple data flow model
Single data flow model
You can create a real time job with single data flow in its real time processing loop and it includes a single message source and single message target.
Creating Real Time job using single data model −
To create Real Time job using single data model, follow the given steps.
Step 1 − Go to Data Services Designer → Project New → Project → Enter the Project Name
Step 2 − Right click on the white space in Project area → New Real time job.

Workspace shows two components of Real time job −
- RT_Process_begins
- Step_ends
It shows the beginning and the end of real time job.
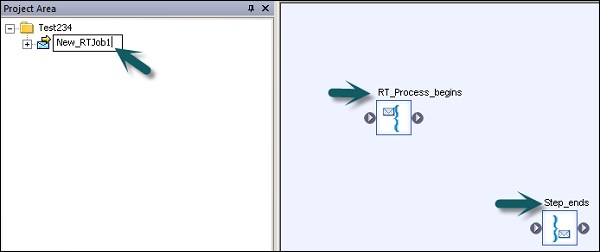
Step 3 − To create a real time job with single data flow, select data flow from the tool palette on the right pane and drag it to the work space.
Click inside the loop, you can use one message source and one message target in real time processing loop. Connect the starting and the end marks to the data flow.
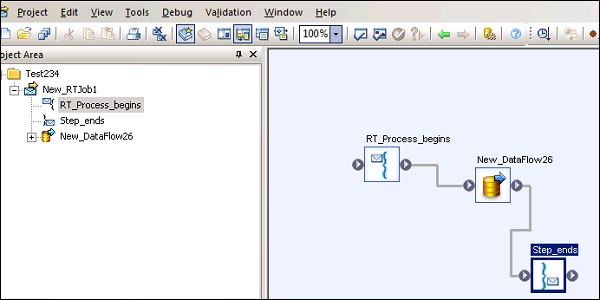
Step 4 − Add configure objects in data flow as required and save the job.
Multiple data flow model
This allows you to create a real time job with multiple data flow in its real time processing loop. You also need to ensure that the data in each data model is fully processed before it moves to the next message.
Testing Real Time Jobs
You can test the real time job by passing the sample message as source message from the file. You can check if the Data Services generate the expected target message.
To ensure that your job gives you the expected result, you can execute the job in view data mode. Using this mode, you can capture output data to make sure that your real time job is working fine.
Embedded Data Flows
Embedded data flow is known as data flows, which are called from another data flow in the design. The embedded data flow can contain multiple number of source and targets but only one input or output pass data to main data flow.
The following types of embedded data flows can be used −
One Input − Embedded data flow is added at the end of dataflow.
One Output − Embedded data flow is added at the beginning of a data flow.
No input or output − Replicate an existing data flow.
Embedded data flow can be used for the following purpose −
To simplify the data flow display.
If you want to save the flow logic and reuse it in other data flows.
For debugging, wherein you create sections of data flow as embedded data flow and execute them separately.
SAP BODS - Creating Embedded Dataflow
You can select an object in the existing data flow. There are two ways in which embedded Data Flow can be created.
Option 1
Right click on the object and select to make it Embedded Data flow.
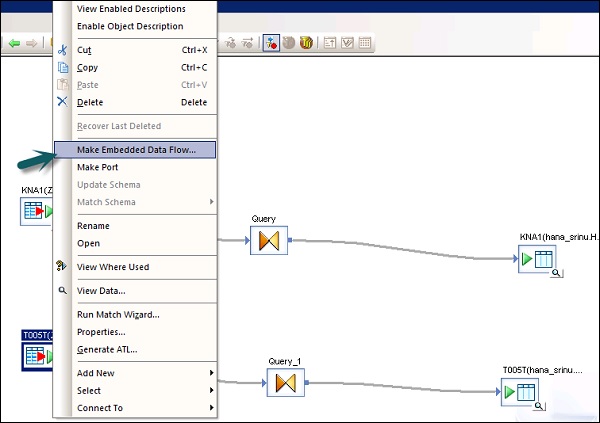
Option 2
Drag the complete and validate data flow from object library into an open data flow in the work space. Next, open the data flow that has been created. Select the object you want to use as the input and output port and click make port for that object.
Data Services add that object as connection point for embedded data flow.
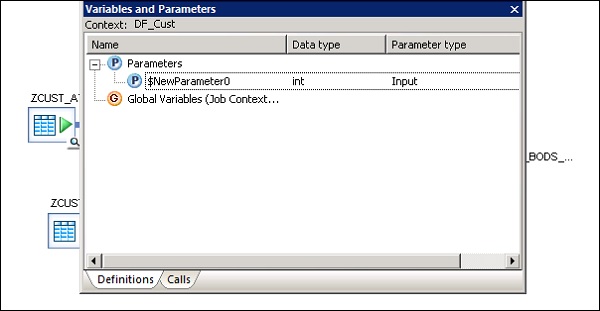
Variables and Parameters
You can use local and global variables with data flow and work flow, which provide more flexibility in designing jobs.
The key features are −
Data type of a variable can be a number, integer, decimal, date or a text string like character.
Variables can be used in the data flows and work flows as function in the Where clause.
Local variables in data services are restricted to object in which they are created.
Global variables are restricted to jobs in which they are created. Using global variables, you can change values for default global variables at run time.
Expressions that are used in work flow and data flow are known as parameters.
All the variables and parameters in work flow and data flows are shown in variable and parameters window.
To view variables and parameters, follow the steps given below −
Go to Tools → Variables.
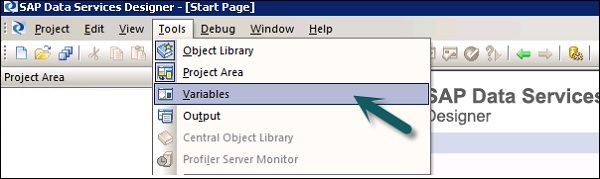
A new window Variables and parameters is displayed. It has two tabs − Definitions and Calls.
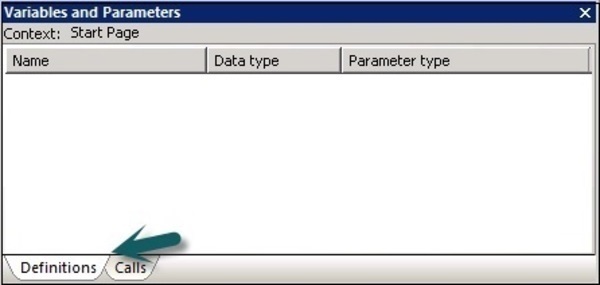
The Definitions tab allows you to create and view variables and parameters. You can use local variables and parameters at work flow and data flow level. Global variables can be used at job level.
Job |
Local variables Global variables |
A script or conditional in the job Any object in the job |
Work flow |
Local variables Parameters |
This work flow or passed down to other work flows or data flows using a parameter. Parent objects to pass local variables. Work flows may also return variables or parameters to parent objects. |
Data flow |
Parameters |
A WHERE clause, column mapping, or a function in the dataflow. Data flow. Data flows cannot return output values. |
In the call tab, you can see the name of the parameter defined for all objects in a parent object’s definition.
Defining Local Variable
To define the Local Variable, Open the Real time job.
Step 1 − Go to Tools → Variables. A new Variables and Parameters window will open.
Step 2 − Go to Variable → Right click → Insert
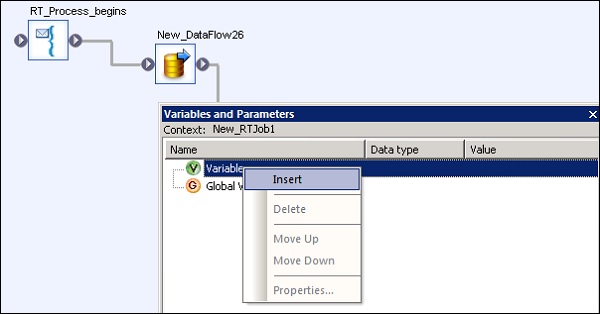
It will create a new parameter $NewVariable0.
Step 3 − Enter the name of the new variable. Select the data type from the list.
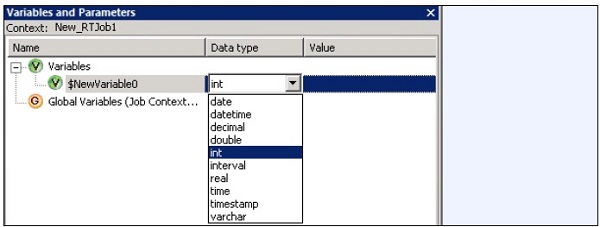
Once it is defined, close the window. In a similar way, you can define the parameters for data flow and work flow.
Debugging & Recovery Mechanism
In case your job does not run successfully, you should fix the error and rerun the job. In case of failed jobs, there is a possibility that some tables have been loaded, altered or partially loaded. You need to rerun the job to get all the data and to remove any duplicate or missing data.
Two techniques that can be used for recovery are as follows −
Automatic Recovery − This allows you to run unsuccessful jobs in recovery mode.
Manually Recovery − This allows you to rerun the jobs without considering partial rerun previous time.
To run a job with Recovery option enabled in Designer
Step 1 − Right Click on job name → Execute.
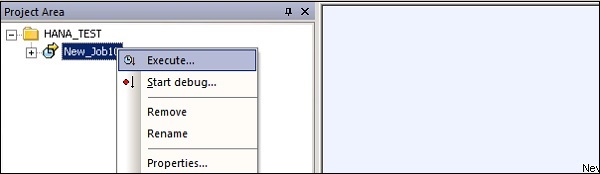
Step 2 − Save all changes and Execute → Yes.
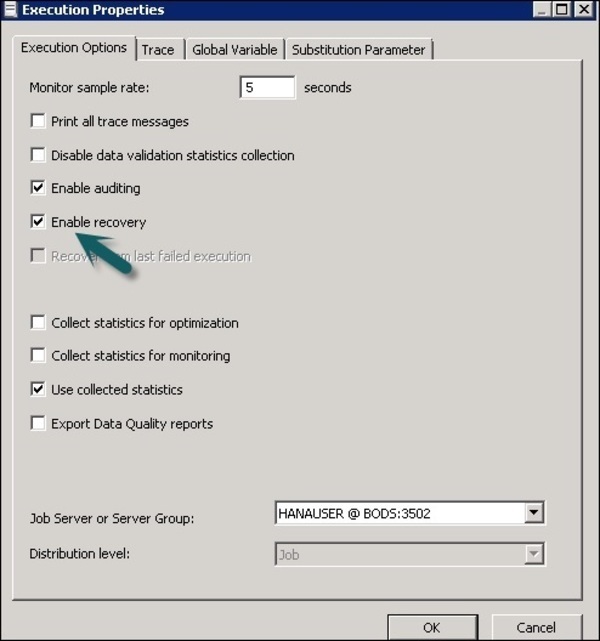
Step 3 − Go to the Execution tab → Enable Recovery check box. If this box is not checked, Data services will not recover the job, if it fails.
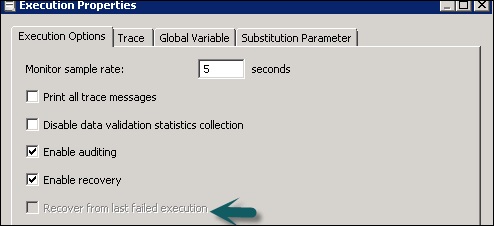
To run a job in Recovery mode from Designer
Step 1 − Right click and execute the job as above. Save changes.
Step 2 − Go to the Execution Options. You have to ensure that the option Recover from last failed execution box is checked.
Note − This option is not enabled, if a job is not yet executed. This is known as Automatic recovery of a failed job.
Data Assessment & Data Profiling
Data Services Designer provides a feature of Data Profiling to ensure and improve the quality and structure of source data.
Data Profiler allows you to −
Find anomalies in source data, validation and corrective action and quality of source data.
Define the structure and relationship of source data for better execution of jobs, work flows and data flows.
Find the content of source and target system to determine that your job returns an expected result.
Data Profiler provides the following information of Profiler server execution −
Column Analysis
Basic Profiling − Includes information like min, max, avg, etc.
Detailed Profiling − Includes information like distinct count, distinct percent, median, etc.
Relationship Analysis
Data anomalies between two columns for which you define a relationship.
Data profiling feature can be used on data from the following data sources −
- SQL Server
- Oracle
- DB2
- Attunity Connector
- Sybase IQ
- Teradata
Connecting to Profiler Server
To connect to a Profile Server −
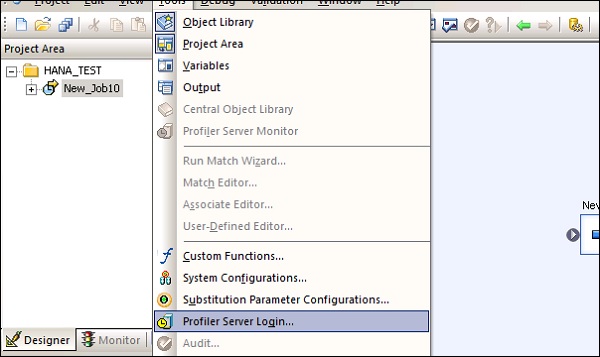
Step 1 − Go to Tools → Profiler Server Login
Step 2 − Enter the details such as System, User Name, Password and Authentication.
Step 3 − Click the Log on button.
When you are connected, a list of profiler repositories will be displayed. Select Repository and click Connect.
SAP BODS - Tuning Techniques
The performance of an ETL job depends on the system on which you are using Data Services software, number of moves, etc.
There are various other factors that contribute to the performance in an ETL task. They are −
Source Data Base − Source database should be set to perform the Select statements quickly. This can be done by increasing the size of database I/O, increasing the size of the shared buffer to cache more data and not allowing parallel for small tables, etc.
Source Operating System − Source Operating System should be configured to read the data quickly from the disks. Set the read ahead protocol to 64KB.
Target Database − Target Database must be configured to perform INSERT and UPDATE quickly. This can be done by −
- Disabling the Archive logging.
- Disabling the Redo logging for all tables.
- Maximizing the size of the shared buffer.
Target Operating System − Target Operating System has to be configured in order to write the data to the disks quickly. You can turn on asynchronous I/O to make the Input/output operations as fast as possible.
Network − Network bandwidth should be enough to transfer the data from source to target system.
BODS Repository Database − To improve the performance of BODS jobs, the following can be performed −
Monitor Sample Rate − In case you are processing a large amount of data set in an ETL job, monitor Sample Rate to a higher value to reduce the number of I/O calls to the log file thereby improving the performance.
You can also exclude the Data Services logs from the virus scan if the virus scan is configured on the job server as it can cause a performance degradation
Job Server OS − In Data Services, one data flow in a job initiates one ‘al_engine’ process, which initiates four threads. For maximum performance, consider a design that runs one ‘al_engine’ process per CPU at a time. The Job Server OS should be tuned in such a way that all the threads are spread to all the available CPUs.
SAP BODS - Central vs Local Repository
SAP BO Data Services support multiuser development where each user can work on an application in their own local repository. Each team uses central repository to save the main copy of an application and all the versions of the objects in the application.
The key features are −
In SAP Data Services, you can create a central repository for storing team copy of an application. It contains all the information that is also available in local repository. However, it just provides a storage location for the object information. To make any changes, you should need to work in local repository.
You can copy objects from central repository to local repository. However, if you have to make any changes, you need to check out that object in central repository. Due to this, the other users cannot check out that object in central repository and hence, they cannot make changes to the same object.
Once you make the changes to the object, you need to check in for the object. It allows Data Services to save new modified object in central repository.
Data Services allow multiple user with local repositories to connect to the central repository at the same time but only one user can check out and make changes to a specific object.
The central repository also maintains the history of each object. It allows you to revert to the previous version of an object, if the changes do not result as required.
Multiple Users
SAP BO Data Services allow multiple users to work on the same application at the same time. The following terms should be considered in a multi-user environment −
| Sr.No. | Multi-user & Description |
|---|---|
| 1 | Highest level object The highest level object is the object that is not a dependent of any object in the object hierarchy. For example, if Job 1 is comprised of Work Flow 1 and Data Flow 1, then Job 1 is the highest level object. |
| 2 | Object dependents Object dependents are objects associated beneath the highest level object in the hierarchy. For example, if Job 1 is comprised of Work Flow 1 which contains Data Flow 1, then both Work Flow 1 and Data Flow 1 are dependents of Job 1. Further, Data Flow 1 is a dependent of Work Flow 1. |
| 3 | Object version An object version is an instance of an object. Each time you add or check in an object to the central repository, the software creates a new version of the object. The latest version of an object is the last or most recent version created. |
To update the local repository in multiuser environment, you can get the latest copy of each object from central repository. To edit an object, you can use check out and check in option.
SAP BODS - Central Repository Security
There are various security parameters that can be applied on a central repository to make it secure.
Various security parameters are −
Authentication − This allows only authentic users to log in to the central repository.
Authorization − This allows the user to assign different level of permissions for each object.
Auditing − This is used to maintain the history of all the changes made to an object. You can check all the previous versions and revert to the older versions.
Creating Non Secure Central Repository
In a multiuser development environment, it is always advisable to work in central repository method.
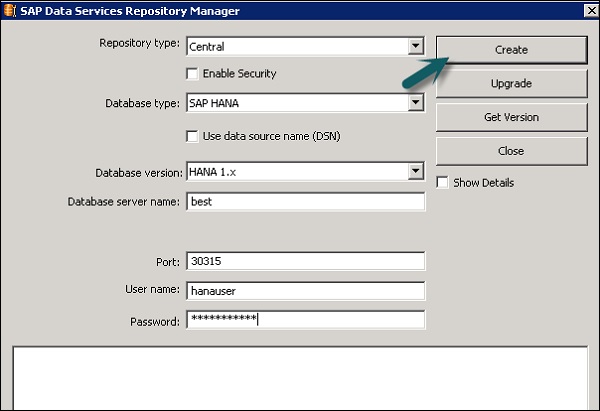
To create a non-secure central repository follow the given steps −
Step 1 − Create a database, using database management system, which will act as a central repository.
Step 2 − Go to a Repository Manager.
Step 3 − Select the Repository type as Central. Enter the database details such as User Name and Password and click Create.
Step 4 − To define a connection to the Central Repository, Tools → Central Repository.
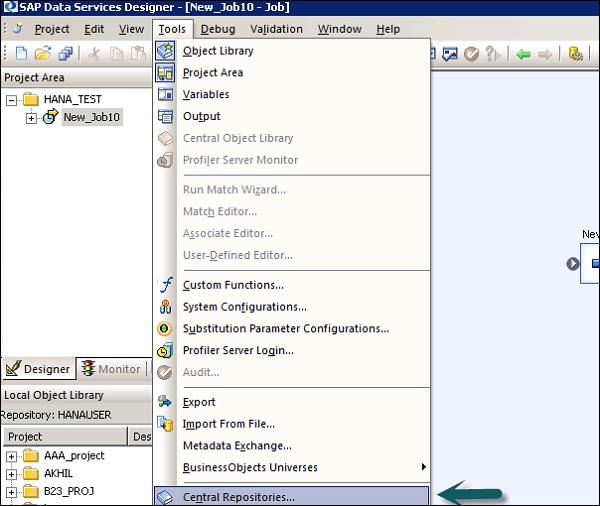
Step 5 − Select the Repository in Central Repository connection and click the Add icon.
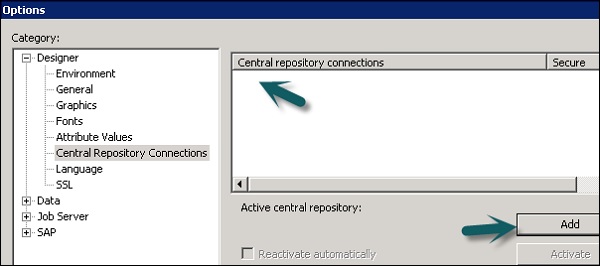
Step 6 − Enter the password for the central repository and click the Activate button.
Creating a Secure Central Repository
To create a secure Central Repository, go to the Repository Manager. Select the Repository Type as Central. Click the Enable Security Check box.
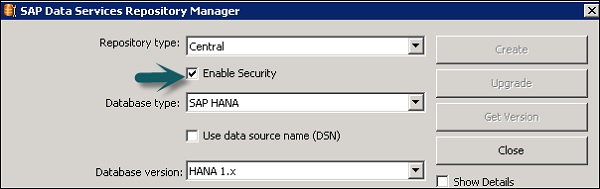
Creating a Multi-user Environment
For a successful development in the multiuser environment, it is advisable to implement some processes like check in and check out.
You can use the following processes in a multiuser environment −
- Filtering
- Checking out objects
- Undoing check out
- Checking in Objects
- Labelling Objects
Filtering is applicable when you add any objects, check in, check out and label objects to the central repository.
Migrating Multiuser Jobs
In SAP Data Services, job migration can be applied at different levels i.e. Application Level, Repository Level, Upgrade level.
You cannot copy the content of one central repository to other central repository directly; you need to make use of local repository.
The first step is to get the latest version of all objects from the central repository to the local repository. Activate the central repository in which you want to copy the contents. Add all the objects you want to copy from the local repository to the central repository.
Central Repository Migration
If you update the version of SAP Data Services, you need to update the version of Repository also.
The following points should be considered when migrating a central repository to upgrade the version −
Take a backup of the central repository of all tables and objects.
To maintain the version of objects in data services, maintain a central repository for each version. Create a new central history with new version of Data Services software and copy all the objects to this repository.
If you install a new version of Data Services, it is always recommended, you should upgrade your central repository to a new version of objects.
Upgrade your local repository to the same version, as different versions of the central and the local repository may not work at the same time.
Before migrating the central repository, check in all the objects. As you do not upgrade central and local repository simultaneously, so there is a need to check in all the objects. Once you have your central repository upgraded to a newer version, you will not be able to check in objects from the local repository, which has an older version of the Data Services.