- RxPY Tutorial
- RxPY - Home
- RxPY - Overview
- RxPY - Environment Setup
- RxPY - Latest Release Updates
- RxPY - Working with Observables
- RxPY- Operators
- RxPY - Working With Subject
- RxPY - Concurrency Using Scheduler
- RxPY - Examples
- RxPY Useful Resources
- RxPY - Quick Guide
- RxPY - Useful Resources
- RxPY - Discussion
RxPY - Quick Guide
RxPY - Overview
This chapter explains what is reactive programming, what is RxPY, its operators, features, advantages and disadvantage.
What is Reactive Programming?
Reactive programming is a programming paradigm, that deals with data flow and the propagation of change. It means that, when a data flow is emitted by one component, the change will be propagated to other components by a reactive programming library. The propagation of change will continue until it reaches the final receiver.
By using RxPY, you have good control on the asynchronous data streams, for example, a request made to URL can be traced by using observable, and use the observer to listen to when the request is complete for response or error.
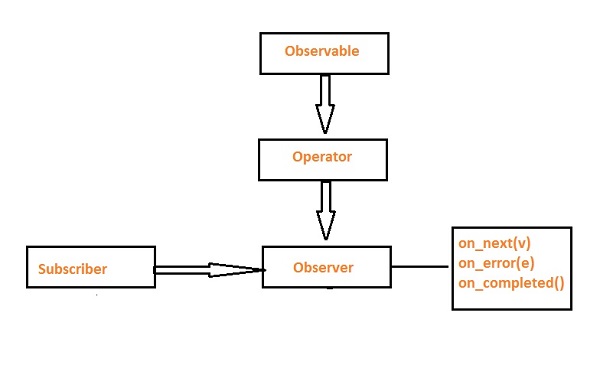
RxPY offers you to handle asynchronous data streams using Observables, query the data streams using Operators i.e. filter, sum, concat, map and also make use of concurrency for the data streams using Schedulers. Creating an Observable, gives an observer object with on_next(v), on_error(e) and on_completed() methods, that needs to be subscribed so that we get a notification when an event occurs.
The Observable can be queried using multiple operators in a chain format by using the pipe operator.
RxPY offers operators in various categories like:−
Mathematical operators
Transformation operators
Filtering operators
Error handling operators
Utility operators
Conditional operators
Creation operators
Connectable operators
These operators are explained in detail in this tutorial.
What is RxPy?
RxPY is defined as a library for composing asynchronous and event-based programs using observable collections and pipable query operators in Python as per the official website of RxPy, which is https://rxpy.readthedocs.io/en/latest/.
RxPY is a python library to support Reactive Programming. RxPy stands for Reactive Extensions for Python. It's a library that uses observables to work with reactive programming that deals with asynchronous data calls, callbacks and event−based programs.
Features of RxPy
In RxPy, following concepts take care of handling the asynchronous task −
Observable
An observable is a function that creates an observer and attaches it to the source having data streams that are expected from, for example, Tweets, computer−related events, etc.
Observer
It is an object with on_next(), on_error() and on_completed() methods, that will get called when there is interaction with the observable i.e. the source interacts for an example incoming Tweets, etc.
Subscription
When the observable is created, to execute the observable we need to subscribe to it.
Operators
An operator is a pure function that takes in observable as input and the output is also an observable. You can use multiple operators on an observable data by using the pipe operator.
Subject
A subject is an observable sequence as well as an observer that can multicast, i.e. talk to many observers that have subscribed. The subject is a cold observable, i.e. the values will be shared between the observers that have been subscribed.
Schedulers
One important feature of RxPy is concurrency i.e. to allow the task to execute in parallel. To make that happen RxPy has two operators subscribe_on() and observe_on() that works with schedulers and will decide the execution of the subscribed task.
Advantages of using RxPY
The following are the advantages of RxPy −
RxPY is an awesome library when it comes to the handling of async data streams and events. RxPY uses observables to work with reactive programming that deals with asynchronous data calls, callbacks and event-based programs.
RxPY offers a huge collection of operators in mathematical, transformation, filtering, utility, conditional, error handling, join categories that makes life easy when used with reactive programming.
Concurrency i.e. working of multiple tasks together is achieved using schedulers in RxPY.
The performance is improved using RxPY as handling of async task and parallel processing is made easy.
Disadvantage of using RxPY
Debugging the code with observables is a little difficult.
RxPY - Environment Setup
In this chapter, we will work on the installation of RxPy. To start working with RxPY, we need to install Python first. So, we are going to work on the following −
- Install Python
- Install RxPy
Installing Python
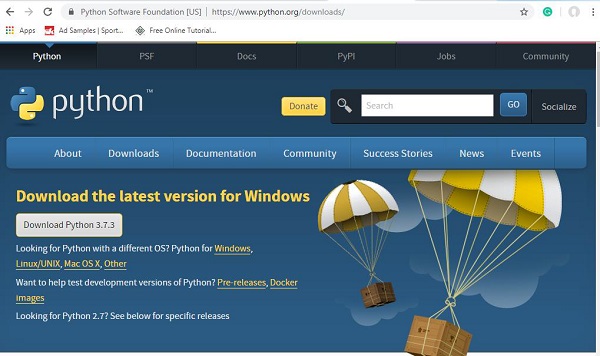
Go to the Python official site: https://www.python.org/downloads/. as shown below, and click on the latest version available for Windows, Linux/Unix, and mac os. Download Python as per your 64 or 32-bit OS available with you.
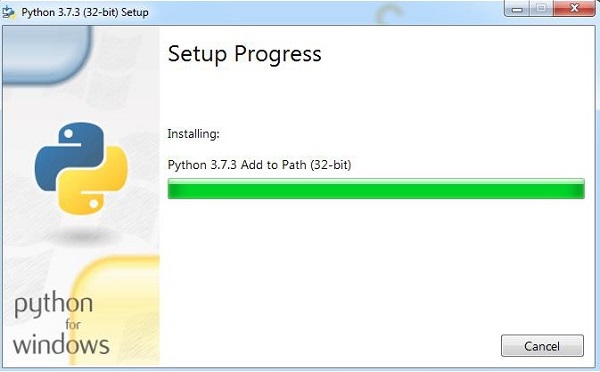
Once you have downloaded, click on the .exe file and follow the steps to install python on your system.
The python package manager, i.e. pip will also get installed by default with the above installation. To make it work globally on your system, directly add the location of python to the PATH variable, the same is shown at the start of the installation, to remember to check the checkbox, which says ADD to PATH. In case, you forget to check it, please follow the below given steps to add to PATH.
To add to PATH follow the below steps −
Right-click on your Computer icon and click on properties → Advanced System Settings.
It will display the screen as shown below −

Click on Environment Variables as shown above. It will display the screen as shown below −
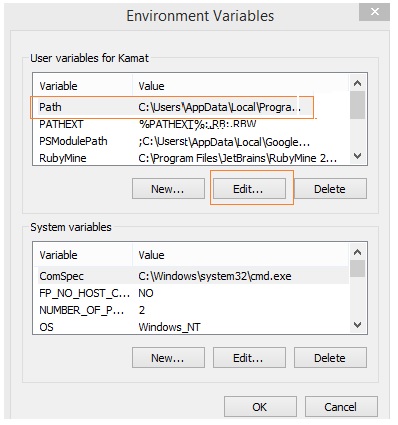
Select Path and click on Edit button, add the location path of your python at the end. Now, let’s check the python version.
Checking for python version
E:\pyrx>python --version
Python 3.7.3
Install RxPY
Now, that we have python installed, we are going to install RxPy.
Once python is installed, python package manager, i.e. pip will also get installed. Following is the command to check pip version −
E:\pyrx>pip --version
pip 19.1.1 from c:\users\xxxx\appdata\local\programs\python\python37\lib\site-
packages\pip (python 3.7)
We have pip installed and the version is 19.1.1. Now, we will use pip to install RxPy
The command is as follows −
pip install rx

RxPY - Latest Release Updates
In this tutorial, we are using RxPY version 3 and python version 3.7.3. The working of RxPY version 3 differs a little bit with the earlier version, i.e. RxPY version 1.
In this chapter, we are going to discuss the differences between the 2 versions and changes that need to be done in case you are updating Python and RxPY versions.
Observable in RxPY
In RxPy version 1, Observable was a separate class −
from rx import Observable
To use the Observable, you have to use it as follows −
Observable.of(1,2,3,4,5,6,7,8,9,10)
In RxPy version 3, Observable is directly a part of the rx package.
Example
import rx
rx.of(1,2,3,4,5,6,7,8,9,10)
Operators in RxPy
In version 1, the operator was methods in the Observable class. For example, to make use of operators we have to import Observable as shown below −
from rx import Observable
The operators are used as Observable.operator, for example, as shown below −
Observable.of(1,2,3,4,5,6,7,8,9,10)\
   .filter(lambda i: i %2 == 0) \
   .sum() \
   .subscribe(lambda x: print("Value is {0}".format(x)))
In the case of RxPY version 3, operators are function and are imported and used as follows −
import rx
from rx import operators as ops
rx.of(1,2,3,4,5,6,7,8,9,10).pipe(
   ops.filter(lambda i: i %2 == 0),
   ops.sum()
).subscribe(lambda x: print("Value is {0}".format(x)))
Chaining Operators Using Pipe() method
In RxPy version 1, in case you had to use multiple operators on an observable, it had to be done as follows −
Example
from rx import Observable
Observable.of(1,2,3,4,5,6,7,8,9,10)\
   .filter(lambda i: i %2 == 0) \
   .sum() \
   .subscribe(lambda x: print("Value is {0}".format(x)))
But, in case of RxPY version 3, you can use pipe() method and multiple operators as shown below −
Example
import rx
from rx import operators as ops
rx.of(1,2,3,4,5,6,7,8,9,10).pipe(
   ops.filter(lambda i: i %2 == 0),
   ops.sum()
).subscribe(lambda x: print("Value is {0}".format(x)))
RxPY - Working With Observables
An observable, is a function that creates an observer and attaches it to the source where values are expected, for example, clicks, mouse events from a dom element, etc.
The topics mentioned below will be studied in detail in this chapter.
Create Observables
Subscribe and Execute an Observable
Create observables
To create an observable we will use create() method and pass the function to it that has the following items.
on_next() − This function gets called when the Observable emits an item.
on_completed() − This function gets called when the Observable is complete.
on_error() − This function gets called when an error occurs on the Observable.
To work with create() method first import the method as shown below −
from rx import create
Here is a working example, to create an observable −
testrx.py
from rx import create
deftest_observable(observer, scheduler):
   observer.on_next("Hello")
   observer.on_error("Error")
   observer.on_completed()
source = create(test_observable).
Subscribe and Execute an Observable
To subscribe to an observable, we need to use subscribe() function and pass the callback function on_next, on_error and on_completed.
Here is a working example −
testrx.py
from rx import create
deftest_observable(observer, scheduler):
   observer.on_next("Hello")
   observer.on_completed()
source = create(test_observable)
source.subscribe(
   on_next = lambda i: print("Got - {0}".format(i)),
   on_error = lambda e: print("Error : {0}".format(e)),
   on_completed = lambda: print("Job Done!"),
)
The subscribe() method takes care of executing the observable. The callback function on_next, on_error and on_completed has to be passed to the subscribe method. Call to subscribe method, in turn, executes the test_observable() function.
It is not mandatory to pass all three callback functions to the subscribe() method. You can pass as per your requirements the on_next(), on_error() and on_completed().
The lambda function is used for on_next, on_error and on_completed. It will take in the arguments and execute the expression given.
Here is the output, of the observable created −
E:\pyrx>python testrx.py
Got - Hello
Job Done!
RxPY - Operators
This chapter explains about the operators in RxPY in detail. These operators include −
- Working with Operators
- Mathematical operators
- Transformation operators
- Filtering operators
- Error handling operators
- Utility operators
- Conditional operators
- Creation operators
- Connectable operators
- Combining operators
Reactive (Rx) python has almost lots of operators, that make life easy with python coding. You can use these multiple operators together, for example, while working with strings you can use map, filter, merge operators.
Working with Operators
You can work with multiple operators together using pipe() method. This method allows chaining multiple operators together.
Here, is a working example of using operators −
test = of(1,2,3) // an observable
subscriber = test.pipe(
   op1(),
   op2(),
   op3()
)
In the above example, we have created an observable using of() method that takes in values 1, 2 and 3. Now, on this observable, you can perform a different operation, using any numbers of operators using pipe() method as shown above. The execution of operators will go on sequentially on the observable given.
To work with operators, first import it as shown below −
from rx import of, operators as op
Here, is a working example −
testrx.py
from rx import of, operators as op
test = of(1, 2, 3, 4, 5, 6, 7, 8, 9, 10)
sub1 = test.pipe(
   op.filter(lambda s: s%2==0),
   op.reduce(lambda acc, x: acc + x)
)
sub1.subscribe(lambda x: print("Sum of Even numbers is {0}".format(x)))
In the above example, there is a list of numbers, from which we are filtering even numbers using a filter operator and later adding it using a reduce operator.
Output
E:\pyrx>python testrx.py
Sum of Even numbers is 30
Here is a list of Operators, that we are going to discuss −
- Creating Observables
- Mathematical operators
- Transformation operators
- Filtering operators
- Error handling operators
- Utility operators
- Conditional
- Connectable
- Combining operators
Creating Observables
Following are the observables, we are going to discuss in Creation category
| Observable | Description |
|---|---|
| create | This method is used to create an observable. |
| empty | This observable will not output anything and directly emit the complete state. |
| never | This method creates an observable that will never reach the complete state. |
| throw | This method will create an observable that will throw an error. |
| from_ | This method will convert the given array or object into an observable. |
| interval | This method will give a series of values produced after a timeout. |
| just | This method will convert given value into an observable. |
| range | This method will give a range of integers based on the input given. |
| repeat_value | This method will create an observable that will repeat the given value as per the count is given. |
| start | This method takes in a function as an input and returns an observable that will return value from the input function. |
| timer | This method will emit the values in sequence after the timeout is done. |
Mathematical operators
The operators we are going to discuss in Mathematical operator category are as follows: −
| Operator | Description |
|---|---|
| average | This operator will calculate the average from the source observable given and output an observable that will have the average value. |
| concat | This operator will take in two or more observables and given a single observable with all the values in the sequence. |
| count | This operator takes in an Observable with values and converts it into an Observable that will have a single value. The count function takes in predicate function as an optional argument. The function is of type boolean and will add value to the output only if it satisfies the condition. |
| max | This operator will give an observable with max value from the source observable. |
| min | This operator will give an observable with min value from the source observable. |
| reduce | This operator takes in a function called accumulator function that is used on the values coming from the source observable, and it returns the accumulated values in the form of an observable, with an optional seed value passed to the accumulator function. |
| sum | This operator will return an observable with the sum of all the values from source observables. |
Transformation operators
The operators we are going to discuss in the Transformation operator category are mentioned below −
| Operator | Category |
|---|---|
| buffer | This operator will collect all the values from the source observable, and emit them at regular intervals once the given boundary condition is satisfied. |
| ground_by | This operator will group the values coming from the source observable based on the key_mapper function given. |
| map | This operator will change each value from the source observable into a new value based on the output of the mapper_func given. |
| scan | This operator will apply an accumulator function to the values coming from the source observable and return an observable with new values. |
Filtering operators
The operators we are going to discuss in Filtering operator category are given below −
| Operator | Category |
|---|---|
| debounce | This operator will give the values from the source observable, until the timespan given and ignore the rest of the time passes. |
| distinct | This operator will give all the values that are distinct from the source observable. |
| element_at | This operator will give an element from the source observable for the index given. |
| filter | This operator will filter values from the source observable based on the predicate function given. |
| first | This operator will give the first element from the source observable. |
| ignore_elements | This operator will ignore all the values from the source observable and only execute calls to complete or error callback functions. |
| last | This operator will give the last element from the source observable. |
| skip | This operator will give back an observable that will skip the first occurrence of count items taken as input. |
| skip_last | This operator will give back an observable that will skip the last occurrence of count items taken as input. |
| take | This operator will give a list of source values in continuous order based on the count given. |
| take_last | This operator will give a list of source values in continuous order from last based on the count given. |
Error handling operators
The operators we are going to discuss in the Error handling operator category are: -
| Operator | Description |
|---|---|
| catch | This operator will terminate the source observable when there is an exception. |
| retry | This operator will retry on the source observable when there is an error and once the retry count is done it will terminate. |
Utility operators
The following are the operators we are going to discuss in the Utility operator category.
| Operator | Description |
|---|---|
| delay | This operator will delay the source observable emission as per the time or date is given. |
| materialize | This operator will convert the values from the source observable with the values emitted in the form of explicit notification values. |
| time_interval | This operator will give the time elapsed between the values from the source observable. |
| timeout | This operator will give all the values from the source observable after the elapsed time or else will trigger an error. |
| timestamp | This operator will attach a timestamp to all the values from the source observable. |
Conditional and Boolean operators
The operators we are going to discuss in Conditional and Boolean Operator category are as given below −
| Operator | Description |
|---|---|
| all | This operator will check if all the values from the source observable satisfy the condition given. |
| contains | This operator will return an observable with the value true or false if the given value is present and if it is the value of the source observable. |
| default_if_empty | This operator will return a default value if the source observable is empty. |
| sequence_equal | This operator will compare two sequences of observables or an array of values and return an observable with the value true or false. |
| skip_until | This operator will discard values from the source observable until the second observable emits a value. |
| skip_while | This operator will return an observable with values from the source observable that satisfies the condition passed. |
| take_until | This operator will discard values from the source observable after the second observable emits a value or is terminated. |
| take_while | This operator will discard values from the source observable when the condition fails. |
Connectable Operators
The operators we are going to discuss in Connectable Operator category are −
| Operator | Description |
|---|---|
| publish | This method will convert the observable into a connectable observable. |
| ref_count | This operator will make the observable a normal observable. |
| replay | This method works similar to the replaySubject. This method will return the same values, even if the observable has already emitted and some of the subscribers are late in subscribing. |
Combining Operators
The following are the operators we are going to discuss in the Combining operator category.
| Operator | Description |
|---|---|
| combine_latest | This operator will create a tuple for the observable given as input. |
| merge | This operator will merge given observables. |
| start_with | This operator will take in the given values and add at the start of the source observable return back the full sequence. |
| zip | This operator returns an observable with values in a tuple form which is formed by taking the first value of the given observable and so on. |
RxPY - Working With Subject
A subject is an observable sequence, as well as, an observer that can multicast, i.e. talk to many observers that have subscribed.
We are going to discuss the following topics on subject −
- Create a subject
- Subscribe to a subject
- Passing data to subject
- BehaviorSubject
- ReplaySubject
- AsyncSubject
Create a subject
To work with a subject, we need to import Subject as shown below −
from rx.subject import Subject
You can create a subject-object as follows −
subject_test = Subject()
The object is an observer that has three methods −
- on_next(value)
- on_error(error) and
- on_completed()
Subscribe to a Subject
You can create multiple subscription on the subject as shown below −
subject_test.subscribe(
   lambda x: print("The value is {0}".format(x))
)
subject_test.subscribe(
   lambda x: print("The value is {0}".format(x))
)
Passing Data to Subject
You can pass data to the subject created using the on_next(value) method as shown below −
subject_test.on_next("A")
subject_test.on_next("B")
The data will be passed to all the subscription, added on the subject.
Here, is a working example of the subject.
Example
from rx.subject import Subject
subject_test = Subject()
subject_test.subscribe(
   lambda x: print("The value is {0}".format(x))
)
subject_test.subscribe(
   lambda x: print("The value is {0}".format(x))
)
subject_test.on_next("A")
subject_test.on_next("B")
The subject_test object is created by calling a Subject(). The subject_test object has reference to on_next(value), on_error(error) and on_completed() methods. The output of the above example is shown below −
Output
E:\pyrx>python testrx.py
The value is A
The value is A
The value is B
The value is B
We can use the on_completed() method, to stop the subject execution as shown below.
Example
from rx.subject import Subject
subject_test = Subject()
subject_test.subscribe(
   lambda x: print("The value is {0}".format(x))
)
subject_test.subscribe(
   lambda x: print("The value is {0}".format(x))
)
subject_test.on_next("A")
subject_test.on_completed()
subject_test.on_next("B")
Once we call complete, the next method called later is not invoked.
Output
E:\pyrx>python testrx.py
The value is A
The value is A
Let us now see, how to call on_error(error) method.
Example
from rx.subject import Subject
subject_test = Subject()
subject_test.subscribe(
   on_error = lambda e: print("Error : {0}".format(e))
)
subject_test.subscribe(
   on_error = lambda e: print("Error : {0}".format(e))
)
subject_test.on_error(Exception('There is an Error!'))
Output
E:\pyrx>python testrx.py
Error: There is an Error!
Error: There is an Error!
BehaviorSubject
BehaviorSubject will give you the latest value when called. You can create behavior subject as shown below −
from rx.subject import BehaviorSubject
behavior_subject = BehaviorSubject("Testing Behaviour Subject"); // initialized the behaviour subject with value:Testing Behaviour Subject
Here, is a working example to use Behaviour Subject
Example
from rx.subject import BehaviorSubject
behavior_subject = BehaviorSubject("Testing Behaviour Subject");
behavior_subject.subscribe(
   lambda x: print("Observer A : {0}".format(x))
)
behavior_subject.on_next("Hello")
behavior_subject.subscribe(
   lambda x: print("Observer B : {0}".format(x))
)
behavior_subject.on_next("Last call to Behaviour Subject")
Output
E:\pyrx>python testrx.py
Observer A : Testing Behaviour Subject
Observer A : Hello
Observer B : Hello
Observer A : Last call to Behaviour Subject
Observer B : Last call to Behaviour Subject
Replay Subject
A replaysubject is similar to behavior subject, wherein, it can buffer the values and replay the same to the new subscribers. Here, is a working example of replay subject.
Example
from rx.subject import ReplaySubject
replay_subject = ReplaySubject(2)
replay_subject.subscribe(lambda x: print("Testing Replay Subject A: {0}".format(x)))
replay_subject.on_next(1)
replay_subject.on_next(2)
replay_subject.on_next(3)
replay_subject.subscribe(lambda x: print("Testing Replay Subject B: {0}".format(x)));
replay_subject.on_next(5)
The buffer value used is 2 on the replay subject. So, the last two values will be buffered and used for the new subscribers called.
Output
E:\pyrx>python testrx.py
Testing Replay Subject A: 1
Testing Replay Subject A: 2
Testing Replay Subject A: 3
Testing Replay Subject B: 2
Testing Replay Subject B: 3
Testing Replay Subject A: 5
Testing Replay Subject B: 5
AsyncSubject
In the case of AsyncSubject, the last value called is passed to the subscriber, and it will be done only after the complete() method is called.
Example
from rx.subject import AsyncSubject
async_subject = AsyncSubject()
async_subject.subscribe(lambda x: print("Testing Async Subject A: {0}".format(x)))
async_subject.on_next(1)
async_subject.on_next(2)
async_subject.on_completed()
async_subject.subscribe(lambda x: print("Testing Async Subject B: {0}".format(x)))
Here, before complete is called, the last value passed to the subject is 2, and the same is given to the subscribers.
Output
E:\pyrx>python testrx.py
Testing Async Subject A: 2
Testing Async Subject B: 2
RxPY - Concurrency Using Scheduler
One important feature of RxPy is concurrency, i.e. to allow the task to execute in parallel. To make that happen, we have two operators subscribe_on() and observe_on() that will work with a scheduler, that will decide the execution of the subscribed task.
Here, is a working example, that shows the need for subscibe_on(), observe_on() and scheduler.
Example
import random
import time
import rx
from rx import operators as ops
def adding_delay(value):
   time.sleep(random.randint(5, 20) * 0.1)
   return value
# Task 1
rx.of(1,2,3,4,5).pipe(
   ops.map(lambda a: adding_delay(a))
).subscribe(
   lambda s: print("From Task 1: {0}".format(s)),
   lambda e: print(e),
   lambda: print("Task 1 complete")
)
# Task 2
rx.range(1, 5).pipe(
   ops.map(lambda a: adding_delay(a))
).subscribe(
   lambda s: print("From Task 2: {0}".format(s)),
   lambda e: print(e),
   lambda: print("Task 2 complete")
)
input("Press any key to exit\n")
In the above example, I have 2 tasks: Task 1 and Task 2. The execution of the task is in sequence. The second task starts only, when the first task is done.
Output
E:\pyrx>python testrx.py
From Task 1: 1
From Task 1: 2
From Task 1: 3
From Task 1: 4
From Task 1: 5
Task 1 complete
From Task 2: 1
From Task 2: 2
From Task 2: 3
From Task 2: 4
Task 2 complete
RxPy supports many Scheduler, and here, we are going to make use of ThreadPoolScheduler. ThreadPoolScheduler mainly will try to manage with the CPU threads available.
In the example, we have seen earlier, we are going to make use of a multiprocessing module that will give us the cpu_count. The count will be given to the ThreadPoolScheduler that will manage to get the task working in parallel based on the threads available.
Here, is a working example −
import multiprocessing
import random
import time
from threading import current_thread
import rx
from rx.scheduler import ThreadPoolScheduler
from rx import operators as ops
# calculate cpu count, using which will create a ThreadPoolScheduler
thread_count = multiprocessing.cpu_count()
thread_pool_scheduler = ThreadPoolScheduler(thread_count)
print("Cpu count is : {0}".format(thread_count))
def adding_delay(value):
   time.sleep(random.randint(5, 20) * 0.1)
   return value
# Task 1
rx.of(1,2,3,4,5).pipe(
   ops.map(lambda a: adding_delay(a)),
   ops.subscribe_on(thread_pool_scheduler)
).subscribe(
   lambda s: print("From Task 1: {0}".format(s)),
   lambda e: print(e),
   lambda: print("Task 1 complete")
)
# Task 2
rx.range(1, 5).pipe(
   ops.map(lambda a: adding_delay(a)),
   ops.subscribe_on(thread_pool_scheduler)
).subscribe(
   lambda s: print("From Task 2: {0}".format(s)),
   lambda e: print(e),
   lambda: print("Task 2 complete")
)
input("Press any key to exit\n")
In the above example, I have 2 tasks and the cpu_count is 4. Since, the task is 2 and threads available with us are 4, both the task can start in parallel.
Output
E:\pyrx>python testrx.py
Cpu count is : 4
Press any key to exit
From Task 1: 1
From Task 2: 1
From Task 1: 2
From Task 2: 2
From Task 2: 3
From Task 1: 3
From Task 2: 4
Task 2 complete
From Task 1: 4
From Task 1: 5
Task 1 complete
If you see the output, both the task has started in parallel.
Now, consider a scenario, where the task is more than the CPU count i.e. CPU count is 4 and tasks are 5. In this case, we would need to check if any thread has got free after task completion, so that, it can be assigned to the new task available in the queue.
For this purpose, we can use the observe_on() operator which will observe the scheduler if any threads are free. Here, is a working example using observe_on()
Example
import multiprocessing
import random
import time
from threading import current_thread
import rx
from rx.scheduler import ThreadPoolScheduler
from rx import operators as ops
# calculate cpu count, using which will create a ThreadPoolScheduler
thread_count = multiprocessing.cpu_count()
thread_pool_scheduler = ThreadPoolScheduler(thread_count)
print("Cpu count is : {0}".format(thread_count))
def adding_delay(value):
   time.sleep(random.randint(5, 20) * 0.1)
   return value
# Task 1
rx.of(1,2,3,4,5).pipe(
   ops.map(lambda a: adding_delay(a)),
   ops.subscribe_on(thread_pool_scheduler)
).subscribe(
   lambda s: print("From Task 1: {0}".format(s)),
   lambda e: print(e),
   lambda: print("Task 1 complete")
)
# Task 2
rx.range(1, 5).pipe(
   ops.map(lambda a: adding_delay(a)),
   ops.subscribe_on(thread_pool_scheduler)
).subscribe(
   lambda s: print("From Task 2: {0}".format(s)),
   lambda e: print(e),
   lambda: print("Task 2 complete")
)
#Task 3
rx.range(1, 5).pipe(
   ops.map(lambda a: adding_delay(a)),
   ops.subscribe_on(thread_pool_scheduler)
).subscribe(
   lambda s: print("From Task 3: {0}".format(s)),
   lambda e: print(e),
   lambda: print("Task 3 complete")
)
#Task 4
rx.range(1, 5).pipe(
   ops.map(lambda a: adding_delay(a)),
   ops.subscribe_on(thread_pool_scheduler)
).subscribe(
   lambda s: print("From Task 4: {0}".format(s)),
   lambda e: print(e),
   lambda: print("Task 4 complete")
)
#Task 5
rx.range(1, 5).pipe(
   ops.map(lambda a: adding_delay(a)),
   ops.observe_on(thread_pool_scheduler)
).subscribe(
   lambda s: print("From Task 5: {0}".format(s)),
   lambda e: print(e),
   lambda: print("Task 5 complete")
)
input("Press any key to exit\n")
Output
E:\pyrx>python testrx.py
Cpu count is : 4
From Task 4: 1
From Task 4: 2
From Task 1: 1
From Task 2: 1
From Task 3: 1
From Task 1: 2
From Task 3: 2
From Task 4: 3
From Task 3: 3
From Task 2: 2
From Task 1: 3
From Task 4: 4
Task 4 complete
From Task 5: 1
From Task 5: 2
From Task 5: 3
From Task 3: 4
Task 3 complete
From Task 2: 3
Press any key to exit
From Task 5: 4
Task 5 complete
From Task 1: 4
From Task 2: 4
Task 2 complete
From Task 1: 5
Task 1 complete
If you see the output, the moment task 4 is complete, the thread is given to the next task i.e., task 5 and the same starts executing.
RxPY - Examples
In this chapter, we will discuss the following topics in detail −
- Basic Example showing the working of observable, operators, and subscribing to the observer.
- Difference between observable and subject.
- Understanding cold and hot observables.
Given below is a basic example showing the working of observable, operators, and subscribing to the observer.
Example
test.py
import requests
import rx
import json
from rx import operators as ops
def filternames(x):
   if (x["name"].startswith("C")):
      return x["name"]
   else :
      return ""
content = requests.get('https://jsonplaceholder.typicode.com/users')
y = json.loads(content.text)
source = rx.from_(y)
case1 = source.pipe(
   ops.filter(lambda c: filternames(c)),
   ops.map(lambda a:a["name"])
)
case1.subscribe(
   on_next = lambda i: print("Got - {0}".format(i)), 8. RxPy — Examples
   on_error = lambda e: print("Error : {0}".format(e)),
   on_completed = lambda: print("Job Done!"),
)
Here, is a very simple example, wherein, I am getting user data from this URL −
https://jsonplaceholder.typicode.com/users.Filtering the data, to give the names starting with "C", and later using the map to return the names only. Here is the output for the same −
E:\pyrx\examples>python test.py
Got - Clementine Bauch
Got - Chelsey Dietrich
Got - Clementina DuBuque
Job Done!
Difference between observable and subject
In this example, we will see the difference between an observable and a subject.
from rx import of, operators as op
import random
test1 = of(1,2,3,4,5)
sub1 = test1.pipe(
   op.map(lambda a : a+random.random())
)
print("From first subscriber")
subscriber1 = sub1.subscribe(lambda i: print("From sub1 {0}".format(i)))
print("From second subscriber")
subscriber2 = sub1.subscribe(lambda i: print("From sub2 {0}".format(i)))
Output
E:\pyrx>python testrx.py
From first subscriber
From sub1 1.610450821095726
From sub1 2.9567564032037335
From sub1 3.933217537811936
From sub1 4.82444905626622
From sub1 5.929414892567188
From second subscriber
From sub2 1.8573813517529874
From sub2 2.902433239469483
From sub2 3.2289868093016825
From sub2 4.050413890694411
From sub2 5.226515068012821
In the above example, every time you subscribe to the observable, it will give you new values.
Subject Example
from rx import of, operators as op
import random
from rx.subject import Subject
subject_test = Subject()
subject_test.subscribe(
   lambda x: print("From sub1 {0}".format(x))
)
subject_test.subscribe(
   lambda x: print("From sub2 {0}".format(x))
)
test1 = of(1,2,3,4,5)
sub1 = test1.pipe(
   op.map(lambda a : a+random.random())
)
subscriber = sub1.subscribe(subject_test)
Output
E:\pyrx>python testrx.py
From sub1 1.1789422863284509
From sub2 1.1789422863284509
From sub1 2.5525627903260153
From sub2 2.5525627903260153
From sub1 3.4191549324778325
From sub2 3.4191549324778325
From sub1 4.644042420199624
From sub2 4.644042420199624
From sub1 5.079896897489065
From sub2 5.079896897489065
If you see the values are shared, between both subscribers using the subject.
Understanding Cold and Hot Observables
An observable is classified as
- Cold Observables
- Hot Observables
The difference in observables will be noticed when multiple subscribers are subscribing.
Cold Observables
Cold observables, are observable that are executed, and renders data each time it is subscribed. When it is subscribed, the observable is executed and the fresh values are given.
The following example gives the understanding of cold observable.
from rx import of, operators as op
import random
test1 = of(1,2,3,4,5)
sub1 = test1.pipe(
   op.map(lambda a : a+random.random())
)
print("From first subscriber")
subscriber1 = sub1.subscribe(lambda i: print("From sub1 {0}".format(i)))
print("From second subscriber")
subscriber2 = sub1.subscribe(lambda i: print("From sub2 {0}".format(i)))
Output
E:\pyrx>python testrx.py
From first subscriber
From sub1 1.610450821095726
From sub1 2.9567564032037335
From sub1 3.933217537811936
From sub1 4.82444905626622
From sub1 5.929414892567188
From second subscriber
From sub2 1.8573813517529874
From sub2 2.902433239469483
From sub2 3.2289868093016825
From sub2 4.050413890694411
From sub2 5.226515068012821
In the above example, every time you subscribe to the observable, it will execute the observable and emit values. The values can also differ from subscriber to subscriber as shown in the example above.
Hot Observables
In the case of hot observable, they will emit the values when they are ready and will not always wait for a subscription. When the values are emitted, all the subscribers will get the same value.
You can make use of hot observable when you want values to emitted when the observable is ready, or you want to share the same values to all your subscribers.
An example of hot observable is Subject and connectable operators.
from rx import of, operators as op
import random
from rx.subject import Subject
subject_test = Subject()
subject_test.subscribe(
   lambda x: print("From sub1 {0}".format(x))
)
subject_test.subscribe(
   lambda x: print("From sub2 {0}".format(x))
)
test1 = of(1,2,3,4,5)
sub1 = test1.pipe(
   op.map(lambda a : a+random.random())
)
subscriber = sub1.subscribe(subject_test)
Output
E:\pyrx>python testrx.py
From sub1 1.1789422863284509
From sub2 1.1789422863284509
From sub1 2.5525627903260153
From sub2 2.5525627903260153
From sub1 3.4191549324778325
From sub2 3.4191549324778325
From sub1 4.644042420199624
From sub2 4.644042420199624
From sub1 5.079896897489065
From sub2 5.079896897489065
If you see, the same value is shared between the subscribers. You can achieve the same using publish () connectable observable operator.