- Raspberry Pi Tutorial
- Raspberry Pi - Home
- Raspberry Pi - Introduction
- Raspberry Pi - Getting Started
- Raspberry Pi - Operating System
- Connecting Raspberry Pi
- Raspberry Pi - Configuration
- Raspberry Pi - Working with Linux
- PIXEL Desktop Environment
- Raspberry Pi - Linux Shell
- Raspberry Pi - Managing Software
- Raspberry Pi - GPIO Connector
- Raspberry Pi - Add-on Boards
- Third-party Software Package
- Raspberry Pi Useful Resources
- Raspberry Pi - Quick Guide
- Raspberry Pi - Useful Resources
- Raspberry Pi - Discussion
Raspberry Pi - Quick Guide
Raspberry Pi - Introduction
Raspberry Pi, developed by Raspberry Pi Foundation in association with Broadcom, is a series of small single-board computers and perhaps the most inspiring computer available today.
From the moment you see the shiny green circuit board of Raspberry Pi, it invites you to tinker with it, play with it, start programming, and create your own software with it. Earlier, the Raspberry Pi was used to teach basic computer science in schools but later, because of its low cost and open design, the model became far more popular than anticipated.
It is widely used to make gaming devices, fitness gadgets, weather stations, and much more. But apart from that, it is used by thousands of people of all ages who want to take their first step in computer science.
It is one of the best-selling British computers and most of the boards are made in the Sony factory in Pencoed, Wales.
Generations and Models
In 2012, the company launched the Raspberry Pi and the current generations of regular Raspberry Pi boards are Zero, 1, 2, 3, and 4.
Generation 1 Raspberry Pi had the following four options −
- Model A
- Model A +
- Model B
- Model B +
Among these models, the Raspberry Pi B models are the original credit-card sized format.
On the other hand, the Raspberry Pi A models have a smaller and more compact footprint and hence, these models have the reduced connectivity options.
Raspberry Pi Zero models, which come with or without GPIO (general-purpose input output) headers installed, are the most compact of all the Raspberry Pi boards types.
Speed Specifications
The table below gives the speed specifications of various Raspberry Pi models and generations focusing on the version’s release date, form factor and dimensions −
| Raspberry Pi Version | Release Date | Form Factor | Dimensions (in mm) |
|---|---|---|---|
| Raspberry Pi 4 Model B | 2019-2020 | Standard | 85.6 x 56.5 |
| Raspberry Pi 3 Model B+ | 2018 | Standard | 85.6 x 56.5 |
| Raspberry Pi 3 Model B | 2016 | Standard | 85.6 x 56.5 |
| Raspberry Pi 3 Model A+ | 2018 | Compact | 65 x 56.5 |
| Raspberry Pi Zero Wireless with Headers | 2017 | Mini | 65 x 30 x 5 |
| Raspberry Pi Zero Wireless | 2016 | Mini | 65 x 30 x 5 |
| Raspberry Pi Zero | 2015 | Mini | 65 x 30 x 5 |
| Raspberry Pi 2 Model B | 2015 | Standard | 85.6 x 56.5 |
| Raspberry Pi 1 Model B + | 2014 | Standard | 85.6 x 56.5 |
| Raspberry Pi 1 Model B | 2012 | Standard | 85.6 x 56.5 |
| Raspberry Pi 1 Model A+ | 2014 | Compact | 65 x 56.5 |
| Raspberry Pi 1 Model A | 2013 | Standard | 85.6 x 56.5 |
The table below gives the speed specifications of various Raspberry Pi models and generations focusing on the version’s weight, General Purpose Input/Output (GPIO), central processing unit (CPU) speed, Cores and Random-access memory (RAM) −
| Raspberry Pi Version | Weight (in grams) | GPIO | CPU Speed | Cores | RAM |
|---|---|---|---|---|---|
| Raspberry Pi 4 Model B | 46 | 40 Pin | 1.5 GHz | Quad | 1,2,4, or 8 GB |
| Raspberry Pi 3 Model B+ | 50 | 40 Pin | 1.4 GHz | Quad | 1 GB |
| Raspberry Pi 3 Model B | 40 | 40 Pin | 1.2 GHz | Quad | 1 GB |
| Raspberry Pi 3 Model A+ | 28 | 40 Pin | 1.4 GHz | Quad | 512 MB |
| Raspberry Pi Zero Wireless with Headers | 10 | 40 Pin | 1 GHz | Single | 512 MB |
| Raspberry Pi Zero Wireless | 10 | 40 Pin Unpopulated | 1 GHz | Single | 512 MB |
| Raspberry Pi Zero | 8 | 40 Pin Unpopulated | 1 GHz | Single | 512 MB |
| Raspberry Pi 2 Model B | 42 | 40 Pin | 1.2 GHz | Quad | 1 GB |
| Raspberry Pi 1 Model B + | 42 | 40 Pin | 700 MHz | Single | 512 MB |
| Raspberry Pi 1 Model B | 38 | 21 Pin (26 Pin Header) | 700 MHz | Single | 512 MB |
| Raspberry Pi 1 Model A+ | 23 | 40 Pin | 700 MHz | Single | 512 MB |
| Raspberry Pi 1 Model A | 30 | 21 Pin (26 Pin Header) | 700 MHz | Single | 256 MB |
Connectivity Specifications
The table below gives the connectivity specifications of various Raspberry Pi boards focusing on the version’s full sized USB ports, other USB and charge methods, power and High-Definition Multimedia Interface (HDMI) ports −
| Raspberry Pi Version | Full sized USB Ports | Other USB & Charge Methods | Power | HDMI Ports |
|---|---|---|---|---|
| Raspberry Pi 4 Model B | 2 USB3.0 2 USB2.0 | 1 USB-C | 5.1V at 3A | 2 micro-HDMI |
| Raspberry Pi 3 Model B+ | 4 USB2.0 | 1 MIcroUSB | 5.1V at 2.5A | HDMI, Composite (TRRS) |
| Raspberry Pi 3 Model B | 4 USB2.0 | 1 MIcroUSB | 5.1V at 2.5A | HDMI, Composite (TRRS) |
| Raspberry Pi 3 Model A+ | 1 USB2.0 | 1 MIcroUSB | 5.1V at 3A | HDMI, Composite (TRRS) |
| Raspberry Pi Zero Wireless with Headers | __ | 1 MIcroUSB | 5.1V at 1.2A | Mini-HDMI, GPIO Composite |
| Raspberry Pi Zero Wireless | __ | 1 MIcroUSB | 5.1V at 1.2A | Mini-HDMI, GPIO Composite |
| Raspberry Pi Zero | __ | 1 MIcroUSB | 5.1V at 1.2A | Mini-HDMI, GPIO Composite |
| Raspberry Pi 2 Model B | 4 USB2.0 | 1 MIcroUSB | 5.1V at 1.8A | HDMI, Composite (TRRS) |
| Raspberry Pi 1 Model B + | 4 USB2.0 | 1 MIcroUSB | 5.1V at 1.2A | HDMI, Composite (TRRS) |
| Raspberry Pi 1 Model B | 2 USB2.0 | 1 MIcroUSB | 5.1V at 3A | PAL and NTSC, HDMI or DSI, RCA |
| Raspberry Pi 1 Model A+ | 1 USB2.0 | 1 MicroUSB or GPIO | 5.1V at 700mA | HDMI, Composite (TRRS) |
| Raspberry Pi 1 Model A | 1 USB2.0 | 1 MicroUSB or GPIO | 5.1V at 700mA | PAL and NTSC, HDMI or DSI, RCA |
The table below gives the connectivity specifications of various Raspberry Pi boards focusing on the version’s video out quality, video in, Ethernet, bluetooth, Wi-Fi and external storage −
| Raspberry Pi Version | Video Out Quality | Video In | Ethernet | Bluetooth | Wi-Fi | External Storage |
|---|---|---|---|---|---|---|
| Raspberry Pi 4 Model B | 4kp60 | CSI Camera Connector | Gigabit Ethernet | Bluetooth 5.0 | Dual Band-2.4 GHz and 5GHz | MicroSD |
| Raspberry Pi 3 Model B+ | 1080p60 | CSI Camera Connector | 10/100 Mbit/s | Bluetooth 4.2/BLE | Dual Band-2.4 GHz and 5GHz | MicroSD |
| Raspberry Pi 3 Model B | 1080p60 | CSI Camera Connector | 10/100 Mbit/s | Bluetooth 4.1 | 2.4 GHz | MicroSD |
| Raspberry Pi 3 Model A+ | 1080p60 | CSI Camera Connector | ___ | Bluetooth 4.2/BLE | Dual Band-2.4 GHz and 5GHz | MicroSD |
| Raspberry Pi Zero Wireless with Headers | 1080p60 | CSI Camera Connector | ___ | Bluetooth 4.1 | 2.4 GHz | MicroSD |
| Raspberry Pi Zero Wireless | 1080p60 | CSI Camera Connector | ___ | Bluetooth 4.1 | 2.4 GHz | MicroSD |
| Raspberry Pi Zero | 1080p60 | CSI Camera Connector | ___ | ___ | ___ | MicroSD |
| Raspberry Pi 2 Model B | 1080p60 | CSI Camera Connector | 10/100 Mbit/s | ___ | ___ | MicroSD |
| Raspberry Pi 1 Model B + | 1080p60 | CSI Camera Connector | 10/100 Mbit/s | ___ | ___ | MicroSD |
History
Software developer Eben Upton and Software Engineers Pete Lomas and David Braden formed the Raspberry Pi foundation in 2006. The main aim of this foundation was to devise a computer to inspire children. Hence, in order to reduce the cost, the early prototypes of the Raspberry Pi were based on the 8-bit Atmel ATmega microcontroller.
On February 29th, 2012, the team started taking the orders for Model B and in the same year, they started its production run which consisted of around 10,000 units. These models were manufactured by the founders in China and Taiwan.
On February 4th, 2013, they started taking the orders for lower cost Model A. Similarly, on November 10th, 2014, the team launched for even more low-cost Model A+. The cheapest Raspberry Pi Zero was launched on November 26th, 2015.
The name Raspberry Pi was chosen with “Raspberry” as an ode to tradition of naming early computer companies after fruit. Here, "Pi" is for Python Programming Language.
Raspberry Pi - Getting Started
In this modern age when computers are sleek, Raspberry Pi seems alien with tiny codes printed all over its circuit board. That’s a big part of Raspberry Pi’s appeal. Let us have a look at what we can do with this appealing circuit board.
Uses
Like a desktop computer, you can do almost anything with the Raspberry Pi. You can start and manage programs with its graphical windows desktop. It also has the shell for accepting text commands.
We can use the Raspberry Pi computer for the following −
- Playing games
- Browsing the internet
- Word processing
- Spreadsheets
- Editing photos
- Paying bills online
- Managing your accounts.
The best use of Raspberry Pi is to learn how a computer works. You can also learn how to make electronic projects or programs with it.
It comes with two programming languages, Scratch and Python. Through GPIO (general-purpose input output) pins, Raspberry Pi can be connected to other circuits, so that you can control the other devices of your choice.
Retailers and Distributors
Some of the global retailers from whom you can buy your Raspberry Pi computers are as follows. You can also refer to their respective websites for details about the Raspberry Pi computers.
- Electronics manufacturing company, Pimoroni (www.Pimoroni.com)
- Electronics store, The Pi Hut (https://thepihut.com)
- U.S. based electronics company, Adafruit (www.adafruit.com)
You can also get it from the following Raspberry Pi’s distributors −
- Electronic components supplier, RS Components (www.rs-components.com)
- Electronic components distributor, Element14 (www.element14.com)
Requirements
To use your Raspberry Pi board, you need to buy a few other bits and pieces. Following is the checklist of what else we might need −
Monitor
The Raspberry Pi uses a high-definition multimedia interface (HDMI) connection for video feed, and you can connect your monitor directly with this interface connection, if your monitor has an HDMI socket.
Television
In the similar way, if you have High Definition Television (HD TV), you can also connect it to your Raspberry Pi using an HDMI socket. It will give you a crisper picture.
USB hub
Depending on the model, Raspberry Pi has 1, 2, or 4 Universal Serial Bus (USB) sockets. You should consider using powered USB to connect other devices to your Raspberry Pi at the same time.
Keyboard and Mouse
Raspberry Pi only supports the USB keyboards and mouse. If you are using keyboards and mouse with PS/2 connectors, you need to replace them with Raspberry Pi.
SD or MicroSD card
As we know that the Raspberry Pi does not have a hard drive, so we need to use SD cards or MicroSD cards (depending on the model) for storage.
USB Wi-Fi adapter
If you are going to use model A and A+ then, you need to buy a USB Wi-Fi adapter for connecting to the internet. This should be done because these Raspberry models do not have an Ethernet socket.
External hard drive
If you want to share your collection of music and movies, you need to use an external hard drive with your Raspberry Pi model. You can connect the same by using a powered USB cable.
Raspberry Pi Camera Module
The Raspberry Pi camera module originated at Raspberry Pi foundation. It is an 8MP (megapixel) fixed focus camera that can be used to shoot high-definition video and take still photos. For wildlife photography at night, it provides another version without an infrared filter.
Speakers
The Raspberry Pi has a standard audio out socket. This socket is compatible with headphones and speakers that use a 3.5mm audio jack. We can plug headphones directly to it.
Power supply
For power supply, it uses a Micro USB connector. Hence theoretically, it is compatible with a mobile phone and tablet charger.
Cables
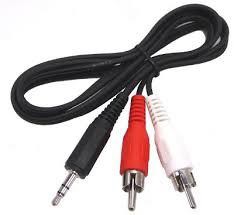
Following are some of the cables, which you need for the connections to the Raspberry Pi computer −
- HDMI cable
- HDMI-to-DVI adapter, if you are using a Digital Visual Interface (DVI) monitor.
- RCA cable, if you want to connect to an older television.
- Audio cable
- Ethernet cable
Compatible and Incompatible Devices
To minimise the cost, the Raspberry Pi models are designed to be used with whatever accessories we have. But, as we know that in practice, not all the devices can be compatible.
You need to check for compatible and incompatible devices as incompatible USB, keyboards and mouse can cause problems.
You can find the list of compatible and incompatible devices at https://elinux.org/RPi_VerifiedPeripherals.
Raspberry Pi - Operating System
Before you get started with your Raspberry Pi board, you need to provide with an OS (operating system). Linux is the most frequently used OS on the Raspberry Pi.
For using an OS, we need to create a Secure Digital (SD) or MicroSD card with an OS on it. The prerequisite for setting up the SD or MicroSD is a computer having an internet connection and the ability to write to SD or MicroSD cards.
NOOBS Software
NOOBS means new-out-of-box software and it is the easiest way to get started with the Raspberry Pi. It is easy to copy NOOBS to your SD or MicroSD card. Once copied, it provides us with a simple menu for installing various operating systems.
There is an option to buy a card with NOOBS already installed on it, but it is always useful to know how to create your own NOOBS cards.
Download NOOBS
Follow the below given steps to download NOOBS −
Step 1 − Go to the website www.raspberrypi.org/downloads/noobs
Step 2 − Select from the two versions of NOOBS available. Version 1 is the main version and includes Raspbian. This is the officially supported OS, which you can use even without any network connection.
Another option is to choose the OS from the menu. You can download and install the OS from the menu, if you have a network connection. It is always recommended to download NOOBS for your first OS.
MicroSD card Formatting
Before downloading and installing OS, we first need to format our SD or MicroSD card. We can use an application program, called SD card Formatter, from SD Association. The latest version is SD Memory Card Formatter 5.0.1.
For Windows and Mac, it can be downloaded from the link https://www.sdcard.org/downloads/formatter/.
Let us see how we can format the SD card by using windows, Mac OS, and Linux.
Using Windows
Step 1 − Download and install the SD formatter application. It will be as follows −
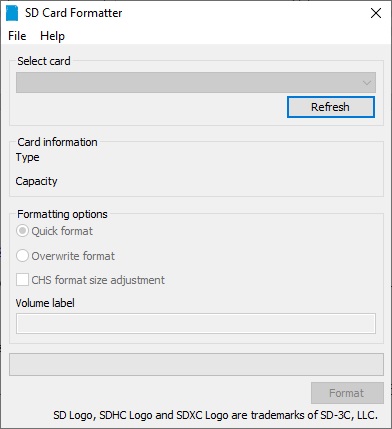
Step 2 − Next, we need to select the drive in which we have our SD High Capacity SDHC/SDXC card. Once selected, click on the format button to format it.
The following screen will appear −
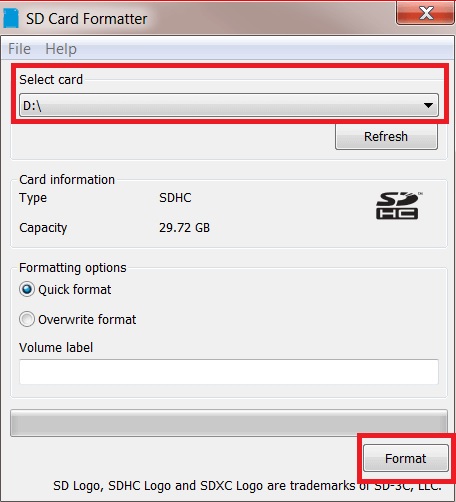
Step 3 − The program will ask for the confirmation. You need to click yes to confirm the format process.
Step 4 − Once the format process is completed, your SD card will be formatted completely.
Using Mac OS
The process of formatting is similar as we did in windows. You just need to download and install the Mac version of SD card formatter.
Using Linux
We will be using the GPartedapplication program, which is an open source partition manager for Linux.
Use the steps given below to format a SD card in Ubuntu software −
Step 1 − Download and install the GParted application by using the terminal as follows −
sudo apt-get install gparted
Step 2 − Once installation is completed, you need to insert the SD card. Next, by using Unity dash, launch the GParted application.
Step 3 − You will get the screen as below, which shows the partitions of the removable disk. But before starting the formatting, we need to unmount the disk by right-clicking on the partition as shown below −
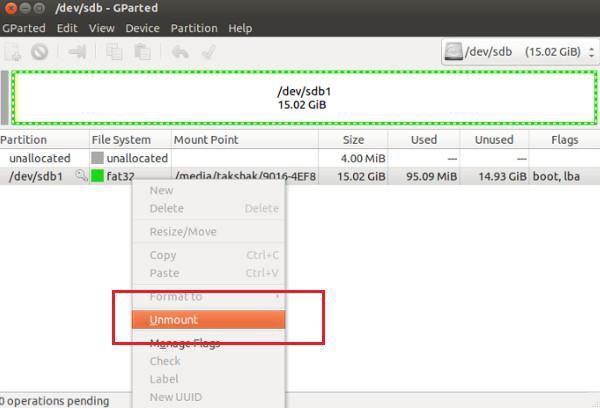
Step 4 − After unmounting, we need to right click on it, which will show us the Format to option. Now from the list, you can choose whatever type of file system you want on the disk.
After selecting the drive to format, you need to click on the Tick sign as shown below −
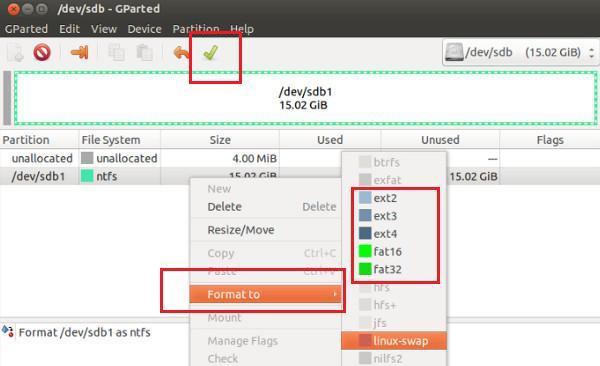
Step 5 − It will show you a couple of warnings and the format procedure will be started.
Install NOOBS to Memory card
Now, you have a formatted card and the .zip file that was downloaded from the Raspberry website. Hence, you can install NOOBS on your card.
On windows PC, you can simply double click the .zip file. It will open the file. Once opened, you can select all the files and copy them to your formatted card.
Similarly, on a Mac OS, you can see the folder that contains all the files by double clicking on the NOOBS .zip file. Now, click on the Edit menu and select all. Drag all the files onto your SD card.
In the same way, on Linux we can use the desktop environment to copy the NOOBS .zip files to our SD card.
Flashing a MicroSD card
Some operating systems (OS) may not be available through NOOBS. One of them is the Reduced Instruction Set Computer (RISC) OS.
For creating a card for such an OS, we need to first download the OS as an image file. Once an image file is downloaded, we need to use the process called flashing your card. Later on, the single file can be converted into all the files which we need on our card (SD or MicroSD).
To download the OS images, we can find the links at the website https://www.raspberrypi.org/software/.
Now to flash the card or you can say burning an image to the card, we can use an OS image flasher Etcher. It is available for windows, Mac OS and Linux at https://www.balena.io/etcher/.
Connecting Raspberry Pi
It is quite easy to connect Raspberry Pi. Let us understand about the same in detail in this chapter.
Ports and Sockets
You should make sure that you have to face your Raspberry Pi in the right way. Most components and sockets, with the help of which you connect it, are sticking out at the top side whereas the back side is relatively flat. The spiky GPIO (general-purpose input output) pins should be at the top left.
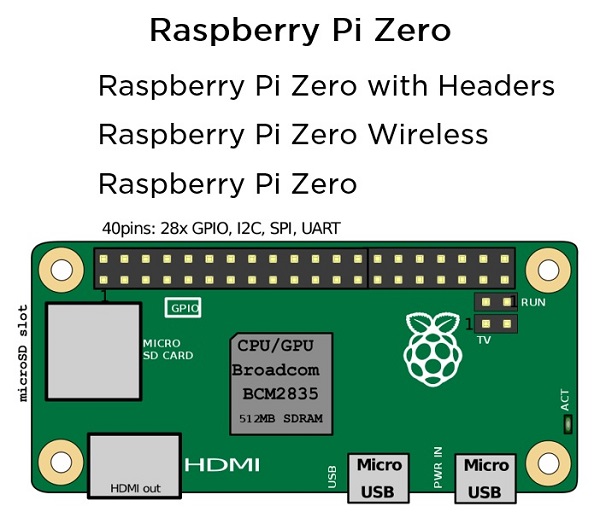
Let us have a look at the diagrams below representing the location of connectors and main integrated circuits (ICs) on the Raspberry Pi boards.
The source of the diagrams is https://core-electronics.com.au
Diagram 1
Following is the diagram for Raspberry Pi Model B −
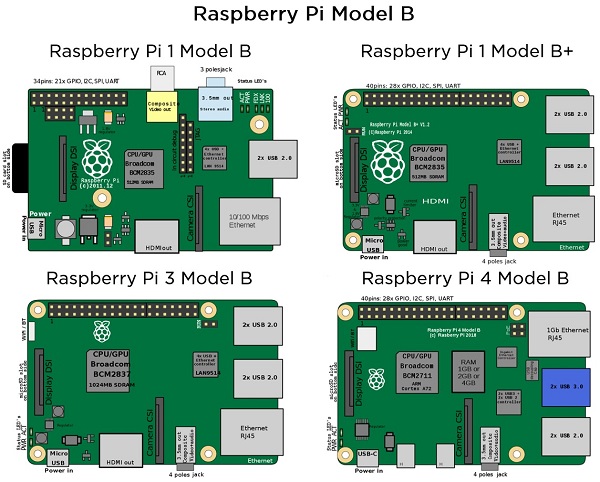
Diagram 2
Following is the diagram for Raspberry Pi Model A −
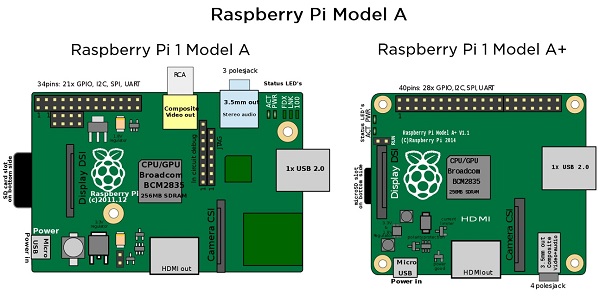
Diagram 3
Following is the diagram for Raspberry Pi Zero −
Insert SD or MicroSD card
As we have discussed, you need an SD or MicroSD card with OS to get started with Raspberry Pi. We have also discussed how you can create one, in the previous chapter. Now, it is time to insert that card and get started.
If you are using model 2, 3, A+, or B+ then, you need to turn your Raspberry Pi circuit board, so that the underside is at your side and you can see that.
You can see, there would be a metal MicroSD card slot on the left side of the board. Slide your card into this slot.
On the other hand, if you are using Model A or Model B, you need an SD card and you need to flip your Raspberry Pi over. Now, slide the SD card while facing the label side above. After that you need to gently press the card home.
And we know that the models Pi Zero and Zero W have the MicroSD card slot mounted on the top surface of the board. To insert the card, you need to put the label side facing you.
Camera Module
Camera module, an official module from the Raspberry Pi board, is a small circuit board with a strip of ribbon cable. It plugs directly into the board.
You can see the diagram below −
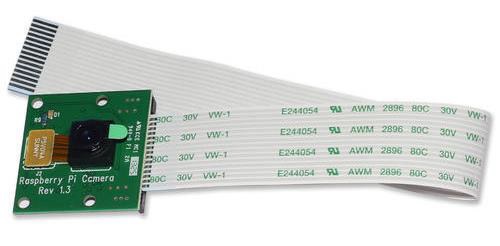
From the above diagram, you can see that for protection, the lens has a plastic film over it. You need to pull the green plastic tab to remove the film.
On Raspberry Pi Zero
The Raspberry Pi model camera socket uses a different width of cable and you can buy that cable separately. You can also get that cable with the official Raspberry Pi Zero case. You can check the board and the camera have similar sockets for the cable.
To open the connector, you just need to gently press the connector between your finger and thumb. The camera connector is on the right of the Raspberry Pi board.
To connect the cable with the camera, insert the cable with the shiny contacts facing the camera front. And on the Pi Zero board, insert the cable with the shiny contacts facing the flat side of the board i.e., the bottom side.
On other Raspberry Pi Models
To connect the camera on other boards, you need to hold the ends in between your finger and thumb. Then, gently lift the board and it will move apart to make a gap. This is the place, where you will insert the cable of the camera.
At the end of the camera’s cable, you can see there are silver connectors on one side. Now hold the cable in such a way that this side faces to the left.
Once done, insert the cable into the connector on your Raspberry Pi board. Press it gently and then press the socket back together again and your board is ready with the camera.
Connect Raspberry Pi to Devices
The respective processes to connect your Raspberry Pi board to different devices is explained below in detail. Let us begin by understanding how to connect a display device to your Pi board.
Display device
Depending on the screen type, you have two ways to connect the display device to your Pi board. In these two ways, we are assuming that you are going to use either monitor or television. Apart from these two ways, there is an official Pi touchscreen that connects using the display socket. Let us check how we can connect an HDMI display and television, as explained below.
HDMI or DVI display
The HDMI connector is on the top surface of your Raspberry Pi board. But for the Raspberry Pi Zero model, you need to use an adapter that converts Mini HDMI to an HDMI socket. For connecting, insert one end of the HDMI cable in the board or Pi ZERO connector and the other end into your monitor.
On the other hand, if you are using a DVI display, an adapter should be used.
Television
If the TV you are using is having a HDMI socket, you can use that for optimal results. But if in case, your TV does not have an HDMI socket, you need to use the composite video socket.
On the Raspberry Pi Model-A and Model-B, the composite video socket is placed on the top edge of the board. It is a round, yellow-and-silver sockets.
On other models, Raspberry Pi 3, Pi 2, and Model B+, the same socket as the audio output can be used as a composite video socket. It is placed on the bottom of the board.
One thing you should note is that you will need to use a special RCA cable for this socket. Connect one end of the RCA cable to the audio output socket and the other end to Video in socket of the TV.
If you are using Pi Zero or Zero W boards then, you need to solder your own connector to the board, where it is labelled TV. This should be done because, both these boards do not have composite video socket.
Keyboard and Mouse
On Raspberry Pi Model B+, Model Pi 2, and Model Pi 3 the keyboard and mouse can be directly connected. They should work fine. But for earlier models of Raspberry Pi, you should use an external USB hub to connect keyboard and mouse.
Because with this, the devices will not draw too much power from the Pi board, and we can reduce the risk of heat and other problems caused by devices.
On the other hand, for Raspberry Pi Zero, Model A, and Model A+, we must use a USB hub, since these boards have only one USB socket.
Audio devices
Raspberry Pi’s audio socket is a small black or blue box. On Model A and Model B, it is stuck along the top edge of the board. Whereas, on Model B+, Pi 2 and Pi 3, it is stuck along the bottom edge of the board.
If you have connected an HDMI TV, then you do not need to connect a separate audio cable, as the sound is routed through your HDMI cable.
On the other hand, if you have earphones or headphones with a 3.5mm jack, you can directly plug them into the audio socket.
Alternatively, it is recommended to use a suitable cable, as shown in the below figure. The cable has Pi’s 3.5mm jack on the left and stereo input/output plugs that feed into many stereos shown on the right.
Internet router
All the Raspberry Pi models other than Model A, A+, and Zero have an Ethernet socket. You can find the socket on the right edge of the Raspberry board. To connect to the internet, you can use a standard Ethernet cable in this socket.
In case if you are using a router with DHCP (Dynamic Host Configuration Protocol) support, your Raspberry Pi will automatically connect to the internet.
On the other hand, if you have a Wi-Fi adapter then, you can plug into a USB socket of Raspberry Pi and it will be ready to use whenever you turn on your board.
Power
Once you are done with connecting all the necessary and required devices, it is time to connect your Raspberry Pi to power and turn it on. For this, you need to use the Micro USB power socket.
To safeguard your board from damage, you need to provide a steady 5v of power. Keep in mind that Raspberry Pi board has no on/off switch. It means, whenever you connect it with power, it will start working.
If you want to turn it off, you just need to disconnect it. So, if you want to save your data, you should proceed with caution and should shut down the Raspberry Pi first.
Turn on Raspberry Pi
Connect with the power and turn on your Raspberry Pi board. There will be a rainbow of colors on screen. Afterwards, it will start to run the NOOBS software on the Memory card. You will get a choice of OS to install.
Below are the OS choices in NOOBS −
Raspbian
Raspbian, a version of a Linux distribution called Debian, is the distribution that is recommended by the Raspberry Pi foundation. It has been optimized for the Raspberry Pi board.
Most of the Raspberry Pi users start with Raspbian and it includes −
- Graphical Desktop software.
- Web browser.
- Development and programming tools like Scratch, Python etc.
It has two versions, one with the PIXEL desktop and other is termed as Raspbian Lite, with a more minimal installation.
LibreELEC and OSMC
Both are the versions of Kodi media center. They are mainly used for playing music and video.
RISC OS
It is an alternative to Linux OS, which most of the people use on the Raspberry Pi. It has a GUI (Graphical User Interface). In 1987, it was created by Acorn Computers and now-a-days, it is maintained and managed by RISC OS open Limited.
Data Partition
If you use the Data Partition option, it will give you an option to sort the data. The sorted data can be accessed by various Linux distributions.
Lakka
It is a retro gaming system that includes emulators for a range of vintage home computers such as Commodore 64 and Amiga, Amstrad CPC, ZX Spectrum and various Atari machines.
It also includes emulators for a range of game consoles such as Nintendo machines and Sony PlayStation. Although the Bomberman clones and 2048 games are included but, if you want to use Lakka, you need to get the games separately.
Plug your USB with games files and you will be ready to get games into Lakka.
Recalbox
It is another game system. It also includes emulators for Super Nintendo Entertainment System (SNES), Nintendo Entertainment System (NES), Game Boy Advance, PC Engine, and Sega Master System. The shareware version of a famous game called Doom is also included in the Recalbox game system.
Screenly OSE
As the name implies, it is a digital signage system. It enables the users to use a Raspberry Pi with a connected HD screen as a digital sign. Here, OSE refers to Open Source Edition.
It enables the following to be displayed on the screen −
- Videos
- Images
- Web pages
Screenly OSE is also suitable for displaying the advertisements and information in public areas like shops, schools, offices, shopping malls, railway stations, etc.
Windows 10 IoT Core
As the name implies, it is the version of Windows which is designed to support the IoT (Internet of things) devices. It is actually different from the windows desktop experience we are familiar with.
Once installed, it will give us the following two versions −
RTM version − It is the release to manufacturing (RTM) version. It is recommended to use because it is a stable version as compared to the Pre-release version.
Pre-release version − Another is pre-release version, which is less stable as compared to RTM version.
TLXOS
This is ThinLinX’s thin client software. It is a trial version and enables the Raspberry Pi to work as a virtual desktop. By using ThinLinX, we can also manage one or more Raspberries centrally.
Raspberry Pi - Configuration
In this chapter, we will learn about configuring the Raspberry Pi. Let us begin by understanding how to configure Raspberry Pi board in Raspbian.
Raspbian configuration
For configuring Raspberry Pi in Raspbian, we are using Raspbian with PIXEL desktop. It is one of the best ways to get Raspbian started with the Raspberry Pi. Once we finish booting, we will be in the PIXEL desktop environment.
Now to open the menu, you need to click the button that has the Raspberry Pi logo on it. This button will be in the top left. After clicking the button, choose Raspberry Pi configuration from the preferences.
Configuration tool
Following is the configuration tool in PIXEL desktop −
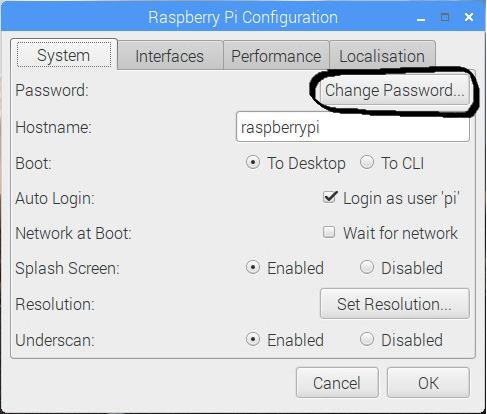
By default, the configuration tool opens to its system tab which has the following options −
Change Password − The default password is raspberry. You can change it by clicking the change password button.
Change the hostname − The default name is raspberry pi. You can also change it to the name, which you want to use on the network.
Boot − You can choose from the two options and control whether Raspberry Pi boots into the desktop or CLI i.e., command line interface.
Auto Login − With the help of this option, you can set whether the user should automatically log in or not.
Network at Boot − By choosing this option, you can set whether the pi user is automatically logged in or not.
Splash screen − You can enable or disable it. On enabling, it will display the graphical splash screen that shows when Raspberry Pi is booting.
Resolution − With the help of this option, you can configure the resolution of your screen.
Underscan − There are two options, enable or disable. It is used to change the size of the displayed screen image to optimally fill the screen. If you see a black border around the screen, you should disable the underscan. Whereas, you should enable the underscan, if your desktop does not fit your screen.
There are three other tabs namely Interfaces, Performance, and Localization. The job of interface tab is to enable or disable various connection options on your Raspberry Pi.
You can enable the Pi camera from the interface tab. You can also set up a secure connection between computers by using SSH (short for Secure Shell) option.
If you want to remote access your Pi with a graphical interface then, you can enable RealVNC software from this tab. SPI, I2C, Serial, 1-wire, and Remote GPIO are some other interfaces you can use.
There is another tab called Performance, which will give you access to the options for overclocking and changing the GPU memory.
The localization tab, as the name implies, enable us to set −
The character set used in our language.
Our time zone.
The keyboard setup as per our choice.
Our Wi-Fi country.
Configure Wi-Fi
You can check at the top right, there would be icons for Bluetooth and Wi-Fi. The fan-shaped icon is on the Wi-Fi. To configure your Wi-Fi, you need to click on that icon. Once clicked, it will open a menu showing the available networks. It also shows the option to turn off your Wi-Fi.
Among those available networks, you need to select a network. After selecting, it will prompt for entering the Wi-Fi password i.e., the Pre Shared Key.
If you see a red cross on the icon, it means your connection has been failed or dropped. To test whether your Wi-Fi is working correctly, open a web browser and visit a web page.
Configure Bluetooth Devices
We can use wireless Bluetooth devices such as keyboard and/or mouse with Pi 3 and Pi zero W because these models are Bluetooth-enabled. In PIXEL desktop, you can set up your Bluetooth devices easily.
Following are the steps to configure the Bluetooth devices −
First, make your device discoverable for pairing.
Now, you need to click on the Bluetooth menu at the top right of the screen. It is aligned to the Wi-Fi button.
Now, choose the Add Device option.
The Raspberry will start searching for the devices and when it finds your device, click it and click the pair button.
Data Partition Setup
As we know that data partition is that area on your memory card (SD or MicroSD) which can be shared by various distributions. One of the best examples of use of a data partition is transferring the files between distributions.
The data partition has the label data.
You can use this labeled data to make a directory point to it as follows −
Step 1 − First, you need to boot the Raspberry Pi into Raspbian.
Step 2 − Now, click the Terminal icon to get to the command line.
Step 3 − Next, type the command mkdir shared. It will create a directory named shared.
Step 4 − Write the command sudo mount -L data shared. This command will point the directory to the shared partition.
Step 5 − Write the command sudo chown $USER: shared. It will set the permission for writing in this shared folder.
Step 6 − Now, to go to this shared folder, you need to type the command cd shared.
Once all the files are created in this shared folder, they will be available to all the distributions that have the permission to access the data partition.
Raspberry Pi - Working with Linux
This chapter enlightens about the functioning of Raspberry Pi with Linux.
PIXEL Desktop Environment
PIXEL (Pi Improved Xwindows Environment, Lightweight) is a visual desktop environment which is a part of the recommended Raspbian Linux distribution. It is the quickest way to get started with Raspberry Pi and by default, it appears when our Raspberry Pi computer finishes starting up.
Some of the characteristics of PIXEL are as follows −
It is based on LXDE (Lightweight X11 Desktop Environment) open-source desktop.
Raspberry Pi foundation has redesigned LXDE and converted it into a PIXEL desktop environment.
The PIXEL desktop environment works in a similar way to Mac OS and Windows OS.
We can manage and find files by using mouse and icons.
Using this desktop environment, it’s really intuitive to navigate.
Navigate Desktop Environment
The image below is of the PIXEL desktop environment. You can see a taskbar (a strip along the top of the screen), which is usually visible in every program we will be using.
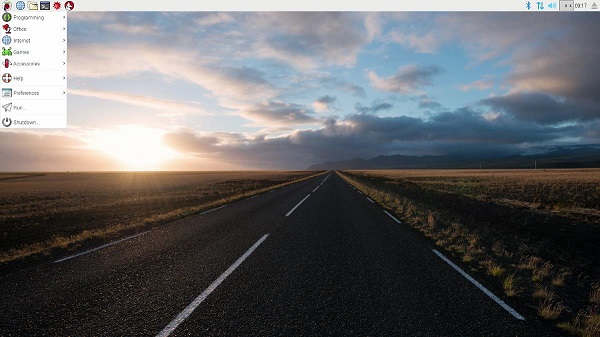
The Application Menu
For most of the programs, which we would like to run under PIXEL desktop or any other desktop environment, we need to use the application menu. You can get it by clicking the Raspberry Pi icon at the top left side of the desktop screen.
You will see the image as follows −

Submenu Programs
You will get the submenu program on the right, after moving the cursor over the categories of the programs. It will show the programs in that particular category.
You need to click on that category to start with that. If you want to add that category icon to the desktop, just right-click that program on the menu.
Following are the wealth of programs under submenu program −
Claws Mail
It is in the internet part of the Application with the help of which you can send or receive messages on your Raspberry Pi computer.
Debian Reference
As we have discussed earlier, the Raspbian version of Linux is the Pi-specific version of the Debian distribution. This icon will guide us how to use Linux on your Raspberry Pi computer.
This is a reference document, which is stored on your SD card and to find this, you need to go through the help section of the Application menu.
To get started with this, first, you need to click the icon and then, click the multi-files link (it is an HTML link) which is at the top of the screen.
LibreOffice
This is the most popular suite of productivity applications. It mainly includes word processing, spreadsheets, and presentations. You can get it from the office section of the Application menu.
Mathematica
Mathematica, under the programming section of the Application menu, is based on the Wolfram programming language. It is used for scientific and technical computing.
Minecraft Pi
We know about the world-building game called Minecraft. Similarly, Minecraft Pi is the Raspberry version of that. You can find it under the Game section of the Application program, and you can also program it by using the Python programming language.
Python 2 and Python 3
Raspberry Pi provides us the Python programming language, which can be found under Programming in the Application menu. We can also use the Thonny IDE (integrated development environment) which provides the Pi users, an alternative way of creating Python programs.
Python games
Raspberry Pi has games such as Reversi, Four in a Row, a sliding puzzle game as well as a snake game. These all are built in Python programming language and can be found in the Game section of the Application menu.
Scratch
Raspberry Pi foundation provides us a simple programming language called Scratch, which is approachable for the peoples of all ages. You can use it to create games and animations. It can also be used to manage electronic projects. You can find it under the Programming section of the Application menu.
Sense HAT emulator
As the name implies, it has some built-in sensors that can be used for creating experiments and other projects. It is an add-on for the Raspberry Pi users, which can be found under the Programming section of the Application menu.
Shutdown
Shutdown, a top-level option in the Application menu, can be used for switching off your Raspberry Pi, before you remove the power. With this, we will also get the options to log out as well as restart your Pi computer.
Sonic Pi
It is another programming language provided by Raspberry Pi foundation which is mainly used for creating music. You can also find it under the Programming section of the Application menu.
Terminal
Terminal is a window that let us issue the instructions from a command line without leaving your PIXEL desktop environment. There are two ways through which you can reach the terminal window. One is to get it in the Accessories part of the Programs menu and other is to use the button on the taskbar.
Wolfram
Wolfram is a programming language provided by Raspberry Pi foundation. It aims to incorporate knowledge, so that the programmers can get results quickly. You can get more information about this at www.wolfram.com/language. It is under the Programming section of the Application menu.
Running programs
Even after installing, some of the programs won’t appear on the Application menu. You can use the Run option to run those programs.
Follow the below given steps −
Step 1 − First, we need to open the Application menu. For this, click the icon at top left of the desktop.
Step 2 − Now, we need to select the Run option from this menu.
Step 3 − Run option will give you a dialog box. You can type the name of the program, which you want to open, and then press Enter.
Close and Rearrange Programs
The controls for closing and rearranging the programs on the PIXEL desktop environment is like the ones in MS Windows. These controls enable us to close as well as resize (minimize and maximize) the programs.
You can find these controls in the top right. They are explained below −
X button − It is used for closing the programs/applications.
Maximize button − As the name implies, this button will enlarge a particular application. Once used, the application will fill the screen.
Minimize button − As the name implies, this button will reduce a particular application. It will hide the program from view but does not stop it from executing/running. We can return to the program by clicking the name of the program on the taskbar.
Raspberry Pi - PIXEL Desktop Environment
Let us learn about the PIXEL desktop environment in Raspberry Pi. First, we will understand what a task manager is.
Task Manager
Sometimes, it may happen that your Raspberry Pi computer does not seem to be responding. But, there is nothing to worry about. This happens when the computer might be quite busy.
The diagram below shows the task manager.
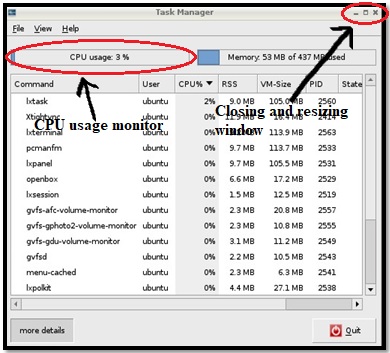
In the top right side, you can see the CPU usage monitor, which will tell you how heavily your Pi’s processor is being used. Moreover, in the top left side of this taskbar, we have three buttons, which are collectively called as the closing and resizing window.
There are two options to open the task manager, which are as follows −
Go to the Accessories folder on the Application menu.
Use the shortcut key, which is by holding down Ctrl and ALT keys and then pressing the Delete key.
If any of the program is responding and you want to terminate it, just right-click in the task list. The menu will appear, and you can choose the Term from it. This option will give a chance to shut down the program safely.
On the other hand, we can also use Kill, but, this option will terminate the program immediately with loss of data.
File Manager
It is easy to manage your files in a PIXEL desktop environment rather than using the command line. Refer the screen given below for the file manager −
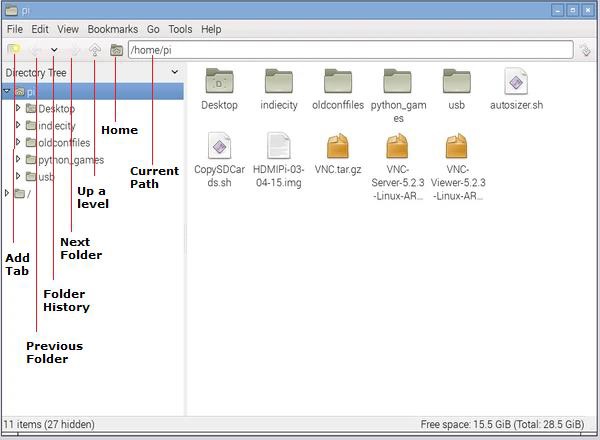
With the help of file management, we can browse, copy, rename or delete the files on our Raspberry Pi or other connected storage devices.
You have two options to start the file manager, which are as follows −
- Click the button on the left of the desktop.
- Go to system tools under the Application menu.
Navigate File Manager
There is an icon bar, having useful shortcuts, under the file manager’s menu bar.
Let us navigate the file manager and understand the icons that come under it.
Add Tab
Suppose, if you want to work in two folders at the same time. For example, copy files from one folder to another. Then, you need to quickly switch between those two folders. Tabs become handy for this purpose.
It enables us to have two different folders open at the same time, so that we can simply click them to switch between them. You can close the tab by clicking the cross (X) icon on the tab.
Previous folder
Previous folder button, as the name implies, takes you back to the last folder, which we have accessed on that tab. It works a bit like a web browser’s back button.
Next folder
Next folder button, as the name implies, takes us to a folder, where we have visited after the folder on which we have been working. We will end up where we started, if we will first click the Previous folder button and then the Next folder button.
Folder History
The Folder history button, as the name implies, will open a menu having the folders we have visited.
Up a level
There can be parent and child folders in your Raspberry Pi desktop. For example, the Desktop folder is inside the Pi folder. Hence, the Pi folder will be the parent folder and Desktop folder will be the child folder. The up a level button will take you to the parent folder.
Home
The home button, as the name implies, takes us back to the Pi folder.
Path
Path, as you have seen in the web browser’s URL bar, is the text description if it is the location of the folder, we are working with. It also includes the list of the folders, which are above it.
Cut, copy, move files and folders
The file manager in the PIXEL desktop environment makes it easy to move your files and folders from one place to another. It also makes it easy to cut, copy, and paste your files and folders.
You just need to right-click a file or folder of your choice and a menu will appear. This menu has the following options −
- Renaming the file.
- Moving the file to the wastebasket.
- Cut or copy the files.
Now, if you want to cut the file or folder, right-click on that and choose option cut. After that, right-click an empty space, where you want to paste that folder. From the menu that appears, select paste and your file or folder will be pasted at that empty space.
Likewise, if you want to copy the file or folder, you need to choose option copy from the right-click menu and then, paste wherever you want. It will create a duplicate file or folder.
Multiple files and folders
If you want to select more than one file at a time, there are following methods to do it −
First method
You need to hold the CTRL key and then, click on every file you want to select.
Second method
For selecting a group of consecutive icons, you first need to click the first icon, press the SHIFT key, and then click the last icon.
Third method
In this method, you need to click the mouse on the background of the file manager. Now while holding the button, you need to loop all the files which you want to select.
Moving the files
Now for moving these files, you have the following methods −
Once you have selected the files, you can drag these files into a different folder.
Otherwise, you can choose the option of cut or copy the whole group of files by right-clicking one of the selected files.
Keyboard Shortcuts
Like MS windows, you can also use some shortcuts in PIXEL as follows −
- Ctrl+A − To select all the files and folders.
- Ctrl+C − To copy the files and folders.
- Ctrl+V − To paste the files and folders.
- Ctrl+X − To cut the files and folders.
Organize files in folders
To easily manage your files, you can organize them in a folder. It is easy to create a new folder.
Follow the below given steps −
First, select and go to the location, typically your pi folder, where you want to create a new folder.
Now, right-click a blank space in the File Manager and click on the option Create New from menu.
Now another menu will appear, and you need to click Folder from that menu. You will now be prompted to enter a name. Enter the name you want to give to the new folder and click OK to confirm.
other method to create a New Folder is to click the File menu at the top left of the File Manager and find Create New. With these methods, you can also create empty files.
Delete files and folders
If you want to delete a single file or folder, you can right-click that in the File Manager. For the menu, you need to choose the option Move to Wastebasket.
On the other hand, if you want to delete more than one file or folder, you can select all of them as we did before, and choose the option Move to Wastebasket right-click menu.
You can also use the keyboard Delete button to send the selected files to the wastebasket.
Sorting the files
You can sort your files in Raspberry Pi by name, size, file type, modification time, etc. For this, you again need to right-click the empty space in the right pane of the file manager. A menu will appear and you need to select the option to change how the files are sorted.
You can also change how your files are displayed in the file manager. For this, you need to use the View menu on the Menu bar at the top of the File Manager.
The View menu will give us the following four ways to display our files and folders −
Icon view
It is the default option used by the File manager. It strikes a good balance between the size of each icon and number of files, we can see at one time.
Thumbnail view
Another view option is thumbnail view, which is mostly used in a folder of images. It enlarges the preview.
Compact view
As the name implies, the compact view lists the files and folders in columns and this is done with a small icon and filename. It helps us to view as many files as possible at a time.
Detailed view
As the name implies, this view reveals detailed information like short description, size, last modification date, etc., about the file.
Now, let us continue learning about the other important aspects with regards to the PIXEL desktop environment in Raspberry Pi.
Browsing the Web
Raspberry Pi gives us the choice of four browsers for browsing the web, namely, Chromium, Dillo, Netsurf and Epiphany. You can type the name of the browsers into the run option on the Application menu and it will appear.
Chromium Browser
It is the recommended browser. Apart from the Run option, you can also access it by clicking the Web browser button (the Globe icon) in the top left of the screen.
The layout of Chromium browser is quite similar to other browsers. It has a thin toolbar and provides a maximum screen to the page which you are accessing. It provides the user with the facility for ad-blocker to strip advertising. You can also change the settings for the same.
Dillo Browser
This browser is fast. Hence, it is a good choice for those users who have a slow internet connection and have problems related to accessing mainly the text information. It does not support Javascript and cannot handle the sophisticated layout instruction.
This is the reason that the web pages look different than the ones intended on it. This browser provides the users with an option to switch off the images from the Tool menu to speed up the downloads of complex pages.
Netsurf
This web browser is capable of handling more sophisticated layouts than Dillo web browser. But like Dillo, netsurf also lacks support for Javascript. Hence, the websites (including Facebook) that require Javascript won’t work on Netsurf.
Epiphany
It supports Javascript and was the recommended browser before Chromium. Epiphany browser is optimized for the Raspberry Pi but, might be noticeably slower than what we are used to.
Claws Mail
Raspberry Pi provides us an open-source email program called Claws Mail. It is preinstalled and you can find it in the internet category of the Application menu.
Following are some prerequisites, if you want to use email on Raspberry Pi −
For sending emails, you need to know the details of the server. You can find this information on the website of your email provider.
Your email user ID and password. This should be the same as you use when logging on with webmail.
Sending and Receiving Emails
Follow the below given steps to use Claws mail for sending and receiving emails −
First, you need to add an account from the configuration wizard of Claws mail. Apart from adding a new account, you can also edit the account settings, delete an account by using the configuration menu.
Once you are done with configuration, go to top left and click the Get mail button. It will show your mail folder in the left and messages on the right at the top.
To read the messages, you can use two methods. One is to use the message preview pane at the bottom right and other is to double-click on a message to open in its own window.
For composing a new message, replying, and forwarding a message, there is a menu bar across the top of Claws mail.
Image Viewer
If you want to look at your Digital images and work with them in Raspberry Pi, PIXEL provides us with the Image Viewer. You can find it in among the accessories on the Application Menu.
Toolbar buttons
You will see a toolbar underneath the picture opened in the Image Viewer.
Following are the buttons on that toolbar −
Previous
As the name implies, with this button, you will go to the previous photo in that folder. Any unsaved changes would be lost.
Next
As the name implies, with this button, you will go to the next photo in that folder. Any unsaved changes would be lost.
Start Slide show
This button will begin a slide show of all the photos in that folder. Predefined interval between two photos is 5 seconds. Image Viewer gives us an option to change it in preferences. Keyboard shortcut for starting slide show is key W.
Zoom Out
This button will reduce the magnification of the image. Keyboard shortcut for Zoom Out is the Minus (-) key.
Zoom In
This button will increase the magnification of the image. Keyboard shortcut for Zoom In is the Plus sign (+) key.
Fit Image to Window
It will shrink a large image to make it fit in the Image Viewer window. Its keyboard shortcut is key F.
Go to Original Size
This button will reset all the zooming by showing an image at its original size. Its keyboard shortcut is key G.
Full Screen
As the name implies, this button will expand an image to fill the monitor. With the use of this button, you will lose the Image Viewer controls.
Rotate Left
It will rotate the image 90 degrees counterclockwise. Keyboard shortcut for Rotate Left is key L.
Rotate Right
It will rotate the image 90 degrees clockwise. Keyboard shortcut for Rotate Right is key R.
Flip Horizontally
This button will mirror the image horizontally. Keyboard shortcut for Flip Horizontally is key H.
Flip Vertically
This button will mirror the image vertically i.e., turns an image upside down. Keyboard shortcut for Flip Vertically is key V.
Open File
It will open a new image file. You can also open an image from a folder in File Manager by using the Drag-and-Drop option on Image Viewer.
Save File
It will save an image with changes which you have done. It will replace the original file. The keyboard shortcut key is S.
Save File as
It will save an image, with the changes which you have done, with a new filename. It will not replace the original file.
Delete
It will delete an image from the storage device. If you use this button, an image will be deleted permanently and won’t be recovered.
Preferences
This button holds the settings, which you can change for the Image Viewer. It permits you to customize the settings as per your needs.
Exit Image Viewer
As the name implies, it will close the Image Viewer application. We can also use the close button (X) which is in the top right.
Text Editor
PIXEL has a simple text editor called Leafpad. You can find it by clicking the Text Editor in the Accessories part of the Application Menu. Leafpad text editor is good for writing and word processing but not ideal for creating the print-ready documents.
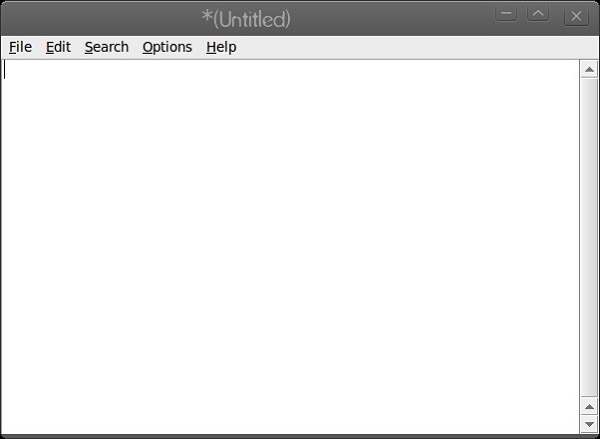
Leafpad
The menu on Leafpad consists of the following buttons −
File Menu
You can use this menu to start the new documents as well as to open, save, and print the files. It has a quit option, which we can use to close the text editor.
Edit Menu
The Edit menu gives you the tools to do the following tasks −
- Undoing your work.
- Redoing your work.
- Cutting the work.
- Copying your work.
- Pasting the work.
- Deleting the work.
- Selecting all the text.
It uses the same shortcuts as MS Windows, as mentioned below −
- Ctrl+C − To copy the work.
- Ctrl+V − To paste the work.
- Ctrl+X − To cut the work.
- Ctrl+A − To select all the text.
Search Menu
This menu gives us the following options −
- To find a particular word or phrase.
- Jump to a particular line in a document.
- Replace a chosen word or phrase with an alternative.
Option Menu
This menu gives us the following options −
- To change the font.
- Switch on word wrap.
- Switch on line numbers.
Customize your Desktop
You can change the look and feel of your desktop and make it easier to use by doing some changes. The options to customize your desktop are under the Preferences section of the Application menu.
With these options we can do the following −
- Change the picture used as a backdrop i.e., wallpaper.
- Change desktop color, if not using wallpaper.
- Change the color of icon descriptions i.e., the text color.
Install New Applications
Although, we can use the command line to discover and install new software, but, there is also a friendly menu in the PIXEL desktop environment. For that menu, we need to go to the Preferences option and click on ADD/REMOVE software.
This menu has the following parts that helps us to find and install new applications −
Search box
The search box is at the top left. Here, you can enter the name of a program you are looking for and it will show you the options.
Main pane
It shows us the packages. The already installed packages will be checked and would be in bold. Tick the box titled decide it, if you want to install that package.
After choosing your software, you need to click the Ok button to install and remove the applications. It will prompt for entering the password.
Back up the data
To back up your data, you can use File manager to copy them to a USB key or MicroSD card. Raspberry Pi provides us an application called the SD Card Copier application for copying data.
You can also use the shell commands, which we will discuss further.
Raspberry Pi - Linux Shell
The Shell, called Bash in Raspberry Pi, is the text-based way of issuing instructions to your Pi board. In this chapter, let us learn about the Linux shell in Raspberry Pi. First, we will understand how to open a shell window.
Open Shell Window
You can open a shell window by using one of the two following ways −
There is a Terminal icon, having a >_ prompt, on the top of the screen. Click on it and you will get a shell window.
Another way is to use the Accessories section of the Application menu. You can find the Terminal there.
Both of the above approaches will open a shell window on the desktop.
Understanding the Prompt
The prompt looks like as follows −
pi@raspberrypi ~ $
It contains lots of information. Let us see the various bits −
pi
It represents the name of that user who logged in.
raspberrypi
It represents the hostname of the machine i.e.; the name other computers use to identify when connecting to it.
The tilde symbol (~)
The tilde symbol tells the user which directory they are looking at. The presence of this horizontal wiggly line is known as home directory and the presence of this symbol shows that we are working in that directory.
The dollar sign ($)
It represents the presence of the ordinary user and not all-powerful superuser. A # symbol means a superuser.
List Files and Directories
When you start the shell window, you start in your home directory.
To see the folders and files in your home directory, you need to issue a command which is as follows −
pi@raspberrypi ~ $ ls
Output
The output is as follows −
Desktop Downloads Pictures python_games Videos
Documents Music Public Templates
You can see the files and folders after issuing the ls command.
As we know that Linux is case sensitive hence the commands LS, Ls, ls and lS are all different.
Change the directory
You can see the above output, it’s all blue which means these are all directories. We can go to these directories and check which files they contain. The command to change the directory is cd. You need to use the cd command along with the name of the directory which you want to see.
The example for changing the directory in Raspberry Pi is given below −
pi@raspberrypi ~ $ cd Pictures
Find information about files
The command to find the information about a particular file is file. You need to put the name of the file after the command to check the information about that file.
Check the below example for finding information about the files in Raspberry Pi−
pi@raspberrypi ~ /Pictures $ file leekha.png aarav.png
leekha.png: PNG image data, 50 x 85, 8-bit/color RGBA, noninterlaced
aarav.png: PNG image data, 100 x 150, 8-bit/color RGBA, noninterlaced
We can also use the file command on directories. It will give us some information about the directories as well −
pi@raspberrypi ~ $ file Pictures Desktop
Pictures: directory
Desktop: directory
Parent Directory
Earlier, we have used the cd command to change into a directory that is inside the current working directory. But sometimes, we need to go to the parent directory i.e. into the directory which is above the current working directory.
The command for this is cd..(cd with two dots), as given below −
pi@raspberrypi ~ /Pictures $ cd..
pi@raspberrypi ~ $
The tilde symbol represents your home directory.
Directory Tree
The following diagram shows the part of the directory tree on your Raspberry Pi computer −
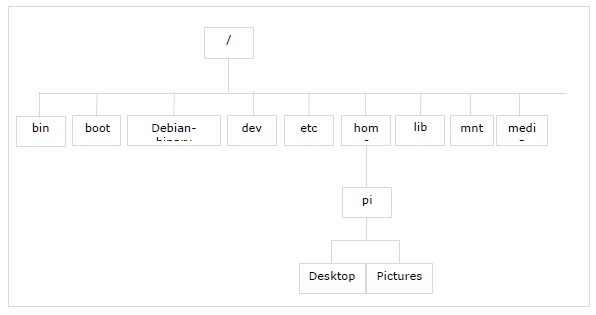
The directories and their uses are as follows −
bin
Bin, short for binaries, contains some small programs that behave like commands in the shell. For example, ls and mkdir.
boot
This directory contains the heart of the OS i.e. the Linux kernel. It also contains the configuration files containing the technical settings for Raspberry Pi computer.
dev
This directory contains a list of devices. For example, the devices like disks and network connections.
etc
This directory is used for various configuration files. These configuration files apply to all the users on the computer.
home
This is the directory where a user can store or write files by default.
lib
The directory contains various libraries that are used by different OS programs.
lost+found
This directory is used, if the file system gets corrupted and recovers partially.
media
You connect a removable storage device such as a USB key and it is automatically recognized. All the details will be stored in the media directory.
mnt
mnt stands for mount and will store all the details of the removable storage devices that we mount ourselves.
root
It is reserved for the use of the root users and we don’t have the permission to change into this directory as an ordinary user.
Relative and Absolute Paths
The shell enables the Raspberry Pi users to go straight to the location by specifying a path.
We have the following two types of paths −
Relative path
It is a bit like giving the directions to the directory from where the user is now.
Absolute path
On the other hand, an absolute path is like a street address. This path is exactly the same wherever the user is. These paths are measured from the root. Hence, they start with a slash (/).
For example, we know the absolute path to the pi directory is /home/pi.
Now, go straight forward to this directory by using the following command −
cd /home/pi
If you want to go to the root, you can use the following command −
cd /
Advanced Listing Commands
We can use the listing command (ls) to look inside any directory outside the current working directory as follows −
pi@raspberrypi ~ $ ls /boot
There are several advanced options, which we can use with the ls command.
These options are given in the following table −
| Option | Description |
|---|---|
| -1 | This option is 1 not l and it outputs the results in a single column instead of a row. |
| -a | The ls command with this option will display all the files. All the files will also include hidden files. |
| -F | This option will add a symbol besides a filename. It will do this to indicate the file type. If you use this option, you will notice a / after directories names and a * after executable files. |
| -h | This option is short for human-readable. It expresses file sizes by using kilobytes, megabytes, and gigabytes. |
| -l | This option will display the result in the long format. It shows the information about the permissions of files, their last modification date, their size. |
| -m | This option will list the result as a list separated by commas. |
| -R | This option is the recursive option. It will also list files and directories in the current working directories, open the subdirectories(if any) and list their results too. |
| -r | It is the reverse option and will display the result in reverse order. |
| -S | This option will sort the result by their size. |
| -t | This option will sort the result as per the date and time they were last modified. |
| -X | This option will sort your result as per the file extension. |
Furthermore, we will learn about the other important aspects related to Linux Shell in Raspberry Pi.
Long Listing Format
Long format is one of the most useful formats of the ls command, because it provides us the additional information on the file.
You can use the ls command with the long listing option as follows −
pi@raspberrypi ~ $ ls -l
total 65
-rw-r--r-- 1 pi pi 256 Feb 18 22:45 Leekha.txt
drwxr-xr-x 2 pi pi 4096 Jan 25 17:45 Desktop
drwxr-xr-x 5 pi pi 4096 Jan 25 17:50 Documents
drwxr-xr-x 2 pi pi 4096 Jan 25 17:52 Downloads
drwxr-xr-x 2 pi pi 4096 Jan 25 17:53 Music
drwxr-xr-x 2 pi pi 4096 Jan 25 17:45 Pictures
drwxr-xr-x 2 pi pi 4096 Jan 25 17:45 Public
drwxr-xr-x 2 pi pi 4096 Jan 25 17:54 Templates
drwxr-xr-x 2 pi pi 4096 Jan 25 17:54 Videos
From the above output, it is very easy to understand that each line relates to one file or directory having its name on the right and the date and time, when it was last modified next to that.
The number 256, 4096 represents the size of the file. You can see some files and directories are having the same size.
The remaining part of this output shows the permissions i.e. who is allowed to use the file and what the user is allowed to do with that file or directory.
Permissions
The permissions on a file are divided in the following three categories −
Owner
It is the person who created the file. This permission consists of the things the file owner can do.
Group
These are the people who belong to a group that has the permission to use the file. This permission consists of the things which the group owners can do.
World
These are known as the world permissions i.e. the things that everyone can do with that file or directory.
In Raspberry Pi, we have two main types of files. One is regular files which have a hyphen (-) and others are directories having a d.
Types of Permissions
Now let us understand the different types of permissions the owner, group and world have respectively −
Read permission − This permission gives the user ability to open and look at the contents of a file or to list a directory.
Write permission − This permission gives the user the ability to change the content of a file. It allows the user to create or delete the files in a directory.
Execute permission − This permission gives the user an ability to treat a file as a program and run it. It also gives permission to enter a directory using the cd command.
Less Command
The ls command deluges with the information that you cannot even notice sometimes, because it flies past our eyes faster than we understand or see it. To avoid this or solve this problem, we can use a command called less.
This command will take our listing and enable us to page through it and that is one screen at a time. To use this command, we need to use a | (pipe character) after the listing (ls) command.
The example of less command in Raspberry Pi is given below −
ls -RXF | less
The less command can also be used to view the content of a text file.
For this, we need to provide the filename as an argument, as given below −
less /boot/config.txt
Speed up the use of Shell
Here we will be learning few tricks to speed up the use of the shell −
If you want to retype a command, then you can save retyping it because, shell keeps the record of history i.e. the commands you entered previously.
In case if you want to reuse your last command, you just need to use two exclamation marks and press enter.
You can also bring back the previous commands in order by tapping the up arrow.
Similarly, you can also move through your history of commands in another direction by tapping the down arrow.
The shell also guesses what the user wants to type and it also automatically completes it for us.
Create File with Redirection
Redirecting files means, you can send the results from a command to a file instead of sending the results to the screen. For this, we need to use a > (greater-than) sign along with the file name, which we would like to send the output to.
The example of creating file by using redirection in Raspberry Pi is given below −
ls > ~/gaurav.txt
There are other commands too and with their help, we can display the content online. These commands are explained below −
echo command
The echo command, as the name implies, will display on screen whatever we write after it. The best use of this command is to solve mathematical problems. You need to put the expression between two pairs of brackets and put a dollar sign in front.
The example of echo command is given below −
echo $((5*5))
date command
The date command, as the name implies, will display on screen the current date and time.
cal command
The cal command (cal stands for calculator) will display the current month’s calendar with today highlighted. With the help of option -y, you can see the whole year calendar.
Create and Remove Directories
Here, we will understand how to create and remove directories in Raspberry Pi. Let us begin by learning about creating directories.
Create Directories
The command to create a directory under your home directory is mkdir.
In the below example, we will be creating a directory named AI_Python −
mkdir AI_Python
You can also use one command to create several directories as follows −
pi@raspberrypi ~ $ mkdir AI_Python Machine_Learning Tutorialspoint
pi@raspberrypi ~ $ ls
Downloads AI_Python Machine_Learning Tutorialspoint Desktop Pictures Documents Public
Remove directories
If you want to remove an empty directory, you can use the command rmdir as follows −
pi@raspberrypi ~ $ rmdir AI_Python
On the other hand, if you want to remove non-empty directories, you need to use the command rm -R as follows −
pi@raspberrypi ~ $ rm -R Machine_Learning
Delete Files
We can use the rm command to delete a file.
The syntax for deleting a file would be as follows −
rm options filename
In an example given below, we will be deleting a text file named leekha.txt −
pi@raspberrypi ~ $ rm leekha.txt
Like mkdir, the rm command will not tell us what it is doing.
To know its function, we need to use the verbose(-v) option as follows −
pi@raspberrypi ~ $ rm -v leekha.txt
removed 'leekha.txt'
We can also delete more than one file at a time as follows −
pi@raspberrypi ~ $ rm -v leekha.txt gaurav.txt aarav.txt
removed 'leekha.txt'
removed 'gaurav.txt'
removed 'aarav.txt'
Raspberry Pi Wildcards
A directory contains a lot of files with the similar filenames and if you want to delete a group of such files, you don’t need to repeat the command by typing out each filename. In shell, wildcards will do this job for us.
Following table provides us a quick reference to the wildcards, which we can use in Raspberry Pi −
| Wildcard | Meaning | Example | Description |
|---|---|---|---|
| ? | It means any single character. | pic?.jpg | The example means that the files start with a pic and have exactly one character after it before extension starts. |
| * | It means any number of characters. | *pic* | The example means that any files that have the word pic in their filename. |
| […] | This wildcard will match any one of the characters in brackets. | [gla]* | The example means that all the files that start with the letter g, l or a. |
| [^…] | This wildcard will match any single character that is not between the brackets. | [^gla]* | The example means that any files that do not start with the letter g, l or a. |
| [a-z] | This wildcard will match any single character in the range specified. | [x-z]*.png | The example means that any files that start with a letter x, y or z and end with the .png extension. |
| [0-9] | This wildcard will match any single character in the range specified. | Pic[1-5]*.png | The example means that it will match pic1.png, pic2.png, pic3.png, pic4.png, and pic5.png. |
The below given example will remove all the files starting with letters lee,
rm –vi lee*
Copy Files
Copying files is one of the fundamentals things we would like to do.
The command for this is cp, which can be used as follows −
cp [options] copy_from copy_to
Here, we need to replace copy_from with the file you want to copy and copy_to for where you want to copy it.
Example
Let us see an example of using the command to copy the respective file.
Suppose, if you want to copy the file leekha.txt from the /desktop directory to the home directory, you can use the cp command as follows −
cp /Desktop/leekha.txt ~
We can also specify a path to an existing folder to send the file to as follows −
cp /Desktop/leekha.txt ~/doc/
Move Files
Rather than making a copy of the file, if you want to move it from one place to another then, you can use the mv command as follows −
mv ~/Desktop/leekha.txt ~/Documents
The above command will move the file named leekha.txt from Desktop directory to the Documents directory. Both of these directories are in the home directory.
Reboot Raspberry Pi
With the help of following command, we can reboot our Raspberry Pi without disconnecting and reconnecting the power −
sudo reboot
Shutdown Raspberry Pi
With the help of following command, we can safely turn off our Raspberry Pi −
sudo halt
Raspberry Pi - Managing Software
We have discussed the simple menu based ADD/REMOVE software tab under Preferences for installing software. It is one of the easiest ways to manage and install software on your Raspberry Pi.
But here, we will be discussing how we can use the command line to install software in Raspberry Pi.
To install software, we require the authority of the root user or superuser but, sometimes that leaves our Raspberry Pi computer files vulnerable, including to any malicious software that might get in.
We can use sudo instead of a root account. Putting sudo before a command will indicate that one wants to carry it with the authority of the root user.
Update Cache Memory
If you want to install software on your Raspberry Pi, you first need to update the cache memory. It is the list of the packages, which the package manager knows about.
Use the following command to update the cache memory −
sudo apt-get update
Find the Software
To find the package name or software, we need to use the package manager cache. In Linux terminology it is the apt, cache.
It contains an index of all the packages available for install. It collects information of the software package and, also used to search for the available packages which are ready for installation on Raspberry Pi.
With the help of following command, we can search the required software −
sudo apt-cache search pkgname
Suppose if you want to search the games packages, you can use the command as follows −
sudo apt-cache search game | less
The list might be long. Hence, we have used less.
And suppose, if you want to find the package name for a particular game say chess, you can give the title in the command as follows −
sudo apt-cache search chess
This command will search for all the packages with name chess.
Install Software
Once you finish the searching, you can now install the software. For searching, you used apt-cache. However, for installing, you need to use apt-get command.
The command will download the specific package from the internet and install it. It will also install other dependencies.
For example, if we want to install the chess game say 3dchess, then the command will be as follows −
sudo apt-get install 3dchess
Run the Software
Following are the two ways to run a particular program in Raspberry Pi −
From command line
You can run some programs directly from the command line. You need to type the name of the program as follows −
3dchess
It will directly run the program.
From Application menu
Another way is to use the Application menu. After installing, you can find the application in the Application menu.
In Raspberry Pi, most of the end-user applications require the X-server. It means they need the Desktop environment to run them.
Upgrade Software
You can use the package manager to keep your software.
Following is the command with the help of which we can update all our software −
sudo apt-get upgrade
On the other hand, if you want to update just one application, you can do it by issuing its install command again.
For example, we have installed the chess game above, now enter the same again −
sudo apt-get install 3dchess
The above command will prompt the apt to check for any updates of the package and install them. If it finds no updates, it will tell us that we are running the latest version of the software.
Remove Software
You can also use the package manager to remove software from your Raspberry Pi computer.
You can use the following command to remove the software −
sudo apt-get remove 3dchess
The above command will remove the 3dchess package, but it will leave some traces of the application. These traces might include user files and any files containing settings.
You can also completely remove the application by using the following command −
sudo apt-get purge 3dchess
What software is installed?
You can use the following command to find out what software is installed on your Raspberry Pi computer −
dpkg --list
With the help of following command, you can search for a specific package −
dpkg –-status packagename
Raspberry Pi - GPIO Connector
Here, we will learn about the GPIO (general-purpose input output) connector in Raspberry Pi.
GPIO Pinout
One of the powerful features of the Raspberry Pi is the row of GPIO (general-purpose input output) pins and the GPIO Pinout is an interactive reference to these GPIO pins.
Following diagram shows a 40-pin GPIO header, which is found on all the current Raspberry Pi boards −
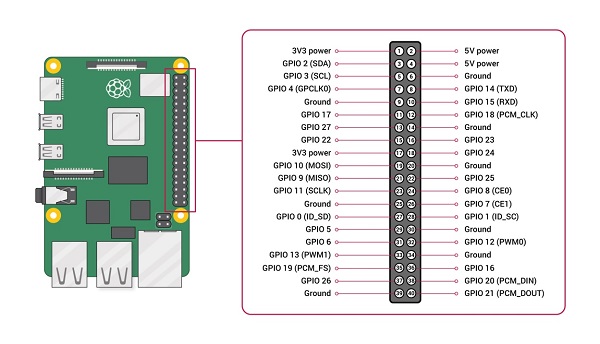
The source of the diagram is www.raspberrypi.org
Voltages
From the above diagram, we can see that there are two 5V pins and two 3V3 pins on the board. It also has several ground pins (0V). All these pins are unconfigurable.
Outputs
A GPIO pin can be designated as an output pin. The pin set as output pin can be set to 3V3(high) or 0V(low).
Inputs
A GPIO pin can be designated as an input pin. The pin set as input pin can be read as 3V3(high) or 0V(low). You can use internal pull-up or pull-down resistors.
You can see in the above diagram, GPIO2 and GPIO3 pins have fixed pull-up resistors but for the other pins, you can configure it in software.
Alternative Functions
GPIO pins can be used with a variety of alternative functions. Among them, some are available on all pins and others on specific pins.
PWM: Pulse-width modulation
Software PWM are available on all the pins whereas Hardware PWM are available on GPIO12, GPIO13, GPIO18, and GPIO19.
SPI: Serial Peripheral Interface
The SPI are available on the following −
SPI0: MOSI (GPIO10); MISO (GPIO9); SCLK (GPIO11); CE0 (GPIO8), CE1 (GPIO7)
SPI1: MOSI (GPIO20); MISO (GPIO19); SCLK (GPIO21); CE0 (GPIO18); CE1 (GPIO17); CE2 (GPIO16)
I2C: Inter-integrated Circuit
The I2C are available on the following −
Data: (GPIO2); Clock (GPIO3)
EEPROM Data: (GPIO0); EEPROM Clock (GPIO1)
Serial
The serial function is available at the following −
TX(GPIO14)
RX(GPIO15)
Connect GPIO to Raspberry Pi
Following are some simple rules to reduce the risk of damaging your Raspberry Pi board, while using the GPIO connector −
Do not try to put more than 3.3V on any GPIO pin.
Do not try to draw more than 3mA per output. Although, you can draw more but to increase the life of your Pi Board, you should restrict upto 3mA.
You should not poke the GPIO connector with a screwdriver when the Raspberry Pi board is powered up.
5V power is enough for your Raspberry Pi. Don’t try to provide more power than that.
You should not try to draw more than a total of 50mA from the 3.3V supply pins.
Output of GPIO pins
To set up the output of GPIO pins and to read the input values by using Python, you need to install RPi.GPIO python library.
Install RPi.GPIO python library
To install RPi.GPIO python library, type the following commands on terminal window of your Raspberry Pi −
sudo apt-get install python-dev
sudo apt-get install python-rpi.gpio
Almost all the latest versions of distributions have RPi.GPIO already installed. In that case, the above commands will update it to the latest version.
I2C Device
Let us check how we can make I2C work with Raspberry Pi.
Case 1: Using Adafruit Occidentalis 0.2 or later
In case, if you are using Adafruit Occidentalis, you don’t need to do anything. Because, this distribution is preconfigured with I2C support.
Case 2: Using Raspbian
In case if you are using Raspbian, you need to do the following configuration changes −
First, edit the file /etc/modules by using the following command −
sudo nano /etc/modules
Now, we need to add the following lines to the end of this file −
i2c-bcm2708
i2c-dev
Next, we need to edit the file named /etc/modprobe.d/raspi-blacklist.conf and comment out the following line by adding a # −
blacklist i2c-bcm2708
#blacklist i2c-bcm2708
Once done, install the Python I2C library by using the following command −
sudo apt-get install python-smbus
Now, reboot your Raspberry Pi and it will be ready for I2C.
Find I2C Address
There is an I2C device attached to Raspberry Pi computer and you want to know its address.
For this, we need to install i2c-tools as follows −
sudo apt-get install i2c-tools
Once done, attach your I2C device to your Raspberry Pi board and run the following command −
sudo i2cdetect -y 1
Here, we need to take care about the following two things −
First, if you have newer distributions then, it is quite possible that it has i2c-tools already installed.
Second, if you have an older version 1 board in use, change 1 to 0 in the above code line.
Serial Peripheral Interface (SPI)
Let us check how we can use SPI (serial peripheral interface) bus with Raspberry Pi.
Case 1: Using Adafruit Occidentalis 0.2 or later
In case if you are using Adafruit Occidentalis, you don’t need to do anything because this distribution is preconfigured with SPI support.
Case 2: Using Raspbian
In case if you are using Raspbian, you need to do the following configuration changes −
First, edit the file /etc/modules by using the following command −
sudo nano /etc/modules
Now, we need to add the following lines to the end of this file −
spidev
Next, we need to edit the file named /etc/modprobe.d/raspi-blacklist.conf and comment out the following line by adding a # −
blacklist spi-bcm2708
#blacklist spi-bcm2708
Once done, install the Python library to carry out communication from a Python program by using the following command −
cd ~
sudo apt-get install python-dev
git clone git://github.com/doceme/py-spidev
cd py-spidev/
sudo python setup.py install
Now, reboot your Raspberry Pi and it will be ready for SPI.
Serial Port
Suppose if you want to use the serial port i.e. Rx and Tx pins on your Raspberry Pi board but, it is used by Linux OS as a console connection. To disable this, we need to comment out a line in a file named /etc/inittab.
Open this file by using the following code line −
sudo nano /etc/inittab
Now, find the following line by scrolling down at the end of this file −
T0:23:respawn:/sbin/getty -L ttyAMA0 115200 vt100
Now, we need to use a # to comment out this line −
#T0:23:respawn:/sbin/getty -L ttyAMA0 115200 vt100
Now, save this file and reboot your Raspberry Pi.
Access serial port from Python
We can also use the serial port i.e. Rx and Tx pins on Raspberry Pi board by using Python. For this, we need to install PySerial library as follows −
sudo apt-get install python-serial
It is recommended to disable (as we did above) the Raspberry Pi’s serial console before using PySerial.
Test the serial port
Once you start using the serial ports, you may want to send and receive the serial commands from a Terminal session. For this, we need to install Minicom as follows −
sudo apt-get install minicom
It is recommended to disable (as we did above) the Raspberry Pi’s serial console before using Minicom.
As now Minicom is installed, we can start a serial communication session with a serial device connected to the RXD and TXD pins of the GPIO connector by using the following command −
minicom -b 9600 -o -D /dev/ttyAMA0
Here, in the above command, after -b is the baud rate and after -D is the serial port. We should use the same baud rate as set on the service we are communicating with.
Raspberry Pi - Add-on Boards
There are ready-made boards with all sorts of components built on. Many companies have produced such boards. Such boards come with sample code to show us how to use them.
Types of ready-made boards
We have two types of ready-made boards, Raspberry Pi, which are as follows −
The boards which are designed for making it easy to get access to the GPIO pins.
The boards with components that have already soldered up.
Styles of Ready-made Boards
The ready-made boards come in following three styles −
Separate boards
These kinds of ready-made boards connect to the GPIO pins via a ribbon cable or your own wires.
Shield or plates
These kinds of ready-made boards plug into all the GPIO pins and cover most of the area of the Raspberry Pi board.
HATs (Hardware Attached on Top)
These kinds of ready-made boards are like the shields or plates but contain an additional identification. Sometimes, it may contain a software so that the Raspberry Pi can read what they are on start-up and install some software and prepare GPIO pins automatically.
Various Boards
Since the introduction of the Raspberry Pi computer, new boards are constantly being developed and produced.
Some of the boards are as follows −
The Sense HAT
The Sense HAT, specifically designed for the Astro-Pi mission, allows Raspberry Pi to sense the world around it. Two ruggedized versions of Sense HAT were flown on the International Space Station from December 2015. The codes for both the versions were written by school children.
Following are some of the characteristics of the Sense HAT board −
It has a 8X8 RGB LED matrix.
It has a 5-button joystick.
It also has sensors to measure acceleration, temperature, pressure, humidity, and magnetism.
It also has sensors to measure the gyroscope.
It has an extensive Python library associated with it. This Python library allows for easy access to this board.
The comprehensive coverage of using the Sense HAT can be found at https://projects.raspberrypi.org/en/projects/getting-started-with-the-sense-hat.
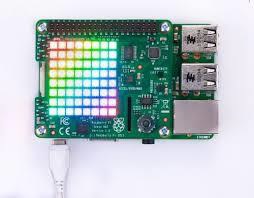
The Skywriter HAT
The Skywriter HAT is an electric near-field 3D proximity interface, which senses things floating in the air over it.
Some of the characteristics of the skywriter HAT are as follows −
You can make gestures with your hands because it can detect the motion of your hand with X, Y and Z positions.
It can detect gestures such as flicks right, left, up, and down.
It can easily detect the circular motion of the finger.
It can also detect the taps directly to its surface.
The range of the skywriter HAT has a range of about 5 cms.
It can also be mounted behind any non-conducting surface.
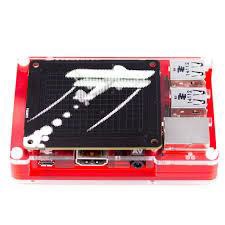
The source of the above image is www.magpi.raspberrypi.org
The Xtrinsic Sense Board
The Xtrinsic Sense Board, made in partnership with the component distributors and Raspberry Pi co-manufacturer Farnell, is a low-cost sensor board. It is somewhat like the Sensor HAT, but without LEDs.
Some of the characteristics of the Xtrinsic Sense Board are as follows −
It contains a high-precision pressure sensor. The range of this sensor is 50 to 110 kPa.
It also contains a 3-axis digital accelerometer and a 3-D magnetometer.
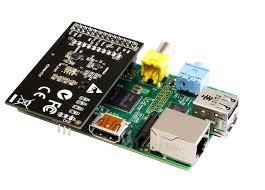
The source of the above image is www.farnell.com
Raspberry Pi - Third-party Software Package
Previously, we have discussed how we can download and install the software on our Raspberry Pi. It is one of the best things about Raspberry Pi.
Here, we will be discussing some of the software packages in Raspberry Pi.
Penguins Puzzle
This is a 3D puzzle game in which you need to safely escort a penguin to exit without letting it fall. It has a total of 50 levels. To move around, you can use the cursor keys. Shortcut key for zoom-out is Z and for reset is R.
Penguin Puzzle is preinstalled with Raspbian but in case, if you want to install or update it, you can find it on ADD/REMOVE software menu.
You can also use the following shell command to install/update it −
sudo apt-get install penguinspuzzle
Once installed, you can start playing this game by typing penguinspuzzle on shell.
FocusWriter
FocusWriter, as the name implies, is a word processing software designed for distraction-free work. While working in FocusWriter, you will only see your writing on screen. To get the menus for changing the setting and saving your file, you need to move the mouse to the top of the screen.
One of the best things about this word processor is that you can set your daily goals for the number of words written per day or time spent for writing. To check your progress or counting number of words, you need to move the mouse to the bottom of the screen.
To install or update it, you can search it on the ADD/REMOVE software menu.
You can also use the following shell command to install/update it −
sudo apt-get install focuswriter
Once installed, to get started with FocusEriter, you need to program’s entry in the office category of the Application menu.
Mathematica
Mathematica, pre-installed on Raspbian, is a symbolic package or Computer Algebra System (CAS). In Mathematica, you can do anything with numbers, complex multidimensional graphics, and music.
As it is preinstalled, to get started with it, you need to click the Mathematica icon under the Programming category of Application menu.
You can expand equations as well as plot graphs with Mathematica.
RealVNC
RealVNC, a remote access server and viewer software was included in Raspbian on 28th September 2016. With the help of RealVNC’s new capture technology, you can directly render content. It can also be used to view non-X11 applications and to control them remotely.
Steam Link
Steam Link which can be implemented as both hardware and software solutions, supports the streaming of the Steam content from a PC to a mobile device or other monitor.
In 2015, it was originally released as a hardware device but on 13 December 2018, its developer Valve released the official Steam Link game streaming client for Raspberry Pi microcomputer (Raspberry Pi3 and Pi 3 B+).
XInvaders 3D
XInvaders 3D is a game like classic Arcade Cabinates. Similar to another classic game Asteroids, this game uses the line graphics to put a fresh spin on Space Invaders.
The three-dimensional rendering makes the aliens move progressively closer to you. To line up your shots, you need to move in four directions. The cursor keys are used to move in four directions, and you can use a spacebar to fire the shots.
To install or update it, you can search it on the ADD/REMOVE software menu.
You can also use the following shell command to install/update it −
sudo apt-get install xinv3d
Once installed, to get started with XInvaders 3D, you need to click the icon on the taskbar to go into the Terminal and then enter xinv3d.
Tux Paint
Tux Paint is a simple drawing program for kids. The tools in Tux Paint help children to quickly create art on Raspberry Pi computer. It also enables freehand drawing and the placement of shapes.
The magic tool of Tux Paint can be used to create effects such as brick walls, flowers, rainbows, waves, and various other creative image distortions. It also has a stamp tool, which is used to stamp clip art onto the screen. The stamp tool includes animals, penguins, hats, food as well as musical instruments.
The name of Tux Paint is a tribute to the penguin Tux, the official mascot of the Linux kernel.
To install or update it, you can search it on the ADD/REMOVE software menu.
You can also use the following shell command to install/update it −
sudo apt-get install tuxpaint
Once installed, to get started with Tux Paint, you need to click the icon on the Education category of your application menu.
Sense HAT Emulator
In the previous chapter, we have discussed the Sense HAT board. Raspbian OS provides us with an emulator to use Sense HAT. You can get it in the Programming section of the Application menu.
As the name suggests, the Sense HAT emulator enables us to simulate the I/O of the Sense HAT, so that we can test how our programs work. It also provides us several sample programs to get started with.
Check the diagram of Sense HAT emulator below −
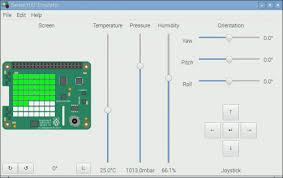
The source of the above image is www.raspberrypi.org
Brain Party
Brain Party, a series of fun minigames, is designed to tune up your brain between programming sessions. To get your “brain weight” score, you need to complete five randomly selected tests. The puzzles in Brain Party game will challenge your memory, logical skills, as well as observational skills.
To install or update it, you can search it on the ADD/REMOVE software menu.
You can also use the following shell command to install/update it −
sudo apt-get install brainparty
Once installed, to get started with Brain Party, you can find it under Games of the Application menu. You can also get it by typing brainparty in the command line.
Grisbi
Grispi is a free application with the help of which you can keep track of your regular and one-off payments. It is mainly used to manage your home accounts on your Raspberry Pi computer. The format in which most of the banks enable us to download bank statements, can be easily used in Grisbi.
To install it or update it, you can search it on the ADD/REMOVE software menu.
You can also use the following shell command to install/update it −
sudo apt-get install grisbi
Once installed, to get started with Brain Party, you can find it in the Office Category of the Application menu.