- Raspberry Pi Tutorial
- Raspberry Pi - Home
- Raspberry Pi - Introduction
- Raspberry Pi - Getting Started
- Raspberry Pi - Operating System
- Connecting Raspberry Pi
- Raspberry Pi - Configuration
- Raspberry Pi - Working with Linux
- PIXEL Desktop Environment
- Raspberry Pi - Linux Shell
- Raspberry Pi - Managing Software
- Raspberry Pi - GPIO Connector
- Raspberry Pi - Add-on Boards
- Third-party Software Package
- Raspberry Pi Useful Resources
- Raspberry Pi - Quick Guide
- Raspberry Pi - Useful Resources
- Raspberry Pi - Discussion
Raspberry Pi - GPIO Connector
Here, we will learn about the GPIO (general-purpose input output) connector in Raspberry Pi.
GPIO Pinout
One of the powerful features of the Raspberry Pi is the row of GPIO (general-purpose input output) pins and the GPIO Pinout is an interactive reference to these GPIO pins.
Following diagram shows a 40-pin GPIO header, which is found on all the current Raspberry Pi boards −
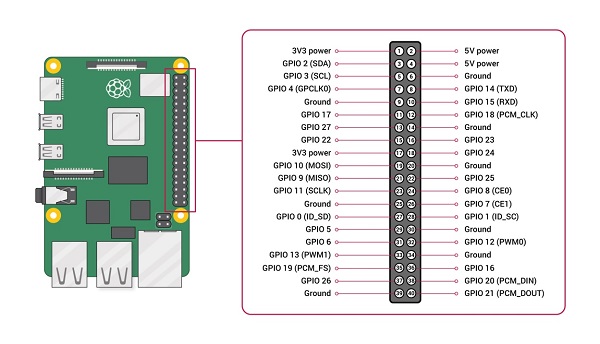
The source of the diagram is www.raspberrypi.org
Voltages
From the above diagram, we can see that there are two 5V pins and two 3V3 pins on the board. It also has several ground pins (0V). All these pins are unconfigurable.
Outputs
A GPIO pin can be designated as an output pin. The pin set as output pin can be set to 3V3(high) or 0V(low).
Inputs
A GPIO pin can be designated as an input pin. The pin set as input pin can be read as 3V3(high) or 0V(low). You can use internal pull-up or pull-down resistors.
You can see in the above diagram, GPIO2 and GPIO3 pins have fixed pull-up resistors but for the other pins, you can configure it in software.
Alternative Functions
GPIO pins can be used with a variety of alternative functions. Among them, some are available on all pins and others on specific pins.
PWM: Pulse-width modulation
Software PWM are available on all the pins whereas Hardware PWM are available on GPIO12, GPIO13, GPIO18, and GPIO19.
SPI: Serial Peripheral Interface
The SPI are available on the following −
SPI0: MOSI (GPIO10); MISO (GPIO9); SCLK (GPIO11); CE0 (GPIO8), CE1 (GPIO7)
SPI1: MOSI (GPIO20); MISO (GPIO19); SCLK (GPIO21); CE0 (GPIO18); CE1 (GPIO17); CE2 (GPIO16)
I2C: Inter-integrated Circuit
The I2C are available on the following −
Data: (GPIO2); Clock (GPIO3)
EEPROM Data: (GPIO0); EEPROM Clock (GPIO1)
Serial
The serial function is available at the following −
TX(GPIO14)
RX(GPIO15)
Connect GPIO to Raspberry Pi
Following are some simple rules to reduce the risk of damaging your Raspberry Pi board, while using the GPIO connector −
Do not try to put more than 3.3V on any GPIO pin.
Do not try to draw more than 3mA per output. Although, you can draw more but to increase the life of your Pi Board, you should restrict upto 3mA.
You should not poke the GPIO connector with a screwdriver when the Raspberry Pi board is powered up.
5V power is enough for your Raspberry Pi. Don’t try to provide more power than that.
You should not try to draw more than a total of 50mA from the 3.3V supply pins.
Output of GPIO pins
To set up the output of GPIO pins and to read the input values by using Python, you need to install RPi.GPIO python library.
Install RPi.GPIO python library
To install RPi.GPIO python library, type the following commands on terminal window of your Raspberry Pi −
sudo apt-get install python-dev
sudo apt-get install python-rpi.gpio
Almost all the latest versions of distributions have RPi.GPIO already installed. In that case, the above commands will update it to the latest version.
I2C Device
Let us check how we can make I2C work with Raspberry Pi.
Case 1: Using Adafruit Occidentalis 0.2 or later
In case, if you are using Adafruit Occidentalis, you don’t need to do anything. Because, this distribution is preconfigured with I2C support.
Case 2: Using Raspbian
In case if you are using Raspbian, you need to do the following configuration changes −
First, edit the file /etc/modules by using the following command −
sudo nano /etc/modules
Now, we need to add the following lines to the end of this file −
i2c-bcm2708
i2c-dev
Next, we need to edit the file named /etc/modprobe.d/raspi-blacklist.conf and comment out the following line by adding a # −
blacklist i2c-bcm2708
#blacklist i2c-bcm2708
Once done, install the Python I2C library by using the following command −
sudo apt-get install python-smbus
Now, reboot your Raspberry Pi and it will be ready for I2C.
Find I2C Address
There is an I2C device attached to Raspberry Pi computer and you want to know its address.
For this, we need to install i2c-tools as follows −
sudo apt-get install i2c-tools
Once done, attach your I2C device to your Raspberry Pi board and run the following command −
sudo i2cdetect -y 1
Here, we need to take care about the following two things −
First, if you have newer distributions then, it is quite possible that it has i2c-tools already installed.
Second, if you have an older version 1 board in use, change 1 to 0 in the above code line.
Serial Peripheral Interface (SPI)
Let us check how we can use SPI (serial peripheral interface) bus with Raspberry Pi.
Case 1: Using Adafruit Occidentalis 0.2 or later
In case if you are using Adafruit Occidentalis, you don’t need to do anything because this distribution is preconfigured with SPI support.
Case 2: Using Raspbian
In case if you are using Raspbian, you need to do the following configuration changes −
First, edit the file /etc/modules by using the following command −
sudo nano /etc/modules
Now, we need to add the following lines to the end of this file −
spidev
Next, we need to edit the file named /etc/modprobe.d/raspi-blacklist.conf and comment out the following line by adding a # −
blacklist spi-bcm2708
#blacklist spi-bcm2708
Once done, install the Python library to carry out communication from a Python program by using the following command −
cd ~
sudo apt-get install python-dev
git clone git://github.com/doceme/py-spidev
cd py-spidev/
sudo python setup.py install
Now, reboot your Raspberry Pi and it will be ready for SPI.
Serial Port
Suppose if you want to use the serial port i.e. Rx and Tx pins on your Raspberry Pi board but, it is used by Linux OS as a console connection. To disable this, we need to comment out a line in a file named /etc/inittab.
Open this file by using the following code line −
sudo nano /etc/inittab
Now, find the following line by scrolling down at the end of this file −
T0:23:respawn:/sbin/getty -L ttyAMA0 115200 vt100
Now, we need to use a # to comment out this line −
#T0:23:respawn:/sbin/getty -L ttyAMA0 115200 vt100
Now, save this file and reboot your Raspberry Pi.
Access serial port from Python
We can also use the serial port i.e. Rx and Tx pins on Raspberry Pi board by using Python. For this, we need to install PySerial library as follows −
sudo apt-get install python-serial
It is recommended to disable (as we did above) the Raspberry Pi’s serial console before using PySerial.
Test the serial port
Once you start using the serial ports, you may want to send and receive the serial commands from a Terminal session. For this, we need to install Minicom as follows −
sudo apt-get install minicom
It is recommended to disable (as we did above) the Raspberry Pi’s serial console before using Minicom.
As now Minicom is installed, we can start a serial communication session with a serial device connected to the RXD and TXD pins of the GPIO connector by using the following command −
minicom -b 9600 -o -D /dev/ttyAMA0
Here, in the above command, after -b is the baud rate and after -D is the serial port. We should use the same baud rate as set on the service we are communicating with.