- Raspberry Pi Tutorial
- Raspberry Pi - Home
- Raspberry Pi - Introduction
- Raspberry Pi - Getting Started
- Raspberry Pi - Operating System
- Connecting Raspberry Pi
- Raspberry Pi - Configuration
- Raspberry Pi - Working with Linux
- PIXEL Desktop Environment
- Raspberry Pi - Linux Shell
- Raspberry Pi - Managing Software
- Raspberry Pi - GPIO Connector
- Raspberry Pi - Add-on Boards
- Third-party Software Package
- Raspberry Pi Useful Resources
- Raspberry Pi - Quick Guide
- Raspberry Pi - Useful Resources
- Raspberry Pi - Discussion
Raspberry Pi - PIXEL Desktop Environment
Let us learn about the PIXEL desktop environment in Raspberry Pi. First, we will understand what a task manager is.
Task Manager
Sometimes, it may happen that your Raspberry Pi computer does not seem to be responding. But, there is nothing to worry about. This happens when the computer might be quite busy.
The diagram below shows the task manager.
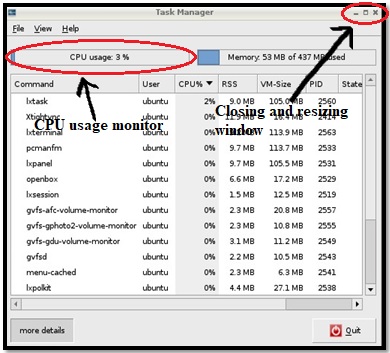
In the top right side, you can see the CPU usage monitor, which will tell you how heavily your Pi’s processor is being used. Moreover, in the top left side of this taskbar, we have three buttons, which are collectively called as the closing and resizing window.
There are two options to open the task manager, which are as follows −
Go to the Accessories folder on the Application menu.
Use the shortcut key, which is by holding down Ctrl and ALT keys and then pressing the Delete key.
If any of the program is responding and you want to terminate it, just right-click in the task list. The menu will appear, and you can choose the Term from it. This option will give a chance to shut down the program safely.
On the other hand, we can also use Kill, but, this option will terminate the program immediately with loss of data.
File Manager
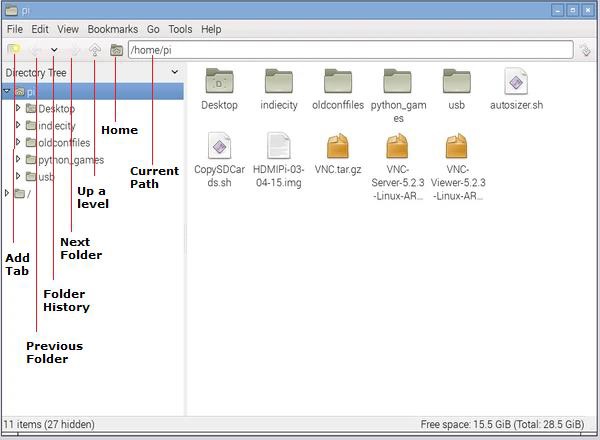
It is easy to manage your files in a PIXEL desktop environment rather than using the command line. Refer the screen given below for the file manager −
With the help of file management, we can browse, copy, rename or delete the files on our Raspberry Pi or other connected storage devices.
You have two options to start the file manager, which are as follows −
- Click the button on the left of the desktop.
- Go to system tools under the Application menu.
Navigate File Manager
There is an icon bar, having useful shortcuts, under the file manager’s menu bar.
Let us navigate the file manager and understand the icons that come under it.
Add Tab
Suppose, if you want to work in two folders at the same time. For example, copy files from one folder to another. Then, you need to quickly switch between those two folders. Tabs become handy for this purpose.
It enables us to have two different folders open at the same time, so that we can simply click them to switch between them. You can close the tab by clicking the cross (X) icon on the tab.
Previous folder
Previous folder button, as the name implies, takes you back to the last folder, which we have accessed on that tab. It works a bit like a web browser’s back button.
Next folder
Next folder button, as the name implies, takes us to a folder, where we have visited after the folder on which we have been working. We will end up where we started, if we will first click the Previous folder button and then the Next folder button.
Folder History
The Folder history button, as the name implies, will open a menu having the folders we have visited.
Up a level
There can be parent and child folders in your Raspberry Pi desktop. For example, the Desktop folder is inside the Pi folder. Hence, the Pi folder will be the parent folder and Desktop folder will be the child folder. The up a level button will take you to the parent folder.
Home
The home button, as the name implies, takes us back to the Pi folder.
Path
Path, as you have seen in the web browser’s URL bar, is the text description if it is the location of the folder, we are working with. It also includes the list of the folders, which are above it.
Cut, copy, move files and folders
The file manager in the PIXEL desktop environment makes it easy to move your files and folders from one place to another. It also makes it easy to cut, copy, and paste your files and folders.
You just need to right-click a file or folder of your choice and a menu will appear. This menu has the following options −
- Renaming the file.
- Moving the file to the wastebasket.
- Cut or copy the files.
Now, if you want to cut the file or folder, right-click on that and choose option cut. After that, right-click an empty space, where you want to paste that folder. From the menu that appears, select paste and your file or folder will be pasted at that empty space.
Likewise, if you want to copy the file or folder, you need to choose option copy from the right-click menu and then, paste wherever you want. It will create a duplicate file or folder.
Multiple files and folders
If you want to select more than one file at a time, there are following methods to do it −
First method
You need to hold the CTRL key and then, click on every file you want to select.
Second method
For selecting a group of consecutive icons, you first need to click the first icon, press the SHIFT key, and then click the last icon.
Third method
In this method, you need to click the mouse on the background of the file manager. Now while holding the button, you need to loop all the files which you want to select.
Moving the files
Now for moving these files, you have the following methods −
Once you have selected the files, you can drag these files into a different folder.
Otherwise, you can choose the option of cut or copy the whole group of files by right-clicking one of the selected files.
Keyboard Shortcuts
Like MS windows, you can also use some shortcuts in PIXEL as follows −
- Ctrl+A − To select all the files and folders.
- Ctrl+C − To copy the files and folders.
- Ctrl+V − To paste the files and folders.
- Ctrl+X − To cut the files and folders.
Organize files in folders
To easily manage your files, you can organize them in a folder. It is easy to create a new folder.
Follow the below given steps −
First, select and go to the location, typically your pi folder, where you want to create a new folder.
Now, right-click a blank space in the File Manager and click on the option Create New from menu.
Now another menu will appear, and you need to click Folder from that menu. You will now be prompted to enter a name. Enter the name you want to give to the new folder and click OK to confirm.
other method to create a New Folder is to click the File menu at the top left of the File Manager and find Create New. With these methods, you can also create empty files.
Delete files and folders
If you want to delete a single file or folder, you can right-click that in the File Manager. For the menu, you need to choose the option Move to Wastebasket.
On the other hand, if you want to delete more than one file or folder, you can select all of them as we did before, and choose the option Move to Wastebasket right-click menu.
You can also use the keyboard Delete button to send the selected files to the wastebasket.
Sorting the files
You can sort your files in Raspberry Pi by name, size, file type, modification time, etc. For this, you again need to right-click the empty space in the right pane of the file manager. A menu will appear and you need to select the option to change how the files are sorted.
You can also change how your files are displayed in the file manager. For this, you need to use the View menu on the Menu bar at the top of the File Manager.
The View menu will give us the following four ways to display our files and folders −
Icon view
It is the default option used by the File manager. It strikes a good balance between the size of each icon and number of files, we can see at one time.
Thumbnail view
Another view option is thumbnail view, which is mostly used in a folder of images. It enlarges the preview.
Compact view
As the name implies, the compact view lists the files and folders in columns and this is done with a small icon and filename. It helps us to view as many files as possible at a time.
Detailed view
As the name implies, this view reveals detailed information like short description, size, last modification date, etc., about the file.
Now, let us continue learning about the other important aspects with regards to the PIXEL desktop environment in Raspberry Pi.
Browsing the Web
Raspberry Pi gives us the choice of four browsers for browsing the web, namely, Chromium, Dillo, Netsurf and Epiphany. You can type the name of the browsers into the run option on the Application menu and it will appear.
Chromium Browser
It is the recommended browser. Apart from the Run option, you can also access it by clicking the Web browser button (the Globe icon) in the top left of the screen.
The layout of Chromium browser is quite similar to other browsers. It has a thin toolbar and provides a maximum screen to the page which you are accessing. It provides the user with the facility for ad-blocker to strip advertising. You can also change the settings for the same.
Dillo Browser
This browser is fast. Hence, it is a good choice for those users who have a slow internet connection and have problems related to accessing mainly the text information. It does not support Javascript and cannot handle the sophisticated layout instruction.
This is the reason that the web pages look different than the ones intended on it. This browser provides the users with an option to switch off the images from the Tool menu to speed up the downloads of complex pages.
Netsurf
This web browser is capable of handling more sophisticated layouts than Dillo web browser. But like Dillo, netsurf also lacks support for Javascript. Hence, the websites (including Facebook) that require Javascript won’t work on Netsurf.
Epiphany
It supports Javascript and was the recommended browser before Chromium. Epiphany browser is optimized for the Raspberry Pi but, might be noticeably slower than what we are used to.
Claws Mail
Raspberry Pi provides us an open-source email program called Claws Mail. It is preinstalled and you can find it in the internet category of the Application menu.
Following are some prerequisites, if you want to use email on Raspberry Pi −
For sending emails, you need to know the details of the server. You can find this information on the website of your email provider.
Your email user ID and password. This should be the same as you use when logging on with webmail.
Sending and Receiving Emails
Follow the below given steps to use Claws mail for sending and receiving emails −
First, you need to add an account from the configuration wizard of Claws mail. Apart from adding a new account, you can also edit the account settings, delete an account by using the configuration menu.
Once you are done with configuration, go to top left and click the Get mail button. It will show your mail folder in the left and messages on the right at the top.
To read the messages, you can use two methods. One is to use the message preview pane at the bottom right and other is to double-click on a message to open in its own window.
For composing a new message, replying, and forwarding a message, there is a menu bar across the top of Claws mail.
Image Viewer
If you want to look at your Digital images and work with them in Raspberry Pi, PIXEL provides us with the Image Viewer. You can find it in among the accessories on the Application Menu.
Toolbar buttons
You will see a toolbar underneath the picture opened in the Image Viewer.
Following are the buttons on that toolbar −
Previous
As the name implies, with this button, you will go to the previous photo in that folder. Any unsaved changes would be lost.
Next
As the name implies, with this button, you will go to the next photo in that folder. Any unsaved changes would be lost.
Start Slide show
This button will begin a slide show of all the photos in that folder. Predefined interval between two photos is 5 seconds. Image Viewer gives us an option to change it in preferences. Keyboard shortcut for starting slide show is key W.
Zoom Out
This button will reduce the magnification of the image. Keyboard shortcut for Zoom Out is the Minus (-) key.
Zoom In
This button will increase the magnification of the image. Keyboard shortcut for Zoom In is the Plus sign (+) key.
Fit Image to Window
It will shrink a large image to make it fit in the Image Viewer window. Its keyboard shortcut is key F.
Go to Original Size
This button will reset all the zooming by showing an image at its original size. Its keyboard shortcut is key G.
Full Screen
As the name implies, this button will expand an image to fill the monitor. With the use of this button, you will lose the Image Viewer controls.
Rotate Left
It will rotate the image 90 degrees counterclockwise. Keyboard shortcut for Rotate Left is key L.
Rotate Right
It will rotate the image 90 degrees clockwise. Keyboard shortcut for Rotate Right is key R.
Flip Horizontally
This button will mirror the image horizontally. Keyboard shortcut for Flip Horizontally is key H.
Flip Vertically
This button will mirror the image vertically i.e., turns an image upside down. Keyboard shortcut for Flip Vertically is key V.
Open File
It will open a new image file. You can also open an image from a folder in File Manager by using the Drag-and-Drop option on Image Viewer.
Save File
It will save an image with changes which you have done. It will replace the original file. The keyboard shortcut key is S.
Save File as
It will save an image, with the changes which you have done, with a new filename. It will not replace the original file.
Delete
It will delete an image from the storage device. If you use this button, an image will be deleted permanently and won’t be recovered.
Preferences
This button holds the settings, which you can change for the Image Viewer. It permits you to customize the settings as per your needs.
Exit Image Viewer
As the name implies, it will close the Image Viewer application. We can also use the close button (X) which is in the top right.
Text Editor
PIXEL has a simple text editor called Leafpad. You can find it by clicking the Text Editor in the Accessories part of the Application Menu. Leafpad text editor is good for writing and word processing but not ideal for creating the print-ready documents.
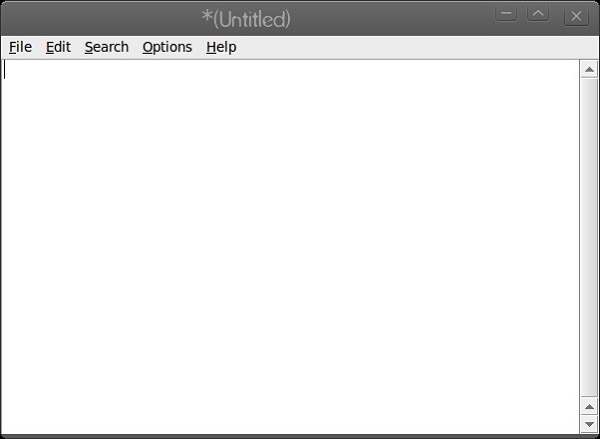
Leafpad
The menu on Leafpad consists of the following buttons −
File Menu
You can use this menu to start the new documents as well as to open, save, and print the files. It has a quit option, which we can use to close the text editor.
Edit Menu
The Edit menu gives you the tools to do the following tasks −
- Undoing your work.
- Redoing your work.
- Cutting the work.
- Copying your work.
- Pasting the work.
- Deleting the work.
- Selecting all the text.
It uses the same shortcuts as MS Windows, as mentioned below −
- Ctrl+C − To copy the work.
- Ctrl+V − To paste the work.
- Ctrl+X − To cut the work.
- Ctrl+A − To select all the text.
Search Menu
This menu gives us the following options −
- To find a particular word or phrase.
- Jump to a particular line in a document.
- Replace a chosen word or phrase with an alternative.
Option Menu
This menu gives us the following options −
- To change the font.
- Switch on word wrap.
- Switch on line numbers.
Customize your Desktop
You can change the look and feel of your desktop and make it easier to use by doing some changes. The options to customize your desktop are under the Preferences section of the Application menu.
With these options we can do the following −
- Change the picture used as a backdrop i.e., wallpaper.
- Change desktop color, if not using wallpaper.
- Change the color of icon descriptions i.e., the text color.
Install New Applications
Although, we can use the command line to discover and install new software, but, there is also a friendly menu in the PIXEL desktop environment. For that menu, we need to go to the Preferences option and click on ADD/REMOVE software.
This menu has the following parts that helps us to find and install new applications −
Search box
The search box is at the top left. Here, you can enter the name of a program you are looking for and it will show you the options.
Main pane
It shows us the packages. The already installed packages will be checked and would be in bold. Tick the box titled decide it, if you want to install that package.
After choosing your software, you need to click the Ok button to install and remove the applications. It will prompt for entering the password.
Back up the data
To back up your data, you can use File manager to copy them to a USB key or MicroSD card. Raspberry Pi provides us an application called the SD Card Copier application for copying data.
You can also use the shell commands, which we will discuss further.