- Qlikview Tutorial
- QlikView - Home
- QlikView - Overview
- QlikView - Desktop Installation
- QlikView - Architecture
- QlikView - Navigation
- QlikView Data Loading
- QlikView - Excel file
- QlikView - Delimited file
- QlikView - XML file
- QlikView - Web file
- QlikView - Database
- QlikView - Inline Data
- QlikView - Resident Load
- QlikView - Preceding Load
- QlikView - Incremental Load
- QlikView - Data - files(QVD)
- QlikView Report Interface
- QlikView - Sheet and Objects
- QlikView - Scripting
- Qlikview - Functions
- QlikView - IntervalMatch
- QlikView - Aggregate Functions
- QlikView - Match Function
- QlikView - Rank Function
- QlikView - Peek Function
- QlikView - RangeSum Function
- QlikView - Documents
- QlikView - List Box
- QlikView - Multi Box
- QlikView - Text Object
- QlikView - Bar Chart
- QlikView - Pie Chart
- QlikView - Dashboard
- QlikView Data Transformation
- QlikView - Transformation Wizard
- QlikView - Fill Function
- QlikView - Column Manipulation
- QlikView - Rotating Tables
- QlikView Data Model
- QlikView - Dimensions & measures
- QlikView - Star Schema
- QlikView - Synthetic Key
- QlikView - Generating Data
- QlikView Data Analysis
- QlikView - Cross Tables
- QlikView - Straight Tables
- QlikView - Pivot Tables
- QlikView - Set Analysis
- QlikView - Joins
- QlikView - Keeps
- QlikView - Concatenation
- QlikView - Master Calendar
- QlikView - Mapping Tables
- QlikView - Circular Reference
- Qlikview Useful Resources
- Qlikview - Questions/Answers
- Qlikview - Quick Guide
- Qlikview - Useful Resources
- Qlikview - Discussion
QlikView - Excel Files
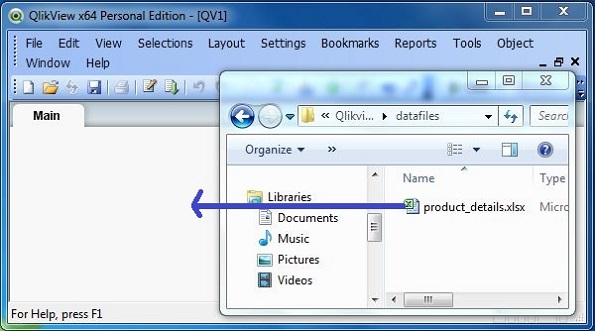
QlikView accepts Excel spreadsheet for data analysis by simple drag and drop action. You need to open the QlikView main window and drag and drop the excel file into the interface. It will automatically create the sheet showing the excel data.
Select the Excel file
Keep the main window of QlikView open and browse for the excel file you want to use.
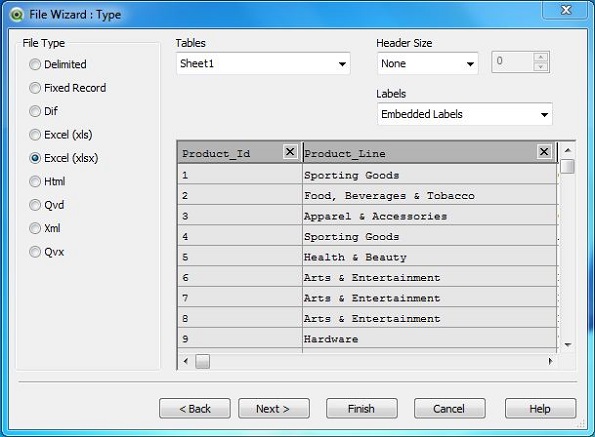
Select a Data Source
On dropping the excel file into the main window, the File wizard appears. The File Type is already chosen as Excel. Under Labels, choose Embedded Labels. Click "Next step" to proceed.
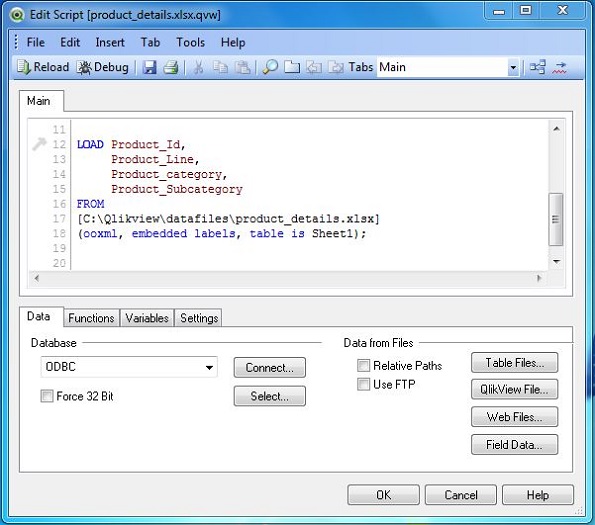
Load Script
The Load script appears which shows the command that loads the data into the QlikView document. This command can be edited.
Now, the Excel wizard prompts to save the file in the form of *.qvw file extension. It asks to select a location where you need to save the file. Click "Next step" to proceed. Now it is time to see the data that is loaded from the Excel file. We use a Table Box sheet object to display this data.
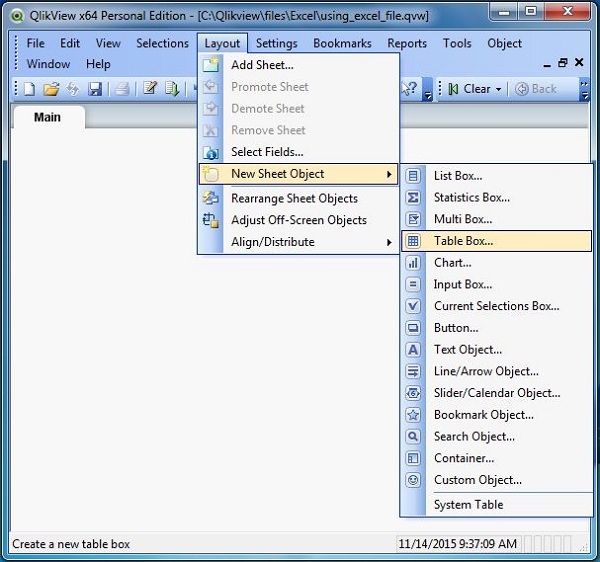
Create Table Box
The Table Box is a sheet object to display the available data as a table. It is invoked from the menu Layout → New Sheet Object → Table Box.
On clicking Next, we get the option to choose the fields from the Table Box. You can use the Promote or Demote buttons to rearrange the fields.
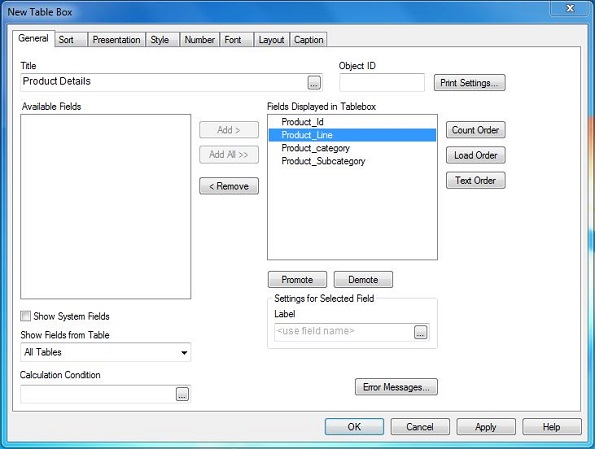
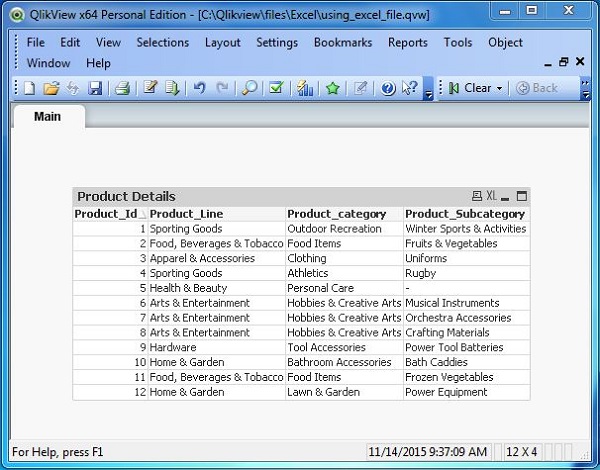
Table Box Data
On completing the above step, the Table Box Sheet Object appears which shows the data that is read from the Excel file.