- Python Web Development Libraries
- Home
- Introduction
- Python Frameworks
- Django Framework
- Flask Framework
- Web2py Framework
- Pyramid Framework
- Dash Framework
- Choosing a Better Framework
- Useful Resources
- Quick Guide
- Useful Resources
- Discussion
Python Web Development Libraries - Quick Guide
Python Web Development Libraries - Introduction
Whenever a user opens any web browser like Google Chrome or Mozilla and search for ‘Web development’, thousands of results appear in no time. What makes this possible? Web development! It broadly refers to the work associated with building, creating and maintaining websites for hosting via intranet or internet. The work associated in website design contain multiple areas: web programming, database management, web design, web publishing, etc.
Web development includes all the codes that influence a website to run. We can separate the whole process of web development into two categories −
- Front-end
- Back-end
Though frontend and backend web development are certainly distinct from each other, they are also like two sides of the same coin. A complete website relies on each side communicating and operating effectively with the other as a single unit. Both front-end and back-end are equally important in web development.
The front-end or client-side of an application is the code responsible for everything the user directly experiences on screen from text colors to buttons, images and navigation menus. Some of the common skills and tools which are used by front-end developers are listed below −
- HTML/CSS/JavaScript
- CSS preprocessors
- Frameworks
- Libraries
- Git and Github
Generally, the back-end/server-side of an application is responsible for managing information within the database and serving that information to the front-end. The back-end of a website consists of a server, application, and database. In general, it involves everything that happens before hitting your browser. The tools required in back-end web development are −
Programming language − Ruby, PHP, Python, etc.
Database − MySQL, PostgreSQL, MongoDB, Oracle, etc.
Why Web Development?
In today’s world, there are multiple choices to promote your business or skills and share your ideas. Some of them are promotion through websites, native applications in marketplaces, etc. The trend of creating new website as a tool of business development is rapidly gaining momentum around the world. But, some of us may be unaware of the importance a website holds in the growth of a business.
Currently there are numerous start-ups struggling to establish their presence in the open market. However, it is also true that most of them fail to gain as much targeted audience as they want. One primary reason which is bringing them down is that they underestimate the potential of a full feature developed website to earn business for them. Website development for business or any other purpose can prove quite fruitful.
Let us look at some of the important reasons why website development is important for business growth −
Reaching out to your audiences
Online websites can reach to broadest audience and are not restricted to a platform that constrain native applications. The viewers or customers can have easy access i.e. from a desktop/laptop to a mobile device, as websites have the capability to display the content through web browser.
In comparison to native application, web browsing is much simpler because it does not require users to access the app store on their devices or download their app (which may include one or more processes in accessing to your contents). Distribution of your data is much more flexible and agile with web-based application than native ones as there are no stringent app store requirements and content restrictions to follow.
Another tool which is very helpful for web development is the power of utilizing SEO techniques to target your audiences.
24/7 Accessible
Instead of establishing a physical outlet for the company, if the business owner develops a website as an online forum or similar, there will be good chance of gaining larger audience online to link up. This is because, most of the people are wired up with the Internet all day.
Generally, people prefer to go for the smartest way to check online first and then take a decision. So if the business owner fills all the basic details of the product and make a secure way to get the product to the customer in timely manner, then people will prefer buying online instead of visiting the outlet physically. This also allows people to access it even in the oddest hour of the day.
Convenience
A fully functional website provides greater advantage for users where they can always tune in and look for what they need. Generally, users avoid going to stores physically if they have an option to get it online. So, if you are a smart businessman, you would prefer to have all the details of your products or your stores on the website only to earn business, which you otherwise might not.
Global Marketing
With an online website, you can link up to social forums and market your product/service to a huge audience all around the globe. With this, you can regularly advertise and share your work on social forums to gain much higher footprints of targeted audience.
Credible Source
An online portal is the most trustworthy platform for any company/organization. Sometimes official websites can even function as their sole office. Consider a scenario, where it is not easy to get access to a company’s physical location. In such case, you can overcome this worry by focusing on their website.
In short, by developing a website, you can promote your services by a few clicks and you can grab the attention of consumers from various parts of the world. The website of a company can prove remarkable to gain business not only in a shorter time but also with a much bigger audience.
Python Frameworks
Python is one of the most acceptable languages among web and application developers because of its strong emphasis on efficiency and readability. There are numerous outstanding Python web frameworks, each with their own specialities and features.
Django
Here, we will outline some necessary details and features of Django framework.
Category − Django belongs to the full-stack Python framework.
Release − Latest release – 2.1 version, commonly used release – 1.8, 1.6 version.
About − Built by experienced developers, Django is a high level Python web framework which allows rapid, clean and pragmatic design development. Django handles much of the complexities of web development, so you can focus on writing your app without a need to reinvent the wheel. It’s free and open source.
To map objects to database table, Django uses ORM and the same is used to transfer from one database to other.
It works with mostly all important databases like Oracle, MySQL, PostgreSQL, SQLite, etc.
There are numerous websites in the industry which uses Django as their primary framework for backend development.
Features of Django
Some of the exemplary features of this Python web framework are −
- URL routing
- Authentication
- Database schema migrations
- ORM (Object-relational mapper)
- Template engine
The Official Website for Django framework is −https://www.djangoproject.com/

Flask
Category − Flask belongs to Non Full-stack frameworks.
Release − 1.0.2 released on 2018-05-02
About − It is classified as a micro-framework as we don’t require any particular libraries or tools. It has no form validation or database abstraction layer or any other components where pre-existing third party libraries provide common functions. However, flask support multiple extensions which extended the application features as if they were implemented in Flask itself. Extensions exist for object-relational mappers, form validation, upload handling, various open authentication technologies and several common frameworks related tools.
Features of Flask
- Integrated support for unit testing
- Restful request dispatching
- Contains development server and debugger
- Uses Jinja2 templating
- Support for secure cookies
- Unicode-based
- 100% WSGI 1.0 compliant
- Extensive documentation
- Google App Engine compatibility
- Extensions available to enhance features desired
Web2py
Category − Web2py belongs to Full-stack framework family.
Release − 2.17.1, released on 2018-08-06
About − Python 2.6, 2.7 to Python 3.x version. With no further dependencies, it’s a complete package in itself. Development, database administration, debugging, deployment, testing, and maintenance of applications all can be done through web interface, but generally not required. It is a scalable open source framework that comes with its own web-based IDE alongside a code editor, one-click deployment and debugger.
Features of Web2py
This framework comes with many developing tools and built-in features that eliminate the hassle of complexity to the developers.
With no installation and configuration, it is easy to run.
Supports almost all major operating system, like Windows, Unix/Linux, Mac, Google App Engine and almost all web hosting platform through Python 2.7/3.5/3.6/ version.
Easy to communicate with MySQL, MSSQL, IBM DB2, Informix, Ingres, MongoDB, SQLite, PostgreSQL, Sybase, Oracle and Google App Engine.
It prevents the most common types of vulnerabilities including Cross Site Scripting, Injection Flaws, and Malicious File Execution.
Supports error tracking and internationalization.
Multiple protocols readability.
Employs successful software engineering practices that makes code easy to read and maintain.
Ensure user-oriented advancements through backward compatibility.
Pyramid
Category − Pyramid is a non-Full Stack Frameworks
Release − 1.9.2, released on 2018-04-23
About − Pyramid is a small, fast, down-to-earth Python web framework. It is developed as part of the Pylons Project. It is licensed under a BSD-like license. It makes real-world web application development and deployment more fun, more predictable and more productive.
Features of Pyramid
Python Pyramid is an open sourced framework with the following features −
Simplicity − Anyone can start to work with it without any prior knowledge about it.
Minimalism − Quite out of the box, Pyramid comes with only some important tools, which are needed for almost every web application, may it be security or serving static assets like JavaScript and CSS or attaching URLs to code.
Documentation − Includes exclusive and up to date documentation.
Speed − Very fast and accurate.
Reliability − It is developed, keeping in mind that it is conservative and tested exhaustively. If not tested properly, it will be considered as broke.
Openness − It’s sold with a permissive and open license.
Dash
Category − The Dash framework belongs to “other” Python web frameworks.
Release − 0.24.1, core dash backend.
About − Dash as an open source library for creating interactive web-based visualizations. The plotly team created Dash – an open source framework that leverages Flask, React.js and plotly.js to build custom data visualization apps. Key highlight of this library is that you can build highly interactive web application only through Python code. Data scientists love dash framework, specially all those who are less familiar with web development.
With Dash, developers get access to all the configurable properties and underlying Flask instance. The applications developed using Dash framework can be deployed to servers and are eventually rendered in the web browser.
Dash applications are inherently cross-platform (Linux/Win/Mac) and mobile friendly and the capabilities of applications can be extended by the rich set of Flask Plugins.
Features of Dash
- Provides access to configurable properties and Flask instance
- Through Flash plugins, we can extend the capabilities of the Dash application
- Mobile-ready
Django Framework
In this chapter, we will discuss about Django Framework in detail.
Django is an MVT web framework that is used to build web applications. The huge Django web-framework comes with so many “batteries included” that developers often get amazed as to how everything manages to work together. The principle behind adding so many batteries is to have common web functionalities in the framework itself instead of adding latter as a separate library.
One of the main reasons behind the popularity of Django framework is the huge Django community. The community is so huge that a separate website was devoted to it where developers from all corners developed third-party packages including authentication, authorization, full-fledged Django powered CMS systems, e-commerce add-ons and so on. There is a high probability that what you are trying to develop is already developed by somebody and you just need to pull that into your project.
Why should you use Django?
Django is designed in such a way that encourages developers to develop websites fast, clean and with practical design. Django’s practical approach to getting things done is where it stands out from the crowd.
If you’re planning to build a highly customizable app, such as social media website, Django is one of the best frameworks to consider. Django strength lies in its interaction between users or its ability to share different types of media. One of the great advantage of django is its ability to utilize large community-based support which gives you highly customizable third-party ready to use plugins in your applications.
Below are the top ten reasons to choose Django for web development −
Python
Python is arguably one of the easiest programming languages to learn because of its simple language constructs, flow structure and easy syntax. It is versatile and runs websites, desktop applications and mobile applications embedded in many devices and is used in other applications as a popular scripting language.
Batteries Included
Django comes with common libraries which are essential to build common functionalities like URL routing, authentication, an object-relational mapper (ORM), a templating system and db-schema migrations.
Built-in admin
Django has an in-built administration interface which lets you handle your models, user/ group permissions and to manage users. With model interface in place, there is no need for a separate database administration program for all but advanced database functions.
Doesn’t get in your way
Creating a Django application adds no boilerplate and no unnecessary functions. There’s no mandatory imports, third-party libraries and no XML configuration files.
Scalable
Django is based on MVC design pattern. It means that all the entities like db (database), back-end and front-end code are individual entity. Django allows us to separate code from the static media including pictures, files, CSS and JavaScript that make up your site.
Django supports a full list of third-party libraries for web servers, caching, performance management, clustering and balancing. One of the advantages Django provides is the support for major email and messaging applications and services like ReST and OAuth.
Battle tested
Django was first open-sourced in 2005. After 12 years of growth, Django now not only runs news publishing websites but also runs all or part of major global enterprise like Pinterest, Instagram, Disqus, Bitbucket, EventBrite and Zapier. This makes it a robust and reliable web framework to work with.
Huge package support
Because of its large community support and huge developers network, there is a high possibility that whatever you intend to do might have been done before. Large international community of developers contribute to the community by releasing their projects as open-source packages.
One such repository of these projects is Django Package site. Currently, Django packages list over 3400 plus reusable Django apps, sites and tools to use in our Django projects.
Actively developed
One of the biggest risks associated with open source project is its sustainability. We cannot be sure if it lasts long.
There is no such risk with Django as it is 12 years old. Its consistent releases, newer/better versions and active community is growing every-day with a large core team of voluntary contributors who maintains and improve the code base every-day.
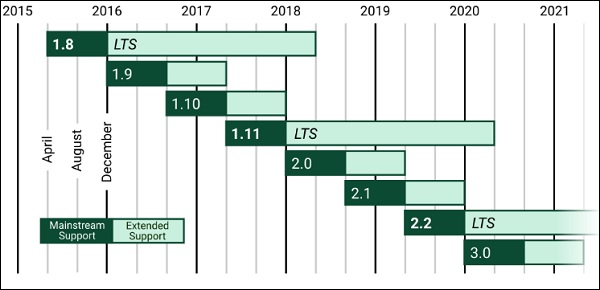
Stable releases
Open-source software projects like Django are, in many cases, actively developed and more secure than competing proprietary software as many developers are developing and testing it every day. However, the drawback of an open-source software project is the absence of a stable codebase to commercially viable development.
In Django, we have Long Term Support (LTS) versions of the software and a defined release process as shown in the below image −
First Class Documentation
From the very first release, Django developers made sure that there must be proper comprehensive documents available and the tutorials are easily understand.
Who’s Using Django?
Because of the Django’s unique strength, there are multiple popular websites which are built with Python on top of the Django framework. Below are some of the major sites which are fully or partially built based on Django.
Disqus
It is one of the most preferred blog comment-hosting sites globally. It is easy to integrate with most popular CMS (content management systems) like WordPress and many others through Disqus. Handling a user-base of over 50 million, Django is able to satisfy the site owners to reach out to their communities.
The Onion
The Onion website which provide an online venue for their satirical newspaper, Django provides the framework for it.
Bitbucket
Bitbucket is like GitHub, a version control repository hosting service. The only difference between Bitbucket and GitHub is that Bitbucket hosts mercurial repositories whereas GitHub hosts git repositories. As millions of users are associated with Bitbucket, and all the services which bitbucket provides (like create a repo, push your code, add collaborators, commits, pull request, etc.) has to be stable. Django is responsible for running the bitbucket site.
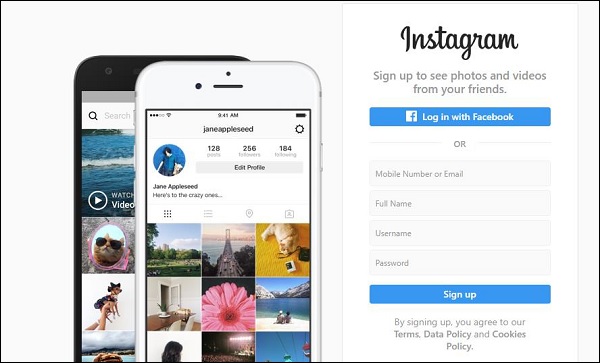
Instagram is a social networking app built especially for those who love to share photos and videos to all their friends. Currently there are a lot of celebrities on Instagram so as to stay closer to their fans. Django framework is running the Instagram too.
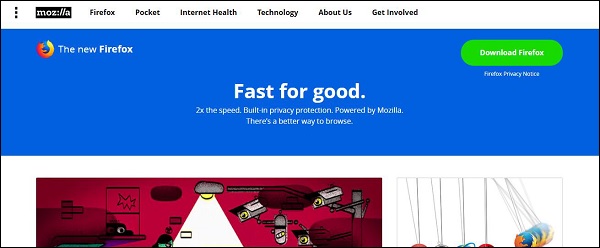
Mozilla Firefox
Second most widely used browser in the world after Google Chrome is the Mozilla browser. Now the help page of Mozilla is built with Django framework.
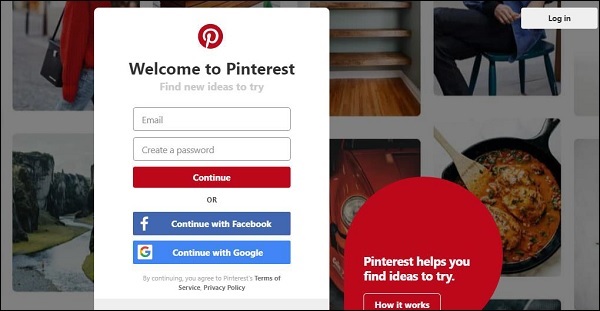
Millions of users around the globe discover their new ideas and inspiration from Pinterest. Pinterest is using the Django framework (done modification as per their requirement) to run it.
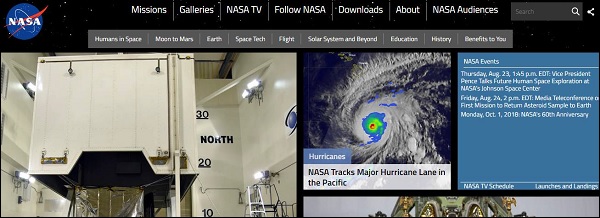
NASA
The National Aeronautics and Space Administration’s official website is a place for millions of users to visit and check out the news, images, videos and podcasts provided by the premiere agency. Django develops some specific parts of official NASA website.
The Washington Post
If there’s one influential newspaper in the world, it is certainly the Washington Post. The Washington Post’s website is a hugely popular online news source to accompany their daily paper. Its huge amount of views and traffic has been easily handled by Django web framework.
Reddit Gifts
The massively popular Reddit website has launched an online, anonymous gift exchange and meetup platform called Reddit Gifts. The site connects users from around the world and facilitates gifts exchange between them. The Django web framework powers its functionalities.
Prezi
Prezi is a cloud based alternative to Microsoft PowerPoint built on the Django framework. The site provides a virtual canvas that can be manipulated and zoomed in and out. This provides the entire view of the presentation rather than individual slides.
Installing and Creating a Django project and app
Before installing Django, we have to make sure that Python is installed. Assuming you are using virtualenv, a simple pip install django should suffice.
Installing virtual environment and Django
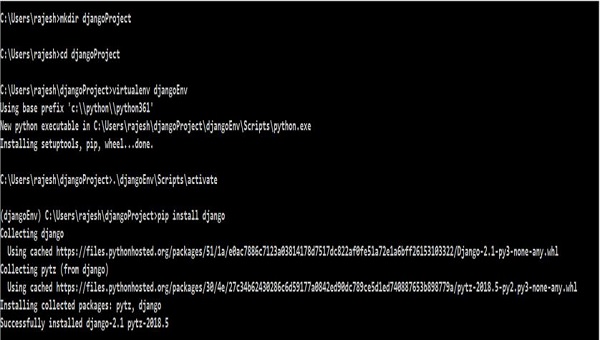
Below is the process to install virtual environment and Django in your windows environment −
To verify if the Django is installed properly, type the code given below −

Creating Django Project
Once the installation is completed, we need to create a Django project.
Running the below command in your windows machine will create the following django project −
django-admin startproject my_project_name

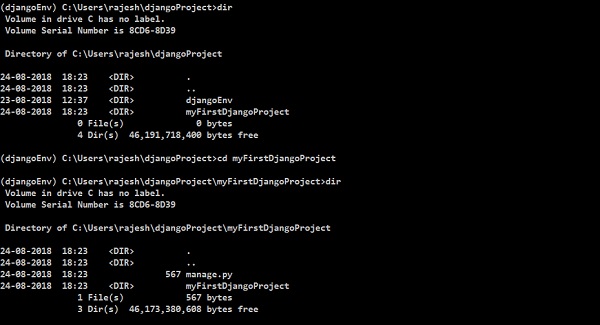
Typing dir will show one new file and one new directory as shown above.
manage.py − manage.py is a command-line-executable Python file which is just a wrapper around django-admin. It helps us manage our project which is implied in its name as well.
With this, it created a directory called, myFirstDjangoProject inside myFirstDjangoProject which represents the configuration root for our project. Let us explore much deeper into it.
Configuring Django
By calling the myFirstDjangoProject directory “configuration root”, we mean this directory holds the files necessary for generally configuring our Django project. Pretty much everything outside this directory will be focused solely on the “business logic” associated with the project’s models, views, routes, etc. All points that connect the project together will lead here.
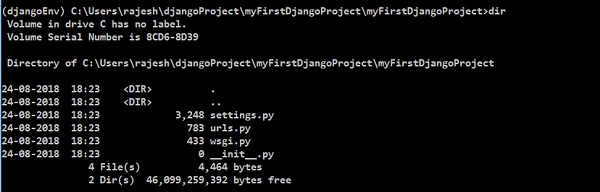
__init__.py − This is empty and changes the directory into an importable Python package.
settings.py − As the name suggest, it is the place where most configuration items will be set.
urls.py − The URLs are set with urls.py. With this, we don’t have to explicitly write every URL for the project in this file. However, we have to tell Django about where the URLs have been declared (i.e., we need to link other URL in urls.py).
Wsgi.py − This is to help application in production and is similar to other applications like Flask, Tornado, Pyramid which exposes some “app” object.
Setting the settings
Taking a look inside settings.py will reveal its considerable size – and these are just the defaults. Other things that we need to take care are the static files, database, media files, cloud integration or other dozens of ways that a Django project can be configured. Let’s understand some points mentioned in the settings.py file −
BASE_DIR − This is helpful for locating files. Inside the setting.py file, BASE_DIR parameter sets the absolute path to the base directory.
SECRET_KEY − It is used for making hashes. In general, we used secret_key for cookies, sessions, csrf protection and auth tokens.
DEBUG − We can set it to project running either in development or production mode.
ALLOWED_HOSTS − We provide the list of hostnames through which our application is being served. In development mode, it is optional to set; however, in production machine, we need to set our Django project.
INSTALLED_APPS − It is the list of Django “apps” that are currently installed and running in our Django project. In-built Django provides six installed apps as follows −
'django.contrib.admin'
'django.contrib.auth'
django.contrib.
django.contrib.sessions
django.contrib.messages
django.contrib.staticfiles
MIDDLEWARE − It helps our Django project to run. It’s a python class that hooks into django request/response processing.
TEMPLATES − It defines how the document should be displayed in the frontend. Django templates are used for producing any text-based format.
WSGI_APPLICATION − Any server we set up has to know where the WSGI file is. In case you’re using an external server, it will look in its own settings. By default, it points to objects in wsgi.py.
DATABASES − It sets to the databases our Django project is currently accessing. It is mandatory to set default database. In case we set the database of our choice, we need to mention few things related to database like - HOST, USER, PASSWORD, PORT, database NAME, and appropriate ENGINE.
STATIC_URL − It is the URL to use when referring to static files located in STATIC_ROOT. By default, it’s None.
However, we may need to add a path for static files. Go down to the end of the file, and just underneath the STATIC_URL entry, add a new one called STATIC_ROOT as shown below −
myFirstDjangoProject/settings.py
STATIC_URL = '/static/'
STATIC_ROOT = os.path.join(BASE_DIR, ‘static’)
Setting up a Database
There’s a lot of different database software that can store date for your site. We’ll use the default one, sqlite3.
This is already set up in the below given part of your myFirstDjangoProject/settings.py −
DATABASES = {
   'default': {
      'ENGINE': 'django.db.backends.sqlite3',
      'NAME': os.path.join(BASE_DIR, 'db.sqlite3'),
   }
}
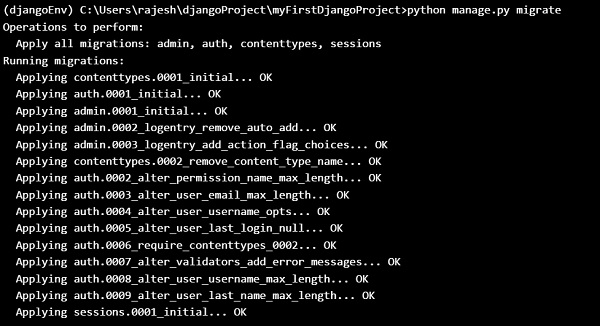
To create a database for our blog, let’s run the following in the console − python manage.py migrate (we need to be in the myFirstDjangoProject directory that contains the manage.py file.
You will get the following output if everything goes well −
Starting the Web Server
You need to be in the directory that contains the manage.py file. In the console, we can start the web server by running python manage.py runserver as follows −
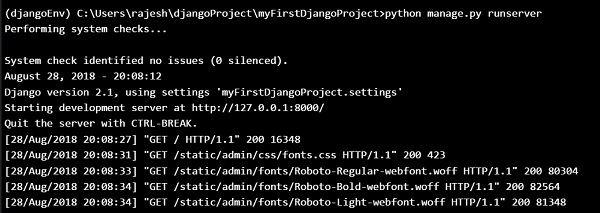
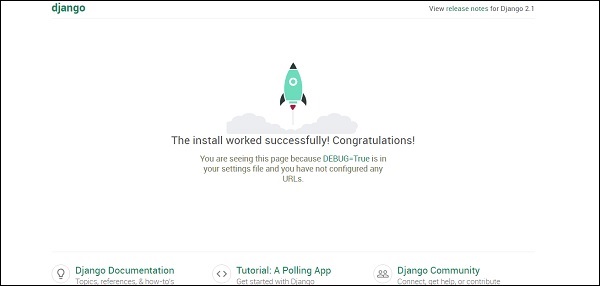
Now all you need to do is check that your website is running. Open your browser (Firefox, Chrome, Safari, Internet Explorer or whatever you use) and enter this address −
http://127.0.0.1:8000/
or
http://localhost:8000/ # As our webserver is running in our local machine only.
Congratulations! You’ve just created your first website and run it using a web server!
While the web server is running, you won’t see a new command-line prompt to enter additional commands. The terminal will accept next text but will not execute new commands. This is because the web server continuously runs in order to listen to incoming requests.
Django Models
We are trying to create a Django model that will store all the posts in our blog. But to make sure it works, we need to learn about objects.
Objects
Objects is a collection of properties and actions. Let us understand this with an example. Suppose we want to model a cat, we will create an object called Cat that has properties such as color, age, mood (good/bad/sleepy) and owner.
Then the Cat has some actions: purr, scratch or feed.
Cat
--------
color
age
mood
owner
purr()
scratch()
feed(cat_food)
CatFood
--------
taste
So basically we are trying to describe real things in code with properties (called object properties) and actions (called methods).
As we are building a blog, we need some text content and a title. It is also necessary to have the author’s name, date of creation and also the date of publication.
So our blog will have the following objects −
Post
--------
title
text
author
created_date
published_date
Also we need to have some method that publishes that post. As we are now aware of what an object is, we can create a Django model for our blog post.
A model is a special kind of object in Django and is saved in the database. We will store our data in SQLite database.
Creating an application
To keep everything clear, we will create a separate application inside our project. Below, we’ll try to create a blog web application by running below mentioned simple command.
Now we will notice that a new myBlog directory is created and it contains a number of files now. The directories and files in our project should be as following −
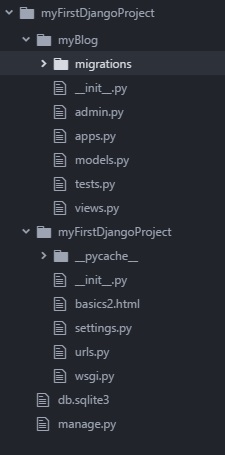
After creating an application, we also need to tell Django to use it. We do that in the file myFirstDjangoProject/settings.py.
INSTALLED_APPS = [
   'django.contrib.admin',
   'django.contrib.auth',
   'django.contrib.contenttypes',
   'django.contrib.sessions',
   'django.contrib.messages',
   'django.contrib.staticfiles',
   'myBlog',
]
Creating a blog post model
In the myBlog/models.py file, we define all objects called Models – this is a place in which we will define our blog post.
Let’s open myBlog/models.py, remove everything from it, and write code as follows −

Firstly, we import some functionalities from other files by calling from or import. So with this, instead of copying and pasting the same things in every file, we can include some parts with from and import.
class Post(models.Model) − This line defines our model (it is an object).
class is a special keyword that indicates that we are defining an object.
Post is the name of our model. Always start a class name with an uppercase letter.
models.Model means that the Post is a Django Model, so Django knows that it should be saved in the database.
Now let us discuss about the properties we defined above: title, text, created_date, published_date and author. To do that, we need to define the type of each field.
models.CharField − This is how you define text with a limited number of characters.
Models.TextField − This is for long text without a limit.
Models.DateTimeField − This is for date and time.
Models.ForeignKey − This is a link to another model.
We define a function/method with def and publish is the name of the method.
Methods often return something. Here when we call __str__(), we will get a text (string) with a Post title.
Creating tables for models in your database
The final step is to add a new model to our database. First, we have to let Django understand that we have made some changes in our model. Let us do the same in our console window with command python manage.py make migrations myBlog as shown below −

Then, Django prepares a migration file that we now have to apply to our database. In our console we can type: python manage.py migrate myBlog and the output should be as follows −

Our Post model is now in our database.
Django Admin
To add, edit and delete the posts we’ve just modelled, we are using Django admin.
So let us open the myBlog/admin.py file and put below contents in this −
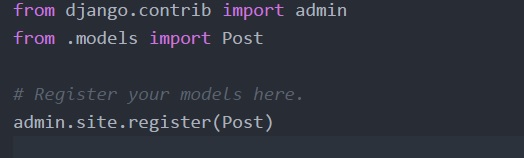
Firstly, we import (include) the Post model defined in the previous chapter. To make our model visible on the admin page, we need to register the model with admin.site.register (Post).
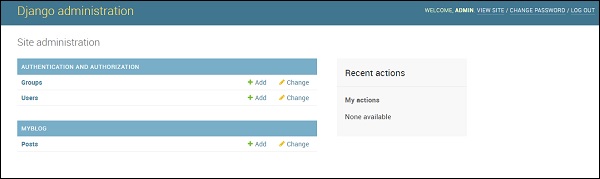
To login to an admin site, you need to create a superuser – a user account that has control over everything on the site. So stop the webserver and type in command line python manage.py createsuperuser, and press enter.

Ok, so it’s time to look at our Post model. Remember to run python manage.py run server in console to run the web server. Go to your browser and type the address https://127.0.0.1:8000/admin/. Log in with the credentials we have just chosen. Then you should see the Django admin dashboard as below −
Go to Posts and experiment a little with it. You can add many blog posts, and contents from anywhere. Your blog will look something like this −
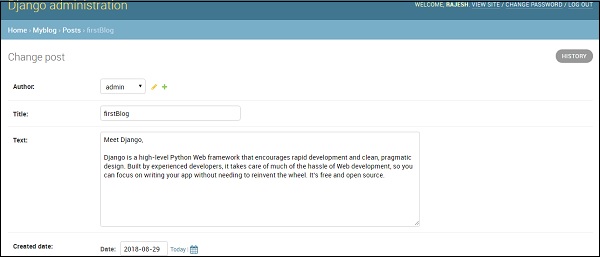
This is just an overview of Django and we are able to create a blog with just a few lines of code.
Flask Framework
Flask is micro-framework which has very little dependency on external libraries. It is a very light framework and gives us freedom to do whatever we want.
In this chapter, we are going to build a project using Python and Flask framework.
Flask Startup and Configuration
Like most widely used python libraries, the Flask package is installable from the Python Package Index (PPI). Let’s create a directory first (In this chapter, we have created a directory called flaskProject) then created a virtual environment (and called it as flaskEnv) where all the project related dependencies will be loaded (including flask). You can also install flask-sqlalchemy so that your flask application has a simple way to communicate with SQL database.
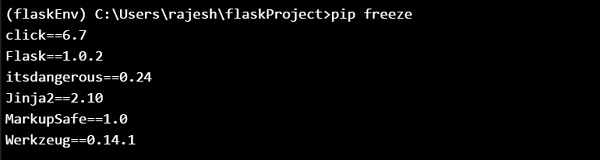
After installing the flask, your flaskEnv (our virtualEnvironment name) will show something like below −
Creating an app with flask
By installing flask, we can create a simple “hello application in flask” with very few lines of code as follows −

Type the following in the terminal −
$python flaskapp.py
And you can see the following output −
Running on http://127.0.0.1:5000/ or on localhost:5000

Below is the explanation of what we did in our example code −
Firstly, we import the Flask class library. An instance from this class is the WSGI app.
Secondly, we create an instance of this class. Application package or module name is our first argument. It is mandatory that flask knows where to find static files, templates and other files.
Next is the route() decorator we use to know which URL should trigger our method/function.
Creating URL Routing
URL Routing makes URLs in your Web app easy to remember. We will now create some URL routes −
/hello
/members
/members/name
We can write the following code based on the above URL and save it as app.py.
from flask import Flask, render_template

app = Flask(__name__)

@app.route('/')
def index():
   return "Index!"

@app.route('/Hello')
def hello():
   return "Hello, World!"

@app.route("/members")
def members():
   return "Members"

@app.route("/members/<name>/")
def getMember(name):
   return name

if __name__ == '__main__':
   app.run(debug=True)
On restarting the application, we use the below lines of code to get different outputs on various URLs −
$ python app.py
Running on http://localhost:5000/
We will get the following output in our browser −

We can try other URLs in our browser as follows −
Running on http://localhost:5000/hello, will give the following output −

Running on http://localhost:5000/members, will give −

Running on http://localhost:5000/members/TutorialsPoint/, will give you the following output −

But normally we don’t want to return a string (as above), we return templates. For that we want to use a function “render_template” from flask, and return render_template with some input. So, below function will do our work −
from flask import render_template
return render_template(‘home.html’)
Let us create a folder template and place home.html file in it.
Next, we will discuss about layout. Instead of using html head tag and body tag for every single template, we will design a layout to include head & body tags and wrap the current views or current template. For that, we have to create one separate file and call it layout.html. In this, we can put our normal head tag, body tag and all the other required tags.
We can create our new layout.html with the following lines of code −
<!DOCTYPE html>
<html>
   <head>
      <meta charset="utf-8">
      <title>MyFlaskApp</title>
      <link rel="stylesheet" href="https://stackpath.bootstrapcdn.com/bootstrap/4.1.3/css/bootstrap.min.css">
   </head>
   <body>
      {% include 'includes/_navbar.html' %}
      <div class="container">
      {% block body %}
      {% endblock %}
      </div>
      <script src="https://stackpath.bootstrapcdn.com/bootstrap/4.1.3/js/bootstrap.min.js">
      </script>
   </body>
</html>
In above code, we have given the title track, MyFlaskAp, use css cdn in the head, and javascript in body block to enable the bootstrap.
Now, we have to create navbar for every single page. For that, we have to first create an include folder and then create _navbar.html file inside it. Now in the _navbar.html, we have to use the standard starter template from getbootstrap.com. The newly created _navbar.html file will be as follows −
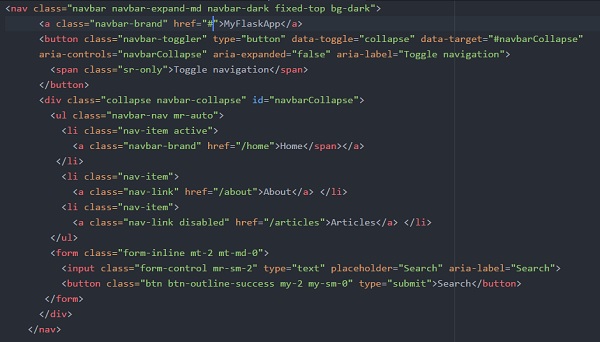
And include this _navbar.html file into our layout.html file.
{% include 'includes/_navbar.html' %}
As we have the layout block, we can extend this block in our home file (home.html).
Our home.html file can be created using the below code −
{% extends 'layout.html' %}
{% block body %}
   <div class="jumbotron text-center">
      <h1>Welcome to FlaskApp</h1>
      <p>This application is built on Flask webframework!</p>
   </div>
{% endblock %}
Using this if we try to run our flaskapp.py file, then we could see the below output in our browser −

Now we want to activate (currently the tabs are not working) our about tab. Create a route for the about tab and create a template file, about.html.
About tab route in appflask.py will be as shown below −

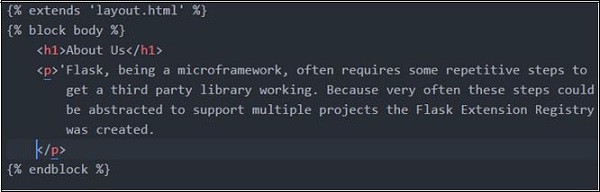
about.html file will have the below content −
So Home and About are now taken care of. For Articles, we can create a new file (data.py) in the root directory, where we put the data and call it in our webpage.
data.py
def Articles():
   articles = [
      {
         'uid': 1,
         'title': 'Article_One',
         'body': 'Flask, being a microframework, often requires some repetitive step
            to get a third party library working. Because very often these steps could
            be abstracted to support multiple projects the Flask Extension Registry
            was created.',
         'Author': 'Rajesh Joshi',
         'Created-on': '07-09-2018'
      },
      {
         'uid': 2,
         'title': 'Article_Two',
         'body': "Flask, being a microframework, often requires some repetitive steps
            to get a third party library working. Because very often these steps could
            be abstracted to support multiple projects the Flask Extension Registry
            was created.",
         'Author': 'Rajesh J',
         'Created-on': '07-09-2018'
      },
      {
         'uid': 3,
         'title': 'Article_Three',
         'body': 'Flask, being a microframework, often requires some repetitive steps
            to get a third party library working. Because very often these steps could be
            abstracted to support multiple projects the Flask Extension Registry
            was created.',
         'Author': 'Joshi Rajesh',
         'Created-on': '07-09-2018'
      }
   ]
   return articles
Below is the code for articles.html, which will display article titles for each uid.
{% extends 'layout.html' %}
{% block body %}
   <h1>Articles</h1>
   {% for article in articles %}
      <li class="list-group-item">
         <a href="article/{{article.uid}}"> {{article.title}}</a>
      </li>
   {% endfor %}
{% endblock %}
To summarize, Flask is one of the most popular python web frameworks because of its lightweight. Although it is micro it is an extensible python web framework. By providing the required functionality, flask accelerates the development of simple web application. So Flask, is more suitable for smaller, less complicated applications.
Web2py Framework
Web2py is an easy-to-use framework. With web2py, no installation and configuration is required as it is portable and can be run on a USD drive too. It is based on the MVC frameworks like many other python frameworks. Though most of them do not support older versions of Python, web2py still supports older versions: python 2.6 and 2.7. It also supports LDAP for authentication which is widely accepted these days.
Web2py tries to lower the barrier of entry to web development by focusing on three main goals −
- Rapid development
- Ease of use
- Security
Keeping in mind the user perspective, Web2py is built and constantly being optimized internally to make it a faster and leaner framework including support for backward compatibility.
Installing and Configuring Web2py Framework
Running a web2py is easy, you need to download the exe from the below link: http://www.web2py.com/init/default/download
For windows, you can download the zip file, unzip it and run the exe file either directly or from the command line. You will be prompted with below screen asking for the admin password.
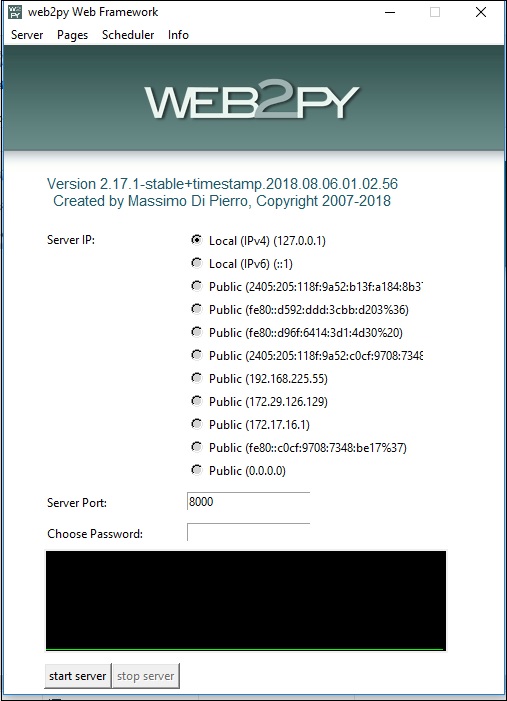
You can choose an administrator password and start the server. You will see the following screen −
Creating an app using Web2py
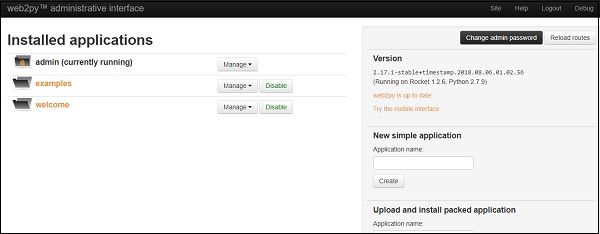
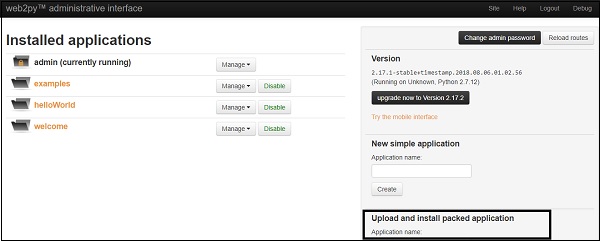
Now we are ready to create a new app. Click on the admin tab located at the bottom. So after entering the admin password, we will get the below screen −
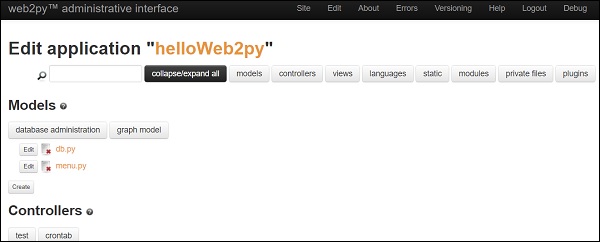
Go to new simple application, enter some application name (like helloWeb2py) and click on create. This will display design interface page as given below −
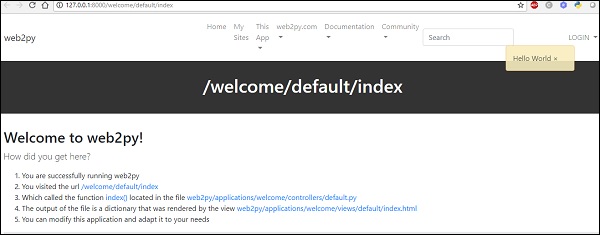
You can also go to your current live web,helloWeb2py, simply type http://127.0.0.1:8000/helloWeb2py on your local machine, you will get the below output −
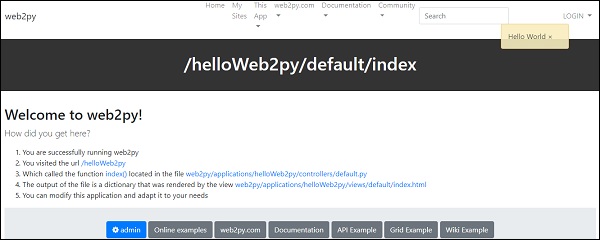
In the design page of helloWeb2py application, go to the controller and click on edit button next to default.py. If you change the return value of the index() function, the following output will be displayed −

Save the changes, and now you can check the changes made in your helloWeb2py app. Just refresh the http://127.0.0.1:8000/helloWeb2py link and you will see the below output −

Deploying the app on cloud platform
Now if you want to deploy your app on cloud platform, come back to your home page and click on the site. You can choose any option for deployment. Here, we choose “pythonAnywhere”. Go to pythonAnywhere website and register yourself (if not already done). Click on “Add a new web app” and fill all the credentials (Choose web2py app). All done.
Now go to https://username.pythonanywhere.com/welcome/default/index, click on admin tab (enter password). Next click on upload and install packed application. Fill the credentials as below and click install.
Once everything is done, a pop-up message will appear as given below −

Now to view your app, open the below link −
https://username.pythonanywhere.com/welcome/default/index and you can see the following screen −

Our first web2py application is successfully created and deployed.
To summarize, Web2py is a free, fast, secure web development framework that is entirely written in python and encourages using python in every way possible (model, view, controller). It is a very good framework for small web applications or prototypes but fails to fulfil the enterprise class quality requirements. It is because, in an enterprise level application, the complexity of solving bugs will increase exponentially because of the lack of unit tests, good and accurate error reporting and scattered model.
Pyramid Framework
Pyramid is a general, open source, web application development framework built in python. It allows python developer to create web applications with ease.
Pyramid is backed by the enterprise knowledge Management System KARL (a George Soros project).Installing, starting up and configuring
As described, “the start small, finish big, stay finished framework”, Pyramid is much like Flask which takes very little effort to install and run. In fact, you’ll recognize that some of the patterns are similar to Flask once you start building this application.
Following are the steps to create pyramid framework environment −
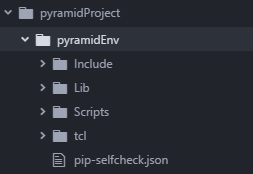
First, create a project directory. Here, we have created a directory named pyramidProject (you can choose any name you want).
Next, create a virtual environment where you will install all the project specific dependencies. Here, we created a virtual environment folder named pyramidEnv where Pyramid is installed.
Then, go to the directory, pyramidEnv and install the pyramid with pip install pyramid.
Once everything is done as mentioned above, your directory structure will be as shown below −
And the pyramid version installed in the system is given below −

Core Concepts
The Pyramid framework is based on below core concepts −
Zope (extensibility, traversal, declarative security) − Pyramid is loosely based on Zope in terms of extensibility, the concept of traversal and the declarative security.
Pylons (URL dispatch, non-opinionated view of persistence, templating, etc.) − Another area from where pyramid draws its concept is the pylons project. Pylons have that concept of routes, that calls the URL dispatch inside the pyramid framework and they also have the non-opinionated view of persistence layer or templating.
Django (View, level of documentation) − Pyramid also gets hint from Django. The way we take our view, routed our URL and the level of documentation is very Django way.
The following are the features of the Pyramid framework −
It is the fastest known Python web framework.
It supports small and large projects (why rewrite when you outgrow your small framework).
It supports single file webapps like microframeworks.
It has built-in sessions.
It supports events similar to Plone/Zope.
It provides Transaction Management (if already have noticed that we have used Zope before).
Configuration
Configuration is the settings that influence the operation of an application. There are two ways to configure a pyramid application: imperative configuration and declarative configuration.
Pyramid configuration supports −
Imperative configuration or even the overriding of the decorator-based configs
Configuration conflict detection (including more local vs. less local determination)
Configuration Extensibility (included from multiple apps)
Flexible Authentication and Authorization Policies
Programmatic Introspection of Configuration (view current state of routes to generate nav)
URL generation
In pyramid, we can generate URLs for routes, resources and static assets. It is easy and flexible to work with URL generation APIs. By generating URLs through pyramid’s various APIs, users can change the configuration arbitrarily without much worry of breaking a link with any of your web pages.
So in short, URL in pyramid −
supports URL generation to allow changes to app that won’t break links.
generates URLs to static resources that live either inside or outside the application.
supports Routes and Traversal.
Views
One of the primary jobs of pyramid is to find and invoke a view callable when a request reaches your application. View callables are bits of code which do something interesting in response to a request made in your application.
When you map your views onto your URL dispatch or python code, there can be any kind of call. Views can be a function declaration or an instance, it can be used as a view in the pyramid.
Some important points about Views are given below −
Views are generated from any callable.
Renderer based views can simply return dictionaries (not required to return a webby style object).
Support multiple views per route (GET vs. POST vs. HTTP Header check, etc.).
View response adapters (when you want to specify how view returns values should be handled vs. response objects).
Extensibility
Pyramid is designed with extensibility in mind. So if a pyramid developer is keeping in mind certain constraints while building an application, a third party should be able to change the application’s behaviour without needing to modify its source code. The behaviour of a pyramid application that obeys certain constraints can be overridden or extended without any modification. It is designed for flexible deployments to multiple environments (No Singletons). Pyramid has “Tweens” middleware support (WSGI middle ware, but runs in the context of Pyramid itself).
Running a Hello, Pyramid Program
The simplest program we can think after installing pyramid framework to check if everything is working fine, is to run a simple “Hello, World” or “Hello, Pyramid” program.
Below is my pyramid “Hello, Pyramid” program on 8000 port number −
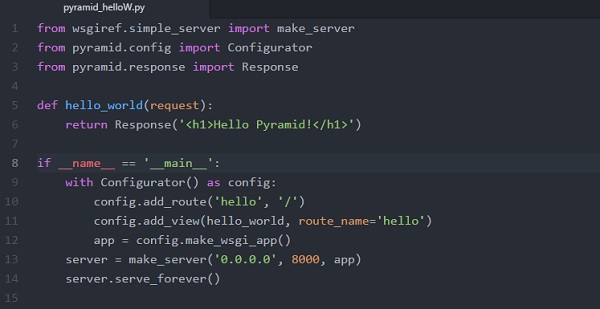
Above simple example is easy to run. Save this as app.py (In this, we have given the name pyramid_helloW.py).
Running the simplest program: −

Next, open http://localhost:8000/ in a browser, and you will see the Hello, Pyramid! Message as follows −

The following is the explanation for above code −
Line no. 1-3
At the head of the file, we have import statements. The first line imports make_server function, which can create a simple web server when it is passed to an application. The second and third line import the configuration and Response function from pyramid. These functions are used to configure details and set parameters for the application and respond to requests, respectively.
Line no. 5-6
Now we have a function definition called hello_world. Implement view code that generates the response. A function that fulfils the requirement of a view is responsible for rendering the text that will be passed back to the requesting entity. In the above case, the function, when called, uses the Response function we imported earlier. This passes back a value that should be given to the client.
Line no. 8
if __name__ == ‘__main__’: Python is saying, “Start here when running from the command line”, rather than when this module is imported.
Line no. 9-11
In line no. 9, we create a variable called config out of the object created by the configurator function that we imported at the top of the program. Line 10 and 11 call the add_route and add_view method of this object. This method is used to define a view that can be used by the application. As we can see, we pass the hello_world function we defined earlier. This is where that function is actually incorporated as a view.
Line no. 12-14
In this, we actually create the WSGI application by calling the make_wsgi_app method of the config object. This uses the object’s attributes, such as the view we added, to create an application. This application is then passed to the make_server function we imported in order to create an object that can launch a web server to serve our application. The last line launches this server.
Our hello world application is one of the simplest and easiest possible pyramid applications, configured “imperatively”. It is imperative because the full power of Python is available to us as we perform configuration tasks.
To summarize, Pyramid is an open source python web framework with a large and active community. This large community contributes towards making the python web framework popular and relevant. Pyramid web framework simplify and accelerate web application development by providing a set of robust features and tools.
Dash Framework
In this chapter, we will discuss about the Dash framework in detail.
Dash is an open-source Python framework used for building analytical web applications. It is a powerful library that simplifies the development of data-driven applications. It’s especially useful for Python data scientists who aren’t very familiar with web development. Users can create amazing dashboards in their browser using dash.
Built on top of Plotly.js, React, and Flask, Dash ties modern UI elements like dropdowns, sliders and graphs directly to your analytical python code.
Dash apps consist of a Flask server that communicates with front-end React components using JSON packets over HTTP requests.
Dash applications are written purely in python, so NO HTML or JavaScript is necessary.
Dash Setup
If Dash is not already installed in your terminal, then install the below mentioned Dash libraries. As these libraries are under active development, install and upgrade then frequently. Python 2 and 3 are also supported.
- pip install dash==0.23.1 # The core dash backend
- pip install dash-renderer==0.13.0 # The dash front-end
- pip install dash-html-components==0.11.0 # HTML components
- pip install dash-core-components==0.26.0 # Supercharged components
- pip install plotly==3.1.0 # Plotly graphing library
In order to make sure everything is working properly, here, we created a simple dashApp.py file.
Dash or App Layout
Dash apps are composed of two parts. The first part is the “layout” of the app which basically describes how the application looks like. The second part describes the interactivity of the application.
Core Components
We can build the layout with the dash_html_components and the dash_core_components library. Dash provides python classes for all the visual components of the application. We can also customize our own components with JavaScript and React.js.
import dash_core_components as dcc
import dash_html_components as html
The dash_html_components is for all HTML tags where the dash_core_components is for interactivity built with React.js.
Using above two libraries, let us write a code as given below −
app = dash.Dash()
app.layout = html.Div(children=[
   html.H1(children='Hello Dash'),
   html.Div(children='''Dash Framework: A web application framework for Python.''')
And the equivalent HTML code would look like this −
<div>
   <h1> Hello Dash </h1>
   <div> Dash Framework: A web application framework for Python. </div>
</div>
Writing Simple Dash app
We will learn how to write a simple example on dash using above mentioned library in a file dashApp.py.
# -*- coding: utf-8 -*-
import dash
import dash_core_components as dcc
import dash_html_components as html

app = dash.Dash()
app.layout = html.Div(children=[
   html.H1(children='Hello Dash'),
   html.Div(children='''Dash Framework: A web application framework for Python.'''),

   dcc.Graph(
      id='example-graph',
      figure={
         'data': [
            {'x': [1, 2, 3], 'y': [4, 1, 2], 'type': 'bar', 'name': 'Delhi'},
            {'x': [1, 2, 3], 'y': [2, 4, 5], 'type': 'bar', 'name': u'Mumbai'},
         ],
         'layout': {
            'title': 'Dash Data Visualization'
         }
      }
   )
])

if __name__ == '__main__':
   app.run_server(debug=True)
Running the Dash app
Note the following points while running the Dash app.
(MyDjangoEnv) C:\Users\rajesh\Desktop\MyDjango\dash>python dashApp1.py
Serving Flask app "dashApp1" (lazy loading)
Environment: production
WARNING: Do not use the development server in a production environment.
Use a production WSGI server instead.
Debug mode: on
Restarting with stat
Debugger is active!
Debugger PIN: 130-303-947
Running on http://127.0.0.1:8050/ (Press CTRL+C to quit)
127.0.0.1 - - [12/Aug/2018 09:32:39] "GET / HTTP/1.1" 200 -
127.0.0.1 - - [12/Aug/2018 09:32:42] "GET /_dash-layout HTTP/1.1" 200 -
127.0.0.1 - - [12/Aug/2018 09:32:42] "GET /_dash-dependencies HTTP/1.1" 200 -
127.0.0.1 - - [12/Aug/2018 09:32:42] "GET /favicon.ico HTTP/1.1" 200 -
127.0.0.1 - - [12/Aug/2018 09:39:52] "GET /favicon.ico HTTP/1.1" 200 -
Visit http:127.0.0.1:8050/ in your web browser. You should see an app that looks like this.
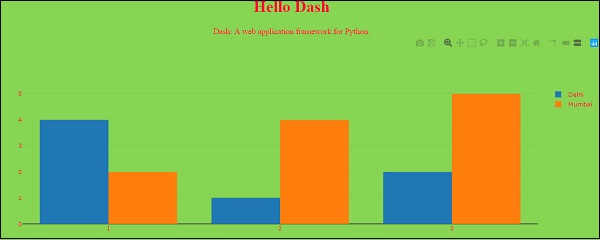
In above program, few important points to be noted are as follows −
The app layout is composed of a tree of “components” like html.Div and dcc.Graph.
The dash_html_components library has a component for every HTML tag. The html.H1 (children = ‘Hello Dash’) component generates a <h1> Hello Dash </h1> HTML element in your application.
Not all components are pure HTML. The dash_core_components describe higher-level components that are interactive and are generated with JavaScript, HTML, and CSS through the React.js library.
Each component is described entirely through keyword attributes. Dash is declarative: you will primarily describe your application through these attributes.
The children property is special. By convention, it’s always the first attribute which means that you can omit it.
Html.H1 (children=’Hello Dash’) is the same as html.H1 (‘Hello Dash’).
The fonts in your application will look a little bit different than what is displayed here. This application is using a custom CSS stylesheet to modify the default styles of the elements. Custom font style is permissible, but as of now, we can add the below URL or any URL of your choice −
app.css.append_css ({“external_url”:https://codepen.io/chriddyp/pen/bwLwgP.css}) to get your file to get the same look and feel of these examples.
More about HTML
The dash_html_components library contains a component class for every HTML tag as well as keyword arguments for all of the HTML arguments.
Let us add the inline style of the components in our previous app text −
# -*- coding: utf-8 -*-
import dash
import dash_core_components as dcc
import dash_html_components as html

app = dash.Dash()
colors = {
   'background': '#87D653',
   'text': '#ff0033'
}

app.layout = html.Div(style={'backgroundColor': colors['background']}, children=[
   html.H1(
      children='Hello Dash',
      style={
         'textAlign': 'center',
         'color': colors['text']
      }
   ),

   html.Div(children='Dash: A web application framework for Python.', style={
      'textAlign': 'center',
      'color': colors['text']
   }),

   dcc.Graph(
      id='example-graph-2',

      figure={
         'data': [
            {'x': [1, 2, 3], 'y': [4, 1, 2], 'type': 'bar', 'name': 'Delhi'},
            {'x': [1, 2, 3], 'y': [2, 4, 5], 'type': 'bar', 'name': u'Mumbai'},
         ],
         'layout': {
            'plot_bgcolor': colors['background'],
            'paper_bgcolor': colors['background'],
            'font': {
               'color': colors['text']
            }
         }
      }
   )
])

if __name__ == '__main__':
   app.run_server(debug=True)
In the above example, we modified the inline styles of the html.Div and html.H1 components with the style property.

It is rendered in the Dash application as follows −

There are couple of key distinctions between dash_html_components and HTML attributes −
For style property in Dash, you can just supply a dictionary, whereas in HTML, it is semicolon-separated string.
Style dictionary keys are camelCased, so text-align changes to textalign.
ClassName in Dash is similar to HTML class attribute.
The first argument is the children of the HTML tag which is specified through the children keyword argument.
Reusable Components
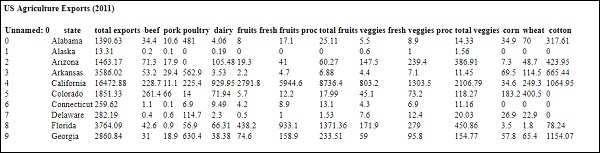
By writing our markup in Python, we can create complex reusable components like tables without switching contexts or languages −
Below is a quick example that generates a “Table” from pandas dataframe.
import dash
import dash_core_components as dcc
import dash_html_components as html
import pandas as pd

df = pd.read_csv(
   'https://gist.githubusercontent.com/chriddyp/'
   'c78bf172206ce24f77d6363a2d754b59/raw/'
   'c353e8ef842413cae56ae3920b8fd78468aa4cb2/'
   'usa-agricultural-exports-2011.csv')

def generate_table(dataframe, max_rows=10):
   return html.Table(
      # Header
      [html.Tr([html.Th(col) for col in dataframe.columns])] +
      # Body
      [html.Tr([
         html.Td(dataframe.iloc[i][col]) for col in dataframe.columns
      ]) for i in range(min(len(dataframe), max_rows))]
   )

app = dash.Dash()
app.layout = html.Div(children=[
   html.H4(children='US Agriculture Exports (2011)'),
   generate_table(df)
])

if __name__ == '__main__':
   app.run_server(debug=True)
Our output will be something like −
More about Visualization
The dash_core_components library includes a component called Graph.
Graph renders interactive data visualizations using the open source plotly.js JavaScript graphing library. Plotly.js support around 35 chart types and renders charts in both vector-quality SVG and high-performance WebGL.
Below is an example that creates a scatter plot from a Pandas dataframe −
import dash
import dash_core_components as dcc
import dash_html_components as html
import pandas as pd
import plotly.graph_objs as go

app = dash.Dash()

df = pd.read_csv(
   'https://gist.githubusercontent.com/chriddyp/' +
   '5d1ea79569ed194d432e56108a04d188/raw/' +
   'a9f9e8076b837d541398e999dcbac2b2826a81f8/'+
   'gdp-life-exp-2007.csv')

app.layout = html.Div([
   dcc.Graph(
      id='life-exp-vs-gdp',
      figure={
         'data': [
            go.Scatter(
               x=df[df['continent'] == i]['gdp per capita'],
               y=df[df['continent'] == i]['life expectancy'],
               text=df[df['continent'] == i]['country'],
               mode='markers',
               opacity=0.7,
               marker={
                  'size': 15,
                  'line': {'width': 0.5, 'color': 'white'}
               },
               name=i
            ) for i in df.continent.unique()
         ],
         'layout': go.Layout(
            xaxis={'type': 'log', 'title': 'GDP Per Capita'},
            yaxis={'title': 'Life Expectancy'},
            margin={'l': 40, 'b': 40, 't': 10, 'r': 10},
            legend={'x': 0, 'y': 1},
            hovermode='closest'
         )
      }
   )
])

if __name__ == '__main__':
   app.run_server()
The output of the above code is as follows −

These graphs are interactive and responsive. You can hover over points to see their values, click on legend items to toggle traces, click and drag to zoom, hold down shift, and click and drag to pan.
Markdown
While dash exposes HTML flavours through the dash_html_components library, it can be tedious to write your copy in HTML. For writing blocks of texts, you can use the Markdown component in the dash_core_components library.
Core Components
The dash_core_components includes a set of higher-level components like dropdowns, graphs, markdown, blocks and many more.
Like all other Dash components, they are described entirely declaratively. Every option that is configurable is available as a keyword argument of the component.
Below is the example, using some of the available components −
# -*- coding: utf-8 -*-
import dash
import dash_core_components as dcc
import dash_html_components as html

app = dash.Dash()

app.layout = html.Div([
   html.Label('Dropdown'),
   dcc.Dropdown(
      options=[
         {'label': 'New York City', 'value': 'NYC'},
         {'label': u'Montréal', 'value': 'MTL'},
         {'label': 'San Francisco', 'value': 'SF'}
      ],
      value='MTL'
   ),

   html.Label('Multi-Select Dropdown'),
   dcc.Dropdown(
      options=[
         {'label': 'New York City', 'value': 'NYC'},
         {'label': u'Montréal', 'value': 'MTL'},
         {'label': 'San Francisco', 'value': 'SF'}
      ],
      value=['MTL', 'SF'],
      multi=True
   ),

   html.Label('Radio Items'),
   dcc.RadioItems(
      options=[
         {'label': 'New York City', 'value': 'NYC'},
         {'label': u'Montréal', 'value': 'MTL'},
         {'label': 'San Francisco', 'value': 'SF'}
      ],
      value='MTL'
   ),

   html.Label('Checkboxes'),
   dcc.Checklist(
      options=[
         {'label': 'New York City', 'value': 'NYC'},
         {'label': u'Montréal', 'value': 'MTL'},
         {'label': 'San Francisco', 'value': 'SF'}
      ],
      values=['MTL', 'SF']
   ),

   html.Label('Text Input'),
   dcc.Input(value='MTL', type='text'),

   html.Label('Slider'),
   dcc.Slider(
      min=0,
      max=9,
      marks={i: 'Label {}'.format(i) if i == 1 else str(i) for i in range(1, 6)},
      value=5,
   ),
], style={'columnCount': 2})

if __name__ == '__main__':
   app.run_server(debug=True)
Output from the above program is as follows −

Calling Help
Dash components are declarative. Every configurable aspect of these components is set during installation as a keyword argument. You can call help in your python console on any of the components to learn more about a component and its available arguments. Some of them are given below −
>>> help(dcc.Dropdown)
Help on class Dropdown in module builtins:
class Dropdown(dash.development.base_component.Component)
| A Dropdown component.
| Dropdown is an interactive dropdown element for selecting one or more

| items.
| The values and labels of the dropdown items are specified in the `options`
| property and the selected item(s) are specified with the `value` property.
|
| Use a dropdown when you have many options (more than 5) or when you are
| constrained for space. Otherwise, you can use RadioItems or a Checklist,
| which have the benefit of showing the users all of the items at once.
|
| Keyword arguments:
| - id (string; optional)
| - options (list; optional): An array of options
| - value (string | list; optional): The value of the input. If `multi` is false (the default)
-- More --
To summarize, the layout of a Dash app describes what the app looks like. The layout is a hierarchical tree of components. The dash_html_components library provides classes for all the HTML tags and the keyword arguments, and describes the HTML attributes like style, className, and id. The dash_core_components library generates higher-level components like controls and graphs.
Choosing a Better Framework
The world of Python web frameworks provides lots of choices. Some of the prominent frameworks to consider are Django, Flask, Bottle, Diesel, Web2py, Pyramid, Falcon, Pecan, etc., that compete for the developer mindshare. Frameworks like Pyramid, Django, Web2py and Flask are ideal with their list of pros and cons; choosing just one for your project is a difficult choice to make.
Dash is entirely designed for different set of needs. So, as a developer you want to cut the legions of options down to the one that will help you finish your project on time and with perfection.
If we compare Flask, Pyramid and Django frameworks, Flask is a micro-framework primarily aimed at small applications with simpler requirements whereas Pyramid and Django are both aimed at larger applications. Pyramid is built with flexibility and freedom in mind, so the developer has right tools for the project. In case of pyramid, the developer is free to choose the database, URL structure, templating style and more. However, Django includes all the batteries a web application needs, so we just need to install Django and start working.
Django comes with an ORM, whereas Pyramid and Flask leave it to the developer to choose how (or if) they want their data to be stored. Generally, the most common ORM for non-Django web applications is SQLAlchemy by far, however, other options can be DjangoDB, MongoDB, LevelDB and SQLite.
Being a developer, if I have to choose between Django and Web2py for my project. I need to have some idea of both the frameworks’ benefits and limitations. So let us compare Django and Web2py −
Django
The community of Django is a big plus. This actually means to a developer is the wealth of resources will be greater. Specifically, this comes down to −
- Documentation
- Open source resources
- Third-party apps support
- Deployment support
- IRC channels with helpful developers
Django has a very big community of development team and documentation. It is the right framework when we are dealing with writing a complex backend as it provides a lot of third party apps that lets you automate things like user’s logic (signup, authentication), asynchronous tasks, API creation, blogs, etc.
Web2py
Web2py is a good fit to fast development of simple web apps or http servers. Below are some of the benefits and limitations of web2py.
Benefits of Web2py
The following are some of the benefits of Web2py framework −
Web2py is a potential framework when compared to Django and Flask in terms of speed and simplicity of the development. As Web2py uses python-based template language, this allows python developers to start writing code immediately after understanding the basics of writing template as views.
Web2py can run python compiled code as an optimization to lower the running time and to allow you to distribute your code in a compiled fashion.
Limitations of Web2py
The following are some of the limitations of the framework:
Web2py supports doctests, however it does not support unit testing. Now doctests are not the optimal choice because of their limited scope.
There is no differentiation between production and development mode. In case an exception occurred, ticket is generated all the times and you will have to navigate to the ticket to check the error. This might be helpful in case of production server but will be difficult in development environment as developers really need to see the error instantly rather than checking the ticket number.
Web2py has a good database abstraction layer (DAL) that allows you to abstract many types of database engines but it lacks powerful ORM. In case you are dealing with relatively large model, your code will get scattered by all nested definitions and attributes which makes things complicated.
We cannot use standard python development tools without modifications as web2py has really poor IDE support.
The Django and Web2py framework are full stack frameworks. This means they provide all the code needed − from form generators to templating layouts and forms validation, and leave you to write things according to your specific needs.
However, with the non-stack frameworks like Flask and Pyramid, if you want to create a full-featured website, you will need to add a lot of code and extra bits yourself. This takes lot of skill and time.
Dash
Dash is entirely designed for specific task of building a reactive framework for dashboards. Dash by Plotly is a great way for the python developer to create interactive web apps without having to learn Javascript and front end web development. Dash is built on top of Flask, Plotly.js, React and React Js.
There is no comparison between Dash and other frameworks (mentioned above) as they belong to different category of frameworks. Below are some of the reasons to prefer dash over other interactive dashboard frameworks (Jupiter Dashboards, matplotlib and other) −
With just 50 lines of code, you can write a simple “hello world” Dash app, as Dash requires very little boilerplater.
Entire Dash apps are written in python language, the most preferred language globally.
In your own python code, you can bind dash interactive components like dropdown, text inputs, sliders, and graphs with reactive Dash “callbacks”.
Complicated UIs in Dash apps can have multiple inputs, multiple outputs and inputs that depends on other inputs.
Simultaneously, multiple users can work on Dash apps.
For creating your own Dash components with React, dash uses React.js to render components and includes a plugin system.
Developers or writers can write dash apps that respond to clicking, hovering or selecting points on the graph as Dash’s Graph components are interactive.
Conclusion
We can conclude that choosing the right framework out of many available python frameworks solely depends on the type of project, complexity, small or enterprise level project, kind of community support available or online resource available, scalability, security, etc.
The above mentioned python frameworks are best in their class but have their own benefits and drawbacks (depending on the project requirement). So, one type of framework is not suitable for all kinds of projects.