- Pygame Tutorial
- Pygame - Home
- Pygame - Overview
- Pygame - Hello World
- Pygame - Display modes
- Pygame - Locals module
- Pygame - Color object
- Pygame - Event objects
- Pygame - Keyboard events
- Pygame - Mouse events
- Pygame - Drawing shapes
- Pygame - Loading image
- Pygame - Displaying Text in Window
- Pygame - Moving an image
- Pygame - Moving with Numeric pad keys
- Pygame - Moving with mouse
- Pygame - Moving Rectangular objects
- Pygame - Use Text as Buttons
- Pygame - Transforming Images
- Pygame - Sound objects
- Pygame - Mixer channels
- Pygame - Playing music
- Pygame - Playing Movie
- Pygame - Using Camera module
- Pygame - Load cursor
- Pygame - Access CDROM
- Pygame - The Sprite Module
- Pygame - PyOpenGL
- Pygame - Errors and Exception
- Pygame Useful Resources
- Pygame - Quick Guide
- Pygame - Useful Resources
- Pygame - Discussion
Pygame - Quick Guide
Pygame - Overview
Pygame is a popular Python library used for developing video games. It is free, open source and cross-platform wrapper around Simple DirectMedia Library (SDL). Abstraction of SDL functions provided by Pygame makes development of multi-media applications using Python very easy.
Originally developed by Peter Shinners, Lenard Lindstrom, René Dudfield and others in Oct 2000, latest version of Pygame is 2.0.1, released in Dec 2020. In addition to SDL functionality, Pygame also provides other features such as vector maths, collision detection, camera and MIDI support etc. Pygame applications can be used on Android based mobile phones also.
Environment Setup
Easiest way to install Pygame on any machine is by using PIP installer that comes with standard Python distribution. Ensure that you have latest version of pip. It is recommended to install Pygame in a new virtual environment using following command −
pip3 install pygame
For Raspberri Pi, Pygame is pre-installed in raspbian Linus distribution. As far as installation on MacOS is concerned, newer versions require Pygame 2.0. Prebuilt binary packages are available for many flavours of Linux. They can be installed using respective package manager utilities.
For Ubuntu, following is the command −
sudo apt-get install pygame
For Fedora, the following is the command −
sudo yum install pygame
It is also possible to compile Pygame’s source code (available at https://github.com/pygame/pygame) and install on desired operating system with the help of respective C/C++ compiler and Python’s setuptools library.
To verify if Pygame has been successfully installed, try and import pygame package and check its version.
(pygmenv) C:\pygmenv>python
Python 3.7.4 (tags/v3.7.4:e09359112e, Jul 8 2019, 20:34:20) [MSC v.1916 64 bit (AMD64)] on win32
Type "help", "copyright", "credits" or "license" for more information.
>>> import pygame
pygame 2.0.1 (SDL 2.0.14, Python 3.7.4)
Hello from the pygame community. https://www.pygame.org/contribute.html
Pygame library consists of following modules −
| pygame._sdl2.touch | to work with touch input |
| pygame.camera | camera use |
| pygame.cdrom | audio cdrom control |
| pygame.cursors | cursor resources |
| pygame.display | to control the display window and screen |
| pygame.draw | drawing shapes |
| pygame.event | interacting with events and queues |
| pygame.examples | module of example programs |
| pygame.fastevent | interacting with events and queues from multiple threads. |
| pygame.font | loading and rendering fonts |
| pygame.freetype | loading and rendering computer fonts |
| pygame.gfxdraw | drawing shapes |
| pygame.image | image transfer |
| pygame.joystick | interacting with joysticks, gamepads, and trackballs. |
| pygame.key | to work with the keyboard |
| pygame.locals | pygame constants |
| pygame.mask | image masks. |
| pygame.math | vector classes |
| pygame.midi | interacting with midi input and output. |
| pygame.mixer | loading and playing sounds |
| pygame.mixer.music | controlling streamed audio |
| pygame.mouse | to work with the mouse |
| pygame.pixelcopy | general pixel array copying |
| pygame.scrap | clipboard support. |
| pygame.sndarray | accessing sound sample data |
| pygame.sprite | basic game object classes |
| pygame.surfarray | accessing surface pixel data using array interfaces |
| pygame.tests | unit test suite package |
| pygame.time | monitoring time |
| pygame.transform | to transform surfaces |
Pygame - Hello World
First step is to import and initialize pygame modules with the help of init() function.
import pygame
pygame.init()
We now set up Pygame display window of preferred size, and give it a caption.
screen = pygame.display.set_mode((640, 480))
pygame.display.set_caption("Hello World")
This will render a game window which needs to be put in an infinite event loop. All event objects generated by user interactions such as mouse movement and click etc. are stored in an event queue. We shall terminate the event loop when pygame.QUIT is intercepted. This event is generated when user clicks the CLOSE button on the title bar.
while True:
   for event in pygame.event.get():
      if event.type == pygame.QUIT:
         pygame.quit()
Complete code for displaying Pygame window with Hello World caption is as follows −
import pygame, sys

pygame.init()
screen = pygame.display.set_mode((640, 480))
pygame.display.set_caption("Hello World")
while True:
   for event in pygame.event.get():
      if event.type == pygame.QUIT:
         pygame.quit()
         sys.exit()
Save above script as hello.py and run to get following output −
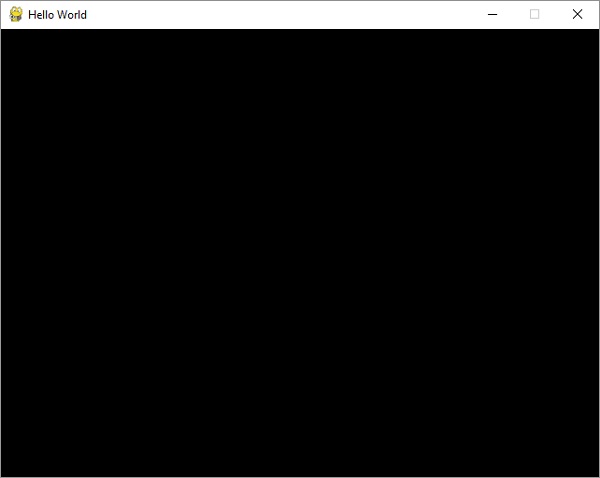
This window will be closed only if the close (X) button is clicked.
Pygame - Display Modes
As in the above example, a display surface is created by set_mode() function defined in pygame.display module.
pygame.display.set_mode(size, flags, depth, display, vsync)
The size parameter is a tuple of width and height in pixels. If size is not set, the surface will have the size of current resolution.
The flags parameter controls the type of display represented by following predefined constants −
| pygame.FULLSCREEN | create a fullscreen display |
| pygame.DOUBLEBUF | recommended for HWSURFACE or OPENGL |
| pygame.HWSURFACE | hardware accelerated, only in FULLSCREEN |
| pygame.OPENGL | create an OpenGL-renderable display |
| pygame.RESIZABLE | display window should be sizeable |
| pygame.NOFRAME | display window will have no border or controls |
| pygame.SCALED | resolution depends on desktop size and scale graphics |
| pygame.SHOWN | window is opened in visible mode (default) |
| pygame.HIDDEN | window is opened in hidden mode |
If the vsync parameter is set to 1, it is possible to get a display with vertical sync, but you are not guaranteed to get one. The request only works at all for calls to set_mode() with the pygame.OPENGL or pygame.SCALED flags set.
The display index 0 means the default display is used. Depth parameter will default to the best and fastest color depth for the system. For given width and height, Pygame will choose best mode available from list_modes().
>>> print (pygame.display.list_modes())
[(1366, 768), (1360, 768), (1280, 768), (1280, 720), (1024, 768), (800, 600), (640, 480)]
pygame.display.mode_ok()
This function Pick the best color depth for a display mode. It is used to determine if a requested display mode is available. It will return 0 if the display mode cannot be set. Otherwise it will return a pixel depth that best matches the display asked for.
pygame.display.update()
This function will update the contents of the entire display.
Pygame - Locals Module
This module contains definitions of various constants used frequently in a Pygame application. Although, these constants are defined in respective modules, it becomes easier to use them from locals module.
For example, Key or Mouse events (such as KEYDOWN or MOUSEBUTTONDOWN) are defined as pygame.key.KEYDOWN or pygame.mouse.MOUSEBUTTON respectively, these constants can be used without qualifying the module name by importing from locals module.
Here, we are using QUIT event from locals module.
import pygame,sys
from pygame.locals import *
pygame.init()
canvas=pygame.display.set_mode((400,300))
pygame.display.set_caption("Hello")
canvas.fill((0,0,0))
while True:
   for event in pygame.event.get():
      if(event.type == QUIT):
         pygame.quit()
            sys.exit(1)
Pygame - Color Object
The Color class in Pygame is used to represent color of screen background, text, shapes and all other Pygame objects. It constructed by passing color values for Red, Green, Blue colors and optionally alpha value that represents opaque value. Each of these values range between 0 to 255.
color = pygame.Color(r, g, b, a=255)
Default value of alpha is 255, meaning fully opaque. Individual attributes are accessible and can be set.
| pygame.Color.r | Gets or sets the red value of the Color. |
| pygame.Color.g | Gets or sets the green value of the Color. |
| pygame.Color.b | Gets or sets the blue value of the Color. |
| pygame.Color.a | Gets or sets the alpha value of the Color. |
Alternative color models like CMY, HSVA, HSLA and i1i2i3 can also be used.
| pygame.Color.cmy | Gets or sets the CMY representation of the Color. Cyan, Magenta, Yellow |
| pygame.Color.hsva | Gets or sets the HSVA representation of the Color. Hue, Saturation, Value |
| pygame.Color.hsla | Gets or sets the HSLA representation of the Color. Hue, Saturation, Lightness |
| pygame.Color.i1i2i3 | Gets or sets the I1I2I3 representation of the Color. |
We can use predefined string constants to represent RGBA color combinations. Some of the predefined colors are listed below −
- 'black': (0, 0, 0, 255)
- 'blue': (0, 0, 255, 255),
- 'cyan': (0, 255, 255, 255),
- 'gold': (255, 215, 0, 255),
- 'gray': (190, 190, 190, 255),
- 'green': (0, 255, 0, 255),
- 'orange': (255, 165, 0, 255),
- 'purple': (160, 32, 240, 255),
- 'red': (255, 0, 0, 255),
- 'violet': (238, 130, 238, 255)
- 'yellow': (255, 255, 0, 255),
- 'white': (255, 255, 255, 255)
To enlist all predefined colors run following for loop −
for k, v in THECOLORS.items():
   THECOLORS[unicode_(k)] = v
Pygame - Event Objects
All events are instances of pygame.event.EventType class. Pygame identifies following event types −
| Event Type | attributes |
|---|---|
| QUIT | None |
| ACTIVEEVENT | gain, state |
| KEYDOWN | unicode, key, mod |
| KEYUP | key, mod |
| MOUSEMOTION | pos, rel, buttons |
| MOUSEBUTTONUP | pos, button |
| MOUSEBUTTONDOWN | pos, button |
| JOYAXISMOTION | joy, axis, value |
| JOYBALLMOTION | joy, ball, rel |
| JOYHATMOTION | joy, hat, value |
| JOYBUTTONUP | joy, button |
| JOYBUTTONDOWN | joy, button |
| VIDEORESIZE | size, w, h |
| VIDEOEXPOSE | None |
| USEREVENT | Code |
Pygame - Keyboard Events
Pygame recognizes KEYUP and KEYDOWN events. The pygame.key module defines functions useful for handling keyboard interaction. pygame.KEYDOWN and pygame.KEYUP events are inserted in event queue when the keys are pressed and released. key attribute is an integer ID representing every key on the keyboard.
import pygame, sys
pygame.init()
screen = pygame.display.set_mode((640, 480))
pygame.display.set_caption("Hello World")
while True:
   for event in pygame.event.get():
      if event.type == pygame.QUIT:
         pygame.quit()
         sys.exit()
      if event.type == pygame.KEYDOWN:
         key=pygame.key.name(event.key)
         print (key, "Key is pressed")
      if event.type == pygame.KEYUP:
         key=pygame.key.name(event.key)
         print (key, "Key is released")
Run the above code and press various keys while the Pygame window is active. Following is a sample output on Python console.
q Key is pressed
q Key is released
right shift Key is released
1 Key is pressed
1 Key is released
enter Key is pressed
enter Key is released
backspace Key is pressed
backspace Key is released
x Key is pressed
x Key is released
home Key is pressed
home Key is released
f1 Key is pressed
f1 Key is released
left Key is pressed
left Key is released
right Key is pressed
right Key is released
up Key is pressed
up Key is released
down Key is pressed
down Key is released
As we see, event.key attribute returns a unique identifier associated with each key. The arrow keys left, right, up and down are used very often in a game situation. We can right appropriate logic if a particular key press is detected.
Other useful attributes in pygame.key module are listed below −
| pygame.key.get_pressed | get the state of all keyboard buttons |
| pygame.key.get_mods | determine which modifier keys are being held |
| pygame.key.set_repeat | control how held keys are repeated |
| pygame.key.get_repeat | see how held keys are repeated |
| pygame.key.name | get the name of a key identifier |
| pygame.key.key_code | get the key identifier from a key name |
| pygame.key.start_text_input | start handling Unicode text input events |
| pygame.key.stop_text_input | stop handling Unicode text input events |
Pygame - Mouse Events
Pygame recongnizes three mouse events, namely, MOUSEMOTION, MOUSEBUTTONUP, and MOUSEBUTTONDOWN. The corresponding event object returns the coordinates of position at which mouse is pressed/released and the button number.
For example, a MOUSEBUTTONDOWN event object will display following result −
<Event(1025-MouseButtonDown {'pos': (398, 328), 'button': 1, 'window': None})>
Example
To obtain the coordinates of position of button down, we can use get_pos() function associated with event object.
import pygame, sys

pygame.init()
screen = pygame.display.set_mode((640, 480))
pygame.display.set_caption("Hello World")
while True:
   for event in pygame.event.get():
      if event.type == pygame.QUIT:
         pygame.quit()
         sys.exit()
      if event.type == pygame.MOUSEBUTTONDOWN:
         pos=pygame.mouse.get_pos()
         btn=pygame.mouse
         print ("x = {}, y = {}".format(pos[0], pos[1]))
Output
Run above code and press the mouse button at random positions on the game window.
x = 192, y = 160
x = 419, y = 245
x = 204, y = 405
x = 449, y = 17
x = 12, y = 15
The MOUSEMOTION event object captures instantaneous position of moving mouse location.
if event.type == pygame.MOUSEMOTION:
   pos=event.pos
   print ("x = {}, y = {}".format(pos[0], pos[1]))
Other important functions and attributes in pygame.mouse module are as follows −
| pygame.key.get_pressed | get the state of the mouse buttons |
| pygame.mouse.get_pos | get the mouse cursor position |
| pygame.mouse.get_rel | get the amount of mouse movement |
| pygame.mouse.set_pos | set the mouse cursor position |
| pygame.mouse.set_visible | hide or show the mouse cursor |
| pygame.mouse.get_visible | get the current visibility state of the mouse cursor |
| pygame.mouse.get_focused | check if the display is receiving mouse input |
| pygame.mouse.set_cursor | set the image for the mouse cursor |
| pygame.mouse.set_system_cursor | set the mouse cursor to a system variant |
Pygame defines following system cursors −
| pygame.SYSTEM_CURSOR_ARROW | arrow |
| pygame.SYSTEM_CURSOR_IBEAM | i-beam |
| pygame.SYSTEM_CURSOR_WAIT | wait |
| pygame.SYSTEM_CURSOR_CROSSHAIR | crosshair |
| pygame.SYSTEM_CURSOR_SIZENWSE | double arrow pointing northwest and southeast |
| pygame.SYSTEM_CURSOR_SIZENESW | double arrow pointing northeast and southwest |
| pygame.SYSTEM_CURSOR_SIZEWE | double arrow pointing west and east |
| pygame.SYSTEM_CURSOR_SIZENS | double arrow pointing north and south |
| pygame.SYSTEM_CURSOR_SIZEALL | four pointed arrow |
| pygame.SYSTEM_CURSOR_NO | slashed circle or crossbones |
| pygame.SYSTEM_CURSOR_HAND | hand |
Following statement will set the game window cursor to crosshair.
pygame.mouse.set_system_cursor(pygame.SYSTEM_CURSOR_CROSSHAIR)
Pygame - Drawing Shapes
Different shapes such as rectangle, circle, ellipse, polygon and line can be drawn on the game window by using functions in pygame.draw module −
| draw a rectangle | rect(surface, color, rect) |
| draw a polygon | polygon(surface, color, points) |
| draw a circle | circle(surface, color, center, radius) |
| draw an ellipse | ellipse(surface, color, rect) |
| draw an elliptical arc | arc(surface, color, rect, start_angle, stop_angle) |
| draw a straight line | line(surface, color, start_pos, end_pos, width) |
Example
Following example uses these functions to draw different shapes −
import pygame
pygame.init()
screen = pygame.display.set_mode((400, 300))
done = False
red = (255,0,0)
green = (0,255,0)
blue = (0,0,255)
white = (255,255,255)
while not done:
for event in pygame.event.get():
if event.type == pygame.QUIT:
done = True
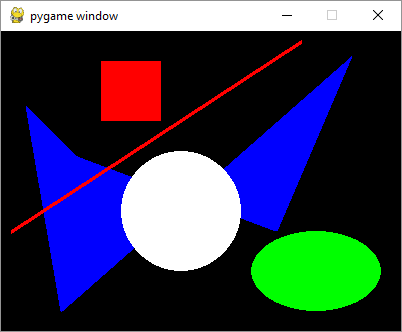
pygame.draw.rect(screen, red, pygame.Rect(100, 30, 60, 60))
pygame.draw.polygon(screen, blue, ((25,75),(76,125),(275,200),(350,25),(60,280)))
pygame.draw.circle(screen, white, (180,180), 60)
pygame.draw.line(screen, red, (10,200), (300,10), 4)
pygame.draw.ellipse(screen, green, (250, 200, 130, 80))
pygame.display.update()
Output
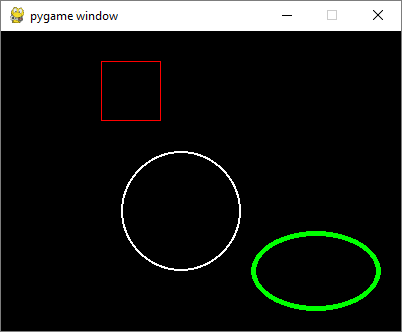
If an optional integer parameter is added to the functions, the shape will be drawn with specified color as outline color. Number corresponds to thickness of the outline and background color inside the shape.
pygame.draw.rect(screen, red, pygame.Rect(100, 30, 60, 60),1)
pygame.draw.circle(screen, white, (180,180), 60,2)
pygame.draw.ellipse(screen, green, (250, 200, 130, 80),5)
Output
Pygame - Loading Image
The pygame.image module contains functions for loading and saving images from file or file like object. An image is loaded as a Surface object which eventually is rendered on Pygame display window.
First we obtain a Surface object by load() function.
img = pygame.image.load('pygame.png')
Next we obtain a rect object out of this Surface and then use Surface.blit() function to render the image −
rect = img.get_rect()
rect.center = 200, 150
screen.blit(img, rect)
Example
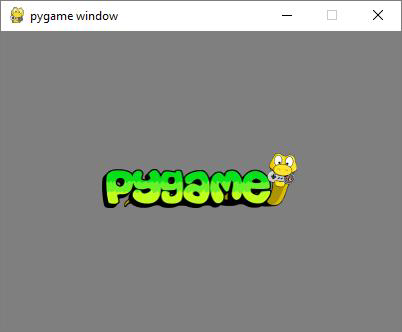
The complete program for displaying Pygame logo on the display window is as follows −
import pygame

pygame.init()
screen = pygame.display.set_mode((400, 300))
img = pygame.image.load('pygame.png')
done = False
bg = (127,127,127)
while not done:
   for event in pygame.event.get():
      screen.fill(bg)
      rect = img.get_rect()
      rect.center = 200, 150
      screen.blit(img, rect)
      if event.type == pygame.QUIT:
      done = True
   pygame.display.update()
Output
The output for the above code is as follows −
The blit() function can take an optional special-flags parameter with one of the following values −
BLEND_RGBA_ADD
BLEND_RGBA_SUB
BLEND_RGBA_MULT
BLEND_RGBA_MIN
BLEND_RGBA_MAX
BLEND_RGB_ADD
BLEND_RGB_SUB
BLEND_RGB_MULT
BLEND_RGB_MIN
BLEND_RGB_MAX
The pygame.Surface module also has a convert() function which optimizes the image format and makes drawing faster.
The pygame.image module has a save() function that saves contents of Surface object to an image file. Pygame supports the following image formats −
| Loading image formats | Saving image formats |
JPG PNG GIF (non-animated) BMP PCX TGA (uncompressed) TIF LBM (and PBM) PBM (and PGM, PPM) XPM |
BMP TGA PNG JPEG |
|---|
Example
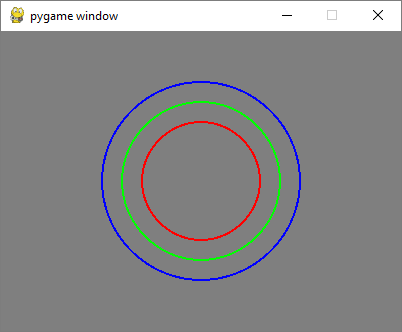
Following program draws three circles on the display surface and save it as a circles.png file using image.save() function.
import pygame

pygame.init()
screen = pygame.display.set_mode((400, 300))
done = False
white=(255,255,255)
red = (255,0,0)
green = (0,255,0)
blue = (0,0,255)

bg = (127,127,127)
while not done:
   for event in pygame.event.get():
      screen.fill(bg)
      if event.type == pygame.QUIT:
         done = True
      pygame.draw.circle(screen, red, (200,150), 60,2)
      pygame.draw.circle(screen, green, (200,150), 80,2)
      pygame.draw.circle(screen, blue, (200,150), 100,2)
   pygame.display.update()
   pygame.image.save(screen, "circles.png")
Output
Pygame - Displaying Text in Window
To display text on the Pygame window, we need to obtain a font object first, with the help of SysFont() function defined in pygame.font module.
Fnt= SysFont(name, size, bold=False, italic=False)
List of fonts installed in current machine can be obtained by get_fonts() function.
fonts = pygame.font.get_fonts()
for f in fonts:
   print(f)
Let us define a font object representing Arial font of 36 point size.
font = pygame.font.SysFont("Arial", 36)
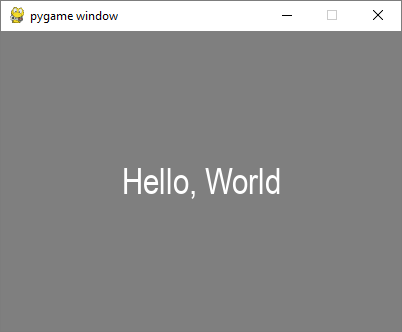
Next we obtain a new Surface object for rendering Hello World text in the newly created font with render() method of Font object.
txtsurf = font.render("Hello, World", True, white)
First argument is a one-line string, second argument represents antialias. If it is set to False, the rendered image is an 8-bit image, and 24-bit if true. An optional background color argument can also be used.
We now need to blit the text Surface at the center of screen window.
screen.blit(txtsurf,(200 - txtsurf.get_width() // 2, 150 - txtsurf.get_height() // 2))
Example
Following is the complete code −
import pygame

pygame.init()
screen = pygame.display.set_mode((400, 300))
done = False
white=(255,255,255)
red = (255,0,0)
green = (0,255,0)
blue = (0,0,255)

bg = (127,127,127)
while not done:
   for event in pygame.event.get():
      screen.fill(bg)
      if event.type == pygame.QUIT:
         done = True
      font = pygame.font.SysFont("Arial", 36)
   txtsurf = font.render("Hello, World", True, white)
   screen.blit(txtsurf,(200 - txtsurf.get_width() // 2, 150 - txtsurf.get_height() // 2))
pygame.display.update()
Output
In addition to SysFont() method, a Font object can also be obtained from a font file (having .ttf extension) or a Python file object pointing towards the ttf file. It is also possible to construct a font object with .ttc file. The font class defines following methods −
| bold() | Gets or sets whether the font should be rendered in bold. |
| italic() | Gets or sets whether the font should be rendered in italics. |
| underline() | Gets or sets whether the font should be rendered with an underline. |
| render() | draw text on a new Surface |
| size() | calculate size needed to render text |
| set_underline() | control if text is rendered with an underline |
| get_underline() | check if text will be rendered with an underline |
| set_bold() | enable fake rendering of bold text |
| get_bold() | check if text will be rendered bold |
| set_italic() | enable fake rendering of italic text |
| metrics() | gets the metrics for each character |
| get_italic() | check if the text will be rendered italic |
| get_linesize() | get the line space of the font text |
| get_height() | get the height of the font |
| get_ascent() | get the ascent of the font |
| get_descent() | get the descent of the font |
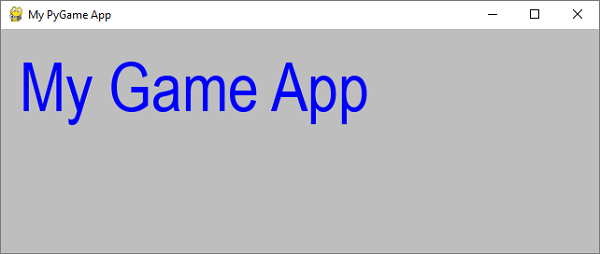
Given below is example to use ttf and ttc files to render text.
font1 = pygame.font.SysFont('chalkduster.ttf', 72)
img1 = font1.render('Hello World', True, BLUE)
font2 = pygame.font.SysFont('didot.ttc', 72)
img2 = font2.render('Hello Pygame', True, GREEN)

screen.blit(img1, (20, 50))
screen.blit(img2, (20, 120))
pygame.display.update()
In the above example, a predefined string has been rendered as a surface object. However, it is possible to read key value of KEYDOWN event to interactively enter a string and display it.
To begin with, we render an empty string. Next, we define the bounding rectangle and then a cursor rectangle which is placed to overlap the text bounding rectangle. Each keystroke identified in KEYDOWN event is appended to original empty string and repeatedly rendered.
Example
Following code initially displays a blank window. Each letter pressed will be displayed alongside each other.
import pygame

pygame.init()
screen = pygame.display.set_mode((400, 300))
done = False
white=(255,255,255)
red = (255,0,0)
green = (0,255,0)
blue = (0,0,255)

bg = (127,127,127)
text=""
while not done:
   for event in pygame.event.get():
      screen.fill(bg)
      if event.type == pygame.QUIT:
         done = True
      if event.type == pygame.KEYDOWN:
         text=text+event.unicode
      font = pygame.font.SysFont("Arial", 36)
      img = font.render(text, True, white)
      rect = img.get_rect()
      cursor = pygame.Rect(rect.topright, (3, rect.height))
      img = font.render(text, True, white)
      rect.size=img.get_size()
      cursor.topleft = rect.topright
      screen.blit(img,(200 - img.get_width() // 2, 150 - img.get_height() // 2))
   pygame.display.update()
Output
Run the above code and enter some text. Sample output is as follows −
Pygame - Moving an Image
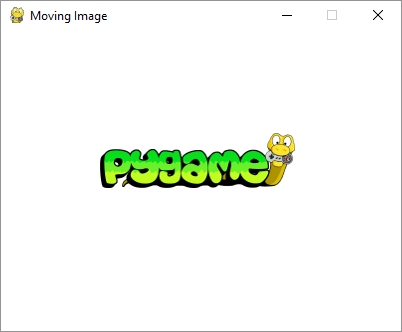
Movement of an object is an important aspect of any computer game. A computer game creates illusion of movement by drawing and erasing an object at incremental position. Following code draws an image by incrementing x coordinate position in an event loop and erasing it with the background color.
Example
image_filename = 'pygame.png'
import pygame
from pygame.locals import *
from sys import exit
pygame.init()
screen = pygame.display.set_mode((400,300), 0, 32)
pygame.display.set_caption("Moving Image")
img = pygame.image.load(image_filename)
x = 0
while True:
   screen.fill((255,255,255))
   for event in pygame.event.get():
      if event.type == QUIT:
         exit()
   screen.blit(img, (x, 100))
   x= x+0.5

   if x > 400:
      x = x-400
   pygame.display.update()
Output
The Pygame logo image starts displaying at left border and repeatedly shifts towards right. If it reaches right border, its position is reset to left.
In the following program, the image is displayed at (0,150) position to begin with. When user presses arrow keys (left, right, up, down), the image changes its location by 5 pixels. If a KEYDOWN event occurs, the program checks if the key value is K_LEFT, K_RIGHT, K_UP or K_DOWN. The x coordinate changes by +5 or -5 if it is K_LEFT or K_RIGHT. Value of y coordinate changes by -5 or +5 if key value is K_UP or K_DOWN.
image_filename = 'pygame.png'
import pygame
from pygame.locals import *
from sys import exit
pygame.init()
screen = pygame.display.set_mode((400,300))
pygame.display.set_caption("Moving with arrows")
img = pygame.image.load(image_filename)
x = 0
y= 150
while True:
   screen.fill((255,255,255))
   screen.blit(img, (x, y))
   for event in pygame.event.get():
      if event.type == QUIT:
         exit()

      if event.type == KEYDOWN:
         if event.key == K_RIGHT:
            x= x+5
         if event.key == K_LEFT:
            x=x-5
         if event.key == K_UP:
            y=y-5
         if event.key == K_DOWN:
            y=y+5
         pygame.display.update()
Pygame - Moving with Numeric Pad Keys
If we want to effect diagonal movement of an object on game window, we need to use numeric key pad keys. While keys 4,6,8 and 2 correspond to left, right, up and down arrows, num keys 7, 9, 3 and 1 can be used to move the object in up-left, up-right, down-right and down-left diagonal movements. These keys are identified by Pygame with following values −
K_KP1       keypad 1
K_KP2       keypad 2
K_KP3       keypad 3
K_KP4       keypad 4
K_KP5       keypad 5
K_KP6       keypad 6
K_KP7       keypad 7
K_KP8       keypad 8
K_KP9       keypad 9
Example
For left, right, up and down arrow press, x and y coordinates are incremented/decremented as before. For diagonal movement, both coordinates are changed as per direction. For instance, for K_KP7 key-press, both x and y are decremented by 5, for K_KP9 x is incremented and y is decremented.
image_filename = 'pygame.png'
import pygame
from pygame.locals import *
from sys import exit
pygame.init()
screen = pygame.display.set_mode((400,300))
pygame.display.set_caption("Moving with arrows")
img = pygame.image.load(image_filename)
x = 0
y= 150
while True:
   screen.fill((255,255,255))
   screen.blit(img, (x, y))
   for event in pygame.event.get():
      if event.type == QUIT:
         exit()
      if event.type == KEYDOWN:
         if event.key == K_KP6:
            x= x+5
         if event.key == K_KP4:
            x=x-5
         if event.key == K_KP8:
            y=y-5
         if event.key == K_KP2:
            y=y+5
         if event.key == K_KP7:
            x=x-5
            y=y-5
         if event.key == K_KP9:
            x=x+5
            y=y-5
         if event.key == K_KP3:
            x=x+5
            y=y+5
         if event.key == K_KP1:
            x=x-5
            y=y+5
   pygame.display.update()
Pygame - Moving with Mouse
Moving an object according to movement of mouse pointer is easy. The pygame.mouse module defines get_pos() method. It returns a two-item tuple corresponding to x and y coordinates of current position of mouse.
(mx,my) = pygame.mouse.get_pos()
After capturing mx and my positions, the image is rendered with the help of bilt() function on the Surface object at these coordinates.
Example
Following program continuously renders the given image at moving mouse cursor position.
filename = 'pygame.png'
import pygame
from pygame.locals import *
from sys import exit
pygame.init()
screen = pygame.display.set_mode((400,300))
pygame.display.set_caption("Moving with mouse")
img = pygame.image.load(filename)
x = 0
y= 150
while True:
   mx,my=pygame.mouse.get_pos()
   screen.fill((255,255,255))
   screen.blit(img, (mx, my))
   for event in pygame.event.get():
      if event.type == QUIT:
         exit()
pygame.display.update()
Pygame - Moving Rectangular Objects
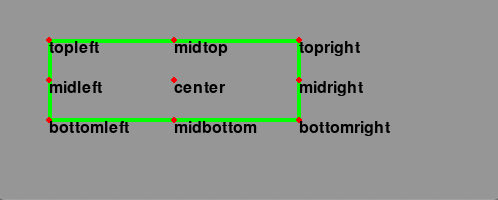
The Pygame.Rect class has functionality to store and manipulate rectangular areas. A Rect object can be constructed from left, top, width and height values. Functions in Rect class enable copying, moving nd resizing the Rect object.
A Rect object has following virtual attributes −
In addition to movement, Rect class has methods to test collision between rectangles.
| copy() | Returns a new rectangle having the same position and size as the original. |
| move() | Returns a new rectangle that is moved by the given offset. The x and y arguments can be any integer value, positive or negative. |
| move_ip() | Same as the Rect.move() method, but operates in place. |
| inflate(x,y) | Returns a new rectangle with the size changed by the given offset. Negative values will shrink the rectangle. |
| inflate_ip(x, y) | Same as the Rect.inflate() method, but operates in place. |
| clamp(Rect) | Returns a new rectangle that is moved to be completely inside the argument Rect. |
| clip(Rect) | Returns a new rectangle that is cropped to be completely inside the argument Rect. |
| union(Rect) | Returns a new rectangle that completely covers the area of the two provided rectangles. |
| union_ip(Rect) | Same as the Rect.union() method, but operates in place. |
| contains(Rect) | Returns true when the argument is completely inside the Rect. |
| collidepoint((x,y)) | Returns true if the given point is inside the rectangle. |
| colliderect(Rect) | Returns true if any portion of either rectangle overlap |
Example
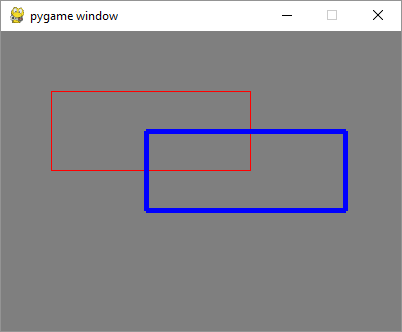
In the following program, a Rect object is drawn with red outline. Using copy() method, its clone is created for movement. The movement is effected by move_ip() method. The arrow keys move the position of copied rectangle by incrementing/decrementing x/y coordinate by + or -5 pixels.
import pygame
from pygame.locals import *
from sys import exit
pygame.init()
screen = pygame.display.set_mode((400,300))
rect1 = Rect(50, 60, 200, 80)
rect2=rect1.copy()
running = True
x=0
y=0
while running:
   for event in pygame.event.get():
      if event.type == QUIT:
         running = False
      if event.type == KEYDOWN:
         if event.key==K_LEFT:
            x= -5
            y=0
         if event.key == K_RIGHT:
            x=5
            y=0
         if event.key == K_UP:
            x = 0
            y = -5
         if event.key == K_DOWN:
            x = 0
            y = 5
   rect2.move_ip(x,y)
   screen.fill((127,127,127))
   pygame.draw.rect(screen, (255,0,0), rect1, 1)
   pygame.draw.rect(screen, (0,0,255), rect2, 5)
   pygame.display.update()
   pygame.quit()
Output
The following output shows rectangle with red outline is the original rectangle. Its copy keeps moving responding to arrow keys and has blue outline
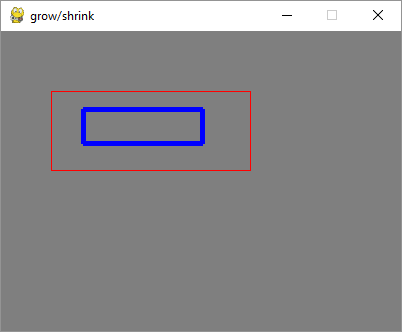
Example
Changing the move_ip() method to inflate_ip() method to grow/shrink the rectangle depending upon the arrow pressed.
while running:
   for event in pygame.event.get():
      if event.type == QUIT:
         running = False
      if event.type == KEYDOWN:
         if event.key==K_LEFT:
            x= -5
            y=0
         if event.key == K_RIGHT:
            x=5
            y=0
         if event.key == K_UP:
            x = 0
            y = -5
         if event.key == K_DOWN:
            x = 0
            y = 5
      rect2.inflate_ip(x,y)
   screen.fill((127,127,127))
   pygame.draw.rect(screen, (255,0,0), rect1, 1)
   pygame.draw.rect(screen, (0,0,255), rect2, 5)
   pygame.display.update()
Output
The following is the screenshot of the arrow key-press activity −
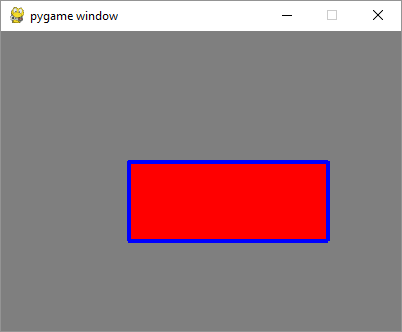
Example
To make the rectangle move by detecting MOUSEMOTION event, we need to first press the mouse inside the original rectangle. To verify whether mouse position is inside the rectangle, we use collidepoint() method of the Rect object. While the mouse is in motion, the rectangle object is moved in place by move_ip() method. Movement shall stop when mouse is released.
import pygame
from pygame.locals import *
from sys import exit
pygame.init()
screen = pygame.display.set_mode((400,300))
rect = Rect(50, 60, 200, 80)
moving = False
running = True
while running:
   for event in pygame.event.get():
      if event.type == QUIT:
         running = False
      elif event.type == MOUSEBUTTONDOWN:
         if rect.collidepoint(event.pos):
            moving = True
      elif event.type == MOUSEBUTTONUP:
         moving = False
      elif event.type == MOUSEMOTION and moving:
         rect.move_ip(event.rel)
   screen.fill((127,127,127))
   pygame.draw.rect(screen, (255,0,0), rect)
   if moving:
      pygame.draw.rect(screen, (0,0,255), rect, 4)
   pygame.display.flip()
pygame.quit()
Output
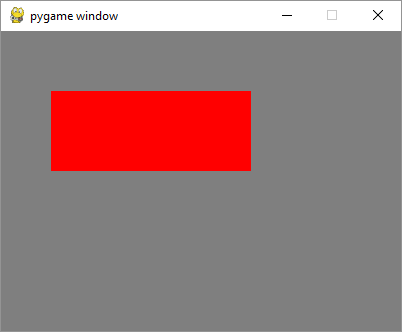
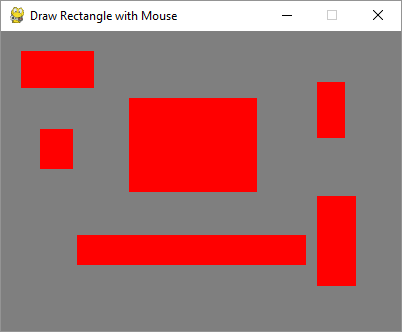
Example
To draw rectangle by mouse, capture the mouse pointer coordinates in MOUSEBUTTONDOWN and MOUSEBUTTONUP events, calculate the topleft coordinates, width and height and call rect() function.
import pygame
from pygame.locals import *
from sys import exit
pygame.init()
screen = pygame.display.set_mode((400,300))
pygame.display.set_caption("Draw Rectangle with Mouse")
screen.fill((127,127,127))
x=0
y=0
w=0
h=0
drawmode=True
running = True
while running:
   for event in pygame.event.get():
      if event.type == QUIT:
         running = False
      if event.type == MOUSEBUTTONDOWN:
         x,y = pygame.mouse.get_pos()
         drawmode = True
      if event.type == MOUSEBUTTONUP:
         x1,y1 = pygame.mouse.get_pos()
         w=x1-x
         h=y1-y
         drawmode= False

   rect = pygame.Rect(x,y,w,h)
   if drawmode == False:
      pygame.draw.rect(screen, (255,0,0), rect)
   pygame.display.flip()
pygame.quit()
Output
Pygame - Use Text as Buttons
Button is an important element in a typical game window. We can use a text or image surface object as button, so that when clicked it can fire a certain action.
Let us try to display three buttons with text captions.
text1=font.render(" START ", True, white)
text2=font.render(" PLAY ", True, white)
text3=font.render(" STOP ", True, white)
In order to draw a border around these buttons obtain their Rect object.
rect1 = text1.get_rect(topleft=(10,10))
rect2 = text2.get_rect(topleft= (100,10))
rect3 = text3.get_rect(topleft= (200,10))
Inside the event loop, blit the text buttons with red border around them.
screen.blit(text1, rect1)
pygame.draw.rect(screen, (255,0,0),rect1,2)
screen.blit(text2, rect2)
pygame.draw.rect(screen, (255,0,0),rect2,2)
pygame.draw.rect(screen, (255,0,0),rect3,2)
screen.blit(text3, rect3)
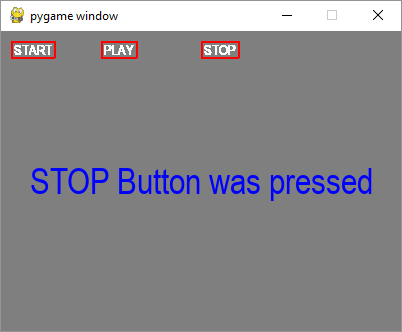
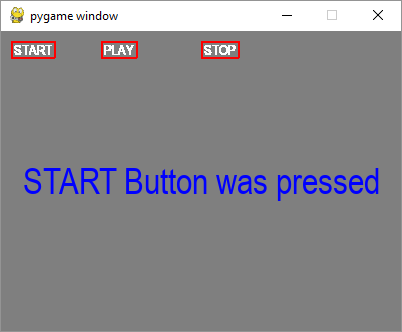
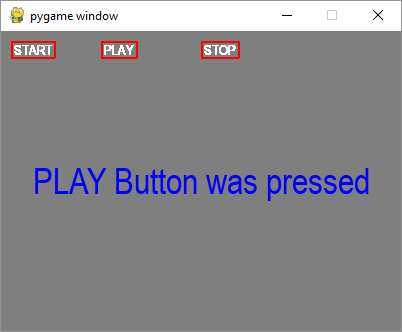
Use collidepoint() function of Rect object to identify which button has been clicked.
if event.type == pygame.MOUSEBUTTONDOWN:
   if rect1.collidepoint(event.pos):
      msg = "START Button was pressed"
   if rect2.collidepoint(event.pos):
      msg = "PLAY Button was pressed"
   if rect3.collidepoint(event.pos):
      msg = "STOP Button was pressed"
Display appropriate message as a text surface −
img=font.render(msg, True, (0,0,255))
imgrect=img.get_rect()
imgrect.center = (200 , 150 )
pygame.draw.rect(screen, bg, imgrect)
screen.blit(img, imgrect)
Example
Following is the complete code −
import pygame

pygame.init()
screen = pygame.display.set_mode((400, 300))
done = False

font = pygame.font.SysFont("Arial", 14)
text1=font.render(" START ", True, white)
text2=font.render(" PLAY ", True, white)
text3=font.render(" STOP ", True, white)

rect1 = text1.get_rect(topleft=(10,10))
rect2 = text2.get_rect(topleft= (100,10))
rect3 = text3.get_rect(topleft= (200,10))
bg = (127,127,127)
msg=" "
screen = pygame.display.set_mode((400,300))
screen.fill(bg)
while not done:
   for event in pygame.event.get():
      screen.blit(text1, rect1)
      pygame.draw.rect(screen, (255,0,0),rect1,2)
      screen.blit(text2, rect2)
      pygame.draw.rect(screen, (255,0,0),rect2,2)
      pygame.draw.rect(screen, (255,0,0),rect3,2)
      screen.blit(text3, rect3)

      if event.type == pygame.QUIT:
         done = True
      if event.type == pygame.MOUSEBUTTONDOWN:
         if rect1.collidepoint(event.pos):
            msg = "START Button was pressed"
         if rect2.collidepoint(event.pos):
            msg = "PLAY Button was pressed"
         if rect3.collidepoint(event.pos):
            msg = "STOP Button was pressed"
      img=font.render(msg, True, (0,0,255))
      imgrect=img.get_rect()
      imgrect.center = (200 , 150 )
      pygame.draw.rect(screen, bg, imgrect)
      screen.blit(img, imgrect)

   pygame.display.update()
Output
When each button is clicked, display window shows the following output −
Pygame - Transforming Images
The pygame.ransform module contains definitions of a number of functions for manipulation of Surface objects obtained out of image or text blocks. Manipulation of a surface include flipping, rotation, scaling, resizing and zooming the object.
Following functions are found in pygame.transform module.
| flip() | flip vertically and horizontally |
| scale() | resize to new resolution |
| rotate() | rotate an image |
| rotozoom() | filtered scale and rotation |
| scale2x() | specialized image doubler |
| smoothscale() | scale a surface to an arbitrary size smoothly |
| get_smoothscale_backend() | return smoothscale filter version in use - 'GENERIC', 'MMX', or 'SSE' |
| set_smoothscale_backend() | set smoothscale filter version to one of - 'GENERIC', 'MMX', or 'SSE' |
| chop() | gets a copy of an image with an interior area removed |
| laplacian() | find edges in a surface |
| average_surfaces() | find the average surface from many surfaces. |
| average_color() | finds the average color of a surface |
| threshold() | finds which, and how many pixels in a surface are within a threshold of a 'search_color' or a 'search_surf'. |
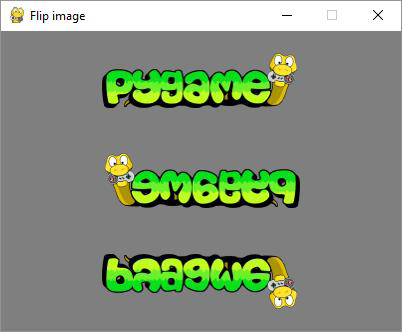
Let us first use the flip() function whose syntax is as follows −
flip(Surface, xbool, ybool)
This function can flip the surface object either horizontally, vertically or both. The orientation is decided by two bool parameters.
To flip the image horizontally, use the following command −
pygame.transform.flip(img2,True, False)
To flip vertically, use the following command −
pygame.transform.flip(img2,False, True)
In the following example, pygame logo image is displayed normally and flipping in both directions. First obtained flipped surface from original image object, fetch its Rect object and then built it. To render horizontally flipped image,
img1 = pygame.image.load('pygame.png')
img2=img1
img2=pygame.transform.flip(img2,True, False)
#inside event loop
rect2 = img2.get_rect()
   rect2.center = 200, 150
   screen.blit(img2, rect2)
Example
The complete code for rendering original Pygame logo and its flipped images is as follows −
import pygame

pygame.init()
screen = pygame.display.set_mode((400, 300))
pygame.display.set_caption("Flip image")
img1 = pygame.image.load('pygame.png')
img2=img1
img3=img1
img2=pygame.transform.flip(img2,True, False)
img3=pygame.transform.flip(img3, False, True)
done = False
bg = (127,127,127)
while not done:
   for event in pygame.event.get():
      screen.fill(bg)
      rect1 = img1.get_rect()
      rect1.center = 200, 50
      screen.blit(img1, rect1)
      rect2 = img2.get_rect()
      rect2.center = 200, 150
      screen.blit(img2, rect2)
      rect3 = img3.get_rect()
      rect3.center = 200, 250
      screen.blit(img3, rect3)
      if event.type == pygame.QUIT:
         done = True
   pygame.display.update()
Output
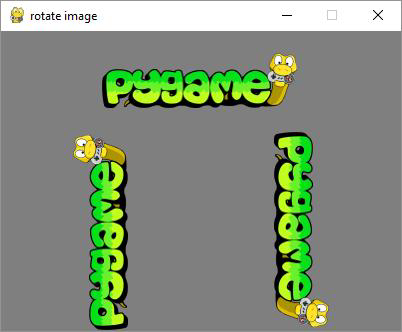
The rotate() function takes following arguments −
rotate(Surface, angle)
Example
Negative value of angle rotates the surface in clockwise direction.
import pygame

pygame.init()
screen = pygame.display.set_mode((400, 300))
pygame.display.set_caption("rotate image")
img1 = pygame.image.load('pygame.png')
img2=img1
img3=img1
img2=pygame.transform.rotate(img2,90)
img3=pygame.transform.rotate(img3, -90)
done = False
bg = (127,127,127)
while not done:
   for event in pygame.event.get():
      screen.fill(bg)
      rect1 = img1.get_rect()
      rect1.center = 200, 50
      screen.blit(img1, rect1)
      rect2 = img2.get_rect()
      rect2.center = 100, 200
      screen.blit(img2, rect2)
      rect3 = img3.get_rect()
      rect3.center = 300,200
      screen.blit(img3, rect3)
      if event.type == pygame.QUIT:
         done = True
   pygame.display.update()
Output
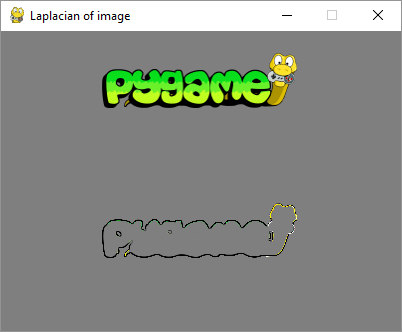
Example
The laplacian() function extracts outline of the surface object. The function just takes one argument, the image object itself.
import pygame
pygame.init()
screen = pygame.display.set_mode((400, 300))
pygame.display.set_caption("Laplacian of image")
img1 = pygame.image.load('pygame.png')
img2=img1
img2=pygame.transform.laplacian(img2)
done = False
bg = (127,127,127)
while not done:
   for event in pygame.event.get():
      screen.fill(bg)
      rect1 = img1.get_rect()
      rect1.center = 200, 50
      screen.blit(img1, rect1)
      rect2 = img2.get_rect()
      rect2.center = 200, 200
      screen.blit(img2, rect2)

      if event.type == pygame.QUIT:
         done = True
   pygame.display.update()
Output
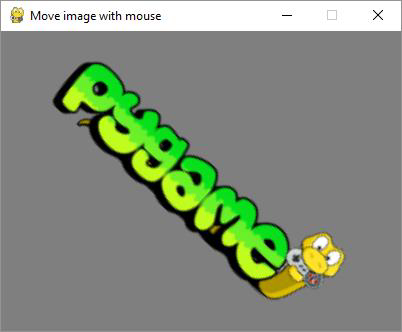
To make the Surface object move along with mouse movement, calculate the x, y coordinates from the center of the image. We also calculate the center-mouse distance d. The atan2(y, x) math function allows to find the rotation angle. We need to transform radians in degrees. From the distance mouse-center we calculate the scale argument.
mouse = event.pos
Pygame
54
x = mouse[0] - 200
y = mouse[1] - 150
d = math.sqrt(x ** 2 + y ** 2)
angle = math.degrees(-math.atan2(y, x))
scale = abs(5 * d / 400)
Finally, we use rotzoom() function which performs combined rotation and scaling transform.
rotozoom(Surface, angle, scale)
Example
Following code renders Pygame logo image that can be rotated in accordance with mouse movement.
import pygame , math
from pygame.locals import *
pygame.init()
screen = pygame.display.set_mode((400, 300))
pygame.display.set_caption("Move image with mouse")
img1 = pygame.image.load('pygame.png')
done = False
bg = (127,127,127)
while not done:
   for event in pygame.event.get():
      screen.fill(bg)

      if event.type == pygame.QUIT:
         done = True
      if event.type == MOUSEMOTION:
         mouse = event.pos
         x = mouse[0] - 200
         y = mouse[1] - 150
         d = math.sqrt(x ** 2 + y ** 2)
         angle = math.degrees(-math.atan2(y, x))
         scale = abs(5 * d / 400)
         img2 = pygame.transform.rotozoom(img1, angle, scale)
         rect = img2.get_rect()
         rect.center = (200,150)
         screen.blit(img2, rect)
   pygame.display.update()
Output
Run above code, try and move mouse cursor along display window. The image shall rotate and either shrink or grow accordingly.
Pygame - Sound Objects
Use of music and sounds make any computer game more engaging. Pygame library supports this feature through pygame.mixer module. This module contains Sound class for loading Sound objects and controlling playback. All sound playback is mixed in background threads. For less laggy sound use a smaller buffer size.
To obtain Sound object from a sound file or file object, use following constructor −
pygame.mixer.Sound(filename or file object)
The Sound class defines following methods for controlling playback −
| play(loops=0, maxtime=0, fade_ms=0) | Begin playback of the Sound (i.e., on the computer's speakers) on an available Channel. Loops parameter is for repeated play. |
| stop() | This will stop the playback of this Sound on any active Channels. |
| fadeout(time) | This will stop playback of the sound after fading it out over the time argument in milliseconds. |
| set_volume(value) | This will set the playback volume for this Sound,immediately affecting the Sound if it is playing and any future playback of this Sound. volume in the range of 0.0 to 1.0 |
| get_length() | Return the length of this Sound in seconds. |
In following example, a text button is rendered at the bottom of display window. A space key fires an arrow upwards accompanied by a sound playing.
font = pygame.font.SysFont("Arial", 14)
text1=font.render(" SHOOT ", True, bg)
rect1 = text1.get_rect(midbottom=(200,300))
img=pygame.image.load("arrow.png")
rect2=img.get_rect(midtop=(200, 270))
Inside the game event loop, for a space key detected, an arrow object is place above the SHOOT button and repeatedly rendered with decrementing y coordinate. The shooting sound is also played at the same time.
sound=pygame.mixer.Sound("sound.wav")img=pygame.image.load("arrow.png")
rect2=img.get_rect(midtop=(200, 270))

if event.type == pygame.KEYDOWN:
   if event.key == pygame.K_SPACE: 18. Pygame — Sound objects
      print ("space")
      if kup==0:
         screen.blit(img, (190,y))
         kup=1
   if kup==1:
      y=y-1
      screen.blit(img, (190,y))
      sound.play()
      if y<=0:
         kup=0
         y=265
Example
Following listing demonstrates use of Sound object.
import pygame
from pygame.locals import *
pygame.init()
screen = pygame.display.set_mode((400, 300))
done = False
white = (255,255,255)
bg = (127,127,127)
sound=pygame.mixer.Sound("sound.wav")
font = pygame.font.SysFont("Arial", 14)
text1=font.render(" SHOOT ", True, bg)
rect1 = text1.get_rect(midbottom=(200,300))
img=pygame.image.load("arrow.png")
rect2=img.get_rect(midtop=(200, 270))
kup=0
psmode=True
screen = pygame.display.set_mode((400,300))
screen.fill(white)
y=265
while not done:

   for event in pygame.event.get():
      screen.blit(text1, rect1)
      pygame.draw.rect(screen, (255,0,0),rect1,2)
      if event.type == pygame.QUIT:
         sound.stop()
         done = True
      if event.type == pygame.KEYDOWN:
         if event.key == pygame.K_SPACE:
            print ("space")
            if kup==0:
               screen.blit(img, (190,y))
               kup=1
   if kup==1:
      y=y-1
      screen.blit(img, (190,y))
      sound.play()
      if y<=0:
         kup=0
         y=265
   pygame.display.update()
Pygame - Mixer Channels
The Sound object can be played on a specific channel instead of the default channel automatically chosen. First create a channel object using the following command −
pygame.mixer.Channel(id)
Following functions are defined in the mixer.channel class −
| play(Sound, loops=0, maxtime=0, fade_ms=0) | This will begin playback of a Sound on a specific Channel. |
| stop() | Stop sound playback on a channel. After playback is stopped the channel becomes available for new Sounds to play on it |
| pause() | Temporarily stop the playback of sound on a channel. |
| unpause() | Resume the playback on a paused channel. |
| set_volume(value) | Set the volume (loudness) of a playing sound. The value argument is between 0.0 and 1.0. |
| queue(Sound) | When a Sound is queued on a Channel, it will begin playing immediately after the current Sound is finished. |
Pygame - Playing Music
The mixer also has a special streaming channel for music playback and is accessed through the pygame.mixer.musicpygame module for controlling streamed audio module. The difference between the music playback and regular Sound playback is that the music is streamed, and never actually loaded all at once. The mixer system only supports a single music stream at once.
First of all, we need to load the music from a music file. Pygame can load WAV, MP3, or OGG files.
pygame.mixer.music.load(filename or object)
This will load a music filename/file object and prepare it for playback. If a music stream is already playing it will be stopped. This does not start the music playing. The playback is controlled by following functions −
play(loops=0, start=0.0, fade_ms = 0)
This will play the loaded music stream. If the music is already playing it will be restarted. loops argument tells how many times to repeat the music. The music repeats indefinitely if this argument is set to -1. start denotes the music starts playing from. The position as time in seconds. fade_ms argument makes the music start playing at 0 volume and fade up to full volume over the given time.
Other useful functions are given below −
| rewind() | Resets playback of the current music to the beginning. |
| stop() | Stops the music playback if it is currently playing. It Won't Unload the music. |
| pause() | Temporarily stop playback of the music stream. |
| unpause() | This will resume the playback of a music stream after it has been paused. |
| fadeout(time) | Fade out and stop the currently playing music. |
| set_volume(volume) | Set the volume of the music playback. |
| set_pos(pos) | This sets the position in the music file where playback will start. |
In the following program, a music file starts playing on clicking PLAY button. The PAUSE button acts as a toggle to pause/unpause play. Click on STOP stops the playback.
import pygame
pygame.init()
screen = pygame.display.set_mode((400, 300)) 20. Pygame — Playing music
done = False
white = (255,255,255)
pygame.mixer.music.load("mario_theme.wav")
font = pygame.font.SysFont("Arial", 14)
text1=font.render(" PLAY ", True, white)
text2=font.render(" PAUSE ", True, white)
text3=font.render(" STOP ", True, white)
rect1 = text1.get_rect(topleft=(10,10))
rect2 = text2.get_rect(topleft= (100,10))
rect3 = text3.get_rect(topleft= (200,10))
bg = (127,127,127)
psmode=True
screen = pygame.display.set_mode((400,300))
screen.fill(bg)
while not done:
   for event in pygame.event.get():
      screen.blit(text1, rect1)
      pygame.draw.rect(screen, (255,0,0),rect1,2)
      screen.blit(text2, rect2)
      pygame.draw.rect(screen, (255,0,0),rect2,2)
      pygame.draw.rect(screen, (255,0,0),rect3,2)
      screen.blit(text3, rect3)

      if event.type == pygame.QUIT:
         done = True
      if event.type == pygame.MOUSEBUTTONDOWN:
         if rect1.collidepoint(event.pos):
            pygame.mixer.music.play()
         if rect2.collidepoint(event.pos):
            if psmode==True:
               pygame.mixer.music.pause()
               psmode=False
            else:
               if psmode==False:
                  pygame.mixer.music.unpause()
                  psmode=True
            if rect3.collidepoint(event.pos):
               pygame.mixer.music.stop()
   pygame.display.update()
Pygame - Playing Movie
Pygame has discontinued support for video files in its latest version. However, earlier versions on Python 2.7 distributions, it can be still used. For this section, Pygame 1.9.2 and Python 2.7.18 has been used.
The pygame.movie module supports playback video and audio from basic encoded MPEG-1 video files. Movie playback happens in background threads, which makes playback easy to manage. the pygame.mixerpygame module for loading and playing sounds module must be uninitialized if the movie’s sound is to be played.
To begin with obtain a Movie object by following syntax −
movie = pygame.movie.Movie('sample.mpg')
The Movie class provides following methods to control playback.
| pygame.movie.Movie.play | start playback of a movie |
| pygame.movie.Movie.stop | stop movie playback |
| pygame.movie.Movie.pause | temporarily stop and resume playback |
| pygame.movie.Movie.skip | advance the movie playback position |
| pygame.movie.Movie.rewind | restart the movie playback |
| pygame.movie.Movie.get_time | get the current vide playback time |
| pygame.movie.Movie.get_length | the total length of the movie in seconds |
| pygame.movie.Movie.get_size | get the resolution of the video |
| pygame.movie.Movie.has_audio | check if the movie file contains audio |
| pygame.movie.Movie.set_volume | set the audio playback volume |
| pygame.movie.Movie.set_display | set the video target Surface |
Following code plays a .MPG file on the Pygame display window. −
import pygame

FPS = 60
pygame.init()
clock = pygame.time.Clock()
movie = pygame.movie.Movie('sample_640x360.mpg')
screen = pygame.display.set_mode(movie.get_size())
movie_screen = pygame.Surface(movie.get_size()).convert()

movie.set_display(movie_screen)
movie.play()

playing = True
while playing:
   for event in pygame.event.get():
      if event.type == pygame.QUIT:
         movie.stop()
         playing = False

   screen.blit(movie_screen,(0,0))
   pygame.display.update()
   clock.tick(FPS)
pygame.quit()
Pygame - Using Camera Module
Earlier versions of Pygame upto 1.9.6 contain pygame.camera module. This module contains functionality to capture camera feed on the game window and grab an image from it. The camera devices available to the system are enumerated in a list returned by list_cameras() method.
pygame.camera.list_cameras()
To initialize a camera object, use camera id, resolution and format arguments.
pygame.camera.Camera(device, (width, height), format)
The default format is RGB. Width and height parameters are by default 640x480.
The camera module has following methods defined in Camera class.
| pygame.camera.Camera.start() | opens, initializes, and starts capturing |
| pygame.camera.Camera.stop() | stops, uninitializes, and closes the camera |
| pygame.camera.Camera.get_controls() | gets current values of user controls |
| pygame.camera.Camera.set_controls() | changes camera settings if supported by the camera |
| pygame.camera.Camera.get_size() | returns the dimensions of the images being recorded |
| pygame.camera.Camera.query_image() | checks if a frame is ready |
| pygame.camera.Camera.get_image() | captures an image as a Surface |
| pygame.camera.Camera.get_raw() | returns an unmodified image as a string |
Example
Following programs captures live feed from computer’s default web camera.
import pygame
import pygame.camera

pygame.init()

gameDisplay = pygame.display.set_mode((640,480))

pygame.camera.init()
print (pygame.camera.list_cameras())
cam = pygame.camera.Camera(0)
cam.start()
while True:
   img = cam.get_image()
   gameDisplay.blit(img,(0,0))
   pygame.display.update()
   for event in pygame.event.get() :
      if event.type == pygame.QUIT :
         cam.stop()
         pygame.quit()
         exit()
Please note that on Windows OS, you may have to install Videocapture module.
pip3 install VideoCapture
Output
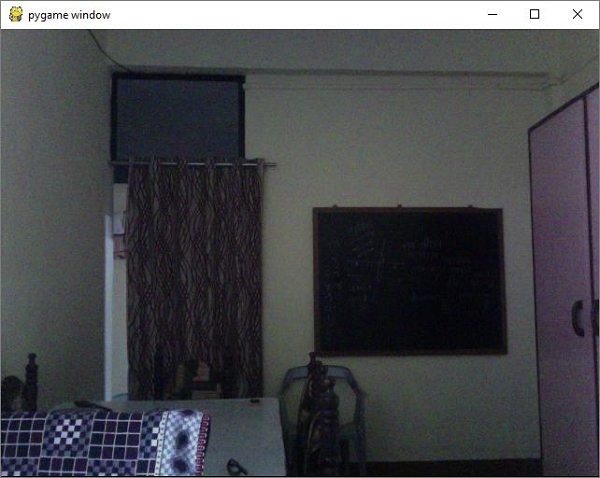
Pygame - Load Cursor
Pygame can let you control system cursor. Onlu black and white cursors can be used in Pygame. The pygame.cursors module defines contain predefined cursor enumerations.
- pygame.cursors.arrow
- pygame.cursors.diamond
- pygame.cursors.broken_x
- pygame.cursors.tri_left
- pygame.cursors.tri_right
The arrow cursor is the default choice. To use another cursor, we use set_cursor() function in pygame.mouse module.
pygame.mouse.set_cursor(pygame.cursors.broken_x)
Example
In the following example, this cursor can be seen on the display window.
import pygame,sys
from pygame.locals import *
pygame.init()
pygame.mouse.set_cursor(pygame.cursors.broken_x)
canvas=pygame.display.set_mode((400,300))
pygame.display.set_caption("Cursor")
while True:
for event in pygame.event.get():
   if(event.type == QUIT):
      pygame.quit()
      sys.exit(1)
Output

This module also contains a few cursors as formatted strings. To use them, use pygame.cursors.compile() function.
- pygame.cursors.thickarrow_strings
- pygame.cursors.sizer_x_strings
- pygame.cursors.sizer_y_strings
- pygame.cursors.sizer_xy_strings
- pygame.cursor.textmarker_strings
cursor = pygame.cursors.compile(pygame.cursors.textmarker_strings)
pygame.mouse.set_cursor((10,10), (0, 0), *cursor)
Pygame - Access CDROM
The pygame library has pygame.cdrom module that enables the program to manage playback from audio CDs and DVDs. We need to explicitly initialize this module for its use.
>>> import pygame
>>> pygame.cdrom.init()
The module defines all important CD class to represent the CDROM device. The constructor requires ID of CDROM drive available, starting with 0.
>>> obj=pygame.cdrom.CD(0)
The CDROM object has access to following useful functions to control the playback.
| init() | initialize a cdrom drive for use |
| quit() | uninitialize a cdrom drive for use |
| play() | start playing audio |
| stop() | stop audio playback |
| pause() | temporarily stop audio playback |
| resume() | unpause audio playback |
| eject() | eject or open the cdrom drive |
| get_busy() | true if the drive is playing audio |
| get_paused() | true if the drive is paused |
| get_empty() | False if a cdrom is in the drive |
| get_numtracks() | the number of tracks on the cdrom |
| get_track_audio() | true if the cdrom track has audio data |
| get_track_start() | start time of a cdrom track |
| get_track_length() | length of a cdrom track |
First, initialize the object.
>>> obj.init()
To find out how many tracks are present in the current CD −
>>> obj.get_numtracks()
8
To start playing the required track, give its number to play() function.
>>> obj.play(4)
To pause, resume and stop the playback, we can use relevant functions listed above.
Pygame - The Sprite Module
Any bitmap that is drawn in our game window and that can move around is called a Sprite. The pygame.sprite module contains classes and functionality useful in game development. Along with a Sprite class to create collection of sprite objects, there are functions that enable collision of sprite objects.
The Sprite class serves as a base class for different objects in the game. You may have to put one more objects in groups. for that purpose, group classes are also provided.
Let us first develop a Sprite class by subclassing the sprite.Sprite class. Each object of this Block class is a rectangular block filled with black color.
class Block(pygame.sprite.Sprite):

   def __init__(self, color, width, height):
      super().__init__()

      self.image = pygame.Surface([width, height])
      self.image.fill(color)

      self.rect = self.image.get_rect()
We shall create 50 block objects and put them in a list.
for i in range(50):
   block = Block(BLACK, 20, 15)

   # Set a random location for the block
   block.rect.x = random.randrange(screen_width)
   block.rect.y = random.randrange(screen_height)

   # Add the block to the list of objects
   block_list.add(block)
   all_sprites_list.add(block)
We create a block with red color call it player, and add it too to the list.
# Create a RED player block
player = Block(RED, 20, 15)
all_sprites_list.add(player)
Inside the game’s event loop, detect the collision of red block (player) as it moves along with mouse motion and black block and count the collisions.
Example
The event loop code is as follows −
while not done:
   for event in pygame.event.get():
      if event.type == pygame.QUIT:
         done = True

   # Clear the screen
   screen.fill(WHITE)

   # Get the current mouse position. This returns the position
   # as a list of two numbers.
   pos = pygame.mouse.get_pos()

   # Fetch the x and y out of the list,
      # just like we'd fetch letters out of a string.
   # Set the player object to the mouse location
   player.rect.x = pos[0]
   player.rect.y = pos[1]

   # See if the player block has collided with anything.
   blocks_hit_list = pygame.sprite.spritecollide(player, block_list, True)

   # Check the list of collisions.
   for block in blocks_hit_list:
      score += 1
      print(score)

   # Draw all the spites
   all_sprites_list.draw(screen)

   # Go ahead and update the screen with what we've drawn.
   pygame.display.flip()

   # Limit to 60 frames per second
   clock.tick(60)

pygame.quit()
Output
Run the above code. Move the player block to capture as many black blocks. The score will be echoed on the console.
Pygame - PyOpenGL
OpenGL is a cross-language, cross-platform API for rendering 2D and 3D vector graphics. By interacting with a graphics processing unit (GPU), it achieves hardware-accelerated rendering. PyOpenGL library is Python’s binding for OpenGL.
We need to install it using pip utility −
pip3 install pyopengl
First we shall import functions from OpenGL.GL and OpenGL.GLU (utility functions) modules.
OpenGL specifies objects within the space by defining vertices or nodes. Lines between vertices are called edges. The OpenGL code is written between glBegin and glEnd.
In our example, we shall draw a cube with following vertices and edges −
verticies = (
   (1, -1, -1),
   (1, 1, -1),
   (-1, 1, -1),
   (-1, -1, -1),
   (1, -1, 1),
   (1, 1, 1),
   (-1, -1, 1),
   (-1, 1, 1)
)
edges = (
   (0,1),
   (0,3),
   (0,4),
   (2,1),
   (2,3),
   (2,7),
   (6,3),
   (6,4),
   (6,7),
   (5,1),
   (5,4),
   (5,7)
)
The cube() function performs OpenGL drawing −
def Cube():
   glBegin(GL_LINES)
   for edge in edges:
      for vertex in edge:
         glVertex3fv(verticies[vertex])
   glEnd()
The GL_LINES attribute to glBegin() tells that lines are to be drawn.
We need to specify OPENGL and DOUBLEBUF flags in set_mode() function that sets up the display.
pygame.display.set_mode(display, DOUBLEBUF|OPENGL)
Then call the gluPerspective() determines the perspective. The first parameter is the degree of the field of view. The second value is the aspect ratio. The next two values here are the znear and zfar, which are the near and far clipping planes.
gluPerspective(45, (display[0]/display[1]), 0.1, 50.0)
glTranslatef(0.0,0.0, -5)
Inside the Pygame event loop, first rotate the current matrix, clear the color buffer and depth buffer, and call cube() function. Finally, we update the display window.
while True:
   for event in pygame.event.get():
      if event.type == pygame.QUIT:
         pygame.quit()
         quit()

   glRotatef(1, 3, 1, 1)
   glClear(GL_COLOR_BUFFER_BIT|GL_DEPTH_BUFFER_BIT)
   Cube()
   pygame.display.flip()
   pygame.time.wait(10)
Example
The complete code of the example is as follows −
import pygame

from pygame.locals import *

from OpenGL.GL import *
from OpenGL.GLU import *

verticies = (
   (1, -1, -1),
   (1, 1, -1),
   (-1, 1, -1),
   (-1, -1, -1),
   (1, -1, 1),
   (1, 1, 1),
   (-1, -1, 1),
   (-1, 1, 1)
)
edges = (
   (0,1),
   (0,3),
   (0,4),
   (2,1),
   (2,3),
   (2,7),
   (6,3),
   (6,4),
   (6,7),
   (5,1),
   (5,4),
   (5,7)
)
def Cube():
   glBegin(GL_LINES)
   for edge in edges:
      for vertex in edge:
         glVertex3fv(verticies[vertex])
   glEnd()

def main():
   pygame.init()
   display = (800,600)
   pygame.display.set_mode(display, DOUBLEBUF|OPENGL)

   gluPerspective(45, (display[0]/display[1]), 0.1, 50.0)

   glTranslatef(0.0,0.0, -5)

   while True:
      for event in pygame.event.get():
         if event.type == pygame.QUIT:
            pygame.quit()
            quit()
      glRotatef(1, 3, 1, 1)
      glClear(GL_COLOR_BUFFER_BIT|GL_DEPTH_BUFFER_BIT)
      Cube()
      pygame.display.flip()
      pygame.time.wait(10)

main()
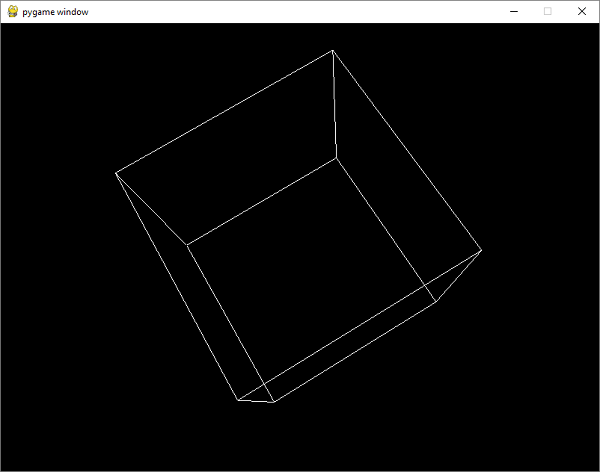
Output
Run the above code. You will see a rotating cube on Pygame’s window surface. This is a short demonstration of capability of PyOpenGL. A detailed discussion of this library is beyond the scope of this tutorial.
Pygame - Errors and Exception
Top level pygame module defines pygame.error as a standard Pygame exception. This exception is raised whenever a pygame or SDL operation fails. You can catch any anticipated problems and deal with the error. The exception is always raised with a descriptive message about the problem.
>>> import pygame
pygame 1.9.6
Hello from the pygame community. https://www.pygame.org/contribute.html
>>> screen = pygame.display.set_mode((640, -1))
Traceback (most recent call last):
   File "<pyshell#1>", line 1, in <module>
      screen = pygame.display.set_mode((640, -1))
pygame.error: Cannot set negative sized display mode
Being derived from the RuntimeError exception, which can also be used to catch these raised errors.
>>> try:
   screen = pygame.display.set_mode((640, -1))
except pygame.error as e:
   print ("unable to set display: ", e)

unable to set display Cannot set: negative sized display mode
There are two more functions in this module to set and retrieve error message.
set_error(error_msg)
SDL maintains an internal error message. When pygame.error()standard pygame exception is raised, this string is used as error message.
It gets the current error message.
get_error()
It returns the string as error message of pygame.error() message.