- Natural Language Toolkit Tutorial
- Natural Language Toolkit - Home
- Natural Language Toolkit - Introduction
- Natural Language Toolkit - Getting Started
- Natural Language Toolkit - Tokenizing Text
- Training Tokenizer & Filtering Stopwords
- Looking up words in Wordnet
- Stemming & Lemmatization
- Natural Language Toolkit - Word Replacement
- Synonym & Antonym Replacement
- Corpus Readers and Custom Corpora
- Basics of Part-of-Speech (POS) Tagging
- Natural Language Toolkit - Unigram Tagger
- Natural Language Toolkit - Combining Taggers
- Natural Language Toolkit - More NLTK Taggers
- Natural Language Toolkit - Parsing
- Chunking & Information Extraction
- Natural Language Toolkit - Transforming Chunks
- Natural Language Toolkit - Transforming Trees
- Natural Language Toolkit - Text Classification
- Natural Language Toolkit Resources
- Natural Language Toolkit - Quick Guide
- Natural Language Toolkit - Useful Resources
- Natural Language Toolkit - Discussion
Natural Language Toolkit - Quick Guide
Natural Language Toolkit - Introduction
What is Natural Language Processing (NLP)?
The method of communication with the help of which humans can speak, read, and write, is language. In other words, we humans can think, make plans, make decisions in our natural language. Here the big question is, in the era of artificial intelligence, machine learning and deep learning, can humans communicate in natural language with computers/machines? Developing NLP applications is a huge challenge for us because computers require structured data, but on the other hand, human speech is unstructured and often ambiguous in nature.
Natural language is that subfield of computer science, more specifically of AI, which enables computers/machines to understand, process and manipulate human language. In simple words, NLP is a way of machines to analyze, understand and derive meaning from human natural languages like Hindi, English, French, Dutch, etc.
How does it work?
Before getting deep dive into the working of NLP, we must have to understand how human beings use language. Every day, we humans use hundreds or thousands of words and other humans interpret them and answer accordingly. It’s a simple communication for humans, isn’t it? But we know words run much-much deeper than that and we always derive a context from what we say and how we say. That’s why we can say rather than focuses on voice modulation, NLP does draw on contextual pattern.
Let us understand it with an example −
Man is to woman as king is to what?
We can interpret it easily and answer as follows:
Man relates to king, so woman can relate to queen.
Hence the answer is Queen.
How humans know what word means what? The answer to this question is that we learn through our experience. But, how do machines/computers learn the same?
Let us understand it with following easy steps −
First, we need to feed the machines with enough data so that machines can learn from experience.
Then machine will create word vectors, by using deep learning algorithms, from the data we fed earlier as well as from its surrounding data.
Then by performing simple algebraic operations on these word vectors, machine would be able to provide the answers as human beings.
Components of NLP
Following diagram represents the components of natural language processing (NLP) −
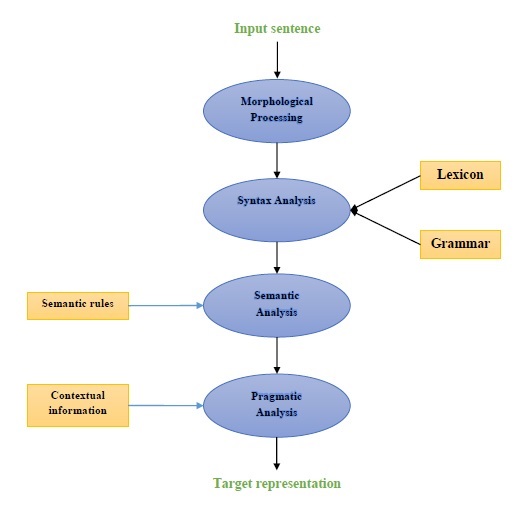
Morphological Processing
Morphological processing is the first component of NLP. It includes breaking of chunks of language input into sets of tokens corresponding to paragraphs, sentences and words. For example, a word like “everyday” can be broken into two sub-word tokens as “every-day”.
Syntax analysis
Syntax Analysis, the second component, is one of the most important components of NLP. The purposes of this component are as follows −
To check that a sentence is well formed or not.
To break it up into a structure that shows the syntactic relationships between the different words.
E.g. The sentences like “The school goes to the student” would be rejected by syntax analyzer.
Semantic analysis
Semantic Analysis is the third component of NLP which is used to check the meaningfulness of the text. It includes drawing exact meaning, or we can say dictionary meaning from the text. E.g. The sentences like “It’s a hot ice-cream.” would be discarded by semantic analyzer.
Pragmatic analysis
Pragmatic analysis is the fourth component of NLP. It includes fitting the actual objects or events that exist in each context with object references obtained by previous component i.e. semantic analysis. E.g. The sentences like “Put the fruits in the basket on the table” can have two semantic interpretations hence the pragmatic analyzer will choose between these two possibilities.
Examples of NLP Applications
NLP, an emerging technology, derives various forms of AI we used to see these days. For today’s and tomorrow’s increasingly cognitive applications, the use of NLP in creating a seamless and interactive interface between humans and machines will continue to be a top priority. Following are some of the very useful applications of NLP.
Machine Translation
Machine translation (MT) is one of the most important applications of natural language processing. MT is basically a process of translating one source language or text into another language. Machine translation system can be of either Bilingual or Multilingual.
Fighting Spam
Due to enormous increase in unwanted emails, spam filters have become important because it is the first line of defense against this problem. By considering its false-positive and false-negative issues as the main issues, the functionality of NLP can be used to develop spam filtering system.
N-gram modelling, Word Stemming and Bayesian classification are some of the existing NLP models that can be used for spam filtering.
Information retrieval & Web search
Most of the search engines like Google, Yahoo, Bing, WolframAlpha, etc., base their machine translation (MT) technology on NLP deep learning models. Such deep learning models allow algorithms to read text on webpage, interprets its meaning and translate it to another language.
Automatic Text Summarization
Automatic text summarization is a technique which creates a short, accurate summary of longer text documents. Hence, it helps us in getting relevant information in less time. In this digital era, we are in a serious need of automatic text summarization because we have the flood of information over internet which is not going to stop. NLP and its functionalities play an important role in developing an automatic text summarization.
Grammar Correction
Spelling correction & grammar correction is a very useful feature of word processor software like Microsoft Word. Natural language processing (NLP) is widely used for this purpose.
Question-answering
Question-answering, another main application of natural language processing (NLP), focuses on building systems which automatically answer the question posted by user in their natural language.
Sentiment analysis
Sentiment analysis is among one other important applications of natural language processing (NLP). As its name implies, Sentiment analysis is used to −
Identify the sentiments among several posts and
Identify the sentiment where the emotions are not expressed explicitly.
Online E-commerce companies like Amazon, ebay, etc., are using sentiment analysis to identify the opinion and sentiment of their customers online. It will help them to understand what their customers think about their products and services.
Speech engines
Speech engines like Siri, Google Voice, Alexa are built on NLP so that we can communicate with them in our natural language.
Implementing NLP
In order to build the above-mentioned applications, we need to have specific skill set with a great understanding of language and tools to process the language efficiently. To achieve this, we have various open-source tools available. Some of them are open-sourced while others are developed by organizations to build their own NLP applications. Following is the list of some NLP tools −
Natural Language Tool Kit (NLTK)
Mallet
GATE
Open NLP
UIMA
Genism
Stanford toolkit
Most of these tools are written in Java.
Natural Language Tool Kit (NLTK)
Among the above-mentioned NLP tool, NLTK scores very high when it comes to the ease of use and explanation of the concept. The learning curve of Python is very fast and NLTK is written in Python so NLTK is also having very good learning kit. NLTK has incorporated most of the tasks like tokenization, stemming, Lemmatization, Punctuation, Character Count, and Word count. It is very elegant and easy to work with.
Natural Language Toolkit - Getting Started
In order to install NLTK, we must have Python installed on our computers. You can go to the link www.python.org/downloads and select the latest version for your OS i.e. Windows, Mac and Linux/Unix. For basic tutorial on Python you can refer to the link www.tutorialspoint.com/python3/index.htm.

Now, once you have Python installed on your computer system, let us understand how we can install NLTK.
Installing NLTK
We can install NLTK on various OS as follows −
On Windows
In order to install NLTK on Windows OS, follow the below steps −
First, open the Windows command prompt and navigate to the location of the pip folder.
Next, enter the following command to install NLTK −
pip3 install nltk
Now, open the PythonShell from Windows Start Menu and type the following command in order to verify NLTK’s installation −
Import nltk
If you get no error, you have successfully installed NLTK on your Windows OS having Python3.
On Mac/Linux
In order to install NLTK on Mac/Linux OS, write the following command −
sudo pip install -U nltk
If you don’t have pip installed on your computer, then follow the instruction given below to first install pip −
First, update the package index by following using following command −
sudo apt update
Now, type the following command to install pip for python 3 −
sudo apt install python3-pip
Through Anaconda
In order to install NLTK through Anaconda, follow the below steps −
First, to install Anaconda, go to the link https://www.anaconda.com/download and then select the version of Python you need to install.

Once you have Anaconda on your computer system, go to its command prompt and write the following command −
conda install -c anaconda nltk
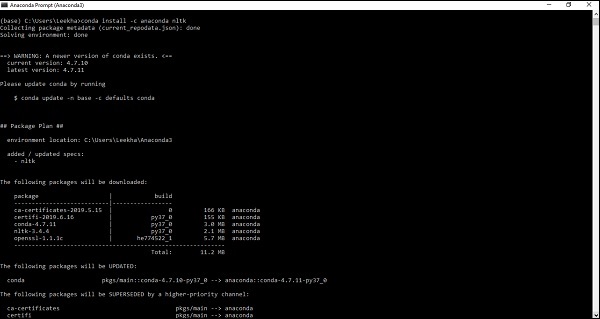
You need to review the output and enter ‘yes’. NLTK will be downloaded and installed in your Anaconda package.
Downloading NLTK’s Dataset and Packages
Now we have NLTK installed on our computers but in order to use it we need to download the datasets (corpus) available in it. Some of the important datasets available are stpwords, guntenberg, framenet_v15 and so on.
With the help of following commands, we can download all the NLTK datasets −
import nltk
nltk.download()
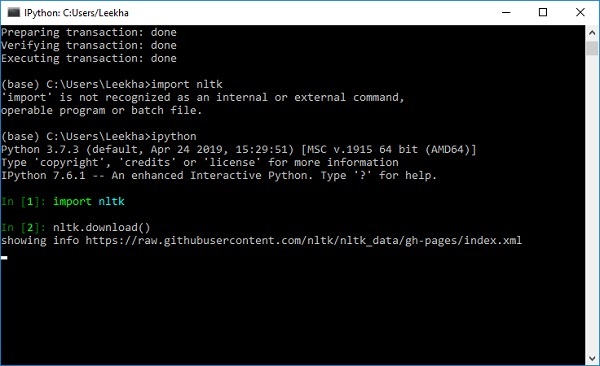
You will get the following NLTK downloaded window.
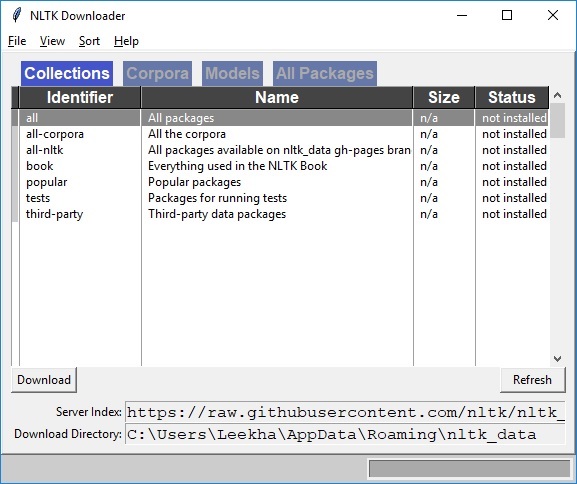
Now, click on the download button to download the datasets.
How to run NLTK script?
Following is the example in which we are implementing Porter Stemmer algorithm by using PorterStemmer nltk class. with this example you would be able to understand how to run NLTK script.
First, we need to import the natural language toolkit(nltk).
import nltk
Now, import the PorterStemmer class to implement the Porter Stemmer algorithm.
from nltk.stem import PorterStemmer
Next, create an instance of Porter Stemmer class as follows −
word_stemmer = PorterStemmer()
Now, input the word you want to stem. −
word_stemmer.stem('writing')
Output
'write'
word_stemmer.stem('eating')
Output
'eat'
Natural Language Toolkit - Tokenizing Text
What is Tokenizing?
It may be defined as the process of breaking up a piece of text into smaller parts, such as sentences and words. These smaller parts are called tokens. For example, a word is a token in a sentence, and a sentence is a token in a paragraph.
As we know that NLP is used to build applications such as sentiment analysis, QA systems, language translation, smart chatbots, voice systems, etc., hence, in order to build them, it becomes vital to understand the pattern in the text. The tokens, mentioned above, are very useful in finding and understanding these patterns. We can consider tokenization as the base step for other recipes such as stemming and lemmatization.
NLTK package
nltk.tokenize is the package provided by NLTK module to achieve the process of tokenization.
Tokenizing sentences into words
Splitting the sentence into words or creating a list of words from a string is an essential part of every text processing activity. Let us understand it with the help of various functions/modules provided by nltk.tokenize package.
word_tokenize module
word_tokenize module is used for basic word tokenization. Following example will use this module to split a sentence into words.
Example
import nltk
from nltk.tokenize import word_tokenize
word_tokenize('Tutorialspoint.com provides high quality technical tutorials for free.')
Output
['Tutorialspoint.com', 'provides', 'high', 'quality', 'technical', 'tutorials', 'for', 'free', '.']
TreebankWordTokenizer Class
word_tokenize module, used above is basically a wrapper function that calls tokenize() function as an instance of the TreebankWordTokenizer class. It will give the same output as we get while using word_tokenize() module for splitting the sentences into word. Let us see the same example implemented above −
Example
First, we need to import the natural language toolkit(nltk).
import nltk
Now, import the TreebankWordTokenizer class to implement the word tokenizer algorithm −
from nltk.tokenize import TreebankWordTokenizer
Next, create an instance of TreebankWordTokenizer class as follows −
Tokenizer_wrd = TreebankWordTokenizer()
Now, input the sentence you want to convert to tokens −
Tokenizer_wrd.tokenize(
   'Tutorialspoint.com provides high quality technical tutorials for free.'
)
Output
[
   'Tutorialspoint.com', 'provides', 'high', 'quality',
   'technical', 'tutorials', 'for', 'free', '.'
]
Complete implementation example
Let us see the complete implementation example below
import nltk
from nltk.tokenize import TreebankWordTokenizer
tokenizer_wrd = TreebankWordTokenizer()
tokenizer_wrd.tokenize('Tutorialspoint.com provides high quality technical
tutorials for free.')
Output
[
   'Tutorialspoint.com', 'provides', 'high', 'quality',
   'technical', 'tutorials','for', 'free', '.'
]
The most significant convention of a tokenizer is to separate contractions. For example, if we use word_tokenize() module for this purpose, it will give the output as follows −
Example
import nltk
from nltk.tokenize import word_tokenize
word_tokenize('won’t')
Output
['wo', "n't"]]
Such kind of convention by TreebankWordTokenizer is unacceptable. That’s why we have two alternative word tokenizers namely PunktWordTokenizer and WordPunctTokenizer.
WordPunktTokenizer Class
An alternative word tokenizer that splits all punctuation into separate tokens. Let us understand it with the following simple example −
Example
from nltk.tokenize import WordPunctTokenizer
tokenizer = WordPunctTokenizer()
tokenizer.tokenize(" I can't allow you to go home early")
Output
['I', 'can', "'", 't', 'allow', 'you', 'to', 'go', 'home', 'early']
Tokenizing text into sentences
In this section we are going to split text/paragraph into sentences. NLTK provides sent_tokenize module for this purpose.
Why is it needed?
An obvious question that came in our mind is that when we have word tokenizer then why do we need sentence tokenizer or why do we need to tokenize text into sentences. Suppose we need to count average words in sentences, how we can do this? For accomplishing this task, we need both sentence tokenization and word tokenization.
Let us understand the difference between sentence and word tokenizer with the help of following simple example −
Example
import nltk
from nltk.tokenize import sent_tokenize
text = "Let us understand the difference between sentence & word tokenizer.
It is going to be a simple example."
sent_tokenize(text)
Output
[
   "Let us understand the difference between sentence & word tokenizer.",
   'It is going to be a simple example.'
]
Sentence tokenization using regular expressions
If you feel that the output of word tokenizer is unacceptable and want complete control over how to tokenize the text, we have regular expression which can be used while doing sentence tokenization. NLTK provide RegexpTokenizer class to achieve this.
Let us understand the concept with the help of two examples below.
In first example we will be using regular expression for matching alphanumeric tokens plus single quotes so that we don’t split contractions like “won’t”.
Example 1
import nltk
from nltk.tokenize import RegexpTokenizer
tokenizer = RegexpTokenizer("[\w']+")
tokenizer.tokenize("won't is a contraction.")
tokenizer.tokenize("can't is a contraction.")
Output
["won't", 'is', 'a', 'contraction']
["can't", 'is', 'a', 'contraction']
In first example, we will be using regular expression to tokenize on whitespace.
Example 2
import nltk
from nltk.tokenize import RegexpTokenizer
tokenizer = RegexpTokenizer('/s+' , gaps = True)
tokenizer.tokenize("won't is a contraction.")
Output
["won't", 'is', 'a', 'contraction']
From the above output, we can see that the punctuation remains in the tokens. The parameter gaps = True means the pattern is going to identify the gaps to tokenize on. On the other hand, if we will use gaps = False parameter then the pattern would be used to identify the tokens which can be seen in following example −
import nltk
from nltk.tokenize import RegexpTokenizer
tokenizer = RegexpTokenizer('/s+' , gaps = False)
tokenizer.tokenize("won't is a contraction.")
Output
[ ]
It will give us the blank output.
Training Tokenizer & Filtering Stopwords
Why to train own sentence tokenizer?
This is very important question that if we have NLTK’s default sentence tokenizer then why do we need to train a sentence tokenizer? The answer to this question lies in the quality of NLTK’s default sentence tokenizer. The NLTK’s default tokenizer is basically a general-purpose tokenizer. Although it works very well but it may not be a good choice for nonstandard text, that perhaps our text is, or for a text that is having a unique formatting. To tokenize such text and get best results, we should train our own sentence tokenizer.
Implementation Example
For this example, we will be using the webtext corpus. The text file which we are going to use from this corpus is having the text formatted as dialogs shown below −
Guy: How old are you?
Hipster girl: You know, I never answer that question. Because to me, it's about
how mature you are, you know? I mean, a fourteen year old could be more mature
than a twenty-five year old, right? I'm sorry, I just never answer that question.
Guy: But, uh, you're older than eighteen, right?
Hipster girl: Oh, yeah.
We have saved this text file with the name of training_tokenizer. NLTK provides a class named PunktSentenceTokenizer with the help of which we can train on raw text to produce a custom sentence tokenizer. We can get raw text either by reading in a file or from an NLTK corpus using the raw() method.
Let us see the example below to get more insight into it −
First, import PunktSentenceTokenizer class from nltk.tokenize package −
from nltk.tokenize import PunktSentenceTokenizer
Now, import webtext corpus from nltk.corpus package
from nltk.corpus import webtext
Next, by using raw() method, get the raw text from training_tokenizer.txt file as follows −
text = webtext.raw('C://Users/Leekha/training_tokenizer.txt')
Now, create an instance of PunktSentenceTokenizer and print the tokenize sentences from text file as follows −
sent_tokenizer = PunktSentenceTokenizer(text)
sents_1 = sent_tokenizer.tokenize(text)
print(sents_1[0])
Output
White guy: So, do you have any plans for this evening?
print(sents_1[1])
Output:
Asian girl: Yeah, being angry!
print(sents_1[670])
Output:
Guy: A hundred bucks?
print(sents_1[675])
Output:
Girl: But you already have a Big Mac...
Complete implementation example
from nltk.tokenize import PunktSentenceTokenizer
from nltk.corpus import webtext
text = webtext.raw('C://Users/Leekha/training_tokenizer.txt')
sent_tokenizer = PunktSentenceTokenizer(text)
sents_1 = sent_tokenizer.tokenize(text)
print(sents_1[0])
Output
White guy: So, do you have any plans for this evening?
To understand the difference between NLTK’s default sentence tokenizer and our own trained sentence tokenizer, let us tokenize the same file with default sentence tokenizer i.e. sent_tokenize().
from nltk.tokenize import sent_tokenize
   from nltk.corpus import webtext
   text = webtext.raw('C://Users/Leekha/training_tokenizer.txt')
sents_2 = sent_tokenize(text)

print(sents_2[0])
Output:

White guy: So, do you have any plans for this evening?
print(sents_2[675])
Output:
Hobo: Y'know what I'd do if I was rich?
With the help of difference in the output, we can understand the concept that why it is useful to train our own sentence tokenizer.
What are stopwords?
Some common words that are present in text but do not contribute in the meaning of a sentence. Such words are not at all important for the purpose of information retrieval or natural language processing. The most common stopwords are ‘the’ and ‘a’.
NLTK stopwords corpus
Actually, Natural Language Tool kit comes with a stopword corpus containing word lists for many languages. Let us understand its usage with the help of the following example −
First, import the stopwords copus from nltk.corpus package −
from nltk.corpus import stopwords
Now, we will be using stopwords from English Languages
english_stops = set(stopwords.words('english'))
words = ['I', 'am', 'a', 'writer']
[word for word in words if word not in english_stops]
Output
['I', 'writer']
Complete implementation example
from nltk.corpus import stopwords
english_stops = set(stopwords.words('english'))
words = ['I', 'am', 'a', 'writer']
[word for word in words if word not in english_stops]
Output
['I', 'writer']
Finding complete list of supported languages
With the help of following Python script, we can also find the complete list of languages supported by NLTK stopwords corpus −
from nltk.corpus import stopwords
stopwords.fileids()
Output
[
   'arabic', 'azerbaijani', 'danish', 'dutch', 'english', 'finnish', 'french',
   'german', 'greek', 'hungarian', 'indonesian', 'italian', 'kazakh', 'nepali',
   'norwegian', 'portuguese', 'romanian', 'russian', 'slovene', 'spanish',
   'swedish', 'tajik', 'turkish'
]
Looking up words in Wordnet
What is Wordnet?
Wordnet is a large lexical database of English, which was created by Princeton. It is a part of the NLTK corpus. Nouns, verbs, adjectives and adverbs all are grouped into set of synsets, i.e., cognitive synonyms. Here each set of synsets express a distinct meaning. Following are some use cases of Wordnet −
- It can be used to look up the definition of a word
- We can find synonyms and antonyms of a word
- Word relations and similarities can be explored using Wordnet
- Word sense disambiguation for those words having multiple uses and definitions
How to import Wordnet?
Wordnet can be imported with the help of following command −
from nltk.corpus import wordnet
For more compact command, use the following −
from nltk.corpus import wordnet as wn
Synset instances
Synset are groupings of synonyms words that express the same concept. When you use Wordnet to look up words, you will get a list of Synset instances.
wordnet.synsets(word)
To get a list of Synsets, we can look up any word in Wordnet by using wordnet.synsets(word). For example, in next Python recipe, we are going to look up the Synset for the ‘dog’ along with some properties and methods of Synset −
Example
First, import the wordnet as follows −
from nltk.corpus import wordnet as wn
Now, provide the word you want to look up the Synset for −
syn = wn.synsets('dog')[0]
Here, we are using name() method to get the unique name for the synset which can be used to get the Synset directly −
syn.name()
Output:
'dog.n.01'
Next, we are using definition() method which will give us the definition of the word −
syn.definition()
Output:
'a member of the genus Canis (probably descended from the common wolf) that has
been domesticated by man since prehistoric times; occurs in many breeds'
Another method is examples() which will give us the examples related to the word −
syn.examples()
Output:
['the dog barked all night']
Complete implementation example
from nltk.corpus import wordnet as wn
syn = wn.synsets('dog')[0]
syn.name()
syn.definition()
syn.examples()
Getting Hypernyms
Synsets are organized in an inheritance tree like structure in which Hypernyms represents more abstracted terms while Hyponyms represents the more specific terms. One of the important things is that this tree can be traced all the way to a root hypernym. Let us understand the concept with the help of the following example −
from nltk.corpus import wordnet as wn
syn = wn.synsets('dog')[0]
syn.hypernyms()
Output
[Synset('canine.n.02'), Synset('domestic_animal.n.01')]
Here, we can see that canine and domestic_animal are the hypernyms of ‘dog’.
Now, we can find hyponyms of ‘dog’ as follows −
syn.hypernyms()[0].hyponyms()
Output
[
   Synset('bitch.n.04'),
   Synset('dog.n.01'),
   Synset('fox.n.01'),
   Synset('hyena.n.01'),
   Synset('jackal.n.01'),
   Synset('wild_dog.n.01'),
   Synset('wolf.n.01')
]
From the above output, we can see that ‘dog’ is only one of the many hyponyms of ‘domestic_animals’.
To find the root of all these, we can use the following command −
syn.root_hypernyms()
Output
[Synset('entity.n.01')]
From the above output, we can see it has only one root.
Complete implementation example
from nltk.corpus import wordnet as wn
syn = wn.synsets('dog')[0]
syn.hypernyms()
syn.hypernyms()[0].hyponyms()
syn.root_hypernyms()
Output
[Synset('entity.n.01')]
Lemmas in Wordnet
In linguistics, the canonical form or morphological form of a word is called a lemma. To find a synonym as well as antonym of a word, we can also lookup lemmas in WordNet. Let us see how.
Finding Synonyms
By using the lemma() method, we can find the number of synonyms of a Synset. Let us apply this method on ‘dog’ synset −
Example
from nltk.corpus import wordnet as wn
syn = wn.synsets('dog')[0]
lemmas = syn.lemmas()
len(lemmas)
Output
3
The above output shows ‘dog’ has three lemmas.
Getting the name of the first lemma as follows −
lemmas[0].name()
Output:
'dog'
Getting the name of the second lemma as follows −
lemmas[1].name()
Output:
'domestic_dog'
Getting the name of the third lemma as follows −
lemmas[2].name()
Output:
'Canis_familiaris'
Actually, a Synset represents a group of lemmas that all have similar meaning while a lemma represents a distinct word form.
Finding Antonyms
In WordNet, some lemmas also have antonyms. For example, the word ‘good ‘has a total of 27 synets, among them, 5 have lemmas with antonyms. Let us find the antonyms (when the word ‘good’ used as noun and when the word ‘good’ used as adjective).
Example 1
from nltk.corpus import wordnet as wn
   syn1 = wn.synset('good.n.02')
   antonym1 = syn1.lemmas()[0].antonyms()[0]
antonym1.name()
Output
'evil'
antonym1.synset().definition()
Output
'the quality of being morally wrong in principle or practice'
The above example shows that the word ‘good’, when used as noun, have the first antonym ‘evil’.
Example 2
from nltk.corpus import wordnet as wn
   syn2 = wn.synset('good.a.01')
   antonym2 = syn2.lemmas()[0].antonyms()[0]
antonym2.name()
Output
'bad'
antonym2.synset().definition()
Output
'having undesirable or negative qualities’
The above example shows that the word ‘good’, when used as adjective, have the first antonym ‘bad’.
Stemming & Lemmatization
What is Stemming?
Stemming is a technique used to extract the base form of the words by removing affixes from them. It is just like cutting down the branches of a tree to its stems. For example, the stem of the words eating, eats, eaten is eat.
Search engines use stemming for indexing the words. That’s why rather than storing all forms of a word, a search engine can store only the stems. In this way, stemming reduces the size of the index and increases retrieval accuracy.
Various Stemming algorithms
In NLTK, stemmerI, which have stem() method, interface has all the stemmers which we are going to cover next. Let us understand it with the following diagram

Porter stemming algorithm
It is one of the most common stemming algorithms which is basically designed to remove and replace well-known suffixes of English words.
PorterStemmer class
NLTK has PorterStemmer class with the help of which we can easily implement Porter Stemmer algorithms for the word we want to stem. This class knows several regular word forms and suffixes with the help of which it can transform the input word to a final stem. The resulting stem is often a shorter word having the same root meaning. Let us see an example −
First, we need to import the natural language toolkit(nltk).
import nltk
Now, import the PorterStemmer class to implement the Porter Stemmer algorithm.
from nltk.stem import PorterStemmer
Next, create an instance of Porter Stemmer class as follows −
word_stemmer = PorterStemmer()
Now, input the word you want to stem.
word_stemmer.stem('writing')
Output
'write'
word_stemmer.stem('eating')
Output
'eat'
Complete implementation example
import nltk
from nltk.stem import PorterStemmer
word_stemmer = PorterStemmer()
word_stemmer.stem('writing')
Output
'write'
Lancaster stemming algorithm
It was developed at Lancaster University and it is another very common stemming algorithms.
LancasterStemmer class
NLTK has LancasterStemmer class with the help of which we can easily implement Lancaster Stemmer algorithms for the word we want to stem. Let us see an example −
First, we need to import the natural language toolkit(nltk).
import nltk
Now, import the LancasterStemmer class to implement Lancaster Stemmer algorithm
from nltk.stem import LancasterStemmer
Next, create an instance of LancasterStemmer class as follows −
Lanc_stemmer = LancasterStemmer()
Now, input the word you want to stem.
Lanc_stemmer.stem('eats')
Output
'eat'
Complete implementation example
import nltk
from nltk.stem import LancatserStemmer
Lanc_stemmer = LancasterStemmer()
Lanc_stemmer.stem('eats')
Output
'eat'
Regular Expression stemming algorithm
With the help of this stemming algorithm, we can construct our own stemmer.
RegexpStemmer class
NLTK has RegexpStemmer class with the help of which we can easily implement Regular Expression Stemmer algorithms. It basically takes a single regular expression and removes any prefix or suffix that matches the expression. Let us see an example −
First, we need to import the natural language toolkit(nltk).
import nltk
Now, import the RegexpStemmer class to implement the Regular Expression Stemmer algorithm.
from nltk.stem import RegexpStemmer
Next, create an instance of RegexpStemmer class and provides the suffix or prefix you want to remove from the word as follows −
Reg_stemmer = RegexpStemmer(‘ing’)
Now, input the word you want to stem.
Reg_stemmer.stem('eating')
Output
'eat'
Reg_stemmer.stem('ingeat')
Output
'eat'
Reg_stemmer.stem('eats')
Output
'eat'
Complete implementation example
import nltk
from nltk.stem import RegexpStemmer
Reg_stemmer = RegexpStemmer()
Reg_stemmer.stem('ingeat')
Output
'eat'
Snowball stemming algorithm
It is another very useful stemming algorithm.
SnowballStemmer class
NLTK has SnowballStemmer class with the help of which we can easily implement Snowball Stemmer algorithms. It supports 15 non-English languages. In order to use this steaming class, we need to create an instance with the name of the language we are using and then call the stem() method. Let us see an example −
First, we need to import the natural language toolkit(nltk).
import nltk
Now, import the SnowballStemmer class to implement Snowball Stemmer algorithm
from nltk.stem import SnowballStemmer
Let us see the languages it supports −
SnowballStemmer.languages
Output
(
   'arabic',
   'danish',
   'dutch',
   'english',
   'finnish',
   'french',
   'german',
   'hungarian',
   'italian',
   'norwegian',
   'porter',
   'portuguese',
   'romanian',
   'russian',
   'spanish',
   'swedish'
)
Next, create an instance of SnowballStemmer class with the language you want to use. Here, we are creating the stemmer for ‘French’ language.
French_stemmer = SnowballStemmer(‘french’)
Now, call the stem() method and input the word you want to stem.
French_stemmer.stem (‘Bonjoura’)
Output
'bonjour'
Complete implementation example
import nltk
from nltk.stem import SnowballStemmer
French_stemmer = SnowballStemmer(‘french’)
French_stemmer.stem (‘Bonjoura’)
Output
'bonjour'
What is Lemmatization?
Lemmatization technique is like stemming. The output we will get after lemmatization is called ‘lemma’, which is a root word rather than root stem, the output of stemming. After lemmatization, we will be getting a valid word that means the same thing.
NLTK provides WordNetLemmatizer class which is a thin wrapper around the wordnet corpus. This class uses morphy() function to the WordNet CorpusReader class to find a lemma. Let us understand it with an example −
Example
First, we need to import the natural language toolkit(nltk).
import nltk
Now, import the WordNetLemmatizer class to implement the lemmatization technique.
from nltk.stem import WordNetLemmatizer
Next, create an instance of WordNetLemmatizer class.
lemmatizer = WordNetLemmatizer()
Now, call the lemmatize() method and input the word of which you want to find lemma.
lemmatizer.lemmatize('eating')
Output
'eating'
lemmatizer.lemmatize('books')
Output
'book'
Complete implementation example
import nltk
from nltk.stem import WordNetLemmatizer
lemmatizer = WordNetLemmatizer()
lemmatizer.lemmatize('books')
Output
'book'
Difference between Stemming & Lemmatization
Let us understand the difference between Stemming and Lemmatization with the help of the following example −
import nltk
from nltk.stem import PorterStemmer
word_stemmer = PorterStemmer()
word_stemmer.stem('believes')
Output
believ
import nltk
from nltk.stem import WordNetLemmatizer
lemmatizer = WordNetLemmatizer()
lemmatizer.lemmatize(' believes ')
Output
believ
The output of both programs tells the major difference between stemming and lemmatization. PorterStemmer class chops off the ‘es’ from the word. On the other hand, WordNetLemmatizer class finds a valid word. In simple words, stemming technique only looks at the form of the word whereas lemmatization technique looks at the meaning of the word. It means after applying lemmatization, we will always get a valid word.
Natural Language Toolkit - Word Replacement
Stemming and lemmatization can be considered as a kind of linguistic compression. In the same sense, word replacement can be thought of as text normalization or error correction.
But why we needed word replacement? Suppose if we talk about tokenization, then it is having issues with contractions (like can’t, won’t, etc.). So, to handle such issues we need word replacement. For example, we can replace contractions with their expanded forms.
Word replacement using regular expression
First, we are going to replace words that matches the regular expression. But for this we must have a basic understanding of regular expressions as well as python re module. In the example below, we will be replacing contraction with their expanded forms (e.g. “can’t” will be replaced with “cannot”), all that by using regular expressions.
Example
First, import the necessary package re to work with regular expressions.
import re
from nltk.corpus import wordnet
Next, define the replacement patterns of your choice as follows −
R_patterns = [
   (r'won\'t', 'will not'),
   (r'can\'t', 'cannot'),
   (r'i\'m', 'i am'),
   r'(\w+)\'ll', '\g<1> will'),
   (r'(\w+)n\'t', '\g<1> not'),
   (r'(\w+)\'ve', '\g<1> have'),
   (r'(\w+)\'s', '\g<1> is'),
   (r'(\w+)\'re', '\g<1> are'),
]
Now, create a class that can be used for replacing words −
class REReplacer(object):
   def __init__(self, pattern = R_patterns):
      self.pattern = [(re.compile(regex), repl) for (regex, repl) in patterns]
   def replace(self, text):
      s = text
      for (pattern, repl) in self.pattern:
         s = re.sub(pattern, repl, s)
      return s
Save this python program (say repRE.py) and run it from python command prompt. After running it, import REReplacer class when you want to replace words. Let us see how.
from repRE import REReplacer
rep_word = REReplacer()
rep_word.replace("I won't do it")
Output:
'I will not do it'
rep_word.replace("I can’t do it")
Output:
'I cannot do it'
Complete implementation example
import re
from nltk.corpus import wordnet
R_patterns = [
   (r'won\'t', 'will not'),
   (r'can\'t', 'cannot'),
   (r'i\'m', 'i am'),
   r'(\w+)\'ll', '\g<1> will'),
   (r'(\w+)n\'t', '\g<1> not'),
   (r'(\w+)\'ve', '\g<1> have'),
   (r'(\w+)\'s', '\g<1> is'),
   (r'(\w+)\'re', '\g<1> are'),
]
class REReplacer(object):
def __init__(self, patterns=R_patterns):
   self.patterns = [(re.compile(regex), repl) for (regex, repl) in patterns]
def replace(self, text):
   s = text
   for (pattern, repl) in self.patterns:
      s = re.sub(pattern, repl, s)
   return s
Now once you saved the above program and run it, you can import the class and use it as follows −
from replacerRE import REReplacer
rep_word = REReplacer()
rep_word.replace("I won't do it")
Output
'I will not do it'
Replacement before text processing
One of the common practices while working with natural language processing (NLP) is to clean up the text before text processing. In this concern we can also use our REReplacer class created above in previous example, as a preliminary step before text processing i.e. tokenization.
Example
from nltk.tokenize import word_tokenize
from replacerRE import REReplacer
rep_word = REReplacer()
word_tokenize("I won't be able to do this now")
Output:
['I', 'wo', "n't", 'be', 'able', 'to', 'do', 'this', 'now']
word_tokenize(rep_word.replace("I won't be able to do this now"))
Output:
['I', 'will', 'not', 'be', 'able', 'to', 'do', 'this', 'now']
In the above Python recipe, we can easily understand the difference between the output of word tokenizer without and with using regular expression replace.
Removal of repeating characters
Do we strictly grammatical in our everyday language? No, we are not. For example, sometimes we write ‘Hiiiiiiiiiiii Mohan’ in order to emphasize the word ‘Hi’. But computer system does not know that ‘Hiiiiiiiiiiii’ is a variation of the word “Hi”. In the example below, we will be creating a class named rep_word_removal which can be used for removing the repeating words.
Example
First, import the necessary package re to work with regular expressions
import re
from nltk.corpus import wordnet
Now, create a class that can be used for removing the repeating words −
class Rep_word_removal(object):
   def __init__(self):
      self.repeat_regexp = re.compile(r'(\w*)(\w)\2(\w*)')
      self.repl = r'\1\2\3'
   def replace(self, word):
      if wordnet.synsets(word):
      return word
   repl_word = self.repeat_regexp.sub(self.repl, word)
   if repl_word != word:
      return self.replace(repl_word)
   else:
      return repl_word
Save this python program (say removalrepeat.py) and run it from python command prompt. After running it, import Rep_word_removal class when you want to remove the repeating words. Let us see how?
from removalrepeat import Rep_word_removal
rep_word = Rep_word_removal()
rep_word.replace ("Hiiiiiiiiiiiiiiiiiiiii")
Output:
'Hi'
rep_word.replace("Hellooooooooooooooo")
Output:
'Hello'
Complete implementation example
import re
from nltk.corpus import wordnet
class Rep_word_removal(object):
   def __init__(self):
      self.repeat_regexp = re.compile(r'(\w*)(\w)\2(\w*)')
      self.repl = r'\1\2\3'
   def replace(self, word):
      if wordnet.synsets(word):
         return word
   replace_word = self.repeat_regexp.sub(self.repl, word)
   if replace_word != word:
      return self.replace(replace_word)
   else:
      return replace_word
Now once you saved the above program and run it, you can import the class and use it as follows −
from removalrepeat import Rep_word_removal
rep_word = Rep_word_removal()
rep_word.replace ("Hiiiiiiiiiiiiiiiiiiiii")
Output
'Hi'
Synonym & Antonym Replacement
Replacing words with common synonyms
While working with NLP, especially in the case of frequency analysis and text indexing, it is always beneficial to compress the vocabulary without losing meaning because it saves lots of memory. To achieve this, we must have to define mapping of a word to its synonyms. In the example below, we will be creating a class named word_syn_replacer which can be used for replacing the words with their common synonyms.
Example
First, import the necessary package re to work with regular expressions.
import re
from nltk.corpus import wordnet
Next, create the class that takes a word replacement mapping −
class word_syn_replacer(object):
   def __init__(self, word_map):
   self.word_map = word_map
def replace(self, word):
   return self.word_map.get(word, word)
Save this python program (say replacesyn.py) and run it from python command prompt. After running it, import word_syn_replacer class when you want to replace words with common synonyms. Let us see how.
from replacesyn import word_syn_replacer
rep_syn = word_syn_replacer ({‘bday’: ‘birthday’)
rep_syn.replace(‘bday’)
Output
'birthday'
Complete implementation example
import re
from nltk.corpus import wordnet
class word_syn_replacer(object):
   def __init__(self, word_map):
   self.word_map = word_map
def replace(self, word):
   return self.word_map.get(word, word)
Now once you saved the above program and run it, you can import the class and use it as follows −
from replacesyn import word_syn_replacer
rep_syn = word_syn_replacer ({‘bday’: ‘birthday’)
rep_syn.replace(‘bday’)
Output
'birthday'
The disadvantage of the above method is that we should have to hardcode the synonyms in a Python dictionary. We have two better alternatives in the form of CSV and YAML file. We can save our synonym vocabulary in any of the above-mentioned files and can construct word_map dictionary from them. Let us understand the concept with the help of examples.
Using CSV file
In order to use CSV file for this purpose, the file should have two columns, first column consist of word and the second column consists of the synonyms meant to replace it. Let us save this file as syn.csv. In the example below, we will be creating a class named CSVword_syn_replacer which will extends word_syn_replacer in replacesyn.py file and will be used to construct the word_map dictionary from syn.csv file.
Example
First, import the necessary packages.
import csv
Next, create the class that takes a word replacement mapping −
class CSVword_syn_replacer(word_syn_replacer):
   def __init__(self, fname):
      word_map = {}
      for line in csv.reader(open(fname)):
         word, syn = line
         word_map[word] = syn
      super(Csvword_syn_replacer, self).__init__(word_map)
After running it, import CSVword_syn_replacer class when you want to replace words with common synonyms. Let us see how?
from replacesyn import CSVword_syn_replacer
rep_syn = CSVword_syn_replacer (‘syn.csv’)
rep_syn.replace(‘bday’)
Output
'birthday'
Complete implementation example
import csv
class CSVword_syn_replacer(word_syn_replacer):
def __init__(self, fname):
word_map = {}
for line in csv.reader(open(fname)):
   word, syn = line
   word_map[word] = syn
super(Csvword_syn_replacer, self).__init__(word_map)
Now once you saved the above program and run it, you can import the class and use it as follows −
from replacesyn import CSVword_syn_replacer
rep_syn = CSVword_syn_replacer (‘syn.csv’)
rep_syn.replace(‘bday’)
Output
'birthday'
Using YAML file
As we have used CSV file, we can also use YAML file to for this purpose (we must have PyYAML installed). Let us save the file as syn.yaml. In the example below, we will be creating a class named YAMLword_syn_replacer which will extends word_syn_replacer in replacesyn.py file and will be used to construct the word_map dictionary from syn.yaml file.
Example
First, import the necessary packages.
import yaml
Next, create the class that takes a word replacement mapping −
class YAMLword_syn_replacer(word_syn_replacer):
   def __init__(self, fname):
   word_map = yaml.load(open(fname))
   super(YamlWordReplacer, self).__init__(word_map)
After running it, import YAMLword_syn_replacer class when you want to replace words with common synonyms. Let us see how?
from replacesyn import YAMLword_syn_replacer
rep_syn = YAMLword_syn_replacer (‘syn.yaml’)
rep_syn.replace(‘bday’)
Output
'birthday'
Complete implementation example
import yaml
class YAMLword_syn_replacer(word_syn_replacer):
def __init__(self, fname):
   word_map = yaml.load(open(fname))
   super(YamlWordReplacer, self).__init__(word_map)
Now once you saved the above program and run it, you can import the class and use it as follows −
from replacesyn import YAMLword_syn_replacer
rep_syn = YAMLword_syn_replacer (‘syn.yaml’)
rep_syn.replace(‘bday’)
Output
'birthday'
Antonym replacement
As we know that an antonym is a word having opposite meaning of another word, and the opposite of synonym replacement is called antonym replacement. In this section, we will be dealing with antonym replacement, i.e., replacing words with unambiguous antonyms by using WordNet. In the example below, we will be creating a class named word_antonym_replacer which have two methods, one for replacing the word and other for removing the negations.
Example
First, import the necessary packages.
from nltk.corpus import wordnet
Next, create the class named word_antonym_replacer −
class word_antonym_replacer(object):
   def replace(self, word, pos=None):
      antonyms = set()
      for syn in wordnet.synsets(word, pos=pos):
         for lemma in syn.lemmas():
            for antonym in lemma.antonyms():
               antonyms.add(antonym.name())
      if len(antonyms) == 1:
         return antonyms.pop()
      else:
         return None
   def replace_negations(self, sent):
      i, l = 0, len(sent)
      words = []
      while i < l:
         word = sent[i]
         if word == 'not' and i+1 < l:
            ant = self.replace(sent[i+1])
            if ant:
               words.append(ant)
               i += 2
               continue
         words.append(word)
         i += 1
      return words
Save this python program (say replaceantonym.py) and run it from python command prompt. After running it, import word_antonym_replacer class when you want to replace words with their unambiguous antonyms. Let us see how.
from replacerantonym import word_antonym_replacer
rep_antonym = word_antonym_replacer ()
rep_antonym.replace(‘uglify’)
Output
['beautify'']
sentence = ["Let us", 'not', 'uglify', 'our', 'country']
rep_antonym.replace _negations(sentence)
Output
["Let us", 'beautify', 'our', 'country']
Complete implementation example
nltk.corpus import wordnet
class word_antonym_replacer(object):
def replace(self, word, pos=None):
   antonyms = set()
   for syn in wordnet.synsets(word, pos=pos):
      for lemma in syn.lemmas():
      for antonym in lemma.antonyms():
         antonyms.add(antonym.name())
   if len(antonyms) == 1:
      return antonyms.pop()
   else:
      return None
def replace_negations(self, sent):
   i, l = 0, len(sent)
   words = []
   while i < l:
      word = sent[i]
      if word == 'not' and i+1 < l:
         ant = self.replace(sent[i+1])
         if ant:
            words.append(ant)
            i += 2
            continue
      words.append(word)
      i += 1
   return words
Now once you saved the above program and run it, you can import the class and use it as follows −
from replacerantonym import word_antonym_replacer
rep_antonym = word_antonym_replacer ()
rep_antonym.replace(‘uglify’)
sentence = ["Let us", 'not', 'uglify', 'our', 'country']
rep_antonym.replace _negations(sentence)
Output
["Let us", 'beautify', 'our', 'country']
Corpus Readers and Custom Corpora
What is a corpus?
A corpus is large collection, in structured format, of machine-readable texts that have been produced in a natural communicative setting. The word Corpora is the plural of Corpus. Corpus can be derived in many ways as follows −
- From the text that was originally electronic
- From the transcripts of spoken language
- From optical character recognition and so on
Corpus representativeness, Corpus Balance, Sampling, Corpus Size are the elements that plays an important role while designing corpus. Some of the most popular corpus for NLP tasks are TreeBank, PropBank, VarbNet and WordNet.
How to build custom corpus?
While downloading NLTK, we also installed NLTK data package. So, we already have NLTK data package installed on our computer. If we talk about Windows, we’ll assume that this data package is installed at C:\natural_language_toolkit_data and if we talk about Linux, Unix and Mac OS X, we ‘ll assume that this data package is installed at /usr/share/natural_language_toolkit_data.
In the following Python recipe, we are going to create custom corpora which must be within one of the paths defined by NLTK. It is so because it can be found by NLTK. In order to avoid conflict with the official NLTK data package, let us create a custom natural_language_toolkit_data directory in our home directory.
import os, os.path
path = os.path.expanduser('~/natural_language_toolkit_data')
if not os.path.exists(path):
   os.mkdir(path)
os.path.exists(path)
Output
True
Now, Let us check whether we have natural_language_toolkit_data directory in our home directory or not −
import nltk.data
path in nltk.data.path
Output
True
As we have got the output True, means we have nltk_data directory in our home directory.
Now we will make a wordlist file, named wordfile.txt and put it in a folder, named corpus in nltk_data directory (~/nltk_data/corpus/wordfile.txt) and will load it by using nltk.data.load −
import nltk.data
nltk.data.load(‘corpus/wordfile.txt’, format = ‘raw’)
Output
b’tutorialspoint\n’
Corpus readers
NLTK provides various CorpusReader classes. We are going to cover them in the following python recipes
Creating wordlist corpus
NLTK has WordListCorpusReader class that provides access to the file containing a list of words. For the following Python recipe, we need to create a wordlist file which can be CSV or normal text file. For example, we have created a file named ‘list’ that contains the following data −
tutorialspoint
Online
Free
Tutorials
Now Let us instantiate a WordListCorpusReader class producing the list of words from our created file ‘list’.
from nltk.corpus.reader import WordListCorpusReader
reader_corpus = WordListCorpusReader('.', ['list'])
reader_corpus.words()
Output
['tutorialspoint', 'Online', 'Free', 'Tutorials']
Creating POS tagged word corpus
NLTK has TaggedCorpusReader class with the help of which we can create a POS tagged word corpus. Actually, POS tagging is the process of identifying the part-of-speech tag for a word.
One of the simplest formats for a tagged corpus is of the form ‘word/tag’like following excerpt from the brown corpus −
The/at-tl expense/nn and/cc time/nn involved/vbn are/ber
astronomical/jj ./.
In the above excerpt, each word has a tag which denotes its POS. For example, vb refers to a verb.
Now Let us instantiate a TaggedCorpusReaderclass producing POS tagged words form the file ‘list.pos’, which has the above excerpt.
from nltk.corpus.reader import TaggedCorpusReader
reader_corpus = TaggedCorpusReader('.', r'.*\.pos')
reader_corpus.tagged_words()
Output
[('The', 'AT-TL'), ('expense', 'NN'), ('and', 'CC'), ...]
Creating Chunked phrase corpus
NLTK has ChnkedCorpusReader class with the help of which we can create a Chunked phrase corpus. Actually, a chunk is a short phrase in a sentence.
For example, we have the following excerpt from the tagged treebank corpus −
[Earlier/JJR staff-reduction/NN moves/NNS] have/VBP trimmed/VBN about/
IN [300/CD jobs/NNS] ,/, [the/DT spokesman/NN] said/VBD ./.
In the above excerpt, every chunk is a noun phrase but the words that are not in brackets are part of the sentence tree and not part of any noun phrase subtree.
Now Let us instantiate a ChunkedCorpusReader class producing chunked phrase from the file ‘list.chunk’, which has the above excerpt.
from nltk.corpus.reader import ChunkedCorpusReader
reader_corpus = TaggedCorpusReader('.', r'.*\.chunk')
reader_corpus.chunked_words()
Output
[
   Tree('NP', [('Earlier', 'JJR'), ('staff-reduction', 'NN'), ('moves', 'NNS')]),
   ('have', 'VBP'), ...
]
Creating Categorized text corpus
NLTK has CategorizedPlaintextCorpusReader class with the help of which we can create a categorized text corpus. It is very useful in case when we have a large corpus of text and want to categorize that into separate sections.
For example, the brown corpus has several different categories. Let us find out them with the help of following Python code −
from nltk.corpus import brown^M
brown.categories()
Output
[
   'adventure', 'belles_lettres', 'editorial', 'fiction', 'government',
   'hobbies', 'humor', 'learned', 'lore', 'mystery', 'news', 'religion',
   'reviews', 'romance', 'science_fiction'
]
One of the easiest ways to categorize a corpus is to have one file for every category. For example, let us see the two excerpts from the movie_reviews corpus −
movie_pos.txt
The thin red line is flawed but it provokes.
movie_neg.txt
A big-budget and glossy production cannot make up for a lack of spontaneity that permeates their tv show.
So, from above two files, we have two categories namely pos and neg.
Now let us instantiate a CategorizedPlaintextCorpusReader class.
from nltk.corpus.reader import CategorizedPlaintextCorpusReader
reader_corpus = CategorizedPlaintextCorpusReader('.', r'movie_.*\.txt',
cat_pattern = r'movie_(\w+)\.txt')
reader_corpus.categories()
reader_corpus.fileids(categories = [‘neg’])
reader_corpus.fileids(categories = [‘pos’])
Output
['neg', 'pos']
['movie_neg.txt']
['movie_pos.txt']
Basics of Part-of-Speech (POS) Tagging
What is POS tagging?
Tagging, a kind of classification, is the automatic assignment of the description of the tokens. We call the descriptor s ‘tag’, which represents one of the parts of speech (nouns, verb, adverbs, adjectives, pronouns, conjunction and their sub-categories), semantic information and so on.
On the other hand, if we talk about Part-of-Speech (POS) tagging, it may be defined as the process of converting a sentence in the form of a list of words, into a list of tuples. Here, the tuples are in the form of (word, tag). We can also call POS tagging a process of assigning one of the parts of speech to the given word.
Following table represents the most frequent POS notification used in Penn Treebank corpus −
| Sr.No | Tag | Description |
|---|---|---|
| 1 | NNP | Proper noun, singular |
| 2 | NNPS | Proper noun, plural |
| 3 | PDT | Pre determiner |
| 4 | POS | Possessive ending |
| 5 | PRP | Personal pronoun |
| 6 | PRP$ | Possessive pronoun |
| 7 | RB | Adverb |
| 8 | RBR | Adverb, comparative |
| 9 | RBS | Adverb, superlative |
| 10 | RP | Particle |
| 11 | SYM | Symbol (mathematical or scientific) |
| 12 | TO | to |
| 13 | UH | Interjection |
| 14 | VB | Verb, base form |
| 15 | VBD | Verb, past tense |
| 16 | VBG | Verb, gerund/present participle |
| 17 | VBN | Verb, past |
| 18 | WP | Wh-pronoun |
| 19 | WP$ | Possessive wh-pronoun |
| 20 | WRB | Wh-adverb |
| 21 | # | Pound sign |
| 22 | $ | Dollar sign |
| 23 | . | Sentence-final punctuation |
| 24 | , | Comma |
| 25 | : | Colon, semi-colon |
| 26 | ( | Left bracket character |
| 27 | ) | Right bracket character |
| 28 | " | Straight double quote |
| 29 | ' | Left open single quote |
| 30 | " | Left open double quote |
| 31 | ' | Right close single quote |
| 32 | " | Right open double quote |
Example
Let us understand it with a Python experiment −
import nltk
from nltk import word_tokenize
sentence = "I am going to school"
print (nltk.pos_tag(word_tokenize(sentence)))
Output
[('I', 'PRP'), ('am', 'VBP'), ('going', 'VBG'), ('to', 'TO'), ('school', 'NN')]
Why POS tagging?
POS tagging is an important part of NLP because it works as the prerequisite for further NLP analysis as follows −
- Chunking
- Syntax Parsing
- Information extraction
- Machine Translation
- Sentiment Analysis
- Grammar analysis & word-sense disambiguation
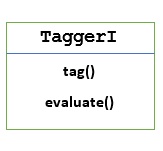
TaggerI - Base class
All the taggers reside in NLTK’s nltk.tag package. The base class of these taggers is TaggerI, means all the taggers inherit from this class.
Methods − TaggerI class have the following two methods which must be implemented by all its subclasses −
tag() method − As the name implies, this method takes a list of words as input and returns a list of tagged words as output.
evaluate() method − With the help of this method, we can evaluate the accuracy of the tagger.
The Baseline of POS Tagging
The baseline or the basic step of POS tagging is Default Tagging, which can be performed using the DefaultTagger class of NLTK. Default tagging simply assigns the same POS tag to every token. Default tagging also provides a baseline to measure accuracy improvements.
DefaultTagger class
Default tagging is performed by using DefaultTagging class, which takes the single argument, i.e., the tag we want to apply.
How does it work?
As told earlier, all the taggers are inherited from TaggerI class. The DefaultTagger is inherited from SequentialBackoffTagger which is a subclass of TaggerI class. Let us understand it with the following diagram −

As being the part of SeuentialBackoffTagger, the DefaultTagger must implement choose_tag() method which takes the following three arguments.
- Token’s list
- Current token’s index
- Previous token’s list, i.e., the history
Example
import nltk
from nltk.tag import DefaultTagger
exptagger = DefaultTagger('NN')
exptagger.tag(['Tutorials','Point'])
Output
[('Tutorials', 'NN'), ('Point', 'NN')]
In this example, we chose a noun tag because it is the most common types of words. Moreover, DefaultTagger is also most useful when we choose the most common POS tag.
Accuracy evaluation
The DefaultTagger is also the baseline for evaluating accuracy of taggers. That is the reason we can use it along with evaluate() method for measuring accuracy. The evaluate() method takes a list of tagged tokens as a gold standard to evaluate the tagger.
Following is an example in which we used our default tagger, named exptagger, created above, to evaluate the accuracy of a subset of treebank corpus tagged sentences −
Example
import nltk
from nltk.tag import DefaultTagger
exptagger = DefaultTagger('NN')
from nltk.corpus import treebank
testsentences = treebank.tagged_sents() [1000:]
exptagger.evaluate (testsentences)
Output
0.13198749536374715
The output above shows that by choosing NN for every tag, we can achieve around 13% accuracy testing on 1000 entries of the treebank corpus.
Tagging a list of sentences
Rather than tagging a single sentence, the NLTK’s TaggerI class also provides us a tag_sents() method with the help of which we can tag a list of sentences. Following is the example in which we tagged two simple sentences
Example
import nltk
from nltk.tag import DefaultTagger
exptagger = DefaultTagger('NN')
exptagger.tag_sents([['Hi', ','], ['How', 'are', 'you', '?']])
Output
[
   [
      ('Hi', 'NN'),
      (',', 'NN')
   ],
   [
      ('How', 'NN'),
      ('are', 'NN'),
      ('you', 'NN'),
      ('?', 'NN')
   ]
]
In the above example, we used our earlier created default tagger named exptagger.
Un-tagging a sentence
We can also un-tag a sentence. NLTK provides nltk.tag.untag() method for this purpose. It will take a tagged sentence as input and provides a list of words without tags. Let us see an example −
Example
import nltk
from nltk.tag import untag
untag([('Tutorials', 'NN'), ('Point', 'NN')])
Output
['Tutorials', 'Point']
Natural Language Toolkit - Unigram Tagger
What is Unigram Tagger?
As the name implies, unigram tagger is a tagger that only uses a single word as its context for determining the POS(Part-of-Speech) tag. In simple words, Unigram Tagger is a context-based tagger whose context is a single word, i.e., Unigram.
How does it work?
NLTK provides a module named UnigramTagger for this purpose. But before getting deep dive into its working, let us understand the hierarchy with the help of following diagram −

From the above diagram, it is understood that UnigramTagger is inherited from NgramTagger which is a subclass of ContextTagger, which inherits from SequentialBackoffTagger.
The working of UnigramTagger is explained with the help of following steps −
As we have seen, UnigramTagger inherits from ContextTagger, it implements a context() method. This context() method takes the same three arguments as choose_tag() method.
The result of context() method will be the word token which is further used to create the model. Once the model is created, the word token is also used to look up the best tag.
In this way, UnigramTagger will build a context model from the list of tagged sentences.
Training a Unigram Tagger
NLTK’s UnigramTagger can be trained by providing a list of tagged sentences at the time of initialization. In the example below, we are going to use the tagged sentences of the treebank corpus. We will be using first 2500 sentences from that corpus.
Example
First import the UniframTagger module from nltk −
from nltk.tag import UnigramTagger
Next, import the corpus you want to use. Here we are using treebank corpus −
from nltk.corpus import treebank
Now, take the sentences for training purpose. We are taking first 2500 sentences for training purpose and will tag them −
train_sentences = treebank.tagged_sents()[:2500]
Next, apply UnigramTagger on the sentences used for training purpose −
Uni_tagger = UnigramTagger(train_sentences)
Take some sentences, either equal to or less taken for training purpose i.e. 2500, for testing purpose. Here we are taking first 1500 for testing purpose −
test_sentences = treebank.tagged_sents()[1500:]
Uni_tagger.evaluate(test_sents)
Output
0.8942306156033808
Here, we got around 89 percent accuracy for a tagger that uses single word lookup to determine the POS tag.
Complete implementation example
from nltk.tag import UnigramTagger
from nltk.corpus import treebank
train_sentences = treebank.tagged_sents()[:2500]
Uni_tagger = UnigramTagger(train_sentences)
test_sentences = treebank.tagged_sents()[1500:]
Uni_tagger.evaluate(test_sentences)
Output
0.8942306156033808
Overriding the context model
From the above diagram showing hierarchy for UnigramTagger, we know all the taggers that inherit from ContextTagger, instead of training their own, can take a pre-built model. This pre-built model is simply a Python dictionary mapping of a context key to a tag. And for UnigramTagger, context keys are individual words while for other NgramTagger subclasses, it will be tuples.
We can override this context model by passing another simple model to the UnigramTagger class instead of passing training set. Let us understand it with the help of an easy example below −
Example
from nltk.tag import UnigramTagger
from nltk.corpus import treebank
Override_tagger = UnigramTagger(model = {‘Vinken’ : ‘NN’})
Override_tagger.tag(treebank.sents()[0])
Output
[
   ('Pierre', None),
   ('Vinken', 'NN'),
   (',', None),
   ('61', None),
   ('years', None),
   ('old', None),
   (',', None),
   ('will', None),
   ('join', None),
   ('the', None),
   ('board', None),
   ('as', None),
   ('a', None),
   ('nonexecutive', None),
   ('director', None),
   ('Nov.', None),
   ('29', None),
   ('.', None)
]
As our model contains ‘Vinken’ as the only context key, you can observe from the output above that only this word got tag and every other word has None as a tag.
Setting a minimum frequency threshold
For deciding which tag is most likely for a given context, the ContextTagger class uses frequency of occurrence. It will do it by default even if the context word and tag occur only once, but we can set a minimum frequency threshold by passing a cutoff value to the UnigramTagger class. In the example below, we are passing the cutoff value in previous recipe in which we trained a UnigramTagger −
Example
from nltk.tag import UnigramTagger
from nltk.corpus import treebank
train_sentences = treebank.tagged_sents()[:2500]
Uni_tagger = UnigramTagger(train_sentences, cutoff = 4)
test_sentences = treebank.tagged_sents()[1500:]
Uni_tagger.evaluate(test_sentences)
Output
0.7357651629613641
Natural Language Toolkit - Combining Taggers
Combining Taggers
Combining taggers or chaining taggers with each other is one of the important features of NLTK. The main concept behind combining taggers is that, in case if one tagger doesn’t know how to tag a word, it would be passed to the chained tagger. To achieve this purpose, SequentialBackoffTagger provides us the Backoff tagging feature.
Backoff Tagging
As told earlier, backoff tagging is one of the important features of SequentialBackoffTagger, which allows us to combine taggers in a way that if one tagger doesn’t know how to tag a word, the word would be passed to the next tagger and so on until there are no backoff taggers left to check.
How does it work?
Actually, every subclass of SequentialBackoffTagger can take a ‘backoff’ keyword argument. The value of this keyword argument is another instance of a SequentialBackoffTagger. Now whenever this SequentialBackoffTagger class is initialized, an internal list of backoff taggers (with itself as the first element) will be created. Moreover, if a backoff tagger is given, the internal list of this backoff taggers would be appended.
In the example below, we are taking DefaulTagger as the backoff tagger in the above Python recipe with which we have trained the UnigramTagger.
Example
In this example, we are using DefaulTagger as the backoff tagger. Whenever the UnigramTagger is unable to tag a word, backoff tagger, i.e. DefaulTagger, in our case, will tag it with ‘NN’.
from nltk.tag import UnigramTagger
from nltk.tag import DefaultTagger
from nltk.corpus import treebank
train_sentences = treebank.tagged_sents()[:2500]
back_tagger = DefaultTagger('NN')
Uni_tagger = UnigramTagger(train_sentences, backoff = back_tagger)
test_sentences = treebank.tagged_sents()[1500:]
Uni_tagger.evaluate(test_sentences)
Output
0.9061975746536931
From the above output, you can observe that by adding a backoff tagger the accuracy is increased by around 2%.
Saving taggers with pickle
As we have seen that training a tagger is very cumbersome and also takes time. To save time, we can pickle a trained tagger for using it later. In the example below, we are going to do this to our already trained tagger named ‘Uni_tagger’.
Example
import pickle
f = open('Uni_tagger.pickle','wb')
pickle.dump(Uni_tagger, f)
f.close()
f = open('Uni_tagger.pickle','rb')
Uni_tagger = pickle.load(f)
NgramTagger Class
From the hierarchy diagram discussed in previous unit, UnigramTagger is inherited from NgarmTagger class but we have two more subclasses of NgarmTagger class −
BigramTagger subclass
Actually an ngram is a subsequence of n items, hence, as name implies, BigramTagger subclass looks at the two items. First item is the previous tagged word and the second item is current tagged word.
TrigramTagger subclass
On the same note of BigramTagger, TrigramTagger subclass looks at the three items i.e. two previous tagged words and one current tagged word.
Practically if we apply BigramTagger and TrigramTagger subclasses individually as we did with UnigramTagger subclass, they both perform very poorly. Let us see in the examples below:
Using BigramTagger Subclass
from nltk.tag import BigramTagger
from nltk.corpus import treebank
train_sentences = treebank.tagged_sents()[:2500]
Bi_tagger = BigramTagger(train_sentences)
test_sentences = treebank.tagged_sents()[1500:]
Bi_tagger.evaluate(test_sentences)
Output
0.44669191071913594
Using TrigramTagger Subclass
from nltk.tag import TrigramTagger
from nltk.corpus import treebank
train_sentences = treebank.tagged_sents()[:2500]
Tri_tagger = TrigramTagger(train_sentences)
test_sentences = treebank.tagged_sents()[1500:]
Tri_tagger.evaluate(test_sentences)
Output
0.41949863394526193
You can compare the performance of UnigramTagger, we used previously (gave around 89% accuracy) with BigramTagger (gave around 44% accuracy) and TrigramTagger (gave around 41% accuracy). The reason is that Bigram and Trigram taggers cannot learn context from the first word(s) in a sentence. On the other hand, UnigramTagger class doesn’t care about the previous context and guesses the most common tag for each word, hence able to have high baseline accuracy.
Combining ngram taggers
As from the above examples, it is obvious that Bigram and Trigram taggers can contribute when we combine them with backoff tagging. In the example below, we are combining Unigram, Bigram and Trigram taggers with backoff tagging. The concept is same as the previous recipe while combining the UnigramTagger with backoff tagger. The only difference is that we are using the function named backoff_tagger() from tagger_util.py, given below, for backoff operation.
def backoff_tagger(train_sentences, tagger_classes, backoff=None):
   for cls in tagger_classes:
      backoff = cls(train_sentences, backoff=backoff)
   return backoff
Example
from tagger_util import backoff_tagger
from nltk.tag import UnigramTagger
from nltk.tag import BigramTagger
from nltk.tag import TrigramTagger
from nltk.tag import DefaultTagger
from nltk.corpus import treebank
train_sentences = treebank.tagged_sents()[:2500]
back_tagger = DefaultTagger('NN')
Combine_tagger = backoff_tagger(train_sentences,
[UnigramTagger, BigramTagger, TrigramTagger], backoff = back_tagger)
test_sentences = treebank.tagged_sents()[1500:]
Combine_tagger.evaluate(test_sentences)
Output
0.9234530029238365
From the above output, we can see it increases the accuracy by around 3%.
More Natural Language Toolkit Taggers
Affix Tagger
One another important class of ContextTagger subclass is AffixTagger. In AffixTagger class, the context is either prefix or suffix of a word. That is the reason AffixTagger class can learn tags based on fixed-length substrings of the beginning or ending of a word.
How does it work?
Its working depends upon the argument named affix_length which specifies the length of the prefix or suffix. The default value is 3. But how it distinguishes whether AffixTagger class learned word’s prefix or suffix?
affix_length=positive − If the value of affix_lenght is positive then it means that the AffixTagger class will learn word’s prefixes.
affix_length=negative − If the value of affix_lenght is negative then it means that the AffixTagger class will learn word’s suffixes.
To make it clearer, in the example below, we will be using AffixTagger class on tagged treebank sentences.
Example
In this example, AffixTagger will learn word’s prefix because we are not specifying any value for affix_length argument. The argument will take default value 3 −
from nltk.tag import AffixTagger
from nltk.corpus import treebank
train_sentences = treebank.tagged_sents()[:2500]
Prefix_tagger = AffixTagger(train_sentences)
test_sentences = treebank.tagged_sents()[1500:]
Prefix_tagger.evaluate(test_sentences)
Output
0.2800492099250667
Let us see in the example below what will be the accuracy when we provide value 4 to affix_length argument −
from nltk.tag import AffixTagger
from nltk.corpus import treebank
train_sentences = treebank.tagged_sents()[:2500]
Prefix_tagger = AffixTagger(train_sentences, affix_length=4 )
test_sentences = treebank.tagged_sents()[1500:]
Prefix_tagger.evaluate(test_sentences)
Output
0.18154947354966527
Example
In this example, AffixTagger will learn word’s suffix because we will specify negative value for affix_length argument.
from nltk.tag import AffixTagger
from nltk.corpus import treebank
train_sentences = treebank.tagged_sents()[:2500]
Suffix_tagger = AffixTagger(train_sentences, affix_length = -3)
test_sentences = treebank.tagged_sents()[1500:]
Suffix_tagger.evaluate(test_sentences)
Output
0.2800492099250667
Brill Tagger
Brill Tagger is a transformation-based tagger. NLTK provides BrillTagger class which is the first tagger that is not a subclass of SequentialBackoffTagger. Opposite to it, a series of rules to correct the results of an initial tagger is used by BrillTagger.
How does it work?
To train a BrillTagger class using BrillTaggerTrainer we define the following function −
def train_brill_tagger(initial_tagger, train_sentences, **kwargs) −
templates = [
   brill.Template(brill.Pos([-1])),
   brill.Template(brill.Pos([1])),
   brill.Template(brill.Pos([-2])),
   brill.Template(brill.Pos([2])),
   brill.Template(brill.Pos([-2, -1])),
   brill.Template(brill.Pos([1, 2])),
   brill.Template(brill.Pos([-3, -2, -1])),
   brill.Template(brill.Pos([1, 2, 3])),
   brill.Template(brill.Pos([-1]), brill.Pos([1])),
   brill.Template(brill.Word([-1])),
   brill.Template(brill.Word([1])),
   brill.Template(brill.Word([-2])),
   brill.Template(brill.Word([2])),
   brill.Template(brill.Word([-2, -1])),
   brill.Template(brill.Word([1, 2])),
   brill.Template(brill.Word([-3, -2, -1])),
   brill.Template(brill.Word([1, 2, 3])),
   brill.Template(brill.Word([-1]), brill.Word([1])),
]
trainer = brill_trainer.BrillTaggerTrainer(initial_tagger, templates, deterministic=True)
return trainer.train(train_sentences, **kwargs)
As we can see, this function requires initial_tagger and train_sentences. It takes an initial_tagger argument and a list of templates, which implements the BrillTemplate interface. The BrillTemplate interface is found in the nltk.tbl.template module. One of such implementation is brill.Template class.
The main role of transformation-based tagger is to generate transformation rules that correct the initial tagger’s output to be more in-line with the training sentences. Let us see the workflow below −
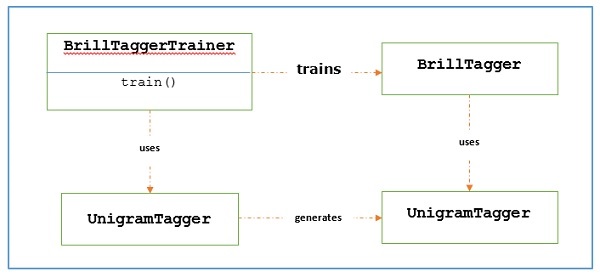
Example
For this example, we will be using combine_tagger which we created while combing taggers (in the previous recipe) from a backoff chain of NgramTagger classes, as initial_tagger. First, let us evaluate the result using Combine.tagger and then use that as initial_tagger to train brill tagger.
from tagger_util import backoff_tagger
from nltk.tag import UnigramTagger
from nltk.tag import BigramTagger
from nltk.tag import TrigramTagger
from nltk.tag import DefaultTagger
from nltk.corpus import treebank
train_sentences = treebank.tagged_sents()[:2500]
back_tagger = DefaultTagger('NN')
Combine_tagger = backoff_tagger(
   train_sentences, [UnigramTagger, BigramTagger, TrigramTagger], backoff = back_tagger
)
test_sentences = treebank.tagged_sents()[1500:]
Combine_tagger.evaluate(test_sentences)
Output
0.9234530029238365
Now, let us see the evaluation result when Combine_tagger is used as initial_tagger to train brill tagger −
from tagger_util import train_brill_tagger
brill_tagger = train_brill_tagger(combine_tagger, train_sentences)
brill_tagger.evaluate(test_sentences)
Output
0.9246832510505041
We can notice that BrillTagger class has slight increased accuracy over the Combine_tagger.
Complete implementation example
from tagger_util import backoff_tagger
from nltk.tag import UnigramTagger
from nltk.tag import BigramTagger
from nltk.tag import TrigramTagger
from nltk.tag import DefaultTagger
from nltk.corpus import treebank
train_sentences = treebank.tagged_sents()[:2500]
back_tagger = DefaultTagger('NN')
Combine_tagger = backoff_tagger(train_sentences,
[UnigramTagger, BigramTagger, TrigramTagger], backoff = back_tagger)
test_sentences = treebank.tagged_sents()[1500:]
Combine_tagger.evaluate(test_sentences)
from tagger_util import train_brill_tagger
brill_tagger = train_brill_tagger(combine_tagger, train_sentences)
brill_tagger.evaluate(test_sentences)
Output
0.9234530029238365
0.9246832510505041
TnT Tagger
TnT Tagger, stands for Trigrams’nTags, is a statistical tagger which is based on second order Markov models.
How does it work?
We can understand the working of TnT tagger with the help of following steps −
First based on training data, TnT tegger maintains several internal FreqDist and ConditionalFreqDist instances.
After that unigrams, bigrams and trigrams will be counted by these frequency distributions.
Now, during tagging, by using frequencies, it will calculate the probabilities of possible tags for each word.
That’s why instead of constructing a backoff chain of NgramTagger, it uses all the ngram models together to choose the best tag for each word. Let us evaluate the accuracy with TnT tagger in the following example −
from nltk.tag import tnt
from nltk.corpus import treebank
train_sentences = treebank.tagged_sents()[:2500]
tnt_tagger = tnt.TnT()
tnt_tagger.train(train_sentences)
test_sentences = treebank.tagged_sents()[1500:]
tnt_tagger.evaluate(test_sentences)
Output
0.9165508316157791
We have a slight less accuracy than we got with Brill Tagger.
Please note that we need to call train() before evaluate() otherwise we will get 0% accuracy.
Natural Language Toolkit - Parsing
Parsing and its relevance in NLP
The word ‘Parsing’ whose origin is from Latin word ‘pars’ (which means ‘part’), is used to draw exact meaning or dictionary meaning from the text. It is also called Syntactic analysis or syntax analysis. Comparing the rules of formal grammar, syntax analysis checks the text for meaningfulness. The sentence like “Give me hot ice-cream”, for example, would be rejected by parser or syntactic analyzer.
In this sense, we can define parsing or syntactic analysis or syntax analysis as follows −
It may be defined as the process of analyzing the strings of symbols in natural language conforming to the rules of formal grammar.
We can understand the relevance of parsing in NLP with the help of following points −
Parser is used to report any syntax error.
It helps to recover from commonly occurring error so that the processing of the remainder of program can be continued.
Parse tree is created with the help of a parser.
Parser is used to create symbol table, which plays an important role in NLP.
Parser is also used to produce intermediate representations (IR).
Deep Vs Shallow Parsing
| Deep Parsing | Shallow Parsing |
|---|---|
| In deep parsing, the search strategy will give a complete syntactic structure to a sentence. | It is the task of parsing a limited part of the syntactic information from the given task. |
| It is suitable for complex NLP applications. | It can be used for less complex NLP applications. |
| Dialogue systems and summarization are the examples of NLP applications where deep parsing is used. | Information extraction and text mining are the examples of NLP applications where deep parsing is used. |
| It is also called full parsing. | It is also called chunking. |
Various types of parsers
As discussed, a parser is basically a procedural interpretation of grammar. It finds an optimal tree for the given sentence after searching through the space of a variety of trees. Let us see some of the available parsers below −
Recursive descent parser
Recursive descent parsing is one of the most straightforward forms of parsing. Following are some important points about recursive descent parser −
It follows a top down process.
It attempts to verify that the syntax of the input stream is correct or not.
It reads the input sentence from left to right.
One necessary operation for recursive descent parser is to read characters from the input stream and matching them with the terminals from the grammar.
Shift-reduce parser
Following are some important points about shift-reduce parser −
It follows a simple bottom-up process.
It tries to find a sequence of words and phrases that correspond to the right-hand side of a grammar production and replaces them with the left-hand side of the production.
The above attempt to find a sequence of word continues until the whole sentence is reduced.
In other simple words, shift-reduce parser starts with the input symbol and tries to construct the parser tree up to the start symbol.
Chart parser
Following are some important points about chart parser −
It is mainly useful or suitable for ambiguous grammars, including grammars of natural languages.
It applies dynamic programing to the parsing problems.
Because of dynamic programing, partial hypothesized results are stored in a structure called a ‘chart’.
The ‘chart’ can also be re-used.
Regexp parser
Regexp parsing is one of the mostly used parsing technique. Following are some important points about Regexp parser −
As the name implies, it uses a regular expression defined in the form of grammar on top of a POS-tagged string.
It basically uses these regular expressions to parse the input sentences and generate a parse tree out of this.
Example
Following is a working example of Regexp Parser −
import nltk
sentence = [
   ("a", "DT"),
   ("clever", "JJ"),
   ("fox","NN"),
   ("was","VBP"),
   ("jumping","VBP"),
   ("over","IN"),
   ("the","DT"),
   ("wall","NN")
]
grammar = "NP:{<DT>?<JJ>*<NN>}"
Reg_parser = nltk.RegexpParser(grammar)
Reg_parser.parse(sentence)
Output = Reg_parser.parse(sentence)
Output.draw()
Output
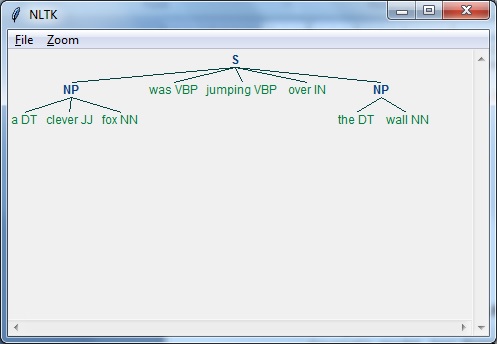
Dependency Parsing
Dependency Parsing (DP), a modern parsing mechanism, whose main concept is that each linguistic unit i.e. words relates to each other by a direct link. These direct links are actually ‘dependencies’ in linguistic. For example, the following diagram shows dependency grammar for the sentence “John can hit the ball”.
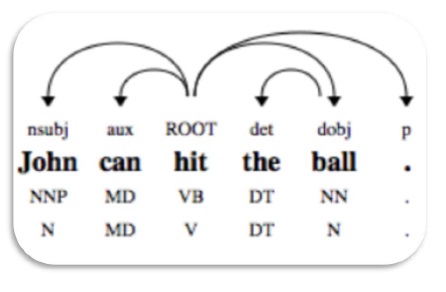
NLTK Package
We have following the two ways to do dependency parsing with NLTK −
Probabilistic, projective dependency parser
This is the first way we can do dependency parsing with NLTK. But this parser has the restriction of training with a limited set of training data.
Stanford parser
This is another way we can do dependency parsing with NLTK. Stanford parser is a state-of-the-art dependency parser. NLTK has a wrapper around it. To use it we need to download following two things −
Language model for desired language. For example, English language model.
Example
Once you downloaded the model, we can use it through NLTK as follows −
from nltk.parse.stanford import StanfordDependencyParser
path_jar = 'path_to/stanford-parser-full-2014-08-27/stanford-parser.jar'
path_models_jar = 'path_to/stanford-parser-full-2014-08-27/stanford-parser-3.4.1-models.jar'
dep_parser = StanfordDependencyParser(
   path_to_jar = path_jar, path_to_models_jar = path_models_jar
)
result = dep_parser.raw_parse('I shot an elephant in my sleep')
depndency = result.next()
list(dependency.triples())
Output
[
   ((u'shot', u'VBD'), u'nsubj', (u'I', u'PRP')),
   ((u'shot', u'VBD'), u'dobj', (u'elephant', u'NN')),
   ((u'elephant', u'NN'), u'det', (u'an', u'DT')),
   ((u'shot', u'VBD'), u'prep', (u'in', u'IN')),
   ((u'in', u'IN'), u'pobj', (u'sleep', u'NN')),
   ((u'sleep', u'NN'), u'poss', (u'my', u'PRP$'))
]
Chunking & Information Extraction
What is Chunking?
Chunking, one of the important processes in natural language processing, is used to identify parts of speech (POS) and short phrases. In other simple words, with chunking, we can get the structure of the sentence. It is also called partial parsing.
Chunk patterns and chinks
Chunk patterns are the patterns of part-of-speech (POS) tags that define what kind of words made up a chunk. We can define chunk patterns with the help of modified regular expressions.
Moreover, we can also define patterns for what kind of words should not be in a chunk and these unchunked words are known as chinks.
Implementation example
In the example below, along with the result of parsing the sentence “the book has many chapters”, there is a grammar for noun phrases that combines both a chunk and a chink pattern −
import nltk
sentence = [
   ("the", "DT"),
   ("book", "NN"),
   ("has","VBZ"),
   ("many","JJ"),
   ("chapters","NNS")
]
chunker = nltk.RegexpParser(
   r'''
   NP:{<DT><NN.*><.*>*<NN.*>}
   }<VB.*>{
   '''
)
chunker.parse(sentence)
Output = chunker.parse(sentence)
Output.draw()
Output
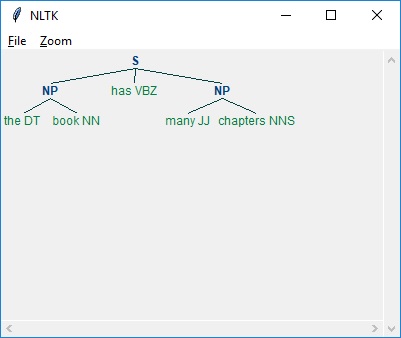
As seen above, the pattern for specifying a chunk is to use curly braces as follows −
{<DT><NN>}
And to specify a chink, we can flip the braces such as follows −
}<VB>{.
Now, for a particular phrase type, these rules can be combined into a grammar.
Information Extraction
We have gone through taggers as well as parsers that can be used to build information extraction engine. Let us see a basic information extraction pipeline −
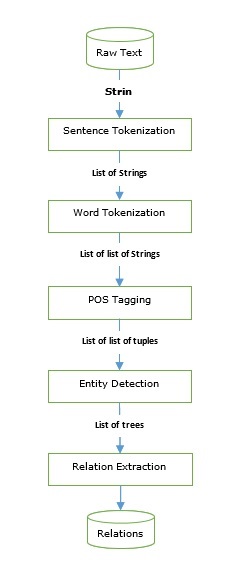
Information extraction has many applications including −
- Business intelligence
- Resume harvesting
- Media analysis
- Sentiment detection
- Patent search
- Email scanning
Named-entity recognition (NER)
Named-entity recognition (NER) is actually a way of extracting some of most common entities like names, organizations, location, etc. Let us see an example that took all the preprocessing steps such as sentence tokenization, POS tagging, chunking, NER, and follows the pipeline provided in the figure above.
Example
Import nltk
file = open (
   # provide here the absolute path for the file of text for which we want NER
)
data_text = file.read()
sentences = nltk.sent_tokenize(data_text)
tokenized_sentences = [nltk.word_tokenize(sentence) for sentence in sentences]
tagged_sentences = [nltk.pos_tag(sentence) for sentence in tokenized_sentences]
for sent in tagged_sentences:
print nltk.ne_chunk(sent)
Some of the modified Named-entity recognition (NER) can also be used to extract entities such as product names, bio-medical entities, brand name and much more.
Relation extraction
Relation extraction, another commonly used information extraction operation, is the process of extracting the different relationships between various entities. There can be different relationships like inheritance, synonyms, analogous, etc., whose definition depends on the information need. For example, suppose if we want to look for write of a book then the authorship would be a relation between the author name and book name.
Example
In the following example, we use the same IE pipeline, as shown in the above diagram, that we used till Named-entity relation (NER) and extend it with a relation pattern based on the NER tags.
import nltk
import re
IN = re.compile(r'.*\bin\b(?!\b.+ing)')
for doc in nltk.corpus.ieer.parsed_docs('NYT_19980315'):
for rel in nltk.sem.extract_rels('ORG', 'LOC', doc, corpus = 'ieer',
pattern = IN):
print(nltk.sem.rtuple(rel))
Output
[ORG: 'WHYY'] 'in' [LOC: 'Philadelphia']
[ORG: 'McGlashan & Sarrail'] 'firm in' [LOC: 'San Mateo']
[ORG: 'Freedom Forum'] 'in' [LOC: 'Arlington']
[ORG: 'Brookings Institution'] ', the research group in' [LOC: 'Washington']
[ORG: 'Idealab'] ', a self-described business incubator based in' [LOC: 'Los Angeles']
[ORG: 'Open Text'] ', based in' [LOC: 'Waterloo']
[ORG: 'WGBH'] 'in' [LOC: 'Boston']
[ORG: 'Bastille Opera'] 'in' [LOC: 'Paris']
[ORG: 'Omnicom'] 'in' [LOC: 'New York']
[ORG: 'DDB Needham'] 'in' [LOC: 'New York']
[ORG: 'Kaplan Thaler Group'] 'in' [LOC: 'New York']
[ORG: 'BBDO South'] 'in' [LOC: 'Atlanta']
[ORG: 'Georgia-Pacific'] 'in' [LOC: 'Atlanta']
In the above code, we have used an inbuilt corpus named ieer. In this corpus, the sentences are tagged till Named-entity relation (NER). Here we only need to specify the relation pattern that we want and the kind of NER we want the relation to define. In our example, we defined relationship between an organization and a location. We extracted all the combinations of these patterns.
Natural Language Toolkit - Transforming Chunks
Why transforming Chunks?
Till now we have got chunks or phrases from sentences but what are we supposed to do with them. One of the important tasks is to transform them. But why? It is to do the following −
- grammatical correction and
- rearranging phrases
Filtering insignificant/useless words
Suppose if you want to judge the meaning of a phrase then there are many commonly used words such as, ‘the’, ‘a’, are insignificant or useless. For example, see the following phrase −
‘The movie was good’.
Here the most significant words are ‘movie’ and ‘good’. Other words, ‘the’ and ‘was’ both are useless or insignificant. It is because without them also we can get the same meaning of the phrase. ‘Good movie’.
In the following python recipe, we will learn how to remove useless/insignificant words and keep the significant words with the help of POS tags.
Example
First, by looking through treebank corpus for stopwords we need to decide which part-of-speech tags are significant and which are not. Let us see the following table of insignificant words and tags −
| Word | Tag |
|---|---|
| a | DT |
| All | PDT |
| An | DT |
| And | CC |
| Or | CC |
| That | WDT |
| The | DT |
From the above table, we can see other than CC, all the other tags end with DT which means we can filter out insignificant words by looking at the tag’s suffix.
For this example, we are going to use a function named filter() which takes a single chunk and returns a new chunk without any insignificant tagged words. This function filters out any tags that end with DT or CC.
Example
import nltk
def filter(chunk, tag_suffixes=['DT', 'CC']):
   significant = []
   for word, tag in chunk:
      ok = True
      for suffix in tag_suffixes:
         if tag.endswith(suffix):
            ok = False
            break
      if ok:
         significant.append((word, tag))
   return (significant)
Now, let us use this function filter() in our Python recipe to delete insignificant words −
from chunk_parse import filter
filter([('the', 'DT'),('good', 'JJ'),('movie', 'NN')])
Output
[('good', 'JJ'), ('movie', 'NN')]
Verb Correction
Many times, in real-world language we see incorrect verb forms. For example, ‘is you fine?’ is not correct. The verb form is not correct in this sentence. The sentence should be ‘are you fine?’ NLTK provides us the way to correct such mistakes by creating verb correction mappings. These correction mappings are used depending on whether there is a plural or singular noun in the chunk.
Example
To implement Python recipe, we first need to need define verb correction mappings. Let us create two mapping as follows −
Plural to Singular mappings
plural= {
   ('is', 'VBZ'): ('are', 'VBP'),
   ('was', 'VBD'): ('were', 'VBD')
}
Singular to Plural mappings
singular = {
   ('are', 'VBP'): ('is', 'VBZ'),
   ('were', 'VBD'): ('was', 'VBD')
}
As seen above, each mapping has a tagged verb which maps to another tagged verb. The initial mappings in our example cover the basic of mappings is to are, was to were, and vice versa.
Next, we will define a function named verbs(), in which you can pass a chink with incorrect verb form and ‘ll get a corrected chunk back. To get it done, verb() function uses a helper function named index_chunk() which will search the chunk for the position of the first tagged word.
Let us see these functions −
def index_chunk(chunk, pred, start = 0, step = 1):
   l = len(chunk)
   end = l if step > 0 else -1
   for i in range(start, end, step):
      if pred(chunk[i]):
         return i
      return None
def tag_startswith(prefix):
   def f(wt):
      return wt[1].startswith(prefix)
   return f

def verbs(chunk):
   vbidx = index_chunk(chunk, tag_startswith('VB'))
   if vbidx is None:
      return chunk
   verb, vbtag = chunk[vbidx]
   nnpred = tag_startswith('NN')
   nnidx = index_chunk(chunk, nnpred, start = vbidx+1)
   if nnidx is None:
      nnidx = index_chunk(chunk, nnpred, start = vbidx-1, step = -1)
   if nnidx is None:
      return chunk
   noun, nntag = chunk[nnidx]
   if nntag.endswith('S'):
      chunk[vbidx] = plural.get((verb, vbtag), (verb, vbtag))
   else:
      chunk[vbidx] = singular.get((verb, vbtag), (verb, vbtag))
   return chunk
Save these functions in a Python file in your local directory where Python or Anaconda is installed and run it. I have saved it as verbcorrect.py.
Now, let us call verbs() function on a POS tagged is you fine chunk −
from verbcorrect import verbs
verbs([('is', 'VBZ'), ('you', 'PRP$'), ('fine', 'VBG')])
Output
[('are', 'VBP'), ('you', 'PRP$'), ('fine','VBG')]
Eliminating passive voice from phrases
Another useful task is to eliminate passive voice from phrases. This can be done with the help of swapping the words around a verb. For example, ‘the tutorial was great’ can be transformed into ‘the great tutorial’.
Example
To achieve this we are defining a function named eliminate_passive() that will swap the right-hand side of the chunk with the left-hand side by using the verb as the pivot point. In order to find the verb to pivot around, it will also use the index_chunk() function defined above.
def eliminate_passive(chunk):
   def vbpred(wt):
      word, tag = wt
      return tag != 'VBG' and tag.startswith('VB') and len(tag) > 2
   vbidx = index_chunk(chunk, vbpred)
   if vbidx is None:
      return chunk
   return chunk[vbidx+1:] + chunk[:vbidx]
Now, let us call eliminate_passive() function on a POS tagged the tutorial was great chunk −
from passiveverb import eliminate_passive
eliminate_passive(
   [
      ('the', 'DT'), ('tutorial', 'NN'), ('was', 'VBD'), ('great', 'JJ')
   ]
)
Output
[('great', 'JJ'), ('the', 'DT'), ('tutorial', 'NN')]
Swapping noun cardinals
As we know, a cardinal word such as 5, is tagged as CD in a chunk. These cardinal words often occur before or after a noun but for normalization purpose it is useful to put them before the noun always. For example, the date January 5 can be written as 5 January. Let us understand it with the following example.
Example
To achieve this we are defining a function named swapping_cardinals() that will swap any cardinal that occurs immediately after a noun with the noun. With this the cardinal will occur immediately before the noun. In order to do equality comparison with the given tag, it uses a helper function which we named as tag_eql().
def tag_eql(tag):
   def f(wt):
      return wt[1] == tag
   return f
Now we can define swapping_cardinals() −
def swapping_cardinals (chunk):
   cdidx = index_chunk(chunk, tag_eql('CD'))
   if not cdidx or not chunk[cdidx-1][1].startswith('NN'):
      return chunk
   noun, nntag = chunk[cdidx-1]
   chunk[cdidx-1] = chunk[cdidx]
   chunk[cdidx] = noun, nntag
   return chunk
Now, Let us call swapping_cardinals() function on a date “January 5” −
from Cardinals import swapping_cardinals()
swapping_cardinals([('Janaury', 'NNP'), ('5', 'CD')])
Output
[('10', 'CD'), ('January', 'NNP')]
10 January
Natural Language Toolkit - Transforming Trees
Following are the two reasons to transform the trees −
- To modify deep parse tree and
- To flatten deep parse trees
Converting Tree or Subtree to Sentence
The first recipe we are going to discuss here is to convert a Tree or subtree back to a sentence or chunk string. This is very simple, let us see in the following example −
Example
from nltk.corpus import treebank_chunk
tree = treebank_chunk.chunked_sents()[2]
' '.join([w for w, t in tree.leaves()])
Output
'Rudolph Agnew , 55 years old and former chairman of Consolidated Gold Fields
PLC , was named a nonexecutive director of this British industrial
conglomerate .'
Deep tree flattening
Deep trees of nested phrases can’t be used for training a chunk hence we must flatten them before using. In the following example, we are going to use 3rd parsed sentence, which is deep tree of nested phrases, from the treebank corpus.
Example
To achieve this, we are defining a function named deeptree_flat() that will take a single Tree and will return a new Tree that keeps only the lowest level trees. In order to do most of the work, it uses a helper function which we named as childtree_flat().
from nltk.tree import Tree
def childtree_flat(trees):
   children = []
   for t in trees:
      if t.height() < 3:
         children.extend(t.pos())
      elif t.height() == 3:
         children.append(Tree(t.label(), t.pos()))
      else:
         children.extend(flatten_childtrees([c for c in t]))
   return children
def deeptree_flat(tree):
   return Tree(tree.label(), flatten_childtrees([c for c in tree]))
Now, let us call deeptree_flat() function on 3rd parsed sentence, which is deep tree of nested phrases, from the treebank corpus. We saved these functions in a file named deeptree.py.
from deeptree import deeptree_flat
from nltk.corpus import treebank
deeptree_flat(treebank.parsed_sents()[2])
Output
Tree('S', [Tree('NP', [('Rudolph', 'NNP'), ('Agnew', 'NNP')]),
(',', ','), Tree('NP', [('55', 'CD'),
('years', 'NNS')]), ('old', 'JJ'), ('and', 'CC'),
Tree('NP', [('former', 'JJ'),
('chairman', 'NN')]), ('of', 'IN'), Tree('NP', [('Consolidated', 'NNP'),
('Gold', 'NNP'), ('Fields', 'NNP'), ('PLC',
'NNP')]), (',', ','), ('was', 'VBD'),
('named', 'VBN'), Tree('NP-SBJ', [('*-1', '-NONE-')]),
Tree('NP', [('a', 'DT'), ('nonexecutive', 'JJ'), ('director', 'NN')]),
('of', 'IN'), Tree('NP',
[('this', 'DT'), ('British', 'JJ'),
('industrial', 'JJ'), ('conglomerate', 'NN')]), ('.', '.')])
Building Shallow tree
In the previous section, we flatten a deep tree of nested phrases by only keeping the lowest level subtrees. In this section, we are going to keep only the highest-level subtrees i.e. to build the shallow tree. In the following example we are going to use 3rd parsed sentence, which is deep tree of nested phrases, from the treebank corpus.
Example
To achieve this, we are defining a function named tree_shallow() that will eliminate all the nested subtrees by keeping only the top subtree labels.
from nltk.tree import Tree
def tree_shallow(tree):
   children = []
   for t in tree:
      if t.height() < 3:
         children.extend(t.pos())
      else:
         children.append(Tree(t.label(), t.pos()))
   return Tree(tree.label(), children)
Now, let us call tree_shallow() function on 3rd parsed sentence, which is deep tree of nested phrases, from the treebank corpus. We saved these functions in a file named shallowtree.py.
from shallowtree import shallow_tree
from nltk.corpus import treebank
tree_shallow(treebank.parsed_sents()[2])
Output
Tree('S', [Tree('NP-SBJ-1', [('Rudolph', 'NNP'), ('Agnew', 'NNP'), (',', ','),
('55', 'CD'), ('years', 'NNS'), ('old', 'JJ'), ('and', 'CC'),
('former', 'JJ'), ('chairman', 'NN'), ('of', 'IN'), ('Consolidated', 'NNP'),
('Gold', 'NNP'), ('Fields', 'NNP'), ('PLC', 'NNP'), (',', ',')]),
Tree('VP', [('was', 'VBD'), ('named', 'VBN'), ('*-1', '-NONE-'), ('a', 'DT'),
('nonexecutive', 'JJ'), ('director', 'NN'), ('of', 'IN'), ('this', 'DT'),
('British', 'JJ'), ('industrial', 'JJ'), ('conglomerate', 'NN')]), ('.', '.')])
We can see the difference with the help of getting the height of the trees −
from nltk.corpus import treebank
tree_shallow(treebank.parsed_sents()[2]).height()
Output
3
from nltk.corpus import treebank
treebank.parsed_sents()[2].height()
Output
9
Tree labels conversion
In parse trees there are variety of Tree label types that are not present in chunk trees. But while using parse tree to train a chunker, we would like to reduce this variety by converting some of Tree labels to more common label types. For example, we have two alternative NP subtrees namely NP-SBL and NP-TMP. We can convert both of them into NP. Let us see how to do it in the following example.
Example
To achieve this we are defining a function named tree_convert() that takes following two arguments −
- Tree to convert
- A label conversion mapping
This function will return a new Tree with all matching labels replaced based on the values in the mapping.
from nltk.tree import Tree
def tree_convert(tree, mapping):
   children = []
   for t in tree:
      if isinstance(t, Tree):
         children.append(convert_tree_labels(t, mapping))
      else:
         children.append(t)
   label = mapping.get(tree.label(), tree.label())
   return Tree(label, children)
Now, let us call tree_convert() function on 3rd parsed sentence, which is deep tree of nested phrases, from the treebank corpus. We saved these functions in a file named converttree.py.
from converttree import tree_convert
from nltk.corpus import treebank
mapping = {'NP-SBJ': 'NP', 'NP-TMP': 'NP'}
convert_tree_labels(treebank.parsed_sents()[2], mapping)
Output
Tree('S', [Tree('NP-SBJ-1', [Tree('NP', [Tree('NNP', ['Rudolph']),
Tree('NNP', ['Agnew'])]), Tree(',', [',']),
Tree('UCP', [Tree('ADJP', [Tree('NP', [Tree('CD', ['55']),
Tree('NNS', ['years'])]),
Tree('JJ', ['old'])]), Tree('CC', ['and']),
Tree('NP', [Tree('NP', [Tree('JJ', ['former']),
Tree('NN', ['chairman'])]), Tree('PP', [Tree('IN', ['of']),
Tree('NP', [Tree('NNP', ['Consolidated']),
Tree('NNP', ['Gold']), Tree('NNP', ['Fields']),
Tree('NNP', ['PLC'])])])])]), Tree(',', [','])]),
Tree('VP', [Tree('VBD', ['was']),Tree('VP', [Tree('VBN', ['named']),
Tree('S', [Tree('NP', [Tree('-NONE-', ['*-1'])]),
Tree('NP-PRD', [Tree('NP', [Tree('DT', ['a']),
Tree('JJ', ['nonexecutive']), Tree('NN', ['director'])]),
Tree('PP', [Tree('IN', ['of']), Tree('NP',
[Tree('DT', ['this']), Tree('JJ', ['British']), Tree('JJ', ['industrial']),
Tree('NN', ['conglomerate'])])])])])])]), Tree('.', ['.'])])
Natural Language Toolkit - Text Classification
What is text classification?
Text classification, as the name implies, is the way to categorize pieces of text or documents. But here the question arises that why we need to use text classifiers? Once examining the word usage in a document or piece of text, classifiers will be able to decide what class label should be assigned to it.
Binary Classifier
As name implies, binary classifier will decide between two labels. For example, positive or negative. In this the piece of text or document can either be one label or another, but not both.
Multi-label Classifier
Opposite to binary classifier, multi-label classifier can assign one or more labels to a piece of text or document.
Labeled Vs Unlabeled Feature set
A key-value mapping of feature names to feature values is called a feature set. Labeled feature sets or training data is very important for classification training so that it can later classify unlabeled feature set.
| Labeled Feature Set | Unlabeled Feature Set |
|---|---|
| It is a tuple that look like (feat, label). | It is a feat itself. |
| It is an instance with a known class label. | Without associated label, we can call it an instance. |
| Used for training a classification algorithm. | Once trained, classification algorithm can classify an unlabeled feature set. |
Text Feature Extraction
Text feature extraction, as the name implies, is the process of transforming a list of words into a feature set that is usable by a classifier. We must have to transform our text into ‘dict’ style feature sets because Natural Language Tool Kit (NLTK) expect ‘dict’ style feature sets.
Bag of Words (BoW) model
BoW, one of the simplest models in NLP, is used to extract the features from piece of text or document so that it can be used in modeling such that in ML algorithms. It basically constructs a word presence feature set from all the words of an instance. The concept behind this method is that it doesn’t care about how many times a word occurs or about the order of the words, it only cares weather the word is present in a list of words or not.
Example
For this example, we are going to define a function named bow() −
def bow(words):
   return dict([(word, True) for word in words])
Now, let us call bow() function on words. We saved this functions in a file named bagwords.py.
from bagwords import bow
bow(['we', 'are', 'using', 'tutorialspoint'])
Output
{'we': True, 'are': True, 'using': True, 'tutorialspoint': True}
Training classifiers
In previous sections, we learned how to extract features from the text. So now we can train a classifier. The first and easiest classifier is NaiveBayesClassifier class.
Naïve Bayes Classifier
To predict the probability that a given feature set belongs to a particular label, it uses Bayes theorem. The formula of Bayes theorem is as follows.
$$P(A|B)=\frac{P(B|A)P(A)}{P(B)}$$Here,
P(A|B) − It is also called the posterior probability i.e. the probability of first event i.e. A to occur given that second event i.e. B occurred.
P(B|A) − It is the probability of second event i.e. B to occur after first event i.e. A occurred.
P(A), P(B) − It is also called prior probability i.e. the probability of first event i.e. A or second event i.e. B to occur.
To train Naïve Bayes classifier, we will be using the movie_reviews corpus from NLTK. This corpus has two categories of text, namely: pos and neg. These categories make a classifier trained on them a binary classifier. Every file in the corpus is composed of two,one is positive movie review and other is negative movie review. In our example, we are going to use each file as a single instance for both training and testing the classifier.
Example
For training classifier, we need a list of labeled feature sets, which will be in the form [(featureset, label)]. Here the featureset variable is a dict and label is the known class label for the featureset. We are going to create a function named label_corpus() which will take a corpus named movie_reviewsand also a function named feature_detector, which defaults to bag of words. It will construct and returns a mapping of the form, {label: [featureset]}. After that we will use this mapping to create a list of labeled training instances and testing instances.
import collections
def label_corpus(corp, feature_detector=bow):
   label_feats = collections.defaultdict(list)
   for label in corp.categories():
      for fileid in corp.fileids(categories=[label]):
         feats = feature_detector(corp.words(fileids=[fileid]))
         label_feats[label].append(feats)
   return label_feats
With the help of above function we will get a mapping {label:fetaureset}. Now we are going to define one more function named split that will take a mapping returned from label_corpus() function and splits each list of feature sets into labeled training as well as testing instances.
def split(lfeats, split=0.75):
   train_feats = []
   test_feats = []
   for label, feats in lfeats.items():
      cutoff = int(len(feats) * split)
      train_feats.extend([(feat, label) for feat in feats[:cutoff]])
      test_feats.extend([(feat, label) for feat in feats[cutoff:]])
   return train_feats, test_feats
Now, let us use these functions on our corpus, i.e. movie_reviews −
from nltk.corpus import movie_reviews
from featx import label_feats_from_corpus, split_label_feats
movie_reviews.categories()
Output
['neg', 'pos']
Example
lfeats = label_feats_from_corpus(movie_reviews)
lfeats.keys()
Output
dict_keys(['neg', 'pos'])
Example
train_feats, test_feats = split_label_feats(lfeats, split = 0.75)
len(train_feats)
Output
1500
Example
len(test_feats)
Output
500
We have seen that in movie_reviews corpus, there are 1000 pos files and 1000 neg files. We also end up with 1500 labeled training instances and 500 labeled testing instances.
Now let us train NaïveBayesClassifier using its train() class method −
from nltk.classify import NaiveBayesClassifier
NBC = NaiveBayesClassifier.train(train_feats)
NBC.labels()
Output
['neg', 'pos']
Decision Tree Classifier
Another important classifier is decision tree classifier. Here to train it the DecisionTreeClassifier class will create a tree structure. In this tree structure each node corresponds to a feature name and the branches correspond to the feature values. And down the branches we will get to the leaves of the tree i.e. the classification labels.
To train decision tree classifier, we will use the same training and testing features i.e. train_feats and test_feats, variables we have created from movie_reviews corpus.
Example
To train this classifier, we will call DecisionTreeClassifier.train() class method as follows −
from nltk.classify import DecisionTreeClassifier
decisiont_classifier = DecisionTreeClassifier.train(
   train_feats, binary = True, entropy_cutoff = 0.8,
   depth_cutoff = 5, support_cutoff = 30
)
accuracy(decisiont_classifier, test_feats)
Output
0.725
Maximum Entropy Classifier
Another important classifier is MaxentClassifier which is also known as a conditional exponential classifier or logistic regression classifier. Here to train it, the MaxentClassifier class will convert labeled feature sets to vector using encoding.
To train decision tree classifier, we will use the same training and testing features i.e. train_featsand test_feats, variables we have created from movie_reviews corpus.
Example
To train this classifier, we will call MaxentClassifier.train() class method as follows −
from nltk.classify import MaxentClassifier
maxent_classifier = MaxentClassifier
.train(train_feats,algorithm = 'gis', trace = 0, max_iter = 10, min_lldelta = 0.5)
accuracy(maxent_classifier, test_feats)
Output
0.786
Scikit-learn Classifier
One of the best machine learning (ML) libraries is Scikit-learn. It actually contains all sorts of ML algorithms for various purposes, but they all have the same fit design pattern as follows −
- Fitting the model to the data
- And use that model to make predictions
Rather than accessing scikit-learn models directly, here we are going to use NLTK’s SklearnClassifier class. This class is a wrapper class around a scikit-learn model to make it conform to NLTK’s Classifier interface.
We will follow following steps to train a SklearnClassifier class −
Step 1 − First we will create training features as we did in previous recipes.
Step 2 − Now, choose and import a Scikit-learn algorithm.
Step 3 − Next, we need to construct a SklearnClassifier class with the chosen algorithm.
Step 4 − Last, we will train SklearnClassifier class with our training features.
Let us implement these steps in the below Python recipe −
from nltk.classify.scikitlearn import SklearnClassifier
from sklearn.naive_bayes import MultinomialNB
sklearn_classifier = SklearnClassifier(MultinomialNB())
sklearn_classifier.train(train_feats)
<SklearnClassifier(MultinomialNB(alpha = 1.0,class_prior = None,fit_prior = True))>
accuracy(sk_classifier, test_feats)
Output
0.885
Measuring precision and recall
While training various classifiers we have measured their accuracy also. But apart from accuracy there are number of other metrics which are used to evaluate the classifiers. Two of these metrics are precision and recall.
Example
In this example, we are going to calculate precision and recall of the NaiveBayesClassifier class we trained earlier. To achieve this we will create a function named metrics_PR() which will take two arguments, one is the trained classifier and other is the labeled test features. Both the arguments are same as we passed while calculating the accuracy of the classifiers −
import collections
from nltk import metrics
def metrics_PR(classifier, testfeats):
   refsets = collections.defaultdict(set)
   testsets = collections.defaultdict(set)
   for i, (feats, label) in enumerate(testfeats):
      refsets[label].add(i)
      observed = classifier.classify(feats)
         testsets[observed].add(i)
   precisions = {}
   recalls = {}
   for label in classifier.labels():
   precisions[label] = metrics.precision(refsets[label],testsets[label])
   recalls[label] = metrics.recall(refsets[label], testsets[label])
   return precisions, recalls
Let us call this function to find the precision and recall −
from metrics_classification import metrics_PR
nb_precisions, nb_recalls = metrics_PR(nb_classifier,test_feats)
nb_precisions['pos']
Output
0.6713532466435213
Example
nb_precisions['neg']
Output
0.9676271186440678
Example
nb_recalls['pos']
Output
0.96
Example
nb_recalls['neg']
Output
0.478
Combination of classifier and voting
Combining classifiers is one of the best ways to improve classification performance. And voting is one of the best ways to combine multiple classifiers. For voting we need to have odd number of classifiers. In the following Python recipe we are going to combine three classifiers namely NaiveBayesClassifier class, DecisionTreeClassifier class and MaxentClassifier class.
To achieve this we are going to define a function named voting_classifiers() as follows.
import itertools
from nltk.classify import ClassifierI
from nltk.probability import FreqDist
class Voting_classifiers(ClassifierI):
   def __init__(self, *classifiers):
      self._classifiers = classifiers
      self._labels = sorted(set(itertools.chain(*[c.labels() for c in classifiers])))
   def labels(self):
      return self._labels
   def classify(self, feats):
      counts = FreqDist()
      for classifier in self._classifiers:
         counts[classifier.classify(feats)] += 1
      return counts.max()
Let us call this function to combine three classifiers and find the accuracy −
from vote_classification import Voting_classifiers
combined_classifier = Voting_classifiers(NBC, decisiont_classifier, maxent_classifier)
combined_classifier.labels()
Output
['neg', 'pos']
Example
accuracy(combined_classifier, test_feats)
Output
0.948
From the above output, we can see that the combined classifiers got highest accuracy than the individual classifiers.