- MVVM Tutorial
- MVVM - Home
- MVVM – Introduction
- MVVM - Advantages
- MVVM - Responsibilities
- MVVM - First Application
- MVVM - Hooking Up Views
- MVVM - Hooking Up ViewModel
- MVVM - WPF Data Bindings
- MVVM - WPF Data Templates
- MVVM - ViewModel Communication
- MVVM - Hierarchies & Navigation
- MVVM - Validations
- MVVM - Dependency Injection
- MVVM - Events
- MVVM - Unit Testing
- MVVM - Frameworks
- MVVM - Interview Questions
- MVVM Useful Resources
- MVVM - Quick Guide
- MVVM - Useful Resources
- MVVM - Discussion
MVVM – View / ViewModel Communication
In this chapter, we will learn how to add interactivity to MVVM applications and how to cleanly call logic. You will also see that all of this is done by maintaining the loose coupling and good structuring which is the heart of the MVVM pattern. To understand all this, first let us learn about commands.
View / ViewModel Communication via Commands
The command pattern has been well documented and frequently uses design pattern for a couple of decades. In this pattern there are two main actors, the invoker and the receiver.
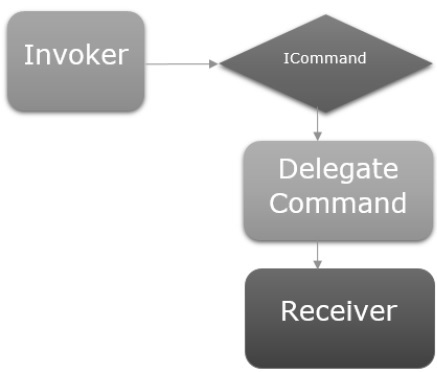
Invoker
The invoker is a piece of code which can execute some imperative logic.
Typically, it is a UI element that the user interacts with, in the context of a UI framework.
It could just be another chunk of logic code somewhere else in the application.
Receiver
The receiver is the logic that is intended for execution when the invoker fires.
In the context of MVVM, the receiver is typically a method in your ViewModel that needs to be called.
In between these two, you have an obstruction layer, which implies the invoker and receiver do not have to explicitly know about each other. This is typically represented as an interface abstraction exposed to the invoker and a concrete implementation of that interface is capable of calling the receiver.
Let’s have a look into a simple example in which you will learn the commands and how to use them to communicate Between View and ViewModel. In this chapter, we will continue with the same example from the last chapter.
In StudentView.xaml file, we have a ListBox which hooks up the student data from a ViewModel. Now let’s add a button for deleting a student from the ListBox.
The important thing is that working with commands on button is very easy because they have a command property to hook up to an ICommand.
So, we can expose a property on our ViewModel that has an ICommand and binds to it from the button’s command property as shown in the following code.
<Button Content = "Delete"
   Command = "{Binding DeleteCommand}"
   HorizontalAlignment = "Left"
   VerticalAlignment = "Top"
   Width = "75" />
Let’s add a new class in your project, which will implement the ICommand interface. Following is the implementation of ICommand interface.
using System;
using System.Windows.Input;

namespace MVVMDemo {

   public class MyICommand : ICommand {
      Action _TargetExecuteMethod;
      Func<bool> _TargetCanExecuteMethod;

      public MyICommand(Action executeMethod) {
         _TargetExecuteMethod = executeMethod;
      }

      public MyICommand(Action executeMethod, Func<bool> canExecuteMethod){
         _TargetExecuteMethod = executeMethod;
         _TargetCanExecuteMethod = canExecuteMethod;
      }

      public void RaiseCanExecuteChanged() {
         CanExecuteChanged(this, EventArgs.Empty);
      }

      bool ICommand.CanExecute(object parameter) {

         if (_TargetCanExecuteMethod != null) {
            return _TargetCanExecuteMethod();
         }

         if (_TargetExecuteMethod != null) {
            return true;
         }

         return false;
      }

      // Beware - should use weak references if command instance lifetime
         is longer than lifetime of UI objects that get hooked up to command

      // Prism commands solve this in their implementation
      public event EventHandler CanExecuteChanged = delegate { };

      void ICommand.Execute(object parameter) {
         if (_TargetExecuteMethod != null) {
            _TargetExecuteMethod();
         }
      }
   }
}
As you can see, this is a simple delegating implementation of ICommand where we have two delegates one for the executeMethod and one for the canExecuteMethod which can be passed in on construction.
In the above implementation, there are two overloaded constructors, one for only executeMethod and one for both executeMethod and I can canExecuteMethod.
Let’s add a property of MyICommand type in StudentView Model class. Now we need to construct an instance in the StudentViewModel. We will use the overloaded constructor of MyICommand that takes two parameters.
public MyICommand DeleteCommand { get; set;}

public StudentViewModel() {
   LoadStudents();
   DeleteCommand = new MyICommand(OnDelete, CanDelete);
}
Now add the implementation of OnDelete and CanDelete methods.
private void OnDelete() {
   Students.Remove(SelectedStudent);
}

private bool CanDelete() {
   return SelectedStudent != null;
}
We also need to add a new SelectedStudent so that the user can delete the Selected Item from ListBox.
private Student _selectedStudent;

public Student SelectedStudent {
   get {
      return _selectedStudent;
   }

   set {
      _selectedStudent = value;
      DeleteCommand.RaiseCanExecuteChanged();
   }
}
Following is the complete implementation of ViewModel class.
using MVVMDemo.Model;

using System.Collections.ObjectModel;
using System.Windows.Input;
using System;

namespace MVVMDemo.ViewModel {

   public class StudentViewModel {

      public MyICommand DeleteCommand { get; set;}

      public StudentViewModel() {
         LoadStudents();
         DeleteCommand = new MyICommand(OnDelete, CanDelete);
      }

      public ObservableCollection<Student> Students {
         get;
         set;
      }

      public void LoadStudents() {
         ObservableCollection<Student> students = new ObservableCollection<Student>();

         students.Add(new Student { FirstName = "Mark", LastName = "Allain" });
         students.Add(new Student { FirstName = "Allen", LastName = "Brown" });
         students.Add(new Student { FirstName = "Linda", LastName = "Hamerski" });

         Students = students;
      }

      private Student _selectedStudent;

      public Student SelectedStudent {
         get {
            return _selectedStudent;
         }

         set {
            _selectedStudent = value;
            DeleteCommand.RaiseCanExecuteChanged();
         }
      }

      private void OnDelete() {
         Students.Remove(SelectedStudent);
      }

      private bool CanDelete() {
         return SelectedStudent != null;
      }
   }
}
In StudentView.xaml, we need to add SelectedItem property in a ListBox which will bind to the SelectStudent property.
<ListBox ItemsSource = "{Binding Students}" SelectedItem = "{Binding SelectedStudent}"/>
Following is the complete xaml file.
<UserControl x:Class = "MVVMDemo.Views.StudentView"
   xmlns = "http://schemas.microsoft.com/winfx/2006/xaml/presentation"
   xmlns:x = "http://schemas.microsoft.com/winfx/2006/xaml"
   xmlns:mc = "http://schemas.openxmlformats.org/markup-compatibility/2006"
   xmlns:d = "http://schemas.microsoft.com/expression/blend/2008"
   xmlns:local = "clr-namespace:MVVMDemo.Views"
   xmlns:viewModel = "clr-namespace:MVVMDemo.ViewModel"
   xmlns:data = "clr-namespace:MVVMDemo.Model"
   xmlns:vml = "clr-namespace:MVVMDemo.VML"
   vml:ViewModelLocator.AutoHookedUpViewModel = "True"
   mc:Ignorable = "d"
   d:DesignHeight = "300" d:DesignWidth = "300">

   <UserControl.Resources>
      <DataTemplate DataType = "{x:Type data:Student}">

         <StackPanel Orientation = "Horizontal">

            <TextBox Text = "{Binding Path = FirstName, Mode = TwoWay}"
               Width = "100" Margin = "3 5 3 5"/>

            <TextBox Text = "{Binding Path = LastName, Mode = TwoWay}"
               Width = "100" Margin = "0 5 3 5"/>

            <TextBlock Text = "{Binding Path = FullName, Mode = OneWay}"
               Margin = "0 5 3 5"/>

         </StackPanel>

      </DataTemplate>
   </UserControl.Resources>

   <Grid>
      <StackPanel Orientation = "Horizontal">
         <ListBox ItemsSource = "{Binding Students}"
            SelectedItem = "{Binding SelectedStudent}"/>

         <Button Content = "Delete"
            Command = "{Binding DeleteCommand}"
            HorizontalAlignment = "Left"
            VerticalAlignment = "Top"
            Width = "75" />
      </StackPanel>
   </Grid>

</UserControl>
When the above code is compiled and executed, you will see the following window.
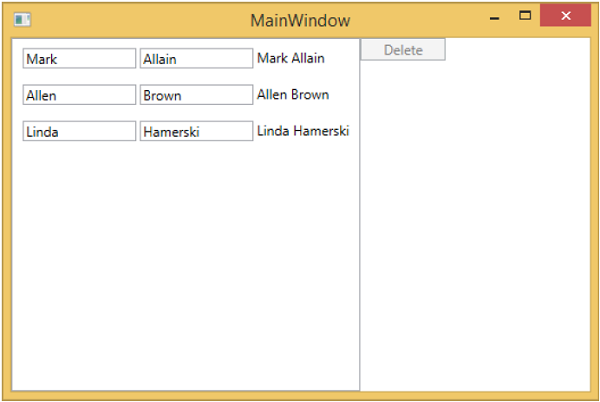
You can see that delete button is disabled. It will be enabled when you select any item.
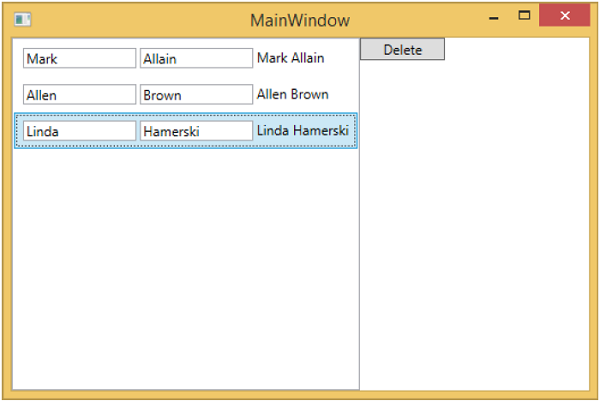
When you select any item and press delete. You will see that the selected item list is deleted and the delete button again becomes disabled.
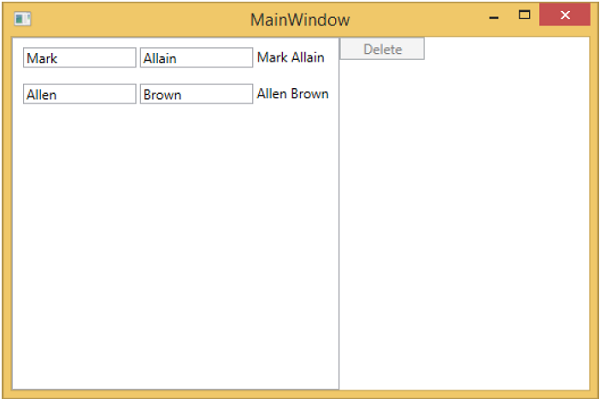
We recommend you to execute the above example in a step-by-step manner for better understanding.