- MVVM Tutorial
- MVVM - Home
- MVVM – Introduction
- MVVM - Advantages
- MVVM - Responsibilities
- MVVM - First Application
- MVVM - Hooking Up Views
- MVVM - Hooking Up ViewModel
- MVVM - WPF Data Bindings
- MVVM - WPF Data Templates
- MVVM - ViewModel Communication
- MVVM - Hierarchies & Navigation
- MVVM - Validations
- MVVM - Dependency Injection
- MVVM - Events
- MVVM - Unit Testing
- MVVM - Frameworks
- MVVM - Interview Questions
- MVVM Useful Resources
- MVVM - Quick Guide
- MVVM - Useful Resources
- MVVM - Discussion
MVVM – Hooking Up Views
In this chapter, we will cover different ways in which you can get your views hooked up to ViewModel. First, let's have a look at View first construction where we can declare it in XAML. As we have seen the example in the last chapter where we have hooked up a view from the main window. Now we will see other ways to hook up views.
We will be using the same example in this chapter as well. Following is the same Model class implementation.
using System.ComponentModel;

namespace MVVMDemo.Model {

   public class StudentModel {}

   public class Student : INotifyPropertyChanged {
      private string firstName;
      private string lastName;

      public string FirstName {
         get { return firstName; }

         set {
            if (firstName != value) {
               firstName = value;
               RaisePropertyChanged("FirstName");
               RaisePropertyChanged("FullName");
            }
         }
      }

      public string LastName {
         get { return lastName; }

         set {
            if (lastName != value) {
               lastName = value;
               RaisePropertyChanged("LastName");
               RaisePropertyChanged("FullName");
            }
         }
      }

      public string FullName {
         get {
            return firstName + " " + lastName;
         }
      }

      public event PropertyChangedEventHandler PropertyChanged;

      private void RaisePropertyChanged(string property) {
         if (PropertyChanged != null) {
            PropertyChanged(this, new PropertyChangedEventArgs(property));
         }
      }
   }
}
Here is the ViewModel class implementation. This time LoadStudents method is called in the default constructor.
using MVVMDemo.Model;
using System.Collections.ObjectModel;

namespace MVVMDemo.ViewModel{

   public class StudentViewModel {

      public StudentViewModel() {
         LoadStudents();
      }

      public ObservableCollection<Student> Students {
         get;
         set;
      }

      public void LoadStudents() {
         ObservableCollection<Student> students = new ObservableCollection<Student>();

         students.Add(new Student { FirstName = "Mark", LastName = "Allain" });
         students.Add(new Student { FirstName = "Allen", LastName = "Brown" });
         students.Add(new Student { FirstName = "Linda", LastName = "Hamerski" });

         Students = students;
      }
   }
}
Whether the view is a Window, User Control or Page, parser generally works top to bottom and left to right. It calls the default constructor for each element as it encounters it. There are two ways to construct a view. You can use any on them.
- View First Construction in XAML
- View First Construction in Code-behind
View First Construction in XAML
One way is to simply add your ViewModel as a nested element in the setter for the DataContext property as shown in the following code.
<UserControl.DataContext>
   <viewModel:StudentViewModel/>
</UserControl.DataContext>
Here is the complete View XAML file.
<UserControl x:Class="MVVMDemo.Views.StudentView"
   xmlns = "http://schemas.microsoft.com/winfx/2006/xaml/presentation"
   xmlns:x = "http://schemas.microsoft.com/winfx/2006/xaml"
   xmlns:mc = "http://schemas.openxmlformats.org/markup-compatibility/2006"
   xmlns:d = "http://schemas.microsoft.com/expression/blend/2008"
   xmlns:local = "clr-namespace:MVVMDemo.Views"
   xmlns:viewModel = "clr-namespace:MVVMDemo.ViewModel"
   mc:Ignorable = "d"
   d:DesignHeight = "300" d:DesignWidth = "300">

   <UserControl.DataContext>
      <viewModel:StudentViewModel/>
   </UserControl.DataContext>

   <Grid>
      <StackPanel HorizontalAlignment = "Left">
         <ItemsControl ItemsSource = "{Binding Path = Students}">

            <ItemsControl.ItemTemplate>
               <DataTemplate>

                  <StackPanel Orientation = "Horizontal">
                     <TextBox Text = "{Binding Path = FirstName, Mode = TwoWay}"
                        Width = "100" Margin = "3 5 3 5"/>

                      <TextBox Text = "{Binding Path = LastName, Mode = TwoWay}"
                        Width = "100" Margin = "0 5 3 5"/>

                     <TextBlock Text = "{Binding Path = FullName, Mode = OneWay}"
                        Margin = "0 5 3 5"/>

                  </StackPanel>

               </DataTemplate>
            </ItemsControl.ItemTemplate>

         </ItemsControl>
      </StackPanel>
   </Grid>

</UserControl>
View First Construction in Code-behind
Another way is that you can get View first construction is by simply constructing the view model yourself in the code behind of your View by setting the DataContext property there with the instance.
Typically, the DataContext property is set in the constructor method of view, but you could also defer the construction until the Load event of the view fires.
using System.Windows.Controls;

namespace MVVMDemo.Views {

   /// <summary>
      /// Interaction logic for StudentView.xaml
   /// </summary>

   public partial class StudentView : UserControl {
      public StudentView() {
         InitializeComponent();
         this.DataContext = new MVVMDemo.ViewModel.StudentViewModel();
      }
   }
}
One reason for constructing the view model in Code-behind instead of XAML is that the View model constructor takes parameters, but XAML parsing can only construct elements if defined in default constructor.
Now in this case the XAML file of View will look like as shown in the following code.
<UserControl x:Class = "MVVMDemo.Views.StudentView"
   xmlns = "http://schemas.microsoft.com/winfx/2006/xaml/presentation"
   xmlns:x = "http://schemas.microsoft.com/winfx/2006/xaml"
   xmlns:mc = "http://schemas.openxmlformats.org/markup-compatibility/2006"
   xmlns:d = "http://schemas.microsoft.com/expression/blend/2008"
   xmlns:local = "clr-namespace:MVVMDemo.Views"
   mc:Ignorable = "d"
   d:DesignHeight = "300"
   d:DesignWidth = "300">

   <Grid>
      <StackPanel HorizontalAlignment = "Left">
         <ItemsControl ItemsSource = "{Binding Path = Students}">

            <ItemsControl.ItemTemplate>
               <DataTemplate>

                  <StackPanel Orientation = "Horizontal"<
                     <TextBox Text = "{Binding Path = FirstName, Mode = TwoWay}"
                        Width = "100" Margin = "3 5 3 5"/>

                     <TextBox Text = "{Binding Path = LastName, Mode = TwoWay}"
                        Width = "100" Margin = "0 5 3 5"/>

                     <TextBlock Text = "{Binding Path = FullName, Mode = OneWay}"
                        Margin = "0 5 3 5"/>

                  </StackPanel>

               </DataTemplate>
            </ItemsControl.ItemTemplate>

         </ItemsControl>
      </StackPanel>
   </Grid>

</UserControl>
You can declare this View in the MainWindow as shown in the MainWindow.XAML file.
<Window x:Class = "MVVMDemo.MainWindow"
   xmlns = "http://schemas.microsoft.com/winfx/2006/xaml/presentation"
   xmlns:x = "http://schemas.microsoft.com/winfx/2006/xaml"
   xmlns:d = "http://schemas.microsoft.com/expression/blend/2008"
   xmlns:mc = "http://schemas.openxmlformats.org/markup-compatibility/2006"
   xmlns:local = "clr-namespace:MVVMDemo"
   xmlns:views = "clr-namespace:MVVMDemo.Views"
   mc:Ignorable = "d"
   Title = "MainWindow" Height = "350" Width = "525">

   <Grid>
      <views:StudentView x:Name = "StudentViewControl"/>
   </Grid>

</Window>
When the above code is compiled and executed, you will see the following output on your main window.
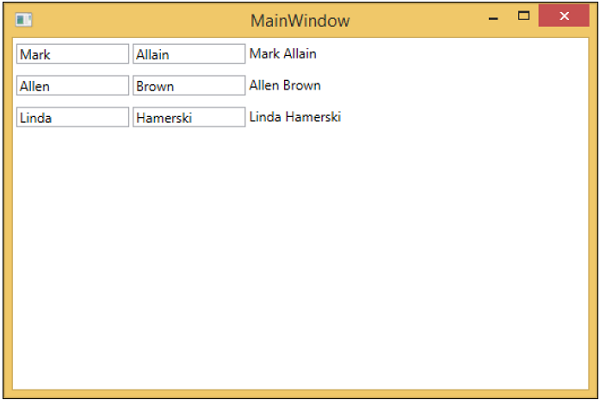
We recommend you to execute the above example in a step-by-step manner for better understanding.