- Mobile Testing Tutorial
- Mobile Testing - Home
- Mobile Testing - Overview
- Mobile Testing - Platforms
- Mobile Testing - Device Types
- Native Vs Hybrid Vs Mobileweb
- Mobile Testing - Device Vs Application
- Emulator Vs Simulator
- Mobile Testing - Application
- Mobile Testing - UI
- Mobile Testing - Planning & Tools
- Hardware Perspective
- Mobile Device Testing - Types
- Mobile Testing - Framework Overview
- Mobile Testing - Android Frameworks
- Mobile Testing - IOS Frameworks
- Robotium Framework
- Selendroid Framework
- Mobile Testing - Appium Framework
- Mobile Testing - Zucchini Framework
- Mobile Testing Useful Resources
- Mobile Testing - Quick Guide
- Mobile Testing - Useful Resources
- Mobile Testing - Discussion
Mobile Testing - Selendroid Framework
Selendroid is a test automation framework for testing Android native and hybrid applications. Selendroid tests are written using the Selenium Webdriver client API.
Benefits of Selendroid
Fully compatible with JSON Wire Protocol/Selenium 3 Ready.
No modification of app under test required in order to automate it.
Testing the mobile web using built in Android driver webview app.
Same concept for automating native or hybrid apps.
UI elements can be found by different locator types.
Gestures are supported: Advanced User Interactions API.
Existing Emulators are started automatically.
Selendroid supports hot plugging of hardware devices.
Full integration as a node into Selenium Grid for scaling and parallel testing.
Multiple Android target API support (10 to 19).
Built in Inspector to simplify test case development.
Selendroid can be extended at runtime with your own extensions.
Selendroid can interact with multiple Android devices (emulators or hardware devices) at the same time.
Drawbacks of Selendroid
The drawback of this tool is that it is quite slow and on some machines with less than 4GB RAM, it is unusable.
How to Use Selendroid
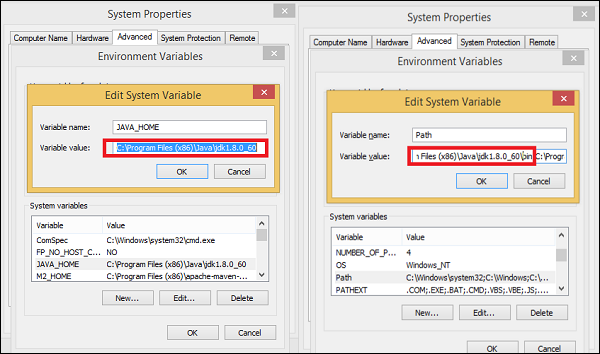
Step 1 − The prerequisites to use Robotium is Java SDK (minimum 1.6). If you don’t have Java installed on your system, then follow the steps given below.
Download JDK and JRE from Oracle JavaSE
Accept license agreement.
Install JDK and JRE.
Set environment variable as shown in the screenshot below.
Step 2 − Download Android Studio from SDK Android (It will take time because of the size of the file).
- Double click the exe and run the installer.
- Continue with all default options.
- Set the ANDROID_HOME.
Step 3 − Download Selenium jar files and test application from Selendroid
- Download selenium jar file and test app.
- Place it into any folder i.e. D:\SelendroidJars.
Step 4 − Physical device with USB cable.
Make sure that the device is attached to the workstation with USB cable.
Make sure the USB debugging mode (under setttings → Developer options) is enabled.
Test an App with Selendroid
To test an App using Selendroid, follow the steps given below −
Step 1 − Install Eclipse.
Step 2 − Create a Java project.
Step 3 − Add the downloaded Selendroid jar file to the newly created project.
Step 4 − Add the downloaded Selenium jar files to the newly created project.
Step 5 − Configure testNG in the Eclipse.
Step 6 − Connect the mobile devices with the system using USB cable. Set the USB debugging mode from the developer’s options under settings.
Step 7 − Run the Selendroid server. Open command prompt and write the following code and hit Enter −
java -jar selendroid-standalone-0.17.0-with-dependencies.jar -app selendroid-test-app-0.17.0.apk
Selendroid-standalone will start an http server on port 4444 and will scan all Android virtual devices (avd) that the user has created (~/.android/avd/).
Open the web browser and navigate to: http://localhost:4444/wd/hub/status.
Step 8 − Create a Java Project; add Selendroid Standalone libraries, Selenium jars, and JUnit libraries in the build path.
Step 9 − Create package under the Java project.
Step 10 − Create a class under the package and write the following code.
package selTest;

import io.selendroid.SelendroidDriver;
import io.selendroid.common.SelendroidCapabilities;
import io.selendroid.standalone.SelendroidConfiguration;
import io.selendroid.standalone.SelendroidLauncher;

import org.openqa.selenium.By;
import org.openqa.selenium.WebDriver;
import org.openqa.selenium.WebElement;

import org.testng.Assert;
import org.testng.annotations.AfterSuite;
import org.testng.annotations.BeforeSuite;
import org.testng.annotations.Test;

public class SelendroidTest {

   private WebDriver driver ;

   @BeforeSuite
   public void setUp() throws Exception {
      SelendroidConfiguration config = new SelendroidConfiguration();
      config.addSupportedApp("selendroid-test-app-0.9.0.apk");
      SelendroidLauncher selendroidServer = new SelendroidLauncher(config);
      selendroidServer.launchSelendroid();

      SelendroidCapabilities caps = new
         SelendroidCapabilities("io.selendroid.testapp:0.9.0");
      driver = new SelendroidDriver(caps);
   }

   @Test
   public void selendroidTest() throws Exception {
      WebElement inputField = driver.findElement(By.id("my_text_field"));
      Assert.assertEquals("true", inputField.getAttribute("enabled"));
      inputField.sendKeys("Selendroid");

      Assert.assertEquals("Selendroid", inputField.getText());

      WebElement button = driver.findElement(By.id("buttonTest"));
      button.click();

      button = driver.findElement(By.id("button2"));
      button.click();

      Thread.sleep(5000);

      button = driver.findElement(By.id("startUserRegistration"));
      button.click();

      Thread.sleep(10000);

      WebElement element = driver.findElement(By.id("label_username"));

      String text = element.getText();
      System.out.println(text);
      element = driver.findElement(By.id("inputUsername"));
      element.sendKeys("bob");

      element = driver.findElement(By.id("inputEmail"));
      element.sendKeys("test@gmail.com");

      element = driver.findElement(By.id("inputPassword"));
      element.clear();
      element.sendKeys("test1233");

      element = driver.findElement(By.id("inputName"));
      element.clear();
      element.sendKeys("My Name ");

      element = driver.findElement(By.id("input_preferedProgrammingLanguage"));
      element.click();

      element = driver.findElement(By.id("text1"));
      element.click();

      element = driver.findElement(By.id("input_adds"));
      element.click();

      element = driver.findElement(By.id("btnRegisterUser"));
      element.click();

      element = driver.findElement(By.id("buttonRegisterUser"));
      element.click();
   }

   @AfterSuite
   public void tearDown(){
      driver.quit();
   }
}
Step 11 − Run the class with testNG run configuration.